Canon XA20 Скачать руководство пользователя страница 12


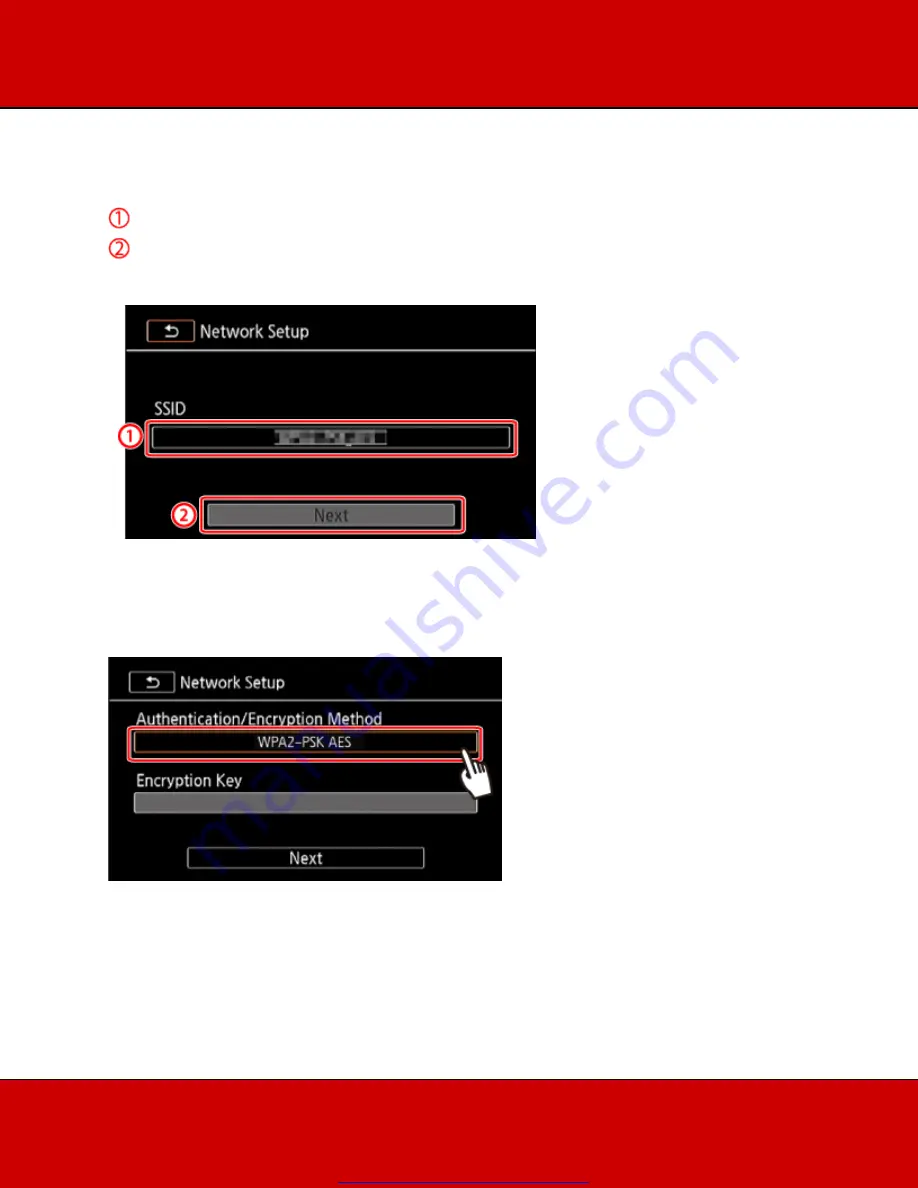
2-d-2. Enter the SSID. 


Touch the [SSID] field. 

Enter the SSID and then touch [OK] > [Next]. 


2-d-3. Select the Authentication/Encryption Method 

Touch the [Authentication/Encryption Method] field. 


2-d-4. Touch the desired method. 

If you selected [OPEN WEP], the WEP index is 1. 

Get other manuals https://www.bkmanuals.com

Содержание XA20

Страница 1: ...XA20 XA25 and HF G30 Using Wi Fi to Play Images and Movies on a Computer Get other manuals https www bkmanuals com...

Страница 2: ...ng a LAN cable Refer also to the instruction manuals for the computer software and access point CAUTION Using an unprotected Wi Fi network can expose your files and data to monitoring by unauthorized...

Страница 3: ...3 Touch 4 Drag your finger up or down bring Wi Fi into the orange selection bar and touch the button 5 Touch Media Server Get other manuals https www bkmanuals com...

Страница 4: ...aying Back Movies and Photos If an access point has not been registered an access point registration message will be displayed Touch OK 1 Select the desired connection method You can select from the f...

Страница 5: ...ssword Manual Setup You manually enter the access points SSID password and other network settings This method is recommended for advanced users of Wi Fi networks WPS which stands for Wi Fi Protected S...

Страница 6: ...rder can connect to a Wi Fi network using a wireless router access point and even remember the settings for the four most recently used access points IMPORTANT General requirements Correctly configure...

Страница 7: ...es touch OK on the camcorders screen The camcorder will connect to the access point You can touch Stop and then OK to interrupt the Wi Fi Protected Setup while it is in progress Get other manuals http...

Страница 8: ...computer or similar device connected to the access point use the Web browser to open the routers WPS settings screen After the 8 digit PIN code appears on the camcorders screen enter it into your rout...

Страница 9: ...nterrupt the Wi Fi Protected Setup while it is in progress Connected will appear on the camcorder s screen and the connection will be established Proceed to Step3 Playing Back Movies and Photos Get ot...

Страница 10: ...gs use the virtual keyboard 2 c 2 Check the access point setting information Note the access points network name SSID and encryption key 2 c 3 Select the desired access point The SSID of detected acce...

Страница 11: ...ed to Step3 Playing Back Movies and Photos 2 d 1 Manual Setup Perform this procedure to manually configure the wireless connection settings This may be necessary for example if your access points netw...

Страница 12: ...the SSID and then touch OK Next 2 d 3 Select the Authentication Encryption Method Touch the Authentication Encryption Method field 2 d 4 Touch the desired method If you selected OPEN WEP the WEP index...

Страница 13: ...ecessary Touch the Encryption Key field and then enter the encryption key Touch OK Next 2 d 6 Select how to obtain the IP address Touch Automatic or Manual If you selected Automatic proceed to Step 2...

Страница 14: ...mation using the procedure explained above for the IP Address 2 d 9 Enter the Subnet Mask and touch Next 2 d 10 Enter the Default Gateway and touch Next 2 d 11 Enter the DNS Server information and tou...

Страница 15: ...ction will be established Step 3 Playing Back Movies and Photos 1 Computer Select your camcorders model number from the list of servers 2 Computer Select the folder for the desired memory card and pla...

Страница 16: ...e transfer destination check the content and make sure they are safe to delete before deleting them NOTE Depending on the access points settings and capability playback may take time to start or may n...

Страница 17: ...RENCE About the camcorders Wi Fi standard The specifications of the camcorder s Wi Fi standard are as follows Wi Fi protocol operating frequency IEEE 802 11b g n compliant 2 4 GHz IEEE 802 11a n compl...

Отзывы: