background image

UHM Media Lab    


               CANON XA10 Camcorder 

2350 DOLE ST. KHET Studio B 


             Director’s Phone: 956-3358 

WEB SITE: http://www.communications.hawaii.edu/mlab/about.htm                         FRONT DESK: 956-3355


CANON XA10 Camcorder   


UHM Media Lab Study Guide 8/17/2011 


Page 7 

16.   Microphone setting to reduce wind noise (cuts out low frequencies) and microphone 

attenuation indicator; normally set to off and does not appear 

17.   Setting for audio monitoring or audio and video monitoring;  The Headphones icon 

indicates it is set for monitoring audio with headphones 

18.   Button to touch to display a screen with zoom control settings.  


The camcorder features a touch-sensitive screen on the LCD panel for users to review, select 
and change camcorder settings. Use your finger to navigate through the options by touching the 
icons or images on the LCD screen.  You can also scroll through the menus and settings by 
swiping your finger up and down or across the screen.  

Touch the screen gently

… sometimes 

there is a lag or no response if you don’t touch the screen in the right place.


NOTE:  Keep your fingers and hands clean for better response from the touch screen and  
to avoid scratching the screen.   


If you see a notation such as FUNC 

 MENU, etc., it means to touch the FUNC icon (top left of 

screen), which will then take you to a MENU of options. From that menu, you can choose 
settings such as White Balance or AGC Limit. 
Whenever you want to return to the main screen on the LCD panel, touch the “X” icon in the 
upper right corner.  Touching a “go back” arrow  returns you to 

the previous screen. 


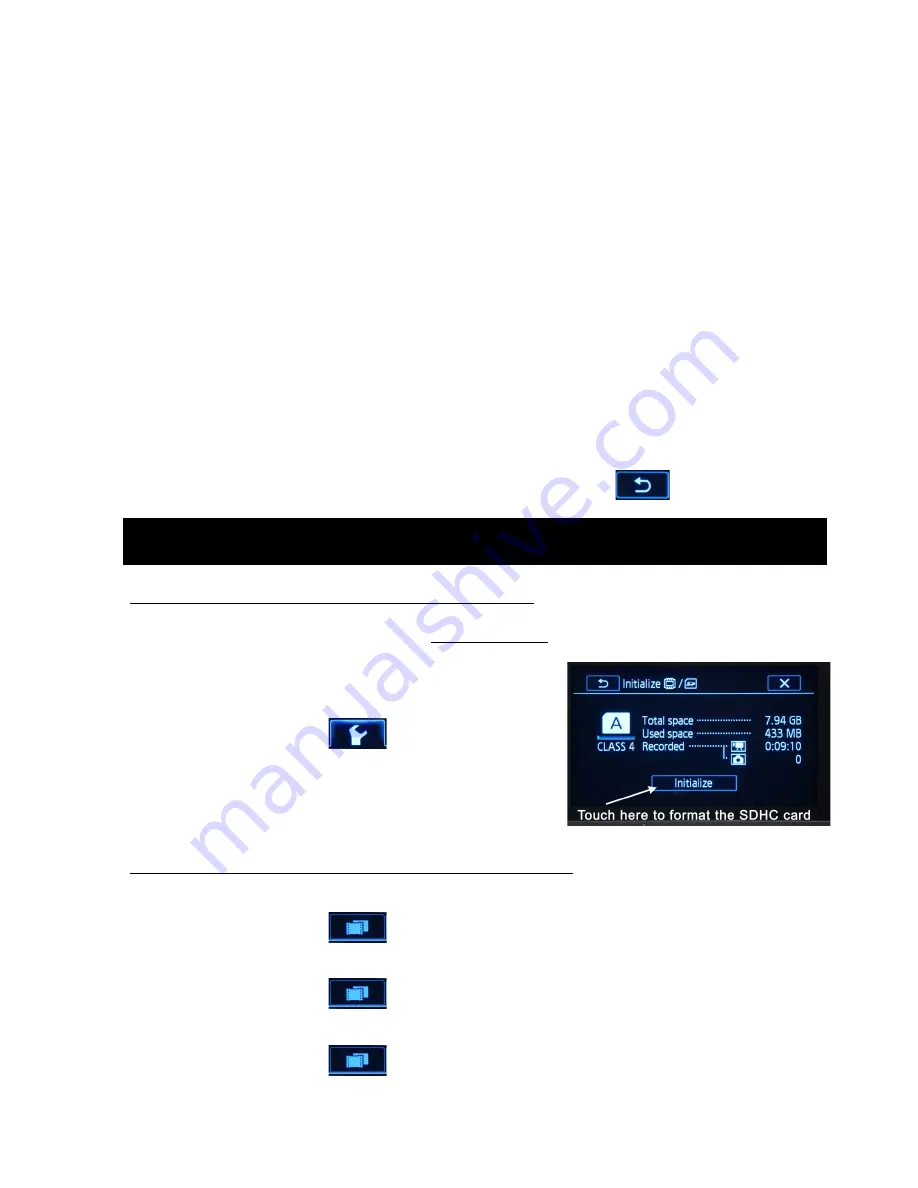
Demonstrate how to initialize the memory card.

  (If you have already used the card in a 

CANON XA10 camera you don’t have to redo it.)  

NOTE

Initializing or formatting deletes all files on the memory card. 


1)  To initialize:

 Turn camera on and use the LCD 

touchscreen to access the menu system: 


FUNC 

 MENU 


 Initialize 

 Mem. 

Card A.  


2)  If you are using two memory cards, initialize Mem. 

Card A and Mem. Card B.  See Instruction Manual 
for additional options. 


Navigate and check or set the following menu selections

 to operate the camera: 


1.  Recording mode (quality) normally set to 

FXP

 (30 mins. on a 4GB card) 

FUNC 

 MENU 


 Recording Mode 

 (

FXP


2.  Recording media (where your movie files will be recorded): “

A

” and/or “

B

” 

FUNC 

 MENU 


 Rec Media for Movies 

 (“

A”


3.  Frame rate: 

60i


FUNC 

 MENU 


 Frame Rate 

 (

60i


MANUAL CAMERA MENU SETTINGS 

Содержание XA10

Страница 1: ...ping of threads The use of excessive force which can damage the equipment 3 Never leave the camcorder equipment unattended Camcorder and other video equipment are prime targets for theft 4 Never leave...

Страница 2: ...3355 CANON XA10 Camcorder UHM Media Lab Study Guide 8 17 2011 Page 2 Identify and explain all the items in the Camcorder Package Identify all Detachable parts of the CANON XA10 Camcorder Unit 1 Shotg...

Страница 3: ...head 2 Tilt lock 3 Pan lock 4 Pan handle 5 Release lever for camcorder plate 6 Camcorder Head Lock 7 Bubble level 8 Leg extensions 9 Leg extension lock 10 Spreaders 11 Spreader lock for collapsed trip...

Страница 4: ...tery points in the correct direction until it locks into place Turning the camcorder on Remove the camcorder lens cap and press the POWER button to turn the camera on A green light will illuminate nex...

Страница 5: ...comes with built in microphones that are only good for ambient background sounds For professional quality audio we will plug in professional microphones 2 If the camera isn t already setup with an ex...

Страница 6: ...und 10dB Adjust the audio separately for Ch1 and Ch2 On the opposite side of the camcorder is a switch that enables you to choose AUTO M Manual or CINEMA You may choose to use AUTO for your shooting b...

Страница 7: ...ands clean for better response from the touch screen and to avoid scratching the screen If you see a notation such as FUNC MENU etc it means to touch the FUNC icon top left of screen which will then t...

Страница 8: ...ng except shutter speed which the camera chooses a Touch to select Aperture control adjust with the slider at the bottom of the screen d b Shutter Speed control adjust with slider d c Gain control adj...

Страница 9: ...ject using the viewfinder Turn the focus ring to focus on your subject then zoom out to frame your scene 3 Selected Focus Select the MF icon in the FUNC menu Touch a subject that appears inside the re...

Страница 10: ...o bring up the wave form Touch it again to remove it Other Settings Infrared Recording Switch the INFRARED lever to ON and off You can choose between a black white or green cast in the menu system The...

Страница 11: ...ng it A checkmark appears on the still image You may touch more than one to delete If you touch one again the checkmark disappears 9 Touch OK and a confirmation screen appears Touch Yes to delete all...

Страница 12: ...away if it is yours Disconnect the camera power cable Disconnect the headphones hand mic and XLR cable DO NOT stretch the headphone cable coils Remove the camera from the tripod Pack all items neatly...

Отзывы: