background image

16

Basic Setup

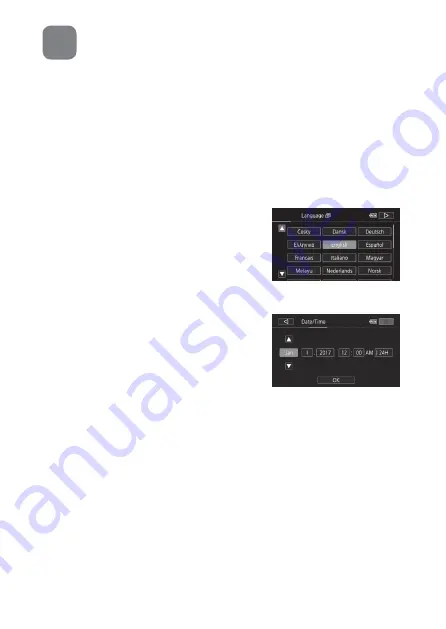
The first time you turn on the camcorder, you will be 
guided by the camcorder’s basic setup screens to select 
the camcorder’s initial settings, such as the language, 
date and time, etc.

1.  Turn on the camcorder.

•  Open the LCD panel or press 

[

.

2.  Touch the desired 

language for onscreen 
displays and then touch [

æ

].

3.  Touch the desired date/time 

format and then touch [

æ

].

4.  Set the date and time.

•  Touch a field you want to 

change and touch [

Í

] or [

Î

] to 

change. Repeat as necessary. 

•  Touch [24H] to use 24-hour 

clock or leave untouched to use AM/PM.

5.  Touch [OK] and then touch [

æ

].

• 

`

 No further settings are necessary. Skip to step 8.

6.  Touch [

&

] (built-in memory) or [

8

] (memory card) 

and then touch [

æ

].

7.  Touch [

&

] (built-in memory) or [

8

] (memory card) 

and then touch [

æ

].

8.  Touch [OK] to complete the basic setup and close 

the setup screen.

3

Содержание VIXIA HF R80

Страница 1: ...a ol Ce guide pr sente uniquement les fonctions de base Pour t l charger le mode d emploi contenant des informations plus approfondies consultez la page 13 Cam scope HD Guide rapide Fran ais This guid...

Страница 2: ...ived including interference that may cause undesired operation Note This equipment has been tested and found to comply with the limits for class B digital device pursuant to Part 15 of the FCC Rules T...

Страница 3: ...is device must accept any interference including interference that may cause undesired operation of the device This transmitter must not be co located or operated in conjunction with any other antenna...

Страница 4: ...e is located on the bottom IMPORTANT SAFETY INSTRUCTIONS CAUTION RISK OF ELECTRIC SHOCK DO NOT OPEN CAUTION TO REDUCE THE RISK OF ELECTRIC SHOCK DO NOT REMOVE COVER OR BACK NO USER SERVICEABLE PARTS I...

Страница 5: ...apparatus 9 Only use attachments accessories specified by the manufacturer 10 Unplug this apparatus during lightning storms or when unused for long periods of time 11 Refer all servicing to qualified...

Страница 6: ...or modify it Do not drop it or subject it to shocks Do not get it wet Important Note About Accessing the Memory Observe the following precautions while the ACCESS indicator is on or flashing Failing...

Страница 7: ...ether your card is approved for use in your area please check with the card manufacturer Availability of FlashAir cards also varies by region Safety Instructions Be sure to read these instructions in...

Страница 8: ...assistance When disposing of batteries battery packs insulate the termi nals with tape or other means This may cause electric shock explosion or fire Keep the product out of the reach of young childre...

Страница 9: ...jury Do not leave the product in places exposed to extremely high or low temperatures The product may become extremely hot cold and cause burns or injury when touched Only mount the product on a tripo...

Страница 10: ...r registered trademarks of their respective companies This device incorporates exFAT technology licensed from Microsoft Full HD 1080 refers to Canon camcorders compliant with high definition video com...

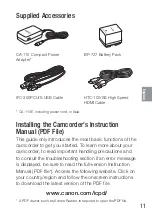
Страница 11: ...ns of the camcorder to get you started To learn more about your camcorder to read important handling precautions and to consult the troubleshooting section if an error message is displayed be sure to...

Страница 12: ...ions 11 Supplied Accessories 11 Installing the Camcorder s Instruction Manual PDF File 13 Charging the Battery Pack 15 Inserting a Memory Card 16 Basic Setup 17 Shooting Video and Taking Photos 18 Pla...

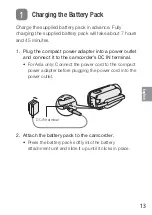
Страница 13: ...ompact power adapter into a power outlet and connect it to the camcorder s DC IN terminal For Asia only Connect the power cord to the compact power adapter before plugging the power cord into the powe...

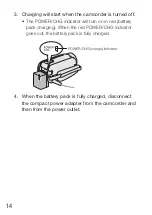
Страница 14: ...ator will turn on in red battery pack charging When the red POWER CHG indicator goes out the battery pack is fully charged POWER CHG charge indicator 4 When the battery pack is fully charged disconnec...

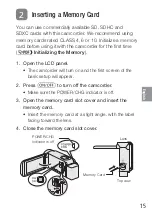
Страница 15: ...rst time Initializing the Memory 1 Open the LCD panel The camcorder will turn on and the first screen of the basic setup will appear 2 Press to turn off the camcorder Make sure the POWER CHG indicator...

Страница 16: ...splays and then touch 3 Touch the desired date time format and then touch 4 Set the date and time Touch a field you want to change and touch or to change Repeat as necessary Touch 24H to use 24 hour c...

Страница 17: ...press and then slide down the lens cover switch 2 Video Press Y to start recording video Press again to stop recording Flashes while recording Photos Touch to record a photo 3 When you finish recordin...

Страница 18: ...hotos index screen Index screen button 2 Touch the thumbnail of the scene or photo you want to play back During playback touch the screen to display the playback controls To change the memory From the...

Страница 19: ...creen 1 Touch Edit Delete 2 Select whether to delete scenes photos by folder selected scenes photos or all scenes photos To select individual recordings Touch all the scenes photos you wish to delete...

Страница 20: ...to upload recordings to the Web You can also use the NFC function to effortlessly connect the camcorder to an NFC enabled Android device 1 If necessary install the required app on the smartphone or t...

Страница 21: ...shall not be liable for any damage to this product and or accidents such as fire etc caused by the malfunction of non genuine Canon accessories e g a leakage and or explosion of a battery pack Please...

Страница 22: ...ill be return shipped to you shipping charges apply If you disapprove we will return ship the equipment at no charge to you Non Canon brand peripheral equipment and software which may be distributed w...

Страница 23: ...AN IMPLIED WARRANTY LASTS SO THE ABOVE LIMITATION OR EXCLUSION MAY NOT APPLY TO YOU CANON USA SHALL NOT BE LIABLE FOR LOSS OF REVENUES OR PROFITS EXPENSE FOR SUBSTITUTE EQUIPMENT OR SERVICE STORAGE C...

Страница 24: ...nt that do not conform to Canon specifications or that cause abnormally frequent service problems iii repairs or services performed by any party other than a Canon Service Facility iv defective batter...

Страница 25: ...ions Any recovery under this limited warranty shall not exceed the purchase price of the equipment Canon Canada does not assume or authorize any other person to assume for Canon Canada any other liabi...

Страница 26: ...January 2017 Specifications and outer appearance are subject to change without previous notice Les informations contenues dans ce guide ont t v rifi es en janvier 2017 Les sp cifications et l apparenc...

Отзывы: