Canon ScanFront 300 Скачать руководство пользователя страница 70

5-18

Chapter 5   Operating Procedures

Scanning

This section describes the procedure for scanning. 
If you want to save the image file to USB memory, specify 
the folder in the USB memory to save the image file in 
Steps 2 to 4. 

(See “USB Memory Screen” on p. 5-16.)
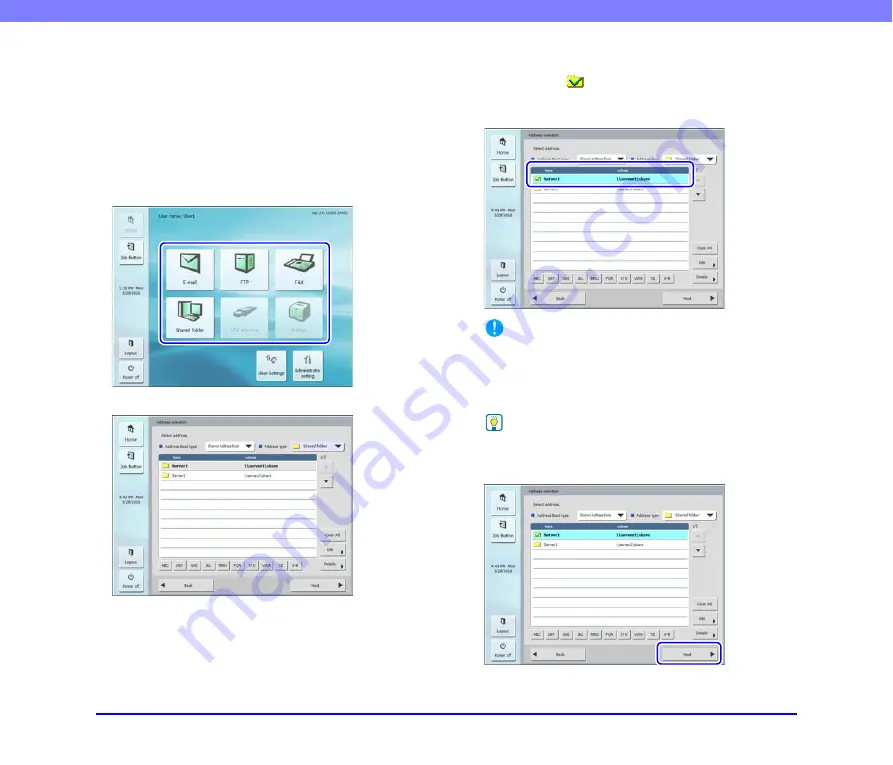
1.

Select a destination.

Press a destination button to select a destination. 

The address selection screen appears. 

2.

Use [Address Book type] and [Address type] to 
display the address to send the image file. 

3.

Press a displayed address to select it. 

A checkmark (

) is added to the icon for the selected 

address. Pressing a selected address again clears the 
selection. 

IMPORTANT

An address is not selected as an address to send data to if there 
is no checkmark, even if the background is shaded. 

4.

Make sure the selected address has a checkmark 
and then press [Next]. 

Hint

When a different type of address is selected, you can confirm 
the selected address by pressing [Selected address] in the 
Address type drop-down list. 

The Scan/Delivery Options screen appears.

Содержание ScanFront 300

Страница 1: ...Please read this manual before using the scanner After you finish reading this manual keep it in a safe place for future reference INSTRUCTIONS...

Страница 2: ...al installation This equipment generates uses and can radiate radio frequency energy and if not installed and used in accordance with the instructions may cause harmful interference to radio communica...

Страница 3: ...Model M11 1051 Trademarks Canon and the Canon logo are registered trademarks of Canon Inc in the United States and may also be trademarks or registered trademarks in other countries imageFORMULA is a...

Страница 4: ...essage Digest Algorithm Copyright c 1998 2002 Paul Johnston Contributors All rights reserved Redistribution and use in source and binary forms with or without modification are permitted provided that...

Страница 5: ...Sec and related services jointly developed by Microsoft Corporation and Cisco Systems Inc The names of actual companies and products mentioned herein may be the trademarks of their respective owners C...

Страница 6: ...er PC or client PC on the network or to an FTP server send it to a printer for printing or deliver it to a remote location via e mail or Internet fax service When using the scanner without a network e...

Страница 7: ...ing the scanner settings as well as handling maintenance and troubleshooting information This manual is stored as a PDF file on the supplied INSTRUCTIONS AND UTILITIES CD ROM and requires Adobe Reader...

Страница 8: ...dures This chapter describes the basic operating procedures for the scanner Chapter 6 Web Menu Administrator Mode This chapter describes the Web menu for the administrator to configure settings Chapte...

Страница 9: ...nt 2 7 Placing a Card 2 8 4 Clearing a Paper Jam or Double Feed Error 2 9 5 Fingerprint Sensor ScanFront 300P 2 11 Cautions for Handling the Fingerprint Sensor 2 11 Fingerprint Authentication 2 12 Cha...

Страница 10: ...Address 5 25 Copying an Address 5 25 9 Scan Delivery Options 5 27 Scan Settings 5 28 File Formats 5 32 Security Settings for PDF Files 5 33 Delivery Options 5 34 Chapter 6 Web Menu Administrator Mode...

Страница 11: ...Exporting and Importing Address Books 8 13 5 Job Button Settings 8 15 Registering New Job Buttons 8 17 Scan Settings Overview 8 18 Copying Job Buttons 8 22 Editing Jobs 8 23 Exporting and Importing Jo...

Страница 12: ...e Fingerprint Sensor ScanFront 300P only 1 5 Disposal 1 5 2 Features of the ScanFront 300 300P 1 6 ScanFront 300 300P 1 6 ScanFront 300P 1 7 3 Names and Functions of Parts 1 8 Front and Document Feed...

Страница 13: ...stalled is cold but rapidly heated water droplets condensation may form inside the scanner This may result in a noticeable degradation in scanning quality The following conditions are recommended for...

Страница 14: ...ing the scanner Failure to do so may result in a fire or electric shock Never use alcohol benzene paint thinner aerosol sprays or any other highly flammable substance near the scanner Do not cut damag...

Страница 15: ...resentative to have the unit serviced Do not install the scanner in a humid or dusty location Doing so may result in a fire or electric shock Do not place objects on top of the scanner as they may tip...

Страница 16: ...ngerprint sensor regulary When cleaning the fingerprint sensor use a soft dry cloth to wipe dirt off the surface Do not use a pointed object to remove any dirt that accumulates around the fingerprint...

Страница 17: ...mode that can automatically detect long document sizes The available scanning modes vary depending on the file format of the image to be transferred Fast Document Feeding The scanner can scan a maximu...

Страница 18: ...Page Function The scanner scans both sides of a document and skips saving the image of any side it determines to be a blank page Deskew If the scanner detects from a scanned image that the document w...

Страница 19: ...Lever Locks the panel unit Pull the lever toward you to unlock the panel unit See p 2 10 f Document Guides Adjust these to match the width of the document See p 2 6 g Document Feed Tray Place document...

Страница 20: ...p 3 3 o Kensington Slot This is an anti theft slot that enables a key chain or lock to be connected to prevent theft p Service Switch This is a service switch Do not insert any object into this hole...

Страница 21: ...anner by e mail FTP Server The FTP server function supports an FTP server configured within the local network and is unable to send to an FTP server that requires firewall settings Fax Scanned images...

Страница 22: ...red folder manually When operating the ScanFront touch panel to specify a shared folder as the destination address for example enter the folder path in Folder path Instead of entering the full path in...

Страница 23: ...ect Tray 2 4 Feed Selection Lever 2 5 USB Port 2 5 3 Placing Documents 2 6 Placing a Document 2 6 Placing a Folded Document 2 7 Placing a Long Document 2 7 Placing a Card 2 8 4 Clearing a Paper Jam or...

Страница 24: ...lean the rollers or scanning glass after scanning a document written in pencil Scanning documents with pencil written on them may soil the rollers or scanning glass cause stripes to appear in images o...

Страница 25: ...g Card Size 2 12 3 37 53 9 85 5 mm Conforming to ISO Standards Thickness 0 0299 0 76 mm and below Insertion orientation Landscape IMPORTANT Insert cards one at a time Be careful when inserting cards t...

Страница 26: ...document 1 Open the document feed tray a 2 Open the document eject tray b Hint Open the center tray extension when output documents are likely to fall out of the tray Hint If the output documents curl...

Страница 27: ...multiple pages to be fed at the same time USB Port You can insert a USB memory device to store image files You can also connect a USB keyboard and USB mouse to operate the ScanFront IMPORTANT The sca...

Страница 28: ...ray Placing a Document Follow the procedure below to place a document 1 Adjust the document guides to be wider than the width of the document 2 Fan the document to offset the pages so that the top edg...

Страница 29: ...or Folio scanning only the Page Separation OFF mode can be used Place documents one at a time Adjust the document guides to fit the width of the document Otherwise the image may scan as skewed or shif...

Страница 30: ...ard 3 Place the card face down with the top edge at the bottom of the tray CAUTION A card placed into the document feed tray in the portrait orientation may not be output properly because a load is pl...

Страница 31: ...ent before progressing with screen operations Press Continue to resume scanning If a paper jam or double feed error is detected in the middle of a document the following messages appear Hint If you pr...

Страница 32: ...t tray when you open the panel unit 4 Pull out the jammed document in the direction that seems the easiest to remove it 5 Close the panel unit and then place the document again 6 Press Continue to res...

Страница 33: ...the fingerprint sensor with dirty hands Placing a sticker on the surface of the fingerprint sensor or covering the surface with ink or another substance If fingerprint authentication fails frequently...

Страница 34: ...s authenticated The following conditions may cause an error in fingerprint authentication The finger is wet or sweaty The finger is dirty The grooves of the fingerprint are filled with sweat or oil Th...

Страница 35: ...FF 3 4 3 Configuring the Scanner Settings 3 5 Administrator Settings 3 5 Web Menu Administrator Mode 3 6 4 Configuring Administrator Settings 3 8 Logging In to the Administrator Settings 3 8 Network S...

Страница 36: ...e amount of dust accumulates Avoid warm or humid locations such as in the vicinity of a water faucet water heater or humidifier and avoid locations where the fumes from ammonia paint thinner or other...

Страница 37: ...the AC adapter and power cord included with the scanner a Connect the power cord and AC adapter b Insert the plug of the AC adapter into the power connector c Connect the power cord to the wall outlet...

Страница 38: ...splay See Display Off on p 6 31 When the power indicator is flashing but nothing appears on the touch panel the Low Power mode has activated to temporarily stop scanner operations To switch out of Low...

Страница 39: ...Setting Item Description Administrator setting Web Menu Administrator Mode Network settings Set the Device Name and IP Address needed to connect to the network Yes Yes Change administrator password Se...

Страница 40: ...s in the Shared Address Book From User Mode you can register and edit entries in the My Address Book Yes See p 6 14 Yes See p 8 8 Job Button Settings Register and edit the Shared Job Button From User...

Страница 41: ...ddress books Yes See p 6 36 No FTP Server Configure settings for saving image files to the FTP server Yes See p 6 36 No NTP Server Register an NTP server to enable automatic adjustment of the scanner...

Страница 42: ...to the Administrator Settings Follow the procedure below to configure the Device name and IP address needed to connect the scanner to a network 1 Press Administrator setting The Administrator Passwor...

Страница 43: ...device name with a hyphen When a DHCP server is not used to assign IP addresses clear the DHCP server Enable check box and enter a fixed address For details contact your network administrator If the...

Страница 44: ...tting information after the version update is finished When submitting the ScanFront for repairs Before you submit the ScanFront for repairs back up the setting information of the ScanFront IMPORTANT...

Страница 45: ...he following times For details see Initializing ScanFront on p 10 13 When submitting the ScanFront for repairs Before you submit the ScanFront for repairs initialize the ScanFront to protect the saved...

Страница 46: ...language setting can also be configured in Language Timezone on the Web Menu Administrator Mode see p 6 30 Network Test Confirm whether communication is enabled between the ScanFront and other device...

Страница 47: ...Service 1 About ScanFront Service 4 2 2 Installing ScanFront Service 4 3 System Requirements 4 3 Installation 4 3 3 ScanFront Service Setup 4 6 ScanFront Settings 4 6 Changing the Port Number Used fo...

Страница 48: ...e network such as the following where direct transfer from the ScanFront is disabled Destinations folders on computers printers etc located on different segments of a network on which a WINS server is...

Страница 49: ...for example to locate the installer in the following folder on the CD ROM and double click the installer to start it For Windows 7 Windows Vista or Windows Server 2008 Q ScanFrontService Vista and 20...

Страница 50: ...lude at the beginning of the account name If the computer is part of a domain and you are entering the domain account here enter the account in one of the following formats Confirm the password by ent...

Страница 51: ...ollowing event will be registered to the System log of the Windows logs However you can proceed and use ScanFront Service safely Level Warning Event ID 3004 Source Windows Defender If installation of...

Страница 52: ...Changing the Port Number Used for Communication If port number 50000 is already in use for example and you want to use a different port number for communication with the ScanFront modify the followin...

Страница 53: ...en 5 9 Change Password 5 9 Fingerprint Registration 5 9 6 Fingerprint Registration Only Available with the ScanFront 300P 5 10 Fingerprint Authentication 5 10 Registering a Fingerprint 5 11 7 Scanning...

Страница 54: ...ettings screen See p 5 9 The User Settings screen enables setting a password for the user that logged in and registration for the ScanFront 300P Scan Delivery Options screen See p 5 27 Scan The proces...

Страница 55: ...You can touch the panel to restore the display See Display Off on p 6 31 When the power indicator is flashing but nothing appears on the touch panel the Low Power mode has activated to temporarily sto...

Страница 56: ...een from Device Operation of the Web menu see p 6 31 or Login type setting in the administrator settings of the ScanFront see p 3 10 Fingerprint authentication is enabled when you are using the ScanFr...

Страница 57: ...r to log in as from the list and then press Next The password input screen appears 2 Press Password The keyboard screen appears 3 Enter a password and then press OK IMPORTANT Passwords are case sensit...

Страница 58: ...ur user name password and then press OK IMPORTANT User names and passwords are case sensitive Make sure to enter the user and password registered during device authentication correctly If you do not k...

Страница 59: ...eed to scan the fingerprint 2 The Home screen or Job Button screen appears if the fingerprint is authenticated correctly Hint When fingerprint authentication fails the cause of the failure and a solut...

Страница 60: ...tings Screen on p 5 9 c Administrator setting button Opens the Administrator Settings screen For details see Configuring Administrator Settings on p 3 8 IMPORTANT If a user whose use of the Home scree...

Страница 61: ...a new user password or change a user password registered via the Web menu Hint The old password does not need to be entered in order to change a password The new password that you entered is register...

Страница 62: ...ints The fingerprint authentication function may not work properly for a finger with a fingerprint that is worn down or has few distinguishable features The same finger needs to be scanned three times...

Страница 63: ...at scanning until the same fingerprint has been successfully scanned three times IMPORTANT If any of the messages below appears there was an error scanning the fingerprint Try scanning your fingerprin...

Страница 64: ...erform an authentication test for the registered fingerprint by scanning your fingerprint 6 Press Close to end fingerprint registration IMPORTANT If you want to change the registered fingerprint start...

Страница 65: ...you press the USB memory destination selection button press Downward and specify the folder in the USB memory to which you want to save the image file If you press the Printer destination selection b...

Страница 66: ...or details on the scanning procedure read from the setting of scanning conditions in Step 5 IMPORTANT The settings screen display and the screen displayed after scanning differ depending on the job bu...

Страница 67: ...te the types of address E mail Shared folder Fax FTP Group Pressing an address adds a checkmark to the icon and selects the address Pressing a selected address again clears the selection An address is...

Страница 68: ...hat was inserted is displayed as USB memory and the second one inserted is displayed as USB memory 2 If you want to insert or replace a USB memory stick while the USB memory screen is open press the B...

Страница 69: ...s the original document Fit to paper Prints while expanding or reducing the scanned image to fit the paper size Actual pixel Prints while matching the resolution of the scanned image d Orientation Pre...

Страница 70: ...ess type to display the address to send the image file 3 Press a displayed address to select it A checkmark is added to the icon for the selected address Pressing a selected address again clears the s...

Страница 71: ...m addresses before sending is set to OFF the image is sent without displaying the address confirmation screen of Step 10 and the operation ends 6 Press Start to start scanning Scanning stops after the...

Страница 72: ...age of the previous page Move the viewing area around an image when an enlarged view of the image is shown Rotate the image 90 degrees counterclockwise Rotate the image 90 degrees clockwise Enlarge th...

Страница 73: ...ery Options screen the image is sent without displaying the address confirmation screen and the operation ends 10 Confirm the address and press OK to send the scanned image IMPORTANT If a send error m...

Страница 74: ...it and then press New 2 Register the address in accordance with the setting conditions of the address type E mail Registration Screen Name Enter the name to appear in the address book E mail address E...

Страница 75: ...enter the domain name Save password Save the entered password FTP Registration Screen Name Enter the name to appear in the address book FTP server Enter the address of the FTP server Folder path Ente...

Страница 76: ...ss book Add button Select addresses to register to the group from Address Book type and Address type The selected addresses are displayed in the list IMPORTANT When you add shared folders to groups do...

Страница 77: ...2 Check the detailed information for the selected address 3 Press Edit and then press Modify The edit screen for the address appears 4 Modify the address Hint For details on editing items see Registe...

Страница 78: ...e the address Hint If the address book already has an address with the same name as the pasted one the following message appears If you select New an address with the same name is created in the addre...

Страница 79: ...ault values of the scanner IMPORTANT If you press Default in the Scan Delivery Options screen opened from a job button the settings are reset not to the setting values registered to the job button but...

Страница 80: ...The scanning speed may be reduced when the Auto Color Detection function is used Resolution Select the resolution for scanning IMPORTANT A resolution of 300 dpi or more cannot be set when Auto size L...

Страница 81: ...It does not function if only a slight portion of the document is overlapping When using the ScanFront 300 the Double feed detection by Ultrasonic setting is set to OFF When Scanning Side is set to Fo...

Страница 82: ...within the document is detected and the image is rotated so that the orientation of the text is correct IMPORTANT The scanning speed may be reduced when Auto is selected Deskew The scanner detects fr...

Страница 83: ...hat emphasizes a specified color You can set each of these effects for the front side and back side IMPORTANT The color drop out settings are disabled when the scanning mode is set to Color Auto Color...

Страница 84: ...uality Adjust the quality for the specified compression method Multi page settings Select Single page Front back separate file to save each side of each page as a separate image file Single page Front...

Страница 85: ...Use permissions password to restrict editing security settings The following settings are restricted by the permissions password Printing allowed This permits printing of the PDF file with a printer...

Страница 86: ...8 IMPORTANT Make sure you set either File name or Auto file name A message appears if you do not enter a file name and then set Auto file name to None If you select Single page of TIFF format or JPEG...

Страница 87: ...which use of the Home screen is restricted by the ScanFront administrator Logout The user is logged out after sending images Select screen after sending A dialog box for selecting the screen after sen...

Страница 88: ...Settings 6 20 Registering New Job Buttons 6 21 Scan Settings Overview 6 22 Copying Job Buttons 6 26 Editing Jobs 6 27 Exporting and Importing Job Buttons 6 27 6 Device Configuration 6 29 Network Setti...

Страница 89: ...ORTANT For a Web browser use Microsoft Internet Explorer 6 0 or later or Firefox 3 5 or later In some cases settings cannot be changed from the Web Menu when the ScanFront administrator or another use...

Страница 90: ...e the Shared Job Button available to all users d Device Configuration See Device Configuration on p 6 29 Use to configure the scanner e Server Settings See Server Settings on p 6 33 Use to configure m...

Страница 91: ...s on p 8 4 Use to change the user settings b Address Book Settings See Address Book Settings on p 8 8 Use to register and manage entries in the Shared Address Book and the My Address Book provided for...

Страница 92: ...dress See Configuring Administrator Settings on p 3 8 3 Launch the Web browser on the computer 4 Enter the device name or the IP address as the URL to open the Web Menu Ex http scanfront300 when the d...

Страница 93: ...er synchronization button If the authentication server is enabled see Server Settings on p 6 33 this deletes users that are not registered on the authentication server from the user list i User List C...

Страница 94: ...entication server User name Password Enter the user name and password to use for login Password confirmation Enter the same password again for confirmation Mail Address Enter the originating address f...

Страница 95: ...he custom file name Separator Select the Enable check box to include a separator between character strings in the file name and select a character to use as the separator in the list box String Specif...

Страница 96: ...ld name Time as necessary Device name Select the Enable check box to include the device name in the index file You can change the default field name Device as necessary Counter Start number Number of...

Страница 97: ...e Web Menu login screen Restricting User Functions To restrict the functions available to a user select the user and click Functional Restriction IMPORTANT If you restrict the functions of the Default...

Страница 98: ...buttons Deselect an address book or job button to disable editing for it Hint Configure the following settings to make only the existing address books and job buttons available to the user Restrictio...

Страница 99: ...n configuring address books see Address Book Settings on p 6 14 Edit Job Button Enables you to register and edit the user s My Job Button For details on configuring job buttons see Job Button Settings...

Страница 100: ...ng method for importing the user settings file Replaces the whole data Deletes the currently registered user and overwrites it with the imported user data Appends data Adds the imported user data to t...

Страница 101: ...Books on p 6 18 c Import to ScanFront 300 Imports a previously exported address book data file See Exporting and Importing Address Books on p 6 18 d Address type Selects the type of addresses E mail F...

Страница 102: ...OK button Registers a new e mail address with the specified parameters Address type FTP Server This option registers a network FTP server IMPORTANT FTP servers that require firewall settings cannot be...

Страница 103: ...aining the publicly shared folder Sub folders on computers running Windows 7 or Windows Server 2008 R2 cannot be browsed by clicking the Browse button In such cases enter the computer name and path up...

Страница 104: ...ers a new shared folder with the specified parameters Address type Fax This option registers a fax destination Fax number Enter the fax number of the destination OK button Registers a new fax destinat...

Страница 105: ...en click Copy 2 Click OK to copy the address Hint A duplicate address with the same name as the copy source is created 3 Change the name and settings of the copied address and register it as a new add...

Страница 106: ...an import previously exported address book data to the scanner 1 Click Import to ScanFront 300 2 Click Browse and specify a previously exported address book settings file 3 Select a processing method...

Страница 107: ...ts a previously exported job button data file See Exporting and Importing Job Buttons on p 6 27 d New Job Button button Registers a new job button See Registering New Job Buttons on p 6 21 e Select Al...

Страница 108: ...button is pressed Skip Scan Setting Screen Starts scanning without displaying the Scan Setting screen when the job button is pressed IMPORTANT If you select Skip Scan Setting Screen scanning starts a...

Страница 109: ...ithout confirming the address Screen after sending Select the screen to display after an image is sent Initial Screen Returns to the startup screen set for Screen after Login in the User Settings Logo...

Страница 110: ...Hint The Skip Blank Page option scans both sides of a document and skips saving any image it determines to be a blank page You can adjust the sensitivity of the Skip Blank Page option under Contents...

Страница 111: ...separate image file Single page Front back same file to save each page as a separate image file or Multi page to save one image file containing multiple pages when scanning multiple pages JPEG Compres...

Страница 112: ...usts the brightness of the image to be scanned Brightness Back Enabled for duplex scanning Use this option when the front and back sides of a document are shaded differently To change the brightness s...

Страница 113: ...in scanning speed Bleed through reduction Eliminates bleed through images in which images on the reverse side of a scanned document appear on the scanned page such as when scanning thin documents with...

Страница 114: ...have multiple ScanFront units you can use the same job buttons on all of them by importing the job button settings file registered on one ScanFront unit to the other units Exporting from the Scanner Y...

Страница 115: ...rator Mode 4 Click Execute Confirm the message that appears and click OK to import the data Hint When importing is completed the following message appears Click OK to return to Job Button Settings and...

Страница 116: ...ORTANT The time zone setting also effects the time stamp on sent e mail c Device Operation Configure the setlings for Display off Auto Logout and Low Power Mode See Device Operation on p 6 31 d Login...

Страница 117: ...in the login screen for the Web menu When you open the Web Menu using Internet Explorer 7 or later an SSL certificate warning will appear However you can proceed and open the Web Menu safely Language...

Страница 118: ...e network when connected to a network Note that if the scanner transitions to Low Power mode when the placed documents run out after scanning is started or scanning is suspended because of a paper jam...

Страница 119: ...Address Register the Administrator e mail address IMPORTANT The e mail address of the Administrator is used as the originating address when a user without a registered e mail address sends an e mail...

Страница 120: ...used for sending fax For details consult your e mail system administrator See E mail Server Fax Settings on p 6 34 b Authentication Server Configure the domain server authentication server on which us...

Страница 121: ...setting based on the authentication method of your mail server For details on the mail server authentication method consult your e mail system administrator IMPORTANT If any setting other than SMTP i...

Страница 122: ...dministrator Enable Authentication Server Select this check box to permit users registered on the authentication server to log in Authentication Method Select one of the following based on the directo...

Страница 123: ...server LDAP server You can configure up to four address book servers Address Book Server Setting Select one of these options when using an address book server LDAP server If the authentication server...

Страница 124: ...NTP server and ScanFront are synchronized when OK is clicked on the settings screen to complete the settings and every time the ScanFront is started ScanFront Service Server When a ScanFront Service...

Страница 125: ...lowing settings are not backed up IP address Device name Touch panel adjustment values b Module Version Information Version Up Displays the OS and module version information of the scanner You can als...

Страница 126: ...ttings This option saves all the ScanFront settings to a specified folder IMPORTANT The following settings are not included in the backup data because they are unique to the scanner unit IP address De...

Страница 127: ...Click Restore 4 Confirm the message that appears and click OK to perform the restoration 5 Click OK to complete the restoration 6 Confirm the restored settings Module Version Information Update You c...

Страница 128: ...ng the scanner 2 Back up all settings See Backup and Restore on p 6 39 3 Click Browse and specify the update file to use 4 Click Version Up 5 Confirm the message that appears and click OK to perform t...

Страница 129: ...ss Browse to select a folder to save User name Password Enter the name and password of a user with the authority to write data to the shared folder Domain Workgroup If the computer containing the shar...

Страница 130: ...ing ScanFront Administration Tool 7 5 Registering ScanFront Scanners 7 5 4 Managing the ScanFront Scanners 7 6 Selecting a ScanFront 7 6 Checking ScanFront Connections 7 6 Changing Passwords 7 6 Chang...

Страница 131: ...software install it on a computer connected to the same network as the ScanFront scanners The following operations can be performed for ScanFront scanners on the same network Checking the current sta...

Страница 132: ...xample to locate the installer in the following folder on the CD ROM and double click the installer to start it For Windows 7 Windows Vista or Windows Server 2008 Q AdministrationTool Vista and 2008Se...

Страница 133: ...inistration Tool 4 Change the install location and user setting if necessary and click Next 5 Click Next Installation starts When installation is complete a screen indicating that installation is comp...

Страница 134: ...Edit menu The Create new items window appears 2 Enter information for the ScanFront you want to register Enter the IP address of the ScanFront in IP address Device name If an administrator password is...

Страница 135: ...lick Check the connection to check the connection of the selected ScanFront The results of the check appear in the Status column For example Connection Possible appears when the ScanFront is properly...

Страница 136: ...heck boxes in the list respectively Click Back up to backup configuration data for users selected in the list to any location on the computer Click Delete to delete the users selected in the list Clic...

Страница 137: ...a You can export administration data for ScanFront Administration Tool to any location on the computer and import exported administration data Exporting Administration Data Click Export in the Edit Da...

Страница 138: ...Settings 8 5 4 Address Book Settings 8 8 Registering New Addresses 8 10 Copying Addresses 8 13 Exporting and Importing Address Books 8 13 5 Job Button Settings 8 15 Registering New Job Buttons 8 17 S...

Страница 139: ...as the URL for logging in to the Web Menu See p 8 3 When you open the Web Menu using Internet Explorer 7 or later an SSL certificate warning will appear However you can proceed and open the Web Menu...

Страница 140: ...ress as the URL to open the Web Menu Ex http scanfront300 when the device name is ScanFront300 and http 172 19 xxx xxx for the IP address Hint If the Web Menu is set to Administrator Mode click To Use...

Страница 141: ...eb Menu User Mode 3 User Settings From the User Settings screen you can change the information of a user logged in by Device Authentication a Setting See User Settings on p 8 4 Allows you to edit a us...

Страница 142: ...y Change Password updates the password information saved on the scanner but does not alter the password registered on the server For a user logged in by Server Authentication you can only select a set...

Страница 143: ...file name User name Select the Enable check box to include the user name in the file name Date Select the Enable check box to include the date in the file name and select a format for the date in the...

Страница 144: ...Start number Number of digits Select the Enable check box to include a counter in the index file When this is enabled you can specify the starting value and number of digits used for the counter You c...

Страница 145: ...ddress Books on p 8 13 c Import to ScanFront 300 Imports a previously exported address book data file See Exporting and Importing Address Books on p 8 13 d Address type Selects the type of addresses E...

Страница 146: ...t the ScanFront administrator If editing is restricted for only one address book either the My Address Book or the Shared Address Book users can only copy addresses from the restricted address book an...

Страница 147: ...y on the scanner E mail Address Enter the destination e mail address OK button Registers a new e mail address with the specified parameters Address type FTP Server This option registers a network FTP...

Страница 148: ...he computer containing the publicly shared folder Sub folders on computers running Windows 7 or Windows Server 2008 R2 cannot be browsed by clicking the Browse button In such cases enter the computer...

Страница 149: ...a new shared folder with the specified parameters Address type Fax This option registers a fax destination Fax number Enter the fax number of the destination OK button Registers a new fax destination...

Страница 150: ...Confirm the copied address Exporting and Importing Address Books You can back up your address books as files in CSV format and import the backed up address book data to another ScanFront unit Hint If...

Страница 151: ...he address book settings file Replaces the whole data Deletes all currently registered address book entries and overwrites them with the imported address book data Appends data Adds the imported addre...

Страница 152: ...previously exported job button data file See Exporting and Importing Job Buttons on p 8 23 d New Job Button button Registers a new job button See Registering New Job Buttons on p 8 17 e Select All but...

Страница 153: ...lt the ScanFront administrator If editing is restricted for only one set of job buttons either the My Job Button or the Shared Job Button users can copy job buttons from the restricted set of job butt...

Страница 154: ...on is pressed Skip Scan Setting Screen Starts scanning without displaying the Scan Setting screen when the job button is pressed IMPORTANT If you select Skip Scan Setting Screen scanning starts as soo...

Страница 155: ...t confirming the address Screen after sending Select the screen to display after an image is sent Initial Screen Returns to the startup screen set for Screen after Login in the User Settings Logout Lo...

Страница 156: ...t The Skip Blank Page option scans both sides of a document and skips saving any image it determines to be a blank page You can adjust the sensitivity of the Skip Blank Page option under Contents dete...

Страница 157: ...ge as a separate image file or Multi page to save one image file containing multiple pages when scanning multiple pages JPEG Compression Select a compression ratio for images saved in JPEG format PDF...

Страница 158: ...nt and back sides clear the Same as front check box Contrast Front Adjusts the contrast of the image to be scanned Contrast Back Enabled for duplex scanning Use this option when the front and back sid...

Страница 159: ...hin documents with text or images on both sides IMPORTANT The bleed through reduction setting is disabled when the scanning mode is set to Text enhance Hint When using bleed through reduction adjust t...

Страница 160: ...ns on all of them by importing the job button settings file registered on one ScanFront unit to the other units Exporting from the Scanner You can save the job button settings file to a specified fold...

Страница 161: ...Mode 4 Click Execute Confirm the message that appears and click OK to import the data Hint When importing is completed the following message appears Click OK to return to Job Button Settings and conf...

Страница 162: ...aning the Fingerprint Sensor ScanFront 300P 9 2 Cleaning the Scanning Glass and Rollers 9 3 Cleaning the Retard Roller 9 5 Cleaning the Feed Roller 9 6 2 Replacing the Rollers and Document Holding Gui...

Страница 163: ...ents may deform discolor or melt the touch panel thus causing a malfunction Cleaning the Scanner Unit To clean the surface of the scanner unit use a cloth slightly dampened with water and well wrung o...

Страница 164: ...n you open the panel unit 2 Use a commercially available air blower to remove any dust and paper particles that have accumulated inside the scanner 3 Use a clean dry cloth to wipe any dirt off the sca...

Страница 165: ...guide using a cloth that has been soaked in water and thoroughly wrung out 6 Remove the retard roller and feed roller and remove any dirt from them See Cleaning the Retard Roller on p 9 5 See Cleanin...

Страница 166: ...formed resulting in feed errors 1 Open the roller cover 2 Lift up the roller lock lever a and slide it in the direction of the arrow b 3 Move the retard roller in the direction of the arrow a and then...

Страница 167: ...ou hear a click which indicates the cover has returned to its original position Cleaning the Feed Roller Use the procedure below to remove and attach the feed roller during cleaning or replacement CAU...

Страница 168: ...ut 5 Align the notch in the shaft of the roller with the shaft of the scanner and place the feed roller into position 6 Move the roller lock lever in the direction of the arrow and then insert it into...

Страница 169: ...duct code 4593B001AA IMPORTANT Rollers and their covers and the document holding guide are consumable parts When the total number of pages scanned with the rollers reaches 100 000 pages purchase an Ex...

Страница 170: ...Open the feed roller cover and pull it out straight 2 Insert the new feed roller cover straight Checking the Page Count and Resetting the Counter Check the page count on the Roller Counter Reset scre...

Страница 171: ...creen Total pages scanned This counter is for the total number of document pages fed by the scanner Pages scanned from the previous roller change This counter is for the number of document pages fed b...

Страница 172: ...Chapter 10 Troubleshooting 1 Troubleshooting 10 2 2 Error Messages ScanFront 10 6 3 Error Messages Web Menu 10 9 4 Adjusting the Touch Panel 10 11 5 Initializing ScanFront 10 13...

Страница 173: ...cifying a mail address as the address and then starting scanning results in an error Cause The mail server settings have not been registered or have been deleted Solution Contact the administrator of...

Страница 174: ...care to ensure duplicate device names are not set Cannot delete a folder Cause Data has been saved to the folder Solution Contact the administrator of the shared folder Cause Permission to change the...

Страница 175: ...irty Solution Clean the rollers See p 9 3 Paper jams occur frequently Cause The rollers consumable parts have worn out Solution Purchase an Exchange Roller Kit and then replace the rollers See p 9 8 D...

Страница 176: ...Solution Check the connections of the AC adapter and power plug If the problem is not resolved after checking the connections contact your local authorized Canon dealer The scanner does not turn ON w...

Страница 177: ...per JAM occured Remove the paper Cause The rollers are dirty or worn out Solution Clean the rollers If the problem is not resolved by cleaning the rollers replace the rollers See p 9 8 A double paper...

Страница 178: ...r File name Cause Invalid characters have been used to set the customer file name Solution Make sure the custom file name does not contain any of the following characters The character string includes...

Страница 179: ...scanning conditions that may cause ScanFront to run out of memory If scanning cannot be executed due to insufficient memory refer to this table to reset scanning conditions Mode Resolution Scanning S...

Страница 180: ...Cause Modifying settings and registration are not possible because a user is logged in Solution Try again after the user logs off Settings cannot be changed The device may currently be displaying an a...

Страница 181: ...Server does not exist on the network A ScanFront Service Server has not been configured or is not running Solution Check the ScanFront Service Server settings In addition you must start the ScanFront...

Страница 182: ...el pen before attempting to adjust the touch panel Adjustment of the touch panel involves one cycle of tapping five places but adjustment may sometimes not end after one cycle if any of the tapped pla...

Страница 183: ...hooting IMPORTANT If you do not tap the panel within a period of 30 seconds after adjustment of the touch panel ends the adjustment values will not take effect and the touch panel will return to the s...

Страница 184: ...ed to the ScanFront including user information address books and job buttons IMPORTANT Initializing the ScanFront deletes all registered information Always back up the data prior to initialization 1 L...

Страница 185: ...Chapter 11 Appendices 1 Specifications 11 2 Unit Specifications 11 2 Network Specifications 11 3 Transfer Destinations 11 3 AC Adapter 11 3 Consumable Parts 11 4 External Dimensions 11 5 2 Index 11 6...

Страница 186: ...s or stacks no thicker than 3 mm including curls Scanning Sensor Contact image sensor Light Source LED Scanning Side Simplex Duplex Scanning Modes Black and White Error Diffusion Text Enhance Gray Col...

Страница 187: ...W D H Weight excluding AC adapter Approximately 7 9 lb 3 6 kg Power Supply DC24V 1 2A Power Consumption Scanning 30W Display Off mode 7 0W Low Power mode 1 0W Power Turned Off less than 0 5W Noise Not...

Страница 188: ...ment holding guide See Replacing the Rollers and Document Holding Guide on p 9 8 IMPORTANT Rollers are consumable parts When the rollers start to wear out problems such as paper jams and improper docu...

Страница 189: ...11 5 Chapter 11 Appendices External Dimensions 6 34 161 mm 8 35 212 mm 3 50 89 mm 8 66 220 mm 5 74 139 mm 11 73 298 mm 12 2 310 mm...

Страница 190: ...Select Login Type 3 10 Touch Panel Adjustment 3 11 Authentication Server 6 35 Auto Logout 6 31 B Backup 6 39 C Card 2 3 Cleaning Fingerprint Sensor 9 2 Rollers 9 3 Scanner Unit 9 2 Scanning Glass 9 3...

Страница 191: ...ings 6 21 8 17 Scan Settings 6 21 8 17 K Key in Type Login 5 6 6 31 L Language 6 30 List Type Login 5 5 6 31 Loading Mark 2 7 Lock Lever 2 10 9 3 Log Settings 6 36 6 42 Logging In to the Web Menu 6 5...

Страница 192: ...4 8 3 Server Settings 6 33 Setting Up 3 5 ScanFront Administration Tool 7 5 Specifications 11 2 T Timezone 6 30 Troubleshooting 10 2 Turning Off the Power 3 4 5 3 Turning On the Power 3 4 5 3 U Update...

Страница 193: ...THERLANDS CANON LATIN AMERICA INC 703 WATERFORD WAY SUITE 400 MIAMI FLORIDA 33126 U S A CANON AUSTRALIA PTY LTD 1 THOMAS HOLT DRIVE NORTH RYDE SYDNEY N S W 2113 AUSTRALIA CANON SINGAPORE PTE LTD 1 HAR...

Отзывы: