Canon Satera LBP9500C Скачать руководство пользователя страница 31


30


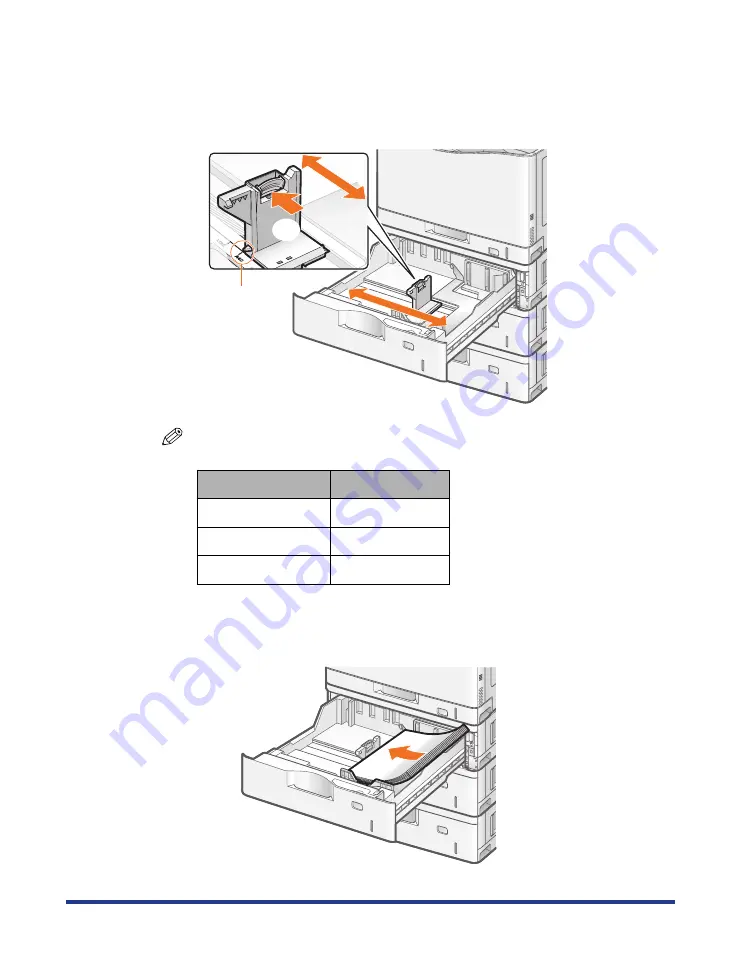
Slide the rear paper guide.


(1) Hold the lock release lever.

(2) Slide the paper guide to the position of the size of the paper to be loaded.


Align the position of (A) with the size mark of the paper to be loaded.

NOTE


Size abbreviation on the paper guides


3


Load paper so that the edges of the paper stack are aligned 
with the rear paper guide. 


Paper Size

Paper Guide


Ledger

11 x 17

Legal

LGL

Letter

LTR

(A)

(1)

(2)

Содержание Satera LBP9500C

Страница 1: ...Laser Beam Printer User s Guide User s Guide ...

Страница 2: ...Paper in Cassette 1 21 Loading Paper in the Paper Cassette 21 Specifying the Settings for the Paper Cassette 25 Registering the Paper Type 26 Loading Standard Size Paper in Cassette 2 3 or 4 28 Loading Paper in the Paper Cassette 29 Specifying the Settings for the Paper Cassette 33 Registering the Paper Type 34 Loading Standard Size Paper Other Than Postcards and Envelopes in the Multi purpose Tra...

Страница 3: ...aper in the Multi purpose Tray 79 Registering the Loading Orientation 84 Registering the Paper Type 85 Registering a Custom Paper Size 87 Paper Loading Orientation 88 Paper Jams 90 Precautions When Removing Jammed Paper 91 Clearing Paper Jams MP Tray Area 94 Clearing Paper Jams Output Area Right Cover Area Duplex Unit Area or Cassette 1 2 3 4 Area 95 Clearing Paper Jams Cassette 2 3 Cover Area 100...

Страница 4: ...cover 2 Press I of the power switch The printer initiates a self diagnostic test on the printer unit and optional accessories If the self diagnostic test result is normal The 印刷可 indicator green オンライン indicator green and 給紙元表示 indicator green are turned on and then the printer is ready to print 1 2 ...

Страница 5: ...the following instructions Do not load paper in the paper cassette Make sure that the packing materials of the paper cassette are removed Turning Off the Printer 1 Check that the printer is not performing the following operations Printing While the printer is running a self diagnostic test immediately after turning the power on While the ジョブ indicator is on When any of the following messages appea...

Страница 6: ...ain If you do not want to execute a shutdown press オンライン NOTE When you are using WSD printing The shutdown notifies the computer that the printer is turned off 4 Select は は は はい い い い using and then press OK The process to turn the printer off is performed and the messages 実行中で す and シャットダウン実行中です 通知があるまで主電源を切らないでください appear 5 Confirm the message When the printer is ready to be turned off the messa...

Страница 7: ...en the power is off when is pressed Even if the power of the printer is turned off power is consumed only slightly while the power plug is inserted into the AC power outlet To cut the power consumption completely unplug the power plug from the AC power outlet If the printer is not turned off immediately even after of the power switch is pressed The printer is cooling down the inside and stopping t...

Страница 8: ...the Printer Online When printing from the computer the printer has to be online If not place the printer online using the following procedure 1 Press オ オ オ オン ン ン ンラ ラ ラ ライ イ イ イン ン ン ン The オンライン indicator turns on and the printer is online IMPORTANT If you cannot place the printer online If an error is occurring in the printer the printer does not come online Eliminate the cause of the error befo...

Страница 9: ...rinter offline using the following procedure 1 Press オ オ オ オン ン ン ンラ ラ ラ ライ イ イ イン ン ン ン The オンライン indicator goes off and the printer is offline IMPORTANT About the automatic online function The printer comes online automatically if left in the offline state for five minutes or longer If an error is occurring in the printer however the printer does not come online automatically ...

Страница 10: ...urpose Tray Cassette 1 Cassette 2 Cassette 3 1 Cassette 4 1 Optional A3 297 0 mm x 420 0 mm B4 257 0 mm x 364 0 mm A4 Portrait 2 210 0 mm x 297 0 mm A4 Landscape 3 210 0 mm x 297 0 mm B5 Portrait 2 182 0 mm x 257 0 mm A5 Portrait 2 148 0 mm x 210 0 mm A5 Landscape 3 148 0 mm x 210 0 mm 12 x 18 12 00 in x 18 00 in Ledger 11 00 in x 17 00 in Legal 8 50 in x 14 00 in Letter Portrait 2 8 50 in x 11 00...

Страница 11: ... custom size paper whose short edges are 76 2 to 320 0 mm and long edges are 127 0 to 457 2 mm can be loaded When the paper whose short edges are more than 312 mm is used however streaks may appear on both sides of the paper 11 The custom size paper whose short edges are 148 0 to 297 0 mm and long edges are 182 0 to 431 8 mm can be loaded The paper whose short edges are 100 0 to 147 9 mm can be lo...

Страница 12: ...aper is available for 1 sided printing and automatic 2 sided printing The paper is available for only 1 sided printing The paper cannot be used for printing Paper Type カ カ カ カセ セ セ セッ ッ ッ ット ト ト ト N N N N N N N N 1 1 1 1 2 2 2 2 3 3 3 3 4 4 4 4 用 用 用 用紙 紙 紙 紙種 種 種 種類 類 類 類 1 in the セ セ セ セッ ッ ッ ット ト ト トア ア ア アッ ッ ッ ップ プ プ プ Menu Paper Source Multi purpose Tray Cassette 1 Cassette 2 Cassette 3 1 Ca...

Страница 13: ...0 mm Recycled paper can be used as plain paper Heavy paper This printer can print heavy paper 106 to 216 g m2 of the following sizes Standard paper size A3 B4 A4 B5 A5 12 x 18 Ledger 11 x 17 Legal Letter Executive Custom paper size Short edges 76 2 to 320 0 mm Long edges 127 0 to 457 2 mm Long size Short edges 210 0 to 297 0 mm Long edges 457 3 to 1 200 0 mm The following heavy paper 106 to 163 g ...

Страница 14: ...cult to clear or may result in damage to the printer Peeled labels or partly used labels Coated labels that are easily peeled off from the backing sheet Labels with uneven adhesive The print speed drops when printing labels NOTE When printing labels Depending on the label type the output paper may curl excessively In this case perform printing using either of the following methods Taking out one s...

Страница 15: ...oated paper Postcard This printer can print postcards reply postcards and 4 on 1 postcards IMPORTANT Precautions when using postcards Using the following types of postcard may deteriorate print quality or result in paper jams Inappropriate size postcards other than Postcard Reply postcard and 4 on 1 postcard Creased reply postcard Postcards and reply postcards for ink jet printers If the postcards...

Страница 16: ... on the surface Wrinkled or creased envelopes Poorly manufactured envelopes in which the glued parts are uneven Irregularly shaped envelopes Before loading envelopes flatten the stack of envelopes to release any remaining air and press the fold lines along the edges tight Do not print on the reverse side glued side of envelopes The print speed drops when printing on envelopes NOTE When printing on...

Страница 17: ...out may be partly missing depending on the property of the document to be printed If the paper width exceeds 315 mm The right and left margins increase respectively as follows The right and left margins may not be even Plain Paper Heavy Paper Transparencies Labels and Coated Paper You can print in the area up to 5 mm of the edges of the paper Paper width Margin 315 mm 5 mm 316 mm 5 5 mm 317 mm 6 m...

Страница 18: ...quality Envelope This printer can print on the following area You may have to change the printable area before printing depending on the application you use Sample YOUNAGA No 3 NAGAGATA No 3 IMPORTANT When a part of the printed zip code is missing Specify the following settings in the printer driver 1 Click Finishing Details in the Finishing sheet 2 Select the Print with Upper Left of Sheet as Sta...

Страница 19: ...ne or another printer The reverse side of the paper is also not usable Using the multi purpose tray however you can perform 2 sided printing manually on the other side of paper previously printed by this printer You cannot print on the printed side again Paper That Is Difficult for Toner to Adhere to Paper with rough surfaces Paper containing thick fibers Paper with an extremely rough or smooth su...

Страница 20: ...ain paper Ex 64 g m2 Approx 100 sheets Approx 250 sheets Approx 550 sheets Heavy paper Ex 128 g m2 Approx 80 sheets Approx 200 sheets Approx 400 sheets Heavy paper Ex 163 g m2 Approx 50 sheets Transparency black and white printing only Approx 50 sheets Label Approx 40 sheets Coated paper Approx 50 sheets Postcard Approx 50 sheets Reply postcard Approx 50 sheets 4 on 1 postcard Approx 50 sheets Env...

Страница 21: ...50 sheets Paper Type Paper Capacity 1 Plain paper Ex 64 g m2 Approx 250 sheets 2 Heavy paper Ex 128 g m2 Approx 100 sheets Heavy paper Ex 163 g m2 Approx 40 sheets Transparency black and white printing only Approx 50 sheets Label Approx 40 sheets Coated paper Approx 50 sheets Postcard Approx 50 sheets Reply postcard Approx 50 sheets 4 on 1 postcard Approx 50 sheets Envelope Approx 10 sheets ...

Страница 22: ... about usable paper See Paper Requirements on p 9 Loading Paper in the Paper Cassette 1 Pull out the paper cassette until it stops Paper Type Paper Size Plain paper 60 to 105 g m2 Heavy paper 106 to 128 g m2 A3 297 0 mm x 420 0 mm B4 257 0 mm x 364 0 mm A4 210 0 mm x 297 0 mm B5 182 0 mm x 257 0 mm A5 148 0 mm x 210 0 mm Ledger 11 00 in x 17 00 in Legal 8 50 in x 14 00 in Letter 8 50 in x 11 00 in...

Страница 23: ...osition of the size of the paper to be loaded Align the position of A with the size mark of the paper to be loaded The side paper guides move together Slide the rear paper guide 1 Hold the lock release lever 2 Slide the paper guide to the position of the size of the paper to be loaded Align the position of A with the size mark of the paper to be loaded A Top View 1 2 1 A 2 ...

Страница 24: ...he paper guide is set at a wrong position this may result in misfeeds Paper cassette capacity When using paper that has been poorly cut If you use paper that has been poorly cut multiple sheets of paper may be fed at once In this case fan the paper thoroughly and then align the edges of the stack properly on a hard flat surface Paper Size Paper Guide Ledger 11 x 17 Legal LGL Letter LTR Executive E...

Страница 25: ...paper stack does not exceed the load limit mark lines B IMPORTANT Adjust the paper guides to the correct positions Slide the side paper guides and rear paper guide until they touch the paper stack Do not load the paper stack which exceeds the load limit mark lines Be sure that the paper stack does not exceed the load limit mark lines If the paper stack exceeds the load limit mark lines this may re...

Страница 26: ...ssette Be careful not to catch your fingers Specifying the Settings for the Paper Cassette This printer s paper cassette is configured to automatically detect the paper size by default Therefore you do not need to change the settings for the paper cassette However you need to change the settings in the following cases When loading standard size paper again after using custom size paper When you wa...

Страница 27: ... カセ セ セ セッ ッ ッ ット ト ト ト 1 1 1 1 用 用 用 用紙 紙 紙 紙サ サ サ サイ イ イ イズ ズ ズ ズ using and and then press OK 3 Select 自 自 自 自動 動 動 動 or フ フ フ フリ リ リ リー ー ー ー using and and then press OK The paper cassette setting is specified Registering the Paper Type Specify カセット1用紙種類 using the control panel according to the type of the loaded paper Paper to Be Used カ カ カ カセ セ セ セッ ッ ッ ット ト ト ト 1 1 1 1 用 用 用 用紙 紙 紙 紙種 種 種 種類...

Страница 28: ...setting for カセット 1 用紙種類 is changed to that in the printer driver by pressing オンライン allowing you to continue printing For users who do not use the printer driver When you are printing from an operating system on which you cannot use the printer driver such as MS DOS and UNIX match the setting for デフォルト用紙種類 and the type of the loaded paper When フ フ フ フリ リ リ リー ー ー ー is specified The printer performs...

Страница 29: ...wing settings Before printing from the printer driver for Windows or Macintosh Specify the paper size and paper type in the printer driver before printing Before printing from the BMLinkS printer driver See User s Manual for the BMLinkS printer driver Before printing from DOS UNIX or other operating systems Specify デフォルト用紙サイズ and デフォルト用紙種類 Paper Type Paper Size Plain paper 60 to 105 g m2 Heavy pap...

Страница 30: ...to the position of the size of the paper to be loaded Slide the side paper guides 1 Hold the lock release lever 2 Slide the paper guides to the position of the size of the paper to be loaded Align the position of A with the size mark of the paper to be loaded The side paper guides move together 1 2 A Top View ...

Страница 31: ...of the size of the paper to be loaded Align the position of A with the size mark of the paper to be loaded NOTE Size abbreviation on the paper guides 3 Load paper so that the edges of the paper stack are aligned with the rear paper guide Paper Size Paper Guide Ledger 11 x 17 Legal LGL Letter LTR A 1 2 ...

Страница 32: ...rly cut multiple sheets of paper may be fed at once In this case fan the paper thoroughly and then align the edges of the stack properly on a hard flat surface NOTE When printing paper with a letterhead or logo See Paper Loading Orientation p 88 and load the paper in the proper orientation 4 Hold down the paper then set it under the hooks A on the paper guides Make sure that the paper stack does n...

Страница 33: ...aper stack does not exceed the load limit mark If the paper stack exceeds the load limit mark this may result in misfeeds 5 Insert the paper size indicator 1 Take out the paper size indicator 2 Attach a paper size label 3 Insert the paper size indicator 6 Set the paper cassette in the paper feeder Push it into the printer firmly CAUTION Precautions when setting the paper cassette Be careful not to...

Страница 34: ...ot check the paper size IMPORTANT Precautions when specifying フ フ フ フリ リ リ リー ー ー ー The printer performs printing without checking the paper settings in the printer driver Make sure that the paper specified in the printer driver matches that loaded in the paper cassette before using the printer 1 Press 給 給 給 給紙 紙 紙 紙選 選 選 選択 択 択 択 2 Select カ カ カ カセ セ セ セッ ッ ッ ット ト ト ト N N N N N N N N 2 2 2 2 3 3 3...

Страница 35: ...ontrol panel If they do not match the message 以下の用紙をセット appears In this case the setting for カセット N N 2 3 4 用紙種類 is changed to that in the printer driver by pressing オンライン allowing you to continue printing For users who do not use the printer driver When you are printing from an operating system on which you cannot use the printer driver such as MS DOS and UNIX match the setting for デフォルト用紙種類 and ...

Страница 36: ... The paper type for the paper cassette is specified Before printing Specify the following settings Before printing from the printer driver for Windows or Macintosh Specify the paper size and paper type in the printer driver before printing Before printing from the BMLinkS printer driver See User s Manual for the BMLinkS printer driver Before printing from DOS UNIX or other operating systems Specif...

Страница 37: ...per for the optimum print quality IMPORTANT Detailed information about usable paper See Paper Requirements on p 9 Paper Type Paper Size Plain paper 60 to 105 g m2 Heavy paper 106 to 216 g m2 Label 1 Coated paper 100 to 220 g m2 2 A3 297 0 mm x 420 0 mm B4 257 0 mm x 364 0 mm A4 210 0 mm x 297 0 mm B5 182 0 mm x 257 0 mm A5 148 0 mm x 210 0 mm 12 x 18 12 00 in x 18 00 in Ledger 11 00 in x 17 00 in ...

Страница 38: ...37 Loading Paper in the Multi purpose Tray 1 Open the multi purpose tray Holding the opening on the right side of the printer open the multi purpose tray ...

Страница 39: ...38 2 When loading long size paper such as A3 etc open the tray extension 3 Spread the paper guides a little wider than the actual paper width ...

Страница 40: ...nned enough multiple sheets of paper may be fed at once causing paper jams When fanning or aligning the transparencies or coated paper try to hold the edges to avoid touching the printing surface Take care not to mark or stain the printing surface of the transparencies or coated paper with fingerprints dust or oil This may result in poor print quality 5 Gently load the paper stack under the load l...

Страница 41: ...ult in misfeeds or paper jams If the paper is curled or folded at corners flatten it before loading it in the printer If you use paper that has been poorly cut multiple sheets of paper may be fed at once In this case fan the paper thoroughly and then align the edges of the stack properly on a hard flat surface NOTE When printing paper with a letterhead or logo See Paper Loading Orientation p 88 an...

Страница 42: ...ign the paper guides with the width of the paper IMPORTANT Be sure to align the paper guides with the width of the paper If the paper guides are too loose or too tight this may result in misfeeds or paper jams ...

Страница 43: ...ter driver When you are printing from an operating system on which you cannot use the printer driver such as MS DOS and UNIX match the setting for デフォルト用紙サイズ and the size of the loaded paper When フ フ フ フリ リ リ リー ー ー ー is specified The printer performs printing without checking the paper settings in the printer driver Make sure that the paper specified in the printer driver matches that loaded in t...

Страница 44: ...トレ イ用紙種類 in the control panel If they do not match the message 以下の用紙をセット appears In this case the setting for 手差しトレイ用紙種類 is changed to that in the printer driver by pressing オンライン allowing you to continue printing For users who do not use the printer driver When you are printing from an operating system on which you cannot use the printer driver such as MS DOS and UNIX match the setting for デフォルト用...

Страница 45: ... イ イ イ用 用 用 用紙 紙 紙 紙種 種 種 種類 類 類 類 using and and then press OK 3 Select a paper type using and and then press OK The paper type for the multi purpose tray is specified Before printing Specify the following settings Before printing from the printer driver for Windows or Macintosh Specify the paper size and paper type in the printer driver before printing Before printing from the BMLinkS printer dri...

Страница 46: ...d 200 0 mm x 296 0 mm IMPORTANT Loading orientation of postcards Load postcards with the printing side facing down as follows Feeding direction Postcard Load the postcards so that the top edge is toward the back of the printer When printing on the address side When printing on the back side Load postcards with the printing side facing down Place the top edge toward the printer ...

Страница 47: ...inter when they are viewed from the right side Detailed information about usable paper See Paper Requirements on p 9 When printing on the address side When printing on the return side Load postcards with the printing side facing down Place the top edge toward the left When printing on the address side When printing on the back side Load postcards with the printing side facing down Place the top ed...

Страница 48: ...47 Loading Postcards in the Multi purpose Tray 1 Open the multi purpose tray Holding the opening on the right side of the printer open the multi purpose tray ...

Страница 49: ... it touches the back of the tray Make sure that the paper stack does not exceed the load limit mark lines B CAUTION Be careful when handling postcards Handle postcards carefully not to cut your hands with the edges of the postcards IMPORTANT Loading orientation of postcards See the instruction described at the top of the procedure on p 45 A B ...

Страница 50: ...n the curls by warping them in the opposite direction before loading them When using postcards that have been poorly cut If you use postcards that have been poorly cut multiple sheets of postcards may be fed at once In this case align the edges of the stack on a hard flat surface 4 Align the paper guides with the width of the postcards IMPORTANT Be sure to align the paper guides with the width of ...

Страница 51: ...ter driver When you are printing from an operating system on which you cannot use the printer driver such as MS DOS and UNIX match the setting for デフォルト用紙サイズ and the size of the loaded paper When フ フ フ フリ リ リ リー ー ー ー is specified The printer performs printing without checking the paper settings in the printer driver Make sure that the paper specified in the printer driver matches that loaded in t...

Страница 52: ...イ用紙種類 is changed to that in the printer driver by pressing オンライン allowing you to continue printing For users who do not use the printer driver When you are printing from an operating system on which you cannot use the printer driver such as MS DOS and UNIX match the setting for デフォルト用紙種類 and the type of the loaded paper When フ フ フ フリ リ リ リー ー ー ー is specified The printer performs printing without ...

Страница 53: ...owing settings Before printing from the printer driver for Windows or Macintosh Specify the paper size and paper type in the printer driver before printing Before printing from the BMLinkS printer driver See User s Manual for the BMLinkS printer driver Before printing from DOS UNIX or other operating systems Specify デフォルト用紙サイズ and デフォルト用紙種類 ...

Страница 54: ...mm x 235 0 mm KAKUGATA No 2 240 0 mm x 332 0 mm IMPORTANT Loading orientation of envelopes Load envelopes with the front side non glued side facing down as follows Feeding direction YOUNAGA No 3 Load the envelopes so that the flap is toward the right of the printer when they are viewed from the right side Close the flap Reverse the envelope and load it ...

Страница 55: ...y toward the printer KAKUGATA No 2 Load the envelopes with the flap opened so that the bottom is toward the back of the tray toward the printer Detailed information about usable paper See Paper Requirements on p 9 Open the flap Reverse the envelope and load it Open the flap Reverse the envelope and load it ...

Страница 56: ...55 Loading Envelopes in the Multi purpose Tray 1 Open the multi purpose tray Holding the opening on the right side of the printer open the multi purpose tray ...

Страница 57: ...56 2 When loading KAKUGATA No 2 size envelopes open the tray extension 3 Spread the paper guides a little wider than the actual envelope width ...

Страница 58: ...elopes on a flat surface flatten them to release any remaining air and be sure that the edges are pressed tightly 2 Loosen any stiff corners of the envelopes and flatten curls as shown in the figure 3 Align the edges of the envelopes on a flat surface ...

Страница 59: ...refully not to cut your hands with the edges of the envelopes IMPORTANT Loading orientation of envelopes See the instruction described at the top of the procedure on p 53 Load envelopes with the front side non glued side facing down You cannot print on the reverse side glued side of envelopes Multi purpose tray capacity for envelopes Up to approximately 10 envelopes can be loaded in the multi purp...

Страница 60: ...to match the setting in the printer driver Match the paper type specified in the セットアップ menu and that specified in Output Size in the printer driver If they do not match the message 以下の用紙をセット appears In this case the setting for 手差しトレイ用紙サイズ is changed to that in the printer driver by pressing オンライン allowing you to continue printing For users who do not use the printer driver When you are printing ...

Страница 61: ... 手 手 手差 差 差 差し し し しト ト ト トレ レ レ レイ イ イ イ用 用 用 用紙 紙 紙 紙サ サ サ サイ イ イ イズ ズ ズ ズ using and and then press OK 3 Select a paper size using and and then press OK The paper size for the multi purpose tray is specified Registering the Paper Type Specify 手差しトレイ用紙種類 using the control panel according to the type of the loaded paper Paper to Be Used 手 手 手 手差 差 差 差し し し しト ト ト トレ レ レ レイ イ イ イ用 用 用 用紙 紙 紙 紙種 種 種...

Страница 62: ...d to that in the printer driver by pressing オンライン allowing you to continue printing For users who do not use the printer driver When you are printing from an operating system on which you cannot use the printer driver such as MS DOS and UNIX match the setting for デフォルト用紙種類 and the type of the loaded paper When フ フ フ フリ リ リ リー ー ー ー is specified The printer performs printing without checking the pa...

Страница 63: ...r for Windows or Macintosh Specify the paper size and paper type in the printer driver before printing Before printing from the BMLinkS printer driver See User s Manual for the BMLinkS printer driver Before printing from DOS UNIX or other operating systems Specify デフォルト用紙サイズ and デフォルト用紙種類 ...

Страница 64: ...Long edges 182 0 to 297 0 mm Landscape orientation when the long edges of the paper are parallel to the front side of the printer Short edges 148 0 to 297 0 mm Long edges 182 0 to 431 8 mm The paper whose short edges are 100 0 to 147 9 mm can be loaded by using the optional small size paper adjuster Can be loaded only when the LIPS LX printer driver is used IMPORTANT Detailed information about usa...

Страница 65: ...parallel to the front side of the printer if all the following conditions are fulfilled The LIPS LX printer driver is used カセット1 用紙サイズ is set to フリー The long edges of the paper is 297 0 mm or less When using paper that has been poorly cut If you use paper that has been poorly cut multiple sheets of paper may be fed at once In this case fan the paper thoroughly and then align the edges of the stack...

Страница 66: ... paper guides 1 Hold the lock release lever 2 Slide the paper guides to be aligned with the loaded paper The side paper guides move together Slide the rear paper guide 1 Hold the lock release lever 2 Slide the paper guide to be aligned with the loaded paper 1 2 1 2 ...

Страница 67: ...aper then set it under the hooks A on the paper guides Make sure that the paper stack does not exceed the load limit mark lines B IMPORTANT Do not load the paper stack which exceeds the load limit mark lines Be sure that the paper stack does not exceed the load limit mark lines If the paper stack exceeds the load limit mark lines this may result in misfeeds A B A A B ...

Страница 68: ...e orientation of the loaded paper IMPORTANT Precautions when specifying フ フ フ フリ リ リ リー ー ー ー The printer performs printing without checking the paper settings in the printer driver Make sure that the paper specified in the printer driver matches that loaded in the paper cassette before using the printer Load paper in portrait orientation when the short edges of the paper are parallel to the front...

Страница 69: ...the printer Specify ユーザ設定サイズ When paper is loaded in landscape orientation when the long edges of the paper are parallel to the front side of the printer Specify ユーザ設定サイズ R The loading orientation is specified Registering the Paper Type Specify カセット1用紙種類 using the control panel according to the type of the loaded paper Paper to Be Used カ カ カ カセ セ セ セッ ッ ッ ット ト ト ト 1 1 1 1 用 用 用 用紙 紙 紙 紙種 種 種 種類 類 ...

Страница 70: ...setting for カセット 1 用紙種類 is changed to that in the printer driver by pressing オンライン allowing you to continue printing For users who do not use the printer driver When you are printing from an operating system on which you cannot use the printer driver such as MS DOS and UNIX match the setting for デフォルト用紙種類 and the type of the loaded paper When フ フ フ フリ リ リ リー ー ー ー is specified The printer performs...

Страница 71: ...ges of the paper are parallel to the front side of the printer Short edges 148 0 to 297 0 mm Long edges 210 0 to 297 0 mm Landscape orientation when the long edges of the paper are parallel to the front side of the printer Short edges 210 0 to 297 0 mm Long edges 210 0 to 431 8 mm Can be loaded only when the LIPS LX printer driver is used IMPORTANT Detailed information about usable paper See Paper...

Страница 72: ...ops 2 Load paper as shown in the figure CAUTION Be careful when handling paper Handle paper carefully not to cut your hands with the edges of the paper IMPORTANT Paper cassette capacity Paper Type Paper Capacity Plain paper Ex 64 g m2 Approx 550 sheets Heavy paper Ex 128 g m2 Approx 400 sheets ...

Страница 73: ...s set to フリー The long edges of the paper is 297 0 mm or less When using paper that has been poorly cut If you use paper that has been poorly cut multiple sheets of paper may be fed at once In this case fan the paper thoroughly and then align the edges of the stack properly on a hard flat surface NOTE When printing paper with a letterhead or logo See Paper Loading Orientation p 88 and load the pape...

Страница 74: ...d the lock release lever 2 Slide the paper guide to be aligned with the loaded paper IMPORTANT Be sure to align the paper guides with the paper If the paper guides are too loose or too tight this may result in misfeeds or paper jams 1 2 ...

Страница 75: ...the paper stack which exceeds the load limit marks Be sure that the paper stack does not exceed the load limit marks If the paper stack exceeds the load limit marks this may result in misfeeds 5 Set the paper cassette in the paper feeder Push it into the printer firmly CAUTION Precautions when setting the paper cassette Be careful not to catch your fingers A B A A B ...

Страница 76: ...ion when the short edges of the paper are parallel to the front side of the printer if you use the LIPS LX printer driver 1 Press 給 給 給 給紙 紙 紙 紙選 選 選 選択 択 択 択 2 Select カ カ カ カセ セ セ セッ ッ ッ ット ト ト ト N N N N N N N N 2 2 2 2 3 3 3 3 4 4 4 4 用 用 用 用紙 紙 紙 紙サ サ サ サイ イ イ イズ ズ ズ ズ using and and then press OK 3 Select a loading orientation using and and then press OK When paper is loaded in portrait orienta...

Страница 77: ...ontrol panel If they do not match the message 以下の用紙をセット appears In this case the setting for カセット N N 2 3 4 用紙種類 is changed to that in the printer driver by pressing オンライン allowing you to continue printing For users who do not use the printer driver When you are printing from an operating system on which you cannot use the printer driver such as MS DOS and UNIX match the setting for デフォルト用紙種類 and ...

Страница 78: ... need to register the custom paper size in the printer driver previously For details on the procedure for registering a custom paper size see Help of the printer driver Before printing Specify the following settings Before printing from the printer driver for Windows or Macintosh Specify the paper size and paper type in the printer driver before printing Before printing from the BMLinkS printer dr...

Страница 79: ...front side of the printer Short edges 127 0 to 297 0 mm Long edges 127 0 to 297 0 mm Landscape orientation when the long edges of the paper are parallel to the front side of the printer Short edges 76 2 to 320 0 mm Long edges 127 0 to 457 2 mm Long size paper Short edges 210 0 to 297 0 mm Long edges 457 3 to 1 200 0 mm Can be loaded only when the LIPS LX printer driver is used IMPORTANT Detailed i...

Страница 80: ...79 Loading Custom Size Paper or Long size Paper in the Multi purpose Tray 1 Open the multi purpose tray Holding the opening on the right side of the printer open the multi purpose tray ...

Страница 81: ...80 2 When loading long size paper open the tray extension 3 Spread the paper guides a little wider than the actual paper width ...

Страница 82: ... fanned enough multiple sheets of paper may be fed at once causing paper jams When fanning or aligning coated paper try to hold the edges to avoid touching the printing surface Take care not to mark or stain the printing surface of coated paper with fingerprints dust or oil This may result in poor print quality 5 Gently load the paper stack under the load limit guides A until it touches the back o...

Страница 83: ...landscape orientation when the long edges of the paper are parallel to the front side of the printer if you do not use the LIPS LX printer driver Also be sure to load paper in portrait orientation when the short edges of the paper are parallel to the front side of the printer if all the following conditions are fulfilled The LIPS LX printer driver is used 手差しトレイ用紙サイズ is set to フリー The long edges o...

Страница 84: ...s been poorly cut multiple sheets of paper may be fed at once In this case fan the paper thoroughly and then align the edges of the stack properly on a hard flat surface NOTE When printing paper with a letterhead or logo See Paper Loading Orientation p 88 and load the paper in the proper orientation 6 Align the paper guides with the width of the paper IMPORTANT Be sure to align the paper guides wi...

Страница 85: ...om an operating system on which you cannot use the printer driver such as MS DOS and UNIX match the setting for デフォルト用紙サイズ and the size of the loaded paper When フ フ フ フリ リ リ リー ー ー ー is specified The printer performs printing without checking the paper settings in the printer driver Make sure that the paper specified in the printer driver matches that loaded in the multi purpose tray before using ...

Страница 86: ...pe of the loaded paper If the setting for the paper type is different from that of the loaded paper this may result in crucial damage to the printer Paper to Be Used 手 手 手 手差 差 差 差し し し しト ト ト トレ レ レ レイ イ イ イ用 用 用 用紙 紙 紙 紙種 種 種 種類 類 類 類 in the セ セ セ セッ ッ ッ ット ト ト トア ア ア アッ ッ ッ ップ プ プ プ Menu Plain paper 60 to 74 g m2 普通紙 L Plain paper 75 to 90 g m2 普通紙 ラフ紙 Plain paper 91 to 105 g m2 普通紙 H ラフ紙 Heavy...

Страница 87: ...rs who do not use the printer driver When you are printing from an operating system on which you cannot use the printer driver such as MS DOS and UNIX match the setting for デフォルト用紙種類 and the type of the loaded paper When フ フ フ フリ リ リ リー ー ー ー is specified The printer performs printing without checking the paper settings in the printer driver Make sure that the paper specified in the printer driver...

Страница 88: ... see Help of the printer driver Before printing Specify the following settings Before printing from the printer driver for Windows or Macintosh Specify the paper size and paper type in the printer driver before printing Before printing from the BMLinkS printer driver See User s Manual for the BMLinkS printer driver Before printing from DOS UNIX or other operating systems Specify デフォルト用紙サイズ and デフォ...

Страница 89: ...ape Layout Paper cassette 1 sided printing With the printing side facing up With the printing side facing up With the printing side facing up With the printing side facing up Paper cassette automatic 2 sided printing With the front side facing down With the front side facing down With the front side facing down With the front side facing down Multi purpose tray 1 sided printing With the printing s...

Страница 90: ...hen paper is loaded in portrait orientation 1 When paper is loaded in landscape orientation 2 Portrait Layout Landscape Layout Portrait Layout Landscape Layout Multi purpose tray automatic 2 sided printing With the front side facing up With the front side facing up With the front side facing up With the front side facing up Multi purpose tray manual 2 sided printing With the printing side facing d...

Страница 91: ...ear one at a time Remove the jammed paper according to the displayed message See Precautions When Removing Jammed Paper on p 91 Removal Order Paper Jam Area Message Clearance Procedure 1 Multi purpose tray 手差しトレイエリア Clearing Paper Jams MP Tray Area See p 94 3 2 4 5 9 6 7 10 1 Multi purpose Tray Paper Feeder Unit Optional Paper flow for 1 sided printing Paper flow for 2 sided printing Cassette 1 Ca...

Страница 92: ...fore removing the jammed paper Touching the fixing unit when it is still hot may result in burns 2 Output area 排紙エリア Clearing Paper Jams Output Area Right Cover Area Duplex Unit Area or Cassette 1 2 3 4 Area See p 95 3 Inside the right cover 右カバーエリア 4 Duplex print transport area 両面ユニットエリア 5 Cassette 1 カセット 1 エリア 6 Cassette 2 カセット 2 エリア 7 Cassette 3 カセット 3 エリア 8 Cassette 4 カセット 4 エリア 9 Right cover ...

Страница 93: ...s into your eyes or mouth wash them immediately with cold water and consult a physician When removing jammed paper be careful not to cut your hands with the edges of the paper Keep your hands and clothing away from the roller in the output area after removing jammed paper The roller may suddenly rotate and catch your hands or clothing resulting in personal injury IMPORTANT Precautions when operati...

Страница 94: ... roller A as this may result in deterioration in print quality The area surrounding the output tray is hot during and immediately after printing Do not touch the area surrounding the output tray when removing paper or clearing a paper jam A ...

Страница 95: ...per by pulling it gently in the direction of the arrow IMPORTANT If the jammed paper cannot be removed easily Do not try to remove it forcefully but proceed to Clearing Paper Jams Output Area Right Cover Area Duplex Unit Area or Cassette 1 2 3 4 Area See p 95 ...

Страница 96: ...a or Cassette 1 2 3 4 Area 1 Open the right cover Check the inside of the right cover also After removing the paper jammed in the multi purpose tray check if paper is jammed inside the right cover See Clearing Paper Jams Output Area Right Cover Area Duplex Unit Area or Cassette 1 2 3 4 Area on p 95 ...

Страница 97: ...96 2 Open the paper output guide 1 Hold the tab A 2 Open it 3 Remove the jammed paper by pulling it gently in the direction of the arrow 2 1 A ...

Страница 98: ... and then close it 4 If the paper is jammed in the area shown in the figure remove the paper by pulling it gently in the direction of the arrow 5 If the paper is jammed in the area shown in the figure remove the paper by pulling it gently in the direction of the arrow ...

Страница 99: ...98 6 Remove the jammed paper by pulling it gently in the direction of the arrow ...

Страница 100: ...ア See Clearing Paper Jams Cassette 2 3 Cover Area on p 100 8 Close the right cover When paper is jammed in the paper cassette the jammed paper is output automatically The message disappears and the printer is ready to print IMPORTANT If a message does not disappear Paper or pieces of paper may remain in the area surrounding the paper cassette See the following pull out the paper cassette and then ...

Страница 101: ...Paper Jams Cassette 2 3 Cover Area 1 Open the right cover If paper is jammed remove the paper See Clearing Paper Jams Output Area Right Cover Area Duplex Unit Area or Cassette 1 2 3 4 Area on p 95 Only for LBP9600C ...

Страница 102: ...101 2 Open the right cover A of Cassette 2 or right cover B of Cassette 3 1 Press the lever in the direction of the arrow 2 Open it 1 A B 2 ...

Страница 103: ...102 3 Remove the jammed paper by pulling it gently in the direction of the arrow 1 Pull out the top edge of the paper 2 Remove the paper by pulling it gently 1 2 ...

Страница 104: ...103 4 If the paper cannot be removed easily when it is jammed in the area shown in the figure do not try to remove it forcefully but proceed to Step 5 5 Close the right cover of the paper cassette ...

Страница 105: ...remain in the area surrounding the paper cassette See the following pull out the paper cassette and then remove the paper or pieces of paper See Checking Paper Jams in the Paper Cassette on p 104 Checking Paper Jams in the Paper Cassette If the message that indicates a paper jam does not disappear check the paper or pieces of paper that remain in the area surrounding the paper cassette using the f...

Страница 106: ...105 2 Pull out a paper cassette in which a paper jam occurs 3 Remove the jammed paper by pulling it gently in the direction of the arrow ...

Страница 107: ...rting the paper cassette Be careful not to catch your fingers 5 Close the right cover The message disappears and the printer is ready to print IMPORTANT If a message does not disappear even after removing the paper Paper may be jammed in another area Check another area also and remove the paper ...

Страница 108: ... the toner cartridge before printing a large amount of data Toner Colors トナー 交換 しばらくは継続して印刷 できます When a toner cartridge needs to be replaced soon The printer stops printing Pressing オンライン continues the job Have ready a new toner cartridge of the indicated color It is recommended that you replace the toner cartridge before printing a large amount of data Toner Colors トナー 交換 When a toner cartridge h...

Страница 109: ...reached the end of its life You can continue printing for a while however as this may result in damage to the printer it is recommended to replace the toner cartridge with a new one Toner Colors トナー との接続を確認してくださ い When there is a possibility that a toner cartridge is not installed properly The printer stops printing and you cannot continue the job Remove the toner cartridge of the indicated color ...

Страница 110: ...rtridges The life of the toner cartridges is affected by the following conditions Printing environment and conditions Spaced printing Paper size and paper type settings Printing ratio Toner is used even when printing with a low printing ratio Color printing Multiple color toner cartridges may reach the end of their life at the same time Printer configuration Black and white printing may affect the...

Страница 111: ...About the packing materials The packing materials may be changed in form or placement or may be added or removed without notice Replacing Toner Cartridges NOTE Checking the status of the toner cartridges of each color You can check the status of the toner cartridges in the display on the control panel You can check the status of the toner cartridges also in the Status page in the Remote UI Model N...

Страница 112: ...r of the printer You can replace the toner cartridges either when the power of the printer is turned on or when it is turned off 1 Gently open the front cover NOTE Order of the toner cartridges Yellow Magenta Cyan Black ...

Страница 113: ...ge to be replaced 1 Hold the handle 2 Pull out the toner cartridge IMPORTANT Hold the toner cartridges properly When handling the toner cartridges hold them properly as shown in the figure Do not place it vertically or upside down 1 2 ...

Страница 114: ...e printer NOTE Your cooperation to collect used toner cartridges would be appreciated 3 Take out the new toner cartridge from the protective bag You can open the protective bag with your hands from the notch When opening the protective bag with scissors be careful not to damage the toner cartridge A ...

Страница 115: ...ill need it when you remove the toner cartridge for printer maintenance or other purposes 4 Shake the toner cartridge to evenly distribute the toner inside the cartridge Hold the toner cartridge as shown in the figure and shake it gently 5 or 6 times Do not remove the drum protective cover A CAUTION If toner gets into your eyes or mouth Wash them immediately with cold water and consult a physician...

Страница 116: ...on If toner is not distributed evenly this may result in deterioration in print quality Be sure to shake the toner cartridge gently If you do not shake the cartridge gently toner may spill out 5 Holding the tab A remove the drum protective cover A ...

Страница 117: ...er cartridge Keep the drum protective cover Keep the removed drum protective cover You will need it when you remove the toner cartridge for printer maintenance or other purposes 6 Install the toner cartridge Fit the projection A of the toner cartridge into the guide B on the front cover to install the toner cartridge A A B ...

Страница 118: ...ng the toner cartridges be careful not to let the drum impact the frame of the printer The position of the toner cartridges in the printer is determined by the toner color Install the toner cartridges in the slots that have labels of the same color Install the toner cartridges securely into the printer ...

Страница 119: ...If you cannot close the front cover Make sure that the toner cartridges are installed in the back of the printer firmly Do not try to forcefully close the front cover as this may damage the printer Do not leave the front cover open for a long time with the toner cartridges installed This may result in deterioration in print quality ...

Страница 120: ...than the printer driver for this printer multiple data may be canceled NOTE About print jobs which cannot be canceled You may not be able to cancel a job even if ジョブを中止中です is displayed Also the following jobs cannot be canceled An encrypted secured print job for which a password is not entered yet A job stored in the box Delete such jobs using the Remote UI 1 Make sure that the ジ ジ ジ ジョ ョ ョ ョブ ブ ブ...

Страница 121: ...press OK ジョブを中止中です appears and the print data being processed is canceled When ジョブを中止中です disappears the job cancellation completes NOTE While ジ ジ ジ ジョ ョ ョ ョブ ブ ブ ブを を を を中 中 中 中止 止 止 止中 中 中 中で で で です す す す is displayed You cannot operate the printer ...

Страница 122: ...ned to be printed on A4 size paper Be sure to load A4 size paper when printing the Status Print 1 Load A4 size paper in the multi purpose tray or paper cassette See Loading Standard Size Paper Other Than Postcards and Envelopes on p 21 2 Make sure that the printer is online If the printer is not online press オンライン 3 Press ユ ユ ユ ユー ー ー ーテ テ テ ティ ィ ィ ィリ リ リ リテ テ テ ティ ィ ィ ィ 4 Select 共 共 共 共通 通 通 通ス ス...

Страница 123: ...2 5 Select は は は はい い い い using and then press OK Status Print is printed NOTE Sample of Status Print This is a sample of Status Print The contents may differ from the Status Print printed by your printer ...

Страница 124: ...s Displayed See p 124 and then contact your local authorized Canon dealer n represents an alphanumeric character A problem has occurred inside the printer Following the procedure in If a Service Error or the Message Power OFF and ON Is Displayed See p 125 cycle the power of the printer n represents an alphanumeric character A problem has occurred while the printer is processing print data E001 nnn...

Страница 125: ...nected turn the computer off and then disconnect the USB cable from the printer 3 Unplug the power plug from the AC power outlet 4 Remove the ground wire from the ground terminal IMPORTANT Do not turn on the printer again A fixing unit error is displayed Do not turn on the printer after turning it off 2 Contact your local authorized Canon dealer 1 2 3 4 ...

Страница 126: ...wer switch 2 Wait at least 10 seconds before turning on the printer 1 Open the power switch cover 2 Press I of the power switch If the message does not reappear the printer is ready If the message reappears you need to request service Follow the procedure below and then contact your local authorized Canon dealer to request service 1 2 1 2 ...

Страница 127: ...able is connected turn the computer off and then disconnect the USB cable from the printer 3 Unplug the power plug from the AC power outlet 4 Remove the ground wire from the ground terminal 5 Contact your local authorized Canon dealer to request service When contacting your Canon dealer please report also the error code which you noted down in Step 3 1 2 3 4 ...

Страница 128: ...g messages are displayed alternately If an error state and warning state are occurring at the same time A warning message is not displayed Auto Error Skip For a message with this mark perform the following procedure according to the situation When you want to skip an error error skip and continue to print 1 Press オンライン to skip the error Printing is continued 2 If print data is missing or is not pr...

Страница 129: ...other paper source 9I ITB ユニット交換準備 Warning Message Cause The ITB unit needs to be replaced soon Solution Although you can continue to print for a while have ready a new ITB unit E1 回収トナー容器交換準備 Warning Message Cause The waste toner container needs to be replaced soon Solution Although you can continue to print for a while have ready a new waste toner container E5 定着器交換準備 Warning Message Cause The f...

Страница 130: ...n Specify the setting properly Cause 3 Improper paper source is selected Solution Specify the setting for 給紙モード in the 給紙選択 menu properly IMPORTANT While 以 以 以 以下 下 下 下の の の の用 用 用 用紙 紙 紙 紙を を を をセ セ セ セッ ッ ッ ット ト ト ト is displayed If the front cover is opened the message may disappear However be sure to follow the directions in the displayed message to change the paper 51 印刷設定エラーが発生し ました Cause The...

Страница 131: ...e cover firmly If the printer is not online press オンライン カラーモードをモノクロに変 更するか 用紙種類を変更し てください Auto Error Skip Cause You tried to perform color printing on transparencies Solution Perform the following procedure 1 Perform a soft reset Canceling a Job See p 119 2 Perform black and white printing or print on paper other than transparencies 給紙できません Cause Paper of the size or type that cannot be fed from t...

Страница 132: ... contact your local authorized Canon dealer for servicing Cause 2 The fixing unit for this printer is not installed Solution Replace the fixing unit with that for this printer 排紙トレイがいっぱいです 用紙を取り除いてください Cause The output tray is filled to the limit Solution Remove the paper in the output tray 用紙がありません Cause Paper of the size specified in the application is not loaded in the paper source in all the p...

Страница 133: ...earing Paper Jams Output Area Right Cover Area Duplex Unit Area or Cassette 1 2 3 4 Area See p 95 Clearing Paper Jams Cassette 2 3 Cover Area See p 100 IMPORTANT If paper jams occur in the multiple areas simultaneously The paper jam areas are displayed alternately in the display If you have removed the jammed paper without opening any cover Be sure to open and close the right cover once and then p...

Страница 134: ...use 3 When the LIPS LX printer driver was not used custom size paper was loaded in landscape orientation to be printed Solution Load the paper in portrait orientation then print again Cause 4 用紙長さ確認 in the 共通セットアップ menu 拡張機 能 options is set to する Solution Set 用紙長さ確認 to しない and then print again 両面印刷エラーが発生しまし た Auto Error Skip Cause The printer received 2 sided printing data of paper sizes including...

Страница 135: ...fety mechanism and pausing printing temporarily Solution Please wait a moment When the inside of the printer cools down printing resumes If the internal temperature of the printer has not decreased sufficiently the safety mechanism is reactivated and printing is paused temporarily When the inside temperature cools down sufficiently the printer resumes the normal printing speed The time until the s...

Отзывы: