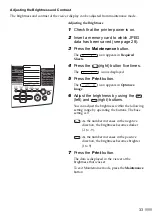
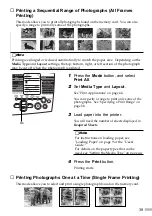
background image

41

1

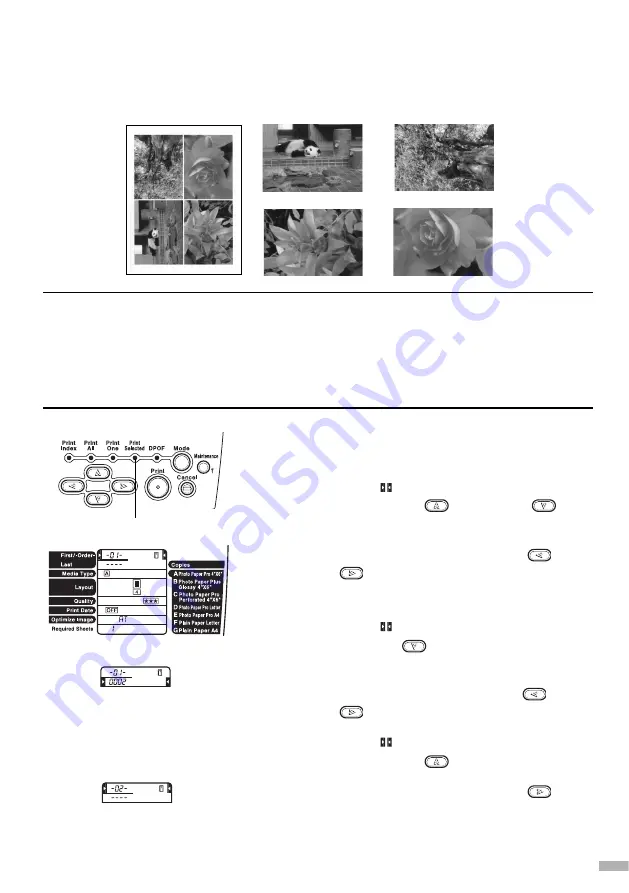
Press the Mode button, and select
Print Selected.

2

Move the 

(cursor) to First/-Order-

by pressing the 

(top) and 

(bottom) buttons.

3

Display [-01-] by pressing the 

(left)

and 

(right) button.

[-01-] indicates the first frame.

4

Move the 

(cursor) to Last by

pressing the 

(down) button.

5

Display the number of the photograph
to be printed by pressing the 

(left)

and 

(right) buttons.

6

Move the 

(cursor) to First/-Order-

by pressing the 

(up) button.

7

Display [-02-] by pressing the 
(right) button.

[-02-] indicates the second frame.
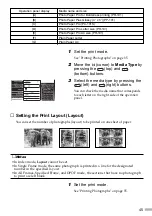
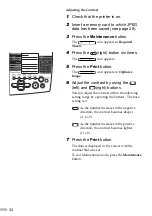
Printing Selected Photographs in Batch Printing (Specified
Frame Printing)

This mode allows you to specify photographs to be printed and print the photographs in
batch printing.  Up to 99 photographs can be specified.

Notes

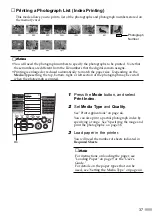
• You will need the photograph numbers to specify photographs to be printed.  To check

the photograph numbers, use index printing.  For details, see "Printing a Photograph
List (Index Printing)" on page 37.

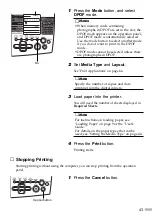
• Printing is enlarged or reduced automatically to match the paper size.  Depending on

the 

Media Type

and 

Layout

settings, the top, bottom, right, or left section of the

photograph may be cut off when the photograph is printed.

On

Содержание S830D

Страница 1: ...Print Head 16 Basic Operations 22 Printing with Windows 22 Printing with Macintosh 24 Printing Without Using the Computer 26 Before Printing 26 Printing Photographs 35 Print Applications 44 If Photogr...

Страница 2: ...at e par l Industrie Canada International ENERGY STAR Program As an ENERGY STAR Partner Canon Inc has determined that this product meets the ENERGY STAR guidelines for efficiency The International ENE...

Страница 3: ...safe operation Instructions that if ignored could result in personal injury or material damage caused by incorrect operation of the equipment These must be observed for safe operation Also read the Sa...

Страница 4: ...he printer to a digital camera Sheet Feeder Load paper here Paper feeds automatically one sheet at a time Indicator lamp Goes on when memory card reading becomes enabled and flashes while the memory c...

Страница 5: ...printer is turned off Green the printer is ready to print Flashing green the printer is preparing to print or is currently printing Flashing orange an error has occurred and the printer is not ready...

Страница 6: ...Setting Up 1 Preparing the Printer 2 Connecting the Printer to the Computer Note If you are printing with only Direct Print skip this section and go to Installing the Print Head on page 6 Use a USB ca...

Страница 7: ...ter has an earth connection ensure that this is attached If you do not intend to use the printer for a long period of time unplug the power cord from the power outlet after turning off the printer Not...

Страница 8: ...the Print Head Never attempt to plug the power cord into the power outlet or unplug the power cord when your hands are wet Never damage modify stretch or excessively bend or twist the power cord Do n...

Страница 9: ...Lock the print head into place by lowering the lever Do not touch the lock lever once the print head has been installed Installing the Ink Tanks For safety reasons store ink tanks out of the reach of...

Страница 10: ...o place 5 Use the same procedure to install the other ink tanks in their appropriate slots Check the labels to ensure that each tank is in the correct position Notes Only install the ink tanks in the...

Страница 11: ...right side of the sheet feeder You can load up to 100 sheets of plain paper Do not exceed this limit After printing do not stack more than 50 sheets in the paper output tray 4 Press the paper guide a...

Страница 12: ...n installing the printer driver in Windows XP or Windows 2000 log on to the system as a member of the Administrators group If the following screen appears automatically click Cancel and follow steps 1...

Страница 13: ...anguage selection screen appears select a language then click the Next button 4 Follow the instructions displayed on the screen When the screen shown on the left is displayed click Install 5 When the...

Страница 14: ...ck Exit Notes To view the User s Guide please refer to page 58 If a message prompting you to restart the computer appears click Yes Installing the Printer Driver Macintosh Notes Do not remove or inser...

Страница 15: ...Read the Licence Agreement and click Accept to continue 6 Click Install Wait for the installation to finish Note If the above message appears check that there are no unsaved documents then click the...

Страница 16: ...9 Double click the BJ Installer 10Click 11Read the Software License Agreement and if you agree click Agree and then click 12Click Install Installation is started and when completed a message for succe...

Страница 17: ...pple Menu 14Click the icon for the printer you are using and close Chooser Before you use the printer you must carry out print head alignment on page 18 Note Refer to the User s Guide when using this...

Страница 18: ...ng Preferences to open the setting screen 4 Click OK 5 Click the Maintenance tab and click the Print Head Alignment icon 6 Check that paper is loaded in the printer and click OK If a message warning y...

Страница 19: ...atterns printed with the least irregularities from each of Columns B to F enter their numbers and click OK 10 Click OK This completes the printer setup The printer is now ready to use Note Before turn...

Страница 20: ...n 4 Check that paper is loaded in the printer and click OK If the pattern is not printed successfully open the front cover and ensure that the ink tanks are correctly installed 5 Look at the print out...

Страница 21: ...ne select the most even patterns printed with the least irregularities from each of Columns B to F enter their numbers and click Send 7 Click Close 8 Click OK This completes the printer setup The prin...

Страница 22: ...on to display the pattern number 7 to 3 of column A where the check mark was placed in step 4 When you press the right button the number increases when you press the left button the number decreases A...

Страница 23: ...cel button and start over from step 1 7 Repeat steps 5 and 6 and set the pattern numbers for columns B to F When you finish pattern number settings for up to column F the icon appears 8 Press the Prin...

Страница 24: ...ic Operations If you detect smoke unusual smells or strange noises around the printer immediately switch the printer off and always unplug the printer Contact your local Canon service representative T...

Страница 25: ...b This may not appear when using Windows XP or Windows 2000 If this happens in Windows XP click Start then select All Programs Canon S830D Guide In Windows 2000 click Start then select Programs Canon...

Страница 26: ...box in your application to print the document On the File menu click Print Check the application s user s manual for the actual procedures 4 Specify the print settings according to your requirements F...

Страница 27: ...e printer 2 Print Mode Select the closest type of document you want to print To specify more detailed settings for the print quality or colour select Manual and click Details 3 Print Click this to sta...

Страница 28: ...one sheet Quality Specify the print quality Print Date Specify whether the date when the photograph was taken is to be printed Optimize Image Specify whether the photograph is to be adjusted before pr...

Страница 29: ...tems To move the cursor press the up and down buttons Changing a Setting To change the photograph number or a setting press the left and right buttons The right button increases the photograph number...

Страница 30: ...que format Photographs that have been edited with the computer may not print properly Use a PC card adapter that is recommended by the memory card you use Note For information on memory cards and PC c...

Страница 31: ...d in formats that are not supported by this printer an E error appears with First Order or Last Such images are not printed Ejecting the Memory Card Note The operation procedure is different if you ar...

Страница 32: ...in Use the Power button on the printer to turn the printer on off If the printer is not connected to a computer print head cleaning begins automatically when the power plug is unplugged and then rein...

Страница 33: ...nect the digital camera to the printer Use either of the cables that come with the printer For the type of connection cables that match up correctly with your camera read the instructions that come wi...

Страница 34: ...28 The first data that was saved to the memory card is displayed on the viewer Note When Digital Print Order Format DPOF is set the photographs are displayed in the chronological order they were shot...

Страница 35: ...t buttons You can adjust the brightness within the following setting range by operating the buttons The base setting is 0 As the number increases in the negative direction the brightness becomes darke...

Страница 36: ...Image 6 Adjust the contrast by using the left and right buttons You can adjust the contrast within the following setting range by operating the buttons The base setting is 0 As the number increases i...

Страница 37: ...vidually DPOF Printing see page 42 Prints according to the camera settings 2 Printing Photographs This section explains how to print photographs without using a computer Print Flow Print photographs a...

Страница 38: ...ng the Print Layout see page 45 Setting the Print Quality see page 46 Printing the Date see page 46 Correcting Photographs see page 47 Operating the Cursor Buttons see page 27 4 Printing Load paper in...

Страница 39: ...details on the paper types that can be used see Setting the Media Type on page 44 Printing a Photograph List Index Printing This mode allows you to print a list of the photographs and photograph numbe...

Страница 40: ...t number the photographs will be printed in reverse order starting from the photograph with the largest photograph number Note Specifying the range and print the photographs You can print only the spe...

Страница 41: ...Setting the Media Type on page 44 4 Press the Print button Printing starts Printing a Sequential Range of Photographs All Frames Printing This mode allows you to print all photographs found on the mem...

Страница 42: ...will need the number of sheets displayed in Required Sheets Note For instructions on loading paper see Loading Paper on page 9 or the User s Guide For details on the paper types that can be used see S...

Страница 43: ...icates the second frame Printing Selected Photographs in Batch Printing Specified Frame Printing This mode allows you to specify photographs to be printed and print the photographs in batch printing U...

Страница 44: ...ings DPOF Printing If Digital Print Order Format DPOF settings are specified in the digital camera the printing begins automatically according to the specified settings Notes This printer supports the...

Страница 45: ...nd Layout See Print Applications on page 44 Note Specify the number of copies and date printing from the digital camera 3 Load paper into the printer You will need the number of sheets displayed in Re...

Страница 46: ...ies from the digital camera Copies allows you to specify the number of copies for one photograph The number of required sheets differs depending on the setting in Layout For example if eight copies in...

Страница 47: ...heet of paper Notes In Index mode Layout cannot be set In Single Frame mode the same photograph is printed in a line for the designated number in the specified layout In All Frames Specified Frame and...

Страница 48: ...e and the print mode 1 Set the print mode See Printing Photographs on page 35 2 Move the cursor to Quality by pressing the top and bottom buttons 3 Select the quality by pressing the left and right bu...

Страница 49: ...rinting photographs that fogged because of fluorescent lighting effects or photographs that do not have proper exposure Notes When image correction is performed printing may take a long time The actua...

Страница 50: ...ed To use only the correction function for reproducing vivid colours VIVID Photo function 3 Press the right button twice The display changes to VP ON and only the VIVID Photo function becomes enabled...

Страница 51: ...n though you increase the print quality setting in the printer driver and carry out all operations up to Step 3 the print head may be damaged Contact the store where you bought the printer or a repair...

Страница 52: ...Head on page 51 If the vertical lines in pattern 2 stand out the print head position must be adjusted See Adjusting the Print Head on page 20 Printing the Nozzle Check Pattern Print the nozzle check...

Страница 53: ...no improvement repeat print head cleaning up to three times 7 If there is still no improvement perform print head deep cleaning See Deep cleaning the Print Head on page 52 Cleaning the Print Head Clea...

Страница 54: ...ance button The icon appears in Required Sheets 2 Press the right button three times The icon appears 3 Press the Print button Print head deep cleaning starts When deep cleaning is completed the is di...

Страница 55: ...ess lever is not correct Corrective action Printing will start when you set the paper thickness lever to the correct position Press the Print button to start printing with paper thickness lever positi...

Страница 56: ...If a sheet is jammed remove the jammed sheet see page 2 load paper correctly and then press the Reset button on the printer Error number 401 Cause Front cover is open Corrective action Close the front...

Страница 57: ...d is already set eject the card set it again and check that the indicator lamp goes on and the memory card mark appears The indicator lamp goes on and memory card mark appears on the panel when a PC c...

Страница 58: ...he Maintenance tab Click the Cleaning icon See page 16 for details on how to open the setting screen Macintosh Open the Page Setup dialog box and click the Utilities button Click the Cleaning icon Whe...

Страница 59: ...may be a problem with the USB driver installation Try reinstalling the printer driver Reinstalling If you cannot proceed beyond the Printer Port screen 1 Click Cancel 2 When the Abort Installation scr...

Страница 60: ...uter 2 Click Document at the bottom left of the screen 3 Click View Documentation If Acrobat Reader is not installed or Acrobat Reader 4 0 is installed a message appears Click Yes Follow the instructi...

Страница 61: ...Fast Draft 4 ppm Standard 2 4 ppm Photo printing PR 101 A4 High Fine 0 47 ppm Print direction Bi directional Print width 203 2 mm 8 0 in max for borderless printing 216 0 mm 8 5 in Resident print cont...

Страница 62: ...per Glossy Photo Paper High Gloss Photo Film Glossy Photo Cards Photo Paper Pro Photo Paper Plus Glossy Matte Photo Paper Transparencies T shirt Transfers Banner Paper Sheet feeder capacity Plain Pape...

Страница 63: ...llow 256 nozzles 1200 dpi Ink Tanks Capacity page Black BCI 6BK approx 620 1 approx 1150 2 Cyan BCI 6C approx 980 2 Magenta BCI 6M approx 740 2 Yellow BCI 6Y approx 480 2 Photo Cyan BCI 6PC Photo appr...

Страница 64: ...rom computer and operation panel 2 4 8 16 patterns in one sheet index Photo Paper Plus Glossy PR 101 Borderless printing from computer and operation panel 2 4 8 16 patterns in one sheet index Matte Ph...

Страница 65: ...nction Photo Optimizer PRO VIVID Photo DPOF function Ver 1 00 compliant Print index prints Set the number of copies Select images for print Include the date on the print Include the file number on the...

Страница 66: ...64...

Страница 67: ......

Страница 68: ...QA7 2140 V01 12345678 CANON INC 2002 PRINTED IN THAILAND...

Отзывы: