background image

4


Safety Precaution

WARNING:  


THIS APPARATUS MUST BE EARTHED .


TO REDUCE THE RISK OF FIRE OR 

ELECTRIC SHOCK, DO NOT EXPOSE THIS 
APPLIANCE TO RAIN OR MOISTURE .

–  This  projector  produces  intense  light  from  the  projection 

lens.  Do  not  stare  directly  into  the  lens,  otherwise  eye 
damage could result. Be especially careful that children do 
not stare directly into the beam.

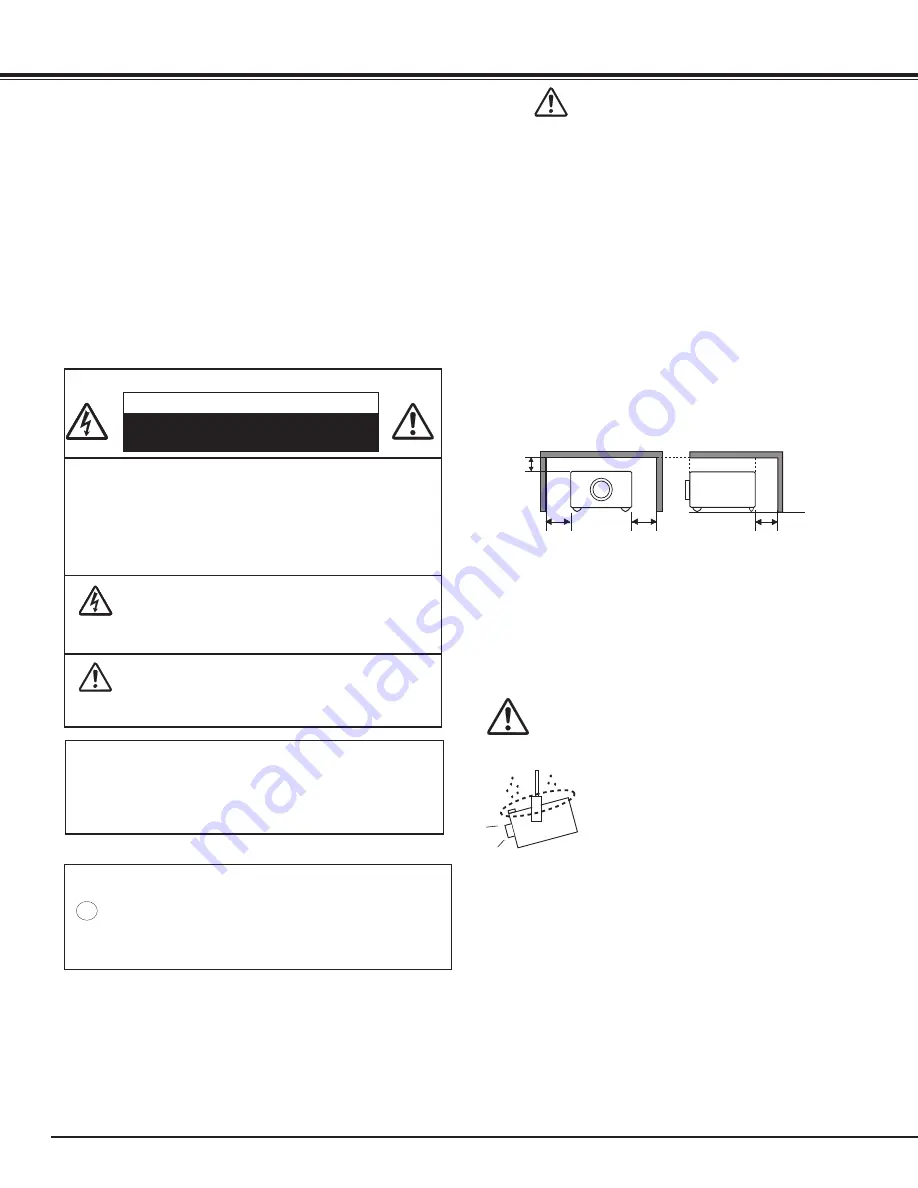
–  Install the projector in a proper position. Otherwise it may 

result in a fire hazard.

–  Allowing  the  proper  amount  of  space  on  the  top,  sides, 

and  rear  of  the  projector  cabinet  is  critical  for  proper  air 
circulation  and  cooling  of  the  unit. The  diagrams  shown 
here indicates the minimum space required. If the projector 
is  to  be  built  into  a  compartment  or  similarly  enclosed, 
these minimum distances  must be maintained.

1.5' (50 cm)

1.5' (50 cm)

1.5' (50 cm)

3' (1 m)

SIDE and TOP

REAR

–  Do  not  cover  the  ventilation  slots  on  the  projector.  Heat 

build-up  can  reduce  the  service  life  of  your  projector,  and 
can also be dangerous.

–  If the projector is unused for an extended time, unplug the 

projector from the power outlet.

–  Do  not  project  the  same  image  for  a  long  time. 

The  afterimage  may  remain  on  the  LCD  panels  by  the 
characteristic of panel.


CAUTION ON HANGING FROM THE CEILING

When  hanging  the  projector  from  the 
ceiling,  clean  the  air  intake  vents  and  top 
of the projector periodically with a vacuum 
cleaner.  If  you  leave  the  projector  unclean 
for  a  long  time,  the  cooling  fans  can  be 
clogged  with  dust,  and  it  may  cause  a 
breakdown or a disaster.

DO  NOT  SET  THE  PROjECTOR  IN  GREASy,  WET, 
OR  SMOKy  CONDITIONS  SUCH  AS  IN  A  KITCHEN 
TO  PREVENT  A  BREAKDOWN  OR  A  DISASTER .  IF 
THE  PROjECTOR  COMES  IN  CONTACT WITH  OIL  OR 
CHEMICALS, IT MAy BECOME DETERIORATED .

To The Owner

CAUTION:TO REDUCE THE RISK OF ELECTRIC 

SHOCK, DO NOT REMOVE COVER 

(OR BACK) . NO USER-SERVICEABLE 

PARTS INSIDE EXCEPT LAMP 

REPLACEMENT .  REFER SERVICING TO 

QUALIFIED SERVICE PERSONNEL .

THIS SYMBOL INDICATES THAT DANGEROUS 

VOLTAGE CONSTITUTING A RISK OF 

ELECTRIC SHOCK IS PRESENT WITHIN THIS 

UNIT.

THIS SYMBOL INDICATES THAT THERE 

ARE IMPORTANT OPERATING AND 

MAINTENANCE INSTRUCTIONS IN THE 

USER’S MANUAL WITH THIS UNIT.

CAUTION

RISK OF ELECTRIC SHOCK

DO NOT OPEN

Before installing and operating the projector, read this 

manual thoroughly.

The projector provides many convenient features and 

functions. Operating the projector properly enables 

you to manage those features and maintains it in good 

condition for many years to come.

Improper operation may result in not only shortening the 

product life, but also malfunctions, fire hazard, or other 

accidents.

If your projector seems to operate improperly, read this 

manual again, check operations and cable connections 

and try the solutions in the “Troubleshooting” section 

in the back of this manual. If the problem still persists, 

contact the dealer where you purchased the projector or 

the service center.

READ AND KEEP THIS USER’S MANUAL FOR LATER USE .

CAUTION

Not for use in a computer room as defined in the 

Standard for the Protection of Electronic Computer/

Data Processing Equipment, ANSI/NFPA 75.

NOTE FOR CUSTOMERS IN THE US

Hg  LAMP(S)  INSIDE THIS  PRODUCT  CONTAIN  MERCURY 
AND MUST BE RECYCLED OR DISPOSED OF ACCORDING TO 
LOCAL, STATE OR FEDERAL LAWS.

Содержание REALIS LV-7590

Страница 1: ...MULTIMEDIA PROJECTOR User s Manual Projection lens not included ...

Страница 2: ...h the Key lock function you can lock the operation on the side control or remote control unit p 59 PIN code lock functions prevents unauthorized use of the projector pp 59 60 Automatic Filter Replacement Function The projector monitors the condition of the filter and replaces a filter automatically when it detects the clogging Powered Lens Shift Projection lens can be moved up down right and left ...

Страница 3: ... Control Unit 34 Pointer Function 36 Wireless Mouse Operation 36 Input Selection 37 Input 37 Computer Input Source Selection 38 Video Input Source Selection 39 Computer Input 40 Computer System Selection 40 Auto PC Adjustment 41 Manual PC Adjustment 42 Image Level Selection 44 Screen Size Adjustment 45 Video Input 47 Video System Selection 47 Image Level Selection 48 Screen Size Adjustment 49 Pict...

Страница 4: ... set the projector in greasy wet or smoky conditions such as IN a kitchen to prevent A Breakdown or a disaster If the projector comes in contact with oil or chemicals it may become deteriorated ToThe Owner CAUTION TO REDUCETHE RISK OF ELECTRIC SHOCK DO NOT REMOVE COVER OR BACK NO USER SERVICEABLE PARTS INSIDE EXCEPT LAMP REPLACEMENT REFER SERVICINGTO QUALIFIED SERVICE PERSONNEL THIS SYMBOL INDICAT...

Страница 5: ...through cabinet slots as they may touch dangerous voltage points or short out parts that could result in a fire or electric shock Never spill liquid of any kind on the projector Do not install the projector near the ventilation duct of air conditioning equipment This projector should be operated only from the type of power source indicated on the marking label If you are not sure of the type of po...

Страница 6: ...electrical contacts of the power plug or connector WARNING WARNING WARNING Follow the instructions below to install or handle the projector Otherwise a fire an electric shock or injury may result Do not touch the projector power cord or cables when lighting begins Do not use the projector in a bathroom or shower room Do not expose the projector to rain snow or use near water Do not insert metal ob...

Страница 7: ... room If you inhale the gas or the gas gets into your eyes or mouth see a doctor at once Dispose of a lamp containing mercury in the same manner as fluorescent lamps according to local regulations This projector is a precision machine Do not subject the projector to strong shocks or vibrations or knock it down Remove the lens close the lens mounting hole with the front cover and retract the adjust...

Страница 8: ...he filter is located in the intake vents to prevent dust from getting inside of the projector In order to care for the projector appropriately regular cleaning is required Remove any dirt or dust that has accumulated on the projector If the projector reaches a time set in the timer setting a Filter replacement icon Fig 1 appears on the screen and WARNING FILTER indicator on the top panel lights up...

Страница 9: ...degrees from side to side Do not put the projector on either side to project an image 10 10 10 10 10 10 In upward projection do not tilt the projector over 10 degrees right and left In downward projection do not tilt the projector over 10 degrees right and left For ceiling mounting you need the ceiling mount kit designed for this projector When not mounted properly the projector may fall causing h...

Страница 10: ...ier or any other transport service consult your dealer Do not put the projector in a case before it is cooled enough Remove the lens close the lens mounting hole with the lens mounting cover and retract the adjustable feet before placing the projector into the carrying case Cautions in Handling the Projector Do not hold the lens or the top cover when lifting or moving the projector Doing so may ca...

Страница 11: ...different from that to which the receiver is connected Consult the dealer or an experienced radio TV technician for help Use of shielded cable is required to comply with class B limits in Subpart B of Part 15 of FCC Rules Do not make any changes or modifications to the equipment unless otherwise specified in the instructions If such changes or modifications should be made you could be required to ...

Страница 12: ...xhausted from the exhaust vent Do not put heat sensitive objects near this side 2 Terminals and Connectors 3 Power Cord Connector Note Replce only with the same types of the supplied cords or cables Using improper cords or cables may cause an electric shock or a fire AC Power cord 1AV4W11B20500 for US 1AV4W11B17000 for EU VGA Cable 1AV4W20B29700 USB Cable 1AV4W20B20201 4 Optional Parts Attachment ...

Страница 13: ...ct the computer to this connector with a control cable p 24 q INPUT 1 TERMINAL DIGITAL Connect the computer output digital signal to this terminal The HDTV HDCP compatible signal can also be connected pp 24 25 w INPUT 1 TERMINAL ANALOG Connect the computer or RGB scart output signal to this terminal pp 24 25 e INPUT 2 TERMINAL Connect the component or composite video output signal from video equip...

Страница 14: ...UT TERMINAL This terminal can be used to output the incoming analog RGB signal from INPUT 1 3 terminal to the other monitor pp 24 25 B A B Kensington Security Slot This slot is for a Kensington lock used to deter theft of the projector Kensington is a registered trademark of ACCO Brands Corporation A Infrared Remote Receiver Back The infrared remote receiver is also located in the front pp 12 18 ...

Страница 15: ...ed item p 30 Zoom in or out the image in the Digital zoom mode p 46 o LAMP SHUTTER indicator Light red during operations Light blue when the shutter is closed p 77 0 LAMP REPLACE indicator Light orange when the projection lamp reaches its end of life pp 66 78 1 WARNING FILTER indicator Blink slow when the filter is being scrolled pp 63 77 Blink fast when the filter scroll is not working properly o...

Страница 16: ...ns Do not bend drop or expose the remote control unit to moisture or heat For cleaning use a soft dry cloth Do not apply benzene thinner spray or any other chemical materials e w Wired Remote jack Connect the remote control unit cable not supplied to this jack when using as a wired remote control unit 1 OK button Execute the selected item p 30 Zoom in or out the image in the Digital zoom mode p 46...

Страница 17: ...when it is not in use Slide this switch to RESET to initialize the remote control unit code 5 R CLICK button Act as the right mouse button for wireless mouse operation p 36 2 LENS SHIFT button Select the Lens Shift function p 34 4 P TIMER button Operate the P timer function p 35 6 7 Number buttons Act as number buttons Use these buttons when setting the remote control unit codes pp 19 57 or when e...

Страница 18: ...replaced by an incorrect type Dispose of used batteries according to the instructions or your local disposal rules or guidelines Point the remote control unit toward the projector to Infrared Remote Receivers when pressing the buttons Maximum operating range for the remote control unit is about 16 4 5 m and 60 degrees in front and rear of the projector Infrared Remote Receivers are provided both i...

Страница 19: ... for the remote control unit See Remote control in the Setting Menu on page 57 Press and hold the MENU and a number button 1 8 for more than 5 seconds to switch between the codes 1 To initialize the remote control code slide the RESET ON ALL OFF switch to RESET and then to ON The initial code is set to Code 1 2 MENU button Remote Control Unit Code Number buttons RESET ON ALL OFF Switch Press and h...

Страница 20: ...ector to the proper height to raise the projector rotate the both feet clockwise To lower the projector or to retract the adjustable feet rotate the both feet counterclockwise To correct keystone distortion press the KEYSTONE button on the remote control unit or select Keystone from the menu see pages 17 35 46 50 Adjustable Feet Installation ...

Страница 21: ...hile pressing the top cover release button on the top cover slide the top cover toward front to remove it Turn off the projector and unplug the AC power cord 5 Hold the mounted lens with one hand and pull the lens lock lever upwarad with the other hand Remove the lens from the projector as shown in the figure below Follow this procedure for replacing the lens Do not touch the glass part of the len...

Страница 22: ...s attachment to detach it follow this procedure for replacing the lens remove the safety lens caps on the optional or standard lens attach the Lens Attachment supplied with the projector to the back end of the lens by using the removed screws or supplied screws and then reconnect the Lens Motor Lead connector to the socket follow this procedure for replacing with the Powered lens If you install th...

Страница 23: ...r mechanical parts 3 Check no part is missing and no mounting part is loose When the lens is attached to the projector and images are being projected onto the screen the peripheral focus may be out of focus in some localized areas If this happens insert the one of three sizes of spacers in between the Lens Attachment and the lens to adjust the focus Inserting the Spacer corrects the distance on th...

Страница 24: ...rnal equipment from the AC outlet before connecting cables Cables used for connection Cables not supplied with this projector VGA Cable One cable is supplied DVI Digital Cable BNC Cable Serial Cross Cable USB Cable Monitor Output INPUT 1 DIGITAL INPUT 1 ANALOG MONITOR OUT USB Serial Cross cable Serial out CONTROL PORT Installation See the next page for the signals that can output to the MONITOR OU...

Страница 25: ...al Cable Component Video Output Composite Video Component Video Output Y Pb Cb Cr Pr Digital Output HDCP compatible RCA cable DVI Digital cable INPUT 3 VIDEO Video INPUT 2 Y Pb Cb Pr Cr INPUT 1 DIGITAL MONITOR OUT INPUT 3 S VIDEO Installation InputTerminal Monitor Out Input 1 D sub15 RGB PC analog YES RGB SCART NO DVI D RGB PC digital NO RGB AV HDCP NO Input 2 5BNC RGB YES Video YES Y Cb Cr YES In...

Страница 26: ... equipment from the AC outlet before connecting cables Cables used for connection Cables not supplied with this projector Audio Output Installation Audio cable stereo R L AUDIO IN I II External Audio Equipment Audio cable stereo Audio Input AUDIO OUT stereo Audio Cable Note See the Sound menu to set the Input pattern for AUDIO IN I II p 33 ...

Страница 27: ...t meet the requirements of the country where you use the projector Confirm the AC plug type with the chart below and proper AC power cord must be used If the supplied AC power cord does not match your AC outlet contact your sales dealer Projector side AC Outlet side To POWER CORD CONNECTOR on your projector Ground To the AC Outlet 120 V AC For Continental Europe For the U S A and Canada For the U ...

Страница 28: ... filter cartridge the projector will be automatically shut down in 3 minutes after turning on to protect the projector pp 63 65 79 Use the Point ed buttons on the side control or Number buttons on the remote control unit to enter a number When using side control Use the Point ed buttons on the side control to select a number Press the Point 8 button to fix the number and move the red frame pointer...

Страница 29: ...own enough the POWER indicator lights green and then you can turn on the projector To unplug the AC power cord wait until the projector is completely cooled down Power off disappears after 4 seconds Note When the On start function is set to On the projector will be turned on automatically by connecting the AC power cord to an AC outlet p 58 The running speed of cooling fans is changed according to...

Страница 30: ... buttons to adjust the values To close the On Screen Menu press the MENU button again Press the MENU button on the side control or the remote control unit to display the On Screen Menu Note The selected item is not active until the OK button is pressed 1 2 3 Remote Control Unit POINT buttons OK button MENU button Basic Operation Pointer red frame Pointer red frame Press the Point ed buttons to mov...

Страница 31: ...nd Menu Display the input source information p 34 Used to set the projector s operating configurations pp 54 62 o Setting Menu 0 Information Menu q w o i u y t r e Show the selected Menu of the On Screen Menu Used to select the system of selected video source p 47 Used to select an image level among Standard Cinema and Custom 1 10 p 48 Used to adjust the size of the image Normal Wide Custom Keysto...

Страница 32: ...t the image Zoom Adjustment Display FOCUS on the screen Use the Point ed buttons to adjust focus of the image Focus Adjustment Side Control Lens Operation ZOOM FOCUS POINT buttons ZOOM FOCUS Lens shift Basic Operation Shutter Function Shutter function allows you to completely block out light to the screen Press the SHUTTER button to close the shutter inside the projector To open up the shutter pre...

Страница 33: ...level of the volume Press the MUTE button to set the Mute function On or Off The dialog box disappears after 4 seconds Sound Menu Sound Menu icon Volume Remote Control Unit VOL button VOL button MUTE button Volume Audio output Mute Audio output Press the Point 8 button to turn up the volume press the Point 7 button to turn down the volume Mute Direct Operation Menu Operation Sound Adjustment Side ...

Страница 34: ...information window on the screen To hide the information window press the INFO button again or Point 7 8 buttons The information window can also be selected from the menu INFO button Press the AUTO PC button on the remote control unit to operate the Auto PC Adj function The computer screen adjustment can be done easily by pressing this button See page 41 for details AUTO PC button Press the D ZOOM...

Страница 35: ...ption of other buttons MOUSE POINTER button Press the KEYSTONE button on the remote control unit The Keystone appears on the screen Use the Point ed7 8 buttons to correct keystone distortion The keystone adjustment can be stored pp 46 50 Basic Operation Note When the filter is replaced the total accumulated time of the filter use is automatically set to 0 KEYSTONE button FREEZE button P TIMER butt...

Страница 36: ... a wireless mouse for your computer Move the pointer on the screen with this button MOUSE POINTER button R CLICK button L CLICK button Acts as right click mouse button while the projector and a computer are connected with a USB cable Acts as left click mouse button while the projector and a computer are connected with a USB cable Before operating the wireless mouse connect your computer and the pr...

Страница 37: ...utton Input 1 Input 2 Input 3 Side Control Remote control unit button operation Input Selection Press the INPUT 1 INPUT 2 or INPUT 3 buttons on the remote control unit The input source appears on the screen as you press each button Select the connected input source INPUT buttons INPUT 1 button Input 1 RGB PC analog RGB Scart RGB PC digital RGB AV HDCP INPUT 2 button Input 2 Video Y Pb Cb Pr Cr RGB...

Страница 38: ...PUT 1 button on the remote control unit is pressed HDCP High bandwidth Digital Content Protection is a system for protecting digital entertainment content which is delivered by DVI Digital Visual Interface from being copied The specification of HDCP is decided and controlled by Digital Content Protection LLC Should the specification be changed this projector may not display the digital content pro...

Страница 39: ... the OK button Input 2 Move the pointer red arrow to Video or Y Pb Cb Pr Cr and press the OK button Source Select Menu INPUT MENU Input Menu icon Move the pointer red arrow to Input 3 and press the OK button Input 3 Move the pointer red arrow to the desired source and press the OK button Source Select Menu Video Input Source Selection Input Selection WHEN SELECTING INPUT 1 COMPUTER INPUTTERMINALS ...

Страница 40: ...computer Check the connection between your computer and the projector See Troubleshooting on page 71 Auto PC System Menu icon Selected system is displayed PC SYSTEM MENU Selecting Computer System Manually Press the MENU button to display the On Screen Menu Use the Point 7 8 buttons to move the red frame pointer to the PC System Menu icon Use the Point ed buttons to move the red arrow pointer to th...

Страница 41: ...ENT on pages 42 43 Note Fine sync Total dots Horizontal and Vertical position of certain computers cannot be fully adjusted with the Auto PC Adjustment function When the image is not provided properly with this operation manual adjustments are required pp 42 43 Auto PC Adjustment cannot be operated in Digital Signal Input on the DVI terminal and 480p 575p 480i 575i 720p 1035i or 1080i is selected ...

Страница 42: ...Fine sync Use the Point 7 8 buttons to adjust the number of total dots in one horizontal period to match your PC image Total dots Use the Point 7 8 buttons to adjust the horizontal picture position Position H Use the Point 7 8 buttons to adjust the vertical picture position Position V Press the OK button to show H sync freq and V sync freq of the connected computer Current mode Use the Point 7 8 b...

Страница 43: ...eturn to their previous figures To store the adjusted data To clear the adjusted data To clear the adjusted data select Mode free and then press the OK button Move the red arrow pointer to the Mode that you want to clear and then press the OK button Reset Mode free Store Quit This Mode has stored parameters Vacant Values of Total dots Position H Position V Display area H and Display area V Close t...

Страница 44: ...er to the desired image level and then press the OK button IMAGE SELECT MENU Normal picture level preset on the projector Standard Picture level with improved halftone for graphics High contrast User preset picture adjustment in the Image Adjust Menu p 53 Custom 1 10 Image Level Selection Menu Operation Image Select Menu icon Move the red frame pointer to the desired level and press the OK button ...

Страница 45: ...Scale H then the screen scale is automatically modified based on the aspect ratio Position H V Adjust the Horizontal Vertical screen position Common Save the adjusted scale to all the inputs Press the OK button at Common to display a confirmation box To save the scale press the OK button at Yes When Custom is selected the saved scale is used Reset Reset the all adjusted values Press the OK button ...

Страница 46: ...ection when the AC power cord is unplugged To correct keystone distortion press the OK button The Keystone dialog box appears Use the Point ed7 8 buttons to correct keystone distortion p 35 Ceiling Rear Ceiling When this function is set to On the picture is top bottom and left right reversed This function is used to project the image from a ceiling mounted projector Rear When this function is set ...

Страница 47: ... adjusts itself to optimize its performance When the Video System is 1035i or 1080i select the system manually If the projector cannot reproduce proper video image select a specific component video signal format from among 480i 575i 480p 575p 720p 1035i and 1080i Auto COMPONENT VIDEO SIGNAL FORMAT INPUT 3TERMINAL VIDEO or INPUT 3TERMINAL S VIDEO INPUT 2TERMINAL The projector automatically detects ...

Страница 48: ...inter to the desired image level and then press the OK button IMAGE SELECT MENU Image Level Selection Move the red frame pointer to the desired level and press the OK button Image Select Menu icon Normal picture level preset on the projector Standard Picture level adjusted with fine tone Cinema User preset picture adjustment in the Image Adjust Menu p 53 Custom 1 10 Menu Operation Video Input ...

Страница 49: ...omatically modified based on the aspect ratio Position H V Adjust the Horizontal Vertical screen position Common Save the adjusted scale to all the inputs Press the OK button at Common to display a confirmation box To save the scale press the OK button at Yes When Custom is selected the saved scale is used Reset Reset the all adjusted values Press the OK button at Reset to display a confirmation b...

Страница 50: ...one distortion p 35 Ceiling Rear Ceiling When this function is set to On the picture is top bottom and left right reversed This function is used to project the image from a ceiling mounted projector Rear When this function is set to On the picture is left right reversed This function is used to project the image from the rear of the screen Reset This function returns all adjusted values to the fac...

Страница 51: ...en and replace these colors with other colors if required You can store up to eight 8 color management data 1 Use the Point ed buttons to move the red frame pointer to Color Management and then press the OK button The projected image freezes and the COLOR MANAGEMENT POINTER appears Use the Point ed7 8 buttons to move the pointer to the spot where you want to adjust the color and then press the OK ...

Страница 52: ...and a confirmation box appears and then select Yes Delete all the data in the list Press the OK button and a confirmation box appears and then select Yes The same function as stated above Level and phase adjustment palette Gamma adjustment palette Color temp Use the Point 7 8 buttons to select the desired Color temp level High Mid Low or XLow COLOR M MENU COLOR PALETTE DEL ALL DEL COLOR M LIST COL...

Страница 53: ...n Blue Press the Point 7 button to lighten red green blue tone of the black level of an image press the Point 8 button to deepen red green blue tone of the black level of an image from 0 to 63 Offset Red Green Blue Exit the Image Adjust Menu To store the adjusted data move the red frame pointer to the Store icon and press the OK button The Image Level Menu appears Move the red arrow pointer to any...

Страница 54: ...ws appear Use the Point ed7 8 buttons to adjust the position After making the adjustment press the OK button to return to the Menu screen Position This function allows you to adjust the position of the On Screen Display and the value adjustment bar in the Picture Image Adjustment Menu Display This function decides whether to display On Screen Displays On Shows all the On Screen Displays Use this f...

Страница 55: ...ing up display from among the following options User Show the image you captured Default Show the factory set logo Off Show the countdown display only Capture Select Yes to stop capturing Logo select Logo Note When On is selected in the Logo PIN code lock function Logo select and Capture functions cannot be selected This function enables you to capture an image being projected to use it for a star...

Страница 56: ...be changed Change the Logo PIN code Use the Point ed buttons on the side control or Number buttons on the remote control unit to enter a number When using side control Use the Point ed buttons on the side control to select a number Press the Point 8 button to fix the number and move the red frame pointer to the next box The number changes to Repeat this step to complete entering a four digit numbe...

Страница 57: ... factory set initial code Code 1 and the other seven codes Code 2 to Code 8 After selecting the RC code move the red arrow pointer to the Quit icon and press the OK button to set the RC code The same code should set on both the projector and the remote control unit For example operating the projector in Code 7 the remote control unit code also must be switched to Code 7 To change the code for the ...

Страница 58: ...ion the projection lamp is turned on if the input signal is reconnected or any button on the side control or remote control unit is pressed Shutdown When the lamp has been fully cooled down the power is turned off Off Power Management function is off Power management Pointer You can emphasize a part of the projected image with this function Use the Point 7 8 buttons to select a pattern of the Poin...

Страница 59: ...by unauthorized persons and provides the following setting options for security Off Unlocked On1 Enter the PIN code every time turning on the projector On2 Enter the PIN code to operate the projector once the power cord is disconnected as long as the AC power cord is connected the projector can be operated without a PIN code Whenever you change the PIN code lock setting or the PIN code the four di...

Страница 60: ... change the PIN code lock setting When using remote control unit Press the Number buttons on the remote control unit to enter a number p 17 When you complete entering a four digit number the pointer moves to Set Press the OK button so that you can change the PIN code lock setting If you fixed an incorrect number use the Point 7 button to move the pointer to the number you want to correct and then ...

Страница 61: ...bits the shutter operation from the remote control unit Projector Selecting On prohibits the shutter operation from the side control unit It is possible to prohibit the shutter operation from both of the remote control and the side control Protection Management The Shutter Management function turns off the projection lamp when the projector is left with the shutter closed and the set time has pass...

Страница 62: ...700H 1000H depending on the use environment Setting This function is used to set a frequency for the filter replacement Use the Point ed buttons to move the red frame pointer to Filter counter and then press the OK button A dialog box appears showing the Used time option and the Scrolls remaining option Used Time Show the total accumulated time of the filter use timer setting option and the Reset ...

Страница 63: ...NG FILTER indicator blinks fast when the projector detects an abnormal condition the filter cartridge is not installed properly or the filter scroll is not working properly p 79 Fig 1 Filter replacement icon Fig 4 Filter cartridge replacement icon Fig 3 Last scroll icon Maintenance and Care Note Fig 1 Fig 2 Fig 3 Fig 4 and Fig 5 will not appear when the Display function is set to Off p 54 or durin...

Страница 64: ...ilter counter and the scroll counter p 65 6 Filter cover Replacing the Filter Cartridge Pull out the filter cartridge When taking out the filter cartridge put your finger on the filter cartridge s tab and then pull Latch Filter cartridge Tab RECOMMENDATION We recommend avoiding dusty smoky environments when operating the projector Usage in these environments may cause a poor image quality When usi...

Страница 65: ...reen Menu Use the Point 7 8 buttons to move the red frame pointer to the Setting Menu icon Use the Point ed buttons to move the red frame pointer to Filter counter and then press the OK button A dialog box appears showing the Used time option and the Scrolls remaining option Use the Point ed buttons to select Used time 1 2 Resetting the Filter Counter Filter counter Select Reset and the Filter cou...

Страница 66: ...mp of the same type Do not drop the lamp or touch the glass bulb The glass can shatter and may cause injury Allow a projector to cool for at least one hour before you open the lamp cover The inside of the projector can become very hot CAUTION CAUTION When the projection lamp of the projector reaches its end of life the Lamp replacement icon appears on the screen and LAMP REPLACE indicator lights o...

Страница 67: ...after replacing the lamp Press the MENU button to display the On Screen Menu Use the Point 7 8 buttons to move the red frame pointer to the Setting Menu icon Use the Point ed buttons to move the red frame pointer to Lamp counter and then press the OK button A dialog box appears showing the total accumulated time of the lamp usage and the reset option Select Reset and the Lamp replacement counter R...

Страница 68: ...radation as a result of hours of use as its lifetime draws to an end Risk of explosion may differ according to the environment or conditions in which the projector and lamp are being used IF A LAMP EXPLODES THE FOLLOWING SAFETY PRECAUTIONS SHOULD BETAKEN If a lamp explodes disconnect the projector s AC plug from the AC outlet immediately Contact an authorized service station for a checkup of the u...

Страница 69: ...e of the lens Cleaning the Projector Cabinet Unplug the AC power cord before cleaning Gently wipe the projector body with a soft dry cleaning cloth When the cabinet is heavily soiled use a small amount of mild detergent and finish with a soft dry cleaning cloth Avoid using an excessive amount of cleaner Abrasive cleaners solvents or other harsh chemicals might scratch the surface of the cabinet Wh...

Страница 70: ...ctor to be ventilated Check the installing condition to see if the air vents of the projector are not blocked Has the projector been installed near an Air Conditioning Heating Duct or Vent Move the installation of the projector away from the duct or vent Is the filter clean Replace the filter with a new one The projector is shut down and the LAMP SHUTTER indicator is lighting red and other four in...

Страница 71: ... See page 64 Check the projection lamp See page 66 PIN code dialog box appears at start up PIN code lock is being set Enter a PIN code the 1234 or numbers you have set See pages 28 59 60 The initial display is not shown Make sure Off or Countdown Off are not chosen at Display function See SETTING section on page 54 The initial display is not same with the default one Make sure User or Off are not ...

Страница 72: ... 46 50 The image isTop Bottom reversed Check the Ceiling function See pages 46 50 The image is distorted or runs off Check PC Adjust menu or Aspect menu and adjust them Auto PC adjustment function does not work Check the Input signal Auto PC Adjustment function cannot work when 480p 575p 720p 480i 575i 1035i or 1080i is selected or when the digital signal is input into DVI terminal See page 41 Som...

Страница 73: ...work Check the batteries Check if the RC sensor is set properly See page 58 Make sure no obstruction is between the projector and remote control unit Make sure you are not too far from the projector when using the remote control unit Maximum operating range is 16 4 5m Make sure that the remote control unit code conforms to the projector s code See SETTING section on page 57 Unlock the Key lock fun...

Страница 74: ...ding on the input signal Information Image Adjust High Color temp Appendix Color management Auto picture control Off L1 L2 Off Auto Advanced color COLOR GAMMA LIST COLOR M MENU Mid Low COLOR M ALL DEL MENU Projector Shutter management Remote Control 5 180 Min PIN code lock Key lock RC code Simple mode Network will be displayed only when an optional Network Imager is attached Quit Off On Film White...

Страница 75: ...the System Menu varies depending on the input signal Note The Menu display varies depending on the input signal SVGA 1 SVGA 2 SVGA 3 Rear Keystone Ceiling Reset Store On Off On Off Custom H V Scale Position H V On Off H V Common Reset Video Input System 2 Auto PAL SECAM NTSC NTSC 4 43 PAL M PAL N System 3 Auto 1080i 1035i 720p 575p 480p 575i 480i Image Select Standard Cinema Custom 1 Custom 10 Asp...

Страница 76: ...Off Projector Remote control PIN code lock Off On1 On2 PIN code change On Countdown Off Off Display User Default Off Yes No Simple mode Remote control RC code Cross Arrow Dot Appendix Quit Used time Filter counter Yes No Factory default Quit Off 400H 700H 1000H Reset Yes No Quit Scrolls remaining Scroll s Reset Yes No Quit 8 test patterns provided Test pattern Quit Lamp counter Hour s Quit Reset Y...

Страница 77: ...down in the Power management mode The projector is in the Power management mode The projection lamp is being cooled down in the Shutter management mode The projector is in the Shutter management mode Press the POWER button to turn on the projector The filter is scrolled using the FILTER button on the remote control unit or the Filter control function in the setting menu When the filter is being sc...

Страница 78: ...r stand by or the projection lamp is being cooled down The projector cannot be turned on until cooling is completed The lamp cannot light up The lamp has been cooled down enough and the projector is in stand by mode and ready to be turned on with the POWER button The lamp has been used overtime Replace the lamp immediately and then reset the lamp counter The indicator will be turned off after rese...

Страница 79: ...soon as possible Note Fig 2 Fig 3 and Fig 4 icon will not appear when the Display function is set to Off p 54 or during Freeze p 35 The filter cartridge is not installed in the projector Check the filter compartment to see if the filter cartridge is installed in the projector When the filter cartridge is installed and the indicators continue to light and blink read the column below The projector d...

Страница 80: ...req Hz SXGA 6 1280x1024 71 690 67 190 SXGA 7 1280x1024 81 130 76 107 SXGA 8 1280x1024 63 980 60 020 SXGA 9 1280x1024 79 976 75 025 SXGA 10 1280x960 60 000 60 000 SXGA 11 1152x900 61 200 65 200 SXGA 12 1152x900 71 400 75 600 SXGA 13 1280x1024 Interlace 50 000 86 000 SXGA 14 1280x1024 Interlace 50 000 94 000 SXGA 15 1280x1024 63 370 60 010 SXGA 16 1280x1024 76 970 72 000 SXGA 17 1152x900 61 850 66 0...

Страница 81: ...SOLUTION H Freq kHz V Freq Hz D WXGA 11 1280x800 49 702 59 810 D SXGA 2 1280x1024 60 276 58 069 D SXGA 3 1280x1024 31 650 29 800 D WXGA 1 1440x900 55 935 59 887 D 720p 1280x720 45 000 60 000 D 720p 1280x720 37 500 50 000 D 1035i 1920x1035 Interlace 33 750 60 000 D 1080i 1920x1080 Interlace 33 750 60 000 1920x1080 Interlace 28 125 50 000 D 1080psf 30 1920x1080 33 750 60 000 D 1080psf 25 1920x1080 2...

Страница 82: ...o In I II Audio Mini Type stereo x 2 R C Jack Mini jack Wired Remote x 1 Control Port D sub 9 pin x 1 USB Connector USB Series B x 1 Option Network Imager Terminal x 1 Power Voltage and Power Consumption AC 100 120 V 5 5 A Max Ampere 50 60 Hz The U S A and Canada AC 200 240 V 2 6 A Max Ampere 50 60 Hz Continental Europe and The U K Operating Environment Operating Temperature 41 F 104 F 5 C 40 C St...

Страница 83: ...nding trademark in some countries PJ Link Notice To the sales and service engineers For the lens replacement and lens installation refer to the installation manual of the optional lens Before replacing and installing the lens make sure that you are using the lens with the correct Type No Projector Input PJLink Input Parameter Input 1 RGB PC analog RGB 1 11 RGB Scart RGB 2 12 RGB PC digital DIGITAL...

Страница 84: ... 12 11 14 15 16 T M D S Data0 No Connect T M D S Data0 No Connect T M D S Data0 Shield T M D S Clock Shield T M D S Clock T M D S Clock 17 21 18 20 19 22 23 24 Vcc Data Data Ground 1 2 3 4 USBTERMINAL Series B 2 3 4 1 Appendix 9 Red Input Ground Horiz sync Green Input No Connect Blue Input Ground Red Ground Green Ground Blue 1 5 2 4 3 6 7 8 Horiz sync Input Composite H V sync Ground Vert sync DDC ...

Страница 85: ...85 Put the label below supplied on in a prominent place of the projector s body while it is locked with a PIN code While the projector is locked with the PIN code Appendix ...

Страница 86: ...6 Dimensions 3 94 100 14 57 370 5 75 146 17 32 439 9 13 58 345 4 13 105 5 20 132 4 33 110 4 33 110 7 36 187 6 5º MAX Screw Holes for Ceiling Mount Screw M6 Depth 0 393 10 0 2 05 52 Unit inch mm Appendix ...

Страница 87: ...etup the communication condition as follows 1 2 3 Baud rate 9600 19200 bps Parity check none Stop bit 1 Flow control none Data bit 8 Type the command for controlling the projector and then enter the Enter key Example When you want to change the input to INPUT 2 Type C 0 6 Enter Note Enter with ASCII 64 byte capital characters and one byte characters Note The default of the baud rate is set to 1920...

Страница 88: ... Sound mute OFF C0D Video mute ON C0E Video mute OFF C0F Aspect 4 3 C10 Aspect 16 9 C1C Menu ON C1D Menu OFF C20 Brightness UP C21 Brightness DOWN C23 Select Input 2 Video C24 Select Input 2 Y Pb Cb Pr Cr C25 Select Input 2 RGB C28 ON Start ON C29 ON Start OFF C33 Select Input 3 Video C34 Select Input 3 S video C35 Select Input 3 Y Pb Cb Pr Cr Command Function C3A Pointer RIGHT C3B Pointer LEFT C3...

Страница 89: ...down at the temperature abnormally 24 Cooling down at Power Management mode 04 Power Management mode after Cooling down 21 Cooling down after the projector is turned off when the lamps are out 81 Stand by mode after Cooling down when the lamps are out 88 Stand by mode after Cooling down at the temperature abnormally 2C Cooling down when the projector is turned off by the shutter management functio...

Страница 90: ... A C Joaquín Costa 41 28002 Madrid Spain CANON PORTUGAL S A Rua Alfredo da Silva 14 Alfragide 2610 016 Amadora Portugal CANON Belgium N V S A Berkenlaan 3 1831 Diegem Mechelen Belgium CANON Netherland NV Neptunusstraat 1 2132 JA Hoofddorp The Netherlands CANON LUXEMBOURG S A Rue des Joncs 21 L1 818 Howald Luxembourg CANON DANMARK A S Knud Hoejgaards Vej 1 DK 2860 Soeborg Danmark CANON OY Huopalahd...

Отзывы: