Canon PRO-6000 Скачать руководство пользователя страница 442

Adjusting Color Balance

You can adjust the color tints when printing.
Since this function adjusts color balance of the output by changing the ink ratios of each color, it changes
the total color balance of the document. Use the application software when you want to change the color
balance significantly. Use the printer driver only when you want to adjust the color balance slightly.
The following sample shows the case when color balance is used to intensify cyan and to diminish yellow so
that the overall colors are more uniform.

No adjustment

Adjust color balance

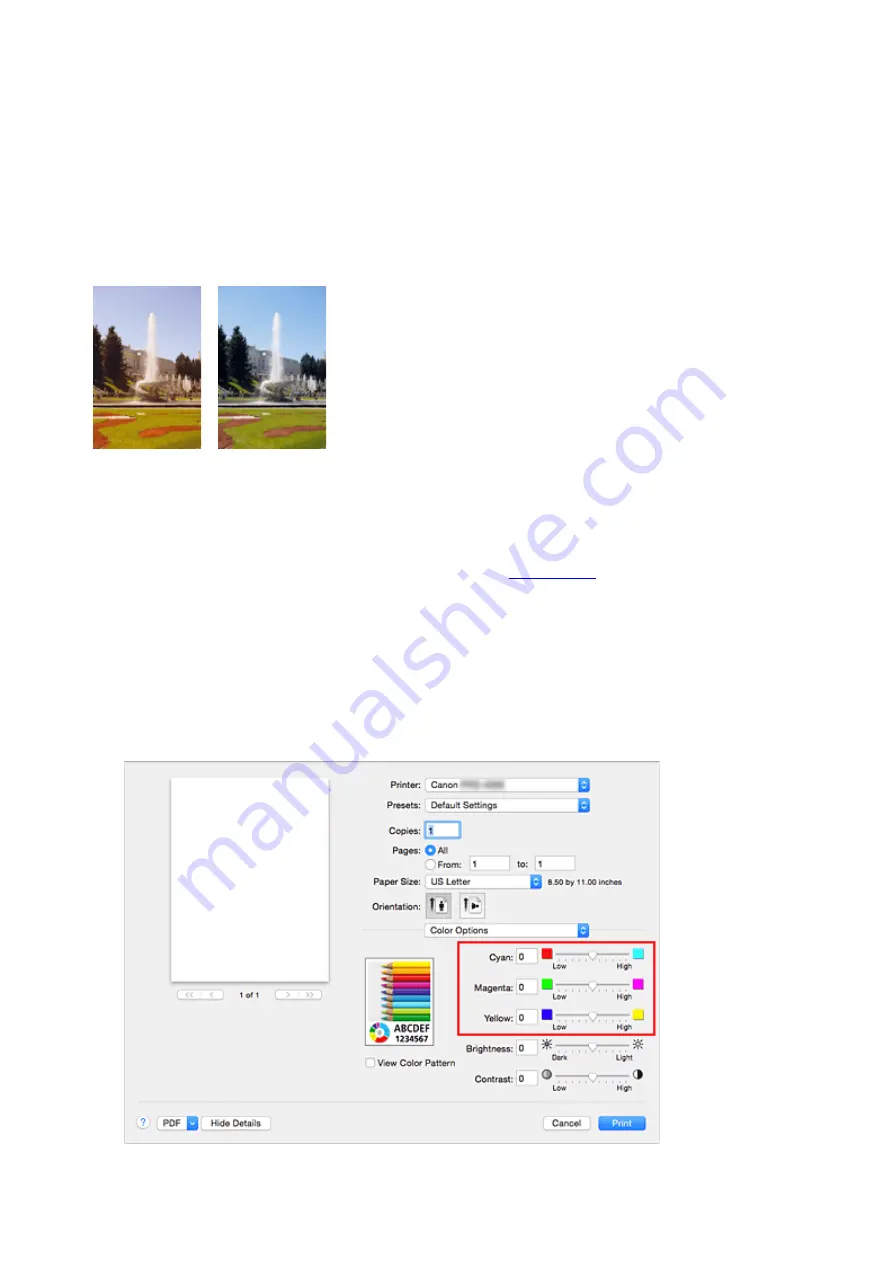
The procedure for adjusting color balance is as follows:

1. Select 

Color Options

 from the pop-up menu of the 

Print Dialog

2. Adjust color balance

There are individual sliders for 

Cyan

Magenta

, and 

Yellow

. Each color becomes stronger when the

corresponding slider is moved to the right, and becomes weaker when the corresponding slider is moved
to the left. For example, when cyan becomes weaker, the color red becomes stronger.
You can also directly enter a value linked to the slider. Enter a value in the range from -50 to 50. The
current settings are displayed in the settings preview on the left side of the printer driver.

442

Содержание PRO-6000

Страница 1: ...Operation Panel Web Browser Printer Parts Network Setting Adjustments for Better Print Quality Color Management Maintenance and Consumables Specifications Safety Basic Printing Workflow Enhanced Prin...

Страница 2: ...e Printer 47 Loading the Lower Roll on the Roll Unit 52 Changing the Type of Paper 57 Specifying the Paper Length 60 Removing the Upper Roll from the Printer 61 Removing the Lower Roll from the Roll U...

Страница 3: ...29 Changing Settings from Operation Panel 131 Printer Menu Operations 132 Menu Operations 133 Menu Structure 138 Changing Settings from Operation Panel 151 Setting Items on Operation Panel 153 Job man...

Страница 4: ...sk 209 Optional accessories 210 Roll Holder Set 211 Network Setting 212 Network Connection Tips 214 Default Network Settings 215 Another Printer Found with Same Name 217 Connecting to Another Computer...

Страница 5: ...sting the Print Head 264 Adjusting the Print Head 265 Automatic Adjustment to Straighten Lines and Colors 266 Manual Adjustment to Straighten Lines and Colors 268 Troubleshooting Paper Abrasion and Bl...

Страница 6: ...to Replace the Maintenance Cartridge 335 Cutter Blade 336 Cutter Blade 337 Replacing the Cutter Blade 338 Performing Maintenance Functions from Your Computer Mac OS 342 Cleaning the Print Heads 343 P...

Страница 7: ...Printing 413 Enhanced Printing Options 414 Printing from Computer Mac OS 418 Printing with Easy Setup 420 Setting the Number of Copies and Printing Order 426 Using Roll Unit to Use 2 Level Rolls 428 A...

Страница 8: ...izontal Banners Large Format Printing 478 Printing by Dividing Joining Documents 480 Lining Up and Printing Multiple Documents 481 Printing by Connecting Multiple Pages 482 Printing Multiple Pages All...

Страница 9: ...Print Job 523 Display the Printing Status Screen 524 Canon IJ Printer Utility3 525 Opening the Canon IJ Printer Utility3 526 Checking the Ink Status from Your Computer 527 Instructions for Use Printer...

Страница 10: ...ree Hard Disk Space 208 Troubleshooting 591 I want to easily create vertical or horizontal banners 594 Does this printer support sub ink tank system 595 I want to know how to configure roll cutting 59...

Страница 11: ...printhead 633 The edges of the paper are dirty 635 The surface of the paper is dirty 637 The back side of the paper is dirty 638 Immediately after borderless printing the trailing edge margin is soile...

Страница 12: ...8 The printer takes time to start up 669 If the Printer Makes a Strange Sound 670 Messages advising to check the maintenance cartridge are not cleared 672 The printer consumes a lot of ink 673 Printed...

Страница 13: ...0 702 1213 703 1214 704 1300 705 1306 706 1317 707 1318 708 1322 709 1323 710 1324 711 1325 712 1401 713 1403 714 1408 715 1409 716 140A 717 140B 718 140C 719 140F 720 1477 721 1478 722 1480 723 1481...

Страница 14: ...B 735 1720 736 1721 737 1722 738 1730 739 1731 740 1752 741 1753 742 1756 743 1757 744 1875 745 2001 746 2002 747 2130 748 2131 749 2132 750 3000 751 3001 752 3101 753 3200 754 3201 755 3250 756 3306...

Страница 15: ...3 768 3334 769 3335 770 3336 771 3340 772 3341 773 3350 774 3351 775 3352 776 3414 777 3415 778 3416 779 3417 780 3418 781 3419 782 3420 783 3421 784 3422 785 3423 786 3424 787 4107 788 4111 789 4112...

Страница 16: ...0 801 4901 802 4903 803 4905 804 4910 805 4911 806 4913 807 4920 808 4922 810 4924 811 4925 812 4926 813 4927 814 4931 815 4932 816 4933 817 4934 818 4935 819 4950 820 4951 821 4952 822 4953 823 4954...

Страница 17: ...1 835 5C00 836 6502 837 6700 838 6702 839 6820 840 6900 841 6901 842 6902 843 6910 844 6911 845 6920 846 6921 847 6930 848 6931 849 6932 850 6933 851 6940 852 6941 853 6942 854 6943 855 6944 856 6945...

Страница 18: ...7051 863 7052 864 8200 865 9000 866 9110 867 B20A 868 B510 869...

Страница 19: ...must be observed for safe operation Important Instructions including important information To avoid damage and injury or improper use of the product be sure to read these indications Note Instruction...

Страница 20: ...and or other countries Note The formal name of Windows Vista is Microsoft Windows Vista operating system Copyright c 2003 2015 Apple Inc All rights reserved Redistribution and use in source and binar...

Страница 21: ...indicated by a copyright notice that is included in or attached to the work an example is provided in the Appendix below Derivative Works shall mean any work whether in Source or Object form that is...

Страница 22: ...excluding those notices that do not pertain to any part of the Derivative Works and 4 If the Work includes a NOTICE text file as part of its distribution then any Derivative Works that You distribute...

Страница 23: ...such obligations You may act only on Your own behalf and on Your sole responsibility not on behalf of any other Contributor and only if You agree to indemnify defend and hold each Contributor harmles...

Страница 24: ...bridge Broadband Ltd copyright notice BSD Portions of this code are copyright c 2001 2003 Cambridge Broadband Ltd All rights reserved Redistribution and use in source and binary forms with or without...

Страница 25: ...S OR BUSINESS INTERRUPTION HOWEVER CAUSED AND ON ANY THEORY OF LIABILITY WHETHER IN CONTRACT STRICT LIABILITY OR TORT INCLUDING NEGLIGENCE OR OTHERWISE ARISING IN ANY WAY OUT OF THE USE OF THIS SOFTWA...

Страница 26: ...CIAL EXEMPLARY OR CONSEQUENTIAL DAMAGES INCLUDING BUT NOT LIMITED TO PROCUREMENT OF SUBSTITUTE GOODS OR SERVICES LOSS OF USE DATA OR PROFITS OR BUSINESS INTERRUPTION HOWEVER CAUSED AND ON ANY THEORY O...

Страница 27: ...DISCLAIMED IN NO EVENT SHALL APPLE OR ITS CONTRIBUTORS BE LIABLE FOR ANY DIRECT INDIRECT INCIDENTAL SPECIAL EXEMPLARY OR CONSEQUENTIAL DAMAGES INCLUDING BUT NOT LIMITED TO PROCUREMENT OF SUBSTITUTE GO...

Страница 28: ...in binary form must reproduce the above copyright notice this list of conditions and the following disclaimer in the documentation and or other materials provided with the distribution Neither the na...

Страница 29: ...distribute this software for any purpose without fee is hereby granted provided that this entire notice is included in all copies of any software which is or includes a copy or modification of this s...

Страница 30: ...pplies only to products supporting Wi Fi c 2009 2013 by Jeff Mott All rights reserved Redistribution and use in source and binary forms with or without modification are permitted provided that the fol...

Страница 31: ...ading Rolls on the Roll Holder Loading the Upper Roll on the Printer Loading the Lower Roll on the Roll Unit Changing the Type of Paper Specifying the Paper Length Removing the Upper Roll from the Pri...

Страница 32: ...arting Point Removing Sheets Clearing a Jammed Sheet Basket Parts of the Basket Using the Basket Example Basket Configurations Storing the Basket Roll Unit Parts of the Roll Unit Roll Unit Switching R...

Страница 33: ...aper and feed confirmed Paper Printing on Paper Other Than Genuine Paper and feed confirmed Paper Using Existing Settings Printing on Paper Other Than Genuine Paper and feed confirmed Paper by Adding...

Страница 34: ...on using paper not included in the Paper Information List see Using Paper Other Than Genuine Paper and feed confirmed Paper Method of Updating Supported Paper Paper that is supported by the printer ma...

Страница 35: ...ed 914 4 mm 36 00 in 36 in Roll 914 4mm Recommended 841 0 mm 33 11 in ISO A0 A1 Roll 841 0mm Recommended 762 0 mm 30 00 in 30 in Roll 762 0mm Possible 2 728 0 mm 28 66 in JIS B1 B2 Roll 728 0mm Recomm...

Страница 36: ...11 46 81 in ISO A1 594 0 841 0 mm 23 39 33 11 in ISO A2 420 0 594 0 mm 16 54 23 39 in ISO A2 431 8 609 6 mm 17 00 24 00 in ISO A3 297 0 420 0 mm 11 69 16 54 in ISO A3 329 0 483 0 mm 12 95 19 02 in ISO...

Страница 37: ...09 6 mm 18 00 24 00 in 12 x18 ARCH B 304 8 457 2 mm 12 00 18 00 in 9 x12 ARCH A 228 6 304 8 mm 9 00 12 00 in DIN C0 917 0 1297 0 mm 36 10 51 06 in DIN C1 648 0 917 0 mm 25 51 36 10 in DIN C2 458 0 648...

Страница 38: ...mm 12 95 21 97 in Poster 300x900mm 300 0 900 0 mm 11 81 35 43 in Custom Paper Size 8 00 8 00 in 203 2 203 2 mm to 60 00 70 87 in 1524 0 1800 0 mm Note For details on non standard sizes see Setting Pa...

Страница 39: ...For Canon genuine paper feed confirmed paper see Paper Information List After loading the paper in the printer select the media type in the control panel and printer driver and then perform the printi...

Страница 40: ...er settings Note For an overview of the media types see Types of Paper For instructions on selecting the media type with the control panel see Types of Paper For instructions on selecting the media ty...

Страница 41: ...nel and printer driver For details on Media Configuration Tool refer as follows Media Configuration Tool Guide Windows Media Configuration Tool Guide Mac OS Important For details on how to select the...

Страница 42: ...dure for applying the Media Information File refer to the following Media Configuration Tool Guide Windows Media Configuration Tool Guide Mac OS Important If you are using the Media Configuration Tool...

Страница 43: ...Upper Roll from the Printer Removing the Lower Roll from the Roll Unit Removing Rolls From the Roll Holder Feeding Roll Paper Manually Keeping Track of the Amount of Roll Paper Left Specifying the Ink...

Страница 44: ...printing surface This may affect the printing quality We recommend wearing clean cloth gloves when handling rolls to protect the printing surface Cut the edge of the roll paper if it is uneven dirty o...

Страница 45: ...in the paper being sent askew 2 If using 3 inch core paper align 3 Inch Paper Core Attachment tabs A with Roll Holder holes B and insert firmly 3 With leading edge of roll paper facing forward as sho...

Страница 46: ...er attach 3 Inch Paper Core Attachment to holder stopper Align the tabs A of the attachment with the holes B of the holder stopper and insert firmly 5 Insert holder stopper from left into Roll Holder...

Страница 47: ...on Home screen of touch screen Note If the Home screen does not appear tap the Home button 2 Tap area 3 Tap Load paper or Replace paper check message that appears and then tap Yes Note If any cut she...

Страница 48: ...per is secured with tape or a paper band so that it will not unravel remove the tape or paper band before loading the roll paper into the roll holder slot If you load the paper into the roll holder sl...

Страница 49: ...handling rolls to protect the printing surface If the paper is wrinkled or warped straighten it out before loading it Load the roll so that there is no gap between the right edge of the paper and the...

Страница 50: ...ype to be used Not prin ted Enable Printed The type and amount of paper left is automatically detected based on the barcode printed on the roll There is no need to specify the type and length of the p...

Страница 51: ...ia types that you can select see Paper Information List Adjusting the printhead alignment with the type of paper to be used in printing may enhance printing quality See Automatic Adjustment to Straigh...

Страница 52: ...inting or Trim Edge First when loading the paper In this case change the basket position and then print See Example Basket Configurations 1 Tap paper settings display area on Home screen of touch scre...

Страница 53: ...o drop the roll and hurt yourself when loading it Be careful not to pinch your fingers between the Roll Holder shaft and the guide grooves B when loading the roll paper Important If the leading edge o...

Страница 54: ...procedure for attaching the roll paper to the Roll Holder see Loading Rolls on the Roll Holder 6 Change Roll Holder Lock switch on roll unit to locked position 7 Change feed flap switch on top of roll...

Страница 55: ...lls to protect the printing surface If the paper is wrinkled or warped straighten it out before loading it Load the roll so that there is no gap between the right edge of the paper and the Roll Holder...

Страница 56: ...e and length of the paper Not printed A menu for selecting the media type and length appears on the touch screen After tapping the media type loaded enter the length of the pa per loaded on the touch...

Страница 57: ...he margins and the size of printed images may vary depending on the type of paper used If margins and the size of images are not as you expected adjust the paper feed amount See Adjusting Feed Amount...

Страница 58: ...for the media type When the release lever is operated the settings automatically return to the last selected media type Using the Same Type of Paper Regularly Configure this setting so that current me...

Страница 59: ...pe of paper specified by the print job If a barcode is printed on the roll paper and you have set Manage remaining roll amount to Enable in the operation panel menu the media type setting is updated t...

Страница 60: ...t 1 Tap paper settings display area on Home screen of touch screen Note If the Home screen does not appear tap the Home button 2 Tap paper feed slot where paper whose length you want to change is load...

Страница 61: ...n of touch screen Note If the Home screen does not appear tap the Home button 2 Tap area 3 Tap Remove paper 4 Tap Yes The roll is rewound Important If Manage remaining roll amount is set to Enable in...

Страница 62: ...om roll holder slot Note For instructions on removing the Roll Holder from rolls see Removing Rolls From the Roll Holder 8 Lower output guide and close top cover Note To load new paper in the printer...

Страница 63: ...he Home screen does not appear tap the Home button 2 Tap area 3 Tap Remove paper 4 Check touch screen message and tap Yes The roll is rewound Important If Manage remaining roll amount is set to Enable...

Страница 64: ...Hold roll holder by its flanges A and remove from roll holder slot Note For instruction on removing the roll paper from the roll holder see Removing Rolls From the Roll Holder To load new paper in the...

Страница 65: ...A toward shaft to release lock and while holding in position B remove holder stopper from roll holder 2 Remove roll holder from roll paper 3 To remove 3 Inch Paper Core Attachment press tabs A inward...

Страница 66: ...ll in the original bag or box away from high temperature humidity and direct sunlight If paper is not stored properly the printing surface may become scratched which may affect the printing quality wh...

Страница 67: ...me button 2 Tap or area 3 Tap Feed cut 4 Tap or touch Advance and Rewind to move roll paper forward or back Note Tapping Advance or Rewind moves the roll paper approximately 0 04 inches 1 mm Touching...

Страница 68: ...a printed barcode the media type and remaining amount are automatically detected after the roll paper is loaded The barcode will be cut off after it has been read Important If the barcode on the roll...

Страница 69: ...hed or soiled or the paper surface may rub when the paper falls and the surface may become soiled To wait for the ink to dry without allowing printed materials to fall after printing set Cutting mode...

Страница 70: ...ox displayed next select the desired values from the lists for Between Pages and Between Scans in Drying Time and then click OK See Main Tab Description Mac OS 1 Choose Print in the application menu 2...

Страница 71: ...3 Select desired values from lists for Dry Time Between Pages and Dry Time Between Scans See Paper Detailed Settings 71...

Страница 72: ...tap Cut paper and cut the roll paper on the cutter blade Eject cut Yes Manual when using media that cannot be cut with the cut ter blade Select this if the paper cannot be cut on the cutter blade Cut...

Страница 73: ...he documents If the paper drops printed documents may be damaged Do not lift the paper when holding printed documents before cutting If the paper rises it may affect the printing quality or cause roug...

Страница 74: ...prevent it from dropping tap Cut paper to cut roll paper Manual when using media that cannot be cut with the cutter blade Note Once the following step has been performed the procedure can be started f...

Страница 75: ...nced 5 Tap Cutting mode 6 Tap User cut 7 When Do you want to set to detect the leading edge of the paper is displayed select Detect recommended 8 Print the job The printer stops advancing the paper af...

Страница 76: ...om step 8 the next time Printing the second and subsequent times Printing after replacing with the same type of paper 1 Tap paper settings display area on Home screen of touch screen Note If the Home...

Страница 77: ...position at which the roll was set for the first printing after replacing a roll Thus the margin of the paper leading edge will enlarge See Loading the Upper Roll on the Printer 8 Tap Back button twi...

Страница 78: ...cutting to have the roll cut at your specified position 1 Tap paper settings display area on Home screen of touch screen Note If the Home screen does not appear tap the Home button 2 Tap paper feed s...

Страница 79: ...4 Tap or touch Advance or Rewind to feed roll paper to desired cutting position 5 Tap Cut paper 6 Tap Yes After the roll paper is cut it is rewound automatically 79...

Страница 80: ...th For the leading edge precut length see Paper Information List Auto specified length Specify the amount to cut from the leading edge of paper on the touch screen The amount to cut from the leading e...

Страница 81: ...Home screen does not appear tap the Home button 2 Tap or 3 Tap Paper settings 4 Tap Advanced 5 Tap Trim edge first 6 Tap desired Trim edge first settings This setting takes effect the next time you lo...

Страница 82: ...g to the media type Important Do not set Cut dust reduction to ON for paper that wrinkles easily such as Plain Paper or lightweight paper If not cut properly the paper may jam Borderless printing is n...

Страница 83: ...6 Tap ON 83...

Страница 84: ...on the roll unit and print while automatically changing between Roll 1 and Roll 2 depending on the print job For details on how to switch between Roll 1 and Roll 2 see How to Switch Paper Rolls Windo...

Страница 85: ...Handling sheets Loading Sheets in the Printer Changing the Type of Paper Printing From a Desired Starting Point Removing Sheets Clearing a Jammed Sheet 85...

Страница 86: ...sed paper in the original package away from high temperature humidity and direct sunlight 1 Select sheets as the paper source If a print job was received Sheets are automatically selected and the medi...

Страница 87: ...arts may damage them 3 Place cut sheet with the print side up insert in portrait orientation between platen A and paper retainer B and align paper s far edge using the following steps 1 Load while ali...

Страница 88: ...e paper tap Suction on the touch screen and adjust the vacuum strength You can adjust the vacuum strength to 5 levels However even if you increase the suction it may not be sufficient to hold some typ...

Страница 89: ...and begin printing If no print job was received A menu for selecting the media type appears Select the media type loaded and tap OK The printer now starts feeding the paper Note For details on media t...

Страница 90: ...ed 5 Select Detect paper width and tap Disable Load paper in the desired position to start printing from Follow these instructions to load paper at the desired starting position for printing when Dete...

Страница 91: ...and check position where paper is loaded To start printing from the current position close the top cover To reposition the paper lift the release lever 4 Load paper keeping right edge of paper aligned...

Страница 92: ...5 Lower release lever and close top cover 6 When screen for selecting paper size appears select size of paper loaded 92...

Страница 93: ...e screen of touch screen Note If the Home screen does not appear tap the Home button 2 Tap area 3 Tap Remove paper 4 Check touch screen message and tap Yes 5 When instructions for removing sheet appea...

Страница 94: ...94...

Страница 95: ...Basket Parts of the Basket Using the Basket Example Basket Configurations Storing the Basket 95...

Страница 96: ...lower it and store alongside of the stand See Storing the Basket C Basket A cloth tray that catches ejected documents D White Tag Marks indicating basket attachment orientation E Basket Rewind Button...

Страница 97: ...g side and then make the change If the basket rod tag side has come off the basket arm attach it by inserting the projections on both ends of the basket rod tag side into oval holes on the tip of the...

Страница 98: ...tant If you are changing the angle of the basket arm make sure the thick part of the basket arm is pulled out as far as possible When changing the angle of the basket arm hold the thick part of the le...

Страница 99: ...u can adjust the basket length by rotating the basket rod tag side To shorten rotate the basket rod tag side in the direction of the arrow to wind the basket To lengthen rotate the basket rod tag side...

Страница 100: ...must store the basket For instructions on storing the basket see Storing the Basket If the printed materials collected are damaged or folded select Eject cut in Cutting mode or use the basket in a di...

Страница 101: ...paper by hand Move the basket rod cord side to the upper of the two pairs of attachment locations on the front of the printer and extend the basket arm as far as possible at the angle shown to achiev...

Страница 102: ...on the front of the printer extend the basket arm as far as possible in the angle shown Next adjust the length so that the basket is pulled into this position Important You can stack up to 10 sheets o...

Страница 103: ...reful when using paper that tends to curl or is damaged easily in this position With some types of paper the leading edge may curl or bend during ejection In this case straighten out the paper Printed...

Страница 104: ...rewind the basket If it is not released and rewound the change may not be performed smoothly or the basket may be damaged See Using the Basket If you are changing the angle of the basket arm make sur...

Страница 105: ...Roll Unit Parts of the Roll Unit Roll Unit Switching Roll Unit Modes Using the Roll Unit In Take Up Mode Removing Printed Paper from the Roll Unit 105...

Страница 106: ...rotate the roll unit the desired amount as long as winding is not in progress When the winding direction is set to inward winding the unit rewinds the paper when it is set to outward winding the unit...

Страница 107: ...M Roll Holder Load the roll on this holder N Holder Stopper This part secures the roll paper on the Roll Holder 107...

Страница 108: ...additional roll for a total of two rolls on the printer and as a take up device that automatically takes up the printed roll paper Switch between these two functions depending on the circumstances For...

Страница 109: ...Printer Driver Windows or Reflect Roll Unit Settings in the Printer Driver Mac OS If you change the roll unit from a take up device to a feed device first cut the paper that has been taken up 1 Tap pa...

Страница 110: ...and Automatic Cutting is set in the Cutting mode settings See Specifying the Cutting Method for Rolls on the printer we recommend setting Wind up after cutting to Enable When set to Disable a printed...

Страница 111: ...r winding is possible until the outer diameter of the wound paper is the same as the outer diameter of the holder stopper When printing on lightweight paper or without a border the border of the paper...

Страница 112: ...er stopper and the paper Always use a paper core for winding that is the same thickness or is thicker than the roll paper s paper core If you use a paper core that is thinner it may affect take up 5 I...

Страница 113: ...flanges A so that roll holder s white gear is on left align roll holder shaft with roll holder slot left and right guide grooves B and load 8 Change Roll Holder Lock switch on roll unit to lock direct...

Страница 114: ...For the winding direction of the roll paper you can select either outward winding to make the printed surface on the outside of the roll or inward winding to make the printed surface on the inside of...

Страница 115: ...l holder and pass the roll paper to the back of the paper core 3 Align right edge of roll paper to right edge of paper core while pulling on roll paper evenly and secure with tape 4 While making sure...

Страница 116: ...r downward again and check that roll holder is not lifting up The winding preparation is complete When printing to the roll starts the roll paper can be automatically wound If Ready to print appears o...

Страница 117: ...the edges so that neither end of the roll paper lift up When rewinding heavyweight paper use strong adhesive tape to fasten it Otherwise a rewinding problem may result If you use a paper core narrower...

Страница 118: ...The winding preparation is complete During printing the winding starts Before printing the winding starts at the same time as the printing Important When winding inwardly loosening of the wound paper...

Страница 119: ...aken up after that However be careful when using easily damaged roll paper because the roll paper touches the roller when paper is cut 1 Tap paper settings display area on Home screen of touch screen...

Страница 120: ...aper may fall to the floor and become soiled 7 While holding trailing edge of printed paper press Take up or Rewind button to wind printed paper Apply adhesive tape to the rewound paper to hold it in...

Страница 121: ...der stopper lever A toward shaft to release lock and while holding in position B remove holder stopper from roll holder 11 Remove printed material that has been taken up from roll holder for each pape...

Страница 122: ...Printer Menu Operations Menu Operations Menu Structure Changing Settings from Operation Panel Setting Items on Operation Panel Status Print Changing Printer s Setting Using Web Browser Changing Setti...

Страница 123: ...Operations and Touch Screen Operation Panel Touch Screen Checking Instructions During Printer Operations 123...

Страница 124: ...ch screen Shows printer menus as well as the printer status and messages You can select menu items and display buttons by gently touching the screen with your fingertip Touch Screen F Status lamp Flas...

Страница 125: ...Note When the printer is in Sleep mode you can touch the touch screen to recover from Sleep mode 125...

Страница 126: ...splay Area Displays the ink status Tap this item to view the remaining amount of ink and how to replace the ink tanks C Paper Setting Display Area Displays the media information for each feeding locat...

Страница 127: ...Removing it can damage the touch screen Tap Gently touch with your fingertip and then release Use this when selecting an item on the screen Touch Gently touch with your fingertip To go or return to a...

Страница 128: ...notification New notice appears in the printer information display area Tap this to display the Notice list screen to view messages with the newest one appearing first Tap a message to display the me...

Страница 129: ...ew instructions Once you complete an action described in the instructions the printer detects the action and switches to the next instruction screen Operation screens are switched every 3 seconds and...

Страница 130: ...130...

Страница 131: ...Changing Settings from Operation Panel Printer Menu Operations Menu Operations Menu Structure Changing Settings from Operation Panel Status Print 131...

Страница 132: ...print job is in progress 4 Maintenance Perform maintenance settings grays out while a print job is in progress 5 Job management Perform job management settings 6 Print from USB flash drive Perform pri...

Страница 133: ...touch screen precautions to avoid malfunction or damage to the printer Do not press hard against the touch screen Do not press the touch screen with objects other than your finger especially sharp ob...

Страница 134: ...enus or a list continuously for example Flick Flick up down left or right on the screen with your finger Flick to move forward or back through menus or a list for example Drag While lightly touching t...

Страница 135: ...e of Using Touch Screen These touch screen operations are available when you print data on a USB flash drive Drag up or down and then tap an item to select it Tapping A displays the print settings men...

Страница 136: ...item to select it After the list is displayed tap a setting to select it Tap D to confirm the settings Tap C to display the screen for selecting the number of copies Tap a number to specify the numbe...

Страница 137: ...Tap B to display the preview screen Touch the Back button to return to the previous screen 137...

Страница 138: ...paper Paper settings Width Length Type Advanced Roll paper 2 Replace paper Feed cut Remove paper Roll unit use setting Paper settings Width Length Type Advanced Take up mode Roll unit use setting Auto...

Страница 139: ...1 Pattern 2 Pattern 3 Deep cleaning All colors Pattern 1 Pattern 2 Pattern 3 System cleaning All colors Pattern 1 Pattern 2 Pattern 3 Print head alignment Auto standard Roll paper 1 Roll paper 2 Manu...

Страница 140: ...l paper 2 Manual Change adjustment values Color calibration Auto adjust Roll paper 1 Roll paper 2 Manual Enable disable adjustment values Enable Disable Adjustment information Roll paper 1 Roll paper...

Страница 141: ...s Delete Priority printing Release hold Saved job Job box list Job list Delete Start print Print the job list Job history Display job history Print job history Pause printing Enable Disable Print from...

Страница 142: ...tings Test print Print nozzle check pattern Status print Status print administrator Print LAN details Print setting print Print advanced paper settings Print job history Print menu map Print settings...

Страница 143: ...er auto Roll paper 1 Roll paper 2 Manual Margin 3mm 5mm Rotate 0 degrees 90 degrees Fit paper ON OFF Display during process Warning display Enable Disable JPEG print settings Print quality settings Co...

Страница 144: ...lash settings Color mode Monochrome Color Print qlty Fast Standard High Paper src Auto select Roll paper auto Roll paper 1 Roll paper 2 Manual Rotate 0 degrees 90 degrees Fit paper ON OFF Print settin...

Страница 145: ...et printer name TCP IP settings IPv4 IP address DNS server Proxy server IPv6 Enable disable IPv6 IPsec settings Use DHCPv6 Manual address DNS server WSD setting Enable disable WSD Enable Disable Optim...

Страница 146: ...ername Password Authentication server name Last authentication result SNTP settings Client operation status Active Inactive NTP SNTP server address Polling interval Spanning tree setting Active Inacti...

Страница 147: ...paper setting mismatch Pause Display warning Do not detect Hold job Paper retention setting Release Retain Advanced paper settings Paper size recognition settings Cut sheet setting 1 Cut sheet settin...

Страница 148: ...st Fast secure Secure Monitoring service settings Enable disable monitoring service Enable Disable Communication test Yes No Communication log Device user settings Energy saving settings Auto power of...

Страница 149: ...5 4 3 2 1 Length unit setting Meters Feet inches Buzzer setting Enable Disable EOP timer setting 10 seconds 30 seconds 1 minute 2 minutes 5 minutes 10 minutes 30 minutes 60 minutes Job history sending...

Страница 150: ...Records of use Head information Head alignment performance log Values applied with auto settings 150...

Страница 151: ...taking the steps to specify Print head movable width setting as an example 1 Make sure printer is turned on 2 Flick HOME screen and tap Device settings Menu Operations The Device settings screen appea...

Страница 152: ...For more on setting items on the operation panel Setting Items on Operation Panel 152...

Страница 153: ...ator password is required Setting Administrator Password on Operation Panel Items for Security Administrator password setting Items for Printer Device user settings Hard disk settings Language selecti...

Страница 154: ...assword if it is enabled for a personal box using Remote UI Job history Important The administrator password is required to display the job history if it is enabled for changing settings using the ope...

Страница 155: ...network information list Printing Network Settings Print setting print Prints out the print settings list Print advanced paper settings Prints out the setting values specified by Advanced paper settin...

Страница 156: ...ges Note The printed paper length is longer than the actual paper length This is because the printed paper includes the upper lower margins specified by Roll Paper Safety Margin and Leading Edge Margi...

Страница 157: ...Select when you perform settings for wireless LAN manually using the operation panel of the printer WPS Push button method Select when you perform settings for wireless LAN using a wireless router sup...

Страница 158: ...ters IPv6 default gateway XXXX XXXX XXXX XXXX XXXX XXXX XXXX XXXX 32 characters IPv6 subnet prefix length XXX up to 3 digits IPv6 link local address XXXX XXXX XXXX XXXX XXXX XXXX XXXX XXXX 32 characte...

Страница 159: ...s XXXXXXXXXXXX IPv6 secondary DNS server add XXXXXXXXXXXX IPv6 DNS dyn update manual Active Inactive IPv6 DNS dyn update stateless Active Inactive IPv6 DNS dyn update stateful Active Inactive IPv6 Use...

Страница 160: ...s displayed on the touch screen The following setting items are displayed Some setting items are not displayed depending on the printer settings Items Setting Connection Active Inactive SSID XXXXXXXXX...

Страница 161: ...length 2 XXX up to 3 digits IPv6 stateless address 3 XXXX XXXX XXXX XXXX XXXX XXXX XXXX XXXX 32 characters IPv6 stateless prefix length 3 XXX up to 3 digits IPv6 stateless address 4 XXXX XXXX XXXX XX...

Страница 162: ...XXXXX up to 15 characters Bonjour service name XXXXXXXXXXXXX XXXXXXXXXXXXX XXXXXXXXXXXXX XXXXXXXXXXXXX up to 52 characters Root cert thumbprint SHA 1 XXXXXXXX XXXXXXXX XXXXXXXX XXXXXXXX XXXXXXXX Root...

Страница 163: ...haracters IPv6 link local prefix length XXX up to 3 digits MAC address XX XX XX XX XX XX 12 characters IPsec settings Enable ESP Enable ESP AH Enable AH Disable Pre shared key XXXXXXXXXXXXXXXX 16 char...

Страница 164: ...8 Windows 7 and Windows Vista Optimize inbound WSD Selecting Enable allows you to receive the WSD printing data faster Timeout setting Specifies the timeout length Bonjour settings Setting items for...

Страница 165: ...ing items are available when you connect a device to the printer Important You can select these setting items only when Activate direct connect is selected for Change LAN Update SSID password Selectin...

Страница 166: ...sleep mode automatically when no operation is made Operation restrictions Restricts the following operations Job history Restricts to display the print job history Remote UI Restricts to use Remote U...

Страница 167: ...d 3 times for errors when Enable is selected EOP timer setting Specify the timeout period before cancellation of print jobs that cannot be received by the printer Job history sending setting The print...

Страница 168: ...ing item from Device settings Important The administrator password is required to change settings if it is enabled for changing settings using the operation panel Changes the language for the messages...

Страница 169: ...ually If you select Retain the roll nip contacts with the rolls and automatic feeding is enabled Selecting Release does not allow you to switch the paper source of rolls upper or lower automatically A...

Страница 170: ...settings Reset paper settings for all paper Tapping Yes initializes each setting specified in Advanced paper settings Entering the administrator password is required if it is enabled Important When yo...

Страница 171: ...checking You can also select the page interval to perform automatic nozzle checking Nozzle check error display Enables Disables displaying the nozzle check error System cleaning frequency Specifies t...

Страница 172: ...you specify the administrator password select the range and specify the administrator password Remote UI or other tools Entering the administrator password is required to change the setting items usin...

Страница 173: ...pears 3 Tap Administrator password setting 4 When confirmation screen to specify administrator password is displayed tap Yes If an administrator password is not specified the register confirmation mes...

Страница 174: ...or security reasons we recommend you use 6 and more alphanumeric characters 8 Tap Apply 9 Enter administrator password you specified again 10 Tap Apply The administrator password is enabled When You W...

Страница 175: ...Print auto delete Deletes the data from the printer s hard disk after printing is completed Save to job box Only saves the print job in the box without printing it Save first and print A setting for j...

Страница 176: ...g settings using the operation panel Enable disable monitoring service Selecting Active allows the printer to send error details to the service center Communication test Performs a communication test...

Страница 177: ...erable error e g paper or ink related error codes up to 5 For more on the error code refer to List of Support Code for Error Records of use Displays the printer s record of use such as total print are...

Страница 178: ...4 Tap Status print Note If you specify the administrator password tap Status print administrator The printer starts printing The following information is included Canon xxxxxxxxxxxxxxxxxxxx Status Pr...

Страница 179: ...setting value of Language selection Roll unit use setting 2 Each setting value of Roll unit use setting 2 Printed only when you select ON Maintenance Color calibration Setting value of Color calibrat...

Страница 180: ...LOT NUMBER DATE OF IN STALLATION Print head lot number Head alignment performance log COUNTER Media Use of each specified media THE NUMBER OF CUTS Total number of cuts AFTER INSTALLATION Days of use...

Страница 181: ...Changing Printer s Setting Using Web Browser Changing Settings Using Web Browser Changeable Setting Items Using Web Browser Setting Password Setting Mail Server Receiving Printer Status by E mail 181...

Страница 182: ...ser iOS device OS iOS 7 0 or later Web browser iOS standard Web browser Mobile Safari Android device OS Android 4 0 or later Web browser Android standard Web browser Browser or Chrome Mac OS device OS...

Страница 183: ...ge to warn you that the secure connection is not guaranteed may appear 5 Select Log on The password authentication screen appears Note When the standard user mode is enabled choose either administrato...

Страница 184: ...8 When you finish checking printer status and changing printer settings select Log off 9 Close web browser 184...

Страница 185: ...This function allows you to display the job history and print it Note When you are logging on in administrator mode you can restrict this function in standard user mode System info and LAN settings T...

Страница 186: ...Setting Mail Server Receiving Printer Status by E mail Note Some of the menu is available only when you logged on in administrator mode Other Items Printer status This function displays printer infor...

Страница 187: ...he sticker attached on the printer It consists of 9 alphanumeric characters four alphabets followed by five numbers 1 Display printer status on web browser 2 Select Security The menus appear 3 Select...

Страница 188: ...a standard user password by following the steps below 1 Display printer status on web browser 2 Select Security The menus appear 3 Select Standard user mode settings 4 When confirming message appears...

Страница 189: ...to each help Important Make sure that you have accessed to the printer IP address correctly by checking the URL field of the web browser before registering the root certificate For Internet Explorer 1...

Страница 190: ...t Download on Remote UI Downloading the root certificate is started 2 Open download file The Add Certificates screen appears 3 Select Add The certificate information appears 4 Make sure thumbprint of...

Страница 191: ...appears 2 Select downloaded certificate The certificate information appears 3 Make sure that thumbprint of certificate information matches printer s thumbprint For printer s thumbprint touch the HOME...

Страница 192: ...Note If a password is set on your device entering a password may be required 3 Select Install 4 Select Install on displayed dialog The root certificate registration is completed 192...

Страница 193: ...server test connect 4 Select Set mail server The setting items for mail server appear 5 Specify mail server settings Specify the following items Sender address Enter the e mail address of the sender...

Страница 194: ...entication Use APOP authentication Select if you send the password by the encryption transmission Clear mailbox Select if you delete the e mails that remain in the POP3 server Important When this sett...

Страница 195: ...y the information settings by following the steps below 1 Display printer status on web browser 2 Select Device settings The menus appear 3 Select Status notification e mail 4 Select Notification reci...

Страница 196: ...The resending setting is completed 196...

Страница 197: ...ide Carriage Ink Tank Cover Inside Operation Panel Stand Parts Parts of the Basket Parts of the Roll Unit Hard Disk Printer Hard Disk Operations Checking Free Hard Disk Space Erasing Data on Printer s...

Страница 198: ...Printer Parts Front Back Top Cover Inside Carriage Ink Tank Cover Inside Operation Panel Stand Parts Parts of the Basket Parts of the Roll Unit 198...

Страница 199: ...on this holder E Holder Stopper Secure the roll on the Roll Holder with this part F Release Lever To release paper retainer lift the lever G Maintenance Cartridge Cover Open this cover to replace the...

Страница 200: ...Use this screen to operate the printer and check the printer status See Operation Panel L Ink Tank Cover Open this cover to replace the ink tank See Ink Tank Cover Inside 200...

Страница 201: ...patible with Hi Speed USB connections C Wired LAN Connector Connect an Ethernet cable to this port The lamp is lit if the Ethernet cable is connected correctly and communication is possible between th...

Страница 202: ...Line Align paper with this line when loading it E Carriage Moves the print head It serves a key role in printing See Carriage F Carriage Shaft The Carriage slides along this shaft G Platen The print...

Страница 203: ...A Print Head Locking Cover Secures the print head B Print Head The printhead is equipped with ink nozzles The carriage serves a key role in printing C Print Head Lock Lever Lock print head locking co...

Страница 204: ...rectly Off No ink tank is installed or the ink level detection function is disabled Flashing Ink tank is empty Note When there is little ink left the ink lamp is lit and appears on the touch screen C...

Страница 205: ...e Using the Basket and Example Basket Configurations C Locking Caster A locking caster that when the lock is in the ON position immobilizes the printer When moving the Stand be sure to set the locking...

Страница 206: ...Hard Disk Printer Hard Disk Operations Checking Free Hard Disk Space Erasing Data on Printer s Hard Disk 206...

Страница 207: ...l box Do not save print jobs in the common box Save print jobs sent from sources other than the printer driver Operations with saved jobs Print saved jobs Delete saved jobs Job queue management Displa...

Страница 208: ...Using Remote UI Using Operation Panel 1 Make sure printer is turned on 2 Flick HOME screen and tap Printer information Menu Operations 3 Tap Hard disk information The free hard disk space appears Usin...

Страница 209: ...isk Choose this method for relatively fast erasure Because only the file management data is erased the print job data itself is not erased Note that it may be possible to read this data using commerci...

Страница 210: ...Optional accessories Roll Holder Set 210...

Страница 211: ...the Roll Holder in the RH2 65 roll holder set with both 2 inch and 3 inch paper cores However if using 3 inch core roll paper attach the 3 Inch Paper Core Attachment See Loading Rolls on the Roll Hol...

Страница 212: ...tarting Up IJ Network Device Setup Utility Diagnosing and Repairing Network Settings Performing Changing Network Settings Other Network Information IJ Network Device Setup Utility Mac OS IJ Network De...

Страница 213: ...Restrictions on Printer Sharing Connecting Smartphone Tablet to Printer via Wireless LAN Connecting Smartphone Tablet to Printer via Wireless LAN Router 213...

Страница 214: ...ther Printer Found with Same Name Connecting to Another Computer via LAN Changing from USB to LAN Connection Printing Network Settings Changing LAN Connection Method Changing Wireless LAN Connection M...

Страница 215: ...ame Canon PRO 6000 LPR protocol setting Enable Wireless LAN DRX setting Enable Wired LAN DRX setting Enable XX represents alphanumeric characters Default value depends on printer To check value use op...

Страница 216: ...2 The password is specified automatically when the printer is turned on for the first time 3 ZZZZZZ represents last six digits of printer s wireless MAC address 216...

Страница 217: ...those on detection result screen Check the printer s MAC address or serial to select the correct printer from the results Note Serial number may not appear on result screen Check the printer s MAC add...

Страница 218: ...puter to connect to the printer on a LAN or to change from USB to LAN connection perform setup using the Setup CD ROM or follow the instructions on the Canon website For Mac OS To connect an additiona...

Страница 219: ...Test print If you specify the administrator password enter the password 5 Tap Print LAN details 6 Tap Yes The printer starts printing network settings information Note You can also print the printer s...

Страница 220: ...ltering Permission Address IP filtering permission address Start Address 1 Start address 1 XXX XXX XXX XXX End Address 1 End address 1 XXX XXX XXX XXX Use Single On 1 Use single on 1 On Off Start Addr...

Страница 221: ...ing SNMP filtering setting information IP Filtering Prohibit Address IP filtering prohibit address Start Address 5 Start address 5 XXX XXX XXX XXX End Address 5 End address 5 XXX XXX XXX XXX Use Singl...

Страница 222: ...1 On Off Start Address 2 Start address 2 XXX XXX XXX XXX End Address 2 End address 2 XXX XXX XXX XXX Use Single On 2 Use single on 2 On Off Start Address 3 Start address 3 XXX XXX XXX XXX End Address...

Страница 223: ...ddress IP Address 1 IP address 1 XXXX XXXX XXXX XXXX XXXX XXXX XXXX XXXX Prefix Length 1 Prefix length 1 XXX 0 to 128 IP Address 2 IP address 2 XXXX XXXX XXXX XXXX XXXX XXXX XXXX XXXX Prefix Length 2...

Страница 224: ...IPv6 filtering permission information IP Filtering Start Address 1 IP filtering start address 1 XXXX XXXX XXXX XXXX XXXX XXXX XXXX XXXX IP Filtering End Address 1 IP filtering end address 1 XXXX XXXX...

Страница 225: ...Single On 1 Use single on 1 On Off IP Filtering Start Address 2 IP filtering start address 2 XXXX XXXX XXXX XXXX XXXX XXXX XXXX XXXX IP Filtering End Address 2 IP filtering end address 2 XXXX XXXX XXX...

Страница 226: ...XXXX XXXX Use Single On 2 Use single on 2 On Off LAN Setting Basic setting information IPv6 Info IPv6 setting information Wired LAN Print Filtering Print filtering setting information IP Filtering St...

Страница 227: ...XXXX XXXX Use Single On 3 Use single on 3 On Off IP Filtering Start Address 4 IP filtering start address 4 XXXX XXXX XXXX XXXX XXXX XXXX XXXX XXXX IP Filtering End Address 4 IP filtering end address...

Страница 228: ...ress 5 MAC address 5 XX XX XX XX XX XX Proxy Setting Proxy server setting information Use Proxy Use proxy server On Off Proxy Server Address Proxy server address XXXXXXXXXXXXXXXX up to 128 characters...

Страница 229: ...y Type Security type for Wireless LAN Direct connection Disabled WPA2 PSK TKIP WPA2 PSK AES Protocol Setting Protocol setting information Printer Name Printer name XXXXXXXX up to 16 characters Use LPR...

Страница 230: ...MIB Access Restriction MIB access restriction Read Only Read Write Security Setting Security setting No Auth No Priv Auth No Priv Auto Priv Authority Algorithm Authority algorithm Null MD5 SHA1 Encryp...

Страница 231: ...Null AES DES User5 User 5 User Name User name XXXXXXXX up to 32 characters Use SNMPv3 Use SNMPv3 On Off MIB Access Restriction MIB access restriction Read Only Read Write Security Setting Security set...

Страница 232: ...Bonjour Use Bonjour On Off Bonjour Service Name Bonjour service name Bonjour service name Up to 50 al phanumeric characters 802 1X Setting 802 1X setting information Authority Type Enable disable 802...

Страница 233: ...racters User5 User 5 User Name User name XXXXXXXX up to 32 characters User6 User 6 User Name User name XXXXXXXX up to 32 characters User7 User 7 User Name User name XXXXXXXX up to 32 characters User8...

Страница 234: ...address 1 XXXXXXXX up to 128 characters Notice Conditions 1 Notice conditions 1 Job End Job end On Off Error Occurred Error occurred On Off Warning Occurred Warning occurred On Off Signature 1 Signat...

Страница 235: ...r Mac OS Follow the instructions on the Canon website to redo setup Changing Wireless LAN Connection Method Follow either procedure below to change wireless LAN connection method infrastructure or dir...

Страница 236: ...For Mac OS Follow the instructions on the Canon website to redo setup 236...

Страница 237: ...1 0 2272 118m or later Mozilla Firefox 37 0 1 or later For more on Remote UI refer to Changing Settings Using Web Browser Important Enable JavaScript and cookies in the web browser If you access Remot...

Страница 238: ...IJ Network Device Setup Utility Mac OS IJ Network Device Setup Utility Starting Up IJ Network Device Setup Utility Diagnosing and Repairing Network Settings 238...

Страница 239: ...uter on which it is installed In addition IJ Network Device Setup Utility restores the status of the printer and computer Important To use the printer over LAN make sure you have the equipment necessa...

Страница 240: ...ct IJ Network Device Setup Utility When you start up IJ Network Device Setup Utility the screen below appears Enter the password specified for your computer and select Install Helper IJ Network Device...

Страница 241: ...Support Diagnosis and Repair Function IJ Network Device Setup Utility starts checking the computer settings when it starts up Perform operations following the instructions on the screen Note This func...

Страница 242: ...ction of IJ Network Device Setup Utility G4000 series PRO 500 series PRO 1000 series MB2100 series MB2700 series MB5100 series MB5400 series iB4000 series PRO 520 PRO 540 PRO 560 PRO 540S PRO 560S PRO...

Страница 243: ...Other Network Information Technical Terms Restrictions Firewall List of Devices Which May Interfere with Wireless LAN Communication 243...

Страница 244: ...es not support ad hoc communication Admin Password Administrator password in IJ Network Device Setup Utility to restrict access to network users It must be entered to access the printer and change pri...

Страница 245: ...relay device to connect to another network such as a router or a computer Default router address A default IP address set for a router DHCP server functionality The router assigns an IP address autom...

Страница 246: ...en when using two or more antennas simultaneously or obtaining a bigger transfer rate than before by using multiple communication channels at the same time the transmission speed may be influenced by...

Страница 247: ...utomatically from a specific prefix information of current network fe80 and an interface identifier generated from printer s MAC address Link Quality The status of the connection between the wireless...

Страница 248: ...name or a wireless router name SSID distinguishes one wireless LAN from another to prevent interference The printer and all clients on a wireless LAN must use the same SSID in order to communicate wi...

Страница 249: ...ithout turning off the power W WCN Windows Connect Now Users running Windows Vista or later can obtain the setting information directly via wireless network WCN NET WEP WEP Key An encryption method em...

Страница 250: ...aracters or a 64 digit hexadecimal value WPA2 Security framework released by the Wi Fi Alliance in September 2004 as a later version of WPA Provides a stronger encryption mechanism through Advanced En...

Страница 251: ...o encrypt wireless transmission Wireless communication with a product that does not comply with the Wi Fi standard cannot be guaranteed Connecting with too many computers may affect the printer perfor...

Страница 252: ...to enable communications When using IJ Network Device Setup Utility you may be prompted to enable or disable communications depending on the firewall function of the security software If so choose to...

Страница 253: ...nd wireless router Radio frequency interference may cause sending print jobs or printing speed to slow down Microwave oven Baby monitor Wireless mouse Wireless keyboard Wireless earphone headphones Wi...

Страница 254: ...ck whether the network settings have been set This section describes the procedure for sharing a printer among Mac Settings on Print Server This section describes how to set up a computer that connect...

Страница 255: ...used has been added Open System Preferences and select Printers Scanners Print Scan The printer list displays the printers that are connected to the computer 3 Set sharing Check the Share this printe...

Страница 256: ...erences and select Printers Scanners Print Scan Click to display the printer list 3 Add a printer to be shared Select a shared printer displayed in the printer list and then click Add The setup on the...

Страница 257: ...administrator privilege Depending on how the computer is connected with the printer the computer may not be able to access the function information that was set on the printer and display the correct...

Страница 258: ...one or tablet to printer via a wireless LAN router Connecting Smartphone Tablet to Printer via Wireless LAN Router To connect a smartphone or tablet to printer without a wireless LAN router Connecting...

Страница 259: ...inistrator password is required to change settings if it is enabled for changing settings using the operation panel Check the usage restrictions and change the printer LAN setting Restrictions Checkin...

Страница 260: ...nter wireless LAN router password Your device is connected to the printer 5 Start printing from application For iOS device 1 Open Settings menu on your device 2 Enable Wi Fi 3 Select wireless router S...

Страница 261: ...and the wireless router will be temporarily disabled while the setting is changed Do not proceed to the next screen of this guide until setup is complete For office use consult your network administra...

Страница 262: ...igure settings again Devices connected to the printer using Direct Connection cannot communicate with each other Firmware updates for the printer are not available while using Direct Connection When a...

Страница 263: ...tments for Better Print Quality Adjusting the Print Head Adjusting the Print Head Troubleshooting Paper Abrasion and Blurry Images Adjusting Feed Amount Adjusting Feed Amount Adjusting Vacuum Strength...

Страница 264: ...Adjusting the Print Head Adjusting the Print Head Troubleshooting Paper Abrasion and Blurry Images 264...

Страница 265: ...ignment Execute Print head alignment in the touch screen menu to adjust the print head alignment Normally execute Auto standard or Auto fine However when printing on special paper or if printing is no...

Страница 266: ...try another type of paper or try Manual adjustment Manual Adjustment to Straighten Lines and Colors Note Because the results of adjustment vary depending on the type of paper used for adjustment use t...

Страница 267: ...nance screen appears 3 Tap Print head alignment 4 Select and tap Auto standard or Auto fine A confirmation message appears 5 Tap Yes The paper source setting screen appears 6 Select and tap paper sour...

Страница 268: ...most often for adjustment Items to Prepare When Using Rolls An unused roll at least 10 00 in 254 0 mm wide When Using Sheets Three sheets of unused paper A4 Letter size or larger or one sheet when us...

Страница 269: ...ment test pattern D 1 and determine the number with straight lines A Example with straight lines B Example with misaligned lines Note If two patterns seem equally good and you cannot decide which one...

Страница 270: ...ainst or becoming caught on the print head may jam or result in printed documents that are soiled Note Raise or lower print head depending on nature of the problem Paper rubs against the printhead The...

Страница 271: ...onding to the ambient temperature and humidity and displays the setting value selected for the previous print job in Values applied with auto settings Printer information When a setting other than Aut...

Страница 272: ...Adjusting Feed Amount Adjusting Feed Amount Adjusting Vacuum Strength 272...

Страница 273: ...Adjusting Feed Amount Selecting Feed Amount Adjustment Method Automatic Banding Adjustment Manual Banding Adjustment Fine Tuning Paper Feed Amount Adjusting Line Length 273...

Страница 274: ...Flick HOME screen and tap Maintenance Menu Operations 3 Tap Paper feed adjustment 4 Tap Set priority 5 Tap paper to adjust 6 Tap setting Prioritize print quality Adjusts the feed amount to reduce ban...

Страница 275: ...stment Method If additional fine tuning is necessary execute Paper feed fine adjustment Fine Tuning Paper Feed Amount Use Adjust feed length to ensure that lines in CAD drawings are printed at exactly...

Страница 276: ...6 Tap paper to adjust A test pattern is printed for adjustment and adjustment is finished 276...

Страница 277: ...per Feed Amount Use Adjust feed length to ensure that lines in CAD drawings are printed at exactly the right length Adjusting Line Length Items to Prepare When Using Rolls An unused roll at least 254...

Страница 278: ...e choose 11 if you cannot decide whether pattern 10 or 12 is better 8 Tap number you decided Test pattern B is printed for manual adjustment Note If you printed test pattern A on a sheet follow the in...

Страница 279: ...priority in Paper feed adjustment Always execute Adjust print quality before Paper feed fine adjustment Once you execute Adjust print quality the Paper feed fine adjustment value will revert to 0 Auto...

Страница 280: ...s One sheet of unused paper of at least A4 Letter size High precision ruler Follow the procedure below to adjust 1 Load paper Loading Rolls on the Roll Holder Loading the Upper Roll on the Printer Loa...

Страница 281: ...ad you will measure a document already printed to determine the discrepancy 6 Tap amount of discrepancy If the scale is shorter than the actual size use a positive setting value If it is longer use a...

Страница 282: ...the platen may improve results Important Paper rubbing against or becoming caught on the print head may jam or result in printed documents that are soiled 1 Flick HOME screen and tap paper informatio...

Страница 283: ...Color Management Digital Photo Printing Guide Color Calibration Managing Colors Performing Color Calibration Adjustment Types of Color Calibration Device Management Console Guide 283...

Страница 284: ...Color Calibration Managing Colors Performing Color Calibration Adjustment Types of Color Calibration 284...

Страница 285: ...ibration from Device Management Console See below for details Device Management Console Guide Windows Device Management Console Guide Mac OS Checking When to Execute Color Calibration You can use the...

Страница 286: ...See below for details Media Configuration Tool Guide Windows Media Configuration Tool Guide Mac OS 286...

Страница 287: ...ions may prevent the printer from making the correct adjustments Before color calibration ensure the printer is not exposed to direct sunlight or other strong sources of light If the printer is expose...

Страница 288: ...ith loaded paper After the paper is confirmed and color calibration is executed the calibration adjustment value is set automatically Other Menu Items Enable disable adjustment values You can select w...

Страница 289: ...reen in the following situations When a new print head has been installed When a certain amount of printing has been executed after color calibration is executed When the data of color calibration has...

Страница 290: ...types of paper see Paper Information List Common Calibration If color calibration is executed on a media type categorized as common calibration new common calibration adjustment values are set Among t...

Страница 291: ...libration adjustment values of media type B are applied Third time Execute color calibration with media type C categorized as unique calibration Media type A The calibration adjustment values of media...

Страница 292: ...ation Adj Value Calibration application information Executed date and paper name appear Note You can check the media information with the Device Management Console or printer driver See below for deta...

Страница 293: ...ing the Maintenance Cartridge Checking the Remaining Maintenance Cartridge Capacity When to Replace the Maintenance Cartridge Cutter Blade Cutter Blade Replacing the Cutter Blade Performing Maintenanc...

Страница 294: ...Cleaning the Printer Exterior Cleaning Inside the Top Cover Cleaning the Roll Unit Cleaning the Print Head Other Maintenance Preparing to Transfer the Printer Reinstalling the Printer 294...

Страница 295: ...Ink Tanks Ink Tanks Replacing Ink Tanks Checking Ink Tank Levels When to Replace Ink Tanks 295...

Страница 296: ...hoto Cyan PFI 1100 PC Photo Magenta PFI 1100 PM Gray PFI 1100 GY Photo Gray PFI 1100 PGY Red PFI 1100 R Blue PFI 1100 B Chroma Opti mizer PFI 1100 CO Matte Black PFI 1300 MBK 11 2 fl oz 330 ml Photo B...

Страница 297: ...to Black PFI 1700 PBK Cyan PFI 1700 C Magenta PFI 1700 M Yellow PFI 1700 Y Photo Cyan PFI 1700 PC Photo Magenta PFI 1700 PM Gray PFI 1700 GY Photo Gray PFI 1700 PGY Red PFI 1700 R Blue PFI 1700 B Chro...

Страница 298: ...ed in this printer in another model of printer This will prevent correct ink level detection which may damage the printer or cause other problems We recommend using up an ink tank in the course of pri...

Страница 299: ...nk Tank Replacement from menu 1 Tap ink display area on Home screen Touch Screen The Current estimated ink levels screen appears 2 Tap Replace Instructions appear on the touch screen Removing ink tank...

Страница 300: ...stops and then push it down toward front Note Check that the ink tank lock lever does not return 4 Remove ink tank by grips A and then tap OK Important Store the removed ink tank with ink remaining w...

Страница 301: ...g and check the ink lamp The ink lamp flashes if there is no ink left Important Avoid jarring the printer a lot when replacing an ink tank Handle the printer gently when replacing tanks 2 Pull forward...

Страница 302: ...Remove ink tank by handle A and then tap OK Important Store the removed ink tank with ink remaining in the box with the ink holes A facing up Otherwise ink may leak and cause stains Note Dispose of t...

Страница 303: ...led in the printer Ink may leak out Failure to agitate the ink tank may cause the ink components to precipitate and may affect printing quality Note If the ink tank is at a low temperature allow it to...

Страница 304: ...rear Important An ink tank cannot be loaded in the holder if the color or orientation is incorrect If the ink tank does not fit in the holder do not force it into the holder Reinstall while checking...

Страница 305: ...6 Make sure ink lamp indicator is lit Note If the ink lamp is not lit reload the tank 7 Close ink tank cover 305...

Страница 306: ...rm to agitate it instead of just your wrist If you agitate the ink tank using just your wrist you may injure your wrist Important Do not remove and agitate an ink tank that has already been installed...

Страница 307: ...he metal contacts B This may cause stains damage the ink tank and affect printing quality Avoid dropping the ink tank after removing it from the pouch Otherwise ink may leak and cause stains 3 Tap OK...

Страница 308: ...k does not fit in the holder do not force it into the holder Reinstall while checking the label color display ink tank color and ink tank orientation 4 Lift up ink tank lock lever and then push it dow...

Страница 309: ...Note If the ink lamp is not lit reload the tank 7 Close ink tank cover 309...

Страница 310: ...eft appears if you have deactivated ink level detection appears The remaining ink level is indicated as shown below If the touch screen indicates to replace the ink tank replace the ink tank If a mess...

Страница 311: ...Note Tap Order ink now to view the ink supplier information 311...

Страница 312: ...ng Ink Tank Levels Before print jobs and maintenance that consume a lot of ink If little ink is left there may not be enough for large format printing head cleaning and maintenance which require a lot...

Страница 313: ...Print Head Print Head Checking for Nozzle Clogging Cleaning the Print Head Replacing the Print Head 313...

Страница 314: ...Print Head When purchasing check the Model number Shape Model number PF 10 Note For instructions on replacing the print head see Replacing the Print Head 314...

Страница 315: ...A4 Letter size 1 Load paper Loading Rolls on the Roll Holder Loading the Upper Roll on the Printer Loading the Lower Roll on the Roll Unit Loading Sheets in the Printer 2 Flick Home screen and tap Mai...

Страница 316: ...no color printing is performed on top of the black pattern Check if the dark gray areas have lines A in the CO pattern If horizontal lines are faint or incomplete execute print head cleaning Cleaning...

Страница 317: ...Use this if printing is not improved after Deep cleaning System cleaning consumes a very large amount of ink Performing this frequently consumes the ink faster Perform this only when needed It takes...

Страница 318: ...aintenance Touch Screen The Maintenance screen appears 2 Tap Print head cleaning 3 Select and tap Cleaning Deep cleaning or System cleaning 4 Select and tap the ink group to be cleaned All colors Patt...

Страница 319: ...6 Print a test pattern to check the nozzles and determine whether cleaning has cleared the nozzles Checking for Nozzle Clogging 319...

Страница 320: ...arefully during replacement The ink may stain clothing Do not open the print head pouch until immediately before installation After removing the print head from the pouch install it right away If the...

Страница 321: ...creen The Maintenance screen appears 4 Tap Head replacement A confirmation message appears 5 Tap Yes Ink begins being drawn in When it finishes instructions are displayed on the touch screen It takes...

Страница 322: ...or ink tube stabilizer C Touching may damage them 3 If ventilation duct A is dirty use damp cloth that you have wrung out completely to wipe it clean If the Carriage is obscuring the ventilation duct...

Страница 323: ...Holding grip A open print head locking cover until it stops 6 Remove print head by blue handle A and then tap OK Important Never touch the metal contacts of the Carriage Furthermore do not allow any...

Страница 324: ...ve tape used to secure print head 9 Lift print head by blue handle and remove orange protective cap 2 Important Always carry the print head by the blue handle Never touch the nozzle A or metal contact...

Страница 325: ...If ink accidentally spills wipe off the ink with a dry cloth If you need to put a print head somewhere temporarily before installation return it to the case in the same orientation If placed face dow...

Страница 326: ...ut 18 or 19 minutes Important While ink is being filled definitely do not remove the ink tank or maintenance cartridge Ink may leak out Note Print head position adjustment is executed when Print patte...

Страница 327: ...Maintenance Cartridge Maintenance Cartridge Replacing the Maintenance Cartridge Checking the Remaining Maintenance Cartridge Capacity When to Replace the Maintenance Cartridge 327...

Страница 328: ...Maintenance Cartridge When purchasing check the Model number Shape Model number MC 30 Note For instructions on replacing the maintenance cartridge see Replacing the Maintenance Cartridge 328...

Страница 329: ...fter replacing the maintenance cartridge The maintenance cartridge may become damaged or ink may leak out To prevent ink from leaking from a used maintenance cartridge avoid dropping the cartridge or...

Страница 330: ...n the touch screen Replacing Maintenance Cartridge 1 Open box and remove plastic bag and maintenance cartridge Important Never touch the metal contacts A This may damage the maintenance cartridge 2 Op...

Страница 331: ...u drop a used maintenance cartridge or store it at an angle ink may leak and cause stains 4 Put used maintenance cartridge in supplied plastic bag and store on flat surface 5 Check the top and bottom...

Страница 332: ...ntenance cartridge level insert it all the way in The maintenance cartridge is initialized Important Do not remove the maintenance cartridge during initialization immediately after replacing the maint...

Страница 333: ...333...

Страница 334: ...intenance cartridge info The Maintenance cartridge info screen appears If the touch screen indicates to replace the maintenance cartridge replace the maintenance cartridge If a message appears indicat...

Страница 335: ...idge Capacity When the maintenance cartridge capacity is drastically depleted Print head cleaning print head replacement and preparations to transfer the printer deplete much of the maintenance cartri...

Страница 336: ...Cutter Blade Cutter Blade Replacing the Cutter Blade 336...

Страница 337: ...ing check the Model number This cutter blade comes with a part for securing the cutter blade during installation Shape Model number CT 07 Note For instructions on replacing the cutter blade see Replac...

Страница 338: ...Carriage moves and after it stops moving instructions appear on the touch screen Note If you do not take action within 2 minutes cutter blade replacement is canceled In this case repeat the procedure...

Страница 339: ...se 4 Remove cutter blade while holding A Caution Never touch any part other than A This may stain your hands or cause injury Additionally this may damage the printer Do not disassemble the cutter blad...

Страница 340: ...accordance with local regulations 5 Install new cutter blade while aligning A to B and C to D 6 Install while aligning fixing part included with replacement cutter blade with center of cutter blade 7...

Страница 341: ...lade does not come off If the cutter blade comes off this may damage the printer 8 Remove fixing part Important Always remove the fixing part Operating with the part installed may damage the printer 9...

Страница 342: ...Performing Maintenance Functions from Your Computer Mac OS Cleaning the Print Heads Printing a Nozzle Check Pattern Adjusting the Paper Feed Volume 342...

Страница 343: ...k Then if necessary perform Cleaning Is there ink remaining in the tank Did you push in the ink tank completely until you heard a clicking sound If the orange tape is there has it been peeled off comp...

Страница 344: ...uting this function check the items below Then if you feel it necessary execute System Cleaning Did you use Nozzle Check to check the nozzle status and was there a problem Did the status remain unchan...

Страница 345: ...cessary perform Nozzle Check Is there ink remaining in the tank Did you push in the ink tank completely until you heard a clicking sound If the orange tape is there has it been peeled off completely A...

Страница 346: ...eck whether the CO pattern contains horizontal streaks A in the dark gray area From the nozzle check pattern printing results if it becomes patchy or there are areas that cannot be printed use Cleanin...

Страница 347: ...y adjusting the lined feed volume Here we explain the procedure for adjusting the line feed volume Paper Feed Amount Adjustment 1 Select Test Print from the pop up menu on the Canon IJ Printer Utility...

Страница 348: ...Cleaning the Printer Cleaning the Printer Exterior Cleaning Inside the Top Cover Cleaning the Roll Unit Cleaning the Print Head 348...

Страница 349: ...r cord from the outlet Caution Always turn off the printer and unplug the power cord before cleaning or maintenance Accidentally leaving the printer on poses a risk of injury if you touch moving parts...

Страница 350: ...he printer there is a risk of fire or electrical shock Important If the output guide is dirty it may soil the edge of the paper when the paper is cut We recommend cleaning the output guide even if it...

Страница 351: ...the top cover becomes dirty it may soil the underside of paper We recommend cleaning the platen after borderless printing or printing on small paper If the output guide is dirty it may soil the edge o...

Страница 352: ...rinse it in water 6 Using a damp cloth that you have wrung out completely wipe inside the top cover to clean it Wipe away any ink residue and paper dust debris from cutting on top cover roller A paper...

Страница 353: ...tances come into contact with electrical components inside the printer there is a risk of fire or electrical shock Important Do not use a dry cloth to wipe inside the top cover This may create a stati...

Страница 354: ...cleaning or maintenance Accidentally leaving the printer on poses a risk of injury if you touch moving parts inside the printer 4 Wipe away any residue and paper dust from areas A B that come in conta...

Страница 355: ...Other Maintenance Preparing to Transfer the Printer Reinstalling the Printer 355...

Страница 356: ...the amount remaining in the maintenance cartridge being used If you can move the printer in a level state using casters or something similar you do not need to execute Prepare to transportation Alway...

Страница 357: ...The printer is now prepared for transfer When the preparation is finished instructions appear on the touch screen Remove the ink tanks before packing the printer Important If consumables must be repl...

Страница 358: ...removed the ink may leak out 4 Replace maintenance cartridge currently being used with new maintenance cartridge Replacing the Maintenance Cartridge 5 Press ON button and turn off printer Pack the pri...

Страница 359: ...tored after initial installation Neglecting to attach the Belt Stopper may damage the printer Never touch the linear scale A carriage shaft B or ink tube stabilizer C Touching may damage them 4 Close...

Страница 360: ...reversing the installation procedure when it was attached to the printer 8 Disassemble and repackage the Stand by following the installation procedure in reverse 9 Repack Roll Holder holder stopper an...

Страница 361: ...ion always unlock the casters before moving the assembled Stand Attempting to move the stand when the casters are locked poses a risk of injury or damage to the location site Install the printer 1 Mou...

Страница 362: ...rinter Also open the top cover and remove stoppers and spacers inside the printer 3 If using optional roll unit refer to Setup Guide provided with roll unit and attach roll unit to Stand 4 Refer to Pr...

Страница 363: ...the power button to turn the printer on When Do you want to install the transported printer Do not install the ink tanks yet appears tap Yes 8 When instructions for loading ink tank appear on touch sc...

Страница 364: ...ee Loading the Upper Roll on the Printer 11 Install the software Note that the driver installation procedure varies depending on the type of connection See Installing the Printer Driver Windows See In...

Страница 365: ...Specifications Printer Specifications Specifications Print Area 365...

Страница 366: ...Printer Specifications Specifications Print Area 366...

Страница 367: ...68 mm Main unit and Stand when using bas ket basket Position 2 4 5 3 Approx 78 8 48 2 46 in 1999 1222 1168 mm Main unit and Stand when using bas ket basket Position 3 3 Approx 78 8 56 5 46 in 1999 143...

Страница 368: ...e USB Hi Speed USB 1 USB memory USB flash drive LAN Wired LAN IEEE802 3ab 1000BASE T IEEE802 3u 100BASE TX IEEE802 3 10BASE T Wireless LAN IEEE802 11n IEEE802 11g IEEE802 11b 2 1 To use Hi Speed USB y...

Страница 369: ...PS push button method PIN code method WCN WCN NET Cableless setup Other Admin password Operating Conditions If operating conditions of the operating system are high follow those Windows Compatible Ope...

Страница 370: ...nmental conditions An Internet connection is required to use the Online Manual To install the software while using Windows you must have a CD ROM drive or a network connection To install the software...

Страница 371: ...Print area For details about Print Area see Print Area 1 Varies depending on the operating system or application 371...

Страница 372: ...int Area We recommend printing within this area To match the document size with the actual printing area print on oversize paper with the required margin added Printing to Oversized Paper Sizes Window...

Страница 373: ...A margin of 0 2 in 3 mm on top and bottom and 0 2 in 3 mm on left and right sides is required For borderless printing the margins on top bottom left and right are 0 in 0 mm For paper that supports bo...

Страница 374: ...Safety Safety Precautions Regulatory Information WEEE EU EEA 374...

Страница 375: ...avoid back strain and other injuries When moving the printer firmly grasp the Carrying Handles under each side The printer may be unsteady if you hold it at other positions which poses a risk of injur...

Страница 376: ...Do not attempt to disassemble or modify the print head ink tanks and maintenance cartridges Avoid dropping or shaking print head ink tanks and maintenance cartridges 376...

Страница 377: ...n reception which can be determined by turning the equipment off and on the user is encouraged to try to correct the interference by one or more of the following measures Reorient or relocate the rece...

Страница 378: ...d keeping the radiator at least 20cm or more away from person s body excluding extremities hands wrists feet and ankles Pour les usagers r sidant au Canada Le pr sent appareil est conforme aux CNR d I...

Страница 379: ...nd Liechtenstein Diese Symbole weisen darauf hin dass dieses Produkt gem WEEE Richtlinie 2012 19 EU Richtlinie ber Elektro und Elektronik Altger te Batterien Richtlinie 2006 66 EG und nationalen Geset...

Страница 380: ...site www canon europe com weee ou www canon europe com battery Uitsluitend bestemd voor de Europese Unie en EER Noorwegen IJsland en Liechtenstein Met deze symbolen wordt aangegeven dat dit product i...

Страница 381: ...i n de residuos dom sticos o visite www canon europe com weee o www canon europe com battery Nom s per a la Uni Europea i a l Espai Econ mic Europeu Noruega Isl ndia i Liechtenstein Aquests s mbols in...

Страница 382: ...i questo prodotto contattare le autorit locali l ente responsabile della raccolta dei rifiuti un rivenditore autorizzato o il servizio di raccolta dei rifiuti domestici oppure visitare il sito www can...

Страница 383: ...t indsamlingssted f eks i overensstemmelse med en godkendt n til n procedure n r du indk ber et nyt tilsvarende produkt eller p et godkendt indsamlingssted for elektronikaffald samt for batterier og a...

Страница 384: ...lueelle N m tunnukset osoittavat ett s hk ja elektroniikkalaiteromua koskeva direktiivi SER direktiivi 2012 19 EU paristoista ja akuista annettu direktiivi 2006 66 EY sek kansallinen lains d nt kielt...

Страница 385: ...b rn ho m sta nap v r mci autorizovan ho syst mu odb ru jednoho v robku za jeden nov prodan podobn v robek nebo do autorizovan ho sb rn ho m sta pro recyklaci odpadn ch elektrick ch a elektronick ch z...

Страница 386: ...i akumulator w maj obowi zek korzysta z dost pnego programu zwrotu recyklingu i utylizacji baterii oraz akumulator w Niew a ciwe post powanie z tego typu odpadami mo e mie wp yw na rodowisko i zdrowi...

Страница 387: ...tri ja elektroonikaseadmetest tekkinud j tmete ning patarei ja akuj tmete tagastamise ja mbert tlemise kohta v tke hendust kohaliku omavalitsusega asjakohase valitsusasutusega asjakohase tootjavastutu...

Страница 388: ...oti organai ar buitini atliek surinkimo mon s Taip pat si loma apsilankyti interneto svetain je www canon europe com weee arba www canon europe com battery Samo za Evropsko unijo in EGP Norve ka Islan...

Страница 389: ...la baterii Acest produs trebuie nm nat punctului de colectare adecvat ex printr un schimb autorizat unu la unu atunci c nd cump ra i un produs nou similar sau la un loc de colectare autorizat pentru r...

Страница 390: ...je o recikliranju ovog proizvoda zatra ite od svog lokalnog gradskog ureda slu be za zbrinjavanje otpada odobrenog programa ili komunalne slu be za uklanjanje otpada ili pak na stranicama www canon eu...

Страница 391: ...Basic Printing Workflow Printing procedure Canceling print jobs Pausing Printing 391...

Страница 392: ...Printing procedure Printing Options Using Rolls and Sheets Turning the Printer On and Off Loading and Printing on Rolls Loading and Printing on Sheets Printing in Windows Printing from Mac OS 392...

Страница 393: ...Microsoft Office applications See Printing Hanging and Horizontal Banners Large Format Printing Windows See Printing Hanging and Horizontal Banners Large Format Printing Mac OS Borderless printing Pri...

Страница 394: ...ic selection of the right paper for the print job Selecting Roll Paper Auto in Paper Source in the printer driver enables automatic selection and printing on the roll that suits the print job from the...

Страница 395: ...er on 1 Press ON button to turn on printer The printer will now start up The Canon logo appears on the touch screen and then Starting the system Please wait appears 2 When startup is finished ON butto...

Страница 396: ...ssary The ON button and Status lamp never light up and nothing appears on the touch screen Make sure the printer is plugged in correctly Check the connection at the plug and electrical outlet No paper...

Страница 397: ...take action as necessary If the Status lamp is flashing white the printer is receiving a print job Turn off the printer after printing is finished 2 Hold down the ON button for more than a second Endi...

Страница 398: ...rying Time in the printer driver See Specifying the Ink Drying Time for Rolls Once you have used all the paper on a roll clean the platen If the platen inside the top cover becomes dirty it may soil t...

Страница 399: ...ve set Manage remaining roll amount to Enable specify the roll length after selecting the media type See Specifying the Paper Length 5 Complete settings in the printer driver for the type of paper and...

Страница 400: ...6 Send the print job Printing in Windows Printing from Mac OS The printer now starts printing the print job 400...

Страница 401: ...Information List Borderless printing is not supported on sheets For the features and the main printing methods available for sheet printing see Printing Options Using Rolls and Sheets 1 Turn the prin...

Страница 402: ...3 Send the print job Printing in Windows Printing from Mac OS 4 Load the sheet See Loading Sheets in the Printer Start printing 402...

Страница 403: ...g Note The appearance of the dialog box varies depending on the software application In most cases the dialog box includes basic printing options and enables you to choose the printer specify the rang...

Страница 404: ...software or from the operating system menu For details see How to Open the Printer Driver Setup Window Windows or How to Open the Printer Driver Setup Window Mac OS 404...

Страница 405: ...ons of Mac OS X in System Preferences before printing For instructions on registering printers see Sharing the Printer on a Network Mac OS Important During this setup process the printer will not be l...

Страница 406: ...printing As shown in the following illustration you can switch to other panes in this dialog box to complete settings for various methods of printing including enlarged and reduced printing borderless...

Страница 407: ...Canceling print jobs Canceling Print Jobs from the Control Panel Canceling Print Jobs from Windows Canceling Print Jobs from Mac OS 407...

Страница 408: ...printer operation varies depending on the current status You press the Stop button before printing starts Pressing the Stop button before printing starts displays a confirmation message To cancel the...

Страница 409: ...to display the printer window Note You can proceed from the folder for configuring the printer settings in the OS you are using For example in Windows 7 open the Devices and Printers window from the s...

Страница 410: ...Note The screen may differ slightly depending on the model you are using 410...

Страница 411: ...con in the Dock to display the printer window 2 Either click for the job to cancel printing or select the job to cancel printing and then click Delete to delete the job Note If the job to be canceled...

Страница 412: ...Pausing Printing Pausing Printing 412...

Страница 413: ...e normal operation after pausing printing set Pause printing to Disable Note In the following cases the status is cleared even if you do not set Pause printing to Disable and printing from the job que...

Страница 414: ...ct Roll Unit Settings in the Printer Driver Printing Photos and Business Documents Printing By Setting Print Purpose Edit in PosterArtist and Print Changing the Print Quality and Correcting Image Data...

Страница 415: ...ages All on One Page Dividing and Printing Posters Printing Document in Center of Paper Printing by Saving Roll Paper Saving Roll Paper by Rotating Document 90 Degrees Saving Roll Paper by Eliminating...

Страница 416: ...tion Optimal Photo Printing of Image Data Adjusting Colors with the Printer Driver Printing with ICC Profiles Specifying an ICC Profile from the Application Software Printing with ICC Profiles Specify...

Страница 417: ...t 90 Degrees Saving Roll Paper by Eliminating Upper and Lower Margins on Document Switching the Paper Source to Match the Purpose Cutting Roll Paper after Printing Printing from Printer Printing from...

Страница 418: ...ings in the Printer Driver Changing the Print Quality and Correcting Image Data Adjusting Color Balance Setting the Print Quality Level Custom Printing a Color Document in Monochrome Adjusting Tone Sp...

Страница 419: ...ges Printing Multiple Pages All on One Page Printing Document in Center of Paper Printing by Saving Roll Paper Saving Roll Paper by Rotating Document 90 Degrees Saving Roll Paper by Eliminating Upper...

Страница 420: ...t paper 3 Select the printer Select your model from the Printer list in the Print Dialog Note Click Show Details to switch the Setup window to the detailed display However depending on the application...

Страница 421: ...5 Select Quality Media from the pop up menu 6 Select the media type For Media Type select the same paper type loaded in the printer 421...

Страница 422: ...ormation List for Canon authentic paper or Canon output check paper 7 Select the paper source For Paper Source select the setting that matches your purpose Important The paper feed method will differ...

Страница 423: ...e print quality settings that can be selected may differ depending on a printing profile 9 Select Page Processing from the pop up menu 10 Selecting Roll Paper Width If you selected a roll paper for Pa...

Страница 424: ...ected for Paper Source in Quality Media Roll Paper Width is grayed out and cannot be set 11 Complete the setup Click Print When you execute print the document will be printed in accordance with the ty...

Страница 425: ...s in the printer driver differ from the paper information registered on the printer an error message may appear on the printer s operation panel You can still print but you may not be able to obtain c...

Страница 426: ...rint Dialog 2 Select Paper Handling from the pop up menu 3 Check the Collate pages check box when you are specifying multiple copies in the Copies box Check the Collate pages check box to print all th...

Страница 427: ...has the same function specify the settings on the printer driver However if the print results are not acceptable specify the function settings on the application software When you specify the number...

Страница 428: ...Level Roll Switching Setting the Paper Rolls in the Printer According to the Intended Use Printing by Automatically Switching Upper level and Lower level Roll Papers How to Switch Paper Rolls Reflect...

Страница 429: ...Roll 2 in this way is called 2 level roll switching For instructions on setting the paper see Loading Roll Papers in the Printer for Different Purposes For the 2 level roll switching procedure see Pr...

Страница 430: ...the print job Set two paper rolls of the same width but of different types of paper on the upper and on the lower trays Alternatively set two paper rolls of different width and different types of pape...

Страница 431: ...settings an error may occur causing the wrong paper roll to be used in such cases it is recommended that instead of using 2 level roll switching you specify which one is best between paper roll 1 and...

Страница 432: ...s the source document created by the application software 2 Select Quality Media from the pop up menu of the Print Dialog 3 Select the media type For Media Type select the same paper type loaded in th...

Страница 433: ...ox Note If you rotate a portrait document 90 degrees and print it at that horizontally you may be able to save paper depending on the paper size Important When you select the Rotate Page 90 degrees ch...

Страница 434: ...nt the paper source is switched automatically to roll paper Important On the operation panel if Device settings Paper related settings Roll paper auto switching is set to Do not identify size the docu...

Страница 435: ...ot be switched automatically Note If Error or On hold are displayed replace the paper to match the requirements of the print job In order to minimize paper waste it is recommended that you configure t...

Страница 436: ...s the paper width specified for the print job only when printing borderless or enlarging reducing Only one of either paper roll 1 or paper roll 2 has the width speci fied for the print job Select the...

Страница 437: ...er the paper roll loaded on the printer is long enough to print the paper size specified for the print job Only one of either paper roll 1 or paper roll 2 is long enough Select the paper roll of suffi...

Страница 438: ...or paper roll 2 have a width matching the one specified for the print job To Condition 6 Both paper roll 1 and paper roll 2 have a width matching the one specified for the print job Paper roll width h...

Страница 439: ...lowing cases neither roll 1 nor roll 2 are being fed onto the platen In such cases paper roll 1 is selected When the printer has switched to sleep mode and has returned to the initial position When th...

Страница 440: ...the printer driver so that they reflect those in the printer unit 1 Open System Preferences and select Printers Scanners Print Scan 2 Select the name of your model from the list of printers and click...

Страница 441: ...ality and Correcting Image Data Adjusting Color Balance Setting the Print Quality Level Custom Printing a Color Document in Monochrome Adjusting Tone Specifying Color Correction Adjusting Brightness A...

Страница 442: ...t the overall colors are more uniform No adjustment Adjust color balance The procedure for adjusting color balance is as follows 1 Select Color Options from the pop up menu of the Print Dialog 2 Adjus...

Страница 443: ...o Print check box is checked for Quality Media the color balance Cyan Magenta Yellow are unavailable If you select ColorSync for Color Matching then the color balance Cyan Magenta Yellow appear grayed...

Страница 444: ...t Custom for Print Quality 3 Setting the print quality level Move the Quality slider to select the print quality level 4 Complete the setup Click Print When you execute print the image data is printed...

Страница 445: ...t Dialog 2 Set black and white photo printing Check the Black and White Photo Print check box 3 Complete the setup Click Print When you execute print the document is converted to grayscale data It all...

Страница 446: ...e pop up menu of the Print Dialog 2 Selecting the paper with Media Type For paper for which the black and white tone can be adjusted select the paper you want to use from Paper Information List and ch...

Страница 447: ...ues directly or click the up down arrows When you enter values set values in the range of 100 to 100 for X and 50 to 50 for Y You can also adjust the color tones by clicking or dragging the adjustment...

Страница 448: ...with adjusted tones It allows you to print the color document in monochrome Important If you select ColorSync for Color Matching then Tone X and Y appear grayed out and are unavailable Related Topics...

Страница 449: ...the pop up menu of the Print Dialog 2 Select color correction Select the item below that matches your purpose ColorSync Perform color correction using ColorSync Canon Color Matching The driver will p...

Страница 450: ...age Data Adjusting Colors with the Printer Driver Printing with ICC Profiles Specifying an ICC Profile from the Application Software Printing with ICC Profiles Specifying an ICC Profile from the Print...

Страница 451: ...ge saving format that requires a computer to develop the image You can embed an input ICC profile tag into a RAW file by using special application software Selecting a Printing Method Suited to the Im...

Страница 452: ...ghtness 100 to 120cd m2 Gamma 2 2 Environment light Fluorescent light for D50 color evaluation color temperature 5000K high color rendering properties Brightness when looking at printed materials 500...

Страница 453: ...Perceptual Photo and reproduces a fresher image No Color Correction The color is not corrected by the printer driver 5 Set the other items From the pop up menu select Color Options If necessary adjus...

Страница 454: ...file in the image data Even if you print using a printing ICC profile that you created yourself or one for special Canon paper be sure to select color management items from your application software F...

Страница 455: ...Specifying Color Correction Adjusting Color Balance Adjusting Brightness Adjusting Contrast 455...

Страница 456: ...ColorSync You can leave Profile set to Automatic Important If you choose a Profile setting other than Automatic or Printing Paper ICC Profile the printer will not be able to print with the correct col...

Страница 457: ...nter specify an ICC profile according to the print output media The ICC profiles installed for this printer appear as follows 1 Printer model 2 Media type For the names of compatible paper check the i...

Страница 458: ...Color Options from the pop up menu of the Print Dialog 2 Adjust brightness Moving the Brightness slider to the right brightens the colors and moving the slider to the left darkens the colors You can...

Страница 459: ...ect ColorSync for Color Matching then the Brightness appears grayed out and is unavailable Related Topics Setting the Print Quality Level Custom Specifying Color Correction Adjusting Color Balance Adj...

Страница 460: ...procedure for adjusting contrast is as follows 1 Select Color Options from the pop up menu of the Print Dialog 2 Adjust the contrast Moving the Contrast slider to the right increases the contrast and...

Страница 461: ...ect ColorSync for Color Matching then the Contrast appears grayed out and is unavailable Related Topics Setting the Print Quality Level Custom Specifying Color Correction Adjusting Color Balance Adjus...

Страница 462: ...ing factor in the Scale box and click OK Note Depending on the Scale value that you set an error message may be displayed 3 Complete the setup On the Print Dialog click Print When you execute print th...

Страница 463: ...inting For Fit Roll Paper Width select On Bordered or On Borderless Note Depending on the Paper Size settings the settings you can choose will differ When selecting XXX oversize from Paper Size On Bor...

Страница 464: ...all areas of the document are printed at their actual size A printout that has the same area as the document can be obtained by trimming the outer margins after printing The procedure for printing wi...

Страница 465: ...Click Print When you print the document is printed so that it fills the paper width Important When printing to oversized paper sizes use paper that has the following necessary margins added to the do...

Страница 466: ...size Click OK The custom size is registered Important If the application software that created the document has a function for specifying height and width values use the application software to set th...

Страница 467: ...he document size with the actual printing area print on oversize paper with the required margin added Printing to Oversized Paper Sizes Margins of Printable Area Margins of Recommended Print Area Top...

Страница 468: ...3 mm on left and right sides is required For borderless printing the margins on top bottom left and right are 0 in 0 mm For paper that supports borderless printing see Paper Information List Recommend...

Страница 469: ...Prints without Edges Based on the Scenarios Printing without Margins to Match Roll Paper Width Printing Full Size without Margins 469...

Страница 470: ...pop up menu select Page Processing 3 Select roll paper width For paper roll width enter the same value set in the printer under Roll Paper Width 4 Select a method for printing on roll paper In Fit Ro...

Страница 471: ...layed in gray and you will not be able to configure them Depending on paper size the length width ratio of the paper may be different from that of the image making it impossible for the whole image to...

Страница 472: ...s may be formed on the left and right of the document even when borderless printing is set 30 in Roll 762 0mm A2 A3 Roll 420 0mm 16 in Roll 406 4mm A3 Roll 329 0mm 300mm Roll 300 0mm A3 A4 Roll 297 0m...

Страница 473: ...3 Select roll paper width For paper roll width enter the same value set in the printer under Roll Paper Width 4 Select a method for printing on roll paper For Fit Roll Paper Width select Off Importan...

Страница 474: ...layed in gray and you will not be able to configure them Depending on paper size the length width ratio of the paper may be different from that of the image making it impossible for the whole image to...

Страница 475: ...s may be formed on the left and right of the document even when borderless printing is set 30 in Roll 762 0mm A2 A3 Roll 420 0mm 16 in Roll 406 4mm A3 Roll 329 0mm 300mm Roll 300 0mm A3 A4 Roll 297 0m...

Страница 476: ...ging the clear coating settings 1 From the Print Dialog display the pop up menu and select Paper Detailed Settings 2 Setting the clear coating area Select Auto or Overall under Clear Coating Area Auto...

Страница 477: ...ia you may not be able to select Overall For paper for which Overall can be used select the paper you want to use from Paper Information List and check the information If Overall is selected and the m...

Страница 478: ...anage Custom Sizes to register the paper size that you want to use 2 Select the paper size In the Print dialog select a registered custom paper size from the Paper Size list 3 Select Page Processing f...

Страница 479: ...6 Complete the setup Click Print When you print the hanging or horizontal banner is printed by using the custom paper size 479...

Страница 480: ...Printing by Dividing Joining Documents Lining Up and Printing Multiple Documents Printing by Connecting Multiple Pages Printing Multiple Pages All on One Page 480...

Страница 481: ...dure for lining up and printing multiple documents is as follows 1 In Print dialog select Canon imagePROGRAF Free Layout for PDF Canon imagePROGRAF Free Layout is started Canon imagePROGRAF Free Layou...

Страница 482: ...up menu of the Print Dialog 2 Select the paper source Select Roll Paper Auto Roll 1 or Roll 2 that matches your purpose for Paper Source Important The paper feed method will differ according to the p...

Страница 483: ...Important When XXX borderless or XXX Cut Sheet is selected for Paper Size in the Print dialog Banner Printing is grayed out and cannot be set 483...

Страница 484: ...p up menu in the Print Dialog 2 Set the number of original you print on one page In Pages per Sheet specify the number of page you print on one page 3 If necessary set the following items Layout Direc...

Страница 485: ...Select this check box to reverse left and right of the document 4 Complete the setup Click Print When you execute print the specified number of pages will be arranged on each sheet of paper in the sp...

Страница 486: ...when performing reduced printing the bottom and right margins of the paper will increase At this time if you place a checkmark next to Print Centered the top bottom left and right margins can all be...

Страница 487: ...e center of paper Check the Print Centered check box 9 Complete the setup Click Print When you print the printer automatically lays out the document to the center of the page and then prints it Import...

Страница 488: ...Printing by Saving Roll Paper Saving Roll Paper by Rotating Document 90 Degrees Saving Roll Paper by Eliminating Upper and Lower Margins on Document 488...

Страница 489: ...essing from the pop up menu of the Print Dialog 2 Selecting Paper Saving Select the Rotate Page 90 degrees check box 3 Complete the setup Click Print When you print you can rotate a portrait document...

Страница 490: ...u of the Print Dialog 2 Select the paper source Select Roll Paper Auto Roll 1 or Roll 2 that matches your purpose for Paper Source Important The paper feed method will differ according to the paper or...

Страница 491: ...ia type For Media Type select the same paper type loaded in the printer 3 Select the paper source For Paper Source select the item below that matches your purpose Roll Paper Auto Feeds paper by automa...

Страница 492: ...ource to print the data Note If the paper settings in the printer driver differ from the paper information registered on the printer an error message may appear on the printer s operation panel You ca...

Страница 493: ...g select the setting that matches your purpose Yes The roll paper is cut automatically after printing None The roll paper is not cut after printing Print Cut Guideline Cut guidelines are printed for c...

Страница 494: ...Printing from Printer Printing from USB Flash Drive 494...

Страница 495: ...Printing from USB Flash Drive Printing Data Saved on USB Flash Drive Setting Items for Printing Using Operation Panel 495...

Страница 496: ...G file Files which conforms to JFIF 1 02 Supports the files with the following conditions Processing method Basic DCT Color mode RGB GrayScale Number of colors 24bit 8bit Number of pixels 19200 or les...

Страница 497: ...ed There are no files that can be printed is displayed on the touch screen The screen below appears A Number of copies Tap to display the screen below and specify the number of copies B Preview Tap to...

Страница 498: ...ms for Printing Using Operation Panel 6 Tap Start print The printer starts printing Note Tapping Yes on the displayed screen returns to step 5 Tap a folder or data to print Tapping No returns to HOME...

Страница 499: ...to display the settings Tap to specify the setting 1 Color Select color or black and white printing 2 Print qlty Print quality Select print quality according to the photo 3 Paper src Paper source Sel...

Страница 500: ...martphone Tablet For more on printing from a device via wireless LAN refer to the device s or application s instruction manual Connecting Smartphone Tablet to Printer Directly via Wireless LAN Direct...

Страница 501: ...ting to Use Wireless LAN Important The administrator password is required to change settings if it is enabled for changing settings using the operation panel If a device has already been connected to...

Страница 502: ...elow Changing Direct Connection Setting 5 Tap OK The direct connection is enabled and a device can be connected to the printer wirelessly Connecting Smartphone Tablet to Printer 1 Turn on wireless com...

Страница 503: ...f your wireless communication device and tap Yes Changing Printer Setting to Use Wireless LAN Follow the procedure below to change the printer setting to use wireless LAN 1 Flick HOME screen and tap L...

Страница 504: ...cters 3 Tap OK to finish entering device name 4 Tap OK to finish specifying device name To change the confirmation screen setting when a Wi Fi Direct compatible device is connecting to the printer Tap...

Страница 505: ...ng Canon Application Software Preview Guide Free Layout Guide Print Plug In for Office Guide Direct Print Share Guide Quick Utility Toolbox Guide Print Studio Pro Guide Digital Photo Printing Guide IJ...

Страница 506: ...de Print Plug In for Office Guide Direct Print Share Guide Quick Utility Toolbox Guide Print Studio Pro Guide Digital Photo Printing Guide IJ Network Device Setup Utility Windows Media Configuration T...

Страница 507: ...e Printer Driver Printing Using Canon Application Software Preview Guide Free Layout Guide Quick Utility Toolbox Guide Print Studio Pro Guide Digital Photo Printing Guide IJ Network Device Setup Utili...

Страница 508: ...Printer Driver Overview of the Printer Driver Description of Print Dialog Updating the Printer Driver 508...

Страница 509: ...og Print Dialog Updating Media Information in Printer Driver Correcting Media Information in Printer Driver When Printer Used in Shared Environment Confirm the Printer Paper Information Setting Accoun...

Страница 510: ...ecause different models support different print data formats you need a printer driver for the specific model you are using Using Help of the Printer Driver You can display Help function from the Prin...

Страница 511: ...g is as follows 1 Select Quality Media from the pop up menu of the Print Dialog 2 Select Print Preview Select the Print Preview check box 3 Complete the setup Click Print When executing printing start...

Страница 512: ...Printing Profile 1 In the Print dialog set the necessary items 2 Select Save Current Settings as Preset from the Presets 3 Save the settings In the displayed dialog enter a name in Preset Name and if...

Страница 513: ...eleted In the print dialog select Show Presets in the Presets section Then in the dialog that appears select the name of the printing profile to be deleted 2 Delete the printing profile Click Delete a...

Страница 514: ...e Setup Dialog Use this procedure to set the page paper settings before printing 1 Select Page Setup from the File menu of the application software The Page Setup Dialog opens Opening the Print Dialog...

Страница 515: ...and then select the following items Page Attributes Set the paper size or scaled printing Save as Default You can save the attributes of the displayed page as the default settings Format For Select th...

Страница 516: ...t settings that are set in the Print dialog Copies You can set the number of copies to be printed Note You can set collated printing by choosing Paper Handling from the pop up menu Pages You can set t...

Страница 517: ...ust the print colors as you desire Paper Detailed Settings Specifies detailed print settings that match the media type loaded in the printer Page Processing You can configure the detailed settings whe...

Страница 518: ...her or not the printer media information needs to be updated a message will be displayed If the printer media information is up to date click OK and finish updating media information If the informatio...

Страница 519: ...rmation update is required but cannot carry out the update itself When you have added deleted or edited media using administrative tools the Media Configuration Tool but have not updated the media inf...

Страница 520: ...displayed If the printer media information is set correctly click OK and finish correcting media information If the information needs to be corrected follow the below steps to do so 3 Correct media in...

Страница 521: ...n Printer 2 Check printer s paper information When you select the paper source to be checked from the list the current settings and status of the printer including Size Roll Paper Width Media Type Pap...

Страница 522: ...the Canon IJ Printer Utility3 pop up menu select Accounting 2 Set Account ID Set an Account ID as necessary Account ID Enter the Account ID to be set Enter the ID by using up to 20 alphanumeric charac...

Страница 523: ...ng Delete unnecessary print jobs from the print status check screen 1 Open System Preferences and select Printers Scanners Print Scan 2 Select your model and then click Open Print Queue The print stat...

Страница 524: ...and select Printers Scanners Print Scan To display the printing status screen select the name of your printer model from the printer list and then click Open Print Queue 2 Checking the printing status...

Страница 525: ...he latest media information from the printer and updates the media information in the printer driver Accounting Allows you to set IDs for each job and each user and manage the print history and print...

Страница 526: ...ollow the steps below 1 Open System Preferences and select Printers Scanners Print Scan 2 Start the Canon IJ Printer Utility3 Select your model from the printer list and click Options Supplies Click O...

Страница 527: ...d levels of ink When ink levels are running low or an error occurs because there is no ink a notification icon will appear If you place the cursor on the ink tank it will display the ink model number...

Страница 528: ...and print you must install the latest AirPort firmware If you are using OS X Mavericks v10 9 close the print status check window when you perform printer maintenance from the Canon IJ Printer Utility3...

Страница 529: ...Description of Print Dialog Quality Media Color Options Paper Detailed Settings Page Processing Additional Settings Specifications 529...

Страница 530: ...er Utility3 and either correct or update media information Paper Source Select the source from which paper is supplied Roll Paper Auto Depending on the paper settings on the printer driver and the pap...

Страница 531: ...olor document be sure to uncheck the check box Rendering Intent Specify the method of matching to use when selecting Canon Color Matching in Color Matching Perceptual Photo This method reproduces imag...

Страница 532: ...check this check box Note When the Black and White Photo Print check box is checked in the Quality Media the graphic is displayed in monochrome Color balance Cyan Magenta Yellow If necessary adjust th...

Страница 533: ...f 100 to 100 for X and 50 to 50 for Y The selected value will be shown in the preview on the left side Important Tone and X Y Monochromatic adjustment value are displayed when Black and White Photo Pr...

Страница 534: ...Matching then the color balance Cyan Magenta Yellow Tone X Y Brightness and Contrast appear grayed out and are unavailable Related Topics Specifying Color Correction Adjusting Color Balance Adjusting...

Страница 535: ...e basket with the ink dried The Dry Time Between Pages setting is effective only for roll paper Settings Details Printer Default Applies the settings configured in the control panel of the printer uni...

Страница 536: ...Default Applies the settings configured in the control panel of the printer unit Fast Choose this if clean cut surfaces are not possible with the Standard setting Standard Choose this if there are no...

Страница 537: ...Important You may not be able to select Overall depending on the paper type and print quality 537...

Страница 538: ...ut automatically or to have cut lines printed on the paper The following settings can be configured for automatic cutting Settings Contents Printer Default Applies the settings configured in the contr...

Страница 539: ...90 degrees Rotate the long edge of the document 90 degrees match it to the width of the roll paper and then print the document When you print a portrait document onto roll paper you can save paper by...

Страница 540: ...hen selecting Save in Job Box select the individual box to save to from the Job Box No list Document Title This can be set when selecting Save in Job Box Input the name of the document you wish to sav...

Страница 541: ...e printer see Paper Sizes Minimum paper length 8 00 in 203 2 mm Maximum printable length Rolls 1 59 feet 18 m Sheets 5 2 feet 1 6 m Thickness Rolls 3 31 mil 0 07 0 8 mm Sheets 3 31 mil 0 07 0 8 mm Rol...

Страница 542: ...Updating the Printer Driver Obtaining the Latest Printer Driver Delete the Unnecessary Canon IJ Printer from the Printer List Before Installing the Printer Driver Installing the Printer Driver 542...

Страница 543: ...olved problems may be solved You can access our website and download the latest printer driver for your model Important You can download the printer driver for free but any Internet access charges inc...

Страница 544: ...inter from the printer list is as follows You cannot delete the Canon IJ Printer unless you are logged in as a user with the administrative right For information about an administrative user refer to...

Страница 545: ...as a user who has the administrator account The installer will prompt you to enter the name and password of the administrative user When multiple users are using Mac OS log on with the account of the...

Страница 546: ...Agreement you cannot install this software 4 Selecting the install destination If necessary select where you want to install the printer driver and then click Continue 5 Executing the installation Cli...

Страница 547: ...Preview Guide Free Layout Guide Quick Utility Toolbox Guide Print Studio Pro Guide Digital Photo Printing Guide IJ Network Device Setup Utility Mac OS Media Configuration Tool Guide Device Management...

Страница 548: ...or Deleting Jobs on Hold Printing Saved Jobs Deleting Saved Jobs Moving Saved Jobs Advanced Print Job Operations Saving Print Jobs Sent from Sources Other than Printer Driver Printing without Saving J...

Страница 549: ...isk using a web browser or operation panel Using web browser Log in to the printer using web browser Changing Settings Using Web Browser After logging on to the printer select Job management and perfo...

Страница 550: ...ng Printer Hard Disk Saving Print Jobs on Printer Hard Disk Managing Job Queue Deleting or Preempting Other Jobs Managing Pending Jobs Printing or Deleting Jobs on Hold Printing Saved Jobs Deleting Sa...

Страница 551: ...rinting work Without using a computer you can select print jobs and print in the desired quantity You can also select multiple print jobs to print during the same period This enables unattended operat...

Страница 552: ...for the shared mailbox Up to 100 print jobs can be saved here However they will be deleted one after another starting with the oldest job in the following situations If there are over 101 jobs queued...

Страница 553: ...n the printer s hard disk configure the printer driver Configuring Printer Driver Windows 1 Open printer properties dialog box How to Open the Printer Driver Setup Window 2 Access Page Setup sheet 3 C...

Страница 554: ...n is available in combination with Print You can prevent degradation of print quality that occurs when receiving a print job is interrupted and printing is aborted in the middle Note Click Acquire Job...

Страница 555: ...print jobs on the permanent storage area of the printer s hard disk Selecting this does not start printing If you select Save in Job Box select the personal box number from Job Box No Print after rec...

Страница 556: ...nel or Remote UI Using Operation Panel Using Remote UI Delete Note that only jobs that are not currently being deleted can be deleted from the job queue Preempting other jobs You can preempt other job...

Страница 557: ...g The screen below appears A Tap to delete data B Tap to perform preempt printing 5 Check message that is displayed and tap Yes Using Remote UI 1 Display printer status on web browser 2 On Menu page s...

Страница 558: ...558...

Страница 559: ...te As long as you do not manage held jobs from the operation panel they will remain in the job queue In this case the printer processes the next job in the queue without pausing To print held jobs rep...

Страница 560: ...that is displayed and tap Yes Using Remote UI 1 Display printer status on web browser 2 On Menu page select Job management 3 Select Print job The print job list appears 4 Select print job with icon on...

Страница 561: ...I Using Operation Panel Using Remote UI Using Operation Panel 1 Make sure printer is turned on 2 Flick HOME screen and tap Job management Menu Operations 3 Tap Saved job The Job box list screen appear...

Страница 562: ...below Specify the number of copies 8 Tap Start print Using Remote UI 1 Display printer status on web browser 2 On Menu page select Job management 3 Select Saved job The saved job list appears 4 On Sa...

Страница 563: ...Note Enter the password if it is enabled for a saving box 5 Select saved job and select Print 563...

Страница 564: ...6 Enter quantity to print in Copies and select Yes 564...

Страница 565: ...rinter is turned on 2 Flick HOME screen and tap Job management Menu Operations 3 Tap Saved job The Job box list screen appears 4 Tap box Note Enter the password if it is enabled 5 Tap Job list 6 Tap j...

Страница 566: ...Note Enter the password if it is enabled for a saving box 5 Select saved job and select Edit 566...

Страница 567: ...6 Select Delete on displayed screen 567...

Страница 568: ...using Remote UI Important Jobs stored in the shared mailbox may be automatically deleted under some conditions To prevent jobs from being deleted move them from the shared mailbox to personal boxes Us...

Страница 569: ...5 Select saved job and select Edit 6 Select Move on displayed screen 7 On Move job page select Destination job box 569...

Страница 570: ...8 Select name or number of destination personal box in Destination job box list and select OK on displayed screen 570...

Страница 571: ...Driver Printing without Saving Jobs in Common Box Setting Passwords for Personal Boxes Naming Personal Boxes Displaying List of Saved Jobs Printing List of Saved Jobs Displaying Details of Saved Jobs...

Страница 572: ...quired to change settings if it is enabled for changing settings using the operation panel Specifying Output Method Printing after Saving Printing Data Specifying Output Method Perform settings for pr...

Страница 573: ...r Save first and print Printing will start when Save first and print is set to ON even if you have selected Save to job box for Output method 1 Make sure printer is turned on 2 Flick HOME screen and t...

Страница 574: ...ted Print in Output Method in the printer driver are deleted from the shared mailbox after printing Use this function when printing highly confidential documents Important The administrator password i...

Страница 575: ...is available using Remote UI Note By default no passwords are set for personal boxes A password cannot be set for the shared mailbox Enter a four digit number as the password in the range 0001 9999 Ev...

Страница 576: ...6 In Edit job box dialog box specify password 7 Enter password This field is limited to four digits in the range 0001 to 9999 8 Select OK 576...

Страница 577: ...ersonal boxes This operation is available using Remote UI 1 Display printer status on web browser 2 On Menu page select Job management 3 Select Saved job The saved job list appears 4 On Saved job page...

Страница 578: ...5 Select Edit 6 In Edit job box dialog box enter name in Job box name and select OK 578...

Страница 579: ...579...

Страница 580: ...peration Panel 1 Make sure printer is turned on 2 Flick HOME screen and tap Job management Menu Operations 3 Tap Saved job The Job box list screen appears 4 Tap box Note Enter the password if it is en...

Страница 581: ...Note Enter the password if it is enabled for a saving box Jobs saved in the box are listed 581...

Страница 582: ...s This operation is available using the operation panel 1 Make sure printer is turned on 2 Flick HOME screen and tap Job management Menu Operations 3 Tap Saved job The Job box list screen appears 4 Ta...

Страница 583: ...ake sure printer is turned on 2 Flick HOME screen and tap Job management Menu Operations 3 Tap Saved job The Job box list screen appears 4 Tap box Note Enter the password if it is enabled 5 Tap Job li...

Страница 584: ...Note Enter the password if it is enabled for a saving box 5 Select print job 584...

Страница 585: ...The details of the saved document appears 585...

Страница 586: ...e renamed as follows This operation is available using Remote UI 1 Display printer status on web browser 2 On Menu page select Job management 3 Select Saved job The saved job list appears 4 On Saved j...

Страница 587: ...5 Select saved job and select Edit 6 Select Change 587...

Страница 588: ...7 Enter name and select OK 588...

Страница 589: ...l box Do not save print jobs in the common box Save print jobs sent from sources other than the printer driver Operations with saved jobs Print saved jobs Delete saved jobs Job queue management Displa...

Страница 590: ...Using Remote UI Using Operation Panel 1 Make sure printer is turned on 2 Flick HOME screen and tap Printer information Menu Operations 3 Tap Hard disk information The free hard disk space appears Usin...

Страница 591: ...form duplex printing I want to perform enlargement printing Examples of Problems Problems Regarding Paper Clearing Jammed Roll Paper Clearing a Jammed Sheet Roll paper cannot be inserted into the Pape...

Страница 592: ...ges is inaccurate in the feeding direction Images are printed crooked Documents are printed in monochrome Line thickness is not uniform Lines or colors are misaligned Borders appear in borderless prin...

Страница 593: ...ter consumes a lot of ink Printed pages are not collected cleanly in the basket When Trim edge first is set the trimmed paper is drawn into the roll unit Ink Level Detection List of Support Code for E...

Страница 594: ...in landscape or portrait orientation automatically enlarged to fit the roll width This is an easy way to create vertical or horizontal banners Printing Hanging and Horizontal Banners Large Format Pri...

Страница 595: ...ystem This printer supports hot swap ink tank replacement Even if an ink tank becomes empty during printing since a certain amount of ink always is stored in a sub ink tank you can replace the ink tan...

Страница 596: ...printer driver to Yes When using paper that is easily scratched or paper where the ink requires extra time to fix we recommend setting Cutting mode on the printer to Eject cut Specifying the Cutting...

Страница 597: ...waiting for the ink to dry You can set an ink drying time in the printer driver You can also configure the same settings on the printer itself Main Tab Description Windows Paper Detailed Settings Mac...

Страница 598: ...inting on roll paper you can set borderless printing in the printer driver settings If printing on sheets borderless printing is not possible Prints without Edges Based on the Scenarios Windows Prints...

Страница 599: ...ow the paper types that can be used in this printer For information about paper that can be used with this printer see the imagePROGRAF home page or refer to the media information list Paper Informati...

Страница 600: ...The paper type that I want to print is not displayed on the Touch Screen If using a new paper type start the Media Configuration Tool to get the latest media information Updating paper information 600...

Страница 601: ...rs or by printer deterioration We recommend color calibration in the following situations After initial printer installation When replacing the print head When you sense a change of color compared to...

Страница 602: ...nnot print double sided An alternative to double sided printing is to use the Folded Duplex function of the Windows software Canon imagePROGRAF Free Layout which prints two pages on one side folds the...

Страница 603: ...rm enlargement printing Use the printer driver to adjust the original to the paper size and width or print enlarged or reduced by specifying a magnification factor Scaled Printing Windows Scaled Print...

Страница 604: ...erted into the Paper Feed Slot Paper cannot be fed automatically Roll paper not switching automatically Cannot load sheets Paper is not cut straight Paper is not cut The size of clear film cannot be d...

Страница 605: ...er to the printer Turning the Printer On and Off 2 Open the top cover Note If the roll paper is very curled or the leading edge of the roll paper blocks the Carriage setting the cutting method for the...

Страница 606: ...aft B or ink tube stabilizer C Touching these may cause malfunction 4 Lift up the release lever 5 Holding the paper on both sides pull the jammed portion out toward the front Use scissors or a cutting...

Страница 607: ...move the Carriage to the right side If the Carriage is on the left a Carriage error may occur when you turn on the printer 7 While holding the leading edge of the roll paper in the middle and gently...

Страница 608: ...n angle 8 Close the top cover 9 Turn on the power to the printer Turning the Printer On and Off The roll is advanced and the printer is ready to print Note To trim the leading edge cleanly select the...

Страница 609: ...off the power to the printer Turning the Printer On and Off 2 Open the top cover 3 If the Carriage is out move the Carriage out of the way away from the paper Important Do not touch the linear scale A...

Страница 610: ...4 Lift up the release lever 5 Pull the paper straight out from the front of the printer 610...

Страница 611: ...move the Carriage to the right until it stops Important Always move the Carriage to the right side If the Carriage is on the left a Carriage error may occur when you turn on the printer 7 Lower the r...

Страница 612: ...Clearing Jammed Roll Paper Clearing a Jammed Sheet Check 3 Check that the correct paper source has been selected Select Paper settings in the touch screen menu and then select the paper source Check 4...

Страница 613: ...d humidity conditions automatic paper feeding may not be possible Set Paper retention setting to Release in the touch screen menu and feed the paper manually Menu Structure Loading the Upper Roll on t...

Страница 614: ...nd humidity conditions roll paper auto switching may not be possible Set Paper retention setting to Release in the touch screen menu and feed the paper manually Menu Structure Loading the Upper Roll o...

Страница 615: ...heets Check Check that the correct paper source has been selected Select Paper settings in the touch screen menu and then select the paper source Tap Load paper and load the paper Loading Sheets in th...

Страница 616: ...tting implement such as scissors Specifying the Cutting Method for Rolls Check 4 Check that the Cut speed setting is correct Change the Cut speed setting in the touch screen menu Menu Structure Check...

Страница 617: ...Replacing the Cutter Blade 617...

Страница 618: ...per If Cutting mode is set to User cut cut the roll paper with a cutting implement such as scissors Specifying the Cutting Method for Rolls Check 3 Is the cutter blade attached Attach the cutter blade...

Страница 619: ...The size of clear film cannot be detected Check Is the platen dirty with ink Open the top cover and clean the entire platen area Cleaning Inside the Top Cover 619...

Страница 620: ...y have been set by responding to the message Do you want to set to detect the leading edge of the paper when Cutting mode was set to User cut in the touch screen menu If the message Do you want to set...

Страница 621: ...the platen lower the release lever and then proceed to the next step If Paper retention setting is set to Release you will no longer be able to automatically switch between the upper and lower roll p...

Страница 622: ...Printing Does Not Start The Data lamp on the Control Panel does not light up The printer does not respond even if print jobs are sent Injecting the ink is displayed Agitating the ink is displayed 622...

Страница 623: ...and try printing again In Mac OS open the dialog box of the printer driver select the printer from the list of Printer and try printing again Check 3 Is the print job paused In Windows restart the pr...

Страница 624: ...the touch screen menu to Disable Pausing Printing Check 2 Is Save in mail box selected as the printer Output Method Print the job saved on the printer s hard disk Printing Saved Jobs Check 3 Is the pr...

Страница 625: ...are being filled with ink Wait until the system has been filled with ink Note This message might appear if you force the power off while the printer is operating Always follow the correct procedure w...

Страница 626: ...ting the ink is displayed Ink agitation is in progress Please wait until ink agitation is finished Agitation time varies depending on time elapsed since powering off approximately 1 minute to 20 minut...

Страница 627: ...The Printer Stops During a Print Job Printing stops and an error message is displayed The printer ejects blank unprinted paper 627...

Страница 628: ...oll paper was used during a print job and paper could not be advanced because the trailing edge is taped to the roll Remove the used roll and insert a new roll Removing the Upper Roll from the Printer...

Страница 629: ...reen menu Cutting the Leading Edge of Roll Paper Automatically Check 2 Is the print head nozzle blocked Print a nozzle check pattern to check the print head status Checking for Nozzle Clogging Check 3...

Страница 630: ...oiled during regular printing Printed colors are inaccurate Banding in different colors occurs Colors in printed images are uneven Image edges are blurred or white banding occurs The contrast becomes...

Страница 631: ...menu to Enable However printing may be stopped by warnings if this setting is set to Enable Menu Structure Check 3 Was the printer left with the ink tank out The ink supply may become blocked by ink...

Страница 632: ...river Advanced Settings Changing the Print Quality and Correcting Image Data Windows Mac OS Change the Print Quality in the printer driver Quality Media settings Changing the Print Quality and Correct...

Страница 633: ...nter Check 3 Is the print head height set too low Set Paper Thickness Head Height in the touch screen menu to Auto Troubleshooting Paper Abrasion and Blurry Images Check 4 Is the paper thick or a type...

Страница 634: ...d on the touch screen Select the correct media type in the touch screen menu when loading paper in the printer Loading the Upper Roll on the Printer Loading Sheets in the Printer Check 6 Does the pape...

Страница 635: ...s specified on the printer as in the printer driver Changing the Type of Paper Follow the steps below to change the printer driver settings 1 To stop printing press the Stop button 2 Change the type o...

Страница 636: ...does not resolve the problem increase the Paper Thickness Head Height setting in the touch screen menu Adjusting Vacuum Strength Troubleshooting Paper Abrasion and Blurry Images If using film based p...

Страница 637: ...paper may curl during printing and come in contact with the output slot In such situations set an Ink drying wait time and an Ink drying target area for Pause between scans in the touch screen menu H...

Страница 638: ...platen and then manually feed roll paper over the platen when printing Cleaning Inside the Top Cover Feeding Roll Paper Manually Check 3 Paper may be gripped weakly over the platen Set a higher Transp...

Страница 639: ...er blade to the next item printed Follow the steps below to change Between Pages in Drying Time to between 30 seconds and 3 minutes and perform borderless printing Windows 1 Click Specify for Media Ty...

Страница 640: ...just the settings of the color management software referring to the software documentation as needed Check 3 Is the print head nozzle blocked Print a test pattern to check the nozzles and see if they...

Страница 641: ...all settings items 3 Execute color calibration Performing Color Calibration Check 8 Was Select Your Place of Residence changed in the Media Configuration Tool when reinstalling the printer driver Cha...

Страница 642: ...been interrupted while receiving and therefore not printed at a fast frame rate Exit other applications and cancel other print jobs Check 4 Is Set priority in the touch screen menu set to Prioritize l...

Страница 643: ...t Quality and Correcting Image Data Windows Mac OS Change the Print Quality in the printer driver Quality Media settings Changing the Print Quality and Correcting Image Data Mac OS When Fast or Standa...

Страница 644: ...andard is selected the printing time is shorter and less ink is used than with Highest or High but the print quality is reduced Changing the Print Quality and Correcting Image Data Windows Changing th...

Страница 645: ...r Coated Paper Set Print Quality to Highest or High and then print Check 8 Is the media type specified in the printer driver the same as the media type loaded in the printer Load paper of the same typ...

Страница 646: ...head Adjusting the Print Head Setting a lower value for Paper Thickness Head Height in the touch screen menu may resolve the problem Troubleshooting Paper Abrasion and Blurry Images Check 3 Is the me...

Страница 647: ...same as the media type loaded in the printer Load the printer with the media type specified in the printer driver Loading the Upper Roll on the Printer Loading Sheets in the Printer Follow the steps b...

Страница 648: ...th Adjusting Feed Amount Check 2 Is the media type specified in the printer driver the same as the media type loaded in the printer Load the printer with the media type specified in the printer driver...

Страница 649: ...nd then reload the paper Menu Structure Check 2 Is Detect paper width set to OFF Set Detect paper width in the touch screen menu to ON Menu Structure Check 3 Has the roll paper been loaded at an angle...

Страница 650: ...r specify Color in Color Mode and try printing again Check 2 Is Black and White Photo Print selected in a Mac OS printer driver Deselect Black and White Photo Print in the printer driver Quality Media...

Страница 651: ...oaded in the printer Load the printer with the media type specified in the printer driver Loading the Upper Roll on the Printer Loading Sheets in the Printer Follow the steps below to match the media...

Страница 652: ...e Print Quality and Correcting Image Data Mac OS Note Setting a lower value for Paper Thickness Head Height in the touch screen menu may resolve the problem Troubleshooting Paper Abrasion and Blurry I...

Страница 653: ...ion software you are using Check 4 Is the Extension for borderless printing set to Small In Extension for borderless printing in the touch screen menu set Paper with recommended width and Paper with a...

Страница 654: ...Cannot Print over Network Cannot Connect Printer to Network Cannot Print over TCP IP Network Cannot Print over Bonjour networks Mac OS 654...

Страница 655: ...indicator is lit The top and bottom indicators are lit if the printer is connected via 1000Base T The top indicator is green if the printer is connected via 100Base TX and the bottom indicator is ora...

Страница 656: ...evice Setup Utility For wired LAN Performing Changing Wired LAN Settings For wireless LAN Performing Changing Wireless LAN Settings Check2 Are the printer s TCP IP network settings configured correctl...

Страница 657: ...printer on the same network Due to the nature of Bonjour printing may not be possible if the printer is on another network behind a router Make sure the computer and printer are on the same network Fo...

Страница 658: ...Printer on Network Cannot Find Printer on Check Printer Settings Screen Windows Cannot Proceed beyond Printer Connection Screen Connect Cable Screen Searching Printer by IP Address or Host Name Durin...

Страница 659: ...nter Settings screen appears after searching the printer by Automatic search on the Search for Printers screen click Redetect and search for the printer again by the IP address on the Search for Print...

Страница 660: ...the back of the printer Check the items below only if you cannot proceed beyond the Printer Connection screen Check2 Follow procedure below to connect printer and computer again Important For Mac OS m...

Страница 661: ...Click Back to Top on Select Printer screen 4 Click Exit on Start Setup screen and finish setup 2 Turn off printer 3 Restart computer 4 Make sure you have no application software running 5 Redo setup...

Страница 662: ...dress or host name To check the printer s IP Address or host name print out the network settings information or use the operation panel to display it Display on the touch screen LAN settings Print the...

Страница 663: ...r s IP address 1 Flick HOME screen and tap Device settings Menu Operations 2 Tap LAN settings If you specify the administrator password enter the password 3 Tap Other settings 4 Tap TCP IP settings If...

Страница 664: ...again If the printer is found follow the instructions on the screen to continue to set up the network communication If no message appears Cancel searching printers and then set the security software t...

Страница 665: ...Installation Problems Removing Printer Software 665...

Страница 666: ...ows 10 1 Right click the start button and open Control Panel 2 Under Programs select Programs and Features select IJ Network Device Setup Utility from the list of programs and then click Uninstall Win...

Страница 667: ...Printer Makes a Strange Sound Messages advising to check the maintenance cartridge are not cleared The printer consumes a lot of ink Printed pages are not collected cleanly in the basket When Trim ed...

Страница 668: ...turn on Check 1 Is the power cord plugged in Plug the power cord into the outlet and then turn on the printer Check 2 Is the specified voltage being supplied Check the voltage of the outlet and breake...

Страница 669: ...ugged before it is turned off In this case the next time power is restored the printer s hard disk is checked and startup may take some time Please wait a while because it may take several minutes to...

Страница 670: ...ith the printer A suction sound can be heard from the platen To prevent the paper from rising the surface of the platen has vacuum holes that create suction on the paper Roll paper makes a fluttering...

Страница 671: ...After the printer is turned on After data transmission After ink tank replacement In other cases contact your Canon dealer 671...

Страница 672: ...k the maintenance cartridge are not cleared The newly replaced maintenance cartridge is not recognized Remove the newly replaced maintenance cartridge and then reinsert it again firmly Replacing the M...

Страница 673: ...out System cleaning after the printer has been transported if has not been used for a long time or if there is a problem with the print head Check 3 You have just finished initial installation when m...

Страница 674: ...le Basket Configurations and try another basket position Example Basket Configurations Check 2 Is the basket in the right position for the media type and size The optimal basket position depends on fa...

Страница 675: ...he roll unit is being used as a paper feeder and the basket is in position 1 the paper strip discarded by Trim edge first for borderless printing or paper loading may get drawn into the roll unit In t...

Страница 676: ...ed for that ink tank To restore the function for detecting the remaining ink level replace the ink tank with a new ink tank for that printer Repeatedly removing and inserting the same ink tank can cau...

Страница 677: ...1021 1022 1023 1024 1025 1051 1052 1054 1055 1056 1057 1061 1200 1201 1210 1213 1214 1300 1306 1317 1318 1322 1323 1324 1325 1401 1403 1408 1409 140A 140B 140C 140F 1477 1478 1480 1481 1485 1492 1494...

Страница 678: ...4932 4933 4934 4935 4950 4951 4952 4953 4954 4955 4956 4957 4959 5000 5ZZZ 5106 5200 5A60 5A61 5B16 5B20 5B21 5C00 6000 6ZZZ 6502 6700 6702 6820 6900 6901 6902 6910 6911 6920 6921 6930 6931 6932 6933...

Страница 679: ...t to Do Check the media size and type for the print job on the touch screen and then tap OK Continuing to print Tap Load paper and then load the paper Loading and Printing on Sheets Stopping printing...

Страница 680: ...o roll is loaded What to Do Tap Load paper on the touch screen and then load the paper roll and print Loading Rolls on the Roll Holder Loading the Upper Roll on the Printer Note To stop printing tap C...

Страница 681: ...oll has been loaded What to Do Tap Load paper on the touch screen and then load the paper roll and print Loading Rolls on the Roll Holder Loading the Upper Roll on the Printer Note To stop printing ta...

Страница 682: ...off wait a moment and then turn the power back on If the error appears again make a note of the detailed error code ECxx xxxx that appears on the touch screen and then turn off the power and contact a...

Страница 683: ...off wait a moment and then turn the power back on If the error appears again make a note of the detailed error code ECxx xxxx that appears on the touch screen and then turn off the power and contact a...

Страница 684: ...print on a sheet but no sheet is loaded What to Do Tap Load paper on the touch screen and then load cut paper and print Loading and Printing on Sheets Note To stop printing tap Cancel on the touch scr...

Страница 685: ...1018 Cause The Roll paper 1 feeder has not been calibrated What to Do Calibrating please remove the upper roll holder 685...

Страница 686: ...1019 Cause The roll unit feeder has not been calibrated What to Do Calibrating please remove the roll unit roll holder 686...

Страница 687: ...Change the Paper Source in the printer driver or replace the paper with paper of the right length for the print job and then try again If using the Media Take up Unit tap Cancel on the touch screen t...

Страница 688: ...en Change the Paper Source in the printer driver or replace the paper with paper of the right length for the print job and then try again If using the Media Take up Unit tap Cancel on the touch screen...

Страница 689: ...print job and you may not be able to print all of the document Replacing paper Tap Replace the paper and print on the touch screen Change the Paper Source in the printer driver or replace the paper w...

Страница 690: ...t the paper length Specifying the Paper Length 5 If There is a job whose printing is not complete Do you want to print this job appears on the touch screen tap Yes Printing will resume starting from t...

Страница 691: ...Note To stop printing press the Stop button 691...

Страница 692: ...he Lower Roll on the Roll Unit 3 If no barcode was printed on the roll specify the paper type Changing the Type of Paper 4 If Manage remaining roll amount is set to On in the touch screen menu and the...

Страница 693: ...The media type specified in the printer driver is not the same as the media type loaded in the printer What to Do You can continue to print but note that this error may cause problems in the printing...

Страница 694: ...paper set in Fit Roll Paper Width in the printer driver is not the same as the width of the roll paper loaded in the printer What to Do You can continue to print but note that this error may cause pro...

Страница 695: ...054 Cause The paper in the printer is smaller than the paper size set in the printer driver What to Do You can continue to print but note that this error may cause problems in the printing results 695...

Страница 696: ...1055 Cause The paper size in the printer cannot be printed borderless What to Do You can continue to print but note that this error may cause problems in the printing results 696...

Страница 697: ...1056 Cause The paper position is not suitable for borderless printing What to Do You can continue to print but note that this error may cause problems in the printing results 697...

Страница 698: ...1057 Cause The paper position is not suitable for borderless printing What to Do You can continue to print but note that this error may cause problems in the printing results 698...

Страница 699: ...screen to stop printing 2 Change the media type in the printer driver settings to the media type loaded in the printer and then try again Replacing paper Follow the steps below to match the media type...

Страница 700: ...ad locking cover is closed properly Make sure there are no foreign objects caught in the top cover and then close the top cover If this error appears again close the top cover turn the power off wait...

Страница 701: ...1201 Cause The ink tank cover is open What to Do Close the ink tank cover 701...

Страница 702: ...1210 Cause The ink tank cover is open What to Do Close the ink tank cover 702...

Страница 703: ...1213 Cause The release lever is raised What to Do Lower the release lever If the error occurs again turn off the printer and wait a while before restoring power 703...

Страница 704: ...ait a moment and then turn the power back on If the error appears again make a note of the detailed error code ECxx xxxx that appears on the touch screen and then turn off the power and contact a Cano...

Страница 705: ...earing Jammed Roll Paper Clearing a Jammed Sheet 2 Load the paper Loading the Upper Roll on the Printer Loading Sheets in the Printer 3 If There is a job whose printing is not complete Do you want to...

Страница 706: ...t to Do Follow these steps to load and print on a roll 1 To remove the cut paper tap Remove paper on the touch screen Removing Sheets 2 Load a new roll Loading the Upper Roll on the Printer Note To st...

Страница 707: ...printer insert the paper roll firmly into the roll holder until it is up against the flange and then insert the roll holder into the printer Loading Rolls on the Roll Holder Important If this message...

Страница 708: ...off wait a moment and then turn the power back on If the error appears again make a note of the detailed error code ECxx xxxx that appears on the touch screen and then turn off the power and contact a...

Страница 709: ...tap Yes Printing will resume starting from the page on which the error occurred Note If this error appears again even after reloading the paper roll remove the roll holder from the printer insert the...

Страница 710: ...n loaded What to Do Lift up the release lever and reload paper of suitable size Paper Sizes Note Load unused A4 letter size or larger paper if printing calibration and nozzle check patterns Each calib...

Страница 711: ...in 1 Tap Remove paper on the touch screen to stop printing 2 Remove the paper roll load cut paper of the size and type specified in the printer driver and then try again Removing the Upper Roll from t...

Страница 712: ...t to Do Follow the steps below to print again 1 Tap Cancel on the touch screen to stop printing 2 Remove the paper roll load cut paper of the size and type specified in the printer driver and then try...

Страница 713: ...1401 Cause Failed to recognize print head What to Do Open the top cover and reattach the print head Replacing the Print Head 713...

Страница 714: ...ad What to Do Tap OK on the touch screen and then replace the current print head with a new one Replacing the Print Head If you do not have a replacement print head ready turn off the power and replac...

Страница 715: ...ad What to Do Tap OK on the touch screen and then replace the current print head with a new one Replacing the Print Head If you do not have a replacement print head ready turn off the power and replac...

Страница 716: ...ad What to Do Tap OK on the touch screen and then replace the current print head with a new one Replacing the Print Head If you do not have a replacement print head ready turn off the power and replac...

Страница 717: ...ad What to Do Tap OK on the touch screen and then replace the current print head with a new one Replacing the Print Head If you do not have a replacement print head ready turn off the power and replac...

Страница 718: ...140B Cause Failed to recognize print head What to Do Open the top cover and reattach the print head Replacing the Print Head 718...

Страница 719: ...140C Cause There is a problem with the print head What to Do Turn off the power wait a moment and then turn it back on 719...

Страница 720: ...ad What to Do Tap OK on the touch screen and then replace the current print head with a new one Replacing the Print Head If you do not have a replacement print head ready turn off the power and replac...

Страница 721: ...1477 Cause There is a problem with the print head What to Do Open the top cover and replace theprint head with a new one Replacing the Print Head 721...

Страница 722: ...ad What to Do Tap OK on the touch screen and then replace the current print head with a new one Replacing the Print Head If you do not have a replacement print head ready turn off the power and replac...

Страница 723: ...1480 Cause The attached print head was previously used in a different model What to Do Attach the correct print head Replacing the Print Head 723...

Страница 724: ...1481 Cause The attached print head was previously used in a model that uses a different ink set What to Do Attach the correct print head Replacing the Print Head 724...

Страница 725: ...1485 Cause Cannot use attached print head What to Do Attach the correct print head Replacing the Print Head 725...

Страница 726: ...ait a moment and then turn the power back on If the error appears again make a note of the detailed error code ECxx xxxx that appears on the touch screen and then turn off the power and contact a Cano...

Страница 727: ...int head What to Do Turn off the power wait a moment and then turn it back on If the error appears again remove and reattach the print head Replacing the Print Head If that does not get rid of the err...

Страница 728: ...cel on the touch screen to stop printing 2 Clean the print head Cleaning the Print Head If this message still appears when printing replace the print head Replacing the Print Head Important To continu...

Страница 729: ...1500 Cause The ink in the ink tank is running low What to Do Prepare a new ink tank 729...

Страница 730: ...1551 Cause A genuine Canon ink tank with a history of past use has been detected What to Do To dismiss the message tap OK on the touch screen 730...

Страница 731: ...1552 Cause A genuine Canon ink tank has been inserted What to Do To dismiss the message tap OK on the touch screen 731...

Страница 732: ...ank has run out What to Do Open the ink tank cover and then replace the ink tank before the ink in the sub ink tank of this printer becomes insufficient Replacing Ink Tanks Note You can replace the in...

Страница 733: ...1571 Cause Ink tank removed during printing What to Do If replacing the ink tank insert a new ink tank Replacing Ink Tanks 733...

Страница 734: ...1660 Cause Ink tank not inserted What to Do Insert the ink tank correctly Replacing Ink Tanks 734...

Страница 735: ...168B Cause The ink tank cannot be recognized Printing cannot be executed because the ink tank may not be compatible with this printer What to Do Install the appropriate ink tank 735...

Страница 736: ...1720 Cause The maintenance cartridge is full It needs to be replaced What to Do Replace the maintenance cartridge Replacing the Maintenance Cartridge 736...

Страница 737: ...1721 Cause The maintenance cartridge is not installed What to Do Install the maintenance cartridge Replacing the Maintenance Cartridge 737...

Страница 738: ...se Incorrect type of maintenance cartridge What to Do Insert the correct maintenance cartridge Replacing the Maintenance Cartridge If this error continues to appear contact a Canon customer service ce...

Страница 739: ...elease it By this operation the fact that you have disabled the function for detecting the remaining ink level will be memorized Please be advised that Canon shall not be liable for any malfunction or...

Страница 740: ...ease it By this operation the fact that you have disabled the function for detecting the remaining ink level will be memorized Please be advised that Canon shall not be liable for any malfunction or t...

Страница 741: ...1752 Cause The ink has run out What to Do Open the ink tank cover and then replace the ink tank Replacing Ink Tanks 741...

Страница 742: ...ction for detecting the remaining ink level To disable this function press and hold the printer s Stop button for at least 5 seconds and then release it By this operation the fact that you have disabl...

Страница 743: ...1756 Cause The ink may become insufficient What to Do To perform the next process or to continue the specified process replace the ink tank Replacing Ink Tanks 743...

Страница 744: ...nnot fill ink reserve tank What to Do Check the touch screen remove the ink tank for the affected color and then reinsert it If the inserted ink tank is empty replace it with a new ink tank Replacing...

Страница 745: ...Attempted to print on roll unit roll paper but roll unit is not powered on or has been removed What to Do Turn off the power and check the connection with the roll unit Roll Unit Switching Roll Unit...

Страница 746: ...2001 Cause An incompatible device is connected What to Do Check the device connected to the USB flash drive port Only USB flash drive can be connected to this device for direct printing 746...

Страница 747: ...2002 Cause An incompatible USB hub is connected What to Do If USB flash drive is connected to this device through a USB hub remove the USB hub Connect the USB flash drive directly to this device 747...

Страница 748: ...ge size settings Removing the Upper Roll from the Printer Removing the Lower Roll from the Roll Unit Removing Rolls From the Roll Holder Loading Rolls on the Roll Holder Loading the Upper Roll on the...

Страница 749: ...oving the Lower Roll from the Roll Unit Removing Rolls From the Roll Holder Loading Rolls on the Roll Holder Loading the Upper Roll on the Printer Loading the Lower Roll on the Roll Unit Stopping prin...

Страница 750: ...printer is the wrong size or type What to Do Roll Tap Replace the paper and print on the touch screen or lift up the release lever and replace the paper with paper of the correct size To stop printing...

Страница 751: ...3000 Cause The print head has not been calibrated What to Do Print head alignment is recommended Adjusting the Print Head Note This message will appear until Print head alignment is carried out 751...

Страница 752: ...3001 Cause The print head nozzle is becoming blocked What to Do Check the printed materials If the printed materials are scratched clean the print head Cleaning the Print Head 752...

Страница 753: ...a media type suitable for Color Calibration but there are no Color Calibration results for that media type and the specified conditions have been met since the last time Common Calibration was carried...

Страница 754: ...It is almost time to replace consumables for which service is required What to Do This can used for a little while until the message Part replacement needed appears Contact your Canon dealer for assi...

Страница 755: ...3201 Cause It is past the recommended time to replace consumables for which service is required What to Do Contact your Canon dealer for assistance 755...

Страница 756: ...enance cartridge is almost full What to Do Prepare a new maintenance cartridge because an error may occur if you continue to use the printer while the maintenance cartridge is full Replacing the Maint...

Страница 757: ...media information Media Configuration Tool Guide Windows Media Configuration Tool Guide Mac OS To set the Media Configuration Tool to recovery mode open the Media Configuration Tool select this devic...

Страница 758: ...ncorrect print data Illegal number of parameters What to Do Defective print data please check the print results If using printing software such as RIP Raster Image Processor contact the software manuf...

Страница 759: ...orrect print data Required items have been omitted What to Do Defective print data please check the print results If using printing software such as RIP Raster Image Processor contact the software man...

Страница 760: ...ause Incorrect print data Data out of range What to Do Defective print data please check the print results If using printing software such as RIP Raster Image Processor contact the software manufactur...

Страница 761: ...ncorrect print data Resolution value out of range What to Do Defective print data please check the print results If using printing software such as RIP Raster Image Processor contact the software manu...

Страница 762: ...rect print data Compression method value out of range What to Do Defective print data please check the print results If using printing software such as RIP Raster Image Processor contact the software...

Страница 763: ...int data Incorrect data formatting color sequence bit count What to Do Defective print data please check the print results If using printing software such as RIP Raster Image Processor contact the sof...

Страница 764: ...t data Illegal combination of resolution and image data format What to Do Defective print data please check the print results If using printing software such as RIP Raster Image Processor contact the...

Страница 765: ...3330 Cause Print data may be corrupt What to Do Check the print job 765...

Страница 766: ...3331 Cause Print results may be abnormal as there is a large volume of print data What to Do Check the print job 766...

Страница 767: ...3332 Cause Unsupported JPEG data format What to Do Print from a PC 767...

Страница 768: ...3333 Cause Unsupported JPEG data format What to Do Print from a PC 768...

Страница 769: ...3334 Cause PDF data is print protected What to Do Open the PDF file in Adobe Acrobat and make sure it can be printed 769...

Страница 770: ...3335 Cause Corrupt PDF file What to Do Open the PDF file in Adobe Acrobat and check it The file can also be printed from Adobe Acrobat 770...

Страница 771: ...3336 Cause Fonts were substituted because the fonts in the PDF file are not embedded or installed What to Do Set the fonts used in the PDF file to be embedded and then save again 771...

Страница 772: ...3340 Cause Print data contains no image processing parameters What to Do Check the print job settings 772...

Страница 773: ...3341 Cause Print data contains illegal image processing table What to Do Check the print job image processing table 773...

Страница 774: ...3350 Cause Free space on the personal box on the printer hard disk is less than 1 GB What to Do Delete unneeded jobs stored in personal boxes Deleting Saved Jobs 774...

Страница 775: ...3351 Cause 100 jobs are stored in the Personal Box What to Do Delete any unneeded jobs saved in the personal box Deleting Saved Jobs 775...

Страница 776: ...printer hard disk is full so the job will only be printed The print job will not be saved to the hard disk What to Do To save the print job delete any unneeded jobs saved in the personal box Deleting...

Страница 777: ...ror Check that the address and port numbers of the sending mail server SMTP server are correct in the RemoteUI mail server settings Setting Mail Server If this does not resolve the error check the sta...

Страница 778: ...or Check that the address and port numbers of the receiving mail server POP3 server are correct in the RemoteUI mail server settings Setting Mail Server If this does not resolve the error check the st...

Страница 779: ...ch screen to dismiss the error Check that the mail server and device secure connection SSL settings match Check the secure connection SSL settings in RemoteUI Setting Mail Server Contact the mail serv...

Страница 780: ...ch screen to dismiss the error Check that the mail server and device secure connection SSL settings match Check the secure connection SSL settings in RemoteUI Setting Mail Server Contact the mail serv...

Страница 781: ...iss the error Check that the sending mail server SMTP server is correctly configured in the RemoteUI mail server settings Setting Mail Server If this does not resolve the error check the status of the...

Страница 782: ...miss the error Check that the sending account and password are correctly configured in the RemoteUI mail server settings Setting Mail Server If this does not resolve the error check the status of the...

Страница 783: ...ss the error Check that the receiving mail server POP3 server is correctly configured in the RemoteUI mail server settings Setting Mail Server If this does not resolve the error check the status of th...

Страница 784: ...iss the error Check that the receiving account and password are correctly configured in the RemoteUI mail server settings Setting Mail Server If this does not resolve the error check the status of the...

Страница 785: ...he touch screen to dismiss the error Check that the settings on the mail server and the APOP settings on this device match Check this device s APOP settings in RemoteUI Setting Mail Server Contact the...

Страница 786: ...n the touch screen to dismiss the error Check if the RemoteUI mail server settings are correct Setting Mail Server If this does not resolve the error check the status of the mail server Contact the ma...

Страница 787: ...3424 Cause Sending mail failed What to Do Tap OK on the touch screen to dismiss the error Specify the correct destination mail address and try again 787...

Страница 788: ...ceived print job for upper roll paper while lower roll paper is in use Received print job for lower roll paper while upper roll paper is in use What to Do Tap OK on the touch screen to dismiss the err...

Страница 789: ...4111 Cause The media type specified is incompatible with this device What to Do Tap OK on the touch screen to dismiss the error Check the media type settings and then try again 789...

Страница 790: ...fying paper feed from the roll unit but the roll unit is not set to paper feed What to Do To stop printing tap OK on the touch screen or press the Stop button Check the roll unit settings and then try...

Страница 791: ...can be printed borderless 1 Tap Replace the paper and print on the touch screen then remove the roll paper Removing the Upper Roll from the Printer Removing the Lower Roll from the Roll Unit Removing...

Страница 792: ...ing Rolls From the Roll Holder 2 Replace the printer paper with paper that can be printed borderless Loading Rolls on the Roll Holder Loading the Upper Roll on the Printer Loading the Lower Roll on th...

Страница 793: ...ted borderless 1 Tap Replace the paper and print on the touch screen then remove the roll paper Removing the Upper Roll from the Printer Removing Rolls From the Roll Holder 2 Replace the printer paper...

Страница 794: ...firmly until it is against the roll holder flange Loading Rolls on the Roll Holder Printing with a border Tap Print with border on the touch screen Printing with a border is now enabled Stopping print...

Страница 795: ...stop printing 2 Check that the printer driver for the printer has been selected and then try again See the media information list for media types compatible with borderless printing Paper Information...

Страница 796: ...topping printing Tap Cancel on the touch screen to stop printing Printing with a border Tap Print with border on the touch screen Printing with a border is now enabled Note See the media information l...

Страница 797: ...ft up the release lever and reload the roll paper Loading the Upper Roll on the Printer Loading the Lower Roll on the Roll Unit Printing with a border Tap Print with border on the touch screen Printin...

Страница 798: ...stop printing 2 Check that the printer driver for the printer has been selected and then try again See the media information list for media types compatible with borderless printing Paper Information...

Страница 799: ...s not specified in the printer driver Roll paper is not wide enough or the paper is out of position What to Do Stopping printing Tap Cancel on the touch screen to stop printing Printing with a border...

Страница 800: ...6 2027 EC16 202A EC16 2038 EC17 2023 EC17 2024 EC17 2028 EC17 2029 EC17 2039 EC1B 2030 EC1B 2031 EC1B 2032 EC1B 2033 EC1C 2034 EC1C 2035 EC1C 2036 EC1C 2037 EC21 2F51 EC21 2F54 EC21 2F57 EC21 2F59 EC2...

Страница 801: ...at to Do Press the Stop button to stop printing and then take the following action Cancel the Print job in the job queue Managing Job Queue Deleting or Preempting Other Jobs Delete unneeded jobs store...

Страница 802: ...hard disk has not been formatted What to Do Tap OK on the touch screen to begin formatting the hard disk When formatting is complete the data on the hard disc will be erased and the printer will auto...

Страница 803: ...d in the box What to Do Take the actions below Cancel the Print job in the job queue Managing Job Queue Deleting or Preempting Other Jobs Delete unneeded jobs stored in personal boxes Deleting Saved J...

Страница 804: ...then turn the power back on If the error appears again make a note of the detailed error code ECxx xxxx that appears on the touch screen and then turn off the power and contact a Canon customer servi...

Страница 805: ...er of the width set in the printer driver 1 Tap Replace the paper and print on the touch screen then remove the roll paper Removing the Upper Roll from the Printer Removing the Lower Roll from the Rol...

Страница 806: ...settings to the media type loaded in the printer and then try again Replacing paper Follow the steps below to match the media type in the printer driver and the media type specified for the printer 1...

Страница 807: ...aper that can be printed borderless Loading Rolls on the Roll Holder Loading the Upper Roll on the Printer Loading the Lower Roll on the Roll Unit Printing begins Note See the media information list f...

Страница 808: ...nter A foreign object near the output slot is obstructing the cutter blade Follow the steps below to resume printing 1 Open the top cover and remove any foreign objects 2 If There is a job whose print...

Страница 809: ...If this does not apply there may be a cutter blade malfunction Contact your Canon dealer for assistance 809...

Страница 810: ...paper from the Media Take up Unit Tap OK on the touch screen to dismiss the error Note When printing on light weight paper or with borderless printing if the paper s border becomes ruffled it may come...

Страница 811: ...ch screen to dismiss the error 2 Load paper suitable for Color Calibration See the media information list for suitable paper Paper Information List Make sure the paper in the printer is the same as th...

Страница 812: ...4925 Cause The performance of some internal printer sensors may be affected What to Do Tap OK on the touch screen to stop Color Calibration Contact your Canon dealer for assistance 812...

Страница 813: ...is not suitable for Color Calibration What to Do Tap OK on the touch screen to stop Color Calibration Load a paper size suitable for Color Calibration and then repeat Color Calibration Managing Color...

Страница 814: ...ction The test pattern was printed too faintly What to Do Tap OK on the touch screen to dismiss the error and then take the following actions Load unused paper suitable for Color Calibration Make adju...

Страница 815: ...sensors to malfunction The test pattern was printed too faintly What to Do Tap OK on the touch screen to dismiss the error and then take the following actions Load unused paper Make adjustments to en...

Страница 816: ...the printer is loaded with very transparent film type paper What to Do Tap OK on the touch screen to dismiss the error We recommend calibrating the print head with a frequently used non film paper Au...

Страница 817: ...head alignment 1 Tap OK on the touch screen to dismiss the error 2 Print a test pattern to check the nozzles Checking for Nozzle Clogging 3 If the nozzle is blocked clean the print head Cleaning the...

Страница 818: ...head alignment 1 Tap OK on the touch screen to dismiss the error 2 Print a test pattern to check the nozzles Checking for Nozzle Clogging 3 If the nozzle is blocked clean the print head Cleaning the...

Страница 819: ...head alignment 1 Tap OK on the touch screen to dismiss the error 2 Print a test pattern to check the nozzles Checking for Nozzle Clogging 3 If the nozzle is blocked clean the print head Cleaning the...

Страница 820: ...4950 Cause WPS Push button method connection failed What to Do Follow the instructions on the touch screen to try connecting to the wireless LAN router again 820...

Страница 821: ...4951 Cause AOSS BUFFALO connection failed What to Do Follow the instructions on the touch screen to try connecting to the wireless LAN router again 821...

Страница 822: ...4952 Cause Failed to connect to the wireless LAN router What to Do Follow the instructions on the touch screen to try connecting to the wireless LAN router again 822...

Страница 823: ...4953 Cause Failed to acquire IP address What to Do Check the information that appears on the touch screen and then try connecting again 823...

Страница 824: ...4954 Cause Failed to set up wireless LAN using Cableless setup What to Do Tap OK on the touch screen to dismiss the error and then configure the settings again 824...

Страница 825: ...5 Cause IPv4 IPv6 settings were changed but Wired LAN and Wireless LAN are set to Disable What to Do On the touch screen tap OK to dismiss the error and then set Wired LAN and Wireless LAN to Enable 8...

Страница 826: ...ut they cannot be changed for the following reasons Printer is operating Printer currently being configured using RemoteUI What to Do Tap OK on the touch screen to dismiss the error exit other process...

Страница 827: ...4957 Cause Raku Raku WLAN Start NEC connection failed What to Do Tap OK on the touch screen to dismiss the error and try connecting again 827...

Страница 828: ...ect connection failed It is also possible that a Direct connection request was made but a connection could not be established What to Do Tap OK on the touch screen to dismiss the error and try connect...

Страница 829: ...occurred What to Do Make a note of the detailed error code ECxx xxxx that appears on the touch screen and then turn off the power and unplug the power cord Contact your Canon dealer for assistance Det...

Страница 830: ...e power cord Wait at least 10 seconds and then turn the power back on If the error appears again make a note of the detailed error code ECxx xxxx that appears on the touch screen and then contact a Ca...

Страница 831: ...ode ECxx xxxx that appears on the touch screen and then turn off the power and unplug the power cord Contact your Canon dealer for assistance Detailed error codes EC33 4020 EC33 4021 EC33 4022 EC33 40...

Страница 832: ...occurred What to Do Make a note of the detailed error code ECxx xxxx that appears on the touch screen and then turn off the power and unplug the power cord Contact your Canon dealer for assistance Det...

Страница 833: ...occurred What to Do Make a note of the detailed error code ECxx xxxx that appears on the touch screen and then turn off the power and unplug the power cord Contact your Canon dealer for assistance Det...

Страница 834: ...a note of the detailed error code ECxx xxxx that appears on the touch screen and then turn off the power and unplug the power cord Contact your Canon dealer for assistance Detailed error codes EC25 40...

Страница 835: ...occurred What to Do Make a note of the detailed error code ECxx xxxx that appears on the touch screen and then turn off the power and unplug the power cord Contact your Canon dealer for assistance Det...

Страница 836: ...occurred What to Do Make a note of the detailed error code ECxx xxxx that appears on the touch screen and then turn off the power and unplug the power cord Contact your Canon dealer for assistance Det...

Страница 837: ...unplug the power cord Wait at least 10 seconds and then turn the power back on If the error appears again make a note of the detailed error code ECxx xxxx that appears on the touch screen and then co...

Страница 838: ...occurred What to Do Make a note of the detailed error code ECxx xxxx that appears on the touch screen and then turn off the power and unplug the power cord Contact your Canon dealer for assistance Det...

Страница 839: ...occurred What to Do Make a note of the detailed error code ECxx xxxx that appears on the touch screen and then turn off the power and unplug the power cord Contact your Canon dealer for assistance Det...

Страница 840: ...ode ECxx xxxx that appears on the touch screen and then turn off the power and unplug the power cord Contact your Canon dealer for assistance Detailed error codes EC07 4060 EC51 4041 EC51 4042 EC51 40...

Страница 841: ...unplug the power cord Wait at least 10 seconds and then turn the power back on If the error appears again make a note of the detailed error code ECxx xxxx that appears on the touch screen and then co...

Страница 842: ...unplug the power cord Wait at least 10 seconds and then turn the power back on If the error appears again make a note of the detailed error code ECxx xxxx that appears on the touch screen and then co...

Страница 843: ...unplug the power cord Wait at least 10 seconds and then turn the power back on If the error appears again make a note of the detailed error code ECxx xxxx that appears on the touch screen and then co...

Страница 844: ...unplug the power cord Wait at least 10 seconds and then turn the power back on If the error appears again make a note of the detailed error code ECxx xxxx that appears on the touch screen and then co...

Страница 845: ...unplug the power cord Wait at least 10 seconds and then turn the power back on If the error appears again make a note of the detailed error code ECxx xxxx that appears on the touch screen and then co...

Страница 846: ...unplug the power cord Wait at least 10 seconds and then turn the power back on If the error appears again make a note of the detailed error code ECxx xxxx that appears on the touch screen and then co...

Страница 847: ...unplug the power cord Wait at least 10 seconds and then turn the power back on If the error appears again make a note of the detailed error code ECxx xxxx that appears on the touch screen and then co...

Страница 848: ...unplug the power cord Wait at least 10 seconds and then turn the power back on If the error appears again make a note of the detailed error code ECxx xxxx that appears on the touch screen and then co...

Страница 849: ...unplug the power cord Wait at least 10 seconds and then turn the power back on If the error appears again make a note of the detailed error code ECxx xxxx that appears on the touch screen and then co...

Страница 850: ...unplug the power cord Wait at least 10 seconds and then turn the power back on If the error appears again make a note of the detailed error code ECxx xxxx that appears on the touch screen and then co...

Страница 851: ...unplug the power cord Wait at least 10 seconds and then turn the power back on If the error appears again make a note of the detailed error code ECxx xxxx that appears on the touch screen and then co...

Страница 852: ...unplug the power cord Wait at least 10 seconds and then turn the power back on If the error appears again make a note of the detailed error code ECxx xxxx that appears on the touch screen and then co...

Страница 853: ...unplug the power cord Wait at least 10 seconds and then turn the power back on If the error appears again make a note of the detailed error code ECxx xxxx that appears on the touch screen and then co...

Страница 854: ...unplug the power cord Wait at least 10 seconds and then turn the power back on If the error appears again make a note of the detailed error code ECxx xxxx that appears on the touch screen and then co...

Страница 855: ...unplug the power cord Wait at least 10 seconds and then turn the power back on If the error appears again make a note of the detailed error code ECxx xxxx that appears on the touch screen and then co...

Страница 856: ...unplug the power cord Wait at least 10 seconds and then turn the power back on If the error appears again make a note of the detailed error code ECxx xxxx that appears on the touch screen and then co...

Страница 857: ...unplug the power cord Wait at least 10 seconds and then turn the power back on If the error appears again make a note of the detailed error code ECxx xxxx that appears on the touch screen and then co...

Страница 858: ...unplug the power cord Wait at least 10 seconds and then turn the power back on If the error appears again make a note of the detailed error code ECxx xxxx that appears on the touch screen and then co...

Страница 859: ...occurred What to Do Make a note of the detailed error code ECxx xxxx that appears on the touch screen and then turn off the power and unplug the power cord Contact your Canon dealer for assistance Det...

Страница 860: ...occurred What to Do Make a note of the detailed error code ECxx xxxx that appears on the touch screen and then turn off the power and unplug the power cord Contact your Canon dealer for assistance Det...

Страница 861: ...occurred What to Do Make a note of the detailed error code ECxx xxxx that appears on the touch screen and then turn off the power and unplug the power cord Contact your Canon dealer for assistance Det...

Страница 862: ...occurred What to Do Make a note of the detailed error code ECxx xxxx that appears on the touch screen and then turn off the power and unplug the power cord Contact your Canon dealer for assistance Det...

Страница 863: ...occurred What to Do Make a note of the detailed error code ECxx xxxx that appears on the touch screen and then turn off the power and unplug the power cord Contact your Canon dealer for assistance Det...

Страница 864: ...occurred What to Do Make a note of the detailed error code ECxx xxxx that appears on the touch screen and then turn off the power and unplug the power cord Contact your Canon dealer for assistance Det...

Страница 865: ...hat to Do Make a note of the detailed error code ECxx xxxx that appears on the touch screen and then turn off the power and unplug the power cord Contact your Canon dealer for assistance Detailed erro...

Страница 866: ...occurred What to Do Make a note of the detailed error code ECxx xxxx that appears on the touch screen and then turn off the power and unplug the power cord Contact your Canon dealer for assistance Det...

Страница 867: ...red What to Do Make a note of the detailed error code ECxx xxxx that appears on the touch screen and then turn off the power and unplug the power cord Contact your Canon dealer for assistance Detailed...

Страница 868: ...red What to Do Make a note of the detailed error code ECxx xxxx that appears on the touch screen and then turn off the power and unplug the power cord Contact your Canon dealer for assistance Detailed...

Страница 869: ...occurred What to Do Make a note of the detailed error code ECxx xxxx that appears on the touch screen and then turn off the power and unplug the power cord Contact your Canon dealer for assistance Det...

Отзывы: