background image

Optional Accessories

198

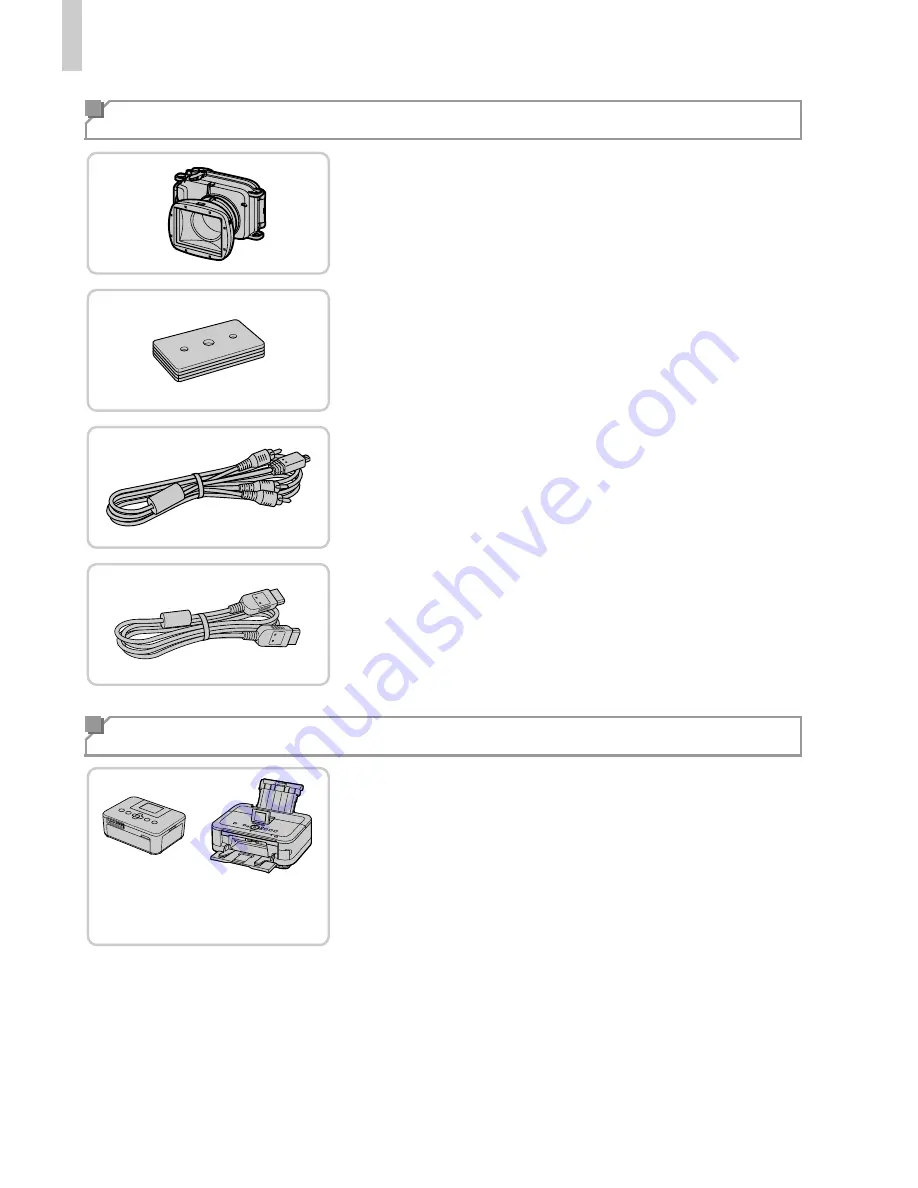
Waterproof Case WP-DC46

z

For underwater photography at depths of up 
to 40 meters (130 ft.). Also useful for shooting 
in the rain, at the beach, or on ski slopes.

Waterproof Case Weight WW-DC1

z

Prevents the waterproof case from floating 
during underwater photography.

Stereo AV Cable AVC-DC400ST

z

Connect the camera to a TV to enjoy 
playback on the larger TV screen.

HDMI Cable HTC-100

z

For connecting the camera to an HDMI input 
of a high-definition TV.

Canon PictBridge-Compatible Printers

z

Printing images without a computer is 
possible by connecting the camera to a 
Canon PictBridge-compatible printer.
For details, visit your nearest Canon dealer.

Other Accessories

Printers

SELPHY 

Series

PIXMA 

Series

Содержание PowerShot SXE60 HS

Страница 1: ...user guide included on the CD ROM for more detailed information Before use be sure to read this guide including the safety precautions This guide will familiarize you with how to use the camera corre...

Страница 2: ...Disk A memory card is not included see below About Getting Started This Guide and the PDF Manual To master more advanced operations and use the included software refer to the PDF manuals on the CD ROM...

Страница 3: ...ory including memory cards that results in the failure of an image to be recorded or to be recorded in a way that is machine readable Images recorded by the camera are intended for personal use Refrai...

Страница 4: ...resemble The tabs shown above titles indicate whether the function is used for still images movies or both Indicates that the function is used when shooting or viewing still images Indicates that the...

Страница 5: ...s I Left button Control dial FUNC SET button Flash I Right button Self timer I mi Single image erase I Down button Turning the control dial is one way to choose setting items switch images and perform...

Страница 6: ...m infants when using the flash Store this equipment out of the reach of children and infants Strap Putting the strap around a child s neck could result in asphyxiation Use only recommended power sourc...

Страница 7: ...sing the camera in places where use of electronic devices is restricted such as inside airplanes and medical facilities Do not play the supplied CD ROM s in any CD player that does not support data CO...

Страница 8: ...from the flash to prevent heat build up and damage to the unit Remove and store the battery when you are not using the camera If the battery is left inside the camera damage caused by leakage may occ...

Страница 9: ...autions I When putting the camera in your bag ensure that hard objects do not come into contact with the screen Do not attach any hard objects to the camera Doing so may cause malfunctions or damage t...

Страница 10: ...r wrist When shooting keep your arms close to your body and hold the camera securely to prevent it from moving If the flash is up do not rest your fingers on it Charging the Battery Before use charge...

Страница 11: ...se a power cord do not attach the charger or cord to other objects Doing so could result in malfunction or damage to the product For details on charging time and the number of shots and recording time...

Страница 12: ...ttery facing the wrong way cannot be locked into the correct position Always confirm that the battery is facing the right way and locks when inserted Insert the memory card Insert the memory card faci...

Страница 13: ...en slowly release it The memory card will pop up CSetting the Da ci Ti _ A screen for setting the date and time is displayed the first time you turn the camera on Be sure to specify the date and time...

Страница 14: ...yed To turn off the camera press the power button Unless you set the date time and local time zone the Date Time screen will be displayed each time you turn the camera on Specify the correct informati...

Страница 15: ...the camera s built in date time battery backup battery after the battery pack is removed The date time battery will be charged in about 4 hours once you insert a charged battery or connect the camera...

Страница 16: ...the _ buttons or turn the dial to choose a language and then press the button Once the display language has been set the setting screen is no longer displayed A clock icon is displayed if you wait to...

Страница 17: ...creen is displayed Enter f IJ t mode Set the mode dial to fD Aim the camera at the subject As the camera determines the scene it will make a slight clicking noise Icons representing the scene and imag...

Страница 18: ...ress the shutter button all the way down As the camera shoots a shutter sound is played and in low light conditions the flash fires automatically Keep the camera still until the shutter sound ends You...

Страница 19: ...stop shooting The camera beeps twice as recording stops Recording will stop automatically when the memory card becomes full After shooting images or movies you can view them on the screen as follows E...

Страница 20: ...p 3 Play movies Press the button choose either press the A buttons or turn the dial and then press the button again Playback now begins and after the movie is finished II is displayed To adjust the vo...

Страница 21: ...using the PDF manuals _Features of the l cluded Softw _ a_ re _ After installing the software on the CD ROM you can do the following things on your computer lmageBrowser EX Import images and change c...

Страница 22: ...e included on the CD ROM bundled with your camera or you can download the latest version from the Canon website c System Requirements The included software can be used on the following computers Adobe...

Страница 23: ...ndows 7 and Mac OS X 10 6 are used here for the sake of illustration Using the software auto update function you can update to the latest version and download new functions via the Internet some softw...

Страница 24: ...ce cable in the computer s USB port For details about USB connections on the computer refer to the computer user manual Install the files Turn the camera on and follow the on screen instructions to co...

Страница 25: ...low the on screen installation instructions for each Doing so will ensure that each camera will receive the correct updates and new functions via the auto update function Saving Images to a Computer W...

Страница 26: ...then click OK Double click Save the images to the computer Click Import Images from Camera and then click Import Untransferred Images Images are now saved to the Pictures folder on the computer in sep...

Страница 27: ...er you connect the camera to the computer until camera images are accessible Images shot in vertical orientation may be saved in horizontal orientation Image protection settings may be cleared from im...

Страница 28: ...emory Card Card Reader HOMI Cable HTC 1 00 AC Adapter Kit ACK DC40 Stereo AV Cable AVC DC400ST 1 Also available for purchase separately 2 High Power Flash HF DC1 also supported 28 Macintosh Computer T...

Страница 29: ...ble for any damage to this product and or accidents such as fire etc caused by the malfunction of non genuine Canon accessories e g a leakage and or explosion of a battery pack Please note that this w...

Страница 30: ...DC40 nnr I V 231 g approx 8 15 oz including batteries and memory card Approx 208 g approx 7 34 oz camera body only f1 fl11 1 fW Approx 224 g approx 7 90 oz including batteries and memory card nnr I V...

Страница 31: ...an for 4 3 images Recording Time per Memory Card Approx 29 min 39 sec Approx 1 hr 59 min 43 sec Approx 42 min 11 sec 1 Approx 2 hr 50 min 19 sec 2 Approx 1 hr 28 min 59 sec Approx 5 hr 59 min 10 sec 1...

Страница 32: ...ting modes Continuous Shooting Speed Shutter Speed nnrt V 2 4 shots sec nnrt V 0 8 shots sec mode automatically set range 1 1 3200 sec Range in all shooting modes 15 1 3200 sec Tv mode available value...

Страница 33: ...74 oz Battery Charger CB 2LY CB 2LYE Rated Input 100 240 V AC 50 60 Hz 0 085 A 1 00 V 0 05 A 240 V Rated Output 4 VDC 0 7 A Charging Time Al 1 uJI 1 hour 55 min when using NB 6L Charge Indicator Charg...

Страница 34: ...or television reception which can be determined by turning the equipment off and on the user is encouraged to try to correct the interference by one or more of the following measures Reorient or relo...

Страница 35: ...tion to a supply not in the U S A use an attachment plug adapter of the proper configuration for the power outlet if needed USA and Canada only The Lithium ion polymer battery that powers the product...

Страница 36: ...a personal and non commercial purpose or 2 by a video provider licensed under the AT T patents to provide MPEG 4 compliant video No license is granted or implied for any other use for MPEG 4 standard...

Страница 37: ...ra User Guide ENGLISH Before use be sure to read this guide including the safety precautions This guide will familiarize you with how to use the camera correctly Keep the guide handy for future refere...

Страница 38: ...eparately can be used regardless of capacity SD memory cards SDHC memory cards SDXC memory cards Eye Fi cards Conforms to SD specifications However not all memory cards have been verified to work with...

Страница 39: ...rding that infringes on copyright law and note that even for personal use photography may contravene copyright or other legal rights at some performances or exhibitions or in some commercial settings...

Страница 40: ...ts Important information you should know Notes and tips for expert camera use p xx Pages with related information in this example xx represents a page number Instructions in this guide apply to the ca...

Страница 41: ...ed by icons o Up button on back q Left button on back r Right button on back p Down button on back 5 Control dial on back m FUNC SET button on back Screen LCD monitor Mode dial AV OUT Audio video outp...

Страница 42: ...4 Common Convenient Features 63 Using Face ID 69 Image Customization Features 78 Helpful Shooting Features 84 Customizing Camera Operation 87 4 Other Shooting Modes 89 Brightness Color Customization L...

Страница 43: ...167 Editing Still Images 172 Editing Movies 178 8 Setting Menu 181 Adjusting Basic Camera Functions 182 9 Accessories 195 Tips on Using Included Accessories 196 Optional Accessories 197 Using Optiona...

Страница 44: ...e shot Self Timer 64 99 z Add the shooting date and time Date Stamp 67 z Movie clips and photos together Movie Digest 92 153 z Use Face ID 69 154 Contents Basic Operations Monochrome p 107 Fish Eye Ef...

Страница 45: ...y Mode 91 z Automatic playback Slideshow 156 z On a TV 199 z On a computer 26 z Browse through images quickly 151 z Erase images 163 E Shoot View Movies z Shoot movies 54 111 z View movies 146 z Fast...

Страница 46: ...around a child s neck could result in asphyxiation Use only recommended power sources Do not attempt to disassemble alter or apply heat to the product Avoid dropping or subjecting the product to seve...

Страница 47: ...camera in places where use of electronic devices is restricted such as inside airplanes and medical facilities Do not play the supplied CD ROM s in any CD player that does not support data CD ROMs It...

Страница 48: ...se use a cotton swab to remove dirt dust or other foreign matter from the flash to prevent heat build up and damage to the unit Remove and store the battery when you are not using the camera If the ba...

Страница 49: ...utions 13 When putting the camera in your bag ensure that hard objects do not come into contact with the screen Do not attach any hard objects to the camera Doing so may cause malfunctions or damage t...

Страница 50: ...e camera securely to prevent it from moving If the flash is up do not rest your fingers on it Before use charge the battery with the included charger Be sure to charge the battery initially because th...

Страница 51: ...er device you should format the memory card with this camera p 185 Check the card s write protect tab z Recording is not possible on memory cards with a write protect tab when the tab is in the locked...

Страница 52: ...be locked into the correct position Always confirm that the battery is facing the right way and locks when inserted Insert the memory card z Insert the memory card facing as shown until it clicks into...

Страница 53: ...ng the date and time is displayed the first time you turn the camera on Be sure to specify the date and time which is the basis for dates and times added to your images Turn the camera on z Press the...

Страница 54: ...displayed z To turn off the camera press the power button Adjust the date and time as follows Access the camera menu z Press the n button Unless you set the date time and local time zone the Date Tim...

Страница 55: ...retained for about 3 weeks by the camera s built in date time battery backup battery after the battery pack is removed The date time battery will be charged in about 4 hours once you insert a charged...

Страница 56: ...r turn the 5 dial to choose a language and then press the m button X Once the display language has been set the setting screen is no longer displayed Display Language A clock icon is displayed if you...

Страница 57: ...the mode dial to A z Aim the camera at the subject As the camera determines the scene it will make a slight clicking noise X Icons representing the scene and image stabilization mode are displayed in...

Страница 58: ...n all the way down X As the camera shoots a shutter sound is played and in low light conditions the flash fires automatically z Keep the camera still until the shutter sound ends X Your shot remains d...

Страница 59: ...ra beeps twice as recording stops X Recording will stop automatically when the memory card becomes full After shooting images or movies you can view them on the screen as follows Enter Playback mode z...

Страница 60: ...p 3 Play movies z Press the m button choose either press the op buttons or turn the 5 dial and then press the m button again X Playback now begins and after the movie is finished is displayed z To adj...

Страница 61: ...you can do the following things on your computer ImageBrowser EX z Import images and change camera settings z Manage images view search and organize z Print and edit images z Update to the latest sof...

Страница 62: ...e ImageBrowser EX Help function Depending on the country or region where you purchased your camera the ImageBrowser EX User Guide may not be accessible from the Help function In such cases it will eit...

Страница 63: ...double click the desktop disc icon to open it and then double click the icon displayed Begin the installation z Click Easy Installation and follow the on screen instructions to complete the installat...

Страница 64: ...USB port For details about USB connections on the computer refer to the computer user manual Install the files z Turn the camera on and follow the on screen instructions to complete the installation p...

Страница 65: ...lick the link to modify the program When not connected to the Internet there are the following limitations The screen in step 3 will not be displayed Some functions may not be installed The first time...

Страница 66: ...Import Images from Camera and then click Import Untransferred Images X Images are now saved to the Pictures folder on the computer in separate folders named by date z After images are saved close Came...

Страница 67: ...mages to a computer simply by connecting your camera to the computer without using the included software the following limitations apply It may take a few minutes after you connect the camera to the c...

Страница 68: ...Windows Macintosh Computer Interface Cable IFC 400PCU 1 Wrist Strap WS DC11 DIGITAL CAMERA Solution Disk Battery Pack NB 6L 1 with terminal cover HDMI Cable HTC 100 Battery Charger CB 2LY CB 2LYE 1 P...

Страница 69: ...or accidents such as fire etc caused by the malfunction of non genuine Canon accessories e g a leakage and or explosion of a battery pack Please note that this warranty does not apply to repairs arisi...

Страница 70: ...34...

Страница 71: ...35 Camera Basics Basic camera operations and features 1...

Страница 72: ...screen and prepare for shooting when the screen is off but the lens is still out press the shutter button halfway p 37 The camera turns itself off automatically after about five minutes of inactivity...

Страница 73: ...e and AF frames are displayed around image areas in focus Press all the way down From the halfway position press fully to shoot X The camera shoots as a shutter sound is played z Keep the camera still...

Страница 74: ...ith optimal settings for specific scenes p 93 Live View Control Mode Customize image brightness or colors when shooting p 90 Auto Mode Fully automatic shooting with camera determined settings pp 21 54...

Страница 75: ...ied simply by pressing the m or r button or another screen is displayed for configuring the function Choose an option z Press the op buttons or turn the 5 dial to choose an option z Options labeled wi...

Страница 76: ...e a setting z Press the op buttons or turn the 5 dial to choose a setting z To choose settings with options not shown first press the m or r button to switch screens and then either press the op butto...

Страница 77: ...ange the display color z Press the m button again to cancel the clock display Indicator Display Color Indicator Status Camera Status Green On Connected to a computer p 29 or display off Blinking Start...

Страница 78: ...42...

Страница 79: ...43 Using GPS Function Basic GPS operations and features 2 SX260 HS...

Страница 80: ...ep the GPS antenna pointing up toward the sky When carrying the camera in a bag put it in the bag with the GPS antenna pointing up and try to put the camera in an outer section of bag Using GPS Functi...

Страница 81: ...ecorded position may differ from the actual position even in situations other than those mentioned above GPS signal reception may take longer after battery replacement or when you have not used GPS fu...

Страница 82: ...the sky will normally be displayed within a few minutes when the camera is used in areas with ample GPS coverage such as outdoor areas with an unobstructed view of the sky If is not displayed move to...

Страница 83: ...es you shoot will now be geotagged z To review the location information latitude longitude and elevation of your geotagged still images or movies see GPS Information Display p 149 Geotagging Images Wh...

Страница 84: ...find the battery to be nearly depleted when turning the camera on Charge the battery as needed or keep a spare charged battery with you Activate GPS z Follow step 1 on p 45 to configure the setting Co...

Страница 85: ...ormation will not remain on the camera z If the camera is off and you want to remove the memory card when the logger is being used turn the camera on then turn it off again before removing the memory...

Страница 86: ...s cannot be saved when write protected memory cards are in the camera Location information date and time will be saved to the memory card when the camera is turned off or when displaying log files see...

Страница 87: ...button choose GPS Auto Time on the 3 tab and then choose On p 40 z To set daylight saving time follow the steps on p 189 Update completed is shown on the Date Time screen in step 2 on p 17 after the d...

Страница 88: ...52...

Страница 89: ...53 Smart Auto Mode Convenient mode for easy shots with greater control over shooting 3...

Страница 90: ...it determines the scene X Icons representing the scene and image stabilization mode are displayed in the upper right of the screen pp 59 61 X Frames displayed around any detected subjects indicate th...

Страница 91: ...focus X The flash automatically rises in low light conditions Shoot z Press the shutter button all the way down X As the camera shoots a shutter sound is played and in low light conditions when the fl...

Страница 92: ...begins you can take your finger off the movie button Resize the subject and recompose the shot as needed z To resize the subject do the same thing as in step 3 on p 54 However note that movies shot a...

Страница 93: ...y be too close if the camera only beeps once when you press the shutter button halfway For details on the focusing range shooting range see Specifications in the Getting Started guide To reduce red ey...

Страница 94: ...recording to sound muffled Avoid touching camera controls other than the movie button when shooting movies because sounds made by the camera will be recorded To correct suboptimal image color that ma...

Страница 95: ...60 The background color of icons is light blue when the background is a blue sky dark blue when the background is dark and gray for all other backgrounds The background color of icons is light blue wh...

Страница 96: ...are correct p 17 If you press the shutter button halfway when one of the icons in the table below is displayed one of the following icons will be displayed to inform you that the camera will shoot con...

Страница 97: ...you want to shoot single images only press the m button choose in the menu and then choose Image Stabilization Icons Image stabilization for still images Image stabilization for movies reducing stron...

Страница 98: ...subjects within a certain range to keep them in focus However if the camera detects subject movement only the white frame will remain on the screen When you are pressing the shutter button halfway and...

Страница 99: ...he zoom lever will display the zoom bar which indicates the zoom position The color of the zoom bar will change depending on the zoom range White range optical zoom range where the image will not appe...

Страница 100: ...isplayed Shoot z For Still Images Press the shutter button halfway to focus on the subject and then press it all the way down z For Movies Press the movie button X Once you start the self timer the la...

Страница 101: ...can specify the delay 0 30 seconds and number of shots 1 10 Choose z Following step 1 on p 64 choose and press the n button immediately Configure the setting z Press the op buttons to choose Delay or...

Страница 102: ...mage brightness and white balance are determined by the first shot More time is required between shots when the flash fires or when you have specified to take many shots Shooting will stop automatical...

Страница 103: ...X As you take shots the camera adds the shooting date or time to the lower right corner of images z To restore the original setting choose Off in step 1 Adding the Shooting Date and Time Still Images...

Страница 104: ...ress the shutter button halfway X A blue frame is displayed and the camera will keep the subject in focus and image brightness adjusted Servo AF Shoot z Press the shutter button all the way down to sh...

Страница 105: ...the camera Additionally when registered people are detected their names will be recorded in still images When using the Face ID function be careful when sharing the camera or images with others and w...

Страница 106: ...he gray frame at the center of the screen z A white frame on the person s face indicates that the face is recognized Make sure a white frame is displayed on the face and then shoot z If the face is no...

Страница 107: ...character z Press the n button to return to the edit profile screen Enter a birthday z Press the op buttons or turn the 5 dial to choose Birthday and then press the m button z Press the qr buttons to...

Страница 108: ...oting X When you point the camera toward a subject the names of up to 3 registered people will be displayed when they are detected z Shoot X Displayed names will be recorded in still images Even if pe...

Страница 109: ...egistered information with new face info Registering face info right before shooting will allow for easier detection of registered faces If a person is mistakenly detected as another person and you co...

Страница 110: ...anges Changing the Name or Birthday Even if you change names in Edit Profile the names recorded in previously shot images will remain the same You can check and erase registered face information by ch...

Страница 111: ...hoose the name of the person to overwrite z Press the opqr buttons to choose the name of a person to overwrite and then press the m button X If 4 or less face information slots are registered follow s...

Страница 112: ...erase z Press the opqr buttons to choose the name of the person whose face info you want to erase and then press the m button Access the Face Info List screen z Press the op buttons or turn the 5 dial...

Страница 113: ...viously shot images will not be erased Access the Erase Info screen z Follow step 1 on p 69 and choose Erase Info Choose the name of the person whose info you want to erase z Press the opqr buttons to...

Страница 114: ...his process but choose Image Customization Features Changing the Aspect Ratio Still Images Same aspect ratio as HDTVs used for display on widescreen HDTVs or similar display devices Same aspect ratio...

Страница 115: ...nfigure the setting z Press the m button choose in the menu and choose the desired option p 39 X The option you configured is now displayed z To restore the original setting repeat this process but ch...

Страница 116: ...ng z Choose Red Eye Corr and then choose On p 40 X Once the setting is complete R is displayed z To restore the original setting repeat this process but choose Off Red Eye Correction Still Images Red...

Страница 117: ...he n button choose Hg Lamp Corr on the 4 tab and then choose On p 40 X Once the setting is complete is displayed z To restore the original setting repeat this process but choose Off Correcting Greenis...

Страница 118: ...now displayed z To restore the original setting repeat this process but choose Fine Detail Movie Processing This function quickly processes a large amount of information making it possible to record...

Страница 119: ...be reduced However the recording may sound unnatural when this option is used when there is no wind Configure the setting z Press the n button choose Wind Filter on the 4 tab and then choose On p 40 z...

Страница 120: ...Press the n button choose Grid Lines on the 4 tab and then choose On p 40 X Once the setting is complete grid lines are displayed on the screen z To restore the original setting repeat this process bu...

Страница 121: ...n halfway The face detected as the main subject is now magnified z To restore the original setting choose Off in step 1 Magnifying the Area in Focus Still Images The display will not magnify if a face...

Страница 122: ...e setting z Press the n button choose Blink Detection on the 4 tab and then choose On p 40 Shoot X A frame accompanied by is displayed when the camera detects a person whose eyes are closed z To resto...

Страница 123: ...restore the original setting repeat this process but choose On You can deactivate the red eye reduction lamp that lights up to reduce red eye when the flash is used in low light shots Access the Flas...

Страница 124: ...choose Review Info on the 4 tab and then choose the desired option p 40 z To restore the original setting repeat this process but choose Off Changing the Image Display Period After Shots 2 10 sec Disp...

Страница 125: ...89 Other Shooting Modes Shoot more effectively in various scenes and take shots enhanced with unique image effects or captured using special functions 4...

Страница 126: ...Press the m button Shoot Brightness Color Customization Live View Control Still Images Movies Brightness Adjust image brightness as desired For brighter images adjust the level to the right and for d...

Страница 127: ...flash press the r button is displayed on the screen To activate the flash press the r button again is displayed The flash will automatically fire in low light conditions z Press the 1 button z To bro...

Страница 128: ...fe is shorter in this mode than in A mode because clips are recorded for each shot Any sounds from camera operations during movie recording will be included in the movie Movies created in mode can be...

Страница 129: ...he menu and then choose a shooting mode p 39 Shoot I Shoot portraits Portrait z Take shots of people with a softening effect Shoot evening scenes without using a tripod Handheld NightScene z Beautiful...

Страница 130: ...ckgrounds Snow z Bright natural colored shots of people against snowy backgrounds t Shoot fireworks Fireworks z Vivid shots of fireworks Still Images Still Images Movies Still Images Movies Still Imag...

Страница 131: ...nd A and then press the m button In and S modes shots may look grainy because the ISO speed p 118 is increased to suit the shooting conditions mode resolution is 1984 x 1488 and cannot be changed Corr...

Страница 132: ...ing z Press the op buttons to choose an item Choose the effect level by pressing the qr buttons or turning the 5 dial and then press the m button X A preview is shown of how your shot will look with t...

Страница 133: ...e lamp lights up z To pause smile detection press the p button Press the p button again to resume detection Auto Shooting After Face Detection Smart Shutter Auto Shooting After Smile Detection Still I...

Страница 134: ...played Face the camera and wink X The camera will shoot about two seconds after detecting a wink by the person whose face is inside the frame z To cancel shooting after you have triggered the self tim...

Страница 135: ...then press the l button z Press the qr buttons or turn the 5 dial to choose and then press the l button Compose the shot and press the shutter button halfway z Make sure a green frame is displayed aro...

Страница 136: ...speed see Specifications in the Getting Started guide HQ High Quality Choose z Follow steps 1 2 on p 93 and choose Shoot X Hold the shutter button all the way down to shoot continuously z Shooting sto...

Страница 137: ...the name is recorded will be determined in the first shot and will be recorded in the same place for further shots Images Displayed During Playback If you erase a grouped image p 163 all images in th...

Страница 138: ...mpose the second shot so that it partially overlaps the image area of first shot z Minor misalignment of overlapping portions will be corrected automatically when the images are combined z Take up to...

Страница 139: ...and then choose a shooting mode p 39 Shoot Shoot in vivid colors Super Vivid z Shots in rich vivid colors Posterized shots Poster Effect z Shots that resemble an old poster or illustration Image Effec...

Страница 140: ...fect of a miniature model by blurring image areas above and below your selected area You can also make movies that look like scenes in miniature models by choosing the playback speed before the movie...

Страница 141: ...and then shoot Playback Speed and Estimated Playback Time for One Minute Clips Speed Playback Time Approx 12 sec Approx 6 sec Approx 3 sec The zoom is not available when shooting movies Be sure to se...

Страница 142: ...s the l button again X A preview is shown of how your shot will look with the effect applied Shoot This function allows you to shoot images as if a soft focus filter is attached to the camera You can...

Страница 143: ...lied Shoot Shoot images in black and white sepia or blue and white Choose z Follow steps 1 2 on p 103 and choose Choose a color tone z Press the l button choose a color tone either press the qr button...

Страница 144: ...er the color to keep and then press the q button X The specified color is recorded Specify the range of colors to keep z Press the op buttons or turn the 5 dial to adjust the range z To keep only your...

Страница 145: ...yed one after another X By default green will be replaced with gray Specify the color to replace z Position the center frame over the color to replace and then press the q button X The specified color...

Страница 146: ...ctivating camera sounds the flash or lamp as follows Use this mode where camera sounds the flash and lights are prohibited Enter mode z Set the mode dial to Shoot Using the flash in this mode may caus...

Страница 147: ...posure or change it in 1 3 stop increments within a range of 2 to 2 Lock the exposure z Press the o button to lock the exposure The exposure shift bar is displayed z To unlock the exposure press the o...

Страница 148: ...um clip length is approx 30 sec z To stop movie recording press the movie button again Shooting Super Slow Motion Movies Frame Rate Image Quality Playback Time For a 30 sec Clip 240 fps 320x240 Approx...

Страница 149: ...ave and manage iFrame movies using the included software Choose z Follow steps 1 2 on p 111 choose and shoot X Black bars displayed on the top and bottom edges of the screen indicate image areas not r...

Страница 150: ...114...

Страница 151: ...era with the mode dial set to G mode G Program AE AE Auto Exposure Before using a function introduced in this chapter in modes other than G make sure the function is available in that mode pp 230 234...

Страница 152: ...d Shooting in Program AE Mode G Mode Still Images Movies If adequate exposure cannot be obtained when you press the shutter button halfway shutter speeds and aperture values are displayed in orange To...

Страница 153: ...he o button again In this case is no longer displayed Compose the shot and shoot z After one shot AE is unlocked and is no longer displayed Adjust the metering method how brightness is measured to sui...

Страница 154: ...the Spot AE Point frame displayed in the center of the screen Changing the ISO Speed Automatically adjusts the ISO speed to suit the shooting mode and conditions Low High For shooting outdoors in fair...

Страница 155: ...overall image contrast can also be automatically corrected before shooting to make subjects stand out better z Press the n button choose i Contrast on the 4 tab and then choose Auto p 40 X Once the se...

Страница 156: ...r shooting outdoors in fair weather Cloudy For shooting in cloudy conditions in the shade or at twilight Tungsten For shooting under ordinary incandescent tungsten lighting and similarly colored fluor...

Страница 157: ...same light source that will illuminate your shot z Follow the steps in Adjusting White Balance p 120 to choose z Aim the camera at a plain white subject so that the entire screen is white Press the l...

Страница 158: ...s Sepia Creates sepia tone images B W Creates black and white images Positive Film Combines the effects of Vivid Blue Vivid Green and Vivid Red to produce intense yet natural looking colors resembling...

Страница 159: ...buttons to choose an option and then specify the value by pressing the qr buttons or turning the 5 dial z For stronger more intense effects or darker skin tones adjust the value to the right and for w...

Страница 160: ...press the shutter button halfway Continuous Shooting AF Continuous shooting and focusing AF Frame is set to Center and cannot be changed Continuous Shooting LV Continuous shooting with the focus fixed...

Страница 161: ...a determine the optimal focal position near the position you specified For details on the focusing range see Specifications in the Getting Started guide Choose f z Press the q button choose f either p...

Страница 162: ...ged while focusing manually p 127 If you want to change the AF frame mode or size cancel manual focus mode first Focusing is possible when using the digital zoom p 63 or digital tele converter p 127 o...

Страница 163: ...shooting conditions as follows z Press the n button choose AF Frame on the 4 tab and then choose the desired option p 40 Digital Tele Converter Still Images Movies The digital tele converter cannot b...

Страница 164: ...fway move the camera to recompose the shot Shoot z Press the shutter button all the way down Center A yellow AF frame is displayed with if the camera cannot focus when you press the shutter button hal...

Страница 165: ...yed around faces in focus Face Detect If faces are not detected or when only gray frames are displayed without a white frame an AF frame is displayed in the center of the screen when you press the shu...

Страница 166: ...e camera beeps and is displayed Even if the subject moves the camera will continue to track the subject within a certain range X If no subject is detected is displayed z To cancel tracking press the q...

Страница 167: ...ble when subjects are too small or move too rapidly or when subject color or brightness matches that of the background too closely AF Point Zoom on the 4 tab is not available e is not available The ca...

Страница 168: ...blue when you press the shutter button halfway In this case the focus and exposure are set according to the specified AF frame mode If adequate exposure cannot be obtained shutter speeds and aperture...

Страница 169: ...button Lock the focus z With the shutter button pressed halfway press the q button X The focus is now locked and f and the MF indicator are displayed z To unlock the focus after you release the shutt...

Страница 170: ...increase the brightness of the background that is out of the flash range For details on the flash range see Flash Range see Specifications in the Getting Started guide Configure the setting z Press t...

Страница 171: ...verexposure the camera automatically adjusts the shutter speed or aperture value during the flash shots to reduce washed out highlights and shoot at optimal exposure However you can deactivate automat...

Страница 172: ...exposure locked With the shutter button pressed halfway press the o button X The flash fires and when is displayed the flash output level is retained z To unlock FE release the shutter button and pres...

Страница 173: ...cording Other Settings Changing the IS Mode Settings Still Images Movies Continuous Optimal image stabilization for the shooting conditions is automatically applied Intelligent IS p 61 Shoot Only Imag...

Страница 174: ...ings p 137 to access the IS Settings screen z Choose Powered IS and then choose Off p 40 Choose from two compression ratios as follows Super Fine Fine For guidelines on how many shots at each compress...

Страница 175: ...139 Tv Av and M Mode Instructions in this chapter apply to the camera as set to the respective mode Take smarter more sophisticated shots 6...

Страница 176: ...ay before you can shoot again as images are processed to remove noise When shooting at low shutter speeds on a tripod you should set IS Mode to Off p 137 Maximum shutter speed with the flash is 1 2000...

Страница 177: ...splay of shutter speeds when you press the shutter button halfway indicates that the settings deviate from standard exposure Adjust the aperture value until the shutter speed is displayed in white or...

Страница 178: ...ed in orange in the lower right when you press the shutter button halfway Specific Shutter Speeds and Aperture Values M Mode Still Images Shutter Speed Aperture Value Standard Exposure Level Exposure...

Страница 179: ...al Calculation of standard exposure is based on the specified metering method p 117 Adjusting the Flash Output You can also set the flash level by accessing n p 40 and choosing Flash Output in Flash S...

Страница 180: ...144...

Страница 181: ...perations press the 1 button to enter Playback mode Have fun reviewing your shots and browse or edit them in many ways It may not be possible to play back or edit images that were renamed or already e...

Страница 182: ...ss the r button or turn the 5 dial clockwise z Press and hold the qr buttons to browse through images quickly Images appear grainy at this time z To access Scroll Display mode turn the 5 dial rapidly...

Страница 183: ...tons or turn the 5 dial to choose and then press the m button X After the movie is finished is displayed To switch to Shooting mode from Playback mode press the shutter button halfway To deactivate Sc...

Страница 184: ...Names will be displayed on detected people Press the l button to view other information on the screen or to hide the information For details on the information displayed see p 226 Not shown for movie...

Страница 185: ...e listed from top to bottom z Press the o button again to return to detailed information display Switching display modes by pressing the l button is also possible immediately after you shoot while you...

Страница 186: ...ater in Playback mode X The portion of the image in the orange frame is magnified Switch frames z Move the zoom lever toward k once X The screen at left is displayed z To switch to a different frame w...

Страница 187: ...ected image z Press the m button to view the selected image in single image display When looking for images on a memory card containing many images you can specify search conditions to display specifi...

Страница 188: ...image search When the camera has found no corresponding images for a search condition those search conditions will not be available Options for viewing images in a search result step 3 include Naviga...

Страница 189: ...Press the m button to start playback Grouped images shot in mode p 100 are generally displayed together but they can also be viewed individually Choose an image group z Press the qr buttons or turn th...

Страница 190: ...1 tab p 40 z Press the op buttons or turn the 5 dial to choose Edit ID Info and then press the m button During group playback step 3 you can use the menu functions accessed by pressing the m button Yo...

Страница 191: ...al to choose the name to change and press the m button Choose Overwrite z Press the opqr buttons or turn the 5 dial to choose Overwrite and then press the m button Choose the name of the person to ove...

Страница 192: ...mages while zoomed turn the 5 dial Automatically play back images from a memory card as follows Each image is displayed for about three seconds Choose a slideshow transition and start playback z Press...

Страница 193: ...p 40 z To start the slideshow with your settings choose Start and press the m button z To return to the menu screen press the n button The camera s power saving functions p 36 are deactivated during...

Страница 194: ...the opqr buttons to choose the image you want to view next X Your chosen image is displayed in the center surrounded by the next four candidate images z For full screen display of the center image pre...

Страница 195: ...d then choose Protect on the 1 tab p 40 Choose a selection method z Choose a menu item and a setting as desired p 40 z To return to the menu screen press the n button Protecting Images Still Images Mo...

Страница 196: ...longer displayed z Repeat this process to specify other images Protect the image z Press the n button A confirmation message is displayed z Press the qr buttons or turn the 5 dial to choose OK and the...

Страница 197: ...Press the qr buttons or turn the 5 dial to choose the image and then press the m button Choose an ending image z Press the r button to choose Last image and then press the m button z Press the qr but...

Страница 198: ...he m button Protect the images z Press the op buttons or turn the 5 dial to choose Protect and then press the m button You can also choose the first or last image by turning the 5 dial when the top sc...

Страница 199: ...rent image is now erased z To cancel erasure press the qr buttons or turn the 5 dial to choose Cancel and then press the m button You can erase all images at once Be careful when erasing images becaus...

Страница 200: ...cess to specify other images Erase the image z Press the n button A confirmation message is displayed z Press the qr buttons or turn the 5 dial to choose OK and then press the m button Choose Select R...

Страница 201: ...K and then press the m button Change the orientation of images and save them as follows Choose z Press the m button and then choose in the menu p 39 Rotate the image z Press the q or r button dependin...

Страница 202: ...rn to the menu screen press the n button Follow these steps to deactivate automatic rotation by the camera which rotates images shot in vertical orientation so they are displayed vertically on the cam...

Страница 203: ...9 X Tagged as Favorite is displayed z To untag the image repeat this process and choose again and then press the m button Choose Favorites z Press the n button and then choose Favorites on the 1 tab p...

Страница 204: ...into categories Note that images are automatically categorized at the time of shooting according to shooting conditions Images with detected faces or images shot in I or mode Images detected as or in...

Страница 205: ...s z Press the n button A confirmation message is displayed z Press the qr buttons or turn the 5 dial to choose OK and then press the m button Access the setting screen z Press the n button and then ch...

Страница 206: ...is displayed z To cancel selection press the m button again is no longer displayed z Repeat this process to choose additional images Finish the setup process z Press the n button A confirmation messa...

Страница 207: ...cify images Choose a category z Press the p button to choose the type of image and then press the qr buttons or turn the 5 dial to choose a category Finish the setup process z Press the p button to ch...

Страница 208: ...press the m button X Save new image is displayed Save the new image z Press the qr buttons or turn the 5 dial to choose OK and then press the m button X The image is now saved as a new file Review the...

Страница 209: ...Choose Trimming z Press the n button and then choose Trimming on the 1 tab p 40 Choose an image z Press the qr buttons or turn the 5 dial to choose the image and then press the m button Editing is not...

Страница 210: ...frames around them in the upper left image which can be used for cropping Switch between frames as needed by turning the 5 dial z Press the m button Save as a new image and review z Follow steps 4 5...

Страница 211: ...image and then press the m button Choose an option z Press the qr buttons or turn the 5 dial to choose an option and then press the m button Save as a new image and review z Follow steps 4 5 on p 172...

Страница 212: ...ose i Contrast on the 1 tab p 40 Choose an image z Press the qr buttons or turn the 5 dial to choose an image and then press the m button Choose an option z Press the qr buttons or turn the 5 dial to...

Страница 213: ...ra is now corrected and frames are displayed around corrected image areas z Enlarge or reduce images as needed Follow the steps in Magnifying Images p 156 Save as a new image and review z Press the op...

Страница 214: ...by choosing and cut the end of the movie by choosing z Even if you move to a position other than a mark choosing will only cut the portion from the nearest to the left and choosing will cut the porti...

Страница 215: ...e is now saved as a new file To overwrite the original movie with the cut one choose Overwrite in step 4 In this case the original movie will be erased Overwrite is only available when memory cards la...

Страница 216: ...180...

Страница 217: ...181 Setting Menu Customize or adjust basic camera functions for greater convenience 8...

Страница 218: ...nd then press the m button z Choose an item and then press the qr buttons to adjust the volume Adjusting Basic Camera Functions Silencing Camera Operations Operation can also be silenced by holding do...

Страница 219: ...ly shown when you choose FUNC menu p 39 or Menu p 40 items If you prefer you can deactivate this information z Choose Hints Tips and then choose Off Customizing Sounds 1 Preset sounds cannot be modifi...

Страница 220: ...ial to choose an option Screen Brightness For maximum brightness press and hold the l button for at least two seconds when the shooting screen is displayed or when in single image display This will ov...

Страница 221: ...rd with this camera Formatting erases all data on a memory card Before formatting copy images on the memory card to a computer or take other steps to back them up An Eye Fi card p 216 contains softwar...

Страница 222: ...level formatting copy images on the memory card to a computer or take other steps to back them up Perform low level formatting z On the screen in step 2 above press the op buttons or turn the 5 dial...

Страница 223: ...ng Stop In this case all data will be erased but the memory card can be used normally File Numbering Continuous Images are numbered consecutively until the 9999th shot is taken saved even if you switc...

Страница 224: ...lder and then choose Daily X Images will now be saved in folders created on the shooting date The lens is normally retracted for safety about one minute after you press the 1 button in Shooting mode p...

Страница 225: ...This convenient feature eliminates the need to change the Date Time setting manually Before using the world clock be sure to set the date and time p 17 and your home time zone Specify your destination...

Страница 226: ...n the shooting screen p 226 Adjust the date and time as follows Access the Date Time screen z Choose Date Time and then press the m button Configure the setting z Press the qr buttons to choose an ite...

Страница 227: ...S altitude information p 47 from m cm to ft in as needed z Choose Units and then choose ft in Change the unit of measurement shown in the MF indicator p 126 and zoom bar p 54 from m cm to ft in as nee...

Страница 228: ...e 5 dial to choose a language and then press the m button The following settings can also be adjusted on the 3 tab GPS Settings p 45 GPS Auto Time p 51 Video System p 199 Ctrl via HDMI p 201 Eye Fi Se...

Страница 229: ...efaults The following functions are not restored to default settings 3 tab settings Date Time p 18 Language p 20 Time Zone p 189 Video System p 199 and the image assigned to Start up Image p 184 Custo...

Страница 230: ...194...

Страница 231: ...195 Accessories Use included accessories effectively and enjoy the camera in more ways with optional Canon accessories and other compatible accessories sold separately 9...

Страница 232: ...ll remaining battery power remove the battery from the camera Store the battery with the cover attached Storing a partially charged battery over extended periods about a year may shorten its life or a...

Страница 233: ...d periods or when connecting the camera to a printer or computer Cannot be used to charge the camera battery High Power Flash HF DC2 z External flash for illuminating subjects that are out of range of...

Страница 234: ...g underwater photography Stereo AV Cable AVC DC400ST z Connect the camera to a TV to enjoy playback on the larger TV screen HDMI Cable HTC 100 z For connecting the camera to an HDMI input of a high de...

Страница 235: ...e camera and TV are off Connect the camera to the TV z On the TV insert the cable plugs fully into the video inputs as shown z On the camera open the terminal cover and insert the cable plug fully int...

Страница 236: ...in high definition Make sure the camera and TV are off Connect the camera to the TV z On the TV insert the cable plug fully into the HDMI input as shown z On the camera open the terminal cover and ins...

Страница 237: ...e p 40 Connect the camera to the TV z Follow steps 1 2 on p 200 to connect the camera to the TV Display images z Turn on the TV On the camera press the 1 button X Images from the camera are now displa...

Страница 238: ...images shot in mode p 100 Only displayed when a grouped image is selected Play Movie Starts movie playback Only displayed when a movie is selected Slideshow Starts slideshow playback To switch images...

Страница 239: ...pen the cover and insert the adapter plug fully into the coupler Connect the power cord z Insert one end of the power cord into the compact power adapter and then plug the other end into a power outle...

Страница 240: ...asily print your shots by connecting the camera to a PictBridge compatible printer sold separately with the included interface cable p 2 Make sure the camera and printer are off Connect the camera to...

Страница 241: ...teps 5 6 after printing is finished z When you are finished printing turn the camera and printer off and disconnect the interface cable Access the printing screen z Follow steps 1 6 on p 204 to access...

Страница 242: ...press the opqr buttons z To rotate the frame press the l button Default Matches current printer settings Date Prints images with the date added File No Prints images with the file number added Both P...

Страница 243: ...ton Choose a paper size z Press the op buttons or turn the 5 dial to choose an option and then press the m button Choose a type of paper z Press the op buttons or turn the 5 dial to choose an option a...

Страница 244: ...buttons or turn the 5 dial to choose an item Choose the length by pressing the qr buttons and then press the m button Available Layout Options Default Matches current printer settings Bordered Prints...

Страница 245: ...r buttons to choose the printing method Print the image Printing Movie Scenes Movies Movie Printing Options Single Prints the current scene as a still image Sequence Prints a series of scenes a certai...

Страница 246: ...ayback via the FUNC menu Choose an image z Press the qr buttons or turn the 5 dial to choose an image Add the image to the print list z Press the m button choose c in the menu and press the m button a...

Страница 247: ...o On Images are printed with the file number Off Clear DPOF data On All image print list settings are cleared after printing Off Not all of your DPOF settings may be applied in printing by the printer...

Страница 248: ...er displayed Specify the number of prints z Press the op buttons or turn the 5 dial to specify the number of prints up to 99 z To set up printing for other images and specify the number of prints repe...

Страница 249: ...s and press the m button Confirm clearing the print list z Press the qr buttons or turn the 5 dial to choose OK and then press the m button z When images have been added to the print list pp 210 213 t...

Страница 250: ...tab and then choose how you will select images Choose Select z Following the previous procedure choose Select and press the m button Adding Images to a Photobook Choosing a Selection Method Still Ima...

Страница 251: ...enu screen Choose Select All Images z Following the procedure on p 214 choose Select All Images and press the m button Configure the print settings z Press the qr buttons or turn the 5 dial to choose...

Страница 252: ...nd Cards may continue to transmit radio waves even when Eye Fi trans is set to Disable p 217 Remove the Eye Fi card before entering hospitals aircraft or other areas where transmission is prohibited W...

Страница 253: ...ab and then press the m button z Choose Eye Fi trans and then choose Disable Power saving p 36 on the camera is temporarily disabled during image transfer Choosing mode will interrupt the Eye Fi conne...

Страница 254: ...218...

Страница 255: ...219 Appendix Helpful information when using the camera 10...

Страница 256: ...the battery is still depleted soon after charging it has reached the end of its life Purchase a new battery The lens is not retracted Do not open the memory card battery cover while the camera is on C...

Страница 257: ...ssed halfway To have AF frames displayed and the camera focus correctly try composing the shot with higher contrast subject areas centered before you press the shutter button halfway Otherwise try pre...

Страница 258: ...Mode FUNC Menu and Shooting Menu pp 230 237 Buttons do not work Some buttons are disabled when the mode dial is set to 9 p 91 The Babies or Children icon does not display The Babies and Children icon...

Страница 259: ...86 There may be brief interruptions when playing movies copied to memory cards that have slow read speeds When movies are played on a computer frames may be dropped and audio may skip if computer perf...

Страница 260: ...ry card does not contain any images that can be displayed Protected p 159 Unidentified Image Incompatible JPEG Image too large Cannot play back AVI RAW Unsupported or corrupt images cannot be displaye...

Страница 261: ...ded In the 3 menu change File Numbering to Auto Reset p 187 or format the memory card p 185 Lens Error This error may occur if the lens is held while it is moving or when the camera is used in dusty o...

Страница 262: ...30 Scene icon p 59 Flash mode pp 66 134 AF frame p 127 Red eye correction p 80 Flash exposure compensation Flash output level pp 135 143 Spot AE point frame p 118 Date stamp p 67 ISO speed p 118 AE lo...

Страница 263: ...n the camera automatically rotates images as needed However the orientation may not be detected correctly when the camera is pointed straight up or down An on screen icon or message indicates the batt...

Страница 264: ...ies Print order p 210 Transferred via Eye Fi p 216 Battery level p 227 Metering method p 117 Folder number File number p 187 Current image no Total no of images Shutter speed still images p 140 Image...

Страница 265: ...nd is played Skip Backward To continue skipping backward keep holding down the m button Previous Frame For fast rewind keep holding down the m button Next Frame For fast forward keep holding down the...

Страница 266: ...xposure Shift p 111 Focusing Range p 125 f p 125 AF Lock p 133 Tracking AF p 130 Screen Display p 38 No Information Display Information Display 1 Settings possible from Dark to Light from Neutral to V...

Страница 267: ...Functions and Menu Tables 231 K E I S P t x v T Y E Available or set automatically Not available...

Страница 268: ...on p 135 Flash Output Level p 143 Drive Mode p 124 5 Still Image Aspect Ratio p 78 Resolution p 79 Compression p 138 Movie Quality p 82 1 White balance is not available 2 Set in a range of 1 5 contras...

Страница 269: ...Functions and Menu Tables 233 K E I S P t x v T Y E 4 6 7 7 Available or set automatically Not available...

Страница 270: ...ff 4 Continuous AF p 132 On Off AF assist Beam p 87 On 5 Off MF Point Zoom p 125 On Off Safety MF p 125 On Off Flash Settings pp 80 87 135 143 Flash Mode Auto Manual Flash Exp Comp Flash Output Red Ey...

Страница 271: ...Functions and Menu Tables 235 K E I S P t x v T Y E Available or set automatically Not available...

Страница 272: ...ff Safety Shift p 141 On Off Wind Filter p 83 On Off Review p 88 Off 3 sec 10 sec Hold 2 sec Review Info p 88 Off Detailed Focus Check Blink Detection p 86 On Off Grid Lines p 84 On Off IS Settings p...

Страница 273: ...automatically Not available When using Face ID p 69 to shoot names will not be displayed in x or v but they will be recorded in still images Setting available but when using Face ID p 69 to shoot name...

Страница 274: ...201 File Numbering p 187 Eye Fi Settings p 216 Create Folder p 188 Language p 20 Lens Retract p 188 Reset All p 193 Power Saving pp 36 189 1 Playback Menu Item Ref Page Item Ref Page Slideshow p 156...

Страница 275: ...212 Clear All Selections p 213 Select Range p 212 Print Settings p 211 Playback Mode FUNC Menu Item Ref Page Item Ref Page Rotate p 165 Movie Digest Playback p 153 Print List p 210 Smart Shuffle p 158...

Страница 276: ...he camera or screen Use a blower brush to remove dust from the lens If cleaning is difficult contact a Canon Customer Support Help Desk To prevent condensation from forming on the camera after sudden...

Страница 277: ...D Date time Adding date time to images 67 Changing 18 Setting 17 World clock 189 Defaults J Reset all DIGITAL CAMERA Solution Disk 2 Digital tele converter 127 Digital zoom 63 Discreet mode shooting...

Страница 278: ...ay 156 Manual focus focus mode 125 Memory cards 2 Menu Basic operations 40 Table 230 Metering method 117 Miniature effect shooting mode 104 Monochrome shooting mode 107 Movie Digest shooting mode 92 M...

Страница 279: ...tion Disk 2 Installation 27 Sounds 182 Stereo AV cable 199 Stitch Assist shooting mode 102 Strap 2 Super vivid shooting mode 103 T Terminal 199 200 203 204 Toy camera effect shooting mode 106 Tracking...

Страница 280: ...se harmful interference to radio communications However there is no guarantee that interference will not occur in a particular installation If this equipment does cause harmful interference to radio o...

Страница 281: ...THESE INSTRUCTIONS DANGER TO REDUCE THE RISK OF FIRE OR ELECTRIC SHOCK CAREFULLY FOLLOW THESE INSTRUCTIONS For connection to a supply not in the U S A use an attachment plug adapter of the proper con...

Страница 282: ...ommercial purpose or 2 by a video provider licensed under the AT T patents to provide MPEG 4 compliant video No license is granted or implied for any other use for MPEG 4 standard Notice displayed in...

Страница 283: ...ImageBrowser EX User Guide CDC E475 010 CD Version...

Страница 284: ...an Internet con nection Internet access is required to use the auto update function Just as with regular Internet use separate ISP account charges and access fees may be necessary depending on the ty...

Страница 285: ...dow and EOS Utility With CameraWindow and EOS Utility you can import images from the camera to a computer and change camera settings when the camera is connected to a computer When using a compact dig...

Страница 286: ...ust be installed Installation may take some time depending on computer performance Macintosh Operating System Mac OS X 10 6 Computer Computer running one of the above operating systems preinstalled wi...

Страница 287: ...or PictBridge compatible camera PRESS Press the FUNC SET button on your camera and select the PRINTmenu PRINT Print long lasting professional quality photos SELPH YES40 COMPACT PHOTO PRINTER Creative...

Страница 288: ...addresses only SELPH YE S40 OMPA T PHOtO PRINJ R Visitt PD Jft jf2 Jj at www canon com c park for background pages borders fonts frames patterns and more for downloading and printing on a letter size...

Страница 289: ...I 1111111111111111...

Страница 290: ...guro ya que contiene informacion importante Fran ais La garantie de ce ou ces produits n est valide que dans le pays indique sur votre certificat de garantie Veuillez conserver cette feuille car elle...

Страница 291: ...strement de produits en ligne pour les clients canadiens seulement Enregistrez votre produit en ligne a www canon ca product_registration et Recevez les mises aniveau de microprogrammation et de logic...

Страница 292: ...SUSE OF OR INABILITY TO USE THE PRODUCTS NOT CAUSED DIRECTLY BY THE NEGLIGENCE OF CANON U S A OR CANON CANADA SOME STATES AND PROVINCES DO NOT ALLOW THE EXCLUSION OR LIMITATION OF INCIDENTAL OR CONSEQ...

Страница 293: ...UTIUSER LES PRODUITS QUELLE QUE SOIT L ARGUMENTATION JURIOIQUE SUR LAOUELLE S APPUIE LA OEMANDE ET ME ME Sl CANON U S A OU CANON CANADA A ETE INFORMEE DE LA POSSIBILITE DE TEL DOMMAGES AUCUN RECOUVRE...

Отзывы: