background image

4

Initial Preparations


5

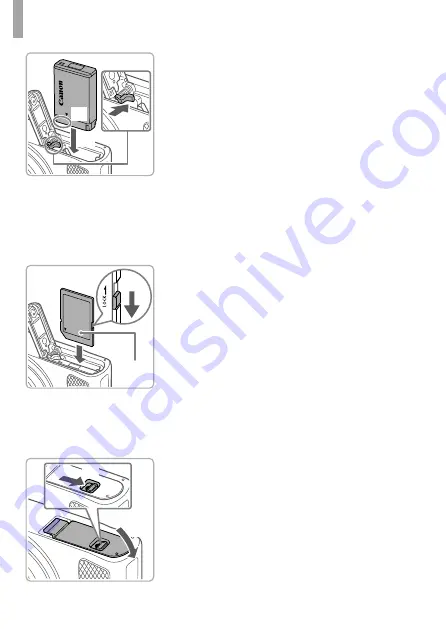
  Insert the battery pack.

Holding the battery pack with the 
terminals in the position shown (1), 
hold the battery lock toward (2) and insert 
the battery pack toward (3) until the lock 
clicks shut.

If you insert the battery pack facing the 
wrong way, it cannot be locked into the 
correct position. Always con

fi

 rm that the 

battery pack is facing the right way and 
locks when inserted.

When removing the battery pack, move 
the battery lock in the direction of 
the arrow.


6

  Check the card’s write-protect 

switch and insert the memory 
card.

Recording is not possible on memory 
cards with a write-protect switch when the 
switch is in the locked position. Move the 
switch in the direction of the arrow (1).

Insert the memory card with the label (2) 
facing as shown until it clicks into place.

When removing the card, push the 
memory card in until it clicks, and then 
slowly release it.


7

  Close the cover.

Lower the cover (1) and hold it down as 
you slide the switch, until it clicks into the 
closed position (2).

If the cover will not close, make sure you 
inserted the battery pack facing the right 
way in step 2.

(2)

(3)

(1)

(2)

(1)

(1)

(2)

Содержание PowerShot SX620 HS

Страница 1: ...CEL SW5WA210 ENGLISH Getting Started...

Страница 2: ...he downloadable Camera User Guide SD memory cards SDHC memory cards SDXC memory cards Cards conforming to SD standards However not all memory cards have been verified to work with the camera Manuals a...

Страница 3: ...hing it in 1 and down 2 3 Charge the battery pack Plug the power cord into the charger then plug the other end into a power outlet The charging lamp turns orange and charging begins When charging is f...

Страница 4: ...direction of the arrow 6 Check the card s write protect switch and insert the memory card Recording is not possible on memory cards with a write protect switch when the switch is in the locked positio...

Страница 5: ...e buttons to choose an item Press the buttons to specify the date and time When finished press the button 10 Specify your home time zone Press the buttons to choose your home time zone Press the butto...

Страница 6: ...Press the buttons to choose a language and then press the button Changing the Date and Time To change the date and time once they have been set press the button use the zoom lever and then select the...

Страница 7: ...shot To zoom in and enlarge the subject move the zoom lever toward and to zoom away from the subject move it toward 3 Shoot Shooting Still Images Press the shutter button lightly 1 The camera beeps tw...

Страница 8: ...n press the buttons to choose and then press the button again Playback now begins and after the movie is finished is displayed To adjust the volume press the buttons during playback Erasing Images To...

Страница 9: ...demarks are the property of their respective owners This device incorporates exFAT technology licensed from Microsoft This product is licensed under AT T patents for the MPEG 4 standard and may be use...

Страница 10: ...10 Graphical symbols placed on the equipment Class II equipment Direct current...

Страница 11: ...11 CANON INC 2016...

Отзывы: