Canon PowerShot SX230 HS Скачать руководство пользователя страница 30

30

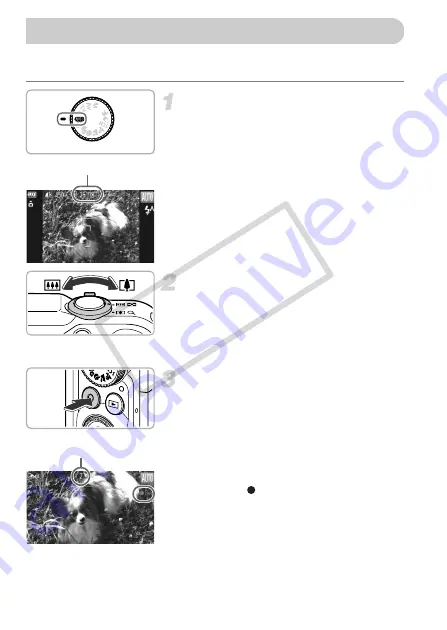
The camera will determine the subject and shooting conditions, and select the 
best settings for the scene.

Choose 

A

 mode.

z

Set the mode dial to 

A

.

Compose the shot.

z

Moving the zoom lever toward 

i

 will 

zoom in on your subject, making it appear 
larger. Moving the lever toward 

j

 will 

zoom out from your subject, making it 
appear smaller.

Shoot.

z

Press the movie button.

z

The display will switch to full-screen, and 
the area displayed on the screen will be 
recorded.

X

The camera will beep once, recording will 
start, and [ Rec] and the elapsed time will 
appear on the screen.

z

Once shooting begins, take your finger off 
the movie button.

z

If you change the composition of your shot 
during shooting, the focus, brightness and 
tone will automatically adjust.

Shooting Movies

Remaining Time

Elapsed Time

COP

Y

Содержание PowerShot SX230 HS

Страница 1: ...Make sure you read this guide including the Safety Precautions section before using the camera Reading this guide will help you learn to use the camera properly Store this guide safely so that you can...

Страница 2: ...m by clicking the shortcuts on the desktop Camera User Guide This Guide Once you have mastered the basics use the camera s many features to shoot more challenging photos Software Guide Read when you w...

Страница 3: ...er legal rights even if the image was shot for personal use Warranty Limitations This camera s warranty is only effective in the country of sale If there is a problem with the camera while abroad plea...

Страница 4: ...works p 67 S Underwater p 67 Shoot with special effects Facial expressions p 78 Low Light p 66 Miniature Effect p 70 Toy Camera Effect p 71 Fish eyeEffect p 70 Super vivid colors p 69 Poster Effect p...

Страница 5: ...Quickly search pictures 124 z Erase pictures 28 138 View E z Shoot movies 30 114 z View movies 32 z Shoot fast moving subjects and play them back in slow motion 117 Shoot View Movies 2 z Easily print...

Страница 6: ...8 Separately Sold Accessories 38 Components Guide 42 Screen Display 44 Indicator 45 FUNC Menu Basic Operations 46 MENU Basic Operations 47 Changing the Sound Settings 48 Adjusting the Screen Brightnes...

Страница 7: ...Synchro 100 Red Eye Correction 100 Checking for Shut Eyes 101 Shooting Using a TV as the Display 101 Using the GPS Function 102 Setting the Shutter Speed 108 Setting the Aperture Value 109 Setting th...

Страница 8: ...Eye Effect 150 Printing Images 152 Choosing Images for Printing DPOF 159 Changing Camera Settings 164 Changing Shooting Function Settings 171 Changing Playback Function Settings 174 Using Household P...

Страница 9: ...at their default settings The various types of memory cards that can be used in this camera are collectively referred to as memory cards in this guide Functions that differ depending on the camera mod...

Страница 10: ...solvents such as alcohol benzine or thinner to clean the equipment Do not let the product come into contact with water e g sea water or other liquids Do not allow liquids or foreign objects to enter...

Страница 11: ...ad to injury or damage the camera Be careful not to subject the screen to strong impacts If the screen cracks injury may result from the broken fragments When using the flash be careful not to cover i...

Страница 12: ...materials may lead to fire or explosions Unplug the battery charger from the power outlet after charging is complete or when you are not using it Do not place anything such as cloth on top of the batt...

Страница 13: ...w images in Easy mode how to shoot and view movies and how to transfer images to a computer Attaching the Strap Holding the Camera Attach the included strap and wrap it around your wrist to avoid drop...

Страница 14: ...nto a power outlet z For CB 2LXE Plug the power cord into the charger then plug the other end into a power outlet X The charge lamp lights orange and charging starts X The charge lamp will light green...

Страница 15: ...ow to store the battery for long periods Deplete and remove the battery from the camera Attach the terminal cover and store the battery Storing a battery for long periods of time about a year without...

Страница 16: ...use Eye Fi cards in many countries or regions Without approval use of the card is not permitted If it is unclear whether the card has been approved for use in the area please check with the card manuf...

Страница 17: ...he memory card as shown until it locks into place with a click z Be sure the memory card is oriented correctly Inserting the memory card in the wrong direction could damage the camera Close the cover...

Страница 18: ...y release it X The memory card will pop up Number of Shots per Memory Card Values are based on the default settings The number of shots that can be taken will vary depending on camera settings the sub...

Страница 19: ...e dial to set a value z Once all settings are complete press the m button Set the home time zone z Press the qr buttons or turn the dial to choose your home time zone Complete the setting z Press m to...

Страница 20: ...r turn the dial to choose you will set the time to daylight saving 1 hour ahead Date Time battery The camera has a built in date time battery backup battery that allows the date time settings to be re...

Страница 21: ...anguage then press the m button X Once the display language has been set the settings screen will close Setting the Display Language What if the clock appears when the m button is pressed The clock wi...

Страница 22: ...he software contained on the card to a computer Display the menu z Press the n button Choose Format z Move the zoom lever to choose the 3 tab z Press the op buttons or turn the dial to choose Format t...

Страница 23: ...memory card When disposing of a memory card take precautions such as physically destroying the card to prevent personal information leaks The total capacity of the memory card displayed in the formatt...

Страница 24: ...you point the camera toward the subject the camera will make a slight noise as it determines the scene X The icon for the determined scene will appear in the upper right of the screen X The camera wil...

Страница 25: ...ds z You can take a second picture even while an image is displayed by pressing the shutter button again AF Frame What if What if the color and brightness of the images do not turn out as expected The...

Страница 26: ...ft at maximum wide angle j and approximately 1 0 2 0 m 3 3 6 6 ft at maximum telephoto i What if the camera beeps once when the shutter button is pressed halfway Your subject may be too close When th...

Страница 27: ...ockwise will cycle through the images from oldest to newest z The images change more quickly if you keep the qr buttons pressed but they will appear coarse z The lens will retract after approximately...

Страница 28: ...the qr buttons or turn the dial to display an image to erase Erase the image z After pressing the m button press the op buttons or turn the dial to choose a then press the m button again X Erase appea...

Страница 29: ...appears on the screen The flash will automatically fire in low light conditions Viewing z Press the 1 button then press the qr buttons or turn the dial to switch images z Press the 1 button then pres...

Страница 30: ...your subject making it appear smaller Shoot z Press the movie button z The display will switch to full screen and the area displayed on the screen will be recorded X The camera will beep once recordin...

Страница 31: ...commended Microphones Zooming while shooting Pressing the zoom lever while shooting will zoom in on or out from the subject However operation sounds will be recorded When the mode dial is set to A the...

Страница 32: ...ontrol panel will appear Press the qr buttons or turn the dial to choose Play then press the m button to resume playback z Press the op buttons to adjust the volume X After the movie finishes appears...

Страница 33: ...s Vista Service Pack 1 and 2 Windows XP Service Pack 3 Computer model The above OS should be pre installed on computers with built in USB ports CPU Pentium 1 3 GHz or higher still images Core2 Duo 2 6...

Страница 34: ...e User Account Control window appears follow the on screen instructions to proceed OS Mac OS X v10 5 v10 6 Computer model The above OS should be pre installed on computers with built in USB ports CPU...

Страница 35: ...o the computer s CD ROM drive Begin installation z Double click the on the CD z Click Install and follow the on screen instructions to proceed with the installation Connect the camera to the computer...

Страница 36: ...by Canon Utilities CameraWindow and CameraWindow Macintosh X CameraWindow will appear when you establish a connection between the camera and computer z If CameraWindow does not appear click the Camera...

Страница 37: ...ansfer function in the included software by simply connecting your camera to a computer There are however the following limitations It may take a few minutes from when you connect the camera to the co...

Страница 38: ...Rechargeable lithium ion battery Accessories Wrist Strap WS DC11 Interface Cable IFC 400PCU DIGITAL CAMERA Solution Disk Stereo AV Cable AVC DC400ST Supplied with Camera Battery Pack NB 5L with Termi...

Страница 39: ...to illuminate Other Accessories Waterproof Case WP DC42 z Use this case to take underwater shots at depths of up to 40 meters 130 ft or to shoot in the rain at the beach or on the ski slopes Waterproo...

Страница 40: ...retailer SELPHY series PIXMA series Use of genuine Canon accessories is recommended This product is designed to achieve excellent performance when used with genuine Canon accessories Canon shall not b...

Страница 41: ...41 Learning More This chapter explains the parts of the camera and what appears on the screen as well as the basic operating instructions 2 COPY...

Страница 42: ...movies p 114 You can use the largest possible portion of the screen to shoot movies p 116 Even if the mode dial is set to a position other than Movie mode movies can be shot by pressing the movie butt...

Страница 43: ...ed to the position you touch will appear on the screen Screen LCD Monitor pp 44 184 186 Power Button p 19 Mode Dial p 42 Indicator p 45 A V OUT Audio Video Output DIGITAL Terminal pp 35 132 152 HDMI T...

Страница 44: ...d the movement of the subject may appear somewhat jagged on the screen This has no effect on the recorded image Overexposure Warning during Playback In Detailed Information Display p 186 overexposed a...

Страница 45: ...gitude elevation and UTC The indicator on the back of the camera p 43 will light or blink depending on the camera s status Bright Dark High Low SX230 HS When a signal is not correctly received from a...

Страница 46: ...e m or r button z Choosing some menu items changes the screen to display further menu options Choose an option z Press the op buttons or turn the dial to choose an option z You can also choose setting...

Страница 47: ...ress the n button Choose a tab z Move the zoom lever or press the qr buttons to choose a tab Choose an item z Press the op buttons or turn the dial to choose an item z Some items require you to press...

Страница 48: ...hen press the qr buttons to choose On z Press the n button to restore the normal screen Changing the Sound Settings You can also mute camera sounds by holding down the l button and turning on the powe...

Страница 49: ...Move the zoom lever to choose the 3 tab z Press the op buttons or turn the dial to choose Volume then press the m button Change the volume z Press the op buttons or turn the dial to choose an item th...

Страница 50: ...restore the normal screen Using the l Button z Press the l button for more than 2 seconds X The screen increases to maximum brightness regardless of the setting in the 3 tab z Press the l button agai...

Страница 51: ...ns or turn the dial to choose OK then press the m button X The camera will reset to the default settings Returning the Camera to Default Settings Are there functions that cannot be reset The Date Time...

Страница 52: ...during Playback The power will turn off approximately 5 minutes after you stop operating the camera You can check the current time z Press and hold the m button X The current time appears z If you ho...

Страница 53: ...hapter explains how to use common functions such as the self timer and how to turn off the flash This chapter assumes that the camera is set to A mode When shooting in another mode check which functio...

Страница 54: ...teps above to choose Turning the Flash Off What if a flashing appears When you press the shutter button halfway in low light conditions where camera shake is likely a flashing will appear on the scree...

Страница 55: ...possible zoom factor without image deterioration The zoom factor will appear on the screen when you release the zoom lever Move it toward i again X The digital zoom will zoom in even further on the su...

Страница 56: ...oom lever to choose the 4 tab z Press the op buttons or turn the dial to choose Digital Zoom Choose the setting z Press the qr buttons to choose a magnification z Press the n button to complete the se...

Страница 57: ...utton to complete the setting and restore the shooting screen X Once set DATE will appear on the screen Shoot X The shooting date or time will be recorded in the image s lower right corner z To restor...

Страница 58: ...een Shoot z Press the shutter button halfway to focus on the subject then press it fully X When the self timer starts the lamp blinks and the self timer sound plays X Two seconds before the shutter re...

Страница 59: ...button immediately Choose the settings z Press the op buttons to choose Delay or Shots z Press the qr buttons or turn the dial to choose a value then press the m button X Once set will appear on the s...

Страница 60: ...iginal setting choose in Steps 1 2 You can choose from the following 2 compression ratios image quality Fine Normal Choose the compression ratio setting z After pressing the m button press the op butt...

Страница 61: ...images However since 16 9 images have a setting of 1920 x 1080 pixels their data size will be larger than 4 3 images Approximate Values for Paper Size for 4 3 Aspect Ratios z For sending images as e m...

Страница 62: ...62 COPY...

Страница 63: ...63 Adding Effects and Shooting in Various Conditions This chapter explains how to add effects and how to shoot in various conditions 4 COPY...

Страница 64: ...Viewing movies made with Movie Digest You can select movies made in mode by date for viewing p 125 Since you are also shooting movies when you shoot still images the battery will be depleted more qui...

Страница 65: ...t majestic landscapes with a real sense of depth C Take shots of kids and pets Kids Pets z Lets you capture subjects that move around such as children and pets without missing photo opportunities z At...

Страница 66: ...n z Press the op buttons or turn the dial to choose a Shooting mode then press the m button Shoot Take nightscapes without using a tripod Handheld NightScene z Lets you take beautiful snapshots of cit...

Страница 67: ...shots of aquatic life and underwater scenery when used with a waterproof case sold separately p 39 OTake shots of foliage Foliage z Lets you shoot trees and leaves such as new growth autumn leaves or...

Страница 68: ...lly you should set IS Mode to Off when shooting with a tripod p 173 In or S mode images may appear coarse because the ISO speed p 85 is increased to match the shooting conditions If camera shake is to...

Страница 69: ...buttons or turn the dial to choose a Shooting mode then press the m button Shoot Shoot images with vivid colors Super Vivid z Lets you take shots with vivid intense colors Take posterized shots Poster...

Страница 70: ...effect on the screen Shoot Take Shots That Look Like a Miniature Model Miniature Effect Blurs chosen portions in the top and bottom of an image to produce the effect of a miniature model Choose z Fol...

Страница 71: ...the m button in Step 2 the horizontal vertical orientation of the frame will switch and you can press the qr buttons to change the frame position when it is displayed vertically Holding the camera ve...

Страница 72: ...llow Steps 1 2 on p 69 to choose Choose a color tone z Press the l button z Color Tone will appear on the screen z Press the qr buttons or turn the dial to choose a color tone then press the l button...

Страница 73: ...e and the Color Accent image will alternately display z The color for default settings is green Specify the color z Position the center frame so it is filled with the color you want and press the q bu...

Страница 74: ...the q button X The specified color will be recorded Specify the target color z Position the center frame so it is filled with the color you want and press the r button X The specified color will be re...

Страница 75: ...ects a smile it will shoot after the lamp lights z Press the p button to pause smile detection Press the p button again to resume smile detection Detecting a Face and Shooting Smart Shutter What if a...

Страница 76: ...me appears around the face of the person who will wink Press the shutter button fully X The camera will enter shooting stand by and Wink to take picture will appear on the screen X The lamp will blink...

Страница 77: ...s appear on other faces Press the shutter button fully X The camera will enter shooting stand by and Look straight at camera to start count down will appear on the screen X The lamp will blink and the...

Страница 78: ...ter button is pressed fully the camera takes five continuous shots and saves one picture only Changing the number of shots After choosing in Step 1 press the op buttons Even if your face is not detect...

Страница 79: ...ending on the shooting conditions camera settings and the zoom position the camera may stop shooting momentarily or the shooting speed may slow down As the number of images increases the shooting spee...

Страница 80: ...first shot Take subsequent shots z Overlap part of the first shot when taking the second shot z Minor discrepancies in the overlapping portions will be corrected when the images are merged z Up to 26...

Страница 81: ...ooting skills This chapter assumes that you have set the mode dial to G mode G stands for Program AE Before attempting to shoot using a function explained in this chapter in modes other than G mode ch...

Страница 82: ...z After pressing the r button press the qr buttons or turn the dial to choose h then press the m button X Once set h will appear on the screen Shooting in Program AE What if the shutter speed and aper...

Страница 83: ...l to choose an option then press the m button X The setting will appear on the screen Adjusting the Brightness Exposure Compensation Adjusting the White Balance Auto Automatically sets the optimal whi...

Страница 84: ...ite balance data is set Correcting the White Balance You can manually adjust the white balance when in S mode p 67 This adjustment will have the same effect as using a commercially available color com...

Страница 85: ...tained However the adjustments will be reset if custom white balance data is recorded Changing the ISO Speed Automatically adjusts the ISO speed to the Shooting mode and shooting conditions Low High F...

Страница 86: ...as 35mm film used for printing out 5 x 7 in or postcard sized images The same aspect ratio as standard televisions used for printing images on 3 5 x 5 in to various A sized papers A square shaped aspe...

Страница 87: ...pprox images sec Description Continuous 3 2 The camera shoots continuously with the focus and exposure set when the shutter button is pressed halfway Continuous Shooting AF 0 8 The camera shoots conti...

Страница 88: ...es B W Changes the image to black and white Positive Film Combines the effects of Vivid Blue Vivid Green and Vivid Red to produce intense natural appearing colors like those obtained with positive fil...

Страница 89: ...gets z Press the l button to complete the setting The camera can detect areas in the scene such as faces or backgrounds that are too bright or dark and automatically adjust them to the optimum brightn...

Страница 90: ...is is called Focus Lock Focus z Center the subject you want in focus and press the shutter button halfway z Confirm that the AF frame on the subject is green Recompose z Keep the shutter button presse...

Страница 91: ...ct you want to focus on and shoot p 92 If a face is not detected and only gray frames no white frame appear an AF frame will appear in the center of the screen when you press the shutter button halfwa...

Страница 92: ...a subject is detected The camera will continue to track the subject within a certain range even if the subject moves X If the camera does not detect the subject will appear on the screen z To cancel...

Страница 93: ...reen Servo AF p 95 is fixed to On The camera may not be able to track the subject if the subject is too small moves too quickly or if the contrast between the subject and the background is too low Whe...

Страница 94: ...ess the qr buttons or turn the dial to choose The focus will unlock Compose the scene and shoot If you press the shutter button halfway the AF frame will magnify and you can check the focus Choose AF...

Страница 95: ...appear magnified if the camera cannot focus The magnified display will not appear when using the digital zoom p 55 digital tele converter p 56 Tracking AF p 92 Servo AF see below or when using a TV a...

Страница 96: ...fine tune the focus Safety MF Shooting in Manual Focus Mode MF indicator You cannot change the AF frame mode or size while focusing manually p 90 If you want to change the AF frame mode or size cancel...

Страница 97: ...toward the subject and press the o button while pressing the shutter button halfway X When appears the exposure will be locked z If you release your finger from the shutter button and press the o but...

Страница 98: ...n while pressing the shutter button halfway X The flash will fire and when appears the flash output will be retained z If you release your finger from the shutter button and press the o button again w...

Страница 99: ...ion Safety FE The camera automatically changes the shutter speed or aperture value when the flash fires to avoid overexposing and blowing out the highlights in the scene However if you press the n but...

Страница 100: ...the flash fires ensure that the main subject does not move until the shutter sound ends You can automatically correct red eye that occurs in images taken with the flash Choose Flash Settings z Press t...

Страница 101: ...TV p 132 Shooting procedures are the same as when using the camera screen Red eye correction may be applied to areas other than red eyes For example when red make up has been used around eyes You can...

Страница 102: ...orded in images and movies with the GPS function may contain information that can be used to determine your physical location Be sure to take adequate precautions when transferring images containing c...

Страница 103: ...z Press the l button to enable information display p 44 z You can check the GPS reception status displayed on the screen Reception Status Display Displayed GPS satellite signal received The camera s...

Страница 104: ...Camera s Location Information Logger Function When the camera is turned off it will continue to receive a signal from GPS satellites for a certain interval of time and record the route taken Based on...

Страница 105: ...X At certain intervals the positioning data and date time based on the GPS satellite signal will be recorded in a log file How do I check if a GPS log file was created will appear in the upper right...

Страница 106: ...If this tab is in the locked position or an Eye Fi card is inserted in the camera you will not be able to save GPS log files The logger function may stop operating when the camera is connected to a co...

Страница 107: ...107 Getting More Out of Your Camera This chapter explains how to shoot in M B and D modes This chapter assumes that the camera has been set to the corresponding mode 6 COPY...

Страница 108: ...1 6 1 3 1 0 8 0 6 0 5 0 4 0 3 1 4 1 5 1 6 1 8 1 10 1 13 1 15 1 20 1 25 1 30 1 40 1 50 1 60 1 80 1 100 1 125 1 160 1 200 1 250 1 320 1 400 1 500 1 640 1 800 1 1000 1 1250 1 1600 1 2000 1 2500 1 3200 Wh...

Страница 109: ...the Aperture Value F3 1 F3 5 F4 0 F4 5 F5 0 F5 6 F5 9 F6 3 F7 1 F8 0 What if the shutter speed appears in orange If the shutter speed appears in orange when the shutter button is pressed halfway the...

Страница 110: ...Shutter Speed and Aperture Value Shutter Speed Aperture Value Exposure Level Indicator Exposure Level Standard Exposure Level The standard exposure is calculated according to the metering method chose...

Страница 111: ...e m button X Once set will appear on the screen Adjusting the Flash Output You can also set the flash output by pressing the n button to choose Flash Settings p 100 from the 4 tab then choose Flash Ou...

Страница 112: ...112 COPY...

Страница 113: ...how to use various functions for shooting and viewing movies This chapter assumes that you have set the mode dial to E However even if the mode dial is set to a position other than E movies can be sho...

Страница 114: ...hooting standard movies iFrame Movie Shoots movies that can be edited with iFrame 1 compatible software 2 or devices The recording pixel setting will be fixed at p 116 Super Slow Motion Movie Shoot fa...

Страница 115: ...he left and right of the screen These sections will not be recorded z To stop shooting the movie press the movie button again Shooting Various Kinds of Movies I Portrait p 65 Y Color Swap p 74 J Lands...

Страница 116: ...ng may stop even if the maximum clip length has not been reached on some memory cards SD Speed Class 6 or higher memory cards are recommended Changing the Image Quality Image Quality RecordingPixels F...

Страница 117: ...choose an option then press the m button X The option you set will appear on the screen Shoot z Press the movie button X The bar showing the shooting time will appear Maximum clip length is approx 30...

Страница 118: ...us z Press the l button z Move the zoom lever to change the frame size and press the op buttons to change the frame position Choose a playback speed z Press the n button z Press the qr buttons or turn...

Страница 119: ...stop shooting the movie press the movie button again Speed Playback Time Approx 12 sec Approx 6 sec Approx 3 sec The image quality will be fixed at when an aspect ratio of is chosen and when an aspec...

Страница 120: ...on the Shooting mode settings may not be available or may not have any effect Zooming in More Closely On Subjects The sound of zoom operations will be recorded Using the Self Timer p 58 Adjusting the...

Страница 121: ...m If you choose you can trim the end of the movie from z Even if you move to a point other than a only the portion from the nearest to the left will be trimmed when is chosen Only the portion from the...

Страница 122: ...a new file When Overwrite is chosen in Step 4 the unedited movie is overwritten with the edited movie erasing the original When there is not enough space left on the memory card only Overwrite can be...

Страница 123: ...ton to enter Playback mode before operating the camera It may not be possible to play back or edit images that have been edited on a computer have had their file names changed or have been taken on a...

Страница 124: ...z Press the m button to display the chosen image by itself Searching Images Using the Control Dial Turning the dial will display images in a line letting you quickly search them You can also jump by...

Страница 125: ...e memory card you can filter and display them by a specified filter You can also protect p 135 or delete p 138 all images at once while filtered Choose z After pressing the m button press the op butto...

Страница 126: ...ges of a specified category p 141 Still image Movie Displays still images movies or movies made in mode p 64 What if you cannot choose a filter Filters that do not have any corresponding images cannot...

Страница 127: ...yed You can choose from 6 transition effects when switching between images Choose Slideshow z Press the n button to choose Slideshow from the 1 tab then press the m button Choose a setting z Press the...

Страница 128: ...age playback z If you turn the dial you can switch images while zoomed Grouped images taken in mode p 79 can also be viewed individually Choose an image group z Press the qr buttons or turn the dial t...

Страница 129: ...r buttons to choose Off z Press the n button to complete the setting and restore single image playback X Grouped images taken in mode are ungrouped and appear individually X To regroup the images foll...

Страница 130: ...the opqr buttons to choose the image you want to view next X The chosen image will be displayed in the middle and the next four possibilities will appear z Press the m button to display the middle im...

Страница 131: ...ppear z Press the m button to move to a different frame when multiple frames appear Change the magnification level or location z Use the zoom lever to change the display size and the opqr buttons to c...

Страница 132: ...e TV and switch it to the input the cable is connected to Turn on the camera z Press the 1 button to turn on the camera X The image will appear on the TV nothing will appear on the screen of the camer...

Страница 133: ...a TV Remote to Control the Camera When you connect the camera to an HDMI CEC compatible TV you can use the TV s remote control to operate the camera and play back images or view slideshows You may nee...

Страница 134: ...the Camera Control Panel Displayed on the TV Return Closes the menu Group playback Displays groups of High speed Burst images only appears when grouped images are chosen Play movie Plays a movie only...

Страница 135: ...follow the step above to choose again then press the m button Using the Menu Choose Protect z Press the n button to choose Protect from the 1 tab then press the m button Choose a selection method z Pr...

Страница 136: ...press the n button a confirmation screen will appear z Press the qr buttons or turn the dial to choose OK then press the m button Select Range Choose Select Range z Follow Step 2 on p 135 to choose S...

Страница 137: ...hen press the m button Choose All Images Choose All Images z Follow Step 2 on p 135 to choose All Images then press the m button Protect images z Press the op buttons or turn the dial to choose Protec...

Страница 138: ...ction method then press the m button z Press the n button to restore the menu screen Choosing Images Individually Choose Select z Follow Step 2 above to choose Select then press the m button Choose an...

Страница 139: ...n Choose images z Follow Steps 2 and 3 on p 136 to choose images Erase z Press the p button to choose Erase then press the m button Choose All Images Choose All Images z Follow Step 2 on p 138 to choo...

Страница 140: ...hoose again then press the m button Using the Menu Choose Favorites z Press the n button to choose Favorites from the 1 tab then press the m button Choose an image z Press the qr buttons or turn the d...

Страница 141: ...buttons to choose a category then press the m button X will appear on the screen z Press the m button again to deselect the image will disappear If you switch to Shooting mode or turn off the power b...

Страница 142: ...e Menu Choose My Category z Press the n button to choose My Category from the 1 tab then press the m button Choose a selection method z Press the op buttons or turn the dial to choose a selection meth...

Страница 143: ...category then press the m button X will appear on the screen z Press the m button again to deselect the image will disappear z To choose additional images repeat the above procedure Complete the sett...

Страница 144: ...ages z Follow Steps 2 and 3 on p 136 to choose images Choose a category z Press the p button to choose an item then press the qr buttons or turn the dial to choose a category Complete the setting z Pr...

Страница 145: ...the m button to complete the setting Using the Menu Choose Rotate z Press the n button to choose Rotate from the 1 tab then press the m button Rotate the image z Press the qr buttons or turn the dial...

Страница 146: ...e an option then press the m button X Save new image will appear on the screen Save the new image z Press the qr buttons or turn the dial to choose OK then press the m button X The image will be saved...

Страница 147: ...ress the opqr buttons you can move the frame z If you press the l button you can change the frame orientation z In an image with detected faces gray frames appear around the faces located in the upper...

Страница 148: ...tton Choose an option z Press the qr buttons or turn the dial to choose an option then press the m button Save as a new image and display z Follow Steps 4 and 5 on p 146 Adding Effects with the My Col...

Страница 149: ...n press the m button Choose an image z Press the qr buttons or turn the dial to choose an image then press the m button Choose an option z Press the qr buttons or turn the dial to choose an option the...

Страница 150: ...pear around the corrected portion z You can magnify or reduce the size of the image using the procedures in Magnifying Images p 128 Save as a new image and display z Press the opqr buttons or turn the...

Страница 151: ...PictBridge compliant printer sold separately Canon Brand PictBridge Compliant Printers This chapter uses Canon brand SELPHY CP series printers in the explanations The displayed screens and available...

Страница 152: ...to the printer z Open the cover and insert the cable s small plug firmly into the camera terminal in the direction shown z Insert the cable s large plug into the printer For connection details refer...

Страница 153: ...en press the m button X Printing will start z If you want to print additional images repeat Steps 5 and 6 after printing has completed z After printing has completed turn off the camera and printer an...

Страница 154: ...Prints the file number Both Prints both the date and file number Off Default Follows the printer s settings Off On Uses shooting information to optimize print settings Red Eye 1 Corrects red eye Red E...

Страница 155: ...ed Choose the trimming area z If you move the zoom lever or turn the dial you can change the frame size z Press the opqr buttons to change the frame position z Press the l button to rotate the frame z...

Страница 156: ...ize z Press the op buttons or turn the dial to choose an option then press the m button Choose the paper type z Press the op buttons or turn the dial to choose an option then press the m button Choose...

Страница 157: ...s the m button Choose the printing area z Follow Step 2 on p 155 to choose the printing area Print images Default Follows the printer s settings Bordered Prints with a border Borderless Prints without...

Страница 158: ...rinting methods for movies Single Prints currently displayed scene as a still image Sequence Prints a sequence of images from a specified scene on a single sheet of paper If Caption is set to On you c...

Страница 159: ...e an image z Press the qr buttons or turn the dial to choose an image Choose 2 movies will be excluded z After pressing the m button press the op buttons or turn the dial to choose 2 then press the m...

Страница 160: ...ex formats Date On Prints the shooting date Off File No On Prints the file number Off Clear DPOF data On Removes all print settings after printing Off Some printers or photo developer services may not...

Страница 161: ...uttons or turn the dial to set the number of prints maximum 99 z Follow Steps 2 and 3 to choose images z You cannot set the number of copies for index prints You can only choose which images to print...

Страница 162: ...hoose Clear All Selections then press the m button All selections will be cleared z Press the qr buttons or turn the dial to choose OK then press the m button Printing chosen images DPOF When there ar...

Страница 163: ...customize various settings to suit your shooting preferences The first part of this chapter explains convenient and commonly used functions The latter part explains how to change shooting and playback...

Страница 164: ...buttons to choose an option Turning Off Hints Tips When you choose an item in the FUNC menu p 46 or MENU p 47 a description of the function hints and tips is displayed You can turn off this function...

Страница 165: ...ose Low Level Format then press the qr buttons to display z Press the opqr buttons or turn the dial to choose OK then press the m button Start the low level format z Press the op buttons or turn the d...

Страница 166: ...r an image z Choose Start up Image then press the m button z Press the qr buttons or turn the dial to choose 2 then press the m button z Press the qr buttons or turn the dial to choose an image then p...

Страница 167: ...registered to the camera Refer to the Software Guide for details Continuous Even if you shoot using a new memory card the file numbers are assigned consecutively until an image with the number 9999 i...

Страница 168: ...the 1 button when in a Shooting mode p 27 If you want the lens to retract immediately when you press the 1 button set the retract time to 0 sec z Choose Lens Retract then press the qr buttons to choos...

Страница 169: ...ching the time zone setting If you pre register the destination time zones you can enjoy the convenience of not having to switch the Date Time settings To use the world clock be sure to set the date t...

Страница 170: ...isplay in the MF indicator p 96 zoom bar p 24 and the altitude recorded with the GPS function p 45 from m cm to ft in z Choose Units then press the qr buttons to choose ft in If you change the date or...

Страница 171: ...utomatically light to assist focusing in low light conditions when you press the shutter button halfway You can turn off the lamp z Choose AF assist Beam then press the qr buttons to choose Off Before...

Страница 172: ...the length of time the images display right after shooting z Choose Review then press the qr buttons to choose an option Changing the Way the Image Displays Right After Shooting You can change the way...

Страница 173: ...isplay which makes it easier to check the composition or focus When shooting movies the camera also reduces strong camera shake for example when walking Dynamic mode Shoot Only Image stabilization is...

Страница 174: ...Image that First Displays in Playback z Choose Resume then press the qr buttons to choose an option Changing Playback Function Settings Images cannot be rotated p 145 if you have set Auto Rotate to Of...

Страница 175: ...seful Information This chapter introduces how to use the AC adapter kit and Eye Fi card both sold separately troubleshooting tips and contains lists of functions and items that appear on the screen 11...

Страница 176: ...17 to close the cover Plug the cord into the coupler z Open the cover and fully insert the plug into the coupler Connect the power cord z Connect the power cord to the compact power adapter then plug...

Страница 177: ...Fi trans to Disable p 178 the Eye Fi card may transmit radio waves Be sure to remove the Eye Fi card from the camera before entering areas that prevent unauthorized transmission of radio waves such a...

Страница 178: ...ab then press the m button z Press the op buttons or turn the dial to choose Eye Fi trans then press the qr buttons to choose Disable The power saving function does not work while transferring images...

Страница 179: ...mory card battery cover turn the power on then back off p 17 TV output Image is distorted or not showing on TV p 132 Shooting Cannot shoot Set the mode dial to a Shooting mode p 42 When in Playback mo...

Страница 180: ...exposure compensation amount or flash output pp 99 111 Increase the ISO speed p 85 Image taken using the flash is too bright overexposed Shoot within an appropriate distance for flash photography p 8...

Страница 181: ...istorted The subject may appear distorted if it passes quickly in front of the camera while shooting Playback Cannot play back images or movies If the file name or folder structure is changed on a com...

Страница 182: ...p 24 29 30 53 81 114 or edit images pp 146 150 Erase the images pp 28 138 to open space for new images or insert an empty memory card p 16 Change the battery pack p 16 No Image There are no images rec...

Страница 183: ...ally available USB card reader to transfer the images Insert the memory card into the printer s card slot to print Naming error The folder or image could not be created because there is an image with...

Страница 184: ...p 60 Recording Pixels p 60 Still Images Recordable Shots p 18 AF Frame p 90 Movies Recording Pixels p 116 Remaining Time p 30 Spot AE Point Frame p 97 Digital Zoom Magnification p 55 Digital Tele conv...

Страница 185: ...ene it has determined and then automatically focuses and selects the optimum settings for subject brightness and color Appears when the scene is dark and the camera is attached to a tripod Exposure Co...

Страница 186: ...s Movies pp 30 114 High speed Burst p 79 Print List p 159 Eye Fi Transfer Complete p 177 Battery Charge Indicator p 15 Metering Method p 97 Folder Number File Number p 167 Displayed image number Total...

Страница 187: ...adjust the speed Sound will not play back Skip backward Continues to skip backward if the m button is held Previous frame Rewind if you hold down the m button Next frame Fast forward if you hold down...

Страница 188: ...E Lock FE Lock pp 97 98 5 AE Lock Movie Exposure Shift p 119 Focusing Range p 93 p 96 AF Lock p 94 Screen Display p 44 No Information Display Information Display 1 Cannot be set to 0 seconds when in m...

Страница 189: ...Functions Available in Each Shooting Mode 189 C K E w S O P t x v T Y E 5 FE Lock not available when set to Selectable or set automatically Not selectable COPY...

Страница 190: ...nsation p 84 ISO Speed p 85 Flash Exposure Compensation p 99 Flash Output Settings p 111 Drive Mode p 87 W 4 Still Image Aspect Ratio p 86 Recording pixels p 60 Compression Ratio p 60 Movie Quality p...

Страница 191: ...Functions Available in Each Shooting Mode 191 FUNC Menu C K E w S O P t x v T Y E 5 5 Only and are available Selectable or set automatically Not selectable COPY...

Страница 192: ...eam p 171 On 5 Off MF Point Zoom p 96 On Off Safety MF p 96 On Off Flash Settings pp 99 100 111 172 Flash Mode Auto Manual Flash Exp Comp Flash Output Red Eye Corr On Off Red Eye Lamp On Off Safety FE...

Страница 193: ...Menus 193 C K E w S O P t x v T Y E 5 On when the flash is set to Selectable or set automatically Not selectable COPY...

Страница 194: ...9 I J Function Review p 172 Off 2 sec 3 10 sec Hold Review Info p 172 Off Detailed Focus Check Blink Detection p 101 On Off Grid Lines p 173 On Off IS Mode p 173 Off Continuous Shoot Only Panning Date...

Страница 195: ...Menus 195 C K E w S O P t x v T Y E Selectable or set automatically Not selectable COPY...

Страница 196: ...Date Time Date and time settings p 20 Time Update On Off p 106 GPS Settings GPS function and logger settings p 102 Units m cm ft in p 170 Video System NTSC PAL p 132 Ctrl via HDMI Enable Disable p 13...

Страница 197: ...es On Off p 129 Auto Rotate On Off p 174 Resume Last seen Last shot p 174 Transition Fade Scroll Slide Off p 131 Default setting Item Content Ref Page Rotate Rotates displayed image p 145 Print List S...

Страница 198: ...s Control System Autofocus Single Continuous Servo AF Servo AE Manual Focus AF Frame Face Detect Tracking AF Center Metering System Evaluative Center weighted average Spot Exposure Compensation Still...

Страница 199: ...Zoom Digital tele converter Continuous Shooting Mode Continuous shooting continuous shooting AF continuous shooting LV Speed Continuous Shooting Approx 3 2 shots sec In P mode Approx 8 1 shots sec In...

Страница 200: ...rate is 239 76 fps 5 Shooting 6 fps 3 fps 1 5 fps Playback 30 fps 2 Interface Hi Speed USB HDMI output Analog audio output stereo Analog video output NTSC PAL Direct Print Standard PictBridge Power S...

Страница 201: ...2LX CB 2LXE Rated input 100 240 V AC 50 60 Hz 0 085 A 100 V 0 05 A 240 V Rated output 4 2 V DC 0 7 A Charge time Approx 2 hours 5 min When using NB 5L Charge Indicator Charging Orange Fully charged Gr...

Страница 202: ...eative Filters Shooting Mode 69 Custom White Balance 84 D Date and Time J Date Time Date Time Adding to Image 57 Changing 20 Setting 19 World Clock 169 Default Settings 51 DIGITAL CAMERA Solution Disk...

Страница 203: ...65 L Lamp 171 172 Landscape Shooting Mode 65 LCD Monitor J Screen Low Light Shooting Mode 66 M M Shooting Mode 110 Macro Focus Mode 93 Magnified Display 128 Manual Focus Focus Mode 96 Memory Cards 16...

Страница 204: ...Mode 75 Smile Shooting Mode 75 Snow Shooting Mode 67 Software DIGITAL CAMERA Solution Disk 2 Installation 34 Software Guide 2 Transferring Images to a Computer for Viewing 33 Sound Settings 48 Stereo...

Страница 205: ...ly available blower brush to remove dust from the lens For stubborn dirt contact a Canon Customer Support Help Desk as listed on the customer support leaflet supplied with your camera When you move th...

Страница 206: ...206 MEMO COPY...

Страница 207: ...207 MEMO COPY...

Страница 208: ...208 MEMO COPY...

Страница 209: ...209 MEMO COPY...

Страница 210: ...210 MEMO COPY...

Страница 211: ...211 MEMO COPY...

Страница 212: ...mission of Canon is prohibited Canon reserves the right to change the contents of this guide at any time without prior notice Illustrations and screenshots in this guide may differ slightly from the a...

Отзывы: