background image

116

Shooting/Viewing Images on a TV set

You can use a video-compatible television as a monitor to shoot or 
play back images when it is connected to the camera with the 
supplied Stereo/Video Cable STV-250N.

1

Turn off the camera and the TV.

2

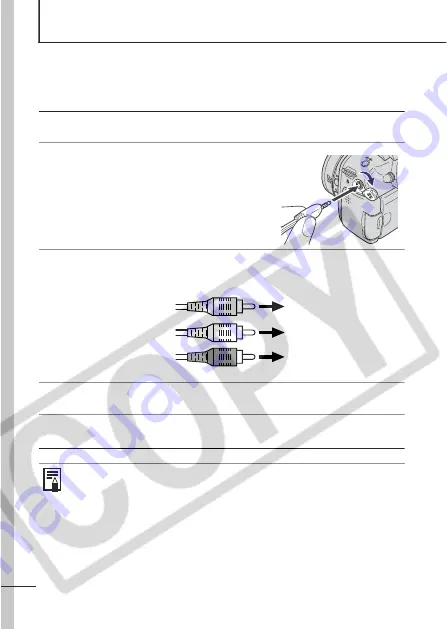
Connect the Stereo/Video Cable 
to the camera's A/V OUT terminal.

z

With your fingernail on the left edge of 
the camera's DIGITAL terminal cover, 
pull it forward to open it, and plug the 
Stereo/Video Cable in all the way.

3

Plug the other ends of the Stereo/Video Cable into the 
VIDEO IN and AUDIO IN jacks on the TV.

4

Turn on the TV and switch it to Video mode.

5

Power on the camera.

z

The video output signal can be switched (NTSC or PAL) to 
accommodate different regional standards (p. 32). The 
default setting varies between regions.
- NTSC: Japan, U.S.A., Canada, Taiwan and others
- PAL: Europe, Asia (excluding Taiwan), Oceania and others

z

If the video system is set incorrectly, the camera output may 
not display properly.

To the Audio IN Jack
Plug (Left) (White)

To the Video IN Jack
Plug (Yellow)

To the Audio IN Jack
Plug (Right) (Red)

Содержание PowerShot S3 IS Digital Camera

Страница 1: ...ons Playback Erasing Viewing Images on a TV set Appendix This guide explains camera features and procedures in detail Customizing the Camera Print Settings Transfer Settings Troubleshooting List of Me...

Страница 2: ...ientation with an Intelligent Orientation sensor z Attach the separately sold wide converter tele converter lens or close up lens to shoot Playback z Plays movies with stereo sound z Auto plays slide...

Страница 3: ...ccessories is recommended This product is designed to achieve excellent performance when used with genuine Canon accessories Canon shall not be liable for any damage to this product and or accidents s...

Страница 4: ...ttings to Their Default Values 34 Formatting Memory Cards 35 Changing the Recording Pixels and Compression Still Images 36 Setting the Slow Synchro 38 Setting the Image Stabilizer Function 39 Magnifie...

Страница 5: ...djusting the Tone White Balance 77 Shooting in a My Colors Mode 80 Switching between Flash Adjustment Settings 82 Compensating the Flash Adjustment Flash Output 82 Switching the Timing at which the Fl...

Страница 6: ...le printers 128 Battery Handling 132 Handling the Memory Card 133 Replacing the Date Battery 135 Using Rechargeable Batteries Sold Separately 136 Using Conversion Lenses Sold Separately 140 Using an E...

Страница 7: ...cameras are intended for personal use and should never be used in a manner that infringes upon or contravenes international or domestic copyright laws and regulations Please be advised that in certai...

Страница 8: ...yourself other persons and equipment zEquipment refers to the camera battery battery charger sold separately compact power adapter sold separately or Externally Mounted Flash sold separately Precauti...

Страница 9: ...liquids If the exterior comes into contact with liquids or salt air wipe it dry with a soft absorbent cloth Continued use of the equipment may result in fire or electrical shock Immediately turn the...

Страница 10: ...ower adapter from both the camera and the power outlet after recharging or when they are not in use to avoid fire and other hazards z Do not place anything such as tablecloths carpets bedding or cushi...

Страница 11: ...m infants when using the flash z Keep objects that are sensitive to magnetic fields such as credit cards away from the speaker of the camera Such items may lose data or stop working z When using the o...

Страница 12: ...ratures such as the dashboard or trunk boot of a car z Do not use the camera in such a way that would cause it to exceed the rating of the power outlet or wiring Do not use if the power cord or plug a...

Страница 13: ...elds Exposure to strong magnetic fields may cause malfunctions or corrupt image data Avoid Condensation Related Problems z When moving the equipment rapidly between hot and cold temperatures you can a...

Страница 14: ...6 28 c Flash Basic Guide p 11 d Microphone R pp 102 103 e Microphone L pp 102 103 f AF assist Beam p 28 g Lens h Ring Release Button p 141 i Tripod Socket p 143 j Battery Cover Basic Guide p 1 k Memor...

Страница 15: ...h the lens cap cord to the strap zRemove the lens cap before turning on the camera s power Attaching the Neck Strap Attach the strap as illustrated Check that the strap does not come loose from the st...

Страница 16: ...Zoom in Zoom out p 92 e Continuous Self timer Button pp 42 43 f Power Mode Indicator Orange Shooting mode Green Playback mode Printer connection Yellow Computer connection g OFF Button h Mode Lever B...

Страница 17: ...Red Recording to memory card Reading memory card Erasing from memory card Transmitting data during a computer connection f MENU Button p 26 Basic Guide p 16 g SET AF Frame Selector Button p 63 Basic...

Страница 18: ...he flash setting are changed regardless of the selected display mode zYou can adjust the brightness for the LCD monitor or viewfinder p 31 zIf the surroundings are too bright for example when you are...

Страница 19: ...tor or viewfinder you wish to display information for when the DISP button is pressed and press the SET button to place a 3 mark zYou cannot disable the display setting of the currently selected displ...

Страница 20: ...rmation displayed zEven though items that are greyed out can be set they will not display in this shooting mode Default setting No Information Displays shooting information grid lines and a histogram...

Страница 21: ...Display When shooting in dark conditions the camera automatically brightens the LCD monitor or viewfinder to suit the brightness of the subject making it easier to frame the subject Noise will appear...

Страница 22: ...ing Method p 73 Exposure Shift Bar Movie p 47 Drive Mode pp 42 43 ISO Speed p 69 Macro Super Macro p 40 Basic Guide p 12 Spot Frame 1 AF Frame p 63 1 Wind Filter OFF p 50 1 Movie Recording Pixels Fram...

Страница 23: ...d zEven in the no information display mode shooting information appears for approximately 6 seconds when changing shooting settings Shooting information may not appear depending on the camera settings...

Страница 24: ...ro p 40 Basic Guide p 12 Exposure Compensation p 75 White Balance p 77 ISO Speed p 69 Histogram p 19 My Colors Shooting p 80 Metering Method p 73 File size Shooting Modes pp 53 54 46 57 Basic Guide pp...

Страница 25: ...g Mode Powers down approximately 3 minutes after the last control is input on the camera Display Off activates and the LCD or viewfinder automatically turns off 1 minute after the last control is inpu...

Страница 26: ...to switch the Date Time settings Setting the Home World Time Zones 1 Set up Menu Time Zone See Menus and Settings p 27 2 Home SET button 3 Use the W or X button to select a home time zone from the ma...

Страница 27: ...p 27 2 Use the W or X button to select World MENU button zTo change the destination time zone use the SET button If you do not select a home time zone beforehand you cannot configure the destination t...

Страница 28: ...mera to the shooting mode b Press the FUNC button c Use the S or T button to select a menu item Some items may not be selectable in some shooting modes d Use the W or X button to select an option for...

Страница 29: ...e items may not be selectable in some shooting modes d Use the W or X button to select an option Menu items followed by an ellipsis can only be set after pressing the SET button to display the next me...

Страница 30: ...ression Still Image p 36 Menu Item Options Reference Page Flash Sync 1st curtain 1 2nd curtain p 83 Slow Synchro Auto 1 Manual p 38 Flash Adjust On 1 Off p 82 Red eye On 1 Off Basic p 12 Cont Shooting...

Страница 31: ...and Viewfinder 1 Digital Zoom On Off 1 On is the default setting for Movie mode p 41 Review Off 2 1 to 10 sec Hold Basic p 7 Save Original On Off 1 p 56 Reverse Disp On 1 Off Basic p 2 IS Mode Off Co...

Страница 32: ...ition p 99 Slide Show p 105 My Colors p 100 Sound Recorder p 103 Protect p 109 Rotate p 98 Erase all p 110 Transfer Order p 114 Menu Item Reference Page Print Select Images Qty p 111 Select All Images...

Страница 33: ...usts the volume of the sound played when the shutter releases The shutter sound does not play while a movie is recording Playback Vol Adjusts the volume of movie sounds sound memos and sound recorder...

Страница 34: ...other than however this method cannot be changed while connected to a printer File Number Continuous 1 Auto Reset p 90 Create Folder p 88 CreateNew Folder Check mark On No check mark Off Creates a fo...

Страница 35: ...the camera Start up Sound Sets the start up sound when you turn on the camera Operation Sound Sets the sound when any button other than the shutter button is pressed Selftimer Sound Sets the sound inf...

Страница 36: ...guage Time Zone and Video System options in the Set up menu p 32 Colors specified in the Color Accent p 53 or Color Swap p 54 modes of the mode Mode Settings p 86 White balance data set with the custo...

Страница 37: ...n You can still use the memory card without problem even if formatting was halted partway but the data is erased completely Formatting Memory Cards z Please note that formatting initializing a memory...

Страница 38: ...6 zUse the W or X button to select recording pixels settings z settings cannot be made in mode Default setting 2 SET button Compression zUse the W or X button to select compression Default setting Cha...

Страница 39: ...nt postcard size prints 148 100 mm 6 4 in Print L size prints 119 89 mm 4 7 3 5 in S Small 640 480 pixels Send images as e mail attachments or shoot more images Widescreen 2816 1584 pixels Print wide...

Страница 40: ...taken 1 Rec Menu Slow Synchro On Off See Menus and Settings p 27 Default setting Setting the Slow Synchro Shooting Mode zThe fastest shutter speed for flash synchronization is 1 500 second The camera...

Страница 41: ...age blur on the LCD monitor or viewfinder since the IS mode runs continually This makes it easier to compose images and focus on subjects Shoot Only IS mode is only activated when the shutter button i...

Страница 42: ...D monitor or viewfinder zPressing the button again cancels the Super Macro mode Macro mode is also canceled zThe image area when the camera is as close as possible to the subject is 22 16 mm 0 87 0 63...

Страница 43: ...rd and shoot the image zWhen you press the button the zoom stops when the lens reaches the maximum optical telephoto setting when shooting still images Press the button again to activate the digital z...

Страница 44: ...ng conditions 3 When using Large Fine mode 1 Press the to display z is the default setting for however High Speed Continuous Shooting cannot be set 2 Shooting zThe camera will continue to record succe...

Страница 45: ...ion it will light before 2 sec To Cancel the Self Timer Press the button to display Selecting a Continuous Shooting Method Select either standard or high speed continuous shooting 1 Rec Menu Cont Shoo...

Страница 46: ...tings p 27 zThe following occurs 2 sec before the shutter releases the self timer sound and lamp will speed up 2 The self timer sound will play when the shutter button is pressed and the shutter will...

Страница 47: ...onds have been specified the self timer sound will speed up 2 seconds before shooting If multiple shots have been specified for the Shots option the sound will play for the first shot only Default set...

Страница 48: ...ress the Movie button to shoot zShooting starts when the Movie button is pressed zRecording will include sound zDuring shooting the recording time in seconds and z Rec appear on the LCD monitor or vie...

Страница 49: ...condition displays on the LCD or viewfinder Press the MF button again to release the setting When AF lock has been registered to the shortcut button AF can be readjusted and locked while shooting movi...

Страница 50: ...can change the movie recording pixels and frame rate in any shooting mode 1 FUNC button Recording Pixels Frame Rate See Menus and Settings p 26 zUse the W or X button to select the recording pixels fr...

Страница 51: ...normal However sound recording continues uninterrupted z The shutter sound is also recorded and cannot be disabled Shooting Mode z The flash will not fire z The recording pixels of still images taken...

Страница 52: ...rate can be changed 1 Set up menu Audio See Menus and Settings p 27 2 Mic Level set the sound recording level with the W or X button 3 Wind Filter On Off zThis suppresses noise when the wind is stron...

Страница 53: ...s in the order of the following settings but the required memory also increases 11 025 kHz 22 050 kHz and 44 100 kHz Default setting zEven if the recording volume becomes too loud it automatically adj...

Страница 54: ...e so that it overlaps a portion of the first and shoot zUse the S T W or X button to return the previous image or retake the recorded images zMinor discrepancies in the overlapping portions can be cor...

Страница 55: ...nate between the original image and the Color Accent image using the previously set color 2 Aim the camera so that the color you wish to retain appears at the center of the LCD monitor or viewfinder a...

Страница 56: ...p SET button zThe camera will switch to color input mode and the display will alternate between the original image and the color swap image using the previously set color zThe default Color Accent is...

Страница 57: ...ant to change 3 Aim the camera so that the desired color appears at the center of the LCD monitor or viewfinder and press the X button zOnly one color can be specified 4 Complete the setting with the...

Страница 58: ...r Color Swap mode will be the higher file number Default setting If Save Original is set to On zOnly the image set with Color Accent or Color Swap is displayed on the LCD monitor or viewfinder during...

Страница 59: ...e the following shooting methods obtain the correct exposure and make them show in white Use the flash raise the flash Adjust the ISO Speed Change the metering mode Shooting in the Creative Zone Shoot...

Страница 60: ...sors is such that noise in the recorded image increases at slow shutter speeds This camera however applies special processing to images shot at shutter speeds slower than 1 3 seconds to eliminate the...

Страница 61: ...e range from foreground to background into focus The larger the aperture value the greater the range of the image brought into clear focus 1 Use the W or X button to select the aperture value then sho...

Страница 62: ...he LCD monitor or viewfinder in red The standard exposure is calculated by measuring the brightness according to the selected metering method F2 7 F3 2 F3 5 F4 0 F4 5 F5 0 F5 6 F6 3 F7 1 F8 0 Safety S...

Страница 63: ...gs to the Shortcut Button Shooting Mode zRecording Pixels Still image 1 p 36 zMovie Recording Pixels Frame Rate Movie p 48 zMetering System p 73 zWhite Balance 2 p 77 zMy Colors 3 p 80 zImage Stabiliz...

Страница 64: ...shooting mode will be retained and pressing the shortcut button will not activate the function Using the Shortcut Button 1 Press the button zThe registered function is activated and its icon appears...

Страница 65: ...using the selected AF frame by pressing the shutter button instead of pressing the button zThe AF frame will move back to its original position Center if you hold down the button Selecting an AF Fram...

Страница 66: ...through glass Try to shoot as close to the glass as possible to reduce the chances of light reflecting back off the glass Shooting with the Focus Lock 1 Aim the camera so that an object at the same fo...

Страница 67: ...the AF Lock Press the MF button zThe AF lock is convenient because you can let go of the shutter button to compose the image Moreover the AF lock is still effective after the picture is taken allowing...

Страница 68: ...titch Assist Movie digital zoom or while displaying the image on a TV the display magnification is not available Can also be set so that the image displayed is not magnified p 28 zThe MF indicator sho...

Страница 69: ...ings p 27 Default setting Switching between Focus Settings Shooting Mode Continuous The camera is continually focusing on whatever it is aimed even when the shutter button is not pressed allowing you...

Страница 70: ...he W button to narrow the focusing distance from the center 3 Press the FUNC button and shoot the image with the manual focus p 66 Focus Bracketing Focus BKT Mode Shooting Mode The three shots are tak...

Страница 71: ...al speed is selected based on the brightness of the environment at the time of shooting The speed is automatically increased in dark places increasing the shutter speed and reducing shaking effects zW...

Страница 72: ...Press the shutter button halfway and press the ISO button zThe will display 3 Re aim the camera to compose the shot as desired and press the shutter button fully To Release the AE Lock Press anything...

Страница 73: ...e Program Shift 1 Turn the mode dial to or 2 Focus on the subject on which you wish to lock the exposure 3 Press the ISO button while pressing the shutter button halfway zThe exposure setting locks an...

Страница 74: ...n the part of the subject on which you wish to lock the flash exposure setting 4 Press the shutter button halfway and press the ISO button zThe flash will pre fire and will display 5 Re aim the camera...

Страница 75: ...ring The camera evaluates complex lighting conditions such as the position of the subject the brightness the background the direct light and the backlighting and adjusts the settings to the correct ex...

Страница 76: ...See Menus and Settings p 26 zWhen Spot AE Point is set to Center the spot AE point frame appears at the center of the LCD monitor or viewfinder The AF frame can be repositioned p 63 zWith AF Point on...

Страница 77: ...to avoid making lights appear too bright in night shots 1 FUNC Menu Exposure Compensation See Menus and Settings p 26 zUse the W or X button to adjust the exposure compensation and press the FUNC butt...

Страница 78: ...t the center To Cancel the AEB Mode Select the BKT OFF Auto Exposure Bracketing AEB Mode Shooting Mode zThe three shots are taken at the same interval as high speed continuous shooting in the followin...

Страница 79: ...mera Day Light For recording outdoors on a bright day Cloudy For recording under overcast shady or twilight skies Tungsten For recording under tungsten and bulb type 3 wavelength fluorescent lighting...

Страница 80: ...nce reading for the following situations that are difficult for the Auto setting to detect correctly zShooting close ups zShooting subjects of monotone color such as sky sea or forest zShooting with a...

Страница 81: ...er the optimal white balance may not be set In particular the following should not be changed ISO Speed Flash Setting the flash to on or off is recommended If the flash fires when reading the white ba...

Страница 82: ...record neutral hues Sepia Records in sepia tones B W Records in black and white Positive Film Produces intense natural appearing colors like those obtained with positive film Lighter Skin Tone Makes...

Страница 83: ...n the image Setting the Camera to a Custom Color Mode You can adjust the contrast sharpness saturation red green blue or skin tone balance and shoot 1 Custom Color SET button See Menus and Settings p...

Страница 84: ...t Shooting Mode Flash Exposure Compensation z When the shooting mode is set to or when Flash Adjust is set to Auto in or mode settings can be adjusted in 1 3 stop increments in the range of 2 to 2 sto...

Страница 85: ...es Shooting Mode 1st curtain The flash fires right after the shutter opens regardless of the shutter speed Usually the 1st curtain is used when shooting 2nd curtain The flash fires right before the sh...

Страница 86: ...n continuously the number of shots changes in units of 5 shots at a time zThe maximum number of shots is determined by the available space on the memory card The maximum number of shots may be reduced...

Страница 87: ...e accessed while the interval shooting is in process the interval shooting session will be canceled Turning the mode dial while the camera is waiting to shoot the next image Opening the memory card sl...

Страница 88: ...oting or self timer are also remembered 1 Switch to the shooting mode you wish to save and set the settings zTo change some of the settings saved in other than shooting mode select zFunctions which ca...

Страница 89: ...o On and the LCD monitor or viewfinder is set to the detailed display mode the normal right end is down or left end is down will appear in the display Default setting Setting the Auto Rotate Function...

Страница 90: ...y When the Auto Rotate function is set to On in shooting mode the orientation of the camera is recorded when the shot is taken Therefore the image is automatically rotated during playback mode based o...

Страница 91: ...he new folder is created Setting the Day or Time for Automatic Folder Creation 2 Select a day for the Auto Create option and a time in the Time option Menu button z displays in the LCD monitor or view...

Страница 92: ...and image is compared with the last one on the card and the larger of the two is utilized as the basis for new images Resetting the File Number Shooting Mode Playback Mode Continuous A number one high...

Страница 93: ...images are always saved together into the same folder zImages cannot be played back when the folder numbers are duplicated or image numbers are duplicated within folders zPlease refer to the Software...

Страница 94: ...press the SET button once more the camera switches to image advance mode and will display You can use the W or X button to advance to the next or previous image at the same level of magnification The...

Страница 95: ...m lever toward Viewing Images in Sets of Nine Index Playback Movie Selected Image Switch the display nine images at a time If you turn the zoom lever towards during index playback the jump bar appears...

Страница 96: ...ding to the search key 2 Use the S or T button to select a search key and press the W or X button To Return to Single Image Playback Press the MENU button Jumping to Images Jump 10 Images Jumps over 1...

Страница 97: ...playback mode Exit Single image playback Print Only appears when connected to a printer For details refer to your Direct Print documentation Play Slow Motion Playback You can use the W button to slow...

Страница 98: ...elect Cut Beginning or Cut End and the W or X button to specify the point at which to cut zTo check a temporarily edited movie select Play and press the SET button zSelecting Exit cancels the edit and...

Страница 99: ...e The pre edit data is lost zWhen there is not enough space left on the memory card only Overwrite can be selected and S appears on the counter of the movie editing bar It may take approximately 3 min...

Страница 100: ...SET button to rotate it zCycle through the 90 270 original orientations with each press of the SET button zImages can be rotated in index playback Rotating Images in the Display zMovies cannot be rota...

Страница 101: ...Playing Back Play back the movie without applying effects Allows you to apply a fade fade in while transitioning between scenes Allows you to apply a movement effect that transitions scenes right wit...

Страница 102: ...button to select the My Colors type and press the SET button zThe displayed image will reflect the My Colors effect zYou can turn the zoom lever toward to check the image at a higher magnification Whi...

Страница 103: ...g Yes displays the image transformed with the My Colors effect while No returns you to the Play menu zThe My Colors function will not work if there is insufficient space on the memory card zAlthough M...

Страница 104: ...and press the SET button zThe elapsed time and the remaining time display zPressing the SET button pauses the recording Pressing it again resumes recording zUp to 1 minute of recordings can be added t...

Страница 105: ...ged p 50 zWhen you press the SET button recording stops Press the SET button again to start a new recording Pressing the shutter button halfway or pressing the movie button will also stop recording So...

Страница 106: ...s the W or X button to select Erase and press the SET button again to erase the selected sound If you select Erase All and press the SET button a confirmation screen displays Press the W or X button t...

Страница 107: ...h the W or X button p 106 For details on the sound number and folder number refer to the Software Starter Guide Automated Playback Slide Shows All Images Plays all images on the memory card in order D...

Страница 108: ...effects to your slide show Default setting Playback begins automatically without using effects Applies a down up fade of the image the image appears from the bottom up At first a cross appears on the...

Страница 109: ...Playback Erasing 107 Select the date folder to play images from 1 Select or SET button 2 Use the W or X button to select the date or folder to play images from MENU button Folder Date...

Страница 110: ...when they are set 2 Use the W or X button to move between images for playback and the SET button to select or deselect them zYou can also select images in the index playback mode zPressing the MENU b...

Страница 111: ...that each image displays Choose between 3 10 seconds 15 seconds and 30 seconds Displaying time can vary slightly depending on the image Default setting zRepeat Sets whether the slide show stops when a...

Страница 112: ...t formatting initializing a memory card erases all data p 35 including protected images and other file types Please check the contents of a memory card before formatting it Erasing All Images zPlease...

Страница 113: ...ettings are compliant with DPOF Digital Print Order Format Single Images 1 Play Menu Print Menu Select Images Qty See Menus and Settings p 27 zSelecting Clear All Selections cancels all print settings...

Страница 114: ...settings for the images zIf the camera is connected to a printer the button lights blue after the SET button is pressed Printing starts after pressing the SET button once the button is pressed and Pri...

Страница 115: ...p 27 2 Select Print Type Date File No or Clear DPOF data and then select the settings Print Type Standard Prints one image per page Index Prints the selected images together at a reduced size in an in...

Страница 116: ...he printable information may vary between printers Index Date and File No cannot be set to On at the same time Standard or Both Date and File No can be set at the same time zDo not set the date in the...

Страница 117: ...tton again deselects the setting zYou can also select images in the index playback mode S All the Images on a Memory Card 2 Select Mark all and press the SET button zSelecting Reset cancels all transf...

Страница 118: ...tereo Video Cable in all the way 3 Plug the other ends of the Stereo Video Cable into the VIDEO IN and AUDIO IN jacks on the TV 4 Turn on the TV and switch it to Video mode 5 Power on the camera zThe...

Страница 119: ...m See Menus and Settings p 27 2 Use the W or X button to select the contents you wish to set Select Theme to set all to the same settings Registering My Camera Settings Images recorded onto the memory...

Страница 120: ...t up Image Select the image you wish to register and press the SET button zStart up Operation Self timer and Shutter Sounds Select Record and press the SET button After recording select Register and p...

Страница 121: ...el zThe following cannot be registered as My Camera settings Movies Sounds recorded with the sound memo function p 102 and sound recorder p 103 zThe prior setting is erased when a new My Camera settin...

Страница 122: ...ize alkaline batteries or Canon AA size NiMH batteries Basic Guide p 1 Insufficient battery voltage Change the batteries message displays z Insert the four unused or fully charged AA size NiMH batteri...

Страница 123: ...ded when shooting still photos but it will be recorded when shooting movies Display flickers Display flickers when shot under fluorescent lighting z This is not a camera malfunction Flickering is reco...

Страница 124: ...rn the mode lever to the left or press the shutter button halfway to switch to Shooting mode z During a computer or printer connection disconnect the interface cable before switching the camera to Sho...

Страница 125: ...us preventing a blurred image p 43 z Even better results can be obtained by placing the camera on a stable surface or by using a tripod to shoot Subject is out of focal range z Shoot with the subject...

Страница 126: ...increase the amount of noise in an image When picture quality is the priority select lower ISO speeds p 69 z In and modes of Special Scene mode the ISO speed increases and noise may occur White dots a...

Страница 127: ...ice z Use a memory card formatted in your camera p 35 Lens will not retract Memory card slot cover or battery cover was opened with power on z First close the memory card slot cover or battery cover t...

Страница 128: ...g displays until it is full and shooting will automatically stop z Try the following procedures Format the card with a low level format before filming p 35 Lower the recording pixels frame rate p 48 U...

Страница 129: ...iewfinder or on a computer Reading images from memory card is slow Memory card was formatted in another device z Use a memory card formatted in your camera p 35 Battery Batteries consumed quickly Batt...

Страница 130: ...t will not appear on a TV in Stitch Assist mode Shoot in a different mode Basic Guide p 8 Direct print compatible printers Cannot print Camera and printer are not properly connected z Make sure the ca...

Страница 131: ...full Memory card is full of images and no more can be recorded or saved Or no more image settings can be recorded Or no more sound memos and sound recorder can be recorded Naming error The image coul...

Страница 132: ...ith a computer or a movie Cannot rotate You attempted to rotate an image recorded in a different camera or data type an image edited with a computer or a movie Incompatible WAVE format A sound memo ca...

Страница 133: ...tored on the memory card Lens error restart camera Camera detected an error while moving the lens and cut the power automatically This error message may appear if you press on the lens while it is mov...

Страница 134: ...th batteries that have been used in other devices The partially used batteries may leak z Be careful to load the batteries with their positive and negative ends in the right direction z Never mix batt...

Страница 135: ...uch batteries may leak overheat or burst Always check the seals on store bought batteries before loading them as some batteries may come with defective seals Do not use batteries with defective seals...

Страница 136: ...ory card may be corrupted or erased by electrical noise static electricity or card camera malfunction making a backup copy of important data is recommended Formatting z Please note that formatting ini...

Страница 137: ...d place a new date battery into the date battery holder with the positive terminal facing upward 4 Replace the date battery holder replace the AA size batteries and close the battery cover 5 Set the d...

Страница 138: ...the charger before plugging the charger into a power outlet zDo not insert additional batteries into the charger once charging begins The indicator blinks while charging then remains lit when charging...

Страница 139: ...th oil from one s skin or dirt If the battery usage time has considerably diminished If the number of recordable images has considerably diminished When charging the batteries insert and remove the ba...

Страница 140: ...amage it causing battery leakage Remove batteries from the camera or charger and store in a dry cool location when not in use zIt takes approximately 4 hours 40 minutes with four for the charger to fu...

Страница 141: ...nect the power cord to the compact power adapter first and then plug the other end into the power outlet Plug in the power cord firmly as far as it will go 2 Open the terminal cover and connect the DC...

Страница 142: ...onversion Lenses Sold Separately zWhen attaching the wide converter tele converter or close up lens be sure to screw it on securely If they come loose they may fall from the lens adapter posing risk o...

Страница 143: ...read diameter Lens Hood LH DC40 We recommend attaching the lens hood to prevent light from outside of the screen from entering the lens when shooting with wide angle and backlight without a flash Atta...

Страница 144: ...tion to attach it securely zCompletely remove all dust and dirt from conversion lenses with a lens blower brush before use The camera may focus on any dirt that remains zBe careful when handling the l...

Страница 145: ...ing High Power Flash HF DC1 This flash is used to supplement the camera s built in flash when the subject is too far away for proper illumination Use the following procedures to affix the camera and H...

Страница 146: ...ash charge time will lengthen as the battery charge gets weaker Always set the power mode switch to OFF when you finish using the flash zBe careful not to touch the flash window or sensor windows with...

Страница 147: ...er brush to remove dust and dirt If necessary gently wipe with a soft cloth or an eyeglass lens wiper to remove stubborn dirt Camera Care and Maintenance Never use thinners benzine synthetic cleansers...

Страница 148: ...olor LCD Approx 115 000 pixels picture coverage 100 AF System TTL autofocus continuous or single Focus lock and Manual focus are available Focusing frame 1 point AF fixed to center or FlexiZone AF Sho...

Страница 149: ...sh Output 3 stops Can be set when flash exposure setting is Off Shooting Modes Auto Creative zone Program Shutter speed priority Aperture priority Manual Custom Image zone Portrait Landscape Night sce...

Страница 150: ...Even if the clip size has not reached 1 GB recording will stop at the moment the clip length reaches 1 hour Depending on the volume and data writing speed of the memory card recording will stop before...

Страница 151: ...ation for each of the display locations Direct Print PictBridge compliant Canon Direct Print and Bubble Jet Direct compatible My Camera settings Start up image start up sound operation sound self time...

Страница 152: ...once every two shots and the camera power turned off after every tenth shot Power is left off for a sufficient amount of time then the power is turned back on and the testing procedure is repeated zA...

Страница 153: ...ard shooting criteria established by Canon Actual results may vary according to the subject and shooting conditions 16MB SDC 128M SDC 512MSH Large 2816 2112 pixels 4 45 176 8 75 292 17 156 603 Medium...

Страница 154: ...rames sec 6 sec 1 min 4 sec 4 min 9 sec 640 480 pixels 15 frames sec 14 sec 2 min 7 sec 8 min 14 sec 320 240 pixels 60 frames sec 10 sec 1 min 32 sec 5 min 59 sec 320 240 pixels 30 frames sec 20 sec 3...

Страница 155: ...330 KB sec 320 240 pixels 60 frames sec 1320 KB sec Interface Compatible with SD memory card standards Dimensions 32 0 24 0 2 1 mm 1 3 0 9 0 1 in Weight Approx 2 g 0 07 oz Interface Compatible with Mu...

Страница 156: ...mA 2 Operating Temperatures Approx 4 hours 40 min 1 Approx 2 hours 2 Dimensions 0 35 C 32 95 F Weight 65 0 105 0 27 5 mm 2 6 4 1 1 1 in Rated Input Approx 95 g 3 4 oz Magnification Approx 0 75 Focal L...

Страница 157: ...m 6 6 ft infinity Thread Diameter 58 mm standard filter thread Conversion Lens Adapter LA DC58E is required for mounting to PowerShot S3 IS Dimensions Diameter 72 0 mm 2 8 in Length 64 8 mm 2 6 in We...

Страница 158: ...ad Dimensions Diameter 79 0 mm 3 1 in Length 31 5 mm 1 2 in Weight Approx 19 g 0 67 oz Shooting Distance from tip of lens 28 50 cm 11 in 1 6 ft W 35 50 cm 1 1 1 6 ft T Thread Diameter 58 mm standard f...

Страница 159: ...Shooting 42 Creative Zone 57 D Date Time 31 DCF 22 148 Detailed Display 22 DIGITAL Terminal 12 Digital Zoom 29 41 DISP 15 Display Off 31 DPOF 111 Print Settings 111 Transfer Settings 114 E Effects Pla...

Страница 160: ...Selector 15 Operation Sound 31 33 Overexposure Warning 23 P Panoramic Image 51 Playback Viewing Images on a TV set 116 Playback Vol 31 Power Saving 23 31 Printing Print Order 111 Print Share 15 Progr...

Страница 161: ...3 Speaker 14 Start up Image 33 Start up Sound 31 33 Stitch Assist 51 Super Macro 40 T Tally Lamp 12 Telephoto 14 41 92 Terminal Cover 14 Time Zone 24 V Video Output Signal 116 Video System 32 Viewfind...

Страница 162: ...160 MEMO...

Страница 163: ...161 MEMO...

Страница 164: ...162 MEMO...

Страница 165: ...163 MEMO...

Страница 166: ...164 MEMO...

Страница 167: ...n made to ensure that the information contained in this guide is accurate and complete no liability can be accepted for any errors or omissions Canon reserves the right to change the specifications of...

Страница 168: ...tions may cause harmful interference to radio communications However there is no guarantee that interference will not occur in a particular installation If this equipment does cause harmful interferen...

Страница 169: ...pression p 36 Super Fine U Fine z z z S z z z z z Normal U Movie Recording Pixels Frame Rate 1 p 48 U Flash Basic p 11 Auto z z 2 z 3 z On 2 3 U Off U Red Eye Reduction Basic p 11 z z 2 z 3 S z z z z...

Страница 170: ...Focus p 66 2 3 MF Point Zoom p 66 z 2 z 3 z z z z AF assist Beam p 28 z z 2 z 3 z z z z z z Macro Basic p 12 Macro 2 9 Super Macro 10 Digital Zoom p 41 7 z Safety Shift p 60 Exposure Compensation p 75...

Страница 171: ...11 Exposure shift can be set after AE lock 12 Only switching between and is available 13 Automatically set by the camera 14 cannot be set 15 or cannot be set 16 This cannot be set when My Colors is s...

Отзывы: