background image

20

Printing Images

1.

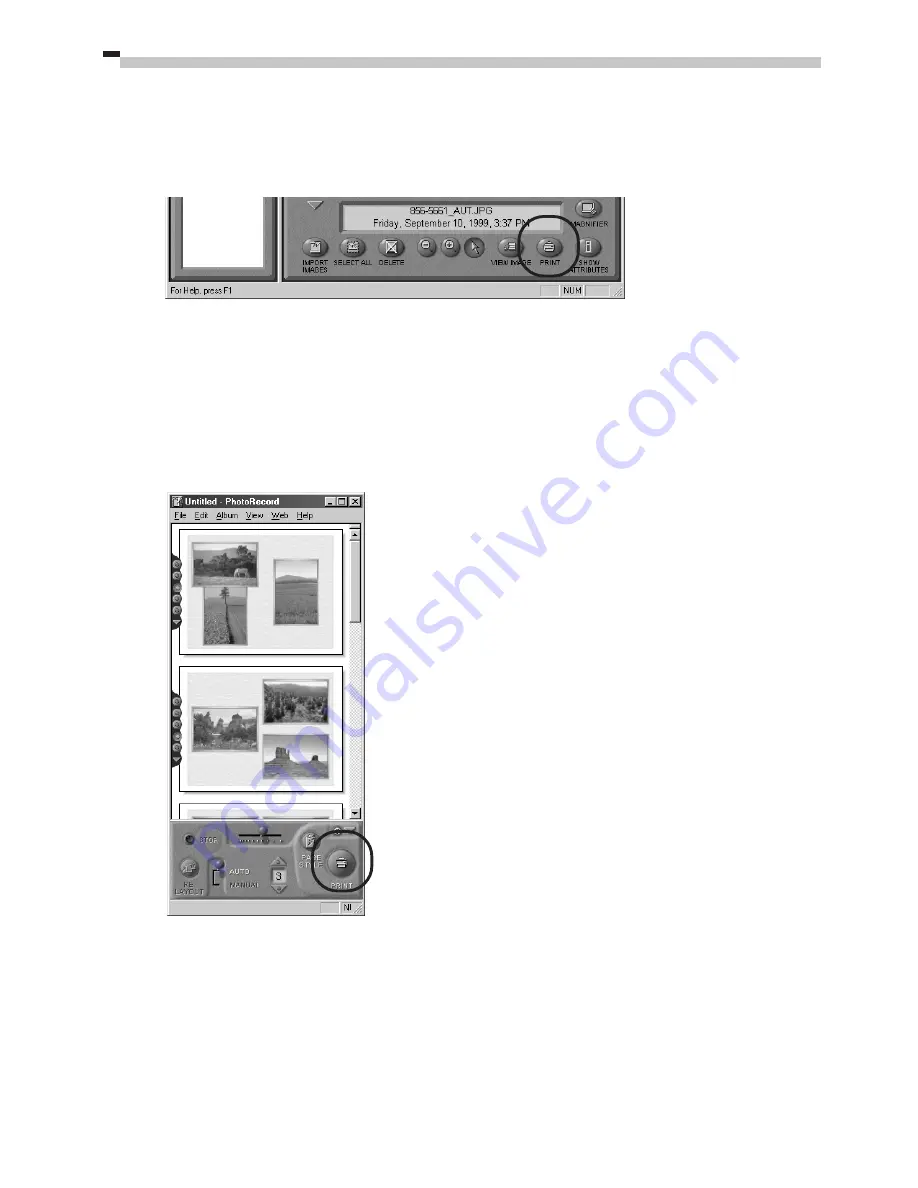
Select the image(s) you wish to print and click the [PRINT] button.

The PhotoRecord printing utility will start and the selected image(s) will automatically
display in a page layout.

2.

Adjust the print settings if you wish to change the page layout.

Please refer to page 27 or the PhotoRecord Help file for instructions.

3.

Click the PhotoRecord [PRINT] button.

The Print dialog will display.

4.

Click the [OK] button to start printing.

Содержание POWERSHOT S10

Страница 1: ...werShot S10 and PowerShot S20 digital cameras This guide explains the installation method and features of the software for loading and processing images on a computer that have been shot with a Canon...

Страница 2: ...and retain the original for back up purposes Any other copying of the SOFTWARE is a violation of this Agreement You must reproduce and include the copyright notice on the back up copy 3 SUPPORT AND U...

Страница 3: ...uch provision shall be null and void with respect to the jurisdiction of that court or tribunal and all the remaining provisions of this Agreement shall remain in full force and effect 8 CONTROLLING L...

Страница 4: ...and PowerShot are trademarks of Canon Inc Adobe Adobe PhotoDeluxe and Photoshop are trademarks of Adobe Systems Incorporated CompactFlash is a trademark of SanDisk Corporation IBM is a registered tra...

Страница 5: ...oading to Printing 15 Basic Procedures for Using ZoomBrowser EX 21 Displaying Images 21 Organizing Images 23 Saving Computer Images to a CF Card in the Camera 24 Editing Camera Slide Shows 24 Stitchin...

Страница 6: ...ages stored on computer disks Displays all the files in a specified folder at once and zooms them in and out to facilitate visual searches Displays files in chronological order in a window that looks...

Страница 7: ...s PowerShot USB TWAIN Driver PowerShot RS 232C TWAIN Driver These are the driver utility programs that work within TWAIN compliant application programs such as Adobe PhotoDeluxe and Photoshop to load...

Страница 8: ...Service Pack 3 or higher required CPU Pentium 75 MHz or better RAM 32 MB or more Windows 95 98 64 MB or more Windows NT 4 0 Interface USB Limited to pre installed Windows 98 systems RS 232C Serial COM...

Страница 9: ...in the CD ROM drive The installer panel will automatically display If the installer panel does not automatically display use the following procedures to start it 1 Double click the My Computer icon o...

Страница 10: ...w the on screen instructions to proceed with the installation 6 Click the Finish button when the installation is complete and the installer panel appears again Installing Adobe PhotoDeluxe Home Editio...

Страница 11: ...he camera will not operate correctly with a USB port controlled by the Windows 95 or Windows NT 4 0 operating system Connecting to a Serial Port COM Port p 13 If your computer is equipped with a seria...

Страница 12: ...connected If this problem arises detach the camera and the other devices and reconnect the camera only Do not connect more than one camera to the USB ports of the same computer at the same time The ca...

Страница 13: ...amera can be connected to any USB port on computers that feature more than one 2 Install the USB driver and the PowerShot USB TWAIN Driver First connec tion only pp 10 12 USB Port USB Cable DIGITAL Te...

Страница 14: ...ion on page 30 if the installation cancels itself during the procedure if the installation does not proceed as described in these procedures or if you think that the drivers are not properly installed...

Страница 15: ...nded option and click the Next button The dialog will change to one that allows you to specify the search location 4 Select the CD ROM drive option 5 Place the PowerShot Solution Disk in the CD ROM dr...

Страница 16: ...pts you to restart your computer remove the Disk from the CD ROM drive and restart the computer as prompted What to Do If You Are Prompted for the Windows System Disk during the Driver File Copying Pr...

Страница 17: ...ual for the location of the serial port 3 Turn on the computer and start Windows Precaution for Unplugging Cables from the DIGITAL Terminal Serial Cable Serial Port COM Port DIGITAL Terminal 1 Open th...

Страница 18: ...ter is not required if your computer is equipped with a CF card reader Place the CF card directly into the reader 1 Place the CF card in the PC card adapter 2 Insert the assembly into the computer s P...

Страница 19: ...g will appear so that you can select an application to start when you connect the camera to a USB port Select ZoomBrowser EX and click the OK button ZoomBrowser EX will start and thumbnail images will...

Страница 20: ...me you connect the camera If the Disable device events option has a check mark the automatic start will be turned off Serial Interface Click the IMPORT IMAGES button and select From Camera Thumbnail i...

Страница 21: ...d select From Dcim Thumbnail images will display in the camera window ZoomBrowser EX Camera Window The camera window will open when a connection to a camera or CF card is initiated Thumbnail small ima...

Страница 22: ...k the My Images folder Select Rename Folder from the pop up menu and input a folder name 2 Select the renamed folder Click the renamed folder in the explorer view 3 Select the images that you wish to...

Страница 23: ...19 Windows The downloaded images will display in the browser area To disconnect the camera click the close box at the upper right of the camera window The camera window will close Browser Area...

Страница 24: ...ll start and the selected image s will automatically display in a page layout 2 Adjust the print settings if you wish to change the page layout Please refer to page 27 or the PhotoRecord Help file for...

Страница 25: ...nd Out a Double Clicking the Browser Area Double click the background frame of a folder to zoom it to fill the browser area b Selecting a Folder in the Explorer View You can also zoom a folder in or o...

Страница 26: ...ome images click the View menu and select TimeTunnel The selected image s will display in a time tunnel window Please refer to the TimeTunnel Help file for more details on how to operate this function...

Страница 27: ...the images in that folder and its subfolders in ZoomBrowser EX Click the File menu select Add Image Library and select the folder The selected folder will appear in the explorer view as a new library...

Страница 28: ...ra Slide Shows 1 Open the camera window p 15 2 Click the EDIT SLIDESHOW button The Edit Slide Show window will display The camera images will display on the left side Images registered in the selected...

Страница 29: ...e PhotoStitch Help file for more details Images Shot in Stitch Assist Mode PhotoStitch automatically arranges images shot with the Stitch Assist mode of PowerShot digital cameras into the correct orde...

Страница 30: ...xe Help file and electronic guide Getting Started pdf for instructions for this program 4 Edit and apply special effects to the image Once you have finished editing the image click the File menu and s...

Страница 31: ...s to display Help Click this to display the Print dialog Click this to change the background design or paper orientation Click this to set the default number of images printed per page Click this to s...

Страница 32: ...PhotoDeluxe Home Edition and click the OK button The TWAIN Driver will appear Serial Interface PC Card Reader or PC Card Slot Interface 1 Click Get Fix Photo at the upper left of the window 2 Click G...

Страница 33: ...click the Acquire button The acquired image will appear in the window of Adobe PhotoDeluxe Settings Button Rotate 90 Degrees Buttons Rotates the selected image left or right 90 degrees Display Style B...

Страница 34: ...reinstalling the drivers with the procedures in the Installing the Driver Software section when the Add New Hardware Wizard appears Check to See That Installation Conditions are Met Does the appropria...

Страница 35: ...es for either the PowerShot S10 or PowerShot S20 item Delete it with the following procedures 1 Select either the PowerShot S10 or PowerShot S20 item and click the Remove button 2 Click the OK button...

Страница 36: ...der within the Inf folder to open it 9 Find and delete the Canon IncCanon_DC file Skip this step if this file is not present in the Other folder within the Inf folder Reconnect the camera to the compu...

Страница 37: ...the Show all files option 1 Click the View menu and select Folder Options 2 Click the View tab 3 Click the Show all files option in the Hidden files section of the Advanced settings list 4 Click the O...

Страница 38: ...Shot S10 or PowerShot S20 name in the Scanners and Cameras Properties device list and click the Remove button 2 Click the OK button and close the Scanners and Cameras Properties dialog 3 Using Steps 3...

Страница 39: ...44 From Loading to Printing 45 Basic Procedures for Using PowerShot Browser 50 Displaying Images 50 Organizing Images 51 Saving Computer Images to a CF Card in the Camera 52 Editing Camera Slide Show...

Страница 40: ...displays camera images when the camera is connected to a USB port Image File Management Functions Displays moves copies or deletes images stored on computer disks Displays the files in a specified fol...

Страница 41: ...frames can be merged into a 360 degrees image and saved in the QuickTime VR format making it appear as if you were standing in the middle of the image looking about in all directions PowerShot Plug I...

Страница 42: ...S Mac OS 7 5 3 or higher QuickTime 2 1 or higher CPU PowerPC RAM 20 MB or more of application memory Interface USB Power Macintosh NEW G3 G4 PowerBook G3 iMac iBook Limited to genuine Apple Computer b...

Страница 43: ...ation Select Custom Install if you wish to install only the minimum required programs Software Installed with the Easy Install Option PowerShot Browser PhotoStitch PowerShot Plug In Module 6 Select a...

Страница 44: ...he image loading software automatically Connecting to a Serial Port Printer or Modem Port p 43 If your computer is equipped with one of the serial ports shown below you can connect the camera with the...

Страница 45: ...cluding USB mice and keyboards are connected If this problem arises detach the camera and the other devices and reconnect the camera only Important Please do not place your Macintosh computer into sle...

Страница 46: ...location of the USB ports The camera can be connected to any USB port on computers that feature more than one Precaution for Unplugging Cables from the DIGITAL Terminal DIGITAL Terminal 1 Open the DIG...

Страница 47: ...ode dial to the Off position 2 Attach the supplied Macintosh cable to the printer or modem port on the computer and to the camera s DIGITAL terminal as shown below Please consult your computer s manua...

Страница 48: ...ter is not required if your computer is equipped with a CF card reader Place the CF card directly into the reader 1 Place the CF card in the PC card adapter 2 Insert the assembly into the computer s P...

Страница 49: ...panel You can restore the connection by pressing the shutter button PC icon displays in the display panel Starting PowerShot Browser 1 Open a connection between the camera and computer Connecting to a...

Страница 50: ...nterface When you connect the camera to the computer PowerShot Browser will automatically start and display its Communication Settings dialog Confirm that the USB port option and either the PowerShot...

Страница 51: ...humbnail small images will display Thumbnail The image of the connected camera or CF card will display PC Card Reader or PC Card Slot Interface Click the arrow to the left of PC Card folder in the exp...

Страница 52: ...te a new folder within the PowerShot Browser Folder Click the PowerShot Browser Folder choose the File menu and select New Folder A folder with the name Untitled Folder will be created Click the folde...

Страница 53: ...rint on one page and click the PRINT button 4 Select the images that you wish to download from the camera window and click the DOWNLOAD button Click the thumbnail s you wish to select The downloaded i...

Страница 54: ...REDUCE or ENLARGE button Zooming a Single Image Double click an image in the browser area Displaying Images in Chronological Order Select a folder choose the Browser menu and select Switch to TimeTunn...

Страница 55: ...Drop a Folder within the Explorer View Refresh the Contents of the Browser Area If you have used the Macintosh Finder or another program to move or edit images that are registered with PowerShot Brow...

Страница 56: ...hows 1 Open the camera window p 46 2 Click the EDIT SLIDESHOW button The SlideShowMaker window will display The camera images will display on the left side Images registered in the selected slide show...

Страница 57: ...the PhotoStitch Help file for more details Images Shot in Stitch Assist Mode PhotoStitch automatically arranges images shot with the Stitch Assist mode of PowerShot digital cameras into the correct o...

Страница 58: ...f contained in the Open Me First folder on the Adobe PhotoDeluxe CD ROM 4 Edit and apply special effects to the image Once you have finished editing the image click the File menu and select Send to an...

Страница 59: ...Serial Port p 43 Connecting via a CF Card Reader or PC Card Slot p 44 2 Turn the camera s mode dial to the position For USB Interface Users PowerShot Browser may automatically start when you connect t...

Страница 60: ...If this happens use the following procedures to prevent PowerShot Browser from attempting to start automatically 1 Click the OK button on the PowerShot Browser not found dialog 2 In the Settings for U...

Страница 61: ...pear in the My Photos window at the lower right of the Adobe PhotoDeluxe window 4 Click the Quit button You can display an image at a larger size by double clicking it in the My Photos window Display...

Страница 62: ...llowing items Confirm that the port selected in the Communication Settings dialog is the one to which the camera is connected Please see the respective pages below Windows Platform p 16 Macintosh Plat...

Страница 63: ...copie 01 41 99 79 51 Canon Photo Vid o France S A Hotline 01 49 04 01 00 T l copie 01 49 04 01 01 Canon Deutschland GmbH Canon Hotline Service Customer Support 02151 349 555 Telefax 02151 349 588 Inf...

Страница 64: ...oad 09 01 06 Singapore 079906 Phone 65 532 4400 Fax 65 221 7577 Canon Hongkong Co Ltd 9 F The Hong Kong Club Building 3A Chater Road Central Hong Kong Phone 852 2739 0802 Fax 852 2369 7701 Canon Marke...

Страница 65: ...Double click the folder that corresponds to your geographic location Inside you will find a file that contains more detailed support informa tion for your location Macintosh computer 1 Open the Suppo...

Страница 66: ......

Страница 67: ......

Страница 68: ...H IE 034 V1 0100CH4 2 2000 CANON INC PRINTED IN JAPAN...

Отзывы: