background image

4

Initial Preparations

  Inserting the Battery Pack and Memory Card 

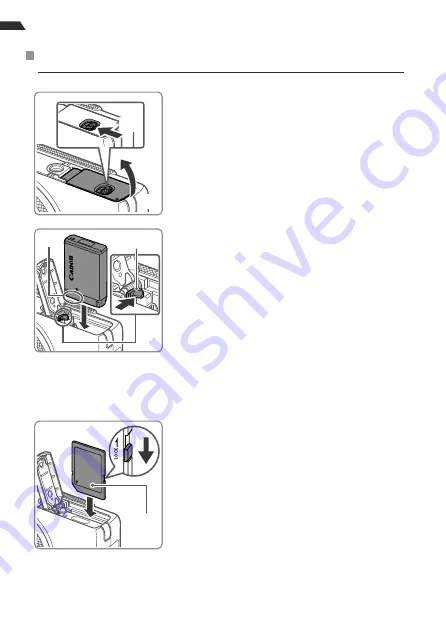
 Open the cover.


z

Slide the switch (1) and open the cover (2).

 Insert the battery pack.


z

Holding the battery pack with the 
terminals (1) facing as shown, press the 
battery lock (2) in the direction of the 
arrow and insert the battery pack until the 
lock clicks shut.


z

If you insert the battery pack facing the 
wrong way, it cannot be locked into the 
correct position. Always con

fi

 rm that the 

battery pack is facing the right way and 
locks when inserted.


z

To remove the battery pack, press the 
battery lock in the direction of the arrow.

 Check the card’s write-protect tab 
and insert the memory card.


z

Recording is not possible on memory 
cards with a write-protect tab when the 
tab is in the locked position. Slide the tab 
to the unlocked position.


z

Insert the memory card with the label (1) 
facing as shown until it clicks into place.


z

To remove the memory card, push it in 
until you feel a click, and then slowly 
release it.

(2)

(1)

(1)

(2)

(1)

Содержание PowerShot G7X

Страница 1: ...CEL SV5TA210 ENGLISH Getting Started...

Страница 2: ...rinted matter is also included A memory card is not included Compatible Memory Cards No memory card is included Purchase one of the following kinds of card as needed These memory cards can be used reg...

Страница 3: ...ownload Initial Preparations Charging the Battery Pack 1 Insert the battery pack z After aligning the S marks on the battery pack and charger insert the battery pack by pushing it in 1 and down 2 2 Ch...

Страница 4: ...ocked into the correct position Always confirm that the battery pack is facing the right way and locks when inserted z To remove the battery pack press the battery lock in the direction of the arrow 3...

Страница 5: ...s into the closed position 2 Setting the Date and Time 1 Turn the camera on z Press the ON OFF button z The Date Time screen is displayed 2 Set the date and time z Press the q r buttons to choose an o...

Страница 6: ...following 1 Press the n button 2 Move the zoom lever to choose the 3 tab 3 Press the o p buttons or turn the 7 dial to choose Date Time and then press the m button 4 Follow step 2 in Setting the Date...

Страница 7: ...n and to zoom away from the subject move it toward j wide angle 3 Shoot Shooting Still Images z Press the shutter button lightly 1 z The camera beeps twice after focusing and AF frames are displayed t...

Страница 8: ...again z Playback now begins and after the movie is finished is displayed z To adjust the volume press the o p buttons Erasing Images To erase the image you chose in step 2 do the following Note that e...

Страница 9: ...9 PC2155 WM223 CANON INC 2014...

Отзывы: