background image

Initial Preparations

15

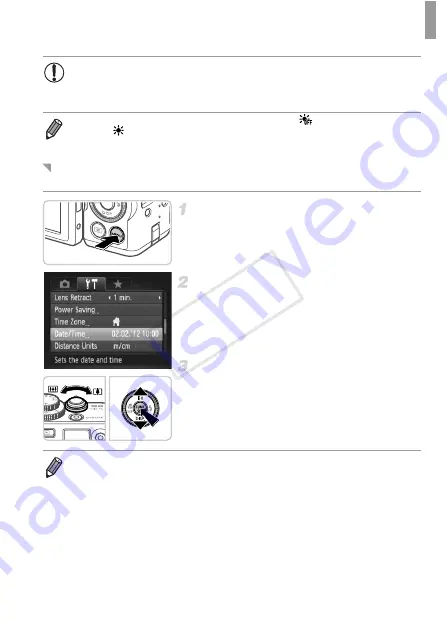
Adjust the date and time as follows.

Access the camera menu.

z

Press the 

n

 button.

Choose [Date/Time].

z

Move the zoom lever to choose the 

3

 tab.

z

Press the 

op

 buttons or turn the 

7

 dial to 

choose [Date/Time], and then press the 

m


button.

Change the date and time.

z

Follow step 2 on p. 14 to adjust the settings.

z

Press the 

n

 button to close the menu.

Unless you set the date, time, and local time zone, the [Date/Time] 
screen will be displayed each time you turn the camera on. Specify 
the correct information.

To set daylight saving time (1 hour ahead), choose 

 in step 2 and then 

choose 

 by pressing the 

op

 buttons or turning the 

7

 dial.

Changing the Date and Time

Date/time settings can be retained for about 3 weeks by the camera’s built-in 
date/time battery (backup battery) after the battery pack is removed.

The date/time battery will be charged in about 4 hours once you insert a charged 
battery or connect the camera to an AC adapter kit (sold separately, see 

Camera User Guide

), even if the camera is left off.

Once the date/time battery is depleted, the [Date/Time] screen will be displayed 
when you turn the camera on. Follow the steps on p. 14 to set the date and time.

COP

Y

Содержание PowerShot G1 X

Страница 1: ...utions section before using the camera Reading this guide will help you learn to use the camera properly Store this guide safely so that you can use it in the future Please refer to the complete user...

Страница 2: ...an be used regardless of capacity Conforms to SD specifications However not all memory cards have been verified to work with the camera Package Contents About Getting Started This Guide and the PDF Ma...

Страница 3: ...ng that infringes on copyright law and note that even for personal use photography may contravene copyright or other legal rights at some performances or exhibitions or in some commercial settings The...

Страница 4: ...in brackets Important information you should know Notes and tips for expert camera use p xx Pages with related information in this example xx represents a page number Instructions in this guide apply...

Страница 5: ...ates that the function is used when shooting or viewing still images Indicates that the function is used when shooting or viewing movies Shortcut c Direct print button AE lock FE lock d Jump button AF...

Страница 6: ...his equipment out of the reach of children and infants Strap Putting the strap around a child s neck could result in asphyxiation Use only recommended power sources Do not attempt to disassemble alter...

Страница 7: ...on when using the camera in places where use of electronic devices is restricted such as inside airplanes and medical facilities Do not play the supplied CD ROM s in any CD player that does not suppor...

Страница 8: ...sing the camera If the battery is left inside the camera damage caused by leakage may occur Before you discard the battery cover the terminals with tape or other insulators Contacting other metal mate...

Страница 9: ...he strap z Always remove the lens cap before turning the camera on Try attaching the lens cap to the neck strap when the cap is not in use z Keep the lens cap on the lens when the camera is not in use...

Страница 10: ...rt the battery by pushing it in and down Charge the battery z For CB 2LC Flip out the plug and plug the charger into a power outlet For CB 2LCE Plug the power cord into the charger then plug the other...

Страница 11: ...Slide the switch and open the cover Insert the battery z While pressing the battery lock in the direction of the arrow insert the battery facing as shown and push it in until it clicks into the locked...

Страница 12: ...y card is facing the right way when you insert it Inserting memory cards facing the wrong way may damage the camera Close the cover z Lower the cover in the direction of the arrow and press it until i...

Страница 13: ...g the Screen The screen can only open to approximately 175 in direction Be careful not to open the screen any further than this as it will damage the camera Adjusting the Screen Angle and Orientation...

Страница 14: ...played Set the date and time z Press the qr buttons to choose an option z Press the op buttons or turn the 7 dial to specify the date and time z When finished press the m button Set the local time zon...

Страница 15: ...ecify the correct information To set daylight saving time 1 hour ahead choose in step 2 and then choose by pressing the op buttons or turning the 7 dial Changing the Date and Time Date time settings c...

Страница 16: ...urn the 7 dial to choose a language and then press the m button X Once the display language has been set the setting screen is no longer displayed Display Language A clock icon is displayed if you wai...

Страница 17: ...he mode dial to A z Aim the camera at the subject As the camera determines the scene it will make a slight clicking noise X Icons representing the scene and image stabilization mode are displayed in t...

Страница 18: ...e flash It will fire when shooting If you prefer not to use the flash push it down with your finger into the camera Shoot z Press the shutter button all the way down X As the camera shoots a shutter s...

Страница 19: ...Rec is displayed with the elapsed time X Black bars displayed on the top and bottom edges of the screen indicate image areas not recorded z Once recording begins you can take your finger off the movie...

Страница 20: ...the next image press the r button or turn the 7 dial clockwise z Press and hold the qr buttons to browse through images quickly Images appear grainy at this time z To access Scroll Display mode turn t...

Страница 21: ...s because they cannot be recovered Choose an image to erase z Press the qr buttons or turn the 7 dial to choose an image Erase the images z Press the a button z After Erase is displayed press the qr b...

Страница 22: ...e images browse search and organize z Print and edit images Digital Photo Professional z Browse process and edit RAW images The following PDF manuals are provided on the included CD ROM Included Softw...

Страница 23: ...bove operating systems preinstalled with an included USB port Processor Pentium 1 3 GHz or higher still images Core 2 Duo 2 6 GHz or higher movies RAM Windows 7 64 bit 2 GB or more Windows 7 32 bit Wi...

Страница 24: ...the icon displayed Install the files z In Windows click Easy Installation or on a Macintosh computer click Install Follow the on screen instructions to complete the installation process z If the User...

Страница 25: ...nal z Insert the larger plug of the interface cable in the computer s USB port For details about USB connections on the computer refer to the computer user manual Turn the camera on to access CameraWi...

Страница 26: ...ck Import Images from Camera and then click Import Untransferred Images X Images are now saved to the Pictures folder on the computer in separate folders named by date z After images are saved close C...

Страница 27: ...ing your camera to the computer without using the included software the following limitations apply It may take a few minutes after you connect the camera to the computer until camera images are acces...

Страница 28: ...B 10L 1 with terminal cover HDMI Cable HTC 100 Battery Charger CB 2LC CB 2LCE 1 Power AC Adapter Kit ACK DC80 1Also available for purchase separately 2Speedlite Transmitter ST E2 Speedlite Bracket SB...

Страница 29: ...nd or explosion of a battery pack Please note that this warranty does not apply to repairs arising out of the malfunction of non genuine Canon accessories although you may request such repairs on a ch...

Страница 30: ...djustment Range 3 0 to 1 0 m 1 dpt Coverage 77 LCD Monitor 3 0 type color TFT LCD Effective Pixels Approx 922 000 dots File Formats Conforms to DCF and DPOF 1 1 standards Data Types Still Images Exif...

Страница 31: ...the file size of an individual clip being recorded reaches 4 GB or when the recording time reaches approximately 29 minutes and 59 seconds for or movies or approximately 1 hour for movies On some memo...

Страница 32: ...3 m 4 3 ft infinity e 20 cm 7 9 in 70 cm 2 3 ft 85 cm 1 6 m 2 8 5 2 ft f 20 cm 7 9 in infinity 85 cm 2 8 ft infinity Continuous Shooting Speed Shooting Mode Continuous Shooting Mode Speed Approx 4 5 s...

Страница 33: ...5 oz Battery Charger CB 2LC CB 2LCE Rated Input 100 240 V AC 50 60 Hz 16 VA 100 V 22 VA 240 V 0 18 A 100 V 0 12 A 240 V Rated Output 8 4 V DC 0 7 A Charging Time Approx 1 hour 50 min when using NB 10L...

Страница 34: ...ecoding MPEG 4 compliant video that was encoded only 1 for a personal and non commercial purpose or 2 by a video provider licensed under the AT T patents to provide MPEG 4 compliant video No license i...

Страница 35: ...erence will not occur in a particular installation If this equipment does cause harmful interference to radio or television reception which can be determined by turning the equipment off and on the us...

Страница 36: ...formation about plug adapter for overseas use For U S A customers only For areas where 120 V AC power is not used you will need a special plug adapter For only United States Use a UL listed 1 8 3m 6 1...

Отзывы: