background image

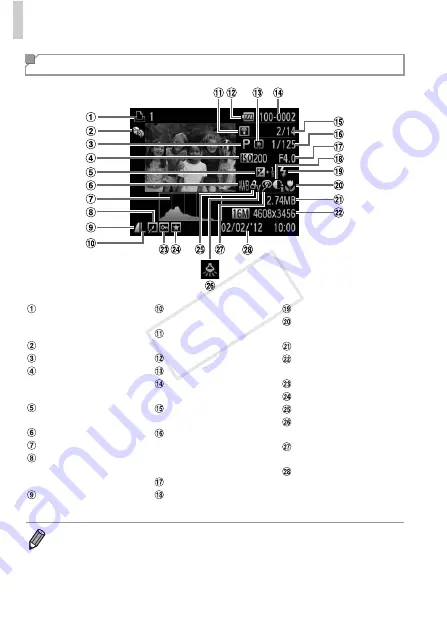
On-Screen Information

202

Playback (Detailed Information Display)

Movies (pp. 42, 122), 
High-speed burst (p. 96), 
Print list (p. 184)
My Category (p. 145)
Shooting mode (p. 204)
ISO speed (p. 104), 
Playback speed (pp. 85, 
99)
Exposure compensation 
level (p. 103)
White balance (p. 106)
Histogram (p. 124)
Group playback (p. 128), 
Image editing (pp. 148 – 
152)
Compression ratio 
(image quality) (p. 119)

Resolution (pp. 68, 71), 
MOV (movies)
Transferred via Eye-Fi 
(p. 190)
Battery level (p. 201)
Metering method (p. 104)
Folder number - File 
number (p. 161)
Current image no. / Total 
no. of images
Shutter speed (still 
images), Image quality / 
Frame rate (movies) 
(p. 71)
Aperture value
i-Contrast (pp. 105, 151)

Flash (p. 117)
Focusing range (pp. 110, 
111)
File size
Still images: Resolution
Movies: Movie length
Protection (p. 135)
Favorite (p. 144)
My Colors (pp. 108, 150)
Mercury lamp correction 
(p. 70)
Red-eye correction 
(pp. 69, 152)
Shooting date/time 
(p. 17)

Some information may not be displayed when viewing images on a TV (p. 171).

COP

Y

Содержание PowerShot ELPH 110 HS

Страница 1: ...User Guide ENGLISH Before use be sure to read this guide including the safety precautions This guide will familiarize you with how to use the camera correctly Keep the guide handy for future referenc...

Страница 2: ...tely can be used regardless of capacity SD memory cards SDHC memory cards SDXC memory cards Eye Fi cards Conforms to SD specifications However not all memory cards have been verified to work with the...

Страница 3: ...ng that infringes on copyright law and note that even for personal use photography may contravene copyright or other legal rights at some performances or exhibitions or in some commercial settings The...

Страница 4: ...eferred to as the memory card The tabs shown above titles indicate whether the function is used for still images movies or both Indicates that the function is used when shooting or viewing still image...

Страница 5: ...Left button on back m FUNC SET button on back r Right button on back p Down button on back On screen text is indicated in brackets Tripod socket Screen LCD monitor Memory card battery cover Indicator...

Страница 6: ...72 Customizing Camera Operation 75 3 Other Shooting Modes 77 Specific Scenes 78 Applying Special Effects 82 Special Modes for Other Purposes 91 Shooting Various Movies 99 4 G mode 101 Shooting in Prog...

Страница 7: ...nts 7 Printing Images 177 Using an Eye Fi Card 190 8 Appendix 193 Troubleshooting 194 Handling Precautions 197 On Screen Messages 198 On Screen Information 200 Functions and Menu Tables 204 Index 212...

Страница 8: ...Use Face ID 57 129 z Movie clips and photos together Movie Digest 91 Contents Basic Operations Monochrome p 87 I P Against Snow p 79 Portraits p 78 Shooting people well Matching specific scenes S App...

Страница 9: ...back Slideshow 132 z On a TV 171 z On a computer 26 z Browse through images quickly 126 z Erase images 139 E Shoot View Movies z Shoot movies 42 99 z View movies 122 z Fast moving subjects slow motion...

Страница 10: ...y Do not use organic solvents such as alcohol benzine or thinner to clean the product Do not let the product come into contact with water e g sea water or other liquids Do not allow liquids or foreign...

Страница 11: ...d lead to injury or damage the camera Be careful not to subject the screen to strong impacts If the screen cracks injury may result from the broken fragments When using the flash be careful not to cov...

Страница 12: ...materials may lead to fire or explosions Unplug the battery charger from the power outlet after charging is complete or when you are not using it Do not place anything such as cloth on top of the batt...

Страница 13: ...other end of the strap through the loop on the threaded end z Place the strap around your wrist z When shooting keep your arms close to your body and hold the camera securely to prevent it from movin...

Страница 14: ...t the battery by pushing it in and down Charge the battery z For CB 2LD Flip out the plug and plug the charger into a power outlet z For CB 2LDE Plug the power cord into the charger then plug the othe...

Страница 15: ...f the arrow insert the battery facing as shown and push it in until it clicks into the locked position z Batteries inserted facing the wrong way cannot be locked into the correct position Always confi...

Страница 16: ...wrong way may damage the camera Close the cover z Lower the cover and hold it down as you slide it until it clicks into the closed position Remove the battery z Open the cover and press the battery l...

Страница 17: ...Time screen is displayed Set the date and time z Press the qr buttons to choose an option z Press the op buttons to specify the date and time z When finished press the m button Set the local time zon...

Страница 18: ...mera on Specify the correct information To set daylight saving time 1 hour ahead choose in step 2 and then choose by pressing the op buttons Changing the Date and Time Date time settings can be retain...

Страница 19: ...ttons to choose a language and then press the m button X Once the display language has been set the setting screen is no longer displayed Display Language A clock icon is displayed if you wait too lon...

Страница 20: ...e mode switch to A z Aim the camera at the subject As the camera determines the scene it will make a slight clicking noise X Icons representing the scene and image stabilization mode are displayed in...

Страница 21: ...era shoots a shutter sound is played and in low light conditions the flash fires automatically X Keep the camera still until the shutter sound ends X Your shot remains displayed on the screen for abou...

Страница 22: ...button Finish shooting z Press the movie button again to stop shooting The camera beeps twice as recording stops X Recording will stop automatically when the memory card becomes full After shooting i...

Страница 23: ...s grouped by shooting date press the op buttons in Scroll Display mode z Movies are identified by a icon To play movies go to step 3 Play movies z Press the m button press the op buttons to choose and...

Страница 24: ...se an image Erase the image z Press the m button press the op buttons to choose a and then press the m button again z After Erase is displayed press the qr buttons to choose Erase and then press the m...

Страница 25: ...o install the following PDF manuals on your computer Camera User Guide Once you are familiar with the information in Getting Started refer to this for a more in depth understanding of camera operation...

Страница 26: ...2 6 GHz or higher RAM Windows 7 64 bit 2 GB or more Windows 7 32 bit Windows Vista 64 bit 32 bit 1 GB or more still images 2 GB or more movies Windows XP 512 MB or more still images 2 GB or more movi...

Страница 27: ...Solution Disk p 2 in the computer s CD ROM drive z On a Macintosh computer after inserting the disc double click the desktop disc icon to open it and then double click the icon displayed Begin the ins...

Страница 28: ...n after installation and remove the CD ROM when the desktop is displayed z Turn the camera off and disconnect the cable When not connected to the Internet there are the following limitations The scree...

Страница 29: ...ss CameraWindow z Press the 1 button to turn the camera on z On a Macintosh computer CameraWindow is displayed when a connection is established between the camera and computer z For Windows follow the...

Страница 30: ...yed click the Start menu and choose All Programs X Canon Utilities X CameraWindow X CameraWindow On a Macintosh computer if CameraWindow is not displayed after step 2 click the CameraWindow icon in th...

Страница 31: ...top Adobe Reader is required to view the PDF manuals Using the PDF Manuals It may not be possible to install the software and PDF manuals on computers that do not meet the system requirements p 26 To...

Страница 32: ...k Please note that this warranty does not apply to repairs arising out of the malfunction of non genuine Canon accessories although you may request such repairs on a chargeable basis AV Cable AVC DC40...

Страница 33: ...33 Camera Basics Basic camera operations and features 1 COPY...

Страница 34: ...ff To activate the screen and prepare for shooting when the screen is off but the lens is still out press the shutter button halfway p 35 The camera turns itself off automatically after about five min...

Страница 35: ...hoot X The camera shoots as a shutter sound is played z Keep the camera still until the shutter sound ends Use the mode switch to access each shooting mode Shutter Button Images may be out of focus if...

Страница 36: ...ation is displayed Screen brightness is automatically increased by the night display function when you are shooting under low light making it easier to check how shots are composed However on screen i...

Страница 37: ...simply by pressing the m or r button or another screen is displayed for configuring the function Choose an option z Press the op buttons to choose an option z Options labeled with a icon can be confi...

Страница 38: ...press the qr buttons to choose a tab Choose a setting z Press the op buttons to choose a setting z To choose settings with options not shown first press the m or r button to switch screens and then p...

Страница 39: ...ss the m button again to cancel the clock display Indicator Display Color Indicator Status Camera Status Green On Connected to a computer p 29 or display off Blinking Starting up recording reading tra...

Страница 40: ...40 COPY...

Страница 41: ...41 Smart Auto Mode Convenient mode for easy shots with greater control over shooting 2 COPY...

Страница 42: ...slight clicking noise as it determines the scene X Icons representing the scene and image stabilization mode are displayed in the upper right of the screen pp 47 49 X Frames displayed around any dete...

Страница 43: ...layed when multiple areas are in focus Shoot z Press the shutter button all the way down X As the camera shoots a shutter sound is played and in low light conditions the flash fires automatically z Ke...

Страница 44: ...e in focus z Once recording begins you can take your finger off the movie button Resize the subject and recompose the shot as needed z To resize the subject do the same thing as in step 3 on p 42 Howe...

Страница 45: ...the camera only beeps once when you press the shutter button halfway For details on the focusing range shooting range see Specifications in the Getting Started guide To reduce red eye and to assist in...

Страница 46: ...may prevent audio from being recorded or may cause the recording to sound muffled Avoid touching camera controls other than the movie button when shooting movies because sounds made by the camera will...

Страница 47: ...using tripod The background color of icons is light blue when the background is a blue sky dark blue when the background is dark and gray for all other backgrounds The background color of icons is lig...

Страница 48: ...hat the date and time are correct p 17 If you shoot a still image when the following icons are displayed the camera will shoot continuously If you press the shutter button halfway when one of the icon...

Страница 49: ...and images may not look as expected Focus image brightness and color are determined by the first shot When you want to shoot single images only press the m button choose in the menu and then choose Im...

Страница 50: ...jects within a certain range to keep them in focus However if the camera detects subject movement only the white frame will remain on the screen When you are pressing the shutter button halfway and th...

Страница 51: ...zoom lever will display the zoom bar which indicates the zoom position The color of the zoom bar will change depending on the zoom range White range optical zoom range where the image will not appear...

Страница 52: ...or Still Images Press the shutter button halfway to focus on the subject and then press it all the way down z For Movies Press the movie button X Once you start the self timer the lamp will blink and...

Страница 53: ...uttons to choose a value and then press the m button X Once the setting is complete is displayed z Follow step 2 on p 52 to shoot Using the Self Timer to Avoid Camera Shake Customizing the Self Timer...

Страница 54: ...to choose and then press the m button X Once the setting is complete is displayed z To restore the original setting repeat this process but choose Deactivating the Flash Still Images If a flashing ico...

Страница 55: ...As you take shots the camera adds the shooting date or time to the lower right corner of images z To restore the original setting choose Off in step 1 Adding the Shooting Date and Time Still Images Im...

Страница 56: ...ss the shutter button halfway X A blue frame is displayed and the camera will keep the subject in focus and image brightness adjusted Servo AF Shoot z Press the shutter button all the way down to shoo...

Страница 57: ...he camera Additionally when registered people are detected their names will be recorded in still images When using the Face ID function be careful when sharing the camera or images with others and whe...

Страница 58: ...nside the gray frame at the center of the screen z A white frame on the person s face indicates that the face is recognized Make sure a white frame is displayed on the face and then shoot z If the fac...

Страница 59: ...ton to delete the previous character z Press the n button to return to the edit profile screen Enter a birthday z Press the op buttons to choose Birthday and then press the m button z Press the qr but...

Страница 60: ...dd a variety of face information In addition to a head on angle add a slight side angle a shot when smiling and shots inside and outside The flash will not fire when following step 2 If you do not reg...

Страница 61: ...red image or scene differs drastically from the registered face information If a registered face is not detected or not easily detected overwrite registered information with new face info Registering...

Страница 62: ...on and then press the m button Check the registered information z Press the op buttons to choose an item and then press the m button z Check the registered information Access the Edit Profile screen z...

Страница 63: ...he m button Choose the name of the person to overwrite z Press the opqr buttons to choose the name of a person to overwrite and then press the m button z If 4 or less face information slots are regist...

Страница 64: ...variety of face information In addition to a head on angle add a slight side angle a shot when smiling and shots inside and outside Access the Check Edit Info screen z Following step 1 on p 57 choose...

Страница 65: ...the face info to erase z Press the m button press the opqr buttons to choose the face info you want to erase and then press the m button z After Erase is displayed press the qr buttons to choose OK an...

Страница 66: ...erase and then press the m button z After Erase is displayed press the qr buttons to choose OK and then press the m button If you erase a registered person s info you will not be able to display thei...

Страница 67: ...n Features Changing the Aspect Ratio Still Images Same aspect ratio as HDTVs used for display on widescreen HDTVs or similar display devices Same aspect ratio as 35 mm film used for printing images at...

Страница 68: ...gure the setting z Press the m button choose in the menu and choose the desired option p 37 X The option you configured is now displayed z To restore the original setting repeat this process but choos...

Страница 69: ...z Choose Red Eye Corr and then choose On p 38 X Once the setting is complete R is displayed z To restore the original setting repeat this process but choose Off Red Eye Correction Still Images Red eye...

Страница 70: ...n button choose Hg Lamp Corr on the 4 tab and then choose On p 38 X Once the setting is complete is displayed z To restore the original setting repeat this process but choose Off Correcting Greenish...

Страница 71: ...e menu and choose the desired option p 37 X The option you configured is now displayed z To restore the original setting repeat this process but choose Changing Movie Image Quality Movies Image Qualit...

Страница 72: ...ss the n button choose Grid Lines on the 4 tab and then choose On p 38 X Once the setting is complete grid lines are displayed on the screen z To restore the original setting repeat this process but c...

Страница 73: ...halfway The face detected as the main subject is now magnified z To restore the original setting choose Off in step 1 Magnifying the Area in Focus Still Images The display will not magnify if a face w...

Страница 74: ...ting z Press the n button choose Blink Detection on the 4 tab and then choose On p 38 Shoot X A frame accompanied by is displayed when the camera detects a person whose eyes are closed z To restore th...

Страница 75: ...restore the original setting repeat this process but choose On You can deactivate the red eye reduction lamp that lights up to reduce red eye when the flash is used in low light shots Access the Flas...

Страница 76: ...ose Review Info on the 4 tab and then choose the desired option p 38 z To restore the original setting repeat this process but choose Off Changing the Image Display Period After Shots 2 10 sec Display...

Страница 77: ...77 Other Shooting Modes Shoot more effectively in various scenes and take shots enhanced with unique image effects or captured using special functions 3 COPY...

Страница 78: ...e menu and then choose a shooting mode p 37 Shoot I Shoot portraits Portrait z Take shots of people with a softening effect Shoot evening scenes without using a tripod Handheld NightScene z Beautiful...

Страница 79: ...80 P Shoot with snowy backgrounds Snow z Bright natural colored shots of people against snowy backgrounds Still Images Still Images Movies Still Images Movies Because the camera will shoot continuous...

Страница 80: ...Adjust the setting z Move the zoom lever to adjust the correction level for B and A and then press the m button Correcting White Balance Still Images Movies The camera will retain white balance correc...

Страница 81: ...the setting z Press the op buttons to choose an item Choose the effect level by pressing the qr buttons and then press the m button X A preview is shown of how your shot will look with the effect appl...

Страница 82: ...oot Shoot in vivid colors Super Vivid z Shots in rich vivid colors Posterized shots Poster Effect z Shots that resemble an old poster or illustration Applying Special Effects Still Images Movies In an...

Страница 83: ...steps 1 2 on p 78 and choose Choose an effect level z Press the p button press the qr buttons to choose an effect level and then press the m button X A preview is shown of how your shot will look with...

Страница 84: ...oose z Follow steps 1 2 on p 78 and choose X A white frame is displayed indicating the image area that will not be blurred Choose the area to keep in focus z Press the p button z Move the zoom lever t...

Страница 85: ...back Time for One Minute Clips Speed Playback Time Approx 12 sec Approx 6 sec Approx 3 sec The zoom is not available when shooting movies Be sure to set the zoom before shooting To switch the orientat...

Страница 86: ...d choose Choose an effect level z Press the p button press the qr buttons to choose an effect level and then press the m button X A preview is shown of how your shot will look with the effect applied...

Страница 87: ...choose Choose a color tone z Press the p button press the qr buttons to choose a color tone and then press the m button X A preview is shown of how your shot will look with the effect applied Shoot S...

Страница 88: ...over the color to keep and then press the q button X The specified color is recorded Specify the range of colors to keep z Press the op buttons to adjust the range z To keep only your specified color...

Страница 89: ...oose Y Access the setting screen z Press the p button X The original image and the Color Swap image are displayed one after another X By default green will be replaced with gray Specify the color to r...

Страница 90: ...Press the op buttons to adjust the range z To replace only your specified color choose a large negative value To replace colors similar to your specified color as well choose a large positive value z...

Страница 91: ...r ways Battery life is shorter in this mode than in A mode because clips are recorded for each shot Any sounds from camera operations during movie recording will be included in the movie Movies create...

Страница 92: ...mp lights up z To pause smile detection press the q button Press the q button again to resume detection Auto Shooting After Face Detection Smart Shutter Auto Shooting After Smile Detection Still Image...

Страница 93: ...e the camera and wink X The camera will shoot about two seconds after detecting a wink by the person whose face is inside the frame z To cancel shooting after you have triggered the self timer press t...

Страница 94: ...reen frame is displayed around the face you focus on and white frames around other faces Press the shutter button all the way down X The camera now enters shooting standby mode and Look straight at ca...

Страница 95: ...u join the others in the shooting area the camera will shoot about 15 seconds later To change the number of shots press the op buttons after choosing in step 1 Blink Detection p 74 is only available f...

Страница 96: ...splayed in the upper left of the screen High Speed Continuous Shooting High speed Burst Still Images The resolution is 2304 x 1728 and cannot be changed Focus image brightness and color are determined...

Страница 97: ...using Image Search p 126 or Smart Shuffle p 133 In this case images are temporarily ungrouped Grouped images cannot have their Face ID info edited p 129 be tagged as favorites p 144 edited pp 142 152...

Страница 98: ...z Compose the second shot so that it partially overlaps the image area of first shot z Minor misalignment of overlapping portions will be corrected automatically when the images are combined z Take u...

Страница 99: ...z To stop movie recording press the movie button again Shooting Various Movies Shooting Super Slow Motion Movies Movies Frame Rate Image Quality Playback Time For a 30 sec Clip 240 fps 320x240 Approx...

Страница 100: ...included software Choose z Follow steps 1 2 on p 78 and choose X Black bars displayed on the top and bottom edges of the screen indicate image areas not recorded Shoot z Press the movie button z To st...

Страница 101: ...G mode with the mode switch set to 4 G Program AE AE Auto Exposure Before using a function introduced in this chapter in modes other than G make sure the function is available in that mode pp 204 209...

Страница 102: ...e obtained when you press the shutter button halfway shutter speeds and aperture values are displayed in orange To obtain adequate exposure try adjusting the following settings Activate the flash p 11...

Страница 103: ...to p 54 Lock the exposure z Aim the camera at the subject to shoot with the exposure locked With the shutter button pressed halfway press the o button X is displayed and the exposure is locked z To u...

Страница 104: ...typical shooting conditions including backlit shots Automatically adjusts exposure to match the shooting conditions Center Weighted Avg Determines the average brightness of light across the entire ima...

Страница 105: ...is complete is displayed To view the automatically set ISO speed when the camera is set to press the shutter button halfway Although choosing a lower ISO speed may reduce image graininess there may b...

Страница 106: ...ptimal white balance for the shooting conditions Day Light For shooting outdoors in fair weather Cloudy For shooting in cloudy conditions in the shade or at twilight Tungsten For shooting under ordina...

Страница 107: ...me light source that will illuminate your shot z Follow the steps in Adjusting White Balance p 106 to choose z Aim the camera at a plain white subject so that the entire screen is white Press the n bu...

Страница 108: ...effects of Vivid Blue Vivid Green and Vivid Red to produce intense yet natural looking colors resembling images on positive film Lighter Skin Tone Lightens skin tones Darker Skin Tone Darkens skin ton...

Страница 109: ...r more intense effects or darker skin tones adjust the value to the right and for weaker lighter effects or lighter skin tones adjust the value to the left z Press the n button to complete the setting...

Страница 110: ...ly or continuous shooting may slow down depending on shooting conditions camera settings and the zoom position As more shots are taken shooting may slow down Shooting may slow down if the flash fires...

Страница 111: ...factor z Press the n button choose Digital Zoom on the 4 tab and then choose the desired option p 38 X The view is enlarged and the zoom factor is displayed on the screen Shooting Distant Subjects Inf...

Страница 112: ...lance only After you aim the camera at the subject a white frame is displayed around the person s face determined by the camera to be the main subject and up to two gray frames are displayed around ot...

Страница 113: ...king press the q button again If faces are not detected or when only gray frames are displayed without a white frame up to nine green frames are displayed in the areas in focus when you press the shut...

Страница 114: ...cts even if you press the shutter button halfway without pressing the q button After your shot is displayed in the center of the screen If Face ID is set to On names will not display when registered p...

Страница 115: ...pressed halfway move the camera to recompose the shot Shoot z Press the shutter button all the way down This mode helps avoid missing shots of subjects in motion because the camera continues to focus...

Страница 116: ...he shot and shoot Focusing may not be possible in some shooting conditions In low light conditions Servo AF may not be activated AF frames may not turn blue when you press the shutter button halfway I...

Страница 117: ...brightness of the background that is out of the flash range For details on the flash range see Flash Range see Specifications in the Getting Started guide Configure the setting z Press the r button p...

Страница 118: ...subject to shoot with the exposure locked With the shutter button pressed halfway press the o button X The flash fires and when is displayed the flash output level is retained z To unlock FE release...

Страница 119: ...Press the n button choose IS Settings on the 4 tab and then press the m button p 38 Configure the setting z Choose IS Mode and then choose the desired option p 38 The setting is changed to Continuous...

Страница 120: ...the camera to match subject movement In this case set Powered IS to Off z Follow the steps in Changing the IS Mode Settings p 119 to access the IS Settings screen z Choose Powered IS and then choose O...

Страница 121: ...rations press the 1 button to enter Playback mode Have fun reviewing your shots and browse or edit them in many ways It may not be possible to play back or edit images that were renamed or already edi...

Страница 122: ...To view the next image press the r button z To access Scroll Display mode press and hold the qr buttons for at least one second In this mode press the qr buttons to browse through images z To return t...

Страница 123: ...Press the p button repeatedly until simple information display is activated and then press the qr buttons to choose an image X Names will be displayed on detected people To switch to Shooting mode fro...

Страница 124: ...e vertical axis how much of the image is at each level of brightness Viewing the histogram is a way to check exposure Switching Display Modes Still Images Movies Switching display modes by pressing th...

Страница 125: ...r in Playback mode X The portion of the image in the orange frame is magnified Switch frames z Move the zoom lever toward k once X The screen at left is displayed z To switch to a different frame when...

Страница 126: ...button to view the selected image in single image display When looking for images on a memory card containing many images you can specify search conditions to display specific images only You can also...

Страница 127: ...h When the camera has found no corresponding images for a search condition those search conditions will not be available Options for viewing images in a search result step 2 include Navigating Through...

Страница 128: ...ovie z Press the m button to start playback Grouped images shot in mode p 96 are generally displayed together but they can also be viewed individually Choose an image group z Press the qr buttons to c...

Страница 129: ...s to choose Edit ID Info and then press the m button During group playback step 3 you can use the menu functions accessed by pressing the m button You can also browse through images quickly Navigating...

Страница 130: ...tons to choose the name to change and press the m button Choose the item to edit z Press the opqr buttons to choose Overwrite and then press the m button Choose the name of the person to change z Foll...

Страница 131: ...hold it Move the display position and switch images as needed z To move the display position press the opqr buttons z While is displayed you can switch to by pressing the m button To switch to other i...

Страница 132: ...ill start a few seconds after Loading image is displayed z Press the n button to stop the slideshow Viewing Slideshows Still Images Movies The camera s power saving functions p 34 are deactivated duri...

Страница 133: ...s the m button z To return to the menu screen press the n button Based on the current image the camera offers four images similar to it that you may wish to view After you choose to view one of those...

Страница 134: ...r image press the m button To restore the original display press the m button again z Press the n button to restore single image display Only still images shot with this camera are played back using S...

Страница 135: ...ss the setting screen z Press the n button and then choose Protect on the 1 tab p 38 Choose a selection method z Choose a menu item and a setting as desired p 38 z To return to the menu screen press t...

Страница 136: ...el protection press the m button again is no longer displayed z Repeat this process to specify other images Protect the images z Press the n button A confirmation message is displayed z Press the qr b...

Страница 137: ...ess the m button z Press the qr buttons to choose an image and then press the m button Choose an ending image z Press the r button to choose Last image and then press the m button z Press the qr butto...

Страница 138: ...z Following step 2 on p 135 choose Select All Images and press the m button Protect the images z Press the op buttons to choose Protect and then press the m button Specifying All Images at Once To ca...

Страница 139: ...el erasure press the qr buttons to choose Cancel and then press the m button You can erase all images at once Be careful when erasing images because they cannot be recovered Protected images p 135 can...

Страница 140: ...his process to specify other images Erase the image z Press the n button A confirmation message is displayed z Press the qr buttons to choose OK and then press the m button Choose Select Range z Follo...

Страница 141: ...Choose Select All Images z Following step 2 on p 139 choose Select All Images and press the m button Erase the images z Press the qr buttons to choose OK and then press the m button Specifying All Im...

Страница 142: ...ress the m button to complete the setting Choose Rotate z Press the n button and then choose Rotate on the 1 tab p 38 Rotate the image z Press the qr buttons to choose an image z The image is rotated...

Страница 143: ...se Auto Rotate on the 1 tab and then choose Off p 38 Deactivating Auto Rotation Images cannot be rotated p 142 when you set Auto Rotate to Off Additionally images already rotated will be displayed in...

Страница 144: ...e m button and then choose in the menu p 37 X Tagged as Favorite is displayed z To untag the image repeat this process and choose again and then press the m button Choose Favorites z Press the n butto...

Страница 145: ...Choose a category z Press the m button and then choose in the menu p 37 Choose images z Press the qr buttons to choose an image press the op buttons to choose a category and then press the m button is...

Страница 146: ...p 38 Choose a selection method z Choose a menu item and a setting as desired p 38 z To return to the menu screen press the n button Choose Select z Following step 2 above choose Select and press the m...

Страница 147: ...z Following step 2 on p 146 choose Select Range and press the m button Choose images z Follow steps 2 3 on p 137 to specify images Choose a category z Press the p button to choose the type of image a...

Страница 148: ...ss the m button X Save new image is displayed Save the new image z Press the qr buttons to choose OK and then press the m button X The image is now saved as a new file Review the new image z Press the...

Страница 149: ...age to be cropped X The original image is shown in the upper left and a preview of the image as cropped is shown in the lower right z To resize the frame move the zoom lever z To move the frame press...

Страница 150: ...n p 148 Editing is not possible for images shot at a resolution of p 68 or resized to p 148 Images supported for cropping will have the same aspect ratio after cropping Cropped images will have a smal...

Страница 151: ...ton and then choose i Contrast on the 1 tab p 38 Choose an image z Press the qr buttons to choose an image and then press the m button Choose an option z Press the qr buttons to choose an option and t...

Страница 152: ...is now corrected and frames are displayed around corrected image areas z Enlarge or reduce images as needed Follow the steps in Magnifying Images p 131 Save as a new image and review z Press the opqr...

Страница 153: ...om by choosing and cut the end of the movie by choosing z Even if you move to a position other than a mark choosing will only cut the portion from the nearest to the left and choosing will cut the por...

Страница 154: ...d as a new file To overwrite the original movie with the cut one choose Overwrite in step 4 In this case the original movie will be erased Overwrite is only available when memory cards lack sufficient...

Страница 155: ...155 Setting Menu Customize or adjust basic camera functions for greater convenience 6 COPY...

Страница 156: ...ows z Choose Volume and then press the m button z Choose an item and then press the qr buttons to adjust the volume Adjusting Basic Camera Functions Silencing Camera Operations Operation can also be s...

Страница 157: ...ts and tips are normally shown when you choose FUNC menu p 37 or Menu p 38 items If you prefer you can deactivate this information z Choose Hints Tips and then choose Off Customizing Sounds 1 Preset s...

Страница 158: ...se an option Screen Brightness For maximum brightness press and hold the p button for at least one second when the shooting screen is displayed or when in single image display This will override the L...

Страница 159: ...Choose an image and press the m button After Register is displayed press the qr buttons to choose OK and then press the m button Customizing the Start up Screen The previous start up setting is overwr...

Страница 160: ...Choose OK z Press the qr buttons to choose OK and then press the m button Format the memory card z To begin the formatting process press the op buttons to choose OK and then press the m button z When...

Страница 161: ...utton and then follow step 3 on p 160 to format low level format the memory card Your shots are automatically numbered in sequential order 0001 9999 and saved in folders that store up to 2 000 images...

Страница 162: ...e 1 button in Shooting mode p 34 To have the lens retracted immediately after you press the 1 button set the retraction timing to 0 sec z Choose Lens Retract and then choose 0 sec Regardless of the op...

Страница 163: ...wer Saving screen z Choose Power Saving and then press the m button Configure the settings z After choosing an item press the qr buttons to adjust it as needed Power Saving Adjustment To conserve batt...

Страница 164: ...r home time zone Specify your destination z Choose Time Zone and then press the m button z Press the op buttons to choose World and then press the m button z Press the qr buttons to choose the destina...

Страница 165: ...as needed Access the Language screen z Choose Language and then press the m button Configure the setting z Press the opqr buttons to choose a language and then press the m button The following settin...

Страница 166: ...m button X Default settings are now restored Restoring Defaults The following functions are not restored to default settings 3 tab settings Date Time p 18 Language p 19 Time Zone p 164 Video System p...

Страница 167: ...167 Accessories Use included accessories effectively and enjoy the camera in more ways with optional Canon accessories and other compatible accessories sold separately 7 COPY...

Страница 168: ...remaining battery power remove the battery from the camera Store the battery with the cover attached Storing a partially charged battery over extended periods about a year may shorten its life or affe...

Страница 169: ...camera over extended periods or when connecting the camera to a printer or computer Cannot be used to charge the camera battery High Power Flash HF DC2 z External flash for illuminating subjects that...

Страница 170: ...ect the camera to a TV to enjoy playback on the larger TV screen HDMI Cable HTC 100 z For connecting the camera to an HDMI input of a high definition TV Canon PictBridge Compatible Printers z Printing...

Страница 171: ...a and TV are off Connect the camera to the TV z On the TV insert the cable plugs fully into the video inputs as shown z On the camera open the terminal cover and insert the cable plug fully into the c...

Страница 172: ...high definition Make sure the camera and TV are off Connect the camera to the TV z On the TV insert the cable plug fully into the HDMI input as shown z On the camera open the terminal cover and insert...

Страница 173: ...choose Enable p 38 Connect the camera to the TV z Follow steps 1 2 on p 172 to connect the camera to the TV Display images z Turn on the TV On the camera press the 1 button X Images from the camera a...

Страница 174: ...mages shot in mode p 96 Only displayed when a grouped image is selected Play Movie Starts movie playback Only displayed when a movie is selected Slideshow Starts slideshow playback To switch images du...

Страница 175: ...e memory card battery cover z Open the coupler cable port as shown Insert the coupler z Insert the coupler as shown z Make sure the coupler cable passes through the port Close the cover z Lower the co...

Страница 176: ...a on and use it as desired z When finished turn the camera off and unplug the power cord from the outlet Do not disconnect the adapter or unplug the power cord while the camera is still on This may er...

Страница 177: ...ly print your shots by connecting the camera to a PictBridge compatible printer sold separately with the included interface cable p 2 Make sure the camera and printer are off Connect the camera to the...

Страница 178: ...ress the op buttons to choose Print and then press the m button X Printing now begins z To print other images repeat steps 5 6 after printing is finished z When you are finished printing turn the came...

Страница 179: ...ter settings Date Prints images with the date added File No Prints images with the file number added Both Prints images with both the date and file number added Off Default Matches current printer set...

Страница 180: ...int Adjust the cropping frame as needed z To resize the frame move the zoom lever z To move the frame press the opqr buttons z To rotate the frame press the m button z Press the n button press the op...

Страница 181: ...p buttons to choose an option and then press the m button Choose a type of paper z Press the op buttons to choose an option and then press the m button Choose a layout z Press the op buttons to choose...

Страница 182: ...on p 180 to choose the printing area Print the image Available Layout Options Default Matches current printer settings Bordered Prints with blank space around the image Borderless Borderless edge to...

Страница 183: ...Printing Movie Scenes Movies Movie Printing Options Single Prints the current scene as a still image Sequence Prints a series of scenes a certain interval apart on a single sheet of paper You can also...

Страница 184: ...Press the qr buttons to choose an image Add the image to the print list z Press the m button choose c in the menu and press the m button again z Press the op buttons to specify the number of prints C...

Страница 185: ...printer or photo development service in some cases may be displayed on the camera to warn you that the memory card has print settings that were configured on another camera Changing the print settings...

Страница 186: ...displayed Specify the number of prints z Press the op buttons to specify the number of prints up to 99 z To set up printing for other images and specify the number of prints repeat steps 2 3 z Printin...

Страница 187: ...nd press the m button Confirm clearing the print list z Press the qr buttons to choose OK and then press the m button z When images have been added to the print list pp 184 187 the screen at left is d...

Страница 188: ...ab and then choose how you will select images Choose Select z Following the previous procedure choose Select and press the m button Adding Images to a Photobook Choosing a Selection Method Still Image...

Страница 189: ...o the menu screen Choose Select All Images z Following the procedure on p 188 choose Select All Images and press the m button Configure the print settings z Press the qr buttons to choose OK and then...

Страница 190: ...Cards may continue to transmit radio waves even when Eye Fi trans is set to Disable p 191 Remove the Eye Fi card before entering hospitals aircraft or other areas where transmission is prohibited When...

Страница 191: ...and then press the m button z Choose Eye Fi trans and then choose Disable Power saving p 34 on the camera is temporarily disabled during image transfer Choosing mode will interrupt the Eye Fi connecti...

Страница 192: ...192 COPY...

Страница 193: ...193 Appendix Helpful information when using the camera 8 COPY...

Страница 194: ...still depleted soon after charging it has reached the end of its life Purchase a new battery The lens is not retracted Do not open the memory card battery cover while the camera is on Close the cover...

Страница 195: ...press the shutter button halfway Otherwise try pressing the shutter button halfway repeatedly Subjects in shots look too dark Set the flash mode to h p 117 Adjust brightness by using exposure compensa...

Страница 196: ...3 or make sure that the date time are set correctly p 17 Shooting Movies The elapsed time shown is incorrect or recording is interrupted Use the camera to format the memory card or switch to a card th...

Страница 197: ...ors or other devices that generate strong electromagnetic fields which may cause malfunction or erase image data If water droplets or dirt adheres to the camera or screen wipe with a dry soft cloth su...

Страница 198: ...does not contain any images that can be displayed Protected p 135 Unidentified Image Incompatible JPEG Image too large Cannot play back AVI RAW Unsupported or corrupt images cannot be displayed It ma...

Страница 199: ...d In the 3 menu change File Numbering to Auto Reset p 161 or format the memory card p 160 Lens Error This error may occur if the lens is held while it is moving or when the camera is used in dusty or...

Страница 200: ...al tele converter p 111 Shooting mode p 204 Scene icon p 47 Focusing range pp 110 111 AF lock p 116 Flash mode pp 54 117 Red eye correction p 69 AF frame p 112 Spot AE point frame p 104 Date stamp p 5...

Страница 201: ...he camera automatically rotates images as needed However the orientation may not be detected correctly when the camera is pointed straight up or down An on screen icon or message indicates the battery...

Страница 202: ...pp 68 71 MOV movies Transferred via Eye Fi p 190 Battery level p 201 Metering method p 104 Folder number File number p 161 Current image no Total no of images Shutter speed still images Image quality...

Страница 203: ...Skip Backward To continue skipping backward keep holding down the m button Previous Frame For fast rewind keep holding down the m button Next Frame For fast forward keep holding down the m button Ski...

Страница 204: ...03 AE Lock FE Lock 1 pp 103 118 Focusing Range pp 110 111 Tracking AF p 56 Flash pp 54 117 2 AF Lock p 116 Screen Display p 36 No Information Display Information Display 1 FE lock not available in fla...

Страница 205: ...Functions and Menu Tables 205 4 T Y S P N x v 3 Available or set automatically Not available COPY...

Страница 206: ...53 Delay 4 Shots 5 Drive Mode p 109 Still Image Aspect Ratio p 67 Resolution p 68 Compression p 119 Movie Quality p 71 1 White balance is not available 2 Set in a range of 1 5 contrast sharpness colo...

Страница 207: ...unctions and Menu Tables 207 4 T Y S P N x v 6 7 7 6 Only and are available Available or set automatically Not available 7 Synchronizes with the aspect ratio setting and is automatically set p 85 COPY...

Страница 208: ...Off Red Eye Lamp On Off i Contrast p 105 Auto Off Hg Lamp Corr p 70 On Off Review p 76 Off 2 10 sec Hold Review Info p 76 Off Detailed Focus Check Blink Detection p 74 On Off Grid Lines p 72 On Off IS...

Страница 209: ...tically Not available When using Face ID p 57 to shoot names will not be displayed in x or v but they will be recorded in still images Setting available but when using Face ID p 57 to shoot names will...

Страница 210: ...HDMI p 173 Format pp 160 161 Eye Fi Settings p 190 File Numbering p 161 Language p 19 Create Folder p 162 Reset All p 166 1 Playback Menu Item Ref Page Item Ref Page Slideshow p 132 Trimming p 149 Era...

Страница 211: ...All Selections p 187 Select Range p 186 Print Settings p 184 Playback Mode FUNC Menu Item Ref Page Item Ref Page Rotate p 142 Play Movie p 122 Print List p 184 Movie Digest Playback p 128 Protect p 1...

Страница 212: ...ages 55 Changing 18 Setting 17 World clock 164 DC coupler 175 Defaults J Reset all DIGITAL CAMERA Solution Disk 2 Digital tele converter 111 Digital zoom 51 Display language 19 DPOF 184 E Editing Crop...

Страница 213: ...Balance 70 My Category 145 My Colors 108 150 P P shooting mode 102 Package contents 2 Photobook set up 188 PictBridge 170 177 Playback J Viewing Portrait shooting mode 78 Poster effect shooting mode 8...

Страница 214: ...171 172 175 177 Toy camera effect shooting mode 85 Tracking AF 56 113 Traveling with the camera 164 168 Troubleshooting 194 TV display 171 U Underwater shooting mode 79 V Viewing Image search 126 Inde...

Страница 215: ...215 MEMO COPY...

Страница 216: ...as encoded only 1 for a personal and non commercial purpose or 2 by a video provider licensed under the AT T patents to provide MPEG 4 compliant video No license is granted or implied for any other us...

Страница 217: ...mful interference to radio communications However there is no guarantee that interference will not occur in a particular installation If this equipment does cause harmful interference to radio or tele...

Страница 218: ...NGER TO REDUCE THE RISK OF FIRE OR ELECTRIC SHOCK CAREFULLY FOLLOW THESE INSTRUCTIONS For connection to a supply not in the U S A use an attachment plug adapter of the proper configuration for the pow...

Отзывы: