background image

Shooting Still Images

14

Getting

 Star

ted

Shooting Still Images 

a

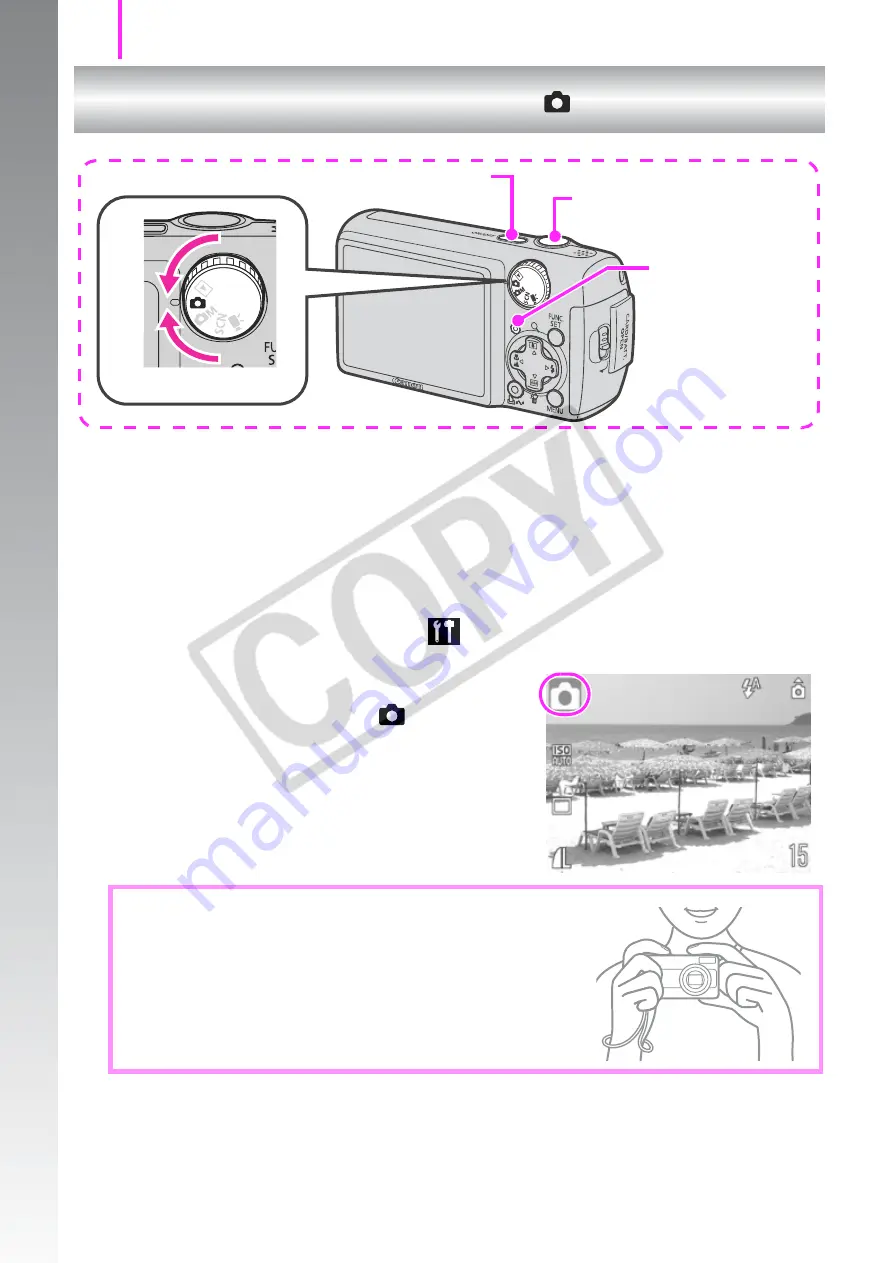
Press the power button.

• The start-up sound will play and the start-up image will display in 

the LCD monitor.

• Pressing the power button again turns the power off.
• To switch to the setting that mutes all sound, press and hold the 

MENU

 button while pressing the power button. The [Mute] setting 

also can be changed in the 

 (Setup) menu.

b

Select a shooting mode.

1. Set the mode dial to 

 (Auto).

c

Aim the camera at the subject.

d

Press the shutter button lightly (press halfway) to set 
the focus.

• When the camera focuses, it beeps twice and the indicator lights 

green (orange when the flash fires). 

Avoiding Camera Shake

Keep your arms tight against your body 
while holding the camera firmly by the sides. 
Using a tripod is also effective.

(

 Auto Mode)

Mode Dial

Power Button

a

Shutter Button

Indicator

b

de

Содержание PowerShot A470

Страница 1: ...Camera User Guide Ensure that you read the Safety Precautions pp 144 149 Getting Started ENGLISH p 7...

Страница 2: ...ry Card 32MB Interface Cable IFC 400PCU AV Cable AVC DC300 Canon Digital Camera Solution Disk Warranty Card i f Wrist Strap WS 800 Download ZoomBrowser EX ImageBrowser Software Guide PDF from http web...

Страница 3: ...by familiarizing yourself with the camera and mastering the basics Once you have mastered the basics use the camera s many features to shoot more challenging photos The PDF manuals are included in th...

Страница 4: ...th the Optical Zoom 54 Using the Digital Zoom Digital Tele Converter 55 Using the Flash 59 Shooting Close ups Infinity Shots Macro Infinity Super Macro 60 Using the Self Timer 62 Changing the Recordin...

Страница 5: ...a Slow Shutter Speed Long Shutter Mode 84 Adjusting the Tone White Balance 86 Shooting in a My Colors Mode 89 Setting the Display Overlays 91 Categorizing Images Automatically Auto Category 92 Registe...

Страница 6: ...Folder 125 Setting the Auto Rotate Function 127 Resetting Settings to Their Default Values 128 Connecting to a TV 129 Shooting Playback Using a TV 129 Troubleshooting 130 List of Messages 140 Appendix...

Страница 7: ...ult the illustrations and screenshots used in this guide may differ from the actual camera 59 Commonly Used Shooting Functions Using the Flash Available Shooting Modes p 178 1 Press the button 1 Use t...

Страница 8: ...legal rights even if the image was shot for personal use Warranty Limitations This camera s warranty is only effective in the country of sale If a problem arises while the camera is in use abroad plea...

Страница 9: ...the Date in the Image Data zShooting Movies zViewing Movies zDownloading Images to a Computer zSystem Map You can use SD memory cards SDHC SD High Capacity memory cards MultiMediaCards MMCplus cards...

Страница 10: ...Getting Started Capture Your Best Memories 8 Capture Your Best Memories...

Страница 11: ...there while moving the entire cover in the direction of the arrow b and opening it up in the direction of the arrow c Installing the Batteries and Memory Card Battery Cover Lock b a c Hold lock open H...

Страница 12: ...the memory card or malfunction if the memory card is inserted backward by mistake Positive end Negative end Check the battery terminals for the correct orientation Caution Front Write Protect Tab Con...

Страница 13: ...ress downward as you slide it until it clicks into place b To Remove the Memory Card Push the memory card with your finger until the memory card clicks and then release it It is recommended to use the...

Страница 14: ...se the S or T button to set the value c Press the FUNC SET button To Change a Previously Set Date Time Perform Steps b c above after using the following procedures to display the Date Time settings wi...

Страница 15: ...e LCD monitor menus and messages a Set the mode dial to Playback b Hold down the FUNC SET button and press the MENU button once c Use the S T W or X button to select a language d Press the FUNC SET bu...

Страница 16: ...power button The Mute setting also can be changed in the Setup menu b Select a shooting mode 1 Set the mode dial to Auto c Aim the camera at the subject d Press the shutter button lightly press halfwa...

Страница 17: ...Rec menu The image will continue to display after shooting if you keep the shutter button pressed The indicator will blink green and the file will record to the memory card To Shoot Images in Focus T...

Страница 18: ...button pressed continuously but they will appear coarse z Setting Resume to either Last seen or Last shot in the Play menu allows you to specify the image to display in Playback mode Default setting...

Страница 19: ...o select an image to erase and press the button c Confirm that Erase is selected and press the FUNC SET button To exit instead of erasing select Cancel Please note that erased images cannot be recover...

Страница 20: ...standard protocol PictBridge you can use it with other PictBridge compliant printers in addition to Canon brand printers Please see the Direct Print User Guide for more information b Turn on the prin...

Страница 21: ...or X button to select Add 3 Press the FUNC SET button To remove an image from the print list press the button again use the W or X button to select Remove and press the FUNC SET button Printing Image...

Страница 22: ...e deleted from the image data once it has been embedded Ensure that the camera s date time is set correctly beforehand p 12 The image size is fixed to the 2M 1600 x 1200 setting and the compression to...

Страница 23: ...me using the W or X button You can use the following methods to imprint the date on images lacking imprinted date stamps Set with the camera s Digital Print Order Format DPOF function Set the Date opt...

Страница 24: ...Movie Confirm that the camera is set to Standard c Aim the camera at the subject z Do not touch the microphone while recording z Do not press any buttons other than the shutter or button The sound tha...

Страница 25: ...fway e Without changing anything else press the shutter button all the way press fully to shoot Recording starts During the recording the elapsed recording time and z Rec will display in the LCD monit...

Страница 26: ...and press the FUNC SET button Images with a icon are movies d Use the W or X button to select Play and press the FUNC SET button The movie will start playing If you press the FUNC SET button during pl...

Страница 27: ...installed on computers with built in USB ports CPU Windows Vista Windows XP Windows 2000 Pentium 1 3 GHz or higher Pentium 500 MHz or higher RAM Windows Vista Windows XP Windows 2000 512 MB or more 2...

Страница 28: ...inish once the installation is complete When the installation is complete Restart or Finish will display Click the button that appears 4 Remove the CD ROM from the drive when your normal desktop scree...

Страница 29: ...l cover and insert the interface cable all the way into the connector c Preparing to download images to the computer 1 Set the camera s mode dial to Playback and press the power button If the Digital...

Страница 30: ...ears at the bottom of the desktop Preparations for downloading images are now finished Please proceed to the Downloading Images Using the Camera Direct Transfer section p 29 except Windows 2000 If thi...

Страница 31: ...s LCD monitor The button will light blue Press the MENU button if the Direct Transfer menu fails to appear b Press the button Images not previously downloaded will download to the computer Downloadin...

Страница 32: ...d press the FUNC SET button Select Transfer Wallpaper 1 Confirm that the Direct Transfer menu is displayed on the camera s LCD monitor 2 Use the S or T button to select or and press the or FUNC SET bu...

Страница 33: ...CameraWindow and the downloaded images will display on the computer By default images are saved on the computer in folders according to the shooting date Only JPEG images can be downloaded as wallpape...

Страница 34: ...tery and Charger Kit CBK4 300 6 Compact Power Adapter CA PS800 Power Cord High Power Flash HF DC1 Interface Cable IFC 400PCU 1 AA size Alkaline Batteries 2 Battery Charger CB 5AH CB 5AHE AA size NiMH...

Страница 35: ...0 CP 200 CP 300 4 See the user guide supplied with the Bubble Jet printer for more information on the printer and interface cables 5 Not sold in some regions 6 The Battery and Charger Kit CBK4 200 can...

Страница 36: ...Battery and Charger Kit CBK4 300 This dedicated battery charger kit includes both a charger unit and four rechargeable AA size NiMH nickel metal hydride batteries Convenient when taking or playing bac...

Страница 37: ...etailer Direct Print Compatible Printers Use of genuine Canon accessories is recommended This product is designed to achieve excellent performance when used with genuine Canon accessories Canon shall...

Страница 38: ...Getting Started 36...

Страница 39: ...37 Learning More...

Страница 40: ...d Flash p 59 e AF assist Beam p 47 f Red Eye Reduction Lamp pp 59 70 g Self Timer Lamp p 62 h Terminal Cover i A V OUT Audio Video output Terminal p 129 j DIGITAL Terminal p 27 k DC IN Power input Ter...

Страница 41: ...b Memory Card Slot Battery Cover Lock p 9 c Memory Card Slot Battery Cover p 9 d Tripod Socket The LCD monitor may be covered with a thin plastic film for protection against scratches during shipment...

Страница 42: ...n p 42 e MENU Button p 43 f Print Share Button pp 18 29 93 g Indicator p 41 h Macro Infinity Button p 60 i Telephoto while shooting Magnify in Playback mode Button pp 54 96 j Flash Button p 59 k Wide...

Страница 43: ...ing Green Camera starting up image recording reading erasing transferring when connected to a computer Orange Ready to shoot flash on Blinking Orange Ready to shoot camera shake warning flash charging...

Страница 44: ...the S or T button to select a menu item Some items may not be selectable in some shooting modes 4 Use the W or X button to select an option for the menu item You can select further options with the M...

Страница 45: ...lect a menu item Some items may not be selectable in some shooting modes 4 Use the W or X button to select an option Menu items followed by an ellipsis can only be set after pressing the FUNC SET butt...

Страница 46: ...on e Flash button f Red Eye Correction MENU button Rec menu Flash Settings g Auto Rotate MENU button Set up menu h Disp Overlay MENU button Rec menu i Create Folder MENU button Set up menu About the B...

Страница 47: ...file is attached JPEG image not conforming to Design rule for Camera File System Standards pp 132 163 RAW image Unrecognized data type z Information for images shot on other cameras may not display co...

Страница 48: ...xposure compensation function you can correct the image brightness before shooting p 82 Menu Item Options Page Shooting Mode Still image pp 14 60 66 68 Movie pp 22 72 Exposure Compensation p 82 Long S...

Страница 49: ...f In Standard Movie mode only Flash Settings p 70 Slow Synchro On Off Red Eye Corr On Off Red Eye Lamp On Off Light Metering p 83 AF assist Beam On Off p 133 Shooting Info On Off p 51 Review Off 2 10...

Страница 50: ...p 113 Rotate p 102 Erase all p 114 Transfer Order p 119 Resume p 16 Transition p 103 Menu Item Topic Page Print Displays the print menu p 115 Select Image Qty Configures print settings for single ima...

Страница 51: ...ration Vol Adjusts the volume of the operation sound that beeps when any button other than the shutter button is pressed Selftimer Vol Adjusts the volume of the self timer sound played 2 sec before th...

Страница 52: ...tting to Auto to print other image sizes However it cannot be changed while the printer is connected Format You can also select a low level format p 122 File Numbering Continuous Auto Reset p 123 Crea...

Страница 53: ...Reviewing an Image Right After Shooting Using the LCD Monitor Available Shooting Modes p 178 Configuration Method Configurable Content During shooting Shooting mode Rec menu Shooting Info On Off Duri...

Страница 54: ...U button 2 In the menu use the S or T button to select Shooting Info or Review Info 2 Accept the setting 1 Use the W or X button to switch between options 2 Press the MENU button 1 Select Info Disp 1...

Страница 55: ...yback mode p 97 Night Display When shooting in dark conditions the camera automatically brightens the LCD monitor to suit the brightness of the subject making it easier to frame the subject Although n...

Страница 56: ...sted from 38 mm 132 mm focal length in 35mm film equivalent terms Shooting with the Optical Zoom 1 Press the or button Wide Angle Zooms out from the subject Telephoto Zooms in on the subject Commonly...

Страница 57: ...zoom factors of up to 14x with digital and optical zoom combined In Movie mode only the Standard mode can be selected Off 38 132 mm Enables shooting without digital zoom 1 5x 57 198 mm Digital zoom is...

Страница 58: ...eteriorate Safety Zoom The icon displays at the maximum zoom factor without image deterioration and you can advance the zoom further by pressing the button again not available in Safety Zoom Factor Op...

Страница 59: ...o select Digital Zoom 2 Accept the setting 1 Use the W or X button to select Standard 2 Press the MENU button 3 Press the button and shoot The combined digital and optical zoom factor will display in...

Страница 60: ...tal Zoom 1 Press the MENU button 2 In the menu use the S or T button to select Digital Zoom 2 Accept the setting 1 Use the W or X button to select 1 5x or 1 9x 2 Press the MENU button 3 Adjust the ang...

Страница 61: ...e Auto On Off You can configure detailed settings for the flash when you press the MENU button while this screen is displayed p 70 Slow Synchro Red Eye Correction Red Eye Lamp The LCD monitor turns of...

Страница 62: ...Minimum focusing distance 5 cm 2 0 in Maximum telephoto setting 76 x 57 mm 3 0 x 2 2 in Minimum focusing distance 25 cm 9 8 in Infinity Use this mode when the distance from the end of the lens to the...

Страница 63: ...g in Super Macro Mode 1 Select 1 Set the mode dial to 2 Press the FUNC SET button 3 Use the S or T button to select and choose with the W or X button 4 Press the FUNC SET button In Super Macro mode th...

Страница 64: ...later Custom Timer you can change the delay time 0 10 15 20 30 sec and number of shots 1 10 When Delay is set to 2 or more seconds the self timer sound beeps quickly 2 seconds before the shutter relea...

Страница 65: ...ect Delay or Shots and change the settings with the W or X button 3 Press the MENU button 4 Press the FUNC SET button If the Shots option is set to 2 or more shots the following occurs The exposure an...

Страница 66: ...Medium 1 5M 2592 x 1944 pixels Printing to about A4 size 210 x 297 mm 8 3 x 11 7 in Printing to about Letter size 216 x 279 mm 8 5 x 11 in Medium 2 3M 2048 x 1536 pixels Printing to about A5 size 148...

Страница 67: ...ded appear on the LCD monitor as a black border z See Memory Cards and Estimated Capacities p 167 z See Image Data Sizes Estimated p 169 Changing the Compression Still Images Available Shooting Modes...

Страница 68: ...or X button to select a mode 4 Press the FUNC SET button Portrait Produces a soft effect when photographing people Night Snapshot Allows you to take snapshots of people against twilight or night back...

Страница 69: ...s in vivid colors Foliage Shoots trees and leaves such as new growth autumn leaves or blossoms in vivid colors Snow Shoots without a blue tinge and without making people appear dark against a snowy ba...

Страница 70: ...ms in an indoor aquarium z The shutter speed is slow in the mode Always use a tripod to avoid camera shake z In the or mode the ISO speed may increase and cause noise in the image depending on the sce...

Страница 71: ...immediately before shooting This reflects standard shooting criteria established by Canon Actual results may vary according to the subject and shooting conditions Even if continuous shooting suddenly...

Страница 72: ...e the flash fires This function reduces the chance of reflected light making eyes appear red when the flash fires Red Eye Correction When Red Eye Corr is set to On only the corrected image is recorded...

Страница 73: ...the setting 1 Use the S or T button to select a function 2 Use the W or X button to select On or Off 3 Press the MENU button You can also display this menu by pressing the button followed by the MENU...

Страница 74: ...ard You can select the recording pixels and record until the memory card is full when a super high speed memory card is used such as the recommended SDC 512MSH The digital zoom can be used while shoot...

Страница 75: ...areful of the following while recording Do not touch the microphone p 38 Do not press any buttons other than the shutter or button The sound that buttons make will be recorded in the movie The camera...

Страница 76: ...of recording pixels 1 Press the FUNC SET button 2 Use the S or T button to select and the W or X button to change the option 3 Press the FUNC SET button 1 Default setting 2 To give priority to recordi...

Страница 77: ...Press the MENU button 2 In the menu use the S or T button to select AF Point Zoom 2 Accept the setting 1 Use the W or X button to select On 2 Press the MENU button 3 Press the shutter button halfway...

Страница 78: ...Available Shooting Modes p 178 Face Detect The camera detects a face and sets the focus exposure 1 and white balance 2 In addition the camera meters the subject so that the face is correctly illuminat...

Страница 79: ...hen the shutter button is pressed halfway and the focus is achieved up to 9 green AF frames may appear z The camera will shoot using AiAF not the Face Detect function if a white frame fails to appear...

Страница 80: ...Shooting Modes p 178 To use the Face Select and Track function first configure the following settings z In the menu set AF Frame to Face Detect p 76 z Register the function to the button p 93 1 Aim th...

Страница 81: ...3 Press the button The face frame of the main subject turns to white and determines the person to focus on the selected face will now be tracked within a certain range 4 Press the shutter button halfw...

Страница 82: ...ce as the main subject is centered in the AF frame 2 Press the shutter button halfway to lock the focus 3 Keep the shutter button pressed halfway while you recompose the image and press the shutter bu...

Страница 83: ...ng Since the ISO speed setting will automatically be raised in dark places the camera will select a faster shutter speed and reduce the chances of camera shake To put priority on image quality select...

Страница 84: ...value to avoid making the subject too bright in night shots or when shot against a dark background To Cancel the Exposure Compensation Restore the compensation value to 0 Adjusting the Exposure Compe...

Страница 85: ...osure for the main subject Center Weighted Avg Averages the light metered from the entire frame but gives greater weight to the subject matter at the center Spot Use when there is a large difference i...

Страница 86: ...the brighter the recorded image becomes If you press the MENU button at this point you will return to the Exposure Compensation setting screen z The brightness of the image appearing on the LCD monit...

Страница 87: ...e note that camera shake becomes a factor at low shutter speeds Shoot with the camera attached to a tripod z Use of the flash may result in an over exposed image If this occurs shoot with the flash se...

Страница 88: ...ungsten and bulb type 3 wavelength fluorescent lighting Fluorescent For recording under warm white cool white or warm white 3 wavelength fluorescent lighting Fluorescent H For recording under daylight...

Страница 89: ...a particular source of light such as a mercury vapor lamp Shooting close ups Macro 1 Select 1 Press the FUNC SET button 2 Use the S or T button to select and choose with the W or X button 2 Aim the ca...

Страница 90: ...z Shoot with the same settings as when reading the white balance data If the settings differ the optimal white balance may not be set In particular the following should not be changed ISO Speed Flash...

Страница 91: ...saturation to record bold colors Neutral Tones down the contrast and color saturation to record neutral hues Sepia Records in sepia tones B W Records in black and white Custom Color Use this option to...

Страница 92: ...on 2 Adjust the setting 1 Press the MENU button 2 Use the S or T button to select Contrast Sharpness or Saturation 3 Use the W or X button to adjust the setting The adjustment results show in the LCD...

Страница 93: ...uide Helps to confirm the print area for L size or postcard size in 3 2 aspect ratio Areas outside the printable area are grayed out Images are still recorded at the standard aspect ratio of 4 3 Both...

Страница 94: ...ges with faces detected when AF Frame is set to Face Detect Scenery For images shot in or mode Events For images shot in or mode 1 Select Auto Category 1 Press the MENU button 2 In the menu use the S...

Страница 95: ...82 ISO Speed For changing the ISO speed p 81 White Balance For changing the white balance p 86 Custom White Balance For recording white balance data p 87 Red Eye Corr For switching between red eye co...

Страница 96: ...n to select Set button 3 Press the FUNC SET button 2 Accept the setting 1 Use the S T W or X button to select the function you wish to register 2 Press the FUNC SET button If displays to the icon s lo...

Страница 97: ...wers back on when you press a button other than the power button or when you change the camera s vertical horizontal orientation The button can be used in place of the shutter button when the camera i...

Страница 98: ...or X button allows you to display the previous or next image at the magnified level 2 Press the FUNC SET button and change the position of the displayed area with the S T W or X button will display an...

Страница 99: ...utton to select 2 Accept the setting 1 Use the W or X button to select Index 2 Press the MENU button Up to nine images can be viewed at once in index playback Use the S T W or X button to change the i...

Страница 100: ...ress the MENU button 2 In the menu use the S or T button to select 3 Press the FUNC SET button 2 Categorize the images 1 Use the W or X button to select images to categorize 2 Use the S or T button to...

Страница 101: ...ges from the Scenery category Events Jumps to images from the Events category Category 1 3 Jumps to the images from each category To Do Jumps to images from the To Do category Jump to Folder Jumps to...

Страница 102: ...ingle Playback mode you can also display the Jump to menu by holding down the MENU button Viewing Movies Movies cannot be played in the Index Playback mode 1 Display the movie file 1 Use the W or X bu...

Страница 103: ...to single image playback Print An icon will display when a printer is connected See the Direct Print User Guide for details Play Play Slow Motion You can use the button to slow down or the button to...

Страница 104: ...tton 2 Rotate the image 1 Use the W or X button to select an image to rotate 2 Press the FUNC SET button Cycle through the 90 270 original orientations with each press of the FUNC SET button This also...

Страница 105: ...e darkens and the next image gradually brightens until it is displayed Press the button to have the previous image display from the left and the button to have the next image display from the right 1...

Страница 106: ...ess the FUNC SET button The following functions are available during slide shows Pausing resuming the slide show Press the FUNC SET button Fast forwarding rewinding Press the W or X button holding dow...

Страница 107: ...to the overall image Faces turned to the side or at a diagonal or faces with a portion hidden 1 Select Red Eye Correction 1 Press the MENU button 2 In the menu use the S or T button to select 3 Press...

Страница 108: ...stored as the last file Overwrite Saved with the same file name as the uncorrected image The uncorrected image is erased When New File is selected proceed to Step 5 To continue correcting red eyes in...

Страница 109: ...ly deteriorate with each application z Since the correction frame will not appear automatically on images that have already been corrected once with the Red Eye Correction function use the Add Frame o...

Страница 110: ...Shift mode allowing you to adjust the position of the correction frame 3 Add a correction frame 1 Press the button The correction frame will be added and the frame color will change to white Press the...

Страница 111: ...he FUNC SET button 2 Adjust the position of the frame 1 Use the W or X button to select a frame to remove The selected frame will appear in green 3 Delete the frame 1 Press the FUNC SET button The sel...

Страница 112: ...button to select 3 Press the FUNC SET button 2 Select an image 1 Use the W or X button to select an image to resize 2 Press the FUNC SET button The FUNC SET button is not selectable for images that ca...

Страница 113: ...tton The resized image will be saved with a new file name The original image will remain 5 Display the saved image 1 Press the MENU button 2 Use the W or X button to select Yes 3 Press the FUNC SET bu...

Страница 114: ...W or X button to select an image to which you wish to attach a sound memo 2 Press the FUNC SET button The sound memo panel will display 3 Record the memo 1 Use the W or X button to select 2 Press the...

Страница 115: ...ss the FUNC SET button z You cannot attach sound memos to movies z Sound memos for protected images cannot be erased Protecting Images 1 Select Protect 1 Press the MENU button 2 In the menu use the S...

Страница 116: ...d with this function 1 Select Erase all 1 Press the MENU button 2 In the menu use the S or T button to select 3 Press the FUNC SET button 2 Erase the images 1 Use the W or X button to select OK 2 Pres...

Страница 117: ...d print settings are also applied to the print list p 19 z The output of some printers or photo developing services may not reflect the specified print settings z Print settings cannot be set for movi...

Страница 118: ...ile No settings change according to the Print Type as follows Index Date and File No cannot be set to On at the same time Standard or Both Date and File No can be set to On at the same time however th...

Страница 119: ...s the FUNC SET button 2 Select the images Selection methods differ for the Print Type settings p 115 Standard Both 1 Use the W or X button to select the images 2 Press the FUNC SET button 3 Use the S...

Страница 120: ...ect OK 1 Use the W or X button to select OK 2 Press the FUNC SET button z Images are printed in order according to the file number z A maximum of 998 images can be selected z When the camera is connec...

Страница 121: ...These settings will be overwritten by those set by your camera 1 Select Transfer Order 1 Press the MENU button 2 In menu use the S or T button to select 3 Press the FUNC SET button 2 Select Order 1 Us...

Страница 122: ...e FUNC SET button 2 Select Mark all 1 Use the W or X button to select Mark all 2 Press the FUNC SET button Selecting Reset cancels all transfer order settings 3 Select OK 1 Use the W or X button to se...

Страница 123: ...last control is accessed on the camera Display Off In Shooting mode the LCD monitor automatically turns off after the specified period of time if no control is accessed on the camera regardless of th...

Страница 124: ...button to select Format 4 Press the FUNC SET button 2 Accept the setting 1 Use the W or X button to select OK 2 Press the FUNC SET button To perform a low level format use the button to select Low Le...

Страница 125: ...image is compared with the last one on the memory card and the larger of the two is utilized as the basis for new images Auto Reset The image and folder number are reset to the starting value 100 0001...

Страница 126: ...mages in a folder is less than 2000 because the following types of images are always saved together into the same folder Images from continuous shooting Self timer images custom Images cannot be playe...

Страница 127: ...mark again Auto Create You can also specify a date and time if you wish to create a new folder using a shooting time after the specified date and time 1 Select Create Folder 1 Press the MENU button 2...

Страница 128: ...S or T button to select Auto Create and the W or X button to select a creation date 2 Use the S or T button to select Time and the W or X button to select a time 3 Press the MENU button displays when...

Страница 129: ...otate 2 Accept the setting 1 Use the W or X button to select On or Off 2 Press the MENU button When the Auto Rotate function is set to On and Shooting Info is set to On normal right end is down or lef...

Страница 130: ...Their Default Values 1 Select Reset All 1 Press the MENU button 2 Use the W or X button to select the menu 3 Use the S or T button to select Reset All 4 Press the FUNC SET button 2 Accept the setting...

Страница 131: ...of the AV cable to the VIDEO IN and AUDIO IN jacks on the TV 4 Turn on the TV and switch it to video mode 5 Turn on the camera z The video output signal can be switched NTSC or PAL to accommodate dif...

Страница 132: ...tteries are loaded in the wrong direction zReload the batteries in the correct direction p 10 Batteries are not the right type zUse only unused AA size alkaline batteries or Canon AA size NiMH batteri...

Страница 133: ...upward p 152 The Date Time menu appears The lithium date time coin battery charge is depleted zReplace the lithium date time coin battery p 159 LCD monitor Nothing displays Power Saving is set to Disp...

Страница 134: ...corded when shooting movies appears A slow shutter speed has likely been selected because of insufficient lighting zRaise the ISO speed p 81 zSelect a setting other than flash off p 59 zSet the self t...

Страница 135: ...ory card p 122 zIf reformatting does not work the memory card logic circuits may be damaged Consult the nearest Canon Customer Support Help Desk SD memory card or SDHC memory card is write protected z...

Страница 136: ...3 Subject is too far away for flash to reach zShoot with the subject within the correct flash range when using the built in flash p 163 zRaise the ISO speed and then shoot p 81 Subject in recorded ima...

Страница 137: ...d back from the eyes when the flash is used in dark areas zShoot with Red Eye Lamp in the Flash Settings set to On p 70 For this mode to be effective the subject must be looking right at the red eye r...

Страница 138: ...in the camera after you save all its images to your computer p 122 Recording images to memory card takes a long time Memory card was formatted in another device zUse a memory card formatted in your ca...

Страница 139: ...ill display properly if you format the memory card in this camera excluding slow recording memory cards p 122 displayed on the LCD monitor in red and shooting automatically stopped There is insufficie...

Страница 140: ...Software Starter Guide for details Movies do not play back correctly Movies recorded with high recording pixels may momentarily stop playing if played on slow reading memory cards You may experience f...

Страница 141: ...ls well with a dry cloth before use zReload the batteries several times If using Canon AA size NiMH batteries As the batteries have not been used for over a year their recharging capacity has decrease...

Страница 142: ...s write protected p 152 Cannot record You attempted to shoot an image without a memory card installed with a memory card installed in the wrong orientation or attempted to attach a sound memo to a mov...

Страница 143: ...tteries or fully charged Canon AA size NiMH batteries Check the battery handling instructions in the Handling Precautions section p 150 No image No images recorded on memory card Image too large You a...

Страница 144: ...Cannot modify Cannot apply red eye correction as no red eye is detected Cannot transfer When transferring images to your computer using the Direct Transfer menu you attempted to select an image with c...

Страница 145: ...it is in motion or you operate it in a location with excessive dust or sand in the air Try turning the power back on and resume shooting or playback If this message continues to display contact your C...

Страница 146: ...nt refers to the camera battery battery charger sold separately and compact power adapter sold separately Safety Precautions Warnings Equipment z Do not point the camera at bright light sources such a...

Страница 147: ...ectrical shock Immediately turn the camera power off and remove the camera batteries or unplug the battery charger or compact power adapter from the power outlet Please consult your camera distributor...

Страница 148: ...heck the seals on store bought batteries before loading them as some batteries may come with defective seals Do not use batteries with defective seals Such batteries may leak overheat or rupture and b...

Страница 149: ...r other insulators to prevent direct contact with other objects Contact with the metallic components of other materials in waste containers may lead to fire or explosions Others z Do not trigger the f...

Страница 150: ...oid using placing or storing the equipment in places subject to strong sunlight or high temperatures such as the dashboard or trunk boot of a car z Do not use the equipment in a manner that exceeds th...

Страница 151: ...lash z Be careful not to cover the flash with your fingers or clothing when shooting The flash may be damaged and emit smoke or noise The resulting heat build up could damage the flash z Do not touch...

Страница 152: ...external and internal surfaces Battery z This camera uses AA size alkaline batteries or Canon AA size NiMH batteries sold separately While it is possible to use AA size nickel cadmium batteries perfo...

Страница 153: ...e the camera can be used may be reduced z At low temperatures battery performance may be reduced and the low battery icon may appear earlier than usual Under these conditions restore the battery perfo...

Страница 154: ...he memory card do not use a pencil or ball point pen Only use a soft point pen e g felt tip pen z Do not use or store memory cards in the following locations Locations subject to dust or sand Location...

Страница 155: ...eripheral devices may not operate correctly in this camera When that happens reformat the memory card with this camera z If formatting in the camera does not work properly turn the camera off and re i...

Страница 156: ...Kits Sold Separately z The CB 5AH CB 5AHE battery charger can only be used to charge Canon AA size NiMH NB 3AH batteries z Do not mix batteries with different purchase dates or different charge state...

Страница 157: ...If you store batteries for a long period of time about 1 year it is recommended that you deplete the batteries in the camera and to then store them at room temperature 0 to 30 C 32 to 90 F in low humi...

Страница 158: ...s determined by testing at Canon facilities Charge batteries in an environment where the temperature is in the range of 0 to 35 C 32 to 95 F z The charging time varies according to the ambient tempera...

Страница 159: ...lways set the power mode switch to OFF when you finish using the flash z Be careful not to touch the flash window or sensor windows with your fingers while the flash is in use z The flash may fire if...

Страница 160: ...itching it for the battery in the flash zNon Use over Extended Periods Leaving batteries in the High Power Flash could allow the battery fluid to leak damaging the product Remove the batteries from th...

Страница 161: ...quickly after you purchase the camera This is because it is installed in the camera at the point of manufacture not when you make the purchase Be particularly careful to keep the date batteries out of...

Страница 162: ...he battery holder and close the cover 8 When the Date Time menu appears set the date and time p 12 After purchasing the camera and turning on the power for the first time although the Date Time menu w...

Страница 163: ...tly wipe with a soft cloth or an eyeglass lens wiper to remove stubborn dirt Camera Care and Maintenance Never use thinners benzine detergents or water to clean the camera These substances may distort...

Страница 164: ...em TTL autofocus Focusing frame Face Detect 1 2 AiAF 9 points Center 1 AF frame can be moved and fixed to specified face 2 If no face is detected AiAF 9 points is used Focusing Range Normal 47 cm 1 5...

Страница 165: ...Detect AF Built in Flash Auto On Off Facial brightness is also evaluated in Face Detect AF Built In Flash Range 30 cm 3 0 m 12 in 9 8 ft W 30 cm 2 0 m 12 in 6 6 ft T Brightness of image periphery may...

Страница 166: ...reen 3072 x 1728 pixels Movies Standard 640 x 480 pixels 20 frames sec 640 x 480 pixels 20 frames sec LP 320 x 240 pixels 30 frames sec Recording can continue until the memory card is full 1 can recor...

Страница 167: ...mmunication Settings MTP PTP Power Source 2 AA size alkaline batteries 2 AA size NiMH batteries NB4 300 sold separately AC Adapter Kit ACK800 sold separately Operating Temperatures 0 40 C 32 104 F 0 3...

Страница 168: ...Approx 6 hours AA size NiMH Batteries NB 3AH fully charged Approx 400 shots Approx 8 hours Shooting Normal temperature 23 C 2 C 73 F 3 6 F normal relative humidity 50 20 alternating wide angle end and...

Страница 169: ...the subject and shooting conditions Recording Pixels Compression 32MB SDC 128M SDC 512MSH Large 3072 x 2304 pixels 9 40 156 15 64 251 32 134 520 Medium 1 2592 x 1944 pixels 11 49 190 20 87 339 41 173...

Страница 170: ...e Recording Pixels Frame Rate 32MB SDC 128M SDC 512MSH Standard 640 x 480 pixels 20 frames sec 22 sec 1 min 36 sec 6 min 12 sec 640 x 480 pixels 20 frames sec LP 45 sec 3 min 10 sec 12 min 16 sec 320...

Страница 171: ...KB 445 KB 1600 x 1200 pixels 1002 KB 558 KB 278 KB 640 x 480 pixels 249 KB 150 KB 84 KB 1600 x 1200 pixels 558 KB 3072 x 1728 pixels 2304 KB 1420 KB 678 KB Frame Rate Recording Pixels File size Stand...

Страница 172: ...card standards Dimensions 32 0 x 24 0 x 2 1 mm 1 3 x 0 9 x 0 1 in Weight Approx 2 g 0 07 oz Type AA size nickel metal hydride battery Nominal Voltage 1 2 V DC Typical Capacity 2500 mAh min 2300 mAh C...

Страница 173: ...ng Time Approx 4 hours 40 min 1 Approx 2 hours 2 Operating Temperatures 0 35 C 32 95 F Dimensions 65 0 x 105 0 x 27 5 mm 2 56 x 4 13 x 1 08 in Weight body only Approx 95 g 3 35 oz Rated Input 100 240...

Страница 174: ...8 Compression 65 Computer Connecting 27 Downloading Images 25 System Requirements 25 Continuous Shooting 69 Create Folder 125 D Date Battery 159 Date Stamp 20 Date Time 12 Digital Tele Converter 55 Di...

Страница 175: ...Dial 14 40 Movie 22 Shooting 22 72 Viewing 24 100 Mute 49 My Category 98 My Colors 89 N Night Display 53 O Overexposure Warning 45 P Power Kits 154 Power Saving 121 Print List 19 Print Method 50 Print...

Страница 176: ...AE Point Frame 44 83 Spot Metering 83 Super Macro 61 System Map 32 T Telephoto 54 Transfer Settings DPOF 119 Transition Effects 103 V Vertical Shutter Release 95 Video System 129 Volume 101 112 W Whit...

Страница 177: ...175 MEMO...

Страница 178: ...tructions may cause harmful interference to radio communications However there is no guarantee that interference will not occur in a particular installation If this equipment does cause harmful interf...

Страница 179: ...any errors or omissions Canon reserves the right to change the specifications of the hardware and software described herein at anytime without prior notice No part of this guide may be reproduced tran...

Страница 180: ...0 White Balance p 86 Auto 1 Other than Auto Drive Mode pp 62 69 Single Shot Continuous Self Timer 2 sec 10 sec Custom Self Timer Delay Shots p 63 My Colors p 89 Recording Pixels Compression still imag...

Страница 181: ...179...

Страница 182: ...igital Tele converter Flash Settings p 70 Slow Synchro 3 Red Eye Correction Red Eye Lamp Metering System p 83 Evaluative Center weighted Avg Spot AF assist Beam p 47 Shooting Info p 51 Off On Review R...

Страница 183: ...181 3 3 4...

Страница 184: ...CDP E061 020 CANON INC 2008...

Отзывы: