Canon PIXMA TS702a Скачать руководство пользователя страница 15

5

ESP

AÑOL

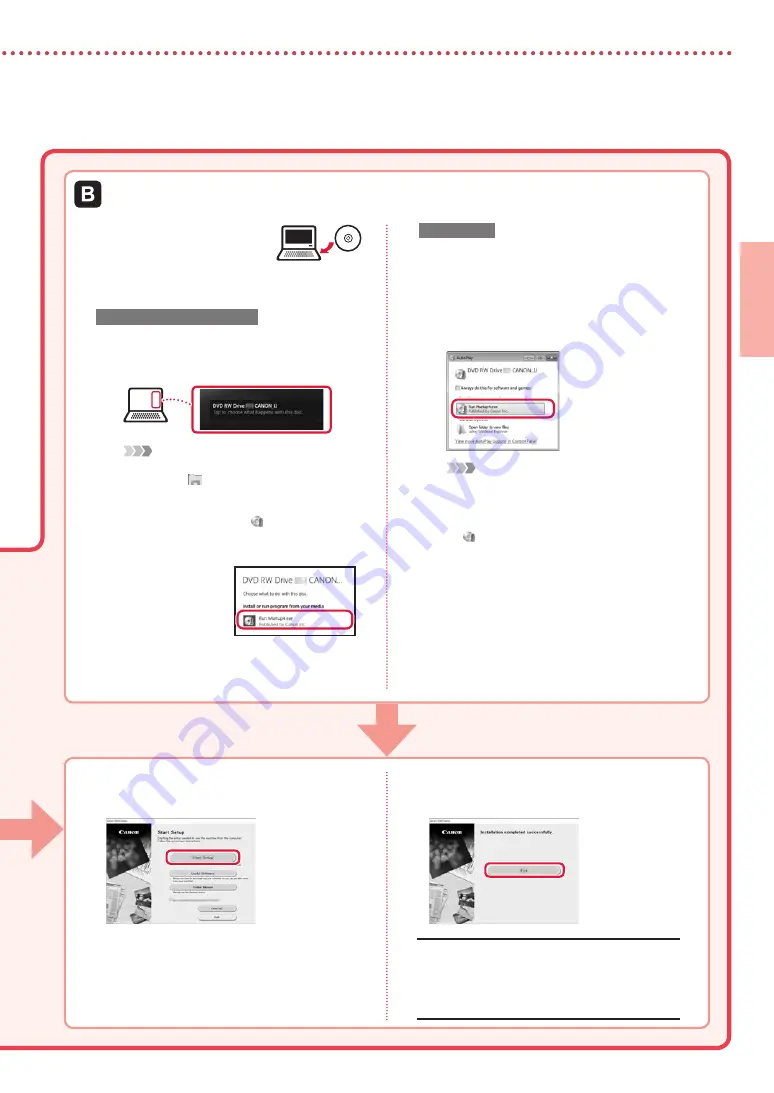
Introduzca el CD-ROM de 

instalación en su ordenador.

Siga las instrucciones para su versión de 

Windows.

Windows 10/Windows 8.1

Haga clic en el mensaje siguiente cuando se 
muestre en el lado derecho de la pantalla del 
ordenador.

 Nota

Si el mensaje no aparece (o si ya no se ve), haga clic 

en el icono de   

Explorador de archivos (File 

Explorer)

 en la barra de tareas. En la parte izquierda de 

la ventana, haga clic en 

Este equipo (This PC)

. Haga 

doble clic en el icono del CD   que se muestra en el 

margen derecho. Cuando se muestre el contenido del 

CD, haga doble clic en 

Msetup4.exe

. Vaya al paso 

c

.

Haga clic en 

Ejecutar


Msetup4.exe


(Run Msetup4.exe)

.

Si se muestra el cuadro de diálogo 

Control 

de cuentas de usuario (User Account 

Control)

, haga clic en 

Sí (Yes)

.

Windows 7

Haga clic en 

Ejecutar


Msetup4.exe


(Run Msetup4.exe)

.

• 

Cuando se muestre la pantalla 

Reproducción automática (AutoPlay)

haga clic en 

Ejecutar


Msetup4.exe


(Run Msetup4.exe)

.

 Nota

Si no aparece la pantalla 

Reproducción 

automática (AutoPlay)

, en el menú Inicio, haga 

clic en 

Equipo (Computer)

. En el margen derecho 

de la ventana, haga doble clic en el icono del  

CD  . Cuando se muestre el contenido del CD, 

haga doble clic en 

Msetup4.exe

.

Si se muestra el cuadro de diálogo  

Control de cuentas de usuario  

(User Account Control)

, haga clic en 

Continuar (Continue)

.

Continúe en el paso 9 siguiente.

Uso del CD-ROM de instalación (solo Windows) proporcionado

Haga clic en 

Iniciar configuración  

(Start Setup)

.

10 

Siga las instrucciones que aparezcan en 

pantalla.

• 

Estas operaciones pueden llevar algún tiempo.

11 

Cuando aparezca la siguiente pantalla, 

haga clic en 

Salir (Exit)

.

Ahora su impresora estará conectada al 
ordenador. Para conectar con un teléfono 
inteligente también, consulte "6-b. Conexión 
con un teléfono inteligente" en la página 6.

Содержание PIXMA TS702a

Страница 1: ... Hay vídeos e instrucciones detalladas en el sitio web de Canon Configurar un ordenador Configurar un teléfono inteligente Getting Started Read Safety and Important Information addendum first Online Setup Detailed instructions and videos are available on the Canon website Setup a Computer Setup a Smartphone ...

Страница 2: ... 1 Conexión con un ordenador teléfono inteligente o tableta página 4 Vídeos instructivos Cómo sujetar la impresora Installing the Printer page 1 Connecting to a Computer Smartphone or Tablet page 4 Holding the Printer Instructional Videos ...

Страница 3: ...Be sure to remove any orange tape 2 Open the top cover and remove the orange tape inside b a 3 Close the top cover 3 Turning on the Printer 1 Connect the power cord Back Important At this time do not connect any other cables 2 Press the ON button Important If the following screen appears press the ON button to turn off the power and redo the procedure from step 2 in 2 Removing Packing Materials 3 ...

Страница 4: ...rk appears on the screen Important If the mark is not displayed on the screen even though you have installed the ink tank the color of the ink tank may be wrong or you may have installed an ink tank such as one with a different model number that is not supported by this printer Either install an ink tank for the correct color or use the provided ink tank for setup 6 Repeat steps 2 through 5 to ins...

Страница 5: ... the right paper guide to the width of the paper b a 5 Attach the cassette cover and replace the cassette When attaching the cassette cover to the cassette fit the cassette cover to the shape of the front of the cassette a b 6 Pull out the paper output tray until it stops Important If you do not pull out the paper output tray an error will occur when printing starts Check Remove and dispose of any...

Страница 6: ...bsite from a computer 2 Select Set Up 3 Enter your printer s model name and click Go 4 Click Start 5 Click If you have already prepared your printer go to Connect Note The following steps are for Windows except Windows 10 in S mode and macOS users For other operating systems continue setup by following the on screen instructions instead 6 Click Download The setup file is downloaded to your compute...

Страница 7: ...c If the User Account Control dialog box appears click Yes Windows 7 a Click Run Msetup4 exe When the AutoPlay screen appears click Run Msetup4 exe Note If the AutoPlay screen does not appear in the Start menu click Computer On the right hand side of the window double click the CD icon When the content of the CD is displayed double click Msetup4 exe b If the User Account Control dialog box appears...

Страница 8: ...ept the ON button on the operation panel to turn on the screen If appears the printer cannot communicate by Wi Fi connection For details see Frequently Asked Questions at http ij start canon Connecting to a Smartphone If you are using multiple smartphones perform these steps on each smartphone Prepare the following before starting a Enable the Wi Fi setting on your smartphone b Connect your smartp...

Страница 9: ... printer The printer is added with the most appropriate connection method for the environment you are using Note If a message saying No printer has been added Perform printer setup does not readily appear after starting the application follow the procedure in and then return to smartphone operations Procedures vary for iOS and Android Follow the instructions for your operating system 3 Press and h...

Страница 10: ...ess the OK button 6 Select the paper size and type and press the OK button 7 Pull out the paper output tray and the paper output support a b Printing a Disc Label Using the Multi PurposeTray Photo paper can only be loaded in the rear tray You can print a label on a printable disc using the multi purpose tray For details open the Online Manual and click Basic Operation Printing a Disc Label from a ...

Страница 11: ...e retirar toda la cinta naranja 2 Abra la cubierta superior y elimine la cinta naranja que está dentro b a 3 Cierre la cubierta superior 3 Encender la impresora 1 Conecte el cable de alimentación Atrás Importante En este momento no conecte ningún otro cable 2 Pulse el botón ACTIVADO ON Importante Si aparece la siguiente pantalla pulse el botón ACTIVADO ON para apagar la impresora y repita el proce...

Страница 12: ...encaje 5 Compruebe que la marca aparezca en la pantalla Importante Si la marca no se muestra en pantalla a pesar de haber instalado el depósito de tinta es posible que el color del depósito de tinta no sea correcto o que haya instalado un depósito de tinta por ejemplo con un número de modelo distinto que no sea compatible con esta impresora Instale un depósito de tinta para el color correcto o uti...

Страница 13: ... del papel derecha con el ancho del papel b a 5 Coloque la cubierta del cassette y reemplace el cassette Alcolocarlacubiertadelcassetteenelcassette encajala cubiertadelcassetteenlaformadelapartefrontaldelcassette a b 6 Extraigalabandejadesalidadelpapelhastaquesedetenga Importante Si no extrae la bandeja de salida del papel se producirá un error cuando se inicie la impresión Comprobar Retire y tire...

Страница 14: ...n ordenador 2 Seleccione Configurar 3 Escriba el nombre del modelo de su impresora y haga clic en Ir 4 Haga clic en Iniciar 5 Haga clic en Si ya ha preparado la impresora vaya a Conectar Nota Los siguientes pasos son para usuarios de Windows excepto Windows 10 in S mode y macOS Para otros sistemas operativos continúe con la configuración siguiendo las instrucciones en pantalla 6 Haga clic en Desca...

Страница 15: ...utar Msetup4 exe Run Msetup4 exe Cuando se muestre la pantalla Reproducción automática AutoPlay haga clic en Ejecutar Msetup4 exe Run Msetup4 exe Nota Si no aparece la pantalla Reproducción automática AutoPlay en el menú Inicio haga clic en Equipo Computer En el margen derecho de la ventana haga doble clic en el icono del CD Cuando se muestre el contenido del CD haga doble clic en Msetup4 exe b Si...

Страница 16: ...control para encender la pantalla Si aparece la impresora no puede comunicarse mediante una conexión Wi Fi Para obtener más información consulte Preguntas más frecuentes en http ij start canon Conexión con un teléfono inteligente Si utiliza varios teléfonos inteligentes realice estos pasos en cada teléfono inteligente Prepare lo siguiente antes de empezar a Active la configuración de Wi Fi en su t...

Страница 17: ...decuado para el ambiente que utilice Nota Si no aparece el siguiente mensaje No se ha agregado ninguna impresora Realizar preparación de impresora No printer has been added Perform printer setup inmediatamente después de iniciar la aplicación siga el procedimiento en y después vuelva a las operaciones del teléfono inteligente Los procedimientos son diferentes para iOS y Android Siga las instruccio...

Страница 18: ...tón OK 6 Seleccione el tipo y tamaño de papel y pulse el botón OK 7 Extraiga la bandeja de salida del papel y el soporte de la salida del papel a b Impresión de una etiqueta de disco mediante la Bandeja multiusos El papel fotográfico solo se pude cargar en la bandeja posterior Puede imprimir una etiqueta en un disco imprimible mediante la bandeja multiusos Para obtener detalles abra el Manual en l...

Страница 19: ...Videoteca sobre procedimientos How To Video Library RMC Regulatory Model Code K10492 RMC Regulatory Model Code K10575 ...

Страница 20: ...l escritorio Manual en línea Canon TS700 series Canon TS700 series Online Manual Desde su navegador Access Online Manual From the Canon TS700 series Online Manual desktop shortcut From your browser PRINTED IN XXXXXXXX QT6 2849 V01 CANON INC 2021 XXXXXXXX ...

Отзывы: