Canon PIXMA TS3365 Скачать руководство пользователя страница 5

3

ENGLISH

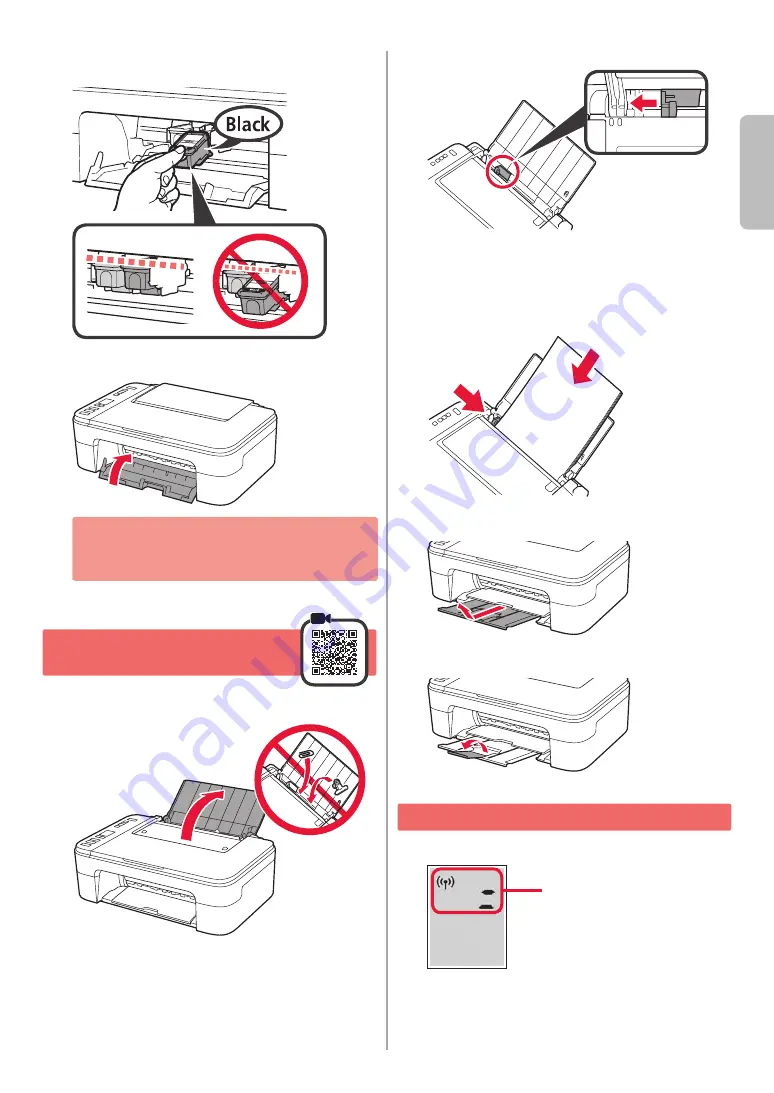
Repeat steps 2 to 3 to install the Black FINE 

cartridge on the right-hand side.

Close the cover.

If 

E

 > 

0

 > 

4

 appears on the screen, return to step 

3 of "4. Installing the FINE Cartridges" and confirm 

that the Color and Black FINE cartridges are 

installed correctly.

5

. Loading Paper 

Open the paper support.

Slide the paper guide to the left.

a   

Load Letter or A4 sized plain paper against the 

right edge with the print side facing up.

b   

Slide the paper guide to align it with the side of 

the paper stack.

a

b

Pull out the paper output tray.

Open the output tray extension.

6

. Preparing for Connection

Confirm that the screen appears as shown below.

Flashing

Содержание PIXMA TS3365

Страница 1: ...ctions détaillées et des vidéos sont disponibles sur le site Web de Canon Configurer un ordinateur Configurer un smartphone Getting Started Read Safety and Important Information addendum first Online Setup Detailed instructions and videos are available on the Canon website Setup a Computer Setup a Smartphone ...

Страница 2: ...mante page 1 Connexion à un ordinateur un smartphone ou une tablette page 4 Instructions vidéo Manipulation de l imprimante Installing the Printer page 1 Connecting to a Computer Smartphone or Tablet page 4 Holding the Printer Instructional Videos ...

Страница 3: ...ng materials and orange tape from the printer s exterior 2 Open the cover 3 Remove and dispose of the orange tape and protective material inside 4 Close the cover 3 Turning on the Printer 1 Connect the power cord At this time do not connect any other cables 2 Press the ON button If E 0 9 appears on the screen press the ON button to turn off the printer and then redo from step 2 of 2 Removing Packi...

Страница 4: ...ot touch b Be careful of ink on the protective tape 3 a Insert the Color FINE cartridge into the FINE cartridge holder on the left hand side at a slight upward angle b Push the FINE cartridge in and up firmly until it snaps into place Confirm that the FINE cartridge is straight and level Do not bump it against the surrounding parts Click a b ...

Страница 5: ...INE cartridges are installed correctly 5 Loading Paper 1 Open the paper support 2 Slide the paper guide to the left 3 a Load Letter or A4 sized plain paper against the right edge with the print side facing up b Slide the paper guide to align it with the side of the paper stack a b 4 Pull out the paper output tray 5 Open the output tray extension 6 Preparing for Connection 1 Confirm that the screen...

Страница 6: ...llowing the on screen instructions instead 6 Click Download 7 Run the downloaded file 8 Click Start Setup 9 Follow the on screen instructions These operations may take some time To connect to a smartphone as well see 7 b Connecting to a Smartphone on page 5 Using the Setup CD ROM for Windows Double click EasySetup exe in the CD ROM and then continue from step 3 If you do not have an internet conne...

Страница 7: ...onnected 1 Press the Stop button 2 Confirm that the screen appears as shown below Once you have added your printer you can print from your smartphone To print photos see Loading Photo Paper on page 6 1 Install the Canon PRINT Inkjet SELPHY app on your smartphone Scan the QR code shown on the right to access the Canon website and then download the app 2 Open your smartphone s Wi Fi settings Tap the...

Страница 8: ...utton 5 Pull out the paper output tray 6 Open the output tray extension Loading Photo Paper If Print Results Are Unsatisfactory Perform Print Head Alignment if straight lines are crooked or colors are inconsistent or print results are otherwise not what you expected For details click Maintenance on the Online Manual and refer to If Printing Is Faint or Uneven Aligning the Print Head Refer to the b...

Страница 9: ... extérieur de l imprimante 2 Ouvrez le capot 3 Retirez et jetez la bande orange et le matériau protecteur se trouvant à l intérieur 4 Refermez le capot 3 Mise sous tension de l imprimante 1 Branchez le cordon d alimentation À ce stade ne branchez aucun autre câble 2 Appuyez sur le bouton MARCHE ON Si E 0 9 s affiche à l écran appuyez sur le bouton MARCHE ON pour mettre l imprimante hors tension pu...

Страница 10: ...n à l encre se trouvant sur le ruban protecteur 3 a Insérez la cartouche FINE couleur dans le porte cartouche FINE sur la gauche en l inclinant légèrement vers le haut b Poussez fermement la cartouche FINE vers le bas puis vers le haut jusqu à entendre un déclic Vérifiez que la cartouche FINE est droite et de niveau Ne cognez pas la cartouche contre les bords Clic a b ...

Страница 11: ...ctement 5 Chargement du papier 1 Ouvrez le support papier 2 Faites glisser le guide papier vers la gauche 3 a Chargez du papier ordinaire au format A4 ou Lettre le long du bord droit face à imprimer vers le haut b Faites glisser le guide papier de manière à l aligner avec le côté de la pile de papier a b 4 Retirez le bac de sortie papier 5 Ouvrez l extension du bac de sortie papier 6 Préparation d...

Страница 12: ...structions à l écran 6 Cliquez sur Télécharger 7 Exécutez le fichier téléchargé 8 Cliquez sur Commencer la configuration 9 Suivez les instructions à l écran Ces opérations peuvent prendre du temps Pour vous connecter aussi à un smartphone voir 7 b Connexion à un smartphone à la page 5 Utilisation du CD ROM d installation pour Windows Cliquez deux fois sur EasySetup exe à partir du CD ROM puis cont...

Страница 13: ...n Arrêt Stop 2 Vérifiez que l écran s affiche comme ci dessous Une fois que vous avez ajouté votre imprimante vous pouvez imprimer depuis votre smartphone Pour imprimer des photos voir Chargement de papier photo à la page 6 1 Installez l application Canon PRINT Inkjet SELPHY sur votre smartphone Scannez le code QR qui apparaît à droite pour accéder au site Web Canon puis téléchargez l application ...

Страница 14: ... l extension du bac de sortie papier Chargement de papier photo Si les résultats de l impression ne sont pas satisfaisants Si les lignes droites sont de travers ou les couleurs incohérentes ou si les résultats de l impression ne sont pas conformes à vos attentes procédez à un Alignement tête d impression Pour plus de détails cliquez sur Entretien dans le Manuel en ligne et reportez vous à Si l imp...

Страница 15: ...RMC Regulatory Model Code K10509 ...

Страница 16: ...Accès au Manuel en ligne À partir de votre navigateur Access Online Manual From your browser PRINTED IN XXXXXXXX IMPRIMÉ XX XXXXXXXX QT6 3244 V01 CANON INC 2019 XXXXXXXX ...

Отзывы: