background image

9. The


printer automatically searches for access points that support 

WPS

 (Wi-Fi Protected Setup)*.  If a 

WPS

 access point is detected, the  

Push 

Button Method

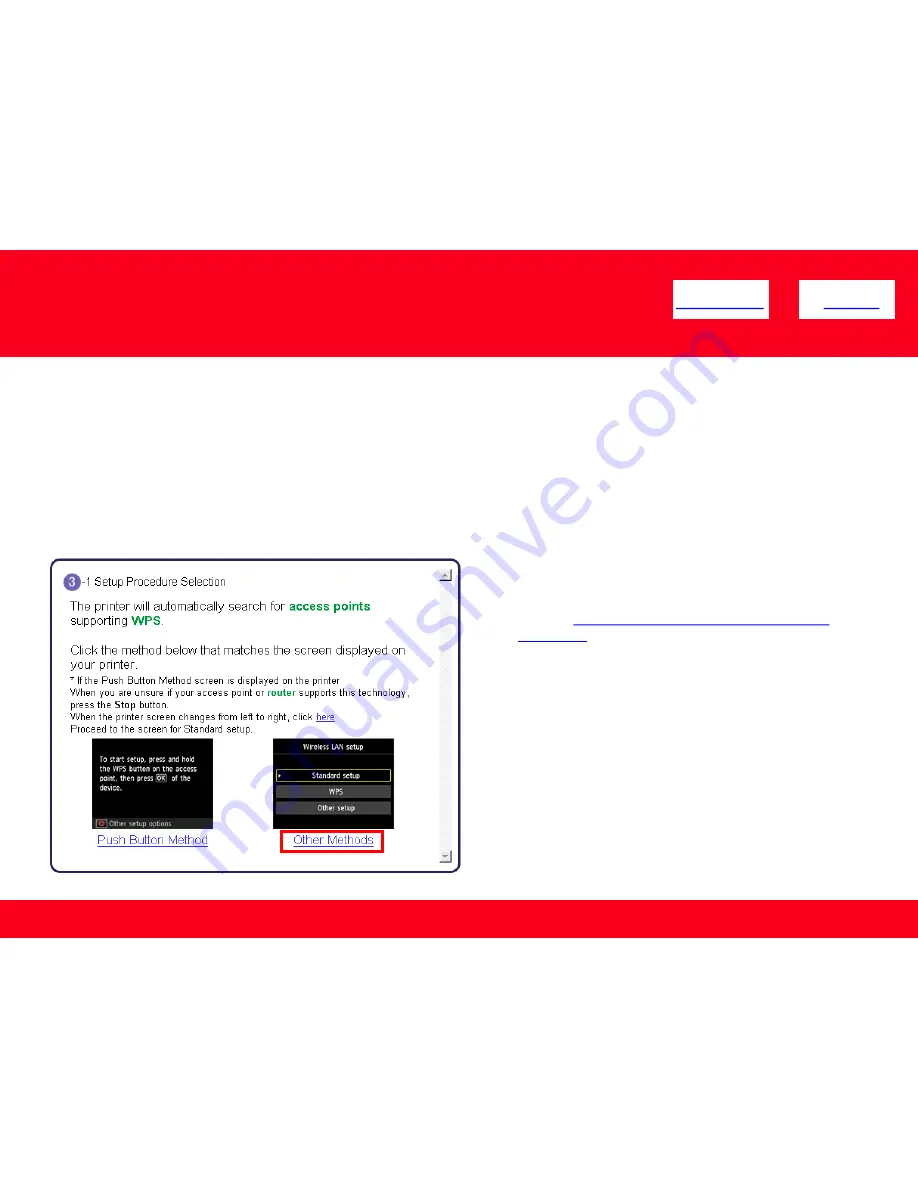
 screen (shown below on left) will appear on the machine’s operation panel 

 
*Unless you are absolutely sure your access point supports WPS and you are familiar with activating  this on your access point, 

press the Stop 

button

 on the printer’s operation panel and click on  

Other Methods 

on the 

Setup Procedure Selection 

screen (screenshot shown below)*.  

 
If the 

Push Button Method 

is not shown  on the printer’s operation panel(when no WPS access points have been detected), select 

Standard 

setup 

on the printers operation panel, then click 

Other Methods 

on the 

Setup Procedure Selection 

screen 

Connecting to the Wireless Network 

 << Previous


Next >>


If you selected the 

Push Button Method

, continue to follow 

any instructions until the 

Completion of Connection

 screen  

appears.  

Click here to skip ahead to the Completion of 

Connection.


If you selected 

Other Methods

, please continue to the next 

page  for important information 

Содержание PIXMA MX922

Страница 1: ...1 Getting Your Multifunction Back On Your Network After A Router Or Network Change PIXMA MX922 Mac OS...

Страница 2: ...re for instructions 1 To re establish communication on the network after changing the router Access Point or when connecting to a different network the settings on the Multifunction need to be changed...

Страница 3: ...3 Previous Next 3 In the subsequent screen enter the administrator name and password Then click OK 2 Click Next to install the helper tool Connecting to the Wireless Network...

Страница 4: ...4 Previous Next 4 If the following screen appears click Start Setup Again Connecting to the Wireless Network Go to the next page...

Страница 5: ...e Printer Setup window appears 8 Follow any instructions Pay particular attention to the instruction in the Setup Procedure Selection 3 1 if setup detects a WPS access point Continue to the next page...

Страница 6: ...hods on the Setup Procedure Selection screen screenshot shown below If the Push Button Method is not shown on the printer s operation panel when no WPS access points have been detected select Standard...

Страница 7: ...nnecting to the Wireless Network 7 Previous Next For Standard setup only Select Standard setup on the Setup Procedure Selection screen 3 2 Continue to next page before proceeding any further with setu...

Страница 8: ...When you get to Step 4 2 and later in Step 4 4 screens shown below you will need to know SSID and password information Step 4 2 Step 4 4 Unless you are absolutely certain of this information please c...

Страница 9: ...e and Network Key refer to a password required to prevent unauthorized access to communication Look for the Confirm the access point name or the Confirm the network key automatic display buttons durin...

Страница 10: ...w any instructions until the Setup Completion or Completion of Connection screen below is displayed Network connection setting is complete Click Next Software will install Continue to follow instructi...

Страница 11: ...Drivers and Canon IJ Network Tool which are pre selected are required for the printer to be able to be used over the network My Image Garden Quick Menu and ScanGear are highly recommended to take ful...

Страница 12: ...12 Previous Next Installing the Drivers Add the Printer 1 Click Add Printer on the Add Printer Screen...

Страница 13: ...nnection you can select Bonjour or Canon IJ Network in the Add Printer dialog If Bonjour is selected remaining ink level messages may differ from those indicated by Canon IJ Network Canon recommends y...

Страница 14: ...14 Previous Next Installing the Drivers 4 Click Next 5 Click Next Setup is complete Setup is complete Click Next to finish the remaining information section...

Страница 15: ...dow System Preferences Print Fax System Preferences Print Scan Lion Mountain Lion To delete highlight the printer in the list click the minus sign then confirm the deletion See example below Name vari...

Отзывы: