Canon PIXMA MP460 Скачать руководство пользователя страница 127

Chapter 12 

125

Appendix

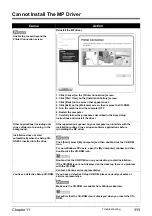
Transporting The Machine

When relocating the machine or storing the machine for prolonged periods, pack the machine using 
the original packing materials. 
If you do not have the original packing materials, pack the machine carefully using protective 
material and a sturdy box.

1

Turn the machine OFF and unplug the machine.

2

Close the Paper Support and Paper Support Extension.

3

Disconnect the USB cable from the computer and from the machine and then 
disconnect the power cord from the machine.

4

To prevent the Scanning Unit or the Paper Support from opening, secure them with 
tape.

5

Cover the machine with protective materials attached on both sides and put it in a 
box.

Important

To protect the machine from damage, do not unplug the machine while 
the Alarm lamp is on.

Note

If using a transport company, clearly label the box as fragile.

Содержание PIXMA MP460

Страница 1: ...INE Cartridges Standard are compatible with this machine The following FINE Cartridges High Yield are also compatible with this machine For details on FINE Cartridge replacement refer to Replacing A F...

Страница 2: ...m Support program specifics are subject to change without notice Ordering Information For additional supplies use the following descriptions and order numbers Description Order FINE Cartridges PG 40 B...

Страница 3: ...ely high quality prints About Consumables Consumables ink tanks FINE Cartridges are available for 5 years after production has stopped Trademark Notices Windows is a registered trademark of Microsoft...

Страница 4: ...e Machine Settings 71 Print Settings 72 Wireless Print Settings 72 Bluetooth Settings 73 Other Settings 73 Language Selection 74 Reset Setting 74 Save Settings 74 Load Settings 74 10 Routine Maintenan...

Страница 5: ...3 Specifications 126 Regulatory Information 129 FCC Notice U S A Only 129 Canon U S A INC LIMITED WARRANTY USA Only 130 Users In Canada 133 Customer Technical Supports 133 Index 134...

Страница 6: ...your local power company The shape of the plug and outlet may vary depending on the country of purchase Do not allow the power cord to be near objects that emit heat The outer cover of the power cord...

Страница 7: ...If you place it near to them the machine may malfunction as a result of the noise emitted by the fluorescent lighting When turning OFF the power be sure to press ON OFF and confirm that the Alarm Lamp...

Страница 8: ...depending on local electrical requirements Do not plug the machine into the same circuit as appliances such as an air conditioner television or copier These devices generate electrical noise which may...

Страница 9: ...be careful not to get ink on your hands or clothing If ink gets on your hands or clothing wash them soon in running water If you use hot water the ink may adhere and become difficult to remove After...

Страница 10: ...artridges Ink Cartridges out of the reach of small children If a child ingests any ink consult a doctor immediately Do not shake FINE Cartridges Ink Cartridges Ink may leak out and stain clothing or t...

Страница 11: ...ed correctly In order to use the machine safely always pay attention to these cautions Important Indicates operational warnings and restrictions Be certain to read these items to operate the machine c...

Страница 12: ...loading paper ensure the left edge of the paper just touches this guide 5 Auto Sheet Feeder Load paper here Paper feeds automatically one sheet at a time 6 Card Slot Cover Covers the Card Slots Open...

Страница 13: ...t a memory card or card adapter containing a memory card into these slots for photo printing The machine is equipped with two kinds of Card Slot 16 Access Lamp Lights when a memory card is inserted in...

Страница 14: ...our machine The power cannot be turned OFF with ON OFF when the machine is operating Your machine performs a print head cleaning every time you plug in the machine This ensures optimum print quality b...

Страница 15: ...Chapter 1 13 Before Printing 14 Photo Index Sheet Button Switches the machine to Photo Index Sheet mode 15 COPY Button Switches the machine to copy mode...

Страница 16: ...order to produce high definition prints In the same way that the tip of a felt tip or marker pen will naturally dry out over time and become unusable even with the cap in place the nozzles might beco...

Страница 17: ...laten Glass Document Type z All types of paper documents z Photographs z Books catalogs or magazines Size W x L Max 8 1 2 in x 11 3 4 in 216 mm x 297 mm Thickness Max 3 4 in 20 mm Note Make sure any g...

Страница 18: ...ot to touch the print surface The print quality will deteriorate if the print surface is damaged or becomes dirty z Do not touch the print surface until the ink has dried z Some paper may curl and the...

Страница 19: ...hickness Lever Position Printer Driver Setting For Media Type Super White Paper SW 201 Approx 100 sheets Letter A4 Left Plain Paper High Resolution Paper HR 101N Approx 80 sheets Letter A4 Left High R...

Страница 20: ...portrait orientation You can use regular copier paper cotton bond paper or typical letterhead Your machine does not require special inkjet paper Legal size paper can only be used when printing from yo...

Страница 21: ...than High Resolution Paper and has a glossy surface to produce near photographic quality printouts By using borderless printing you can print without any white borders Do not touch the printing surfa...

Страница 22: ...from your computer photo printing This is a thick paper with a glossy water resistant coating and provides superior color reproduction It is ideal for printing high quality photographs By using borde...

Страница 23: ...the count reaches 20 For other than 4 x 6 cards remove the paper from the Paper Output Tray before the count reaches 10 For additional information on Photo Paper Pro see page 22 Photo Stickers 4 x 6 4...

Страница 24: ...from direct exposure to air or sunlight z Do not mount printouts in an adhesive type album as you may not be able to remove them z Be aware that some types of clear plastic folders and albums may cau...

Страница 25: ...to Sheet Feeder 1 pinch the Paper Guide A and adjust it to the left side of the stack 2 z Set the Paper Thickness Lever to the correct position for the paper See page 17 Note Set the Lever to the left...

Страница 26: ...he envelopes to make the folds crisp Also press firmly on the area that corresponds to the edges of the back flap z Remove any curling by holding the edges diagonally and bending them gently z If the...

Страница 27: ...Auto Sheet Feeder 1 pinch the Paper Guide A and adjust it to the left side of the stack 2 z Load the envelopes in the Auto Sheet Feeder with the short side down z Set the Paper Thickness Lever to the...

Страница 28: ...such as page size media type bordered or borderless print etc z How to change the Settings screen This section describes the steps to specify the page size for Memory card mode to 4 x 6 101 6 x 152 4...

Страница 29: ...ng 3 Select the setting item 1 Use or to select the setting item Select A4 here 4 Change the setting 1 Use or to change the setting Change to 4 x 6 101 6 x 152 4 here 5 Complete setting 1 Press Settin...

Страница 30: ...y Fast Standard High 4 You can specify the reduction or enlargement method Same magnification Preset ratio Zoom 25 400 Fit to page Tab 2 You can specify Auto intensity 1 You can specify if Auto intens...

Страница 31: ...dia type Plain paper Photo Paper Pro Photo Plus Glossy Matte Photo Paper Glossy Photo Paper 3 Select the printing quality Standard High 4 Select bordered or borderless print Bordered Borderless 5 Sele...

Страница 32: ...as like the sky as well as on black areas Noise reduction ON Noise reduction OFF 4 Activate deactivate Face brightener function This function brightens a darkened face on the photo taken against the l...

Страница 33: ...played as well 3 Load the document on the Platen Glass 4 Press Color for color copying or Black for black white copying The machine starts copying Note Press Settings to check or change the page size...

Страница 34: ...cursor down and use or to select the setting value Holding down or steps through the values faster 3 Finalize your selection Press Settings to return to the Copy standby screen 4 Start copying See pa...

Страница 35: ...You can adjust the image quality for the document to be copied 4 You can specify the reduction enlargement method See Reducing Or Enlarging A Copy on page 32 5 You can specify if auto intensity is pe...

Страница 36: ...cedure 1 Display the Special copy screen See Special Copy on page 34 2 Use or to select Sticker copy then press OK 3 Use or to select Stickers x16 then press OK 4 Follow the on screen instructions to...

Страница 37: ...for black white copying Note z The copied image may need to be enlarged to fit onto the selected page size when making borderless copies Some cropping may occur z You can use this feature only when th...

Страница 38: ...to set the vertical repeats 5 Press to move the cursor to the right 6 Use or to set the horizontal repeats then press OK 7 Follow the on screen instructions to load the document on the Platen Glass t...

Страница 39: ...apter for xD Picture Card separately 2 Use the special adapter supplied with the card Memory Cards which can be inserted directly z CompactFlash CF Card Supports TYPE I TYPE II 3 3V z Microdrive z Mem...

Страница 40: ...he memory card Memory card data formats may not be compatible with computer specific formats z Images edited on a computer may result in improper printing z Please use only one type of memory card at...

Страница 41: ...e Card Install these cards into the left card slot z SmartMedia Card Install this card into the right card slot z Memory Stick z Memory Stick PRO z Memory Stick Duo z Memory Stick PRO Duo z SD Card z...

Страница 42: ...u 1 Press MEMORY CARD The Menu screen is displayed 2 Use or to select Single photo print and then press OK The photo selection screen is displayed 5 Select the photo to print 1 Use or to select the ph...

Страница 43: ...nt For Each Photo Multi photo Print You can specify how many copies to print for each photo 1 Prepare to print 1 Turn ON the machine 2 Load the paper in the Auto Sheet Feeder See Loading Paper on page...

Страница 44: ...ed Printing By Using The Photo Index Sheet With this machine you can easily print photographs using a Photo Index Sheet by filling in the appropriate circles to select print options and photographs yo...

Страница 45: ...3 Go to step 6 z If you select Search 1 Press OK 2 Use or to select the first recorded date of photographs you want to print then press OK 3 Use or o select the last recorded date of photographs you w...

Страница 46: ...o print for each photograph those marks will be disregarded and one copy each of all photographs will be printed 4 Select the number of copies fill in the respective circle under the photograph you wa...

Страница 47: ...t corner of the sheet with the alignment mark on the lower right corner of the Platen Glass Important z Be sure to fill in a circle for every setting item except options z If there is more than one Ph...

Страница 48: ...n the Auto Sheet Feeder See Loading Paper on page 23 2 Insert the memory card into the Card Slot See Inserting A Memory Card on page 38 2 Select the print menu 1 Press MEMORY CARD 2 Use or to select S...

Страница 49: ...y the photo to be pasted then press OK 2 Repeat step 1 to paste photos Press Back to cancel the last pasted photo Press Stop Reset to cancel all pasted photos 3 Press Color after pasting all photos Th...

Страница 50: ...t 1 Use or to select the photo you wish to print and then press OK 2 Use or to select the frame and then press OK 5 Start printing See page 47 Other Printing Functions The following print functions ar...

Страница 51: ...function are printed Print type Index The photos for which you specified Index using the DPOF function are printed according to the index print layout Photos to Print Only the photos specified using...

Страница 52: ...hard disk onto a memory card Enabling Writing Of Data To Memory Cards 1 Make sure no memory card is inserted in the machine 2 Press Menu 3 Use or to select Maintenance settings then press OK 4 Use or...

Страница 53: ...rd Important z Windows 2000 when the write protection is enabled on the machine If the computer does not detect that the write protection is enabled a delayed write error might occur and data could be...

Страница 54: ...lect Print from the application software s File menu The Print dialog box opens 2 Ensure that your machine is selected 1 3 Click Preferences or Properties 2 The Main tub of the Preferences screen is d...

Страница 55: ...the On screen Manual Note z From the Page Setup tab select the correct document size to be printed z For details about other printer driver functions click Instructions or Help to view the Printer Dri...

Страница 56: ...ng Note z You can cancel a print job in progress by simply pressing Stop Reset on the machine z Click Cancel Printing on Canon IJ Status Monitor to stop printing To show Canon IJ Status Monitor click...

Страница 57: ...up from the application software s File menu The Page Setup dialog box opens 2 Confirm that MP460 is selected in Format for 1 3 Select the desired paper size from Paper Size 2 4 Click OK 3 Note z Menu...

Страница 58: ...cuments consisting mainly of photographs and graphics featuring fine color gradation Printing tables and charts Select when printing documents consisting mainly of graphs and graphics illustrations wi...

Страница 59: ...ter Setup Utility When using Mac OS X 10 2 8 double clicking the name of your machine in the Printer List of the Print Center displays a dialog that prompts you to confirm the status of the print job...

Страница 60: ...ing Using The MP Navigator Using the MP Navigator you can scan process and save documents to your computer For details on using the MP Navigator see the Scanning Guide On the Windows desktop double cl...

Страница 61: ...button is pressed then click OK If you are using Macintosh OS X v 10 2 8 Select Applications from the Go menu then double click Image Capture Select Preferences from the Image Capture menu Select Oth...

Страница 62: ...rocedure varies depending on the application software For the detailed procedure refer to the manual of the application software you are using Important If with some types of original the position and...

Страница 63: ...ithout the need to use a computer Hereafter the digital still cameras digital video camcorders and mobile phones are collectively called the PictBridge compliant device Caution Do not connect any equi...

Страница 64: ...on the LCD display of the device when the machine is correctly connected Confirming Or Changing The Device Settings To change the page size or media type operate the device to select the PictBridge p...

Страница 65: ...ia type settings made using the controls of the machine The following sizes and types of paper can be loaded in the machine by selecting options in Page size and Media type 1 This paper is exclusively...

Страница 66: ...16 up use the following settings 1 Load Photo Stickers PS 101 in the Auto Sheet Feeder 2 Select 10 x 15 cm 4 x 6 for the Page size and Photo for the Media type 3 Select N up for layout then select 16...

Страница 67: ...hen Printing From A Mobile Phone You can select the page size media type layout and borderless printing when printing from a mobile phone The initial setting is borderless printing on 4 x 6 Photo Pape...

Страница 68: ...nd smoothes out the jaggedness that occurs when a small sized photo is printed on large sized paper 4 Select the layout of the photo from Sticker print Stickers x16 Printing on paper other than sticke...

Страница 69: ...tart Infrared Communication 1 Oppose the infrared port of the mobile phone to that of the machine at a distance of less than 20 cm 7 87 in A Infrared port of machine B Less than 20 cm 7 87 in Do not b...

Страница 70: ...el printing on the mobile phone z Following limitations apply on transmittable data It does not support printing a downloaded content or photo and a photo attached to an email for security reason It d...

Страница 71: ...ecessary print settings See Changing The Print Settings on page 26 3 Install the Bluetooth unit BU 20 to the Direct Print Port 4 Display the Bluetooth settings screen 1 Press Menu 2 Use or to select M...

Страница 72: ...etting a passkey will help prevent interference from other Bluetooth devices 3 Selecting ON will disable search and printing from Bluetooth devices 4 You can change the passkey The passkey refers to a...

Страница 73: ...n example 1 Press ON OFF to turn ON the machine 2 Display the Device settings screen 1 Press Menu The Menu screen is displayed 2 Use or to select Maintenance settings then press OK The Maintenance set...

Страница 74: ...Media type Specifies the media type for printing photos saved on a mobile phone Image optimizer When Image optimizer ON is selected corrects the jagged outline of a person s image and makes it smooth...

Страница 75: ...Selects whether to allow data to be written onto memory cards from a computer Adjust contrast Use this to adjust the contrast of the LCD if it is too low or too high Note z When Print date only or Pri...

Страница 76: ...o the default except for the language for LCD messages and the position of the print head Save Settings Saves the current settings for the Settings screen Load Settings Loads the saved settings for th...

Страница 77: ...he model number very carefully The machine will not print properly if the wrong FINE Cartridge is used or installed incorrectly The FINE Cartridge PG 50 Black High Yield and CL 51 Color High Yield are...

Страница 78: ...INE Cartridge Important z Handle FINE Cartridges carefully to avoid staining your clothes or the surrounding work area z Discard empty FINE Cartridges according to local laws and disposal regulations...

Страница 79: ...rt a new FINE Cartridge on a slight tilt 2 Push the FINE Cartridge up until it clicks into place Important z Do not reattach the Protective Tape once you have removed it z Handle the removed Protectiv...

Страница 80: ...artridge removed z When a FINE Cartridge runs out of ink replace the FINE Cartridge with a new one immediately If you replace it with the FINE Cartridge that has previously been removed the machine ma...

Страница 81: ...en printing is finished replace the FINE Cartridge immediately If you continue printing with an empty FINE Cartridge it will be a cause of trouble Be sure to press OK with all the FINE Cartridges inst...

Страница 82: ...er 10 Routine Maintenance Note If an error message is displayed on the LCD a FINE Cartridge error has occurred and the machine cannot continue to print See An Error Message Is Displayed On The LCD on...

Страница 83: ...d FINE Cartridge is installed a message that the remaining level of ink cannot be detected appears z When the mark appears on the Low Ink Warning The ink level of the FINE Cartridge showing the mark i...

Страница 84: ...en Printer Setup Utility or Print Center 2 Double click the model name from Name in the Printer List and then click Utility 3 Choose the name of your machine from Product and click the Maintenance but...

Страница 85: ...t you replace the FINE Cartridge with a new one If you try printing when mark appears the following message appears and printing stops In either case clicking OK cancels the error indication and enabl...

Страница 86: ...ay improve the print quality See Increase the Print Quality setting in the Printer Driver Guide Step 1 See Printing The Nozzle Check Pattern on page 85 After FINE Cartridge Cleaning print the nozzle c...

Страница 87: ...are blurred or the color is incorrect Performing Maintenance 1 Press ON OFF to turn ON the machine 2 Press Menu 3 Display the Maintenance screen 1 Use or to select Maintenance settings then press OK T...

Страница 88: ...he Auto Sheet Feeder 2 Print the Nozzle Check Pattern 1 Display the Maintenance screen 2 Use or to select Nozzle check then press OK The pattern print confirmation screen is displayed 3 Use or to sele...

Страница 89: ...rly Examine the nozzle check pattern output by the machine z If the lines are broken 1 or white lines 2 are present in the pattern A replace the relevant ink tank See Replacing A FINE Cartridge on pag...

Страница 90: ...10 Routine Maintenance z A white stripe exists on any of the printed patterns 1 Select Also B and press OK The cleaning confirmation screen is displayed 2 Select Yes and press OK to start FINE Cartrid...

Страница 91: ...leaning starts when the ON OFF lamp starts flashing 3 Check the FINE Cartridge condition 1 When the Nozzle check confirmation screen is displayed print the nozzle check pattern A nozzle check pattern...

Страница 92: ...tion message is displayed select Yes and press OK FINE Cartridge Deep Cleaning starts when the ON OFF lamp starts flashing 3 Check the FINE Cartridge condition 1 Print a nozzle check pattern to evalua...

Страница 93: ...d 1 With the machine ON load a sheet of A4 or Letter sized plain paper in the Auto Sheet Feeder Move the Paper Thickness Lever to the left position 2 Print the pattern 1 Display the Maintenance screen...

Страница 94: ...Least solid box 2 Load the checked sheet on the Platen Glass When loading the checked sheet place the front side down and align the upper left corner of the sheet with the alignment mark on the lower...

Страница 95: ...ou have trouble getting the scanning area clean wipe with diluted mild detergent for dish washing Cleaning The Exterior Wipe the machine s exterior with a clean soft lint free damp cloth Caution z Be...

Страница 96: ...Display the Maintenance screen 2 Use or to select Roller cleaning then press OK The confirmation screen is displayed 3 Use or to select Yes then press OK The paper feed rollers are cleaned 3 Repeat st...

Страница 97: ...ng quality The parts can be cleaned in the following ways See Cleaning The Bottom Plate on page 95 See Cleaning The Protrusions Inside The Machine on page 96 1 Ensure that the machine is turned ON and...

Страница 98: ...The Machine If the protrusions inside the machine are stained wipe ink off the protrusions using a swab or something similar Note If the discharged paper still appears dirty after you have run this Cl...

Страница 99: ...Cannot Print Properly From The Digital Camera See page 108 Cannot Print Properly Through Wireless Communication See page 110 Cannot Install The MP Driver See page 111 Cannot Connect To PC Properly Se...

Страница 100: ...e ink absorber is almost full Press OK to continue printing Contact the service center The ink absorber is almost full Printing will no longer be possible once the ink absorber is full Contact the ser...

Страница 101: ...hine back in and turn the machine back ON If the problem remains contact a Canon service representative Cause Action Cannot see the display properly on the LCD The display on the LCD is illegible Adju...

Страница 102: ...e 91 Print Quality is not set properly Be sure to set the Print Quality setting to High in Windows or Fine in Macintosh 1 Open the printer properties dialog box 2 On the Main tab click High for the Pr...

Страница 103: ...unning If you still cannot print restart Windows and try printing again The machine has been printing continuously over a long period If so the FINE Cartridge will overheat To protect the FINE Cartrid...

Страница 104: ...d correctly Check that the document is loaded correctly on the Platen Glass See Loading Documents on page 15 The quality image quality displayed on the LCD is not suitable for the document Set the ima...

Страница 105: ...here is no paper loaded in the Auto Sheet Feeder 2 Place A4 Letter sized plain paper in landscape orientation horizontally fold it in half 3 Unfold the paper and load the paper in the Auto Sheet Feede...

Страница 106: ...er Types You Cannot Use on page 16 z Note that smudging may occur at the top and bottom edges of the paper when using Borderless Printing Ensure that the paper you are using is compatible with Borderl...

Страница 107: ...loaded Paper is loaded incorrectly Load in the portrait orientation regardless of the print direction of the Auto Sheet Feeder Ensure that paper is loaded correctly Slide the paper guides against the...

Страница 108: ...nside the machine at this time After removing all paper close the Scanning Unit turn the machine OFF and turn it back ON z If you cannot pull the paper out turn the machine OFF and turn it back ON The...

Страница 109: ...ten Glass See Printing By Using The Photo Index Sheet on page 42 Cause Action The language you want to be displayed is not selected Select the language you want to be displayed following the procedure...

Страница 110: ...le device may need to be switched to printing mode before it is connected to the machine depending on the model of the device Also it may need to be turned on manually or switched to replay mode after...

Страница 111: ...the FINE Cartridge and close the Scanning Unit If printing is in progress and you want to continue printing press OK with the FINE Cartridge installed Then printing can continue under the ink out con...

Страница 112: ...proper communication During infrared communication infrared rays were interrupted or another infrared communication device is operating nearby If infrared communication between the infrared ports of t...

Страница 113: ...on your computer can interfere with the installation routine Close all open software applications before reinstalling the MP driver Installation does not start automatically when the Setup CD ROM is...

Страница 114: ...0 the machine will operate at the lower speed provided under USB 1 1 In this case the machine operates properly but printing speed may be slower due to the communication speed Check the following to...

Страница 115: ...different USB port on the computer itself not a hub z If a USB hub is used for the connection do not use it Attach the cable directly to a USB port on the computer itself not the hub z The machine may...

Страница 116: ...ment Cover of the machine taking special care not to press strongly on the Platen Glass The status of the original is poor Scan with certain functions such as Reduce Dust and Scratches Fading Correcti...

Страница 117: ...ginal is slightly crooked on the Platen Glass within 10 degrees of true the image will be automatically straightened z Originals that are irregularly shaped close cropped photos or smaller than 1 2 30...

Страница 118: ...rogram supplied with the machine instead See the on screen manuals for each application program for the detailed procedures z Change the resolution setting in the scanner driver and rescan The higher...

Страница 119: ...trol Panel Printers and Other Hardware and then Printers and Faxes For non Windows XP click Start select Settings and then Printers 2 Select the icon of your machine 3 Open the File menu and select Pr...

Страница 120: ...wing the procedures described in the Easy Setup Instructions Cause Action The ink absorber is almost full Ink used for cleaning is absorbed in a ink absorber inside the machine Press OK to cancel the...

Страница 121: ...are not installed Insert the Setup CD ROM into your computer and install the on screen manuals instruction manuals The Instructions button is displayed only on Main and Maintenance tabs The Scanning G...

Страница 122: ...nfirm the following z Product name PIXMA MP460 z Serial number written on label at rear of machine z Details of the problem z What you tried to solve the problem and what happened Caution Attempts by...

Страница 123: ...with no margins is possible This is available in A4 Letter 4 x 6 101 6 x 152 4 mm 4 x 8 101 6 x 203 2 mm and 5 x 7 127 0 x 177 8 mm and Credit Card paper sizes See A4 B5 A5 4 x 6 4 x 8 5 x 7 Credit C...

Страница 124: ...2 x 169 8 mm 4 7 x 6 7 in Credit Card 47 2 x 78 0 mm 1 86 x 3 07 in Recommended printing area Printable area Note When Printing on Glossy Photo Paper GP 401 GP 501 Matte Photo Paper MP 101 Photo Paper...

Страница 125: ...Photo Paper Plus Double Sided PP 101D Photo Paper Plus Glossy PP 101 Photo Paper Plus Semi gloss SG 101 SG 201 and Photo Paper Pro PR 101 selection of Borderless Printing enables you to make prints wi...

Страница 126: ...click OK When the message prompting you to restart your computer is displayed click OK to restart your computer z Uninstall the Printer Driver Guide and Scanning Guide Delete the MP driver and scanner...

Страница 127: ...ug the machine 2 Close the Paper Support and Paper Support Extension 3 Disconnect the USB cable from the computer and from the machine and then disconnect the power cord from the machine 4 To prevent...

Страница 128: ...t IrDA Bluetooth1 2 Option Acoustic noise level Approx 45 dB A when printing in the highest print quality mode on Photo Paper Pro Operating environment Temperature 5 to 35 C 41 to 95 F Humidity 10 to...

Страница 129: ...icker Printing on this paper is available only when the Layout function on your camera has a 16 up option See Recommended Paper on page 17 2 If using a Canon PictBridge compatible camera you can selec...

Страница 130: ...J Status Monitor cannot be used under the following conditions When sharing this machine on a network Windows Me Windows 98 z Use a Macintosh series computer equipped with USB interface on which Mac O...

Страница 131: ...s However there is no guarantee that interference will not occur in a particular installation If this equipment does cause harmful interference to radio or television reception which can be determined...

Страница 132: ...shall have no responsibility for such items except for compatible Canon brand peripheral equipment covered by a separate warranty Separate Warranty Repairs of such Canon brand peripheral equipment sh...

Страница 133: ...OF THE PRODUCT CAUSING THE ALLEGED DAMAGE WITHOUT LIMITING THE FOREGOING YOU ASSUME ALL RISK AND LIABILITY FOR LOSS DAMAGE OR INJURY TO YOU AND YOUR PROPERTY AND TO OTHERS AND THEIR PROPERTY ARISING O...

Страница 134: ...xchange Service expedites usually by the second business day the exchange of a defective Product with a replacement Product which will normally be shipped the same day if your request for this service...

Страница 135: ...N z The location of the authorized service facility nearest you 1 800 OK CANON If the problem cannot be corrected by using one of the above technical support options repair options are available at th...

Страница 136: ...Cartridge 79 G General Paper Guidelines 16 I IrDA Port 10 L LCD Liquid Crystal Display 12 Loading Paper 23 Loading Envelopes 24 M Machine Parts 10 Memory Card 37 Inserting 38 Reading From Writing To...

Страница 137: ...AN Button 12 Scanning Images 58 From An Application Software 60 Using The MP Navigator 58 Using The SCAN Button 59 Scanning Unit 11 Scanning Unit Support 11 Setting Documents 15 Document Requirements...

Страница 138: ...erials related to such distribution and use acknowledge that the software was developed at Cygnus Support Inc Cygnus Support Inc may not be used to endorse or promote products derived from this softwa...

Страница 139: ...m Support program specifics are subject to change without notice Ordering Information For additional supplies use the following descriptions and order numbers Description Order FINE Cartridges PG 40 B...

Страница 140: ...INE Cartridges Standard are compatible with this machine The following FINE Cartridges High Yield are also compatible with this machine For details on FINE Cartridge replacement refer to Replacing A F...

Отзывы: