


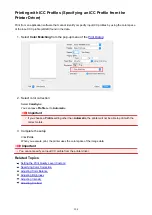


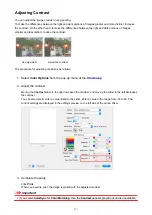

Printing with ICC Profiles (Specifying an ICC Profile from the
Printer Driver)
Print from an application software that cannot identify or specify input ICC profiles by using the color space
of the input ICC profile (sRGB) found in the data.
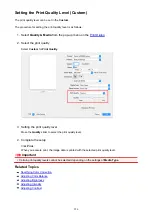
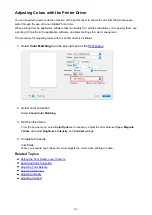
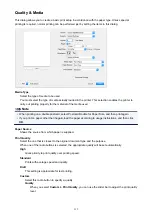
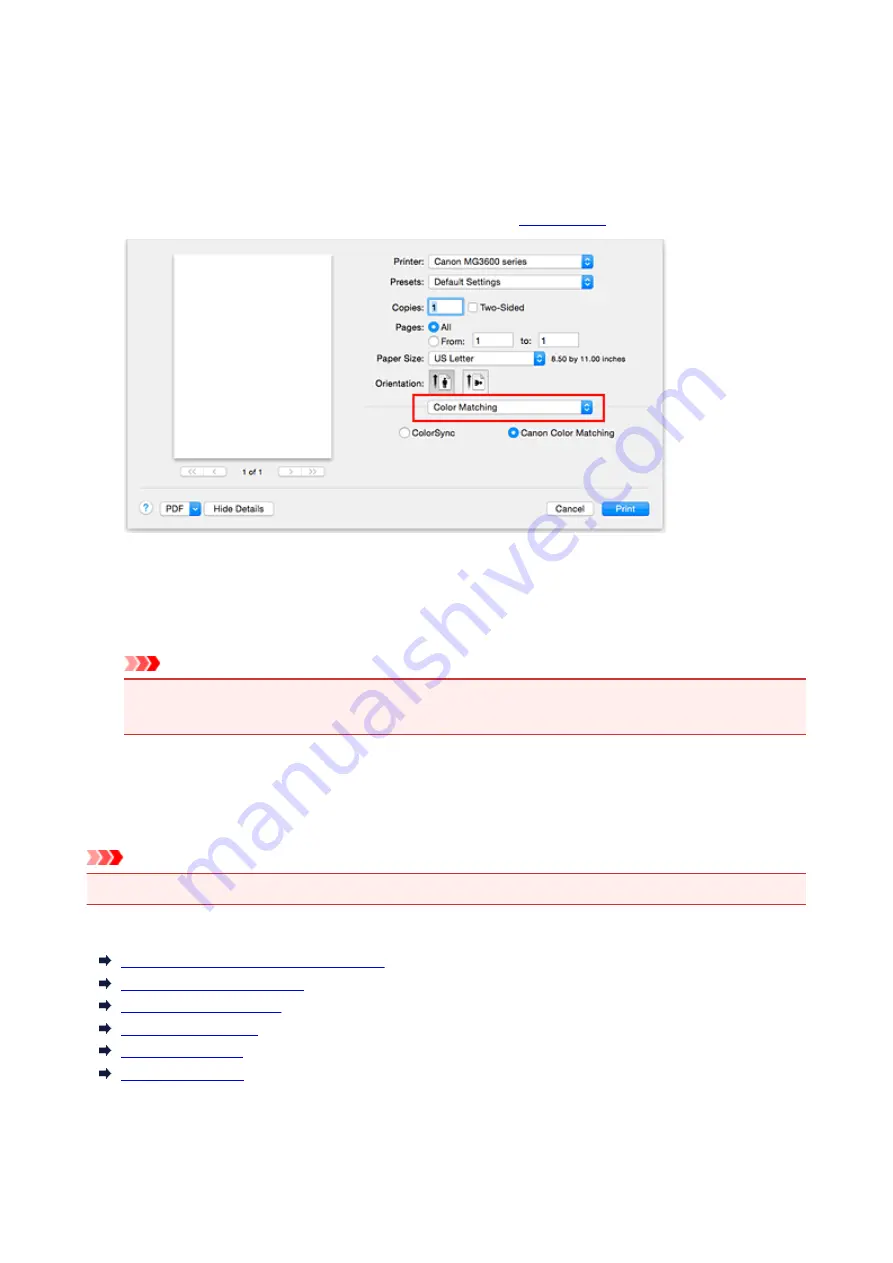
1. Select
Color Matching
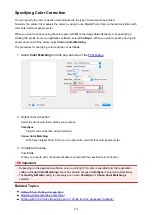
2. Select color correction
Select
ColorSync
.
You can leave
Profile
set to
Automatic
.
Important
• If you choose a
Profile
setting other than
Automatic
, the printer will not be able to print with the
correct colors.
3. Complete the setup
Click
.
When you execute print, the printer uses the color space of the image data.
Important
• You cannot specify an input ICC profile from the printer driver.
Related Topics
Setting the Print Quality Level (Custom)
Specifying Color Correction
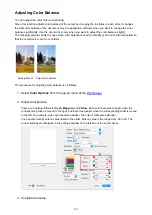
Adjusting Color Balance
Adjusting Brightness
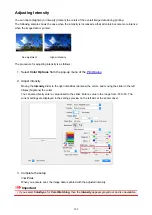
Adjusting Intensity
Adjusting Contrast
304
Содержание PIXMA MG3660
Страница 23: ...Using the Machine Printing Photos from a Computer Copying Originals 23...
Страница 27: ...My Image Garden Guide Mac OS 27...
Страница 30: ...Note For details on copy features see Copying 30...
Страница 82: ...4 The senior clerk selects Advanced management from 5 For Select how to manage the senior clerk selects Set 82...
Страница 85: ...11 On Printers tab check that all printers are selected 12 On Apps tab set only Evernote app to 85...
Страница 89: ...6 On the Printers tab select printer to be used 7 On the Apps tab set the Evernote and Facebook apps to 89...
Страница 115: ...Loading Paper Loading Plain Paper Photo Paper Loading Envelopes 115...
Страница 128: ...Replacing a FINE Cartridge Replacing a FINE Cartridge Checking Ink Status 128...
Страница 167: ...Keeping Print Quality High Transporting Your Printer Legal Restrictions on Scanning Copying Specifications 167...
Страница 168: ...Safety Safety Precautions Regulatory Information 168...
Страница 173: ...Main Components and Their Use Main Components Power Supply 173...
Страница 174: ...Main Components Front View Rear View Inside View Operation Panel 174...
Страница 197: ...Changing Settings from Operation Panel Quiet setting Turning on off Machine Automatically 197...
Страница 202: ...Network Connection Network Connection Tips 202...
Страница 210: ...Network Communication Mac OS Checking and Changing Network Settings Network Communication Tips 210...
Страница 216: ...Changing Settings in Direct Connection 4 Help menu Instructions Displays this guide 216...
Страница 224: ...Note This machine supports WPA WPA2 PSK WPA WPA2 Personal and WPA2 PSK WPA2 Personal 224...
Страница 234: ...Network Communication Tips Using Card Slot over Network Technical Terms Restrictions 234...
Страница 262: ...Printing Area Printing Area Other Sizes than Letter Legal Envelopes Letter Legal Envelopes 262...
Страница 271: ...Printing Printing from Computer Printing from Smartphone Tablet Printing from Digital Camera 271...
Страница 286: ...Click Print When you execute print the document will be enlarged or reduced to fit to the page size 286...
Страница 292: ...Related Topics Cleaning Inside the Printer Changing the Printer Operation Mode 292...
Страница 299: ...Printing with ICC Profiles Specifying an ICC Profile from the Printer Driver 299...
Страница 303: ...Adjusting Brightness Adjusting Intensity Adjusting Contrast 303...
Страница 338: ...Printing Using Canon Application Software My Image Garden Guide Easy PhotoPrint Guide 338...
Страница 340: ...Printing Using a Web Service Using PIXMA MAXIFY Cloud Link Printing with Google Cloud Print 340...
Страница 354: ...Printing from Smartphone Tablet Printing Directly from Smartphone Tablet Printing Using a Web Service 354...
Страница 364: ...Printing Using a Web Service Using PIXMA MAXIFY Cloud Link Printing with Google Cloud Print 364...
Страница 379: ...Scanning Scanning from Computer Windows Scanning from Computer Mac OS Scanning Using Smartphone Tablet 379...
Страница 396: ...5 Select Select Source according to the items to be scanned 6 Select Auto scan for Paper Size then click OK 396...
Страница 400: ...Note The default save folder is the Pictures folder 7 Click OK Scanned images are saved according to the settings 400...
Страница 414: ...Defaults You can restore the settings in the displayed screen to the default settings 414...
Страница 420: ...Instructions Opens this guide Defaults You can restore the settings in the displayed screen to the default settings 420...
Страница 424: ...Defaults You can restore the settings in the displayed screen to the default settings 424...
Страница 459: ...Scanning Tips Resolution Data Formats 459...
Страница 469: ...Network Communication Problems Cannot Find Machine on Network Network Connection Problems Other Network Problems 469...
Страница 478: ...Note For Windows you can use the Setup CD ROM to redo setup 478...
Страница 502: ...Problems while Printing Scanning from Smartphone Tablet Cannot Print Scan from Smartphone Tablet 502...
Страница 512: ...Back of Paper Is Smudged Vertical Line Next to Image Uneven or Streaked Colors 512...
Страница 586: ...For paper jam support codes see also List of Support Code for Error Paper Jams 586...
Страница 602: ...1202 Cause Paper output cover is open What to Do Close the paper output cover 602...
Страница 603: ...1250 Cause Paper output tray is closed What to Do Open the paper output tray and resume printing 603...
Страница 642: ...5B02 Cause Printer error has occurred What to Do Contact your nearest Canon service center to request a repair 642...
Страница 643: ...5B03 Cause Printer error has occurred What to Do Contact your nearest Canon service center to request a repair 643...
Страница 644: ...5B04 Cause Printer error has occurred What to Do Contact your nearest Canon service center to request a repair 644...
Страница 645: ...5B05 Cause Printer error has occurred What to Do Contact your nearest Canon service center to request a repair 645...
Страница 646: ...5B12 Cause Printer error has occurred What to Do Contact your nearest Canon service center to request a repair 646...
Страница 647: ...5B13 Cause Printer error has occurred What to Do Contact your nearest Canon service center to request a repair 647...
Страница 648: ...5B14 Cause Printer error has occurred What to Do Contact your nearest Canon service center to request a repair 648...
Страница 649: ...5B15 Cause Printer error has occurred What to Do Contact your nearest Canon service center to request a repair 649...


