Canon PIXMA G2060 Series Скачать руководство пользователя страница 36

4

Настроювання принтера

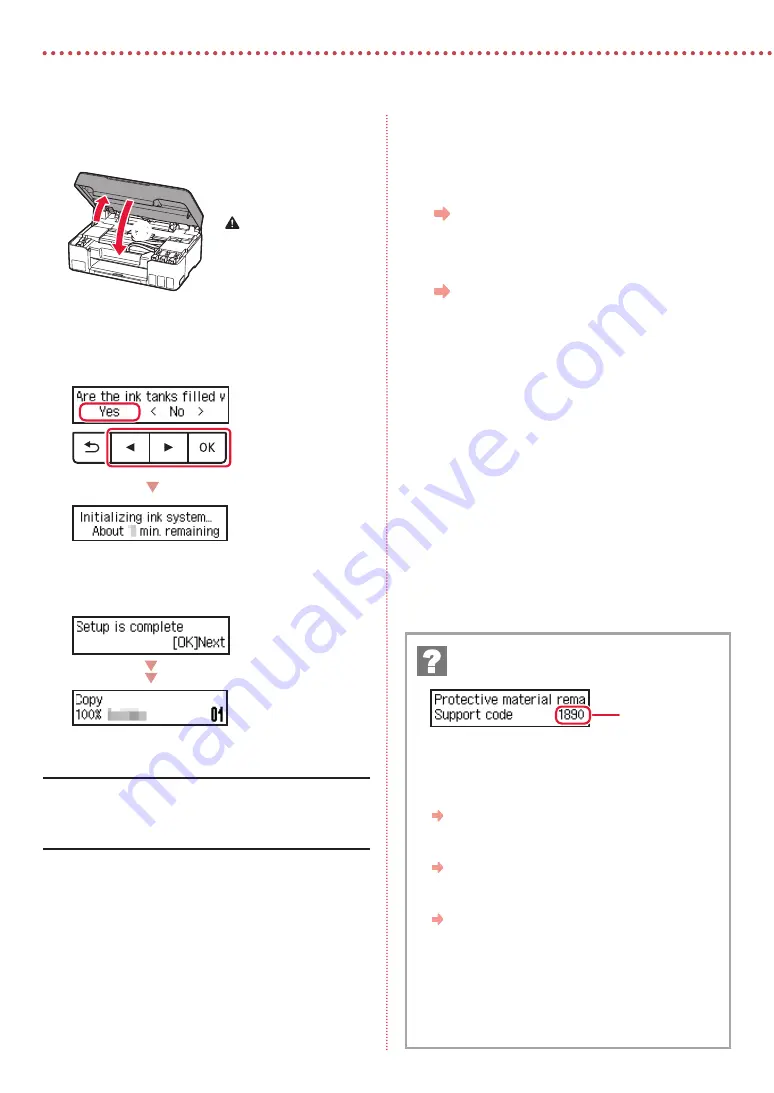
Закрийте модуль сканування / кришку.

• 

Повністю відкрийте модуль сканування / кришку, 
потім закрийте цей компонент.

b

a

 Увага!

Бережіть пальці.

10 

Якщо з’явиться наведений нижче екран, 
кнопками 

[

 і 

]

 виберіть пункт 

Так (Yes)

 і 

натисніть кнопку 

OK

.

• 

Зачекайте, доки не з’явиться наведений нижче 
екран. Дотримуйтесь інструкцій на екрані та 
натисніть кнопку 

OK

.

Якщо потрібно використовувати принтер без 
підключення інших пристроїв, настроювання можна 
завершити.

Виберіть найоптимальніший спосіб підключення залежно 
від того, як використовуватиметься принтер.

• 

Використання принтера без підключення до інших 
пристроїв

  Настроювання завершено.

• 

Щоб використовувати принтер із підключеним 
комп’ютером

  Перейдіть до наступної сторінки.

Перегляньте код підтримки та дотримуйтесь 
інструкцій, якщо це один із кодів, наведених нижче.

• 

1890

Не знято захисні матеріали.

 «2. Зняття пакувальних матеріалів» на стор. 1

• 

1470

Друкуючі головки встановлено неправильно.

 «3. Встановлення друкуючих головок» на стор. 1

• 

1471

Не вдається розпізнати друкуючі головки.

 «3. Встановлення друкуючих головок» на стор. 1

• 

5200

Під час підготовки системи чорнил сталася помилка. 

Натисніть кнопку 

УВІМК. (ON)

, щоб перезавантажити 

принтер, а потім перегляньте розділ «5. Наливання 

чорнила» на стор. 3.

В іншому разі див. 

Онлайновий посібник

.

Якщо на екрані з’явиться повідомлення 

про помилку (код підтримки)

Код підтр. 
)Support code(

Содержание PIXMA G2060 Series

Страница 1: ...tes addendum D marrage Leia Informa es Importantes e Sobre Seguran a adendo primeiro Para Come ar Lea primero Informaci n de seguridad e informaci n importante ap ndice Gu a de inicio Getting Started...

Страница 2: ...n ordinateur page 5 Segurando a impressora Instalando a impressora p gina 1 Conectando a um Computador p gina 5 C mo sujetar la impresora Instalaci n de la impresora p gina 1 Conectar al ordenador p g...

Страница 3: ...d orange tape 2 Open the scanning unit cover remove and dispose of the orange tape and protective material inside a b 3 Installing the Print Heads 1 Open the print head locking cover 2 Take out each p...

Страница 4: ...k 7 Close the scanning unit cover Open the scanning unit cover fully and then close it b a Caution Watch your fingers 4 Turning on the Printer 1 Connect the power cord Back 2 Press the ON button 3 Whe...

Страница 5: ...e ink bottle upright and gently twist the bottle cap to remove Check PGBK 4 Align the nozzle of the ink bottle with the inlet 5 Slowly stand the ink bottle upside down and push down to pour the ink If...

Страница 6: ...se the printer without connecting to any other devices Setup is now complete To use the printer connecting to a computer Proceed to the next page Check the support code and then follow the instruction...

Страница 7: ...lick B Connecting to a Computer The following steps are for Windows users 6 Click Download 7 Run the downloaded file Follow the on screen instructions This may take some time Using the Setup CD ROM Do...

Страница 8: ...Online Manual for details Check that both joint buttons are pressed down completely to avoid ink leaks Check that the position of the ink valve lever is closed Pack the printer in a plastic bag in cas...

Страница 9: ...ta naranja 2 Abra la cubierta unidad de escaneado retire y tire la cinta naranja y el material de protecci n que hay dentro a b 3 Instalar los cabezales de impresi n 1 Abra la cubierta de bloqueo del...

Страница 10: ...mprobar 7 Cierre la cubierta unidad de escaneado Abra la cubierta unidad de escaneado completamente y luego ci rrela b a Precauci n Tenga cuidado con los dedos 4 Encender la impresora 1 Conecte el cab...

Страница 11: ...arriba y gire suavemente la tapa del frasco para retirarla Comprobar PGBK 4 Alinee la boquilla del frasco de tinta con la entrada 5 Coloque el frasco de tinta boca abajo despacio y empuje hacia abajo...

Страница 12: ...o la configuraci n Para usar la impresora conect ndola a un ordenador Contin e a la p gina siguiente Compruebe el c digo de asistencia y despu s siga las instrucciones si el c digo que se muestra est...

Страница 13: ...n con un ordenador Los siguientes pasos son para usuarios de Windows 6 Haga clic en Descargar 7 Ejecute el archivo descargado Siga las instrucciones que aparezcan en pantalla Esto puede llevar alg n...

Страница 14: ...a obtener m s informaci n Compruebe que ambos botones de uni n se hayan presionado hacia abajo completamente para evitar derrames de tinta Compruebe que la palanca de v lvula de tinta est en la posici...

Страница 15: ...alagem e a fita laranja 2 Abra a unidade de digitaliza o tampa remova e descarte a fita laranja e o material de prote o que est o dentro a b 3 Instalando as cabe as de impress o 1 Abra a tampa de fixa...

Страница 16: ...ar 7 Feche a unidade de digitaliza o tampa Abra totalmente a unidade de digitaliza o tampa e feche em seguida b a Cuidado Cuidado com seus dedos 4 Ligando a Impressora 1 Conecte o cabo de alimenta o P...

Страница 17: ...e gire cuidadosamente a tampa da garrafa para remov la Verificar PGBK 4 Alinhe o bocal da garrafa de tinta com a entrada 5 Levante lentamente a garrafa de tinta de cabe a para baixo e empurre para bai...

Страница 18: ...sitivo A configura o foi conclu da Para utilizar a impressora com conex o a um computador Prossiga para a p gina seguinte Verifique o c digo de suporte e siga as instru es se o c digo exibido estiver...

Страница 19: ...que em B Conectar a um Computador As etapas a seguir s o para usu rios do Windows 6 Clique em Download 7 Execute o arquivo baixado Siga as instru es na tela Isso pode levar algum tempo Usando o CD ROM...

Страница 20: ...etalhes Verifique se ambos os bot es acoplados foram pressionados para baixo completamente para evitar vazamentos de tinta Verifique se a posi o da alavanca de v lvula de tinta est fechada Embale a im...

Страница 21: ...l unit de num risation capot retirez et jetez tout bande orange et mat riau protecteur se trouvant l int rieur a b 3 Installation des t tes d impression 1 Ouvrez le couvercle de verrouillage de t te...

Страница 22: ...Fermez l unit de num risation capot Ouvrez compl tement l unit de num risation capot puis fermez la b a Attention Faites attention vos doigts 4 Mise sous tension de l imprimante 1 Branchez le cordon d...

Страница 23: ...ille d encre bien droite et exercez doucement une torsion sur le capuchon de la bouteille pour le retirer V rifiez PGBK 4 Alignez la buse de la bouteille d encre avec l arriv e 5 Renversez lentement l...

Страница 24: ...ante sans connexion aucun autre p riph rique La configuration est termin e Pour utiliser l imprimante en la connectant un ordinateur Passez la page suivante V rifiez le code support puis suivez les in...

Страница 25: ...dinateur Les tapes suivantes concernent les utilisateurs Windows 6 Cliquez sur T l charger 7 Ex cutez le fichier t l charg Suivez les instructions l cran Cette op ration peut prendre du temps Utilisat...

Страница 26: ...us de d tails V rifiez que les deux boutons mixtes sont compl tement enfonc s pour viter les fuites d encre V rifiez que le levier de valve d encre est en position ferm e Emballez l imprimante dans un...

Страница 27: ...1 1 2 1 2 a b 3 1 2 3 URL https ij start canon...

Страница 28: ...2 4 C B 5 6 7 b a 4 1 2 ON 3 OK 4...

Страница 29: ...3 5 1 2 3 PGBK 4 5 a b 6 a b 7 8 2 7 C M Y...

Страница 30: ...4 9 b a 10 Yes OK OK 1890 2 1 1470 3 1 1471 3 1 5200 ON 5 3 Support code...

Страница 31: ...6 5 1 Canon 2 3 4 5 B Windows 6 7 EasySetup exe 3 win SETUP exe 6...

Страница 32: ...6 1 2 a b 3 a b 4 5 Save the rear tray paper information OK 6 OK 7...

Страница 33: ...1 1 2 1 2 a b 3 1 2 3 URL https ij start canon...

Страница 34: ...2 4 C B 5 6 7 b a 4 1 2 ON 3 OK 4...

Страница 35: ...3 5 1 2 3 PGBK 4 5 a b 6 a b 7 8 2 7 C M Y...

Страница 36: ...4 9 b a 10 Yes OK OK 1890 2 1 1470 3 1 1471 3 1 5200 ON 5 3 Support code...

Страница 37: ...6 5 1 Canon 2 3 4 5 B Windows 6 7 EasySetup exe 3 win SETUP exe 6...

Страница 38: ...6 1 2 a b 3 a b 4 5 Save the rear tray paper information OK 6 OK 7...

Страница 39: ...6 1 1 2 2 a b 3 3 a b 4 4 5 5 Save the rear tray paper information OK 6 6 OK 7 7...

Страница 40: ...6 5 1 1 Canon 2 2 3 3 4 4 5 5 B Windows 6 6 Download 7 7 3 EasySetup exe SETUP exe win 6...

Страница 41: ...4 9 9 b a 10 1 Yes OK OK support code 1890 1 2 1470 1 3 1471 1 3 5200 5 ON 3 support code Support code...

Страница 42: ...3 5 1 1 2 2 3 3 PGBK 4 4 5 5 a b 6 6 a b 7 7 8 8 7 2 C M Y...

Страница 43: ...2 4 4 B C 5 5 6 6 7 7 b a 4 1 1 2 2 ON 3 3 OK support 4 code...

Страница 44: ...1 1 2 1 1 2 2 a b 3 1 1 2 2 3 3 URL https ij start canon...

Страница 45: ...indows uma marca comercial ou marca registrada da Microsoft Corporation nos EUA e ou em outros pa ses Marcas comerciales Windows es una marca comercial o marca comercial registrada de Microsoft Corpor...

Страница 46: ...navigateur Acc s au Manuel en ligne Do seu navegador Acesse o Manual On line Desde su navegador Acceso al Manual en l nea Access Online Manual From your browser PRINTED IN XXXXXXXX QT6 3710 V01 CANON...

Отзывы: