background image

4

7.  Connecting to Computer 


Windows

You need a connection setup for each computer. Proceed with the setup from step 

1

 for each computer.

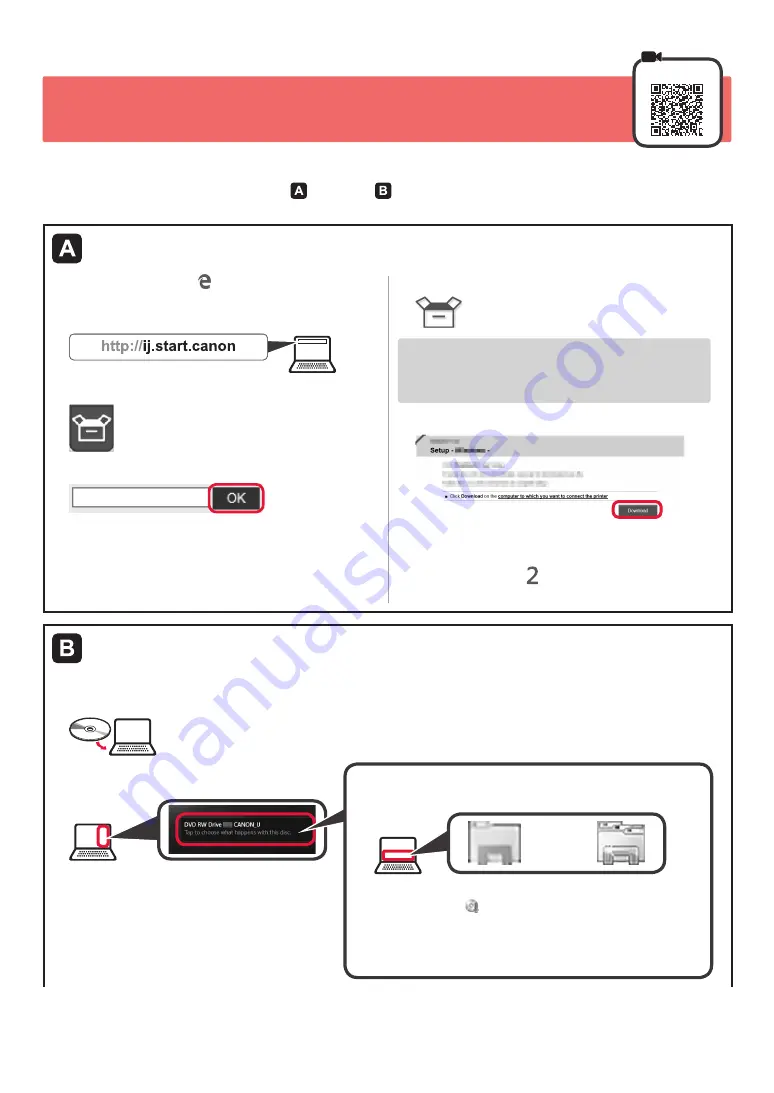
Start the setup file for either method   or method 

.

Downloading from the Internet

Open a web browser (   etc.) on your computer.

Input the following URL and access the 

Canon 

website.

Select 

Set Up

.

Input the model name of your printer and click 

OK

.

You can select a model name from the list.

Click 

Setup

.

The procedures for Windows are shown below. If 

you are using a computer with an OS other than 

Windows, do the setup according to the on-screen 

instructions.

Click 

Download

 and download the setup file.

Execute the downloaded file.

Proceed to step   on the next page to 

continue.

Using Setup CD-ROM (Windows Only)


When using Windows 10 or Windows 8.1:

Load the Setup CD-ROM in your computer.

When the following message appears on the 

right side of your computer screen, click it.

When This Message Does Not Appear (or Has Disappeared)
1.  Click 

File Explorer

 on the taskbar.

or

2.  Click 

This PC

 on the left side of the opened window.

3.  Double-click the   CD-ROM icon on the right side of the 

window.


If the contents of the CD-ROM appear, double-click 

Msetup4.exe

.

4.  Proceed to step 

d

.

Содержание Pixma G1110 Series

Страница 1: ...eia Informações Importantes e Sobre Segurança adendo primeiro Guía de inicio Lea primero Información de seguridad e información importante apéndice Getting Started Read Safety and Important Information addendum first ...

Страница 2: ...a 4 Como segurar a impressora Filmes explicativos Instalación de la impresora página 1 Conexión con el ordenador página 4 Cómo sujetar la impresora Películas explicativas Installing the Printer page 1 Connecting with Computer page 4 How to Hold Printer Explanatory Movies ...

Страница 3: ... top cover b Remove the orange tape and the protective material and discard them a b 3 Installing the Cartridge 1 Open the cartridge locking cover 2 Take out each cartridge from the package and remove the label 3 Remove the protective tape Do not touch 4 Insert the C color cartridge on the left and the B black cartridge on the right Do not bump it against the surrounding parts 5 Close the cartridg...

Страница 4: ... the error Flashing 5 Pouring Ink This product requires careful handling of ink Ink may splatter when the ink tanks are filled with ink If ink gets on your clothes or belongings it may not come off 1 Open the top cover 2 Open the ink tank cover 3 Grab and remove the tank cap of the ink tank 4 Hold the ink bottle upright and remove the bottle cap 5 Insert the nozzle of the ink bottle into the inlet...

Страница 5: ...s Proceed to the next page The Alarm lamp is flashing Count the number of flashes to determine the cause of the problem 4 times The cartridges are not installed correctly 3 Installing the Cartridge on page 1 5 times No cartridges are installed 3 Installing the Cartridge on page 1 9 times The protective materials are not removed 2 Removing Packing Materials on page 1 The ON lamp is flashing Prepari...

Страница 6: ...omputer with an OS other than Windows do the setup according to the on screen instructions f Click Download and download the setup file g Execute the downloaded file Proceed to step on the next page to continue Using Setup CD ROM Windows Only When using Windows 10 or Windows 8 1 a Load the Setup CD ROM in your computer b When the following message appears on the right side of your computer screen ...

Страница 7: ... dialog box appears click Continue When AutoPlay Screen Does Not Appear 1 Click Computer from the start menu 2 Double click the CD ROM icon on the right side of the opened window If the contents of the CD ROM appear double click Msetup4 exe Proceed to step to continue 2 Click Start Setup If the following screen appears click Exit Follow the on screen instructions to proceed with the setup The setu...

Страница 8: ...nk leaks Pack the printer in a sturdy box so that it is placed with its bottom facing down using sufficient protective material to ensure safe transport Do not tilt the printer Ink may leak Please handle with care and ensure the box remains flat and NOT turned upside down or on its side as the printer may be damaged and ink in the printer may leak When a shipping agent is handling transport of the...

Страница 9: ...de la impresora 2 a Abra la cubierta superior b Retire la cinta naranja y el material de protección y deséchelos a b 3 Instalar el cartucho 1 Abra la tapa de bloqueo del cartucho 2 Saque cada cartucho del paquete y retire la etiqueta 3 Retire la cinta protectora No tocar 4 Inserte el cartucho C color en la parte izquierda y el cartucho B negro en la parte derecha No golpear contra los objetos de a...

Страница 10: ...er la tinta Este producto un tratamiento cuidadoso de la tinta ya que puede salpicar cuando se rellenan de tinta los depósitos de tinta Es posible que las manchas de tinta no salgan de la ropa u otras pertenencias 1 Abra la cubierta superior 2 Abra la cubierta del depósito de tinta 3 Agarre y retire la tapa del depósito del depósito de tinta 4 Sujete el frasco de tinta hacia arriba y retire la tap...

Страница 11: ...arse Continúe a la página siguiente La luz de Alarma Alarm parpadea Cuente el número de parpadeos para determinar la causa del problema 4 veces Los cartuchos no están instalados correctamente 3 Instalar el cartucho en la página 1 5 veces No hay cartuchos instalados 3 Instalar el cartucho en la página 1 9 veces No se han retirado los materiales de protección 2 Retirar los materiales de protección e...

Страница 12: ...dows realice la configuración siguiendo las instrucciones en pantalla f Haga clic en Descargar y descargue el archivo de instalación g Ejecute el archivo descargado Vaya al paso en la página siguiente para continuar Uso del CD ROM de instalación solo para Windows Si utiliza Windows 10 o Windows 8 1 a Cargue el CD ROM de instalación en su ordenador b Cuando se muestre el mensaje siguiente en el lad...

Страница 13: ...rio User Account Control haga clic en Continuar Continue Si no se muestra la pantalla Reproducción automática AutoPlay 1 Haga clic en Equipo Computer en el menú de inicio 2 Haga doble clic en el icono de CD ROM en el lado derecho de la ventana abierta Si se muestra el contenido del CD ROM haga doble clic en Msetup4 exe Vaya al paso para continuar 2 Haga clic en Iniciar configuración Start Setup La...

Страница 14: ...a impresora en una caja resistente y de modo que no quede boca abajo Utilice suficiente material de protección para garantizar un transporte seguro No incline la impresora De lo contrario es posible que la tinta se derrame Manipule con cuidado y asegúrese de que la caja permanece en una superficie plana y que NO se coloca boca abajo o de lado ya que la impresora podría dañarse y la tinta de la imp...

Страница 15: ... externa da impressora 2 a Abra a tampa superior b Remova a fita laranja e o material de proteção e descarte os a b 3 Instalando o cartucho 1 Abra a tampa de fixação do cartucho 2 Retire cada cartucho do pacote e remova a etiqueta 3 Remova a fita de proteção Não toque 4 Insira o cartucho C colorido à esquerda e o cartucho B preto à direita Não bata a contra as peças em volta 5 Feche a tampa de fix...

Страница 16: ...ionar o erro Piscando 5 Colocando tinta Este produto requer manuseio cauteloso da tinta A tinta pode respingar quando cartuchos de tinta estão cheios Se a tinta entrar em contato com roupas ou objetos pode ser que ela não saia 1 Abra a tampa superior 2 Abra a tampa do cartucho de tinta 3 Segure e remova a tampa do cartucho do cartucho de tinta 4 Segure a garrafa de tinta em posição vertical e remo...

Страница 17: ... página O indicador luminoso Alarme Alarm está piscando Conte o número de piscadas para determinar a causa do problema 4 vezes Os cartuchos não estão instalados corretamente 3 Instalando o cartucho na página 1 5 vezes Nenhum cartucho instalado 3 Instalando o cartucho na página 1 9 vezes Os materiais de proteção não foram removidos 2 Removendo os materiais da embalagem na página 1 O indicador lumin...

Страница 18: ...operacional que não seja o Windows execute a configuração de acordo com as instruções na tela f Clique em Download e faça download do arquivo de configuração g Execute o arquivo baixado Siga para a etapa na próxima página para continuar Usando o CD ROM de instalação somente Windows Ao usar Windows 10 ou Windows 8 1 a Insira o CD ROM de instalação no computador b Clique na mensagem a seguir quando ...

Страница 19: ... User Account Control for exibida clique em Continuar Continue Quando a tela Reprodução Automática AutoPlay não for exibida 1 Clique em Computador Computer no menu Iniciar 2 Clique duas vezes no ícone do CD ROM no lado direito da janela aberta Se o conteúdo do CD ROM aparecer clique duas vezes em Msetup4 exe Siga para a etapa para continuar A configuração estará completa quando o indicador luminos...

Страница 20: ... Coloque a impressora em uma caixa resistente de modo que tenha sua parte inferior virada para baixo usando material de proteção suficiente para garantir o transporte seguro Não incline a impressora A tinta pode vazar Manuseie com cuidado e garanta que a caixa permaneça na horizontal e NÃO de cabeça para baixo ou de lado pois a impressora pode ser danificada e a tinta da impressora pode vazar Quan...

Страница 21: ...RMC Regulatory Model Code K10469 ...

Страница 22: ...avegador A partir do atalho da área de trabalho Do navegador Acceso al Manual en línea Desde el navegador Desde el acceso directo del escritorio Desde el navegador Access Online Manual From browser From desktop shortcut From browser PRINTED IN XXXXXXXX QT6 2276 V02 ...

Отзывы: