


Setting the Sender Information
You can set the sender information such as date/time, unit name, and unit fax/telephone number.
Setting Daylight Saving Time (Summer Time)
About the Sender Information
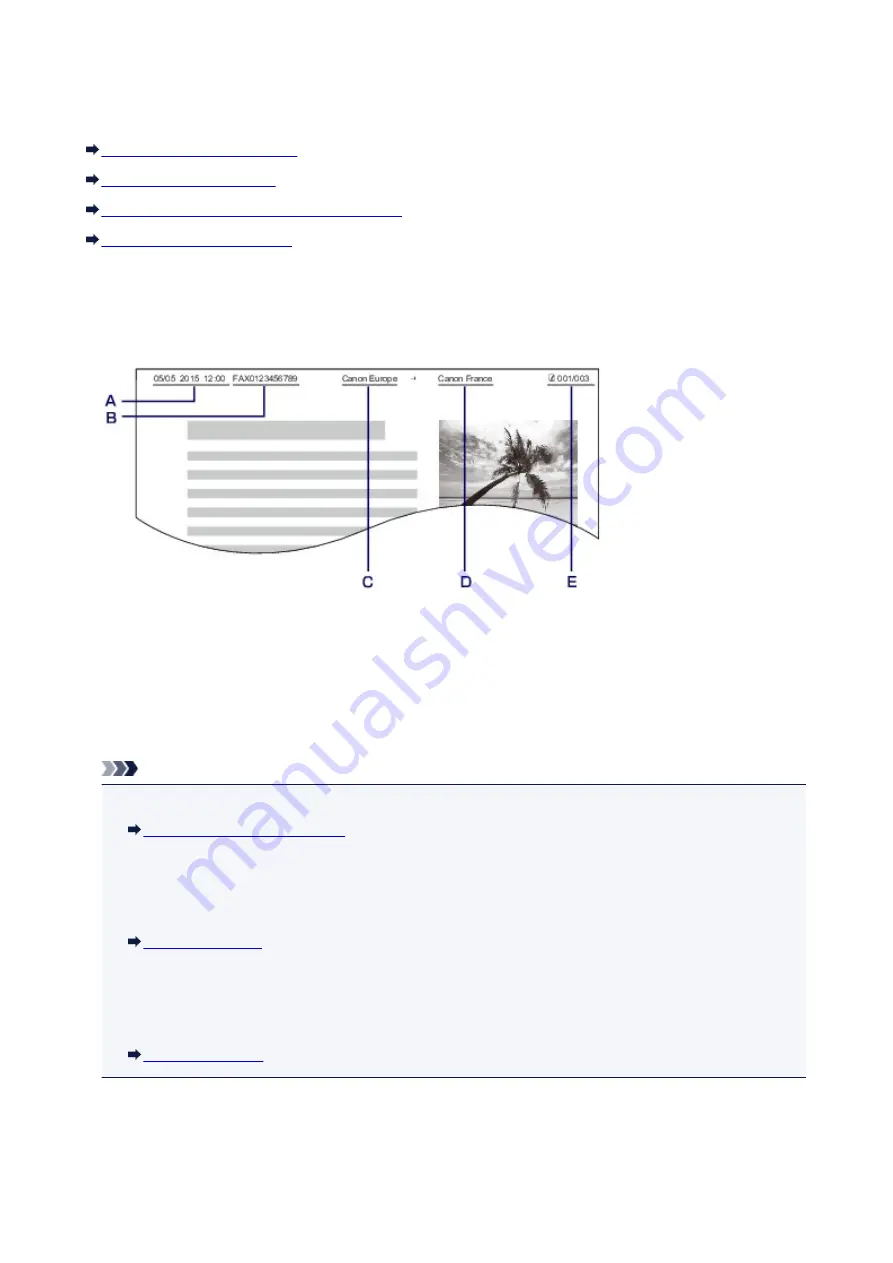
If the unit name and unit fax/telephone number are registered, they are printed with date and time as
sender information on the recipient's fax.
A. Date and time of transmission
B. Unit fax/telephone number
C. Unit name
D. The registered recipient's name is printed when sending faxes.
E. Page number
Note
• You can print USER'S DATA LIST to confirm the sender information you have registered.
• When sending faxes in black & white, you can select whether to print the sender information inside or
outside the image area.
Specify the setting on
TTI position
in
Adv. FAX settings
under
Fax settings
.
• You can select the date print format from three formats:
YYYY/MM/DD
,
MM/DD/YYYY
, and
DD/MM/
YYYY
.
Select the date print format on
Date display format
under
Dev. user settings
.
Setting the Date and Time
This section describes the procedure to set the date and time.
496
Содержание Pixma E480 series
Страница 15: ...B204 776 ...
Страница 67: ...67 ...
Страница 99: ...Safety Guide Safety Precautions Regulatory and Safety Information 99 ...
Страница 108: ...Main Components Front View Rear View Inside View Operation Panel 108 ...
Страница 121: ...Select Scan contrast press the OK button D Use the or button C to change the contrast then press the OK button D 121 ...
Страница 124: ...Loading Paper Originals Loading Paper Loading Originals 124 ...
Страница 141: ...Printing Area Printing Area Other Sizes than Letter Legal Envelopes Letter Legal Envelopes 141 ...
Страница 153: ... Photo or thick paper 153 ...
Страница 154: ...Replacing a FINE Cartridge Replacing a FINE Cartridge Checking the Ink Status 154 ...
Страница 193: ...Changing the Machine Settings Changing Machine Settings from Your Computer Changing the Machine Settings on the LCD 193 ...
Страница 222: ...Information about Network Connection Useful Information about Network Connection 222 ...
Страница 230: ...About Network Communication Changing and Confirming Network Settings Appendix for Network Communication 230 ...
Страница 244: ...Note This machine supports WPA WPA2 PSK WPA WPA2 Personal and WPA2 PSK WPA2 Personal 244 ...
Страница 252: ...Appendix for Network Communication Using the Card Slot over a Network About Technical Terms Restrictions 252 ...
Страница 272: ...272 ...
Страница 282: ...PRO 10S 282 ...
Страница 283: ...Printing Printing from a Computer Printing Using the Operation Panel of the Machine Paper setting for Printing 283 ...
Страница 284: ...Printing from a Computer Printing with Application Software that You are Using Printer Driver 284 ...
Страница 289: ... Paper Settings on the Printer Driver and the Printer Paper Size 289 ...
Страница 300: ...Click Print When you execute print the document will be enlarged or reduced to fit to the page size 300 ...
Страница 314: ...Adjusting Brightness Adjusting Intensity Adjusting Contrast 314 ...
Страница 331: ...Related Topics Setting the Print Quality Level Custom Printing a Color Document in Monochrome 331 ...
Страница 349: ...Printing Using the Operation Panel of the Machine Printing Template Forms Such As Lined Paper or Graph Paper 349 ...
Страница 356: ...Copying Making Copies Basic Reducing or Enlarging a Copy About Special copy Menu Collated Copying 356 ...
Страница 371: ...Scanning Scanning from a Computer Scanning from the Operation Panel of the Machine 371 ...
Страница 386: ...5 Select Select Source according to the items to be scanned 6 Select Auto scan for Paper Size then click OK 386 ...
Страница 395: ...Note The default save folder is the Pictures folder 7 Click OK Scanned images are saved according to the settings 395 ...
Страница 410: ...Defaults You can restore the settings in the displayed screen to the default settings 410 ...
Страница 420: ...Defaults You can restore the settings in the displayed screen to the default settings 420 ...
Страница 465: ...Useful Information on Scanning Adjusting Cropping Frames in the Image Stitch Window Resolution Data Formats 465 ...
Страница 471: ...471 ...
Страница 478: ... Scan resolution Select the resolution for scanning Ex 478 ...
Страница 483: ...6 Select the application you want to start after scanning in Application Settings 7 Click OK 483 ...
Страница 484: ...The responses will be executed according to the specified settings when you start scanning from the operation panel 484 ...
Страница 543: ...Receiving Faxes Receiving Faxes Changing the Paper Settings Memory Reception Receiving Faxes Using Useful Functions 543 ...
Страница 556: ... You can register the rejected number in Rejected numbers in TEL no registration under Fax settings 556 ...
Страница 600: ...Problems while Printing Scanning from Smartphone Tablet Cannot Print Scan from Smartphone Tablet 600 ...
Страница 629: ...Problems with Faxing Problems Sending Faxes Problems Receiving Faxes Cannot Send a Fax Clearly Telephone Problems 629 ...
Страница 643: ...Telephone Problems Cannot Dial Telephone Disconnects During a Call 643 ...
Страница 646: ...Problems with Scanning Problems with Scanning Scan Results Not Satisfactory 646 ...
Страница 672: ...Problems with Installation Downloading Cannot Install the MP Drivers Uninstalling IJ Network Tool 672 ...
Страница 673: ...Cannot Install the MP Drivers Download the driver from the support page of our website then reinstall it 673 ...
Страница 701: ...1250 Cause The paper output tray is closed Action Open the paper output tray to resume printing 701 ...
Страница 739: ...5B02 Cause Printer error has occurred Action Contact the service center 739 ...
Страница 740: ...5B03 Cause Printer error has occurred Action Contact the service center 740 ...
Страница 741: ...5B04 Cause Printer error has occurred Action Contact the service center 741 ...
Страница 742: ...5B05 Cause Printer error has occurred Action Contact the service center 742 ...
Страница 743: ...5B12 Cause Printer error has occurred Action Contact the service center 743 ...
Страница 744: ...5B13 Cause Printer error has occurred Action Contact the service center 744 ...
Страница 745: ...5B14 Cause Printer error has occurred Action Contact the service center 745 ...
Страница 746: ...5B15 Cause Printer error has occurred Action Contact the service center 746 ...