Canon PC860 Скачать руководство пользователя страница 26

Canon

PC880/860

Operator’s Manual

ENGLISH

26

Transporting the Copier and Repacking

If the copier will be subjected to vibration (e.g., when transporting over long distances), the following precautions
should be taken. If you do not follow these precautions, the copier may get damaged or the quality of your copy
images may be adversely affected.

1. Press the power switch ON.
2. Press the Preset Copy Ratio key and select a ratio of 70%. For the

PC860, proceed to Step 4.

3. For the PC880, press the Paper Select key and select the multi-stack

bypass.

4. For the PC880, without placing any paper in the multi-stack bypass, press

the Start key. For the PC860, insert a sheet of the copy stock into the
single-sheet bypass. The copier will perform an automatic adjustment
operation so that you can attach shipping attachment 

b

. (For the PC880,

the Paper Supply (

) indicator flashes and 

lights.)

5. Turn OFF the copier and unplug it.
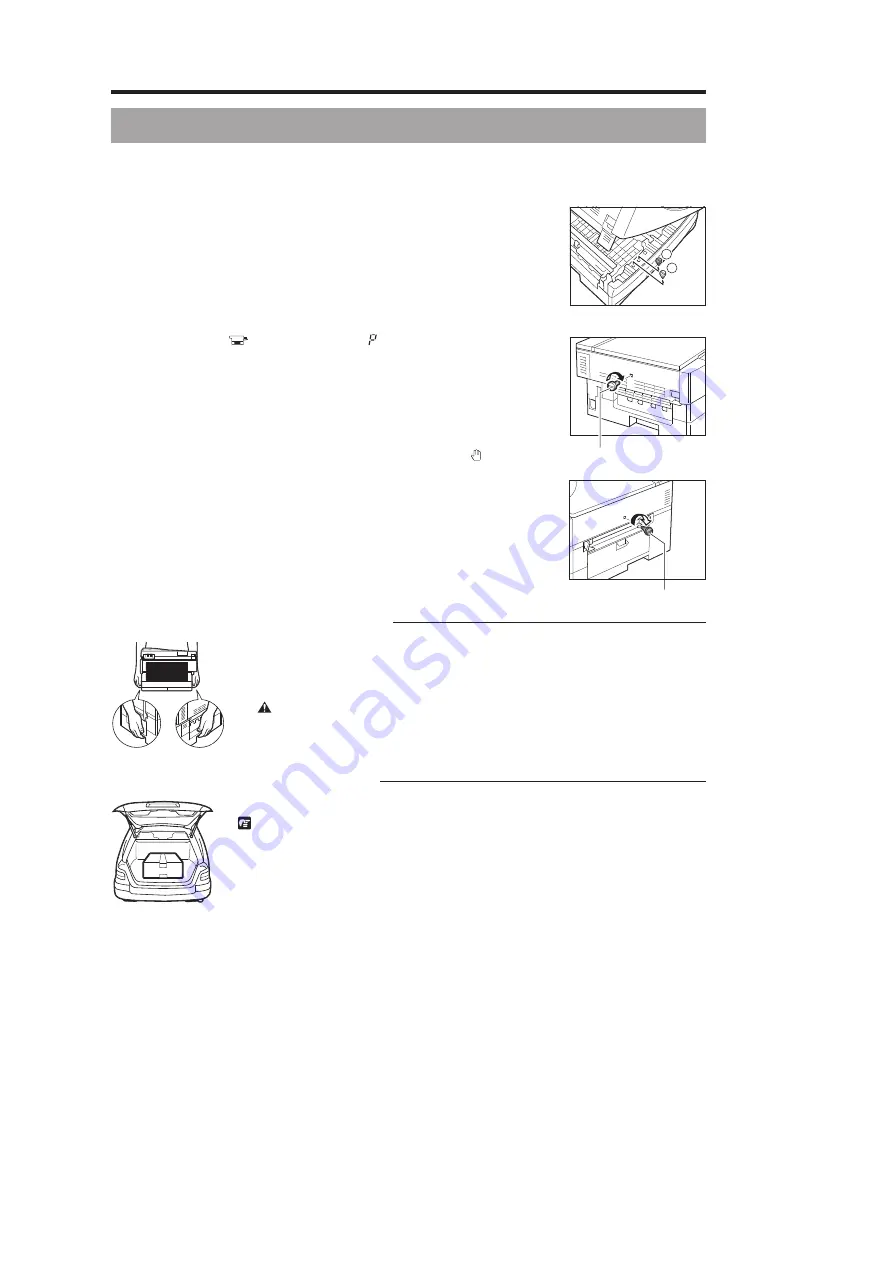
6. Lift the main unit lever on the left side to open the top of the main unit.
7. Pull out shipping attachment 

a

and 

b

from the shipping attachment

holder; these attachments were inserted in the shipping attachment holder
during the installation of your copier. (In steps 10 and 11, re-attach
shipping attachment 

a

and 

b

.)

8. Grip the end of the cartridge, and pull it out of the copier.
9. Close the main unit by pressing down firmly on the part marked “ ”.

10. Re-attach shipping attachment 

a

on the left side of the main unit and

which was pulled out of the shipping attachment holder in step 7.

11. Re-attach shipping attachment 

b

on the right side of the main unit and

which was pulled out of the shipping attachment holder in step 7.

1

2

7

10

Shipping attachment 

a

11

Shipping attachment 

b

Carrying the Copier by the Sides

1. Remove the copy tray from the copier. For the PC880, it is also necessary to fold up

the multi-stack bypass.

2. Grip the handles at the side of the copier and lift up the copier, as shown in the

illustration to the left.

CAUTION:

I

When carrying this machine, be sure to hold it in the designated places as shown in the
illustration. Dropping the machine can cause personal injury.

Transporting the Copier by Car

Place the copier on a level, stable surface.

REQUEST:

I

Do not leave the copier inside a car for a long period of time; the temperature can become very
high or low.

I

Avoid rough roads; excessive vibration may damage the copier or adversely affect the quality of
your copy images.

I

Place a cover over the copier. Do not leave the copier in direct sunlight.

I

When moving the copier, use the original shipping box that it was packed inside when you
purchased it.

I

When using the original shipping box, do not place the power cord on the platen glass cover; this
may damage the platen glass.

Содержание PC860

Страница 1: ...naccuracies and omissions However as we are constantly improving our products some of the data contained herein may not exactly reflect the current model of the particular product with which this manual has been included If you have a need for an exact specification please contact Canon for the current specification This copier model meets the ENERGY STAR Program for energy efficiency The Internat...

Страница 2: ...ng Using Preset Copy Ratios 35 Enlarging Reducing Using the Zoom Key 36 Making Multiple Copies with a Selected Copy Ratio 38 Special Features 39 Making Two sided Copies 39 Copying Thick Books or Large Originals Detaching the Platen Glass Cover 40 Replacing and Storing the Cartridge 41 When to Replace the Cartridge 41 Copy Yield 42 Handling and Storing the Cartridge 42 Handling Precautions 42 Stora...

Страница 3: ...er over Reset Inner side Front side Title function name Descriptions of Functions and Sample Copy output is simply described using illustrations Operational Instructions Numbered steps describe how to set and operate functions Notes and Supplementary Instructions Notes and restrictions in regard to the use of functions are provided Supplementary instructions and reference page numbers are also giv...

Страница 4: ...mmediately turn OFF the power switch and unplug the power plug from the outlet Then contact your service representative CAUTION I Do not install the copier in unstable locations such as on unsteady platforms or in tilted places or in locations which are subject to excessive vibrations as this may cause the copier to fall or tip over resulting in personal injury I Do not install the copier so that ...

Страница 5: ...re or electrical shock I Do not bundle up or tie the power cord in a knot as this may result in a fire or electrical shock I Insert the power cord completely into the outlet as failure to do so may result in a fire or electrical shock I Do not use power cords other than the provided power cord as this may result in a fire or electrical shock I As a general rule do not use extension cords Using an ...

Страница 6: ... when unplugging the power plug Pulling on the power cord may expose or snap the core wire or otherwise damage the power cord If the cord is damaged this could cause an electricity leak and result in a fire or electrical shock I Leave sufficient space around the power plug so that it can be unplugged easily If objects are placed around the power plug you will be unable to unplug it in an emergency...

Страница 7: ...ble substances alcohol benzene paint thinner etc inside the copier If these items come into contact with a high voltage area inside the copier this may result in a fire or electrical shock If these items are dropped or spilled inside the copier immediately turn OFF the power switch and unplug the power plug from the outlet Then contact your service representative CAUTION I Close the platen glass c...

Страница 8: ...er which are subject to high voltages and high temperatures Take adequate precaution when performing internal inspections to avoid burns or electrical shock I When removing jammed paper or when inspecting the inside of the copier do not allow necklaces bracelets or other metal objects to touch the inside of the copier as this may result in burns or electrical shock I When removing copy paper which...

Страница 9: ... toner to ignite and result in burns or a fire I Do not store cartridges or copy paper in places exposed to open flames as this may cause the toner or copy paper to ignite and result in burns or fire CAUTION I Keep cartridges and other consumables out of the reach of small children If these items are ingested consult a physician immediately ...

Страница 10: ... alcohol benzene or paint thinner on the copier If a foreign object or liquid comes in contact with a voltage point inside the copier it could result in a risk of fire or an electric shock could occur I Never lubricate any part of the copier with oil Doing so will cause a machine malfunction I Do not use any extremely flammable substances such as aerosols etc near the copier as such a substance ma...

Страница 11: ...ss if the machine is used for a prolonged period of time in a poorly ventilated room or when making lots of copies be sure to ventilate the room to make the working environment as comfortable as possible L Place on a flat level surface Do not install the copier on an incline or uneven surface L Power supply I This copier is designed only for use with a power source shown on the marking label on th...

Страница 12: ...Preset Copy Ratio display Lights to indicate the selected preset copy ratio Exposure Adjustment lever Slide to manually adjust the copy exposure Move the lever to the right to make copies darker and to the left to make them lighter See p 33 Exposure Mode Select key Press to select Exposure Mode Automatic Exposure Control Manual Exposure Control Photo Mode Toner Saver Mode Exposure Mode indicator L...

Страница 13: ...ply indicator PC880 Lights to indicate the selected paper supply the cassette or the multi stack bypass If there is no paper loaded it will flash Paper Jam indicator Flashes when there is a paper jam See p 48 Copy quantity Copy ratio display Clear Stop key Press to return the copy quantity to one return to direct 100 copying or stop the copier before copying is completed See p 32 Power switch Pape...

Страница 14: ... appropriate installation site See Installation Precautions on p 11 Then follow the procedure described below to install the copier REQUEST I Do not insert the copier plug press the power switch or turn the power ON before completing steps 2 to 5 of Setting Up the Copier If you do you could damage your copier Setting Up the Copier 1 Remove the copier from the shipping bag Then peel off all packing...

Страница 15: ...g attachment holder NOTICE I You will need these shipping attachments whenever you transport the copier so store them in the shipping attachment holder See Transporting the Copier and Repacking on p 26 MEMO I The edge of a coin will allow for easy removal Shipping attachment b 3 Lift the main unit lever on the left side of the main unit and open the main unit Lever 4 Squeeze and remove the attachm...

Страница 16: ...of the arrow mark away from the cartridge CAUTION I When removing the sealing tape take care not to allow the toner on the sealing tape to come into contact with your hands or clothing If you get toner on either your hands or clothing wash immediately with cold water Washing with warm water will set the toner and make it impossible to remove REQUEST I Do not pull the sealing tape out at an angle I...

Страница 17: ...g away from you 10 Close the main unit by pressing down firmly on the part marked CAUTION I When you close the main unit be careful not to get your hand in the way Connecting the Power Cord 11 Plug one end of the power cord into the copier power inlet 12 Plug the other end of the power cord into an outlet CAUTION I This copier is designed for use with a power source matching the power requirements...

Страница 18: ... the Multi stack bypass 14 Insert the Multi stack bypass so that the tabs on the right and left side of the Multi stack bypass fit into the two holes in the copier NOTICE I Make sure that the tabs on the right and left side of the Multi stack bypass fit completely into the two holes in the copier 1 2 Loading Paper in the Cassette 15 Remove the packing material inside the cassette and load copy pap...

Страница 19: ...per to ignite and resulting in burns or fire Do not copy on the following types of copy stock doing so will result in paper jams I Severely curled or wrinkled paper I Transparencies for digital full colour copiers I Paper which has already been copied using a digital full colour copier Do not copy on the reverse side either I Paper which has been printed on using a thermal transfer printer Do not ...

Страница 20: ...te comes to a stop 2 Open a package of copy paper and remove the paper stack NOTICE I If the copy paper is curled uncurl it before placing it in the cassette Failure to do so will cause paper creases and a paper jam MEMO I 64 to 80 g m2 copy paper is acceptable I The cassette holds up to approximately 250 sheets of 80 g m2 copy paper 3 Load the paper stack beneath the cassette s length guide a and...

Страница 21: ...ssette If Copy Paper is Sticking Out of the Cassette Sometimes when you pull out the cassette copy paper may stick out as shown in the illustration to the right Make sure that the paper is neatly loaded into the cassette before you push the cassette back into the main unit If Using the Optional Universal Cassette 250 sheets The instruction label on the cassette is written only in English If you pr...

Страница 22: ...u can adjust the cassette to hold the following standard paper sizes A4 and A5 MEMO I You can load LTR LGL and STMT size paper See To load LTR and LGL size paper in the cassette on p 24 1 Remove the cassette from the main unit and remove all loaded copy paper 2 Align the left and right locking levers on the width guides to the Unlock position 3 Slide the width guides to the width mark for the pape...

Страница 23: ...LING THE COPIER 5 Tilt the length guide over towards the inside of the cassette to remove 6 Fit in the length guide into the length mark for the paper to be loaded in the cassette 7 Load the copy paper See How to Load Copy Paper in the Cassette on p 20 ...

Страница 24: ...hown in the figure and push the stopper up from the rear side of the cassette with the other hand 4 Remove the stopper as shown in the figure 5 Align the width and the length guides with the LTR or LGL marks and lock the locking levers on the width guides 6 Load the copy paper See p 20 NOTICE I When loading A4 size paper first reinsert the stopper into its original position Copying without reinser...

Страница 25: ...paper size the quality of your copy images may be adversely affected 3 Load the copy stock face up into the multi stack bypass NOTICE I Insert the copy stock into the copier as far as it will go I If the copy paper is curled uncurl it before placing it in the cassette Failure to do so will cause paper creases and a paper jam I 52 to 128 g m2 copy paper is acceptable I Make sure that the height of ...

Страница 26: ... and pull it out of the copier 9 Close the main unit by pressing down firmly on the part marked 10 Re attach shipping attachment a on the left side of the main unit and which was pulled out of the shipping attachment holder in step 7 11 Re attach shipping attachment b on the right side of the main unit and which was pulled out of the shipping attachment holder in step 7 1 2 7 10 Shipping attachmen...

Страница 27: ...er gently to avoid catching your hand as this may result in personal injury MEMO I After placing the original lower the platen glass cover Do not copy with the platen glass cover left open doing so will result in excessive toner consumption Paper size marks Positioning Originals Use the guide plate on the left side of the platen glass to position originals L If your original conforms to a standard...

Страница 28: ...en you finish copying press the power switch OFF CAUTION I If the copier will not be used for an even longer period of time such as during consecutive holidays unplug the power plug for safety Special Feature for the Copier L Auto Power off Feature If the copier is not operated for a period of 5 minutes after copying finishes the power turns OFF automatically ...

Страница 29: ...en glass cover gently to avoid catching your hand as this may result in personal injury I Do not press down hard on the platen glass cover when using the platen glass to copy thick books This may damage the platen glass and or result in personal injury MEMO I After placing the original lower the platen glass cover Do not copy with the platen glass cover left open doing so will result in excessive ...

Страница 30: ...lass The side that you want to copy must face downward Align the original between the appropriate paper size marks CAUTION I Close the platen glass cover gently to avoid catching your hand as this may result in personal injury I Do not press down hard on the platen glass cover when using the platen glass to copy thick books This may damage the platen glass and or result in personal injury MEMO I A...

Страница 31: ...e centre of it aligned with the mark 1 Adjust the slide guides for the width of the transparency 2 Load transparencies on the multi stack bypass one at a time PC880 Insert a transparency into the single sheet bypass PC860 NOTICE I Remove each transparency from the copy tray as it is output If Transparencies Do Not Feed Smoothly PC880 If the copier is used in certain operating environments in which...

Страница 32: ...ntity appears in the Copy quantity Copy ratio display To increase the copy quantity press the key To decrease the copy quantity press the key To clear the copy quantity to 1 press the Clear Stop key Zoom 3 Press the Start key MEMO I After a copy job begins you cannot change the copy quantity To change the copy quantity press the Clear Stop key and reenter the copy quantity C Stopping before copyin...

Страница 33: ...the copy exposure MEMO I Each press of the Exposure Mode Select key lights the Exposure Mode indicator in the following order Manual Exposure Control This mode allows you to manually select the desired exposure by moving the Exposure Adjustment lever 1 Press the Exposure Mode Select key until the Manual Exposure M lights 2 Adjust the copy exposure level by sliding the Exposure Adjustment lever To ...

Страница 34: ...Exposure Adjustment lever To make darker copies move the lever to the right To make lighter copies move the lever to the left Toner Saver Mode Copying to Reduce Toner Consumption This mode allows you to make copies at a lower than normal exposure to save toner 1 Press the Exposure Mode Select key until the Toner Saver lights 2 Adjust the copy exposure level by sliding the Exposure Adjustment lever...

Страница 35: ...arks 2 Press the Preset Copy Ratio key Press it the number of times necessary to light up the desired copy ratio MEMO I When you press the Preset Copy Ratio key the preset copy ratios will appear in the following order Enlarge copies from A5 to A4 size Reduce copies from A4 to A5 size 3 Press the Start key MEMO I To stop copying press the Clear Stop key C Standard Paper Sizes The paper sizes are a...

Страница 36: ...eturn to the direct copy ratio 100 while is flashing press the Clear Stop key MEMO I The Copy quantity Copy ratio display will display the copy quantity three seconds after you have finished setting the copy ratio and stopped pressing the or keys I To set the copy ratio to 120 for example keep pressing the key until 120 appears in the display I You can use the Preset Copy Ratio key together with t...

Страница 37: ...MEMO I To stop copying press the Clear Stop key C How to Calculate the Zoom Ratio To calculate the Zoom Ratio follow the procedure described below Desired Copy Size v Original Size 100 You can choose from two different formulas to calculate the Zoom ratio X v X 100 or Y v Y 100 X Y X Y ...

Страница 38: ...e Preset Copy Ratio key or Zoom key Preset Copy Ratio Press the Preset Copy Ratio key the number of times necessary to light up the indicator in the Preset Copy quantity Copy ratio display for the desired copy ratio See p 35 Zoom Ratios Press the Zoom key then press the or keys within three seconds to set the desired copy ratio The selected copy ratio will then appear in the Copy quantity Copy rat...

Страница 39: ...t the top edge of the original is opposite to the top edge of the first original Landscape orientation originals Load so that the orientation is the same as the first original 3 Insert the copied sheet into the multi stack bypass PC880 or single sheet bypass PC860 Turn the copy paper making sure that the inner side and front side stay at the same side and load the copy paper as shown in the figure...

Страница 40: ...s cover hold it with both hands so that it does not fall forward Making Copies 3 Place your original on the platen glass Then Press the Start key I For instructions on how to set the copying features see pp 32 through 38 REQUEST I The maximum allowable weight that can be placed onto the platen glass is 2 kg I Do not press down on the original with excessive force Attaching the Platen Glass Cover 4...

Страница 41: ... streaks or light bands on copies indicate that the toner in the cartridge has run low Paper feeding direction N Remove the cartridge from the copier Hold the cartridge level and rock it several times at a 90 angle Re install the cartridge in the copier See p 44 Then make a few test copies N If the copies appear normal N If white streaks or light bands are still present You can use the cartridge h...

Страница 42: ...als with less print will use less toner However although you may be able to use the cartridge longer than indicated above dark bands might appear on copies Handling and Storing the Cartridge To ensure optimum copy quality please observe the following precautions Handling Precautions WARNING I Do not throw cartridges into open flames as this may cause the toner to ignite and result in burns or a fi...

Страница 43: ...to its shipping box and store it away from direct sunlight I Do not stand the cartridge on end or turn it upside down I Avoid storing the cartridge in front of heaters and humidifiers etc Store it in a location where the temperature does not exceed 40 C I The recommended storage conditions are as follows Temperature 15 C to 25 C Relative Humidity 40 to 70 Storing Partially Used Cartridges If you r...

Страница 44: ... used cartridge and pull it out of the copier WARNING I Do not throw used cartridge into open flames as this may ignite the toner remaining inside the cartridges and result in burns or a fire CAUTION I When removing used cartridge from the copier remove the cartridge carefully to prevent toner from scattering and entering your eyes or mouth If toner enters your eyes or mouth wash immediately with ...

Страница 45: ...Do not press down forcefully on the cartridge MEMO I The sealing tape grip is affixed to the end of the cartridge Before pulling out the tape be sure to peel it from the end of the cartridge Then pull the tape out slowly from the cartridge I The sealing tape is approximately 50 cm long Be sure to pull the sealing tape completely out of the cartridge Installing the New Cartridge 6 Hold the new cart...

Страница 46: ...the optional universal cassette 250 sheets is being used lights PC860 Paper Jam indicator flashes There is a paper jam See p 48 and another number flash alternately The copier is not operating as usual and needs repair See p 50 Power turns OFF after lights The copier is not operating as usual and needs repair See p 50 and flash alternately The attachments are not removed See p 15 lights The Exposu...

Страница 47: ...py paper Place copy paper in the cassette See p 20 Re insert the copy paper Pull out the cassette and make sure that the copy paper is loaded properly See p 20 I Are the paper guides aligned correctly for the size of the loaded paper I Is the paper stack loaded beneath the cassette s claws length guide width guides I Is paper loaded neatly in the cassette N Check to make certain that the cassette ...

Страница 48: ...cold water Washing with warm water will set the toner and make it impossible to remove the toner stains I When removing copy paper which has become jammed from inside the copier remove the jammed copy paper gently to prevent the toner on the paper from scattering and entering your eyes or mouth If toner enters your eyes or mouth wash immediately with cold water and consult a physician I When loadi...

Страница 49: ...0 or Single sheet Bypass PC860 Slowly remove any jammed copy paper from the copier Cassette 1 Open the right cover 2 Slowly remove any jammed paper behind the right cover 3 Close the right cover NOTICE I When you close the right cover make sure it is closed completely N Slowly remove any jammed copy paper from the copier If you cannot remove the jammed paper Grip and pull up the fixing assembly kn...

Страница 50: ...the copier is brought from the cold outdoors into a warm room or if the room is rapidly heated condensation may form inside the copier This can adversely affect the quality of your copy images When the copier is exposed to such conditions allow at least two hours for the copier to adjust to room temperature before attempting to use it If the Power Turns OFF After Appears Unplug the copier Then con...

Страница 51: ...do so will cause a paper jam 1 Raise the platen glass cover and remove the static charge eliminator cleaning brush that is attached to it 2 Lift the main unit lever on the left side to open the main unit Lever 3 Using the brush on the tip of the static charge eliminator cleaner sweep out the dust from the groove inside the copier CAUTION I There are some areas inside the copier which are subject t...

Страница 52: ... however a new one will be needed soon Replace the cartridge with a new one See p 44 If Copies Are Completely Black Some possible causes and remedies I The platen glass cover or the platen glass is dirty and needs cleaning For details about how to clean your copier see Routine Cleaning on p 55 I Condensation has built up inside the copier Under such conditions allow at least two hours for the copi...

Страница 53: ...ol Press the Exposure Mode Select key to select Manual Exposure M Photo or Toner Saver Adjust the copy exposure level by sliding the Exposure Adjustment lever See p 33 To make darker copies move the lever to the right To make lighter copies move the lever to the left If the Copier Will Not Operate If the Power Does Not Turn ON Is the attachment removed Q If not remove the attachment Is the power t...

Страница 54: ...he platen glass Q If not place the original to be copied on the platen glass Check the control panel I Is the Paper Supply indicator flashing and lit in the Copy quantity Copy ratio display PC880 I Is lit in the Copy quantity Copy ratio display PC860 Q Load copy paper See p 47 I If flashes Q Remove any jammed copy paper See p 48 Is the cartridge installed in the copier Q If not install the cartrid...

Страница 55: ... or paint thinner Doing so may cause damage to the copier a fire or an electric shock CAUTION I Unplug the power plug from the outlet at least once a year and clean the area around the base of the plug s metal pins to ensure all dust is removed If dust accumulates in this area it may result in a fire REQUEST I Avoid lubricating the copier parts as there are lubricating oils that are unsuitable for...

Страница 56: ... increments 15 Paper Feeding System Cassette Feeding 250 sheets 1 Multi stack bypass L PC880 50 sheets stack approx 5 mm high Single sheet bypass L PC860 1 sheet 16 Multiple Copies 1 100 17 Power Requirements 220 240 V AC 50 60 Hz Power requirements differ depending on the country in which you purchased the copier 18 Power Consumption 0 90 kW max 19 Dimensions W D H 484 mm 448 mm 297 mm 20 Install...

Страница 57: ...Exposure adjustment lever 12 33 53 Exposure mode indicator 12 33 Exposure mode Select key 12 33 53 Exposure recalibration switch 13 53 F Features 56 H Handling Precautions 10 I Installation Precautions 11 Installing the Copier 14 L Loading paper 20 25 M Manual exposure control 33 53 Multi stack bypass 12 Loading copy paper 25 Making copies 29 O Original placement 27 P Lights 47 Paper jam 48 Paper ...

Страница 58: ...Canon PC880 860 Operator s Manual ENGLISH 58 ...

Отзывы: