background image

N670U/N676U/N1240U Quick Start Guide

10

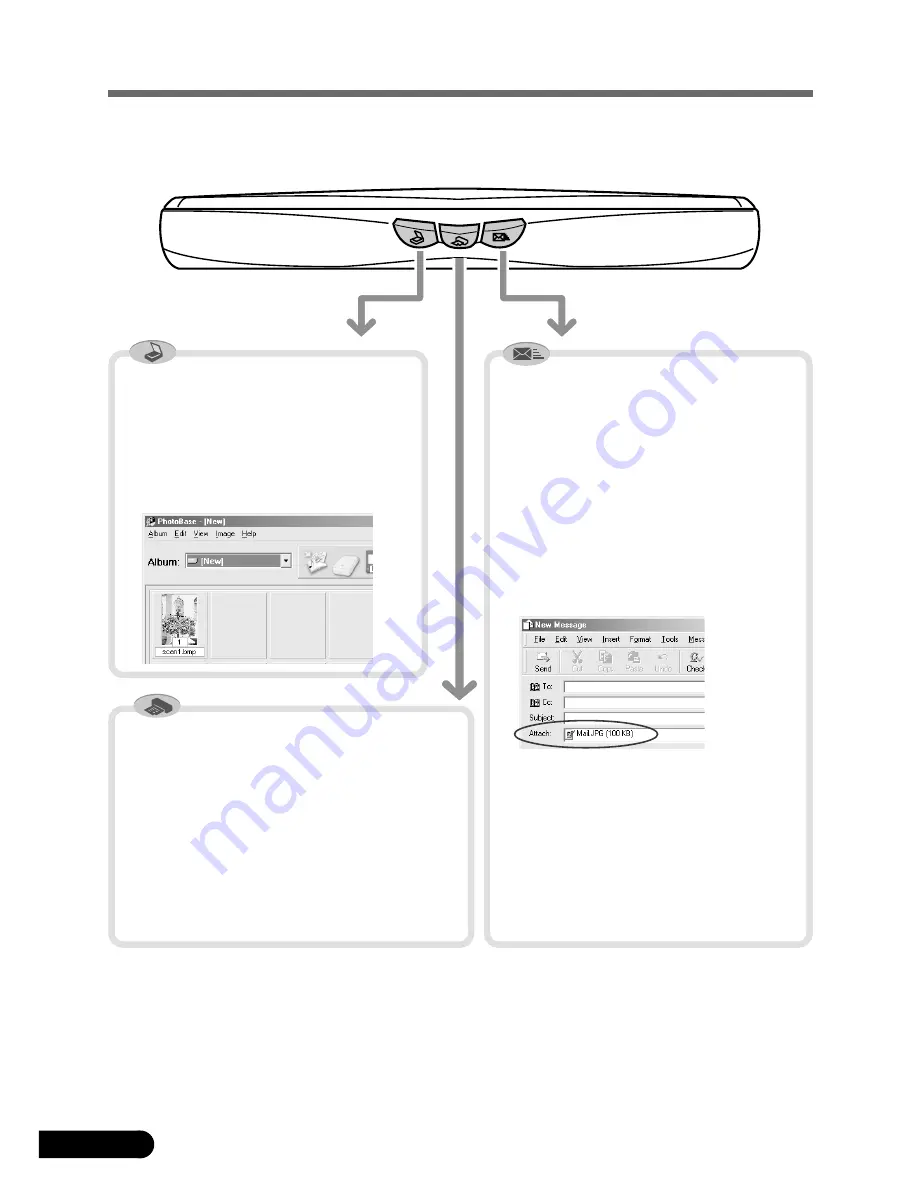
Using the Scanner Buttons

You can use the 3 convenient buttons on the front of the scanner, to scan and perform
related tasks easily, with a single touch of the button. Place an item on the scanner
before pressing a button.

To Open the scanned image in the
ArcSoft PhotoBase window

1. Press the [SCAN] button.
2. The item is scanned.
3. The scanned image will appear in the

PhotoBase window.

To Print (Copy) the scanned image with a
printer

1. Press the [COPY] button.
2. The item is scanned.
3. The scanned image will print.

• The printer driver should be installed and the

printer should be on-line to use this function.

To E-mail the scanned image as an
attached file

1. Press the [E-MAIL] button.
2. The item is scanned.
3. The [E-mail software selection] dialog

appears. Select one from the list and
click [OK].

•  Required only for the first scan.

4. The e-mail software will start, and

the scanned image will be attached in
a new message window.

5. Enter the receiver’s address, title,

message, confirm the required
settings, and send the message.

• For Windows, MAPI compliant e-mail

software, such as Microsoft Outlook
Express, Microsoft Outlook, Eudora,
should be installed and enabled.
With certain mail software, you should
set the MAPI function on.

[SCAN] Button

[COPY] Button

[E-MAIL] Button

• To use these buttons, ScanGear CS-U, ScanGear Toolbox and ArcSoft PhotoBase should be installed

from the CanoScan Setup Utility CD-ROM.

• While scanning, you can change the default settings for scanning by clicking the [Cancel] button. For

details on changing settings or arranging the scanner’s button-to-function assignment, refer to the
ScanGear Toolbox User’s Guide (PDF manual).

COPY

E-MAIL

SCAN

Содержание N1240U - CanoScan Flatbed Scanner

Страница 1: ...Helpdesk 02 7220404 CANON GmbH Zetschegasse 11 1232 Wien Austria CANON SCHWEIZ A G Industriestrasse 12 CH 8305 Dietlikon Switzerland Tel 01 835 61 61 Fax 01 835 68 60 Hotline 157 30 20 CANON ESPA A S...

Страница 2: ...tached Peripherals Name of Network Connected CanoScan and ScanGear are trademarks of Canon Inc Adobe Acrobat and Photoshop are trademarks of Adobe Systems Incorporated Macintosh Power Macintosh and Ma...

Страница 3: ...can N1240U Quick Start Guide this guide Additional documents Unlock the Scanning Unit Unlock the scanner before connecting to the computer If it is left locked a malfunction or other problem may occur...

Страница 4: ...vated as soon as the computer is turned on Proceed to the next page Jump to page 6 The screen shots common to both Windows and Macintosh used in this manual are from the Windows platform unless otherw...

Страница 5: ...page 4 Windows Millennium Edition 1 Turn the computer on 2 The Add New Hardware Wizard dialog box will appear Confirm that Automatic search for a better driver Recommended is selected 3 Place the Cano...

Страница 6: ...ROM drive is selected wait for 10 seconds and then click Next If Driver Not Found appears click Back and repeat this step 6 When CanoScan N670U N676U or CanoScan N1240U appears click Next The driver w...

Страница 7: ...rocedures 1 The CanoScan Setup Utility main menu will appear If the CanoScan Setup Utility main menu does not automatically appears eject the CD ROM and re insert it 2 Click Install the Software Softw...

Страница 8: ...for these drivers over the internet appears click Cancel 2 Place the CanoScan Setup Utility CD ROM in the drive The CanoScan Setup Utility main menu will appear If no window displays double click the...

Страница 9: ...ck the File menu and select Select Source b Highlight CanoScan N670U N676U or CanoScan N1240U and click Select Top Bottom Alignment Mark Try Scanning 1 Place an item photo or picture on the glass Plac...

Страница 10: ...e preview scan will start and gradually display the image 5 Drag the mouse diagonally to select the area you want to scan Try Scanning 3 Click the Acquire icon ScanGear CS U will start 3 Click the Fil...

Страница 11: ...a file type and click Save 9 Click the or close box in the PhotoStudio window to close it You have now confirmed the scanner operation You should now be ready to explore the possibilities of the bundl...

Страница 12: ...3 The E mail software selection dialog appears Select one from the list and click OK Required only for the first scan 4 The e mail software will start and the scanned image will be attached in a new...

Страница 13: ...11 N670U N676U N1240U Quick Start Guide Using the Scanner in the Vertical Position 1 Attaching the Velcro Strip 2 Installing the Stand 3 Positioning an Item Removing the Stand Press the hook...

Страница 14: ...c line 600 dpi 10 6 msec line 1200 dpi B W 5 3 msec line 600 dpi 5 3 msec line 600 dpi 10 6 msec line 1200 dpi Preview Speed 2 15 sec approx Interface USB 1 1 Maximum Document Size A4 Letter 216 x 297...

Отзывы: