Canon MultiPASS C635 Скачать руководство пользователя страница 39

Chapter 2

Printing With the MultiPASS C635

2-5

Printing

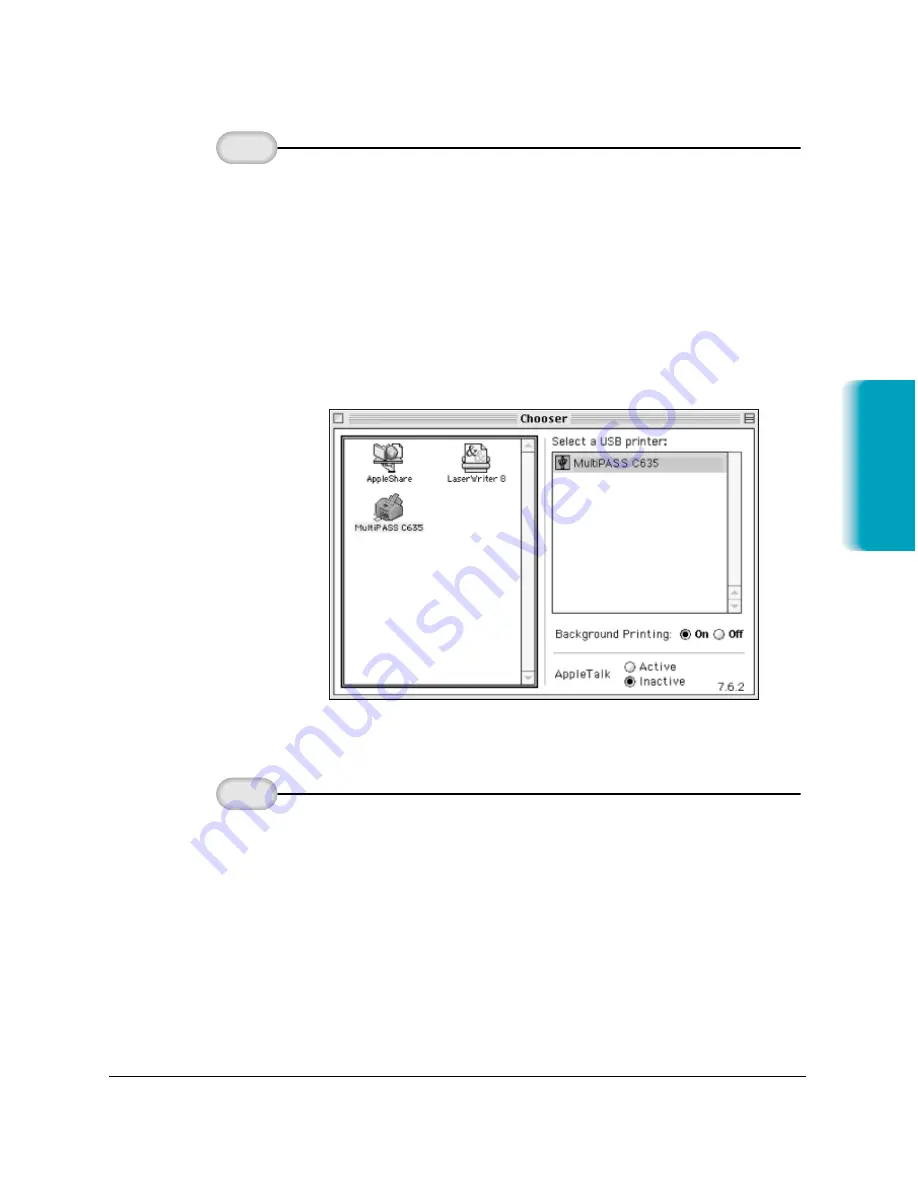
Use the Chooser to configure your system to print to the
MultiPASS C635.

Select Chooser from the Apple

®

menu.

On the left side of the Chooser, click the MultiPASS C635
icon.

On the right side of the Chooser, select the MultiPASS
C635 as your printer.

Close the Chooser.

Start an application from which you want to print.

From the File menu, choose Page Setup.

Make any appropriate adjustments for printing your
document. See “Setting Up Print Jobs” on the following 
page for details.

Choose Print from the File menu. Make any necessary
changes in the printing options, and click Print.

Print a

document.

2

Select the

MultiPASS C635

in the Chooser.

1

Содержание MultiPASS C635

Страница 1: ...MP C635 USER MANUAL Canon ...

Страница 2: ...C635 ...

Страница 3: ... guides or related documents are believed reliable but the accuracy and completeness thereof are not guaranteed or warranted and they are not intended to be nor should they be understood to be representations or warranties concerning the products described Your MultiPASS C635 and the software media included with your system have been sold to you subject to the limited warranties set forth in the w...

Страница 4: ...of Infowave Software Inc Apple Finder and Macintosh are registered trademarks of Apple Computer Inc ScanTastic is a trademark of Second Glance Software All other product and brand names are registered trademarks trademarks or service marks of their respective owners ENERGY STAR COMPLIANT As an ENERGY STAR Partner Canon U S A Inc has determined that this product meets the ENERGY STAR guidelines for...

Страница 5: ...l Waiting can be used with your MultiPASS C635 Key telephone systems are not recommended because they send non standard signals to individual telephones for ringing and special codes which may cause a fax error C Power Requirements This equipment should be connected to a standard 120 volt AC three wire grounded outlet only Do not connect this unit to an outlet or power line shared with other appli...

Страница 6: ... designed to provide reasonable protection against harmful interference in a residential installation This equipment generates uses and can radiate radio frequency energy and if not installed and used in accordance with the instructions may cause harmful interference to radio communications However there is no guarantee that interference will not occur in a particular installation If this equipmen...

Страница 7: ...e per unit DDD DIRECT DISTANCE DIAL LINE or IDDD INTERNATIONAL DIRECT DISTANCE DIAL LINE IF YOU COMMUNICATE OVERSEAS N Canon recommends an individual line following industry standards e g the 2500 touch tone or 500 rotary pulse dial telephones A dedicated extension off a PBX unit without Camp On signals is also permissible with your MultiPASS C635 Key telephone systems are not recommended because ...

Страница 8: ... repairs or alterations made by the user to this equipment or equipment malfunctions may give the telecommunications company cause to request the user to disconnect the equipment Users should ensure for their own protection that the electrical ground connections of the power utility telephone lines and internal metallic water pipe system if present are connected together This precaution may be par...

Страница 9: ... monochrome or color printer stand alone plain paper fax color scanner and color copier It also includes maintenance troubleshooting and specifications Conventions This User s Manual uses the following conventions to alert you to information that will help you operate the MultiPASS C635 correctly and safely N Notes provide advice or suggestions regarding the use of the MultiPASS C635 C Cautions al...

Страница 10: ...r Scanning 1 13 Loading the Document 1 14 Adding Pages to the Document 1 16 Setting the Document Feed Lever 1 16 Identifying Your Documents 1 17 Copying Documents 1 18 Miscellaneous 1 21 If the Power Goes Out 1 21 Using Switch Boxes 1 21 Disconnecting the MultiPASS 1 21 2 Printing With the MultiPASS C635 Paper Handling 2 2 Selecting Paper 2 2 Paper Guidelines 2 4 Understanding the Printer Driver 2...

Страница 11: ...ndividual to a Speed Dial Code 3 13 Defining a Group Speed Dial Code 3 14 4 Sending Faxes With the MultiPASS C635 Sending a Document 4 1 Regular Dialing 4 2 Automatic Dialing 4 4 Sending a Document Using Group Dialing 4 6 Redialing 4 7 Resending a Fax After an Error 4 8 Manual Sending 4 9 Cancel Sending 4 10 Sending a Document to More Than One Location Sequential Broadcasting 4 11 Transmitting the...

Страница 12: ...ScanTastic 6 9 Performing in Hardware 6 10 Using Manual Balance 6 10 Using Auto Balance 6 17 Using the Advanced Functions of ScanTastic 6 18 Customizing the Device Panel 6 18 Automatic Batch Scanning 6 20 Using ScanTastic as a Plug In 6 24 Troubleshooting 6 25 Poor Image Quality On the Screen 6 25 Poor Image Quality When Printing 6 25 Rebuilding ScanTastic Preferences 6 26 7 Maintaining the MultiP...

Страница 13: ...Faxing Problems 8 23 Scanning Problems 8 26 Telephone Problems 8 27 Copying Problems 8 28 General Problems 8 29 Memory Clear Report 8 30 Appendix A Specifications Printing Specifications A 1 BJ Cartridges A 3 Facsimile A 3 Copier A 5 Scanner A 5 MultiPASS System Requirements A 6 General Specifications A 7 Receiving Faxes and Phone Calls Automatically Fax Tel Mode A 9 Appendix B Using the MultiPASS...

Страница 14: ...ine Color Bubble Jet printer plain paper fax color copier and color scanner This chapter introduces you to the MultiPASS C635 It includes Supplies and accessories Getting help from Canon Important safety instructions Examining the main components of the unit Using the operator panel Loading paper in the sheet feeder Preparing documents for faxing copying or scanning Identifying your documents Copy...

Страница 15: ...MultiPASS C635 comes with One BC 21e Color BJ Cartridge One SB 21 Ink Cartridge Storage Box One extra BCI 21 Black BJ Tank You can also purchase the following BJ cartridge for use with the MultiPASS C635 BC 20 Black BJ Cartridge You can purchase the following BJ tanks for use in the BC 21e Color BJ Cartridge BCI 21 Black BJ Tank one extra BJ tank comes with the printer BCI 21 Color BJ Tank N BJ ca...

Страница 16: ... Jet products that is attributable to the use of third party parts or supplies including inks The limited warranty remains in effect for its life once that particular damage has been properly repaired For optimum printing results Canon recommends that you use only Canon ink cartridges Canon Specialty Papers Canon manufactures numerous specialty papers including Brilliant White Paper Bubble Jet Pap...

Страница 17: ...an for a service charge currently 24 99 per call during holidays and days hours not listed above regarding urgent product questions or for products no longer under warranty 1 800 423 2366 Or for a charge of 2 50 per minute to a maximum of 25 00 per call 1 900 246 1200 Technical support via the Canon Computer Systems Inc Web site www ccsi canon com 24 hour toll free Fax Retrieval System 1 800 526 4...

Страница 18: ... problem contact the Canon Computer Systems Customer Care Center see previous page for details If you feel your MultiPASS needs servicing contact Canon on the World Wide Web to locate the Canon Authorized Service Facility ASF nearest you If you do not have access to the Web you can call Canon see previous page for details Important Safety Instructions Read these safety instructions and refer to th...

Страница 19: ...rd is not knotted or kinked Do not push metal objects of any kind into the slots or openings on the cabinet This could result in a risk of fire or electric shock Do not allow small objects such as pins paper clips or staples to fall into the MultiPASS If something does fall into it that you cannot remove unplug the unit immediately and call the Canon Customer Care Center Unplug this product from t...

Страница 20: ... DOCUMENT FEEDER ADF AND PRINTER COVER HOLDS DOCUMENTS TO BE SCANNED UP TO 30 SHEETS OPERATOR PANEL USE TO CONTROL OPERATION OF THE MultiPASS C635 SHEET FEEDER HOLDS 100 SHEETS OF PLAIN PAPER OUTPUT TRAY HOLDS PRINTED DOCUMENTS AS THEY EXIT THE MultiPASS C635 PAPER OUTPUT GUIDES RAISE THESE GUIDES WHEN OUTPUTTING HIGH RESOLUTION PAPER OUTPUT TRAY EXTENSION HOLDS PRINTED DOCUMENTS AS THEY EXIT THE ...

Страница 21: ...side the Printer Area 1 8 Introduction Chapter 1 LINE JACK TELEPHONE ANSWERING MACHINE JACK USB TO PARALLEL CABLE CONNECTOR MANUAL FEED SLOT POWER CORD CONNECTOR PAPER THICKNESS LEVER CARTRIDGE HOLDER PRINTER COVER ...

Страница 22: ...ing fax transmissions For color scanning change the resolution from your software LCD display Displays messages and prompts during operation Displays selections text numbers and names when registering information 1 2 ABC 3 DEF 4 5 JKL GHI 6 MNO 7 8 TUV PRS 9 WXY 0 OPER TONE SYMBOLS REDIAL PAUSE ALARM STOP CODED DIAL START COPY 1 2 3 4 5 6 PRINTER RESET CARTRIDGE FUNCTION RESUME COLOR COPY B W FAX ...

Страница 23: ...hen an error occurs when the MultiPASS is out of paper or ink or when received faxes are stored in memory START COPY button Press to begin sending receiving copying or other operations or to select functions when registering information CODED DIAL button Press this button followed by a two digit code to dial a number that you have registered for coded speed dialing REDIAL PAUSE button Press to red...

Страница 24: ...r of the unit when installing or replacing the cartridge Press again after installing the cartridge to move the holder back to its home position on the right RESUME button Press when you want to form feed paper when printing PRINTER RESET button Press to reset the MultiPASS to Standby mode if the LCD displays PRINTER MODE Arrow buttons Use to scroll through menu selections or to move the cursor wh...

Страница 25: ... faxes use plain paper such as copier paper When the message LOAD PAPER appears in the LCD display you need to add paper to the sheet feeder The sheet feeder holds approximately 100 sheets of plain paper For best results fan the paper before loading it Always fan a stack of paper along the edge that will feed into the MultiPASS first Pull the paper rest up until it stops Move the paper guide to th...

Страница 26: ...legal or A4 size paper Follow these guidelines to prepare your documents Do not attempt to feed the following types of documents into the MultiPASS wrinkled or creased paper curled or rolled paper torn paper carbon paper or carbon backed paper coated paper onion skin or thin paper CAN ON INC TAMA GAW A PLAN T 3 16 1 SHIM ONO GE TAKA TUKU KAW ASAK I SHI KANA GAW A 213 JAPA N PHON E 04 4 811 2111 Sl...

Страница 27: ...cument that will not feed into the MultiPASS You can then feed the copy Do not feed documents with pages that are different sizes or of different thicknesses Loading the Document You can load up to 30 letter or A4 size sheets and up to 10 legal size sheets at a time into the Automatic Document Feeder ADF For a multiple page document fan the sheets and tap the document on a flat surface to even the...

Страница 28: ...h of the document The MultiPASS automatically feeds the pages one by one from the bottom If you have problems feeding multiple page documents insert the pages one at a time into the ADF This stacks the pages on a slant so they feed correctly into the ADF Do not attempt to stack more than 30 sheets in the ADF A4 LTR Feed the document 2 Introduction ...

Страница 29: ...ng the Document Feed Lever You use the document feed lever on the ADF to select multiple documents or single sheets Always set the document feed lever to single sheets and manually feed the following types of documents Thick paper Thin paper Small documents postcards business cards Documents with uneven surfaces Photographs Special types of paper 1 2 ABC 3 DEF 4 5 JKL GHI 6 MNO 7 8 TUV PRS 9 WXY 0...

Страница 30: ...rty if you send the document using one touch speed dialing coded speed dialing or group dialing and you registered the party s name It also includes the page number N You enter your fax header information in the MultiPASS Fax Setup Utility which launches automatically after the MultiPASS installation is complete The header information will be printed on the top of your outgoing faxes For details o...

Страница 31: ...a good idea to use the optional BC 20 Black BJ Cartridge when you make black and white copies You can use the BC 21e Color BJ Cartridge to make color copies Place the document face down in the ADF The LCD displays these messages The display shows the size of the copy the default is 100 and the number of copies the default is 1 COPY 100 01 START COPY Press START COPY 2 DOCUMENT READY FAX FINE MEMOR...

Страница 32: ... for copying most text documents Use B W PHOTO resolution when copying documents that contain photographs This scans areas of the document that contain photos with 256 levels of gray and results in a much better reproduction of the photograph When copying in color You can specify plain paper or High Resolution paper using the LCD menu system Press FUNCTION press or until you see USER SETTINGS pres...

Страница 33: ...nd the LCD displays START AGAIN reload the document and start copying again N If the LCD displays MEMORY FULL while making multiple copies of a document do not use the multiple copy feature for copying the document Make single copies of the document instead as many times as required You may be able to make multiple copies if you first print out any faxes that are stored in memory see page 5 5 COPY...

Страница 34: ...Avoid unplugging the MultiPASS unless absolutely necessary This is the same as a power outage Using Switch Boxes Canon does not recommend using a switch box with the MultiPASS To use more than one printer it s a good idea to use another USB port on your computer or add a powered USB hub Disconnecting the MultiPASS You can disconnect the MultiPASS if you want to use the USB port for another purpose...

Страница 35: ...SS printer driver you can use the MultiPASS for all your printing needs This chapter describes Paper handling Understanding the printer driver Printing a document Setting up print jobs Setting the paper thickness lever Printer settings for various print media Loading paper Printing on envelopes Printing on Canon Specialty Papers 2 Printing With the MultiPASS C635 ...

Страница 36: ... or damaged edges Copier paper has a preferred side for printing Look at the label on the package to see which side to print on Brilliant White Paper Canon s unique paper formulation gives you a bright white printing surface that produces incredibly brilliant colors and dark crisp black text This paper works great for proposals color presentations color charts graphs flyers and newsletters You can...

Страница 37: ...a bright white finish that lends striking visual power to charts graphs and photographic images Use this film to make your presentation materials and graphics look professional High Resolution Paper Canon s High Resolution Paper is designed to produce photo realistic quality output with sharp and vivid graphics Assorted Paper Starter Kit If you would like to try some of the papers described above ...

Страница 38: ...tridge Understanding the Printer Driver Before you can use any type of printer with your computer you must install a printer driver The printer driver tells the computer what kind of a printer you are using The printer driver also controls the various settings such as print quality and paper type You define these settings within the printer driver and the printer driver then communicates the setti...

Страница 39: ... of the Chooser select the MultiPASS C635 as your printer Close the Chooser Start an application from which you want to print From the File menu choose Page Setup Make any appropriate adjustments for printing your document See Setting Up Print Jobs on the following page for details Choose Print from the File menu Make any necessary changes in the printing options and click Print Print a document 2...

Страница 40: ...r Setting Up Print Jobs Once you have selected the MultiPASS C635 driver in the Chooser you can set up your print jobs from any application Using the Page Setup Dialog Use the Page Setup dialog to format your document by setting options such as paper size orientation and scaling These settings are saved with the document From the Finder or from within any application choose Page Setup from the Fil...

Страница 41: ...ge as shown in the following examples Fractional Widths This feature provides for better compatibility with older applications by helping your Macintosh determine the proper spacing between words When Fractional Widths is checked it forces the use of fractional character widths even if your application does not support this feature If your application already uses fractional widths it overrides th...

Страница 42: ... of your document Choose the following options to control how your documents print Flip Horizontal This option reverses the page left to right mirror image Flip Vertical This option reverses the page top to bottom upside down Selecting both Flip Horizontal and Flip Vertical rotates your page 180 degrees without any mirroring which prints it bottom up Invert Image This option reverses how the image...

Страница 43: ...create are available in all applications including the Finder Paper List The top section of the Paper dialog shown above is called the Paper List it lists the available paper sizes by name and page dimensions The first four names are the four paper sizes listed individually in the Page Setup dialog Click beside a paper name to include it in the Page Setup dialog A checkmark appears beside sizes th...

Страница 44: ...of the window 3 Click the Set button To delete a custom paper size 1 In the Print List click the paper size you want to delete You cannot delete those sizes which have a gray radio button beside them 2 Click the Delete button 3 Click OK Using the Settings Dialog Click the Settings button in the Page Setup dialog to define default Page Setup settings that are used when you create a new document For...

Страница 45: ...gh Gloss Photo Film High Resolution Paper or Glossy Photo Cards Pages You can print all pages of a document or select a range of pages by entering the appropriate page number in the From and To boxes You can also choose to print every page or you can print only even or only odd pages so you can produce a double sided print job manually Copies Type the number of copies you want to print in this edi...

Страница 46: ...ore or after a print job or print no cover page at all The cover page lists the driver name and version the document name the application name your user name as specified in the File Sharing or Sharing Setup Control Panels the date and the time Printing a cover page is useful when you want to output a divider sheet between multiple print jobs Using the Color Dialog In the Print dialog click the Co...

Страница 47: ...at make up a particular color or shade of gray Select the method best suited to your output requirements This option is available when either Grayscale or Full Color is selected in the Print Colors As menu Pattern Select this option if you are printing graphics from drawing packages or business graphics with uniform color regions such as blocks graphs or lines Pattern dither uses a regular dot pat...

Страница 48: ...is available when you choose Grayscale or Full Color in the Print Colors As menu Moving the slider alters the overall brightness of the printed output Using the Preview Window Use Print Preview to see how your document looks before you actually print it To preview a document select the Preview checkbox in the Print dialog then click Print Use the direction arrows to turn the pages or click the Go ...

Страница 49: ...may have to double check your Extensions Manager and restart your computer 5 Close the Chooser Your MultiPASS printer driver can now use SpoolMaster s background printing capabilities Printing With SpoolMaster When background printing is on you can continue to print normally from any program When you print documents SpoolMaster saves the document to a spool file and adds it to the queue of documen...

Страница 50: ...int job Cancelling a Print Job 1 In the SpoolMaster window select the printing document 2 Click the Cancel Printing button Removing a Document from the Queue To remove a document from the queue so it will not print 1 In the SpoolMaster window select the document in the Waiting area 2 Click Remove From List Changing the Print Order To change the printing order 1 In the SpoolMaster window click and ...

Страница 51: ...Colors As and Dithering in the Color dialog Output resolution has the greatest effect on print quality The higher the resolution you use the smaller the dots used to form the printed image and the better output you get The Print Mode setting in the Print dialog determines your output resolution The Print Colors As setting you select in the Color dialog affects the quality of shading for your image...

Страница 52: ...e printer than is sent when printing at lower resolutions Controlling the Color Output Quality Use the Color options dialog to control the color printing mode halftoning method and the brightness of your output To get the best color output quality make sure you are printing in Full Color mode Select Full Color from the Print Colors As menu If your output is banded or displays a geometric pattern s...

Страница 53: ...C 20 Black BJ Cartridge Right for heavier weight print media or envelopes N Be sure to check this lever when you change BJ cartridges and before and after printing on heavier weight print media or envelopes Open the printer cover by grasping the paper guides and lifting up 1 In k Cartrid ge BCl 21 Color Made in Japan Ink C artridge B C l 21 B lack M ade in Japan DO NOT TOUCH THE GUIDE RAIL DO NOT ...

Страница 54: ...rinter cover Complete the operation 4 In k Cartrid ge BCl 21 Color Made in Japan Ink C artridge B C l 21 B lack M ade in Japan Set the paper thickness lever 3 1 2 ABC 3 DEF 4 5 JKL GHI 6 MNO 7 8 TUV PRS 9 WXY 0 OPER TONE SYMBOLS REDIAL PAUSE ALARM STOP CODED DIAL START COPY 1 2 3 4 5 6 PRINTER RESET CARTRIDGE FUNCTION RESUME COLOR COPY B W FAX COPY RESOLUTION Press the CARTRIDGE button to move the...

Страница 55: ...4 or 10 mm stack Brilliant White Center Left Down Auto Approx 100 Paper Bubble Jet Paper Center Left Down Auto Approx 100 0 4 or 10 mm stack Glossy Photo Paper Center Up Auto or 1 Manual Greeting Cards Right Down Manual 1 High Gloss Film Center Down Manual 1 High Resolution Center Up Auto Approx 80 Paper 0 4 or 10 mm stack Other heavier weight Right Down Manual 1 print media Envelopes Single Right...

Страница 56: ...gh Resolution Paper in the sheet feeder However special media may not advance correctly under unusual environmental conditions such as extreme temperatures or humidity If you have trouble with special papers becoming skewed or feeding multiple sheets do not stack them in the sheet feeder Load them one sheet at a time Automatically Feeding Paper Center for the BC 21e Color BJ Cartridge Left for the...

Страница 57: ...nting Move the paper guide to the left to match your paper size For best results fan the paper before loading it Always fan a stack of paper along the edge that will feed into the printer first Fan the paper 3 Pull the paper support up until it stops 2 ...

Страница 58: ...s may cause the paper to misfeed or jam If your printed page contains lots of graphics the ink on the page may be damp due to the print density Remove the page right away and allow the ink to dry The capacity of the paper output tray is 30 sheets of paper To reduce paper jams remove paper from the output tray before the count reaches 30 If paper curls after printing remove it immediately otherwise...

Страница 59: ... pages the ink may need time to dry Within two to three seconds the ink becomes smudge resistant After drying for several minutes the ink becomes water resistant Do not try to load paper into the sheet feeder beyond the paper limit mark or the tab on the right side of the sheet feeder stacking too much paper may cause paper feeding or printing problems Make sure there are no gaps between the stack...

Страница 60: ... when paper is loaded in the manual feed slot If you are manually feeding heavier weight print media set the paper thickness lever to the right You must select Manual Feed in the Print dialog for the printer to accept manually fed paper After clicking the Print button you will see this screen Start your print operation 2 Check the paper thickness lever 1 DO NOT TOUCH THE GUIDE RAIL DO NOT TOUCH TH...

Страница 61: ...of the printer until it stops Hold the sheet for about two seconds until it feeds automatically The printer will automatically load the paper into position When ready click OK in the dialog box After printing on thick paper or envelopes set the paper thickness lever inside the printer back to the left or center position before printing on other paper types See Setting the Paper Thickness Lever ear...

Страница 62: ... not recommended because they may cause jams or smears or may damage your printer Envelopes with windows holes perforations cutouts and double flaps Envelopes made with special coated paper or deeply embossed paper Envelopes using peel off sealing strips Envelopes in which letters have been enclosed When you are ready to print on envelopes follow these steps to stack envelopes in the sheet feeder ...

Страница 63: ...he folds crisp Press all the way around the envelopes to remove any curls and expel air from inside the envelopes Remove any curling from the envelopes by holding the edge of the envelopes diagonally and bending them gently Make sure the flaps of the envelopes are flat and not curled Prepare the envelopes 2 PRESS DOWN FIRMLY ON THE EDGES OF THE FLAP ...

Страница 64: ...ack of envelopes Insert the envelopes with the print side up Feed the top of the envelope return address portion into the sheet feeder first Make sure the back flap is toward the sheet feeder Now you can start your print operation CAN ON INC TAMA GAWA PLAN T 3 16 1 SHIMO NOGE TAKA TUKU KAWA SAKI SHI KANA GAWA 213 JAPAN PHON E 044 811 2 111 PA R AV ION Insert the envelopes 3 ...

Страница 65: ...t quality with these papers Follow these guidelines When automatically feeding transparencies or High Gloss Film remove each sheet after it is delivered Do not allow film sheets to stack up Let the printed sheets of film or paper dry completely before storing them Paper type Drying time Canon Glossy Photo Paper 10 minutes Canon High Gloss Film 10 minutes When your output has dried completely cover...

Страница 66: ...remove papers from their protective packaging until you are ready to use them Store unused film at temperatures between 59 F to 86 F 15 C to 30 C The relative humidity should be between 10 and 70 Canon s High Resolution Paper When printing on High Resolution Paper you need to lift the paper output guides on both sides of the output tray These guides help support the document as it exits the MultiP...

Страница 67: ...designed for high quality printing This paper is specially coated to produce delicate color output After using a package of High Resolution Paper 200 sheets you need to use the cleaning sheet enclosed with the paper to remove paper dust from the printer s rollers this will help prevent paper feed problems Make sure the paper thickness lever is to the center Remove the two pieces of tape from the s...

Страница 68: ... feeder Adjust the paper guide to the edge of the cleaning sheet Press the or button until ROLLER CLEANING appears Press START COPY The cleaning sheet feeds through the unit and ejects START COPY ROLLER CLEANING 1 2 FUNCTION FUNCTION To feed the sheet press FUNCTION on the one touch speed dial keypad 4 Insert the cleaning sheet 3 ...

Страница 69: ...the MultiPASS Desktop Manager software package and restart your computer the MultiPASS Fax Setup Utility automatically launches At this time you can configure settings such as Fax Header and Receive Mode You can use the MultiPASS Fax Setup Utility to change your MultiPASS Fax settings at any time after the initial setup Simply double click the MultiPASS Fax Setup Utility icon found inside the Mult...

Страница 70: ...te tab to display the Fax Setup panel you want to access Preferences Send Fax Receive Fax or Speed Dial Once you have the appropriate Fax Setup panel displayed specify your changes To save changes and close the dialog box click OK To exit the dialog box without saving your changes click Cancel To restore all MultiPASS Fax settings to the defaults that were set at the factory click Factory Defaults...

Страница 71: ...ate Format You can select the format used to display the date on the MultiPASS LCD and for printing the date on a fax from the list The default is MM DD YY Display Language You can select the language to be used on the MultiPASS LCD from the list The default is English Volume You can set the volume level of the various sound components of your MultiPASS to best suit your office environment The def...

Страница 72: ...method the MultiPASS printer will use touch tone or rotary pulse The default is Touch Tone You also specify any prefix used to access an outside phone line usually 9 Retries You can specify the number of retries the system should attempt when sending a fax transmission default is 2 and the length of time between each retry default is 2 Report You can specify whether or not you want a report to pri...

Страница 73: ...faster the transmission If you experience problems when sending faxes try a lower speed setting The default is 14 400 bps Pause Duration You can set the length of the pause that you may have to insert when dialing a long distance number The default is 2 seconds Error Correction ECM You can select this option to reduce system and line errors when sending a fax With this option selected the system c...

Страница 74: ...Lighter or darken Darker the contrast for the fax transmission Fax Heading Position You can select where you want the sent fax heading information your fax number your name and date and time to print on the faxes you send This information is known as the Transmit Terminal Identification TTI Choose between Outside Imaging Area the default and Inside Imaging Area On Error Resend You can select this ...

Страница 75: ...uction You can specify whether you want an incoming fax reduced to ensure the contents fits on the paper on which it is printed You can reduce it vertically only Vertical Only reduce it both vertically and horizontally Horizontal and Vertical or turn off reduction Off The default is Vertical Only Answer Receive Mode You can select the mode by which you want the MultiPASS to receive incoming calls ...

Страница 76: ...S not to ring for an incoming fax This is applicable only in Fax Tel Mode and Fax Only Mode The default is Silent Receive enabled Answer Number of Rings If you cleared the Silent Receive option indicating you want the MultiPASS to ring for incoming fax calls you specify the number of times the MultiPASS should ring for the fax call The MultiPASS will only ring if you have connected a telephone The...

Страница 77: ...fax With this option selected the system checks each incoming fax for lost data If data has been lost from a portion of a page the system receives that portion again after confirming that all data within that portion can be received successfully The default is ECM enabled Fax Telephone Switching Options You set the options if your Receive mode is Fax Tel switching Listen Time Before Ringing When a...

Страница 78: ...ode on the Receive Fax panel to answering machine mode AnsMode and your fax sender may be using a fax machine that does not emit a send fax signal Receive Fax If No Signal Select this option to have the MultiPASS automatically receive a call as a fax call if a send fax signal is not detected for the number of seconds you specify Clear this option to have the MultiPASS remain in answering machine m...

Страница 79: ... the type of call to be received for each selected ring pattern Typically you would specify telephone calls for one ring pattern and fax calls for the other ring pattern However if necessary you can specify that a selected ring pattern switch between receiving telephone and fax calls Fax ID If you subscribe to DRPD through your phone company enter your name or company name or some other fax recipi...

Страница 80: ...S You add the fax recipients in the fax Address Book list then assign the desired individual to speed dial codes You can also set up a group speed dial by assigning two or more individuals to a single speed dial assignment Maintaining Your Fax Address Book You can add change and delete fax recipients in your fax Address Book To add a recipient to the Address Book list click New In the Address Data...

Страница 81: ...mple you can use 0 through 9 dash or parentheses The following fax phone characters are valid in the MultiPASS Fax Setup Utility Character Description 0 to 9 Dialing digits p Pause P Last Pause T Tone switch over function Space Display only characters Space cannot be used at the beginning of a number Assigning an Individual to a Speed Dial Code To assign a speed dial code 1 In the Address Book lis...

Страница 82: ...ant to assign the group of recipients and click Group Dial 3 In the Group Dial box enter a name for the group assignment 4 In the Speed Dial List box select the first recipient and click Add Repeat this procedure until the desired recipients are included in the Group Members list box To remove a member from the group select the member in the Group Members list box and click Remove When all the des...

Страница 83: ... numbers and then download them to the MultiPASS For details on changing setup options refer to Chapter 3 Using the MultiPASS Fax Setup Utility This chapter describes Sending a document Sending a document to more than one location Adjusting the quality of your faxes Sending a Document The MultiPASS starts sending a document while it is being scanned into memory When scanning a multipage document t...

Страница 84: ...he current resolution and then the message DOCUMENT READY Change the resolution if necessary See page 4 13 Use the numeric buttons to dial the number The MultiPASS begins scanning the document and dials the number TX START COPY Press START COPY 3 TEL 555 7899 1 2 ABC 3 DEF 4 5 JKL GHI 6 MNO 7 8 TUV PRS 9 WXY 0 OPER TONE SYMBOLS Dial the other party s fax number 2 DOCUMENT READY FAX STANDARD MEMORY...

Страница 85: ...ransaction reports The MultiPASS continues to show these displays in order while the fax is being scanned After the document is scanned in the MultiPASS shows these displays while the fax is being sent When the document has been sent successfully the display shows these messages TX RX NO 0001 TRANSMITTING OK ECM TX P 001 11234567899 CANON FAX BACK TX RX NO 0001 11234567899 CALLING SCANNING P 001 T...

Страница 86: ...and try sending the fax again If the ALARM light is flashing correct the error described in the LCD display and then press STOP You may need to open the operator panel to remove the document from the ADF see page 8 3 Automatic Dialing You can send a document using one touch speed dialing coded speed dialing or group dialing You must register the one touch speed dialing numbers the coded speed dial...

Страница 87: ...dial is entered correctly If you make a mistake press STOP Then press the correct one touch speed dialing button or press CODED DIAL and re enter the code If you do not press START COPY within five seconds the MultiPASS starts sending your document automatically If the ALARM light is flashing for any reason correct the error and press STOP You may need to open the operator panel to remove the docu...

Страница 88: ... in the ADF Press the one touch speed dialing button or press CODED DIAL and the code under which you registered the group The MultiPASS starts scanning your document into memory five seconds after you select the group to which you will send the fax even if you do not press START COPY ten seconds if you are sending to more than one group After scanning the document into memory the MultiPASS automa...

Страница 89: ...c buttons Make sure the document is in the ADF Automatic The MultiPASS automatically redials if the first attempt at sending fails for example if the line is busy The unit redials twice and the time between redials is two minutes These are the default settings The LCD displays AUTO REDIAL and the transaction number while the MultiPASS is redialing If the MultiPASS fails to make a connection after ...

Страница 90: ...m memory the MultiPASS can resend it to the same destination without having to rescan it To do this the On Error Resend option must be set in the Advanced Send Fax panel of the MultiPASS Fax Setup Utility See Setting Up Advanced Fax Send Options in Chapter 3 Using the MultiPASS Fax Setup Utility for details You can also set how much of the fax is sent again The entire document All Pages The first ...

Страница 91: ...omatic dialing methods If a person answers you can converse normally When you are ready to send the fax ask them to press the start button on their fax machine Then press START COPY on your unit and hang up the telephone Faxing starts Be sure to press START COPY before you hang up or you will disconnect the call START COPY Converse with the other party 3 TEL 4567899 1 2 ABC 3 DEF 4 5 JKL GHI 6 MNO...

Страница 92: ...ally the transmission is cancelled immediately If you are sending from memory the LCD displays Press to cancel or press to continue the transmission Transmission continues If you press STOP while the document is being scanned you may need to open the operator panel to remove the document see page 8 3 TX RX CANCELLED Press or 2 YES NO STOP Press STOP 1 ...

Страница 93: ...ter the one touch and coded speed dialing numbers in any order You simply press the one touch speed dialing button or press CODED DIAL followed by the two digit code You can also include one destination using regular dialing This must be the last number you enter because you must press START COPY after entering the number N If you often send to the same group of destinations use group dialing see ...

Страница 94: ...o enter the groups You must press the second speed dialing number within five seconds of pressing the first one Each subsequent speed dialing number must be entered within ten seconds of the preceding one You can enter only one number directly from the numeric keypad using regular dialing This must be the last number you enter The MultiPASS scans the entire document into memory and begins sending ...

Страница 95: ... displays MEMORY FULL You may need to open the operator panel to remove the document see page 8 3 You can split the document into two or three different jobs or you can try sending the document to one location at a time Adjusting the Quality of Your Faxes Canon s Ultra High Quality UHQ imaging technology enables you to send faxes that have a print quality very close to that of the original documen...

Страница 96: ...h halftones is for documents that contain photographs With this setting areas of the document that contain photos are automatically scanned with 64 levels of gray rather than just two black and white which it uses otherwise This gives a much better reproduction of the photos though transmission time is longer N The COLOR COPY button is used only for making color copies it is inoperative when sendi...

Страница 97: ... You can adjust the contrast the MultiPASS uses for sending faxes Darker Standard or Lighter through the Advanced Send Fax panel in the MultiPASS Fax Setup Utility See Setting Up Advanced Fax Send Options in Chapter 3 Using the MultiPASS Fax Setup Utility for details Standard is the default and is adequate for most documents To darken a light original choose Darker to lighten a dark original choos...

Страница 98: ... the MultiPASS Fax Setup Utility for details Receiving Documents During reception of a fax If the unit runs out of paper or if the BJ cartridge runs out of ink the MultiPASS receives the remainder of the document in memory To stop receiving before the document is complete press STOP Then press to cancel reception If the ALARM light is flashing for any reason correct the error and then press STOP I...

Страница 99: ...to the MultiPASS will not ring when it receives a call from another fax machine that is trying to send a document This is so that you are not disturbed when your MultiPASS is communicating with another fax machine The unit automatically receives the document If the call is from a person the MultiPASS rings to alert you to pick up the phone You must pick up the telephone connected to the MultiPASS ...

Страница 100: ...hone after the MultiPASS displays RECEIVE If you don t hang up the MultiPASS beeps intermittently for a few seconds after you receive the document To disable the beeping turn off the Off Hook Alarm option on the Advanced Send Fax panel For details see Setting Up Advanced Send Fax Options in Chapter 3 Using the MultiPASS Fax Setup Utility Using the Telephone for Remote Reception of a Fax If you pic...

Страница 101: ...ine Ans Machine Mode Connecting an answering machine to the MultiPASS allows you to receive faxes and phone messages while you are out of the office In Answer Machine Mode the MultiPASS allows the answering machine to answer incoming calls then listens for a fax tone or for four seconds of silence also an indication that a fax is coming in and automatically receives the fax if it detects the tone ...

Страница 102: ... I ll return your call as soon as possible If you would like to send a fax press the start button on your fax machine after you leave your message Thank you Printing Documents Received in Memory If one of the following errors occurs while the MultiPASS is receiving a document the unit stores the document in memory BJ cartridge runs out of ink BJ cartridge is not installed Sheet feeder runs out of ...

Страница 103: ...memory It then prints the document as soon as you finish making copies or printing If you are entering information into the LCD menu system and the MultiPASS receives a fax it prints the document immediately it does not store the document in memory Printing a Received Fax Stored In Memory When a document is stored in its memory the MultiPASS displays the message REC D IN FILE and alternately flash...

Страница 104: ... number s for your MultiPASS using only one telephone line Your MultiPASS will automatically detect incoming calls Based on the distinctive ring pattern the MultiPASS knows if the call is from a fax machine trying to send a document or from a telephone trying to make a voice call Use the information in this section to set up the MultiPASS for use with a DRP service For more details on the DRP serv...

Страница 105: ...ose described above You set the DRPD Switch Options in the Advanced Receive Fax dialog box see Setting Up Advanced Receive Fax Options in Chapter 3 Using the MultiPASS Fax Setup Utility for details You must set all DRPD ring numbers in the MultiPASS You select the ring pattern and then specify whether the pattern is for telephone calls faxes or both fax tel switching See the next section for detai...

Страница 106: ...rn Detection DRPD Feature Using the MultiPASS with a DRP service is almost the same as using it with a normal telephone line When you turn on DRPD the Receive Mode defaults to Fax Tel Mode You cannot change this Receive Mode When someone calls using the number assigned for telephone communication the MultiPASS rings in the pattern you registered for telephone calls When you hear this pattern simpl...

Страница 107: ...rform the final scan of the document This chapter describes Launching ScanTastic Exploring the ScanTastic Window Enhancing images with ScanTastic Using the advanced functions of ScanTastic Using ScanTastic as a Plug In Troubleshooting Launching ScanTastic You can use ScanTastic scanning software on its own or as a plug in in applications that support the Adobe Photoshop Plug in standard To use Sca...

Страница 108: ... will be copied into the appropriate Plug Ins folder located in your application s folder For more information about using ScanTastic as a plug in see Using ScanTastic as a Plug In later in this chapter N If your MultiPASS is not communicating with the computer properly a warning message asks you to double check your cable connection Check your USB to Parallel cable connection to the MultiPASS the...

Страница 109: ...nted in Best resolution mode in Full Color with your MultiPASS C635 printer driver C635 Color Normal For scanned images that will be printed in Normal resolution mode in Full Color with your MultiPASS C635 printer driver C635 Grayscale Normal For scanned images that will be printed in Normal resolution mode in Grayscale with your MultiPASS C635 printer driver Computer s FaxModem 216 dpi Best for s...

Страница 110: ...d processing time will be required to work with the scan N The Monitor icon in the left most position of the panel behaves somewhat differently than the others in the group This icon has no halftone calculation This means it will always use the value supplied in the Res field for reference Setting Resolution Manually To provide the most flexible scanning environment you can override the device pan...

Страница 111: ...d or move the scale slider left or right The acceptable scale range is shown to the left of the percentage field The Width and Height fields show you what size the image will be when the selected scaling factor is applied You can also enter a desired output size in either Width or Height and the scale will adjust automatically The amount that you can scale an image is dependent upon the resolution...

Страница 112: ...ontrol panel You can refer to these numbers while selecting an area to scan Changing the Unit of Measure You can use the Units pop up menu to change the units of measure used to display images Select Inches Picas Points Centimeters Millimeters or Pixels Previewing the Image To preview an image place a document in the Automatic Document Feeder ADF and click the Prescan button The image appears in t...

Страница 113: ...h you can drag The hand icon indicates that you can drag the existing selection rectangle to another portion of the preview image To select the entire scannable area press Command A select All To cancel a selection press Command D Deselect Another method of selecting an area to scan is to type width and height dimensions in the edit fields at the bottom of the Preview window Once you have entered ...

Страница 114: ... appear You may then further enhance print or save the image You can also convert the image to text using the Optical Character Recognition OCR program TextBridge Pro At this time TextBridge Pro will only OCR an image that is scanned in as Line Art You are prompted for the location where you want to save your image 2 Click the Save button to save the image or select one of the other options as fol...

Страница 115: ...ed Enhancing Images With ScanTastic One of the key features of ScanTastic is the ability to apply enhancements to both prescan and final images Working with the Prescan allows you to quickly and easily observe changes in the appearance and quality of your image before doing the final scan To view the Enhancement Panel click the Enhance check box in the Control Panel You see this screen Image enhan...

Страница 116: ...S hardware if it is not selectable you need to perform the function in the software Using Manual Balance The Manual Balance function allows you to set the color points yourself This gives you precise control over the image balance either by choosing a color from the preview or selecting a color from the standard color wheel To choose a color from the preview image click on the eye dropper tool tha...

Страница 117: ...image to the desired level Click the Shadow Eye Dropper to set the darkest point of the image in the same manner as above Click the Mid Tone Eye Dropper on an area of the image that is as close to neutral gray as possible If you make a mistake with these tools simply repeat the process until you are satisfied with the results Click the Reset button to undo your changes To manually set the balance ...

Страница 118: ...htness and Contrast by clicking on the slider handles and dragging them to the left or right The numeric values reflect the position of the slider Sharpening or Softening Images Sharpness and softness can be adjusted with the third Enhancement icon Alter the image Sharpness by clicking on the slider handles and dragging them to the left or right The numeric values reflect the position of the slide...

Страница 119: ...e a particular range of color Dragging a selection point up or down will saturate or neutralize make gray the particular color range under the point To remove all color from the image press the Neutralize button To return to the default click the Normalize button To completely saturate the image click the Saturate button ScanTastic allows you to easily locate a color range in the equalizer by simp...

Страница 120: ...ing Tone Curves ScanTastic provides you with a method of fine tuning your image with tone curve settings These curves operate on the red green blue and master channels of your image This provides a method of custom image enhancement To work with an individual color channel click in the box of the desired color N When the Image Type is set to Gray only changes made to the Master channel have any ef...

Страница 121: ... to modify Acceptable values range from 0 maximum darkness to 100 maximum lightness for each handle To locate a color range in the tone curve move the pointer over the specific area of your image and click while holding down the Option key A line will appear on the tone curve corresponding to the area under the pointer In this way you can tell exactly where to make your adjustments Changes made to...

Страница 122: ...ster curve you affect the shadow portion of the image without touching the mid range or highlights It s a good idea to experiment with these curves to gain the necessary experience to use them effectively Changing Gamma Curve Values Another method of adjusting the tone curves is to use the Gamma Bar Click and drag within the Gamma Bar located above the numerical values HIGHLIGHTS SHADOWS 1 4 TONES...

Страница 123: ... right to increase the Red Green or Blue tint of your image The numeric values to the right reflect the position of the slider Using Auto Balance The Auto Balance function alters the tonal balance of the image by stretching the contrast or dynamic range of each color channel between the whitest and blackest point of your image or selected area Because all scanners compress image data images have l...

Страница 124: ...ts of ScanTastic It is designed to allow the easiest possible method for choosing the proper scan resolution and enhancements for the given output quality desired The three C635 device settings are pre set to obtain the best results for scans to be printed in different resolution and color modes on the MultiPASS C635 To customize the descriptions in the device panel first click the icon you wish t...

Страница 125: ...r output device Because halftone cells inherently limit the perceived resolution of a scanned image there is no reason to scan an image at a resolution higher than 1 5 times the line screen frequency of your final output Keep in mind that the higher resolution scan you acquire the more memory disk space and processing time will be required to work with the scan ScanTastic calculates its halftone r...

Страница 126: ...while clicking an icon 2 This displays a pop up menu that allows you to save and load settings for the selected icon Automatic Batch Scanning 1 Choose ScanTastic from the Apple menu or double click the ScanTastic icon 2 Indicate letter size 8 5 11 inch paper by leaving the Force Letter check box selected If you are using legal size paper deselect the Force Letter check box 3 Place a stack of image...

Страница 127: ...w to convert the images to text consult your TextBridge Pro documentation Please note that OCR is only available if you have TextBridge Pro software installed Scan More Continue the scanning session Print Sends all the scanned images to the MultiPASS without saving the files Save Allows you to save the images 9 If you are saving the images choose a location and name for the file and click the appr...

Страница 128: ...olor boxes to the left of the histogram to view that channel s data or click on the gray box to view the overall summary data Each of the following examples shows the display of the histogram under certain conditions This is a normal uncorrected scan Notice the concentration of data in the dark regions as indicated by the heavy concentration of data content in the left of the histogram Using ScanT...

Страница 129: ...where a conversion has been made between the light we see Red Green Blue and the separations used to produce printed material with Cyan Magenta Yellow and Black inks The information it provides helps the user decide if the separation will print properly with the correct tonal cast etc Since ScanTastic only deals with RGB data as is the case with all scanners since they capture the light reflecting...

Страница 130: ...anTastic application file will be copied into the appropriate Plug Ins folder in your application s folder If the image editing software is running make sure you quit and restart the application so that it recognizes ScanTastic as a plug in 2 Launch the image editing application If you are using PhotoDeluxe and the application prompts you to choose an input source choose the ScanTastic option If y...

Страница 131: ...ous tones are viewed Normally line art scans are performed at very high resolutions in excess of 300 dpi Since a computer monitor is 72 dpi it is not capable of reducing the view effectively Poor Image Quality When Printing Make sure you are scanning in the right mode and resolution This is particularly important when working with line art For example if you try to scan line art when the color mod...

Страница 132: ...ice Panel settings at any time or to load Device Panel settings which you have already saved hold down the Option key and click on the icon of the Output Device setting you wish to save or load You will then see a popup menu giving you the option to save or load an Output Device setting If you have not saved the default Output Device settings and you wish to return to the defaults at any time simp...

Страница 133: ...MultiPASS It includes MultiPASS guidelines Routine maintenance Cleaning inside the MultiPASS Printing the nozzle check Cleaning the BJ cartridge print head BJ cartridge guidelines Replacing the BJ cartridge Replacing a BJ tank in the BC 21e Color BJ Cartridge Storing a BJ cartridge Transporting the MultiPASS 7 Maintaining the MultiPASS C635 ...

Страница 134: ...ultiPASS to strong physical shock or vibration Make sure the area where you use the unit is free from dust Keep the MultiPASS clean Dust accumulation can prevent the unit from operating properly To assure proper electrical contact make sure the unit is firmly plugged in Never pull on the cord to unplug the MultiPASS Pull on the plug itself Do not overload the electrical outlet where the MultiPASS ...

Страница 135: ...loth moistened with water or diluted dishwashing detergent solution Never use thinner benzene alcohol or any other organic solvent as it may damage the surface of the MultiPASS Cleaning Inside the MultiPASS To prevent ink spots and paper dust from accumulating inside the MultiPASS and affecting print quality clean the unit s print area periodically Follow these guidelines Never use volatile liquid...

Страница 136: ...Make sure not to touch the cartridge Check the small black rollers If they are dirty clean them with a soft dry cloth When finished close the printer cover and plug the MultiPASS back in Cleaning the Scanner Components Periodically check and clean the scanning components as explained here Be sure to disconnect the power cord from the MultiPASS Open the operator panel by gently pulling it toward yo...

Страница 137: ...er Wipe with a soft dry clean cloth to clean the rollers N If the scanning components are dirty the documents you send or print will also be dirty Be sure to use a soft cloth to avoid scratching the components C Do not use tissue paper Dust from the tissue paper causes static electricity Clean the components 2 Maintaining the MultiPASS C635 Chapter 7 Maintaining the MultiPASS C635 7 5 SEPARATION G...

Страница 138: ... copy or send Use a soft dry clean cloth to wipe up paper dust around the rollers Press the center of the operator panel until it locks into place Plug the unit back in When you are finished close the operator panel 4 Clean the shaded areas of the operator panel and the unit 3 7 6 Maintaining the MultiPASS C635 Chapter 7 ...

Страница 139: ...olor BJ Cartridge is installed the pattern includes all four colors yellow magenta cyan and black In the color pattern you ll notice that lines are missing between the colors This is normal The following sample shows the Nozzle Check when the optional BC 20 Black BJ Cartridge is installed START COPY Press START COPY 3 NOZZLE CHECK 1 2 Press either of the buttons until NOZZLE CHECK appears in the L...

Страница 140: ... Cleaning the print head consumes a small amount of ink Cleaning too often reduces the amount of ink in the BJ cartridge Make sure the MultiPASS is plugged in The unit cleans the print head When cleaning ends the MultiPASS beeps once to let you know it is done and returns to Standby mode Do this five consecutive times if necessary If the problem persists install a new BJ cartridge START COPY Press...

Страница 141: ...timum print quality is take care of the BJ cartridges C Spilled ink can stain any surface Open BJ cartridges and BJ tanks carefully and follow the guidelines presented here to protect against spilled ink If you are using both the BC 21e Color BJ Cartridge and any of the optional BJ cartridges make sure you store the cartridge not being used in the Ink Cartridge Storage Box Keep BJ cartridges and B...

Страница 142: ...y However Canon cannot guarantee the quality or performance of your printer when you are using inks from other suppliers Canon s limited warranty does not cover damage caused to Canon s Bubble Jet products that is attributable to the use of third party parts or supplies including inks The limited warranty remains in effect for its life once that particular damage has been properly repaired N For o...

Страница 143: ...he BC 21e Color BJ Cartridge and your output is blank one of the BJ tanks is probably out of ink See the next section for instructions on how to replace a BJ tank The following procedure describes how to replace the BC 21e Color BJ Cartridge with the optional BC 20 Black BJ Cartridge Follow the instructions in this section to replace an old BJ cartridge or to change BJ cartridges when you are swit...

Страница 144: ... overheating After allowing it to cool plug the unit in again and press the CARTRIDGE button to move the cartridge holder to the center of the unit Hold the BJ cartridge on the sides only Do not touch the silver plate on the bottom of the BJ cartridge or the silver metal or circuit area on the side The metal area may become hot during printing Open the printer cover 2 7 12 Maintaining the MultiPAS...

Страница 145: ...rage Box Peel the protective foil off the new BJ cartridge s packaging and remove the cartridge Open the BJ cartridge package 5 Ink Cartridge BCl 21 Color Made in Japan Color Slot Ink Cartridge BCl 21 Black Made in Japan Black Slot Color BJ Cartridge BC 21 Mad e in Japan Dispose of or store the BJ cartridge 4 Lift the green lock lever on the cartridge holder 3 Maintaining the MultiPASS C635 ...

Страница 146: ...and your work area Make sure the cartridge label faces you Be careful not to touch the silver plate on the bottom of the BJ cartridge or the silver metal or circuit area on the side In k C artr id g e B C l 21 C o lo r M ade in Japan In k C artr id g e B C l 21 B lack M ade in Japan Slide the BJ cartridge straight into the cartridge holder 7 Remove the protective material from the BJ cartridge 6 C...

Страница 147: ...e paper thickness lever for the type of BJ cartridge you installed See Setting the Paper Thickness Lever in Chapter 2 Printing With the MultiPASS C635 for details CARTRIDGE Close the printer cover and press the CARTRIDGE button 9 In k Cartrid ge BCl 21 Color Made in Japan In k C artrid ge B C l 21 B lack M ade in Japan Make sure the cartridge is aligned against the back of the holder then lower th...

Страница 148: ...k The cartridge holder then moves to the center of the unit Grasp both sides and lift it up C Do not try to move the cartridge holder manually this may damage the unit If the cartridge holder does not move and the unit beeps several times unplug the MultiPASS and let it cool for several minutes The device has an automatic protection mode that prevents it from overheating After allowing it to cool ...

Страница 149: ...BJ cartridge unit Dispose of the BJ tank properly You may want to place it in a plastic bag to keep from spilling any residual ink Remove the orange protective cap Do not touch the bottom of the BJ tank you may get ink on your hands Take the new BJ tank out of its packaging 4 In k C artrid ge B C l 21 B lack M ade in Japan In k C artr id ge B C l 21 C olor M ade in Japan Remove the empty BJ tank 3...

Страница 150: ...hile it is printing or move the BJ cartridge from the home position the cartridge will not be capped and may dry out CARTRIDGE Close the printer cover and press the CARTRIDGE button 7 In k Cartridge BCl 21 Colo r Made in Japan In k C artrid ge B C l 21 B lack M ade in Japan Press firmly on the tab on top of the new BJ tank until it snaps into place 6 In k C artrid ge B C l 21 B lack M ade in Japan...

Страница 151: ...tab that locks the cover in place You must insert the cartridge correctly or the storage box will not close The protective cap must be removed from the cartridge before you set it in the storage box Be sure the lid snaps closed Close the storage box 3 Ink Cartridge BCl 21 Color Made in Japan Color Slot Ink Cartridge BCl 21 Black Made in Japan Black Slot Color BJ Cartridg e BC 21 Mad e in Japan Car...

Страница 152: ... Transporting the MultiPASS If you need to transport the MultiPASS be very careful DO NOT remove the BJ cartridge With the cartridge holder on the right side of the unit tape the BJ cartridge and cartridge holder to the side of the unit Unplug the power cord Disconnect the telephone lines and USB to parallel cable Remove the sending document support Remove the document support and output tray exte...

Страница 153: ...idge Storage Box may leak and the print head may dry out Also if you do not tape the BJ cartridge to the side of the unit ink may spill into the MultiPASS N If you no longer have the shipping carton your MultiPASS came in pack the unit in a suitably sized sturdy cardboard box using bubble wrap foam peanuts or other suitable packing materials If you use foam peanuts be sure to wrap the unit in plas...

Страница 154: ...ms Memory Clear Report If you have a problem with your MultiPASS and you cannot resolve it by referring to the information in this chapter contact the Canon Computer Systems Customer Care Center See Getting Help From Canon in Chapter 1 Introduction for details Canon s support personnel are trained in the technical support of Canon s products and should be able to help you with your problem If your...

Страница 155: ...rs Place of purchase Nature of problem Steps you have taken to solve the problem and the results The serial number is located on the label on the back of the unit You can find the version number of MultiPASS software included in the Get Info information In Finder select the name of the MultiPASS software file and then select Get Info Location Software MultiPASS Desktop Manager folder MultiPASS Fax...

Страница 156: ...ed or jam You can usually clear the problem easily N You need not unplug the MultiPASS to clear paper jams Jams in the Automatic Document Feeder ADF Stops the operation Gently pull the operator panel toward you It opens only slightly Open the operator panel 2 STOP Press STOP 1 CHECK DOCUMENT Chapter 8 Troubleshooting 8 3 ...

Страница 157: ...orce it If a multipage document is loaded remove the entire document from the ADF Gently press the operator panel until it clicks closed Fan and stack the sheets and replace the stack in the ADF Start your operation again Close the operator panel 4 Remove the document 3 8 4 Troubleshooting Chapter 8 ...

Страница 158: ... on press RESUME to eject the page and clear the error message If you are printing from a Windows application follow any instructions displayed on your computer If the paper jam occurred while a fax was being received the MultiPASS will store the fax in memory and print it when the jam is cleared STOP Press STOP or RESUME 3 Remove the stack of paper from the sheet feeder 2 Gently pull any jammed p...

Страница 159: ...ing properly The MultiPASS driver can print only what the application sends it Occasionally the application has trouble generating a print job Usually application problems are memory related and allocating more memory fixes the problem especially when complicated pages or graphic elements print incorrectly To allocate more memory to an application 1 Quit the application if it is running You cannot...

Страница 160: ...utput quality problems adjust the print settings to a different output resolution or color depth See Printing Tips in Chapter 2 Printing With the MultiPASS C635 Step 4 Remove Corrupted Print or Preference Files If you do experience a problem while printing old print jobs may remain in your system and the printer drivers preference files can be corrupted To fix this problem 1 Open the System Folder...

Страница 161: ...ctly installed you will find the following files At the root level of your hard drive MultiPASS Desktop Manager folder In the Extensions folder the MultiPASS driver you installed SpoolMaster and SpoolLauncher In the Preferences folder PowerPrint Prefs files folder If you have been using SpoolMaster you will find SpoolMaster folder Memory Considerations Application Memory Allocation If you are expe...

Страница 162: ... 17MB of free RAM If your application is running at 14MB 14 000K this now leaves less than 3MB of free RAM SpoolMaster Memory Allocation If you are encountering problems while using background printing we recommend allocating more memory to SpoolMaster Follow the steps listed below 1 Locate the SpoolMaster application program in the Extensions Folder in the System Folder 2 Click on the SpoolMaster...

Страница 163: ...ber dialed Check the fax number was incorrect and dial again The other party s fax is Contact the other party not working and have them check their fax The other party is not Contact the other party using a G3 machine and have them send or receive the document using a G3 machine The touch tone rotary Set your MultiPASS pulse setting on your to the setting that MultiPASS is incorrect matches your t...

Страница 164: ...manual feed slot feed slot when you are receiving a fax CHECK PRINTER There may be an Check for a paper clip obstruction that is not paper jam or the plastic allowing the cartridge orange cap off the BJ mechanism to move cartridge Press STOP right or left and try your operation again The BJ cartridge may be Press STOP Reinstall defective the cartridge and try your operation again In either case if...

Страница 165: ...ing ECM transmissions Turn off ECM if you need to receive quickly or if you know your local lines are in good condition ECM TX The MultiPASS is ECM transmissions may sending a fax using take longer than normal ECM transmissions Turn off ECM if you need to transmit quickly or if you know your local lines are in good condition HANG UP PHONE The telephone is Place the telephone off hook properly into...

Страница 166: ...ed more space memory currently in use print or send any documents in memory NO ANSWER 005 The receiving fax Make sure you dialed machine does not the correct number answer Try again later NO RX PAPER 012 The other party s fax is Contact the other party out of paper or its and have them install memory is full paper in their fax NO TEL 022 The one touch or coded Register the number speed dialing num...

Страница 167: ...e the so the MultiPASS BJ cartridge or clear received the document the paper jam Press in memory STOP to clear the error message The MultiPASS automatically prints the document stored in memory START AGAIN An error has occurred Start the procedure in the phone line or in again from the the system beginning STOP KEY PRESSED You pressed the STOP Resume operation button to cancel the current operatio...

Страница 168: ...an extension manager make sure the printer driver is ON in the Extensions Manager Control Panel Make sure the printer driver is in the Extensions folder If not reinstall the driver Cannot set background SpoolMaster and SpoolLauncher If the SpoolMaster software printing are not installed or loaded is not in your Extensions folder use the MultiPASS Installer to install the SpoolMaster software If yo...

Страница 169: ... is plugged securely into the unit and into the wall outlet If the MultiPASS is plugged into a power strip make sure the power strip is plugged in and turned on The MultiPASS may have been Unplug the MultiPASS and plugged in or the computer may turn off the computer Plug have been turned on when you the unit back in and turn connected the interface cable the computer back on again The orange tape ...

Страница 170: ... be empty Check the BJ tanks and BC 21e Color BJ cartridge replace them if necessary The MultiPASS suspends The print head may have Stop your print operation print after every line is become too hot If this happens and wait several minutes to printed the MultiPASS may be slowing allow the unit to cool Then its print speed at the end of each start your operation again line to protect the print head...

Страница 171: ...e the paper is loaded match paper size and aligned correctly in and aligned correctly see page 2 22 The application s page Make sure the paper size and size and margin settings margin set in your application may be incorrect are correct for the paper in the sheet feeder The selected printer driver Make sure you select the may be incorrect MultiPASS C635 printer in in the Chooser The printout curls...

Страница 172: ...int head see may be clogged page 7 8 repeat cleaning if necessary If print quality is not recovered after executing the cleaning five times replace the BJ cartridge BJ cartridge may be Make sure the BJ cartridge installed incorrectly and or BJ tanks are installed correctly A BJ tank in the BC 21e Replace BJ tanks as necessary Color BJ Cartridge may be see page 7 16 empty The print head may be The ...

Страница 173: ...wrong side of the sheet printing If the print quality is not as clear as you would like try turning the paper over and printing on the other side Color Printing and Copying Problems Problem Cause Solution Printer prints only in The MultiPASS printer driver Make sure the MultiPASS is black you are printing may not be selected the default printer in your from an application that application supports...

Страница 174: ...he paper guide is adjusted correctly Paper is loaded skewed Paper may not be stacked Make sure the stack of paper printing is skewed correctly in the sheet feeder is straight in the sheet feeder Make sure the right side of the stack of paper is aligned against the right side of the sheet feeder and the paper guide is aligned against the left side Make sure the paper exit path is clear Multiple she...

Страница 175: ...ee Appendix A Specifications for details Repeated paper jams The paper you are using may Fan the paper before stacking occur be causing the jams it in the sheet feeder This keeps the sheets of paper from sticking together Check that the paper you are using and your printing environment are within the specifications of the unit See Appendix A Specifications for details Envelopes do not load Envelop...

Страница 176: ... feed it into the unit into the MultiPASS correctly see page 1 14 Make sure the operator panel is closed The one touch or coded Check the one touch or coded speed dialing number you speed dialing button and be used may not be registered sure it is registered correctly for the feature you want to use The other party s fax may be Call the other party and ask out of paper them to make sure paper is i...

Страница 177: ... or receiving poor condition or you may see pages 3 5 and 3 9 have a poor connection The sending fax machine may The sending fax machine not be functioning properly usually determines the fax s quality Call the sender and have them make sure the top cover and scanning glass on their fax machine are clean Cannot receive a The MultiPASS may not be To receive faxes automatically fax automatically set...

Страница 178: ... signal is a fax is from a fax In such cases you will have to receive the document manually Cannot receive a You may have pressed Always press START COPY document manually START COPY after hanging before hanging up the up the telephone telephone Do not press START COPY after you hang up the telephone this will disconnect the call Print quality is poor You may not be using the Be sure you are using...

Страница 179: ...tion or eliminate such problems you may have a bad However if the telephone connection lines are in poor condition you may have to try again The other party s fax may Remember the sending fax have a problem usually determines document quality Be sure the other party s top cover and scanning glass are clean Scanning Problems Problem Cause Solution TextBridge Pro reports it TextBridge Pro can only E...

Страница 180: ...set the may be incorrect proper resolution for the MultiPASS Your application settings If importing the scanned may be incorrect image into another application review the software s documentation to help resolve the problem Telephone Problems Problem Cause Solution You cannot dial The telephone line may Be sure the telephone line is not be connected properly correctly connected to the MultiPASS se...

Страница 181: ...l not The MultiPASS may have a Replace the empty BJ tank make a copy BC 21e Color BJ Cartridge see page 7 16 installed and its black BJ tank may be empty The telephone may be off hook Make sure the telephone is in its cradle The document may not be Make sure a document is set loaded correctly in the ADF and the LCD displays DOCUMENT READY Make sure the operator panel is closed The BJ cartridge is ...

Страница 182: ...r by using a voltmeter to test it for continuity The MultiPASS will not The MultiPASS may have a Replace the empty BJ tank print reports BC 21e Color BJ Cartridge see page 7 16 installed and its black BJ tank may be empty A cartridge other than the Install the BC 21e Color or BC 21e Color or BC 20 Black BC 20 Black BJ Cartridge BJ Cartridge may be installed Nothing appears in the The MultiPASS may...

Страница 183: ...ience a power failure any documents stored in memory will be lost When you turn on the MultiPASS after power is restored the MultiPASS automatically prints out a list of documents that were stored in the memory at the time of the power failure MEMORY CLEAR REPORT MEMORY FILES DELETED TX RX NO MODE CONECTION TEL ID PGS SET TIME ST TIME 0079 TRANSMIT 3122685700 1 08 03 12 54 0080 RECEIVE 3375821111 ...

Страница 184: ... resolution paper Approx 80 sheets Transparencies 50 sheets Envelopes 10 Other special media 1 sheet only Paper Size Letter 8 5 in 11 in Legal 8 5 in 14 in A4 210 mm 297 mm B5 176 250 mm COM 10 envelope 9 50 in 4 125 in Monarch envelope 7 50 in 3 875 in DL envelope 110 mm 220 mm C5 envelope 162 mm 229 mm Recommended Canon Brilliant White Paper Media Types Canon Bubble Jet Paper Canon Glossy Photo ...

Страница 185: ...ution Black BC 20 Black BJ Cartridge 720 360 dpi with Smoothing Printable Area Papers The shaded portion in the following figure shows the printing area for paper The table lists the minimum margins Margin Inches mm L 0 25 6 4 R 0 25 6 4 T 0 12 3 0 B 0 65 16 5 Printable Area Envelopes The shaded portion in the following figure shows the printing area for a COM10 envelope The table lists the minimu...

Страница 186: ...k BJ Cartridge Print head 128 nozzles Ink color Black Cartridge yield Approx 900 text pages at 5 coverage Facsimile Applicable line Public Switched Telephone Network Compatibility G3 Data compression MH MR MMR ECM MMR system Modem type Fax modem Modem speed 14400 9600 7200 4800 2400 bps Automatic fallback Transmission Approx 6 sec page at 14 4 Kbps speed ECM MMR transmitting from memory Transmissi...

Страница 187: ...s Manual dialing with numeric buttons Automatic redialing including error redialing Redial times 1 10 Redial interval 2 99 min Manual redialing Pause button variable length 1 15 sec Other Features Sequential broadcast up to 57 locations Networking Automatic receiving Non ring reception Deactivate ECM DRPD Distinctive Ring Pattern Detection Report Reference Activity report up to 20 transactions Non...

Страница 188: ...igh Quality image enhancement processing Halftones 256 levels of gray Color 16 7 million colors Photo text auto recognition Paper Size Up to 30 letter size or A4 size sheets 15 legal size sheets based on 20 lb paper Color Scanning Up to 600 dpi 300 dpi optical Resolution Effective scanning 8 42 in 214 mm width Compatibility Adobe Photoshop Plug In standard Scanning speed Black and White 9 78 sec p...

Страница 189: ...n on the top and bottom that are not picked up by the scanner MultiPASS System Requirements Macintosh Macintosh 8 1 or later System Power PC USB enabled Requirements 32MB RAM 64MB recommended 75MB available hard disk space Color monitor with 256 or more colors and 800 600 pixel display CD ROM drive 2 or better Legal Letter 0 12 in 3 0 mm 0 12 in 3 0 mm 0 16 in 4 0 mm 0 16 in 4 0 mm 8 42 in 214 mm ...

Страница 190: ... 5 6 kg Environmental Temperature 41 F 90 5 F 5 C 32 5 C Conditions Humidity 10 to 90 RH Liquid Crystal 16 1 Display LCD Display Languages English French Spanish Telephone Automatic Fax Tel switchover Answering machine hook up CNG detecting signal no sound Telephone hook up Remote reception by telephone Remote receiving ID Default 25 Tone button Pause button variable length 1 15 sec Appendix A Spe...

Страница 191: ...A 8 Specifications Appendix A Space Requirements 11 in 281 mm 24 3 in 618 mm 14 4 in 365 mm 16 in 400 mm ...

Страница 192: ...ens for FAX TONE For 8 sec FAX TONE detected FAX TONE is not detected Document received automatically MultiPASS starts ringing Pick up the handset to talk If you don t pick up the handset within 15 sec F T SW ACTION Choose between Receive factory default setting and Disconnect DISCONNECT RECEIVE Factory default setting FAX TONE is detected and the MultiPASS switches to receive mode The MultiPASS d...

Страница 193: ...rt Guide See Chapter 3 for details on using the MultiPASS Fax Setup Utility N In the United States you are required by FCC regulations to include your name and fax number every time you send a fax Be sure to enter this information LCD Menu System To enter the LCD Menu System press the FUNCTION button on the operator panel Then press or to move between selections and press START COPY to make a sele...

Страница 194: ...ettings only through the MultiPASS Fax Setup Utility Entering Information in the MultiPASS When using the MultiPASS as a stand alone fax machine you must enter your user information into the unit through the operator panel When entering information through the operator panel of the MultiPASS follow these guidelines If you pause and do not make an entry for more than 60 seconds the MultiPASS return...

Страница 195: ... Use the month day year format mm dd yy Precede single digits with a zero 11 15 99 00 00 1 2 ABC 3 DEF 4 5 JKL GHI 6 MNO 7 8 TUV PRS 9 WXY 0 OPER TONE SYMBOLS Enter today s date and the time using the numeric buttons 3 06 08 99 15 36 START COPY DATE TIME START COPY Press START COPY twice 2 USER SETTINGS 1 2 Then press the button FUNCTION FUNCTION Press FUNCTION on the one touch speed dialing keypa...

Страница 196: ...ABC 3 DEF 4 5 JKL GHI 6 MNO 7 8 TUV PRS 9 WXY 0 OPER TONE SYMBOLS Enter your fax number up to 20 digits using the numeric buttons 5 TEL START COPY DATA ENTRY OK START COPY Press START COPY twice when the date and time are entered 4 11 15 99 08 15 1 2 ABC 3 DEF 4 5 JKL GHI 6 MNO 7 8 TUV PRS 9 WXY 0 OPER TONE SYMBOLS B 4 Using the MultiPASS C635 as a Stand alone Fax Appendix B ...

Страница 197: ...8 TUVtuv8 9 WXYZwxyz9 0 0 _ Correct errors by moving the cursor to the error using or on the one touch speed dialing keypad and entering the correct character CANON FAX BACK Enter your name up to 24 characters using the numeric buttons 7 START COPY Then press START COPY again UNIT NAME DATA ENTRY OK START COPY Press START COPY when the fax number is entered 6 Stand alone Fax Appendix B Using the M...

Страница 198: ...SS returns to standby mode STOP Press STOP to complete the registration 9 DATA ENTRY OK START COPY Press START COPY when you finish entering your name 8 B 6 Using the MultiPASS C635 as a Stand alone Fax Appendix B ...

Страница 199: ... You define the number of times the unit redials and the length of time between redialing Bi directional parallel interface port An interface connection that is capable of both sending or receiving For example when you print from your computer data goes from your computer to the MultiPASS when you scan into your computer data goes from the MultiPASS to your computer BJ cartridge The printing mecha...

Страница 200: ...signal it automatically starts to receive the fax transmission The majority of fax machines in use today can send and detect CNG signals Coded speed dialing An automatic dialing method that allows you to dial a fax or telephone number by pressing the CODED DIAL button and a two digit code using the numeric buttons cps Characters per second A unit of measurement that indicates the printer s speed d...

Страница 201: ...tching The ability of the MultiPASS to automatically detect whether a call is from a fax or telephone With this feature one telephone line can be shared by both the telephone and the fax FINE The fax setting for documents with very small characters and lines Font A complete set of characters of the same size and style a particular implementation of a typeface For example 12 point Courier bold G3 G...

Страница 202: ...heral devices a higher speed data transfer rate and protection against data loss due to noise interference Ink Saver You can enable or disable economy printing ink saving feature when receiving faxes By enabling the Ink Saver Mode ink consumption can be decreased by as much as fifty percent resulting in a longer effective cartridge life You set Ink Saver Mode in the Advanced Receive Fax dialog box...

Страница 203: ...ice converts the modulated data DEModulates to digital format that the computer understands MultiPASS Fax Setup Utility Canon s exclusive software package that allows you to use the MultiPASS to send and receive faxes Noise A term applied to a variety of problems that impair the operation of telephone lines used for faxing Noise level See dB A Numeric buttons The round numbered buttons on the oper...

Страница 204: ...zles and ejects the ink for printing Print head capping An automatic protection function that prevents the print head unit and BJ cartridges from drying out or becoming clogged with dust Printable area The area of a sheet of paper or envelope on which a printer can reproduce text or graphics the printable area is smaller than the paper Printer driver Software that sends printing instructions to a ...

Страница 205: ...bles you to manually activate a fax using a telephone that is connected to the MultiPASS The default code is 25 Remote reception Activating a fax by answering a telephone that is connected to the MultiPASS but that is not located near the unit such as a cordless phone You need to dial a remote receiving ID number to start remote reception Resolution The measurement of a printer s quality expressed...

Страница 206: ...lso bps bits per seconds SpoolMaster Software you can use so that you can continue to use your computer while you print For more information see Chapter 2 Printing with the MultiPASS C635 Standby The mode in which the MultiPASS is on and ready to use All operations start from Standby mode when the LCD displays the date and Receive mode Tone pulse setting The ability to set the MultiPASS to match t...

Страница 207: ...e typeface appears slanted italic or upright UHQ Ultra High Quality An exclusive Canon digital image processing system that incorporates 64 shades of gray along with a special edge enhancement feature which ensures that text and photos are transmitted with ultimate clarity USB to Parallel cable The cable that you use to connect the Centronics parallel port on the MultiPASS to the USB port on your ...

Страница 208: ...tanks 1 2 3 7 9 12 7 16 21 A 3 replacing 7 16 18 yield A 3 Black White setting 2 13 Blurred ink 8 20 8 Colors setting 2 13 72 dpi 6 3 180 180 dpi 2 11 216 dpi 6 3 360 360 dpi 2 11 A 5 720 360 dpi 2 11 A A4 paper size A 1 Accessories 1 2 3 Adding pages to document 1 16 Address book faxing 3 12 13 ADF See Automatic document feeder Adjusting color distribution 6 23 24 contrast and brightness 6 12 his...

Страница 209: ...24 image 6 5 missing 8 21 output quality 2 18 printing copying problems 8 20 21 wheel 6 11 Color Best scanning 6 3 Color Normal scanning 6 3 COLOR COPY button 1 9 4 14 COLOR COPY MEDIA setting 1 19 B 2 COLOR DRAFT mode 1 19 COLOR FINE mode 1 19 COLOR SNAPSHOT mode 1 19 COM10 envelopes 2 28 A 1 Compatibility A 3 A 5 Components 1 7 8 Configuring setup options 3 2 Contrast 6 17 adjusting 6 12 setting...

Страница 210: ...n B 2 6 Envelopes 2 21 2 28 30 A 1 printable area A 2 printing 2 28 30 Environmental conditions A 7 Error 108 8 18 Error correction ECM 3 5 3 9 European DL envelopes 2 28 Extension phone 5 2 Eye dropper tool 6 10 F Facsimile specifications A 3 4 Fast setting print mode 2 11 Fax address book 3 12 13 fine resolution 4 14 15 header 1 17 heading position 3 6 heading unit name 3 4 information 3 4 numbe...

Страница 211: ... dither 2 13 resolution 6 19 Hard disk space A 6 Hardware connections 8 8 HEAD CLEANING function 7 8 B 2 Help Canon 1 4 High Gloss Film 1 3 2 3 2 21 2 31 A 1 High Resolution Paper 1 3 1 19 2 3 2 21 22 2 32 34 A 1 Hilite eye dropper 6 11 Histogram tone levels 6 22 23 Home position 7 18 I Identifying documents 1 17 Image area scanned A 6 balance controlling 6 10 18 contrast 3 6 enhancing 6 9 18 fina...

Страница 212: ...y feeding paper 2 26 27 Master channel 6 14 Media type 2 21 recommended A 1 Memory 8 9 A 6 allocation 8 8 9 considerations 8 8 9 faxes stored 1 20 printing document 5 5 sending 4 1 Memory Clear Report 8 30 MEMORY FULL message 1 20 8 28 Messages LCD 8 10 14 Mid tone eye dropper 6 11 Modem speed A 3 type A 3 Monitor 72 dpi 6 3 MultiPASS printer driver 2 6 14 servicing 1 5 software 8 8 specifications...

Страница 213: ... setting 2 19 20 Paper types selecting 2 2 3 setting 2 11 Parallel cable connector 1 8 Pattern dither 2 13 Pause duration 3 5 Perform in hardware 6 10 Phone line option 3 4 Photo resolution 4 14 15 Photocopy reduction 2 7 PhotoDeluxe 6 2 Photoshop 6 2 Plain paper 2 2 2 21 A 1 Platen 2 25 7 4 Plug in ScanTastic 6 24 Portrait orientation 2 7 Power consumption A 7 cord connector 1 8 failure 8 30 goes...

Страница 214: ...no signal 3 10 telephone 5 3 4 Receive fax options 3 7 11 advanced 3 9 11 Receive Mode 3 7 8 5 1 5 B 2 Receiving documents 5 1 5 faxes 5 1 9 faxes Fax Tel mode A 9 telephone calls 5 2 3 REDIAL PAUSE button 1 9 10 Redialing 4 7 8 cancelling 4 8 Reducing print job 2 6 Reduction option faxing 3 7 sizes A 5 Registering receiving 5 6 Registration card 1 5 Regular dialing 4 2 4 Remote identification num...

Страница 215: ... resolution A 5 speed A 5 width A 5 ScanTastic advanced functions 6 18 24 application file 6 24 Central 8 2 launching 6 1 2 plug in 6 24 preferences 6 26 troubleshooting 6 25 26 window 6 2 9 Scatter dither 2 14 Send Fax options 3 4 6 advanced 3 5 6 Sending document 4 1 13 faxes 4 1 15 multiple locations 4 11 13 Sending document support 1 7 Separation guide 7 5 roller 7 5 Sequential broadcasting 4 ...

Страница 216: ...ing machine jack 1 8 TextBridge Pro 6 8 6 21 8 26 Tint adjusting 6 17 Tonal balance 6 17 Tone curves resetting 6 17 setting 6 14 16 Touch tone dialing 3 4 Transmission speed A 3 Transmission reception memory A 3 Transmit report B 1 Transmit Terminal Identification TTI 1 17 3 6 Transmitting document 4 11 13 Transporting MultiPASS 7 20 21 Troubleshooting 8 1 30 ScanTastic 6 25 26 TX REPORT option B ...

Отзывы: