Canon MP480 series Скачать руководство пользователя страница 34

32

Specifications

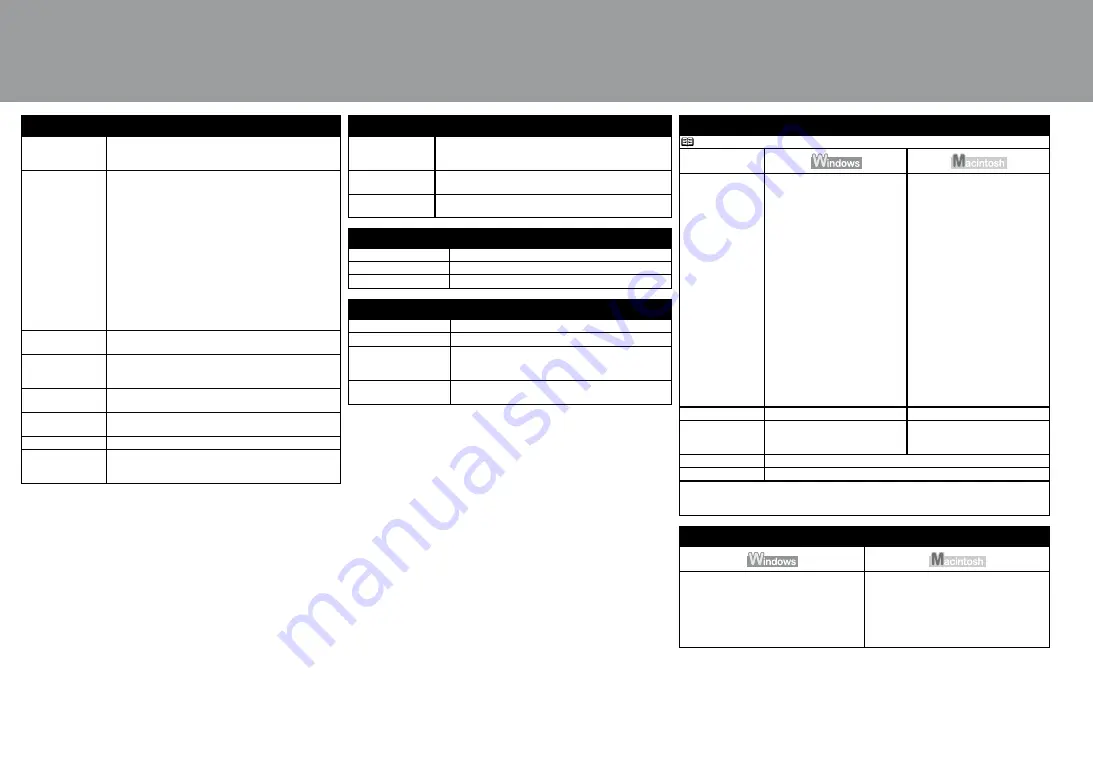
Minimum System Requirements

 Conform to the operating system’s requirements when higher than those given here.

Operating System 

Processor 

RAM

Windows Vista

1 GHz processor

512 MB

Windows XP SP2

300 MHz processor

128 MB

Windows 2000 Professional SP4

300 MHz processor

128 MB

Note: Operation can only be

guaranteed on a PC with Windows 

Vista, XP or 2000 pre-installed.

Mac OS X v.10.5

Intel processor, PowerPC G5, 

PowerPC G4

(867 MHz or faster)

512 MB

Mac OS X v.10.4

Intel processor, PowerPC G5, 

PowerPC G4, PowerPC G3

256 MB

Mac OS X v.10.3.9

PowerPC G5, PowerPC G4, 

PowerPC G3

128 MB

Note: Hard Disk must be formatted 

as Mac OS Extended (Journaled) 

or Mac OS Extended.

Browser

Internet Explorer 6.0 or later

Safari

Hard Disk Space

650 MB


Note: For bundled software 

installation.

750 MB


Note: For bundled software 

installation.

CD-ROM Drive

Required

Display

XGA 1024 x 768 

Some functions may not be available with Windows Media Center

To upgrade from Windows XP to Windows Vista, first uninstall software bundled with the 

Canon inkjet printer.

General Specifications

Printing resolution 

(dpi)

4800 (horizontal)* x 1200 (vertical)

Ink droplets can be placed with a pitch of 1/4800 inch at 

minimum.

Interface

USB Port:

  Hi-Speed USB

*1

Direct Print Port:

  PictBridge

  Bluetooth v2.0 (Option)

*2 *3 *4

  USB flash drive

*1 

A computer that complies with Hi-Speed USB 

standard is required. Since the Hi-Speed USB 

interface is fully upwardly compatible with USB 1.1, 

it can be used at USB 1.1.

*2 

Maximum speed: 1.44 Mbps

*3 

JPEG/PNG only

*4 

Bluetooth connection is for printing only.

Print width

8 inches/203.2 mm

(for Borderless Printing: 8.5 inches/216 mm)

Acoustic noise level

Approx. 46 dB(A)

* When printing in the standard print quality mode on 

Photo Paper Plus Glossy II.

Operating 

environment

Temperature: 5 to 35°C (41 to 95°F)


Humidity: 10 to 90% RH (no condensation)

Storage 

environment

Temperature: 0 to 40°C (32 to 104°F)


Humidity: 5 to 95% RH (no condensation)

Power supply

AC 100-240 V, 50/60 Hz

Power consumption

Printing (Copy): Approx. 13W


Standby (minimum): Approx. 2.2W


OFF: Approx. 0.9W

Additional System Requirements for on-screen manuals

Browser: Easy Guide Viewer

Note: Microsoft Internet Explorer 6.0 or later 

must be installed. The on-screen manual 

may not be displayed properly depending on 

your operating system or Internet Explorer 

version. We recommend that you keep your 

system up to date with Windows Update.

Browser: Help Viewer

Note: The on-screen manual may not be 

displayed properly depending on your 

operating system. We recommend that you 

keep your system up to date.

Microsoft is a registered trademark of Microsoft Corporation.

Windows is a trademark or registered trademark of Microsoft Corporation in the U.S. and/or other countries.

Windows Vista is a trademark or registered trademark of Microsoft Corporation in the U.S. and/or other countries.

Macintosh and Mac are trademarks of Apple Inc., registered in the U.S. and other countries.

Copy Specifications

Multiple copy

MAX 99 pages

Intensity adjustment

Auto intensity (AE copy)

Reduction/Enlargement Fit-to-page

Scan Specifications

Scanner driver

TWAIN/WIA (Windows Vista and Windows XP only)

Maximum scanning size

A4/Letter, 8.5” x 11.7”/216 x 297 mm

Scanning resolution

Optical resolution (horizontal x vertical) max:  

2400 dpi x 4800 dpi


Interpolated resolution max: 19200 dpi x 19200 dpi

Gradation (Input/Output)

Gray: 16bit/8bit


Color: 48bit/24bit (RGB each 16bit/8bit)

General Specifications

External dimensions

Approx. 17.5 (W) x 13.1 (D) x 6.1 (H) inches


Approx. 444 (W) x 331 (D) x 154 (H) mm

*


With the Paper Support and Paper Output Tray retracted.

Weight

Approx. 5.7 kg (Approx. 12.6 lb)

*


With the FINE Cartridges installed.

CANON FINE 

Cartridges

Black: 320 nozzles

Color: 384 x 3 nozzles

Specifications are subject to change without notice.

About Consumables

Consumables (ink tanks/FINE Cartridges) are available for 5 years after 

production has stopped.

Содержание MP480 series

Страница 1: ...ese de leer este manual antes de usar el equipo Cons rvelo a mano para utilizarlo como referencia en el futuro Gu a de inicio L ame primero Make sure to read this manual before using the machine Pleas...

Страница 2: ...producir da os personales o da os materiales Descripciones de operaciones que llevan cierto tiempo en completarse N mero de modelo K10321 MP480 Instalaci n del software Symbols Additional explanation...

Страница 3: ...hasta que encaje en su lugar El soporte de la unidad del esc ner C se ajusta de forma autom tica Es necesario un cable USB para conectar el equipo al ordenador remove the Protective Material First che...

Страница 4: ...pliegue el soporte de la unidad del esc ner C para luego cerrar suavemente la unidad del esc ner cubierta B retirada del material protector Before turning on the machine remove all the orange tapes an...

Страница 5: ...Use el o bot n D del panel de control para seleccionar el idioma de la pantalla LCD y a continuaci n pulse el bot n ACEPtAr E Aparecer la pantalla de espera turn the Power On Plug in the power cord o...

Страница 6: ...se de usar los cartuchos FINE FINE Cartridges suministrados Maneje los cartuchos FINE FINE Cartridges con cuidado por ejemplo no los presione con demasiada fuerza ni los deje caer Lift the Scanning Un...

Страница 7: ...arse las manos ni el rea de trabajo circundante con la tinta de la cinta protectora que ha quitado Sujete F firmemente y levante la cubierta Open the Ink Cartridge Locking Cover on the right side Afte...

Страница 8: ...entorno bien iluminado Instale el cartucho negro en el soporte de la derecha y el de color en el de la izquierda Instalaci n de los cartuchos FINE FINE Cartridges Place the Black FINE Cartridge into...

Страница 9: ...cartuchos FINE FINE Cartridges est n correctamente instalados Cuando haya instalado los cartuchos FINE FINE Cartridges no deber extraerlos salvo que sea totalmente necesario Lift the Scanning Unit Co...

Страница 10: ...e muestran m s abajo se basan en el sistema operativo Windows Vista Ultimate Edition en adelante Windows Vista y Mac OS X v 10 5 x Vaya a la p gina 9 Vaya a la p gina 17 Install the Software To use th...

Страница 11: ...el ruido de funcionamiento Aseg rese de que la l mpara de ENCENDIDO B deje de parpadear Desconecte del equipo el cable USB Puede que se cierre la pantalla En ese caso siga desde el paso If the Found N...

Страница 12: ...ROM haga doble clic en MSETUP4 EXE El programa de instalaci n deber ejecutarse de forma autom tica Aparece la pantalla AutoPlay Reproducci n autom tica Haga clic en Run Msetup4 exe Ejecutar Msetup4 ex...

Страница 13: ...autom ticamente Si desea seleccionar los elementos que quiere instalar haga clic en Custom Install Instalaci n personalizada y siga las instrucciones en pantalla para continuar con la instalaci n Use...

Страница 14: ...n la pantalla License Agreement Contrato de licencia Se inicia la instalaci n Siga todas las instrucciones en pantalla para instalar el software Click Install Move the cursor over items to display exp...

Страница 15: ...mensaje en la pantalla Si no puede ir al siguiente procedimiento pasados 10 minutos haga clic en Help Ayuda y confirme el mensaje When the Printer Connection screen appears connect one end of the USB...

Страница 16: ...near el cabezal de impresi n Consulte When Printing Becomes Faint or Colors Are Incorrect Cuando la impresi n es borrosa o los colores no son los correctos en el manual en pantalla Gu a b sica Click N...

Страница 17: ...e puede acceder a la pantalla User Registration Registro de usuario desde el icono Solution Menu Para obtener m s detalles consulte la secci n Solution Menu en la p gina 25 Click Next If connected to...

Страница 18: ...Despu s de reiniciarlo extraiga el Setup CD ROM CD ROM de instalaci n y gu rdelo en un lugar seguro Haga clic en Exit Salir A continuaci n lea la secci n 5 Carga del papel en la p gina 23 When the Ext...

Страница 19: ...ble clic en el icono CANON_IJ del escritorio Haga doble clic en el icono Setup El puerto USB se encuentra en la parte derecha del equipo Connect one end of the USB cable to the computer and the other...

Страница 20: ...i desea seleccionar los elementos que quiere instalar haga clic en Custom Install Instalaci n personalizada y siga las instrucciones en pantalla para continuar con la instalaci n Enter your administra...

Страница 21: ...epta haga clic en Yes S en la pantalla License Agreement Contrato de licencia Siga todas las instrucciones en pantalla para instalar el software Move the cursor over items to display explanations Clic...

Страница 22: ...Printing Becomes Faint or Colors Are Incorrect Cuando la impresi n es borrosa o los colores no son los correctos en el manual en pantalla Gu a b sica Haga clic en Next Siguiente Click Next If straight...

Страница 23: ...io desde el icono Solution Menu Para obtener m s detalles consulte la secci n Solution Menu en la p gina 25 Se requiere una conexi n a Internet Se aplican tasas de conexi n Click Next If connected to...

Страница 24: ...Para obtener m s informaci n consulte Saving Scanned Data to PC Using the Operation Panel of the Machine Almacenamiento de datos escaneados en el PC con el panel de control del equipo en el manual en...

Страница 25: ...ite de carga D Carga del papel Para obtener detalles sobre c mo manipular el papel consulte Loading Paper Carga del papel en el manual en pantalla Gu a b sica Open the Paper Support A and pull it out...

Страница 26: ...ones del equipo Tambi n incluye informaci n sobre Soluci n de problemas del equipo Gu a avanzada manual en pantalla Despu s de instalar el equipo After Installing the Machine Safety Precautions For pr...

Страница 27: ...le permiten aprovechar al m ximo todas las funciones del equipo Los botones que aparecen pueden variar seg n el pa s o regi n de adquisici n Por ejemplo Windows Vista Solution Menu Solution Menu is a...

Страница 28: ...las funciones y los procedimientos de funcionamiento consulte los manuales en pantalla Despu s de instalar el equipo Ya ha llegado el momento de usar el equipo Using Your Machine This machine allows...

Страница 29: ...la p gina 23 Es posible que el equipo haga un ruido cuando carga el papel Cargue una hoja de papel normal A4 o tama o Carta Abra la cubierta de documentos A Try Copying You can copy a document by simp...

Страница 30: ...a marca de alineaci n B La copia se iniciar Retire el documento cuando se haya imprimido Cierre la cubierta de documentos A y a continuaci n pulse el bot n Negro C si desea una copia en blanco y negro...

Страница 31: ...la Gu a avanzada Seleccione la imagen que desea imprimir de una carpeta y a continuaci n haga clic en Layout Print Dise o Imprimir Cuando se selecciona una fotograf a el n mero de copias se establece...

Страница 32: ...iniciar Impresi n de fotograf as desde un ordenador En Macintosh si aparece la pantalla Print Imprimir haga clic en Print Imprimir para empezar a imprimir Load a sheet of photo paper in portrait orie...

Страница 33: ...c ner cubierta se deja abierta durante m s de 10 minutos el contenedor del cartucho FINE se desplaza a la derecha autom ticamente Maintenance After a period of use the inside of the machine may become...

Страница 34: ...sation Storage environment Temperature 0 to 40 C 32 to 104 F Humidity 5 to 95 RH no condensation Power supply AC 100 240 V 50 60 Hz Power consumption Printing Copy Approx 13W Standby minimum Approx 2...

Страница 35: ...namiento Temperatura 0 a 40 C 32 a 104 F Humedad de 5 a 95 humedad relativa sin condensaci n Suministro el ctrico 100 a 240 V de CA 50 a 60 Hz Consumo Impresi n Copia Aprox 13 W En espera m nimo Aprox...

Страница 36: ...w usa canon com QT5 1591 V01 XXXXXXXX CANON INC 2008 PRINTED IN VIETNAM Los siguientes cartuchos de tinta son compatibles con este producto The following ink cartridges are compatible with this produc...

Отзывы: