background image


— 

37


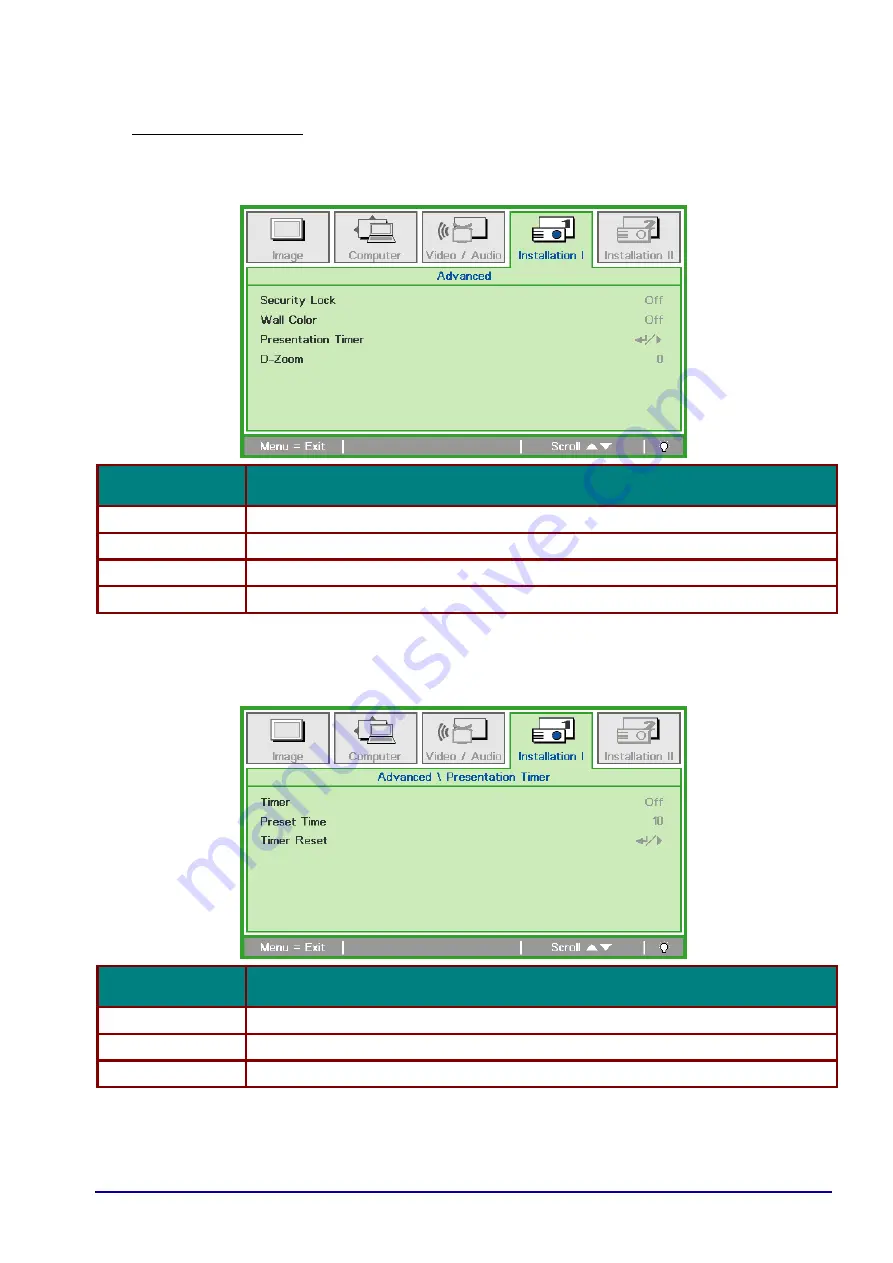
Advanced Feature 

Press the 

Menu

 button to open the 

OSD


menu. Press ◄► to move to the 

Installation I

 menu. 

Press ▲▼ to move to the 

Advanced

 menu and then press 

OK


or ►. Press ▲▼ to move up and 

down in the 

Advanced


menu. Press ◄► to change values for setting. 


I

TEM


D

ESCRIPTION


Security Lock 

Press the cursor 

◄► button to enable or disable security lock function. 

Wall Color 

Press the cursor 

◄► button to enable or disable wall color function. 

Presentation Timer 

Press OK / 

► to go to the Presentation Timer Menu. See


Presentation Timer


below. 

D-Zoom 

Press the cursor ◄► button to adjust the D-Zoom menu. 


Presentation Timer 

The Presentation Timer function can indicate the presentation time on the screen to help you 
achieve better time management when giving presentations. 


I

TEM


D

ESCRIPTION


Timer 

Press the cursor 

◄► button to enable or disable presentation timer. 

Preset Time 

Press the cursor 

◄► button to select Preset Time (1 ~ 60 minutes) 

Timer Reset 

Press OK / 

► to reset the timer settings. 

Содержание LV-WX300UST

Страница 1: ...ENGLISH MULTIMEDIA PROJECTOR User s Manual ...

Страница 2: ...High Definition Multimedia Interface are trademarks or registered trademarks of HDMI Licensing LLC in the United States and other countries All other product names used in this manual are the properties of their respective owners and are acknowledged Copyright Notice Please note that enlarging or reducing the size of an image for commercial purposes or public presentation may infringe on the legal...

Страница 3: ...splay effect The AUDIO IN connector should be connected to the AUDIO IN port and CANNOT be connected to AUDIO OUT or other ports like BNC RCA otherwise it will lead to mute output and even DAMAGE the port The power cord and signal cable should be connected before power on the projector During the projector starting and operating process DO NOT insert or remove the signal cable or the power cord to...

Страница 4: ...y with ceiling mounted projectors the lamp may fall out when you open the lamp cover or while you are attempting to replace it During replacement stand to the side of the lamp cover not directly under it If the lamp ruptures and you accidentally inhale or get pieces in your eyes or mouth consult a doctor immediately If the lamp ruptures dust and gas containing mercury vapor may come out of the exh...

Страница 5: ...GS 25 OSD MENU CONTROLS 25 Navigating the OSD 25 SETTING THE OSD LANGUAGE 26 OSD MENU OVERVIEW 27 IMAGE MENU 30 Advanced Feature 31 Color Manager 32 COMPUTER MENU 33 VIDEO MENU 34 Audio 35 INSTALLATION I MENU 36 Advanced Feature 37 INSTALLATION II MENU 38 Advanced Feature 39 OSD Menu Setting 40 Peripheral Test 40 Reset Lamp Time 41 3D 41 Network Setting 42 Factory Reset 51 Status 51 MAINTENANCE AN...

Страница 6: ... SPECIFICATIONS 60 PRODUCT SPECIFICATIONS 60 INSTALLATION DISTANCE VS PROJECTION SIZE 61 Installation Distance and Size Table 61 TIMING MODE TABLE 62 PROJECTOR DIMENSIONS 64 APPENDIX I 66 COMMUNICATION 66 ...

Страница 7: ...NUAL CAUTION Not for use in a computer room as defined in the Standard for the Protection of Electronic Computer Data Processing Equipment ANSI NFPA 75 Copyright notice Please note that enlarging or reducing the size of an image for commercial purposes or public presentation any infringe on the legally protected copyright or the copyright holder of the original material About Trademarks Ethernet i...

Страница 8: ...u leave the projector unclean for a long time the cooling fans can be clogged with dust and it may cause a breakdown or a disaster DO NOT SET THE PROJECTOR IN GREASY WET OR SMOKY CONDITIONS SUCH AS IN A KITCHEN TO PREVENT A BREAKDOWN OR A DISASTER IF THE PROJECTOR COMES IN CONTACT WITH OIL OR CHEMICALS IT MAY BECOME DETERIORATED READ AND KEEP THIS MANUAL FOR LATER USE All the safety and operating ...

Страница 9: ...power supplied contact the Canon Customer Support Center or local power company Do not overload wall outlets and extension cords as this can result in fire or electric shock Do not allow anything to rest on the power cord Do not locate this projector where the cord may be damaged by people walking on it Do not attempt to service this projector yourself as opening or removing covers may expose you ...

Страница 10: ...ve 2006 66 EC and or national legislation implementing those Directives If a chemical symbol is printed beneath the symbol shown above in accordance with the Battery Directive this indicates that a heavy metal Hg Mercury Cd Cadmium Pb Lead is present in this battery or accumulator at a concentration above an applicable threshold specified in the Battery Directive This product should be handed over...

Страница 11: ...relocate the receiving antenna Increase the separation between the equipment and receiver Connect the equipment into an outlet on a circuit different from that to which the receiver is connected Consult the dealer or an experienced radio TV technician for help The cable with a ferrite core provided with the projector must be used with this equipment in order to comply with Class B limits in Subpar...

Страница 12: ...jector The power cord may be damaged Do not cover the power cord with a carpet Do not excessively bend twist pull or make modifications to the power cord Keep the power cord away from heaters and other sources of heat Do not use the power cord when it is bent finely coiled or bundled Do not use a damaged power cord If your power cord is damaged contact the Canon Customer Support Center Do not use ...

Страница 13: ...ojector Do not place the projector in any location where it will be exposed to oily smoke or steam such as a kitchen work surface or table etc Do not touch the projector itself the power cord or the cable if lightening strikes Pay attention to the following points regarding installation and handling of the projector Failure to do so may cause a fire electric shock or personal injury Do not move th...

Страница 14: ... from the projector lens etc do not use any kind of spray that is flammable As the temperature of the lamp inside the projector is high it could ignite causing a fire If the projector is used for a long period of time dust could accumulate inside the projector This could cause a fire or malfunction It is recommended that periodic maintenance of the projector be performed For details of maintenance...

Страница 15: ...tempt to recharge the battery Insert the battery in the correct positions If any liquid leaks from the battery and comes into contact with skin wash off thoroughly with water Caution for viewing 3D content Pay attention to the following points when viewing 3D content Photosensitive patients patients with heart disease pregnant women elderly people and people with serious illness and or with a hist...

Страница 16: ...ioration of image quality Do not touch the lens with bare hands Doing so may result in deterioration of image quality If the projector is suddenly moved from a location where the temperature is low to a location where the temperature is high or if the temperature in the location where the projector is installed increases suddenly moisture in the air could cause condensation to form on the projecto...

Страница 17: ...IN CD ROM THIS USER S MANUAL IMPORTANT INFORMATION WARRANTY CARD The Following ITEMS only for LV WX300USTi CD ROM INTERACTIVE DRIVER AND SOFTWARE USB CABLE A TYPE TO MINI 5 0M 16 4 TWO PENS WITH FOUR AAA BATTERIES FOUR TIPS Contact your dealer immediately if any items are missing appear damaged or if the unit does not work It is recommend that you keep the original packing material should you ever...

Страница 18: ...dule unit lamp 2 IR receiver Receives IR signal from remote control 3 Lens Projection Lens 4 Focus ring Focuses the projected image 5 Function keys See Top view On screen Display OSD buttons and LEDs 13 6 Interactive Camera Interactive function use Not Available in LV WX300UST 7 Aspheric mirror Reflects images 4 5 7 6 1 3 2 ...

Страница 19: ...ettings in the OSD 25 5 OK Enter or confirm highlighted OSD menu item 6 AUTO Optimizes image size position and resolution 7 Navigates and changes settings in the OSD 25 8 Navigates in the OSD Quick Menu For Keystone 9 Turns the projector On or Off 10 LAMP LED Amber Lamp error 58 Flashing Error code 11 POWER LED Green Power on Power off Flashing Cooling Error code 12 TEMP LED Red Over Temperature 1...

Страница 20: ...IO OUT Connect an AUDIO cable to an audio amplifier 7 MIC Connect the Microphone for use 8 Mini USB Connect the USB cable to PC for Interactive function not available in LV WX300UST 9 USB Connect the USB cable from a computer 10 AC IN Connect the POWER cable 20 11 VGA 2 Connect the RGB cable from a computer or components device 12 VGA 1 Connect the RGB cable from a computer or components device 13...

Страница 21: ... cable from a HDMI device 19 RJ 45 Connect a LAN cable from Ethernet It is necessary to turn the 3D setting off in case of connecting with some digital cameras by HDMI Note If your video equipment has various input sources it is recommended to connect in priority of HDMI DVI component thru VGA Composite for better picture quality When MIC insertion machine only MIC sound ...

Страница 22: ...eiling support holes Contact your dealer for information on mounting the projector on a ceiling Warning The ceiling attachment part No LV WL02 is required in order to mount the projector on the wall Make sure to ask the Canon Customer Support Center if you want to install the Wall Attachment 247 01 135 51 1 2 2 2 1 1 ...

Страница 23: ... between the remote control and the projector If the path between the remote control and the projector is obstructed you can bounce the signal off certain reflective surfaces such as projector screens 3 The buttons and keys on the projector have the same functions as the corresponding buttons on the remote control This user s manual describes the functions based on the remote control 1 2 3 4 5 6 7...

Страница 24: ...d changes settings in the OSD 25 14 Left cursor Navigates and changes settings in the OSD 15 Menu Opens the OSD Remote Control Operating Range The remote control uses infrared transmission to control the projector It is not necessary to point the remote directly at the projector Provided you are not holding the remote perpendicular to the sides or the rear of the projector the remote will function...

Страница 25: ...over in the direction of the arrow A Pull out the cover B 2 Insert the battery with the positive side facing up 3 Replace the cover Caution 1 Only use a 3V lithium battery CR2025 2 Dispose of used batteries according to local ordinance regulations 3 Remove the battery when not using the projector for prolonged periods ...

Страница 26: ...security lock is enabled 4 If more than one input device is connected press the SOURCE button of the remote and use to scroll among devices Component is supported through the RGB to COMPONENT ADAPTER VGA 1 VGA 2 Analog RGB Component DVD input YCbCr YPbPr or HDTV input YPbPr via HD15 connector Composite Video Traditional composite video S Video Super video Y C separated HDMI1 HDMI2 HDMI DVI 5 When ...

Страница 27: ...g the OSD on page 25 and Setting the OSD Language on page 26 for help on using OSD menus Important Keep the password in a safe place Without the password you will not be able to use the projector If you lose the password contact your reseller for information on clearing the password 1 Press the MENU button to open the OSD menu 2 Press the cursor button to move to the Installation I menu 3 Press th...

Страница 28: ...ination including the same arrow five times but not less than five Press the cursor buttons in any order to set the password Push the MENU button to exit the dialog box 7 The password confirm menu appears when user presses the power on key in case the Security Lock is enabled Enter the password in the order you set it at step 5 In case you forget the password please contact the service center Serv...

Страница 29: ...projector table or stand should be level and sturdy Position the projector so that it is perpendicular to the screen Ensure the cables are in a safe location You could trip over them To adjust the angle of the picture turn the tilt adjuster right or left until the desired angle has been achieved ...

Страница 30: ...E buttons on the remote control to correct keystone distortion wider top or bottom effect 3 The keystone control appears on the display Adjusting the Volume 1 Press the Volume buttons on the remote control The volume control appears on the display 2 Press the MUTE button to turn off the volume This feature is available only on the remote ...

Страница 31: ...ENU button 2 There are five menus Press the cursor button to move through the menus 3 Press the cursor button to move up and down in a menu 4 Press to change values for settings 5 Press MENU to close the OSD or leave a submenu Note Depending on the source not all items in the OSD are available For example the Horizontal Vertical Position items in the Computer menu can only be modified when connect...

Страница 32: ...e before continuing 1 Press the MENU button Press the cursor button to navigate to Installation I 2 Press the cursor button until Language is highlighted 3 Press the cursor button until the language you want is highlighted 4 Press the MENU button twice to close the OSD ...

Страница 33: ... Auto RGB YUV Color Temperature Native 6500K 7500K 8200K Color Manager Red Hue Saturation Gain Green Hue Saturation Gain Blue Hue Saturation Gain Cyan Hue Saturation Gain Magenta Hue Saturation Gain Yellow Hue Saturation Gain White Red Green Blue Reset Computer Horizontal Position 5 5 Vertical Position 5 5 Tracking 0 31 Total Dots 5 5 Auto PC Video Audio Video AGC Off On Video Saturation 0 100 Vid...

Страница 34: ...Image Flip H V Front Table Rear Table Front Ceiling Rear Ceiling Aspect Fill 4 3 16 9 Letter Box Native Test Pattern Off Cross Hatch RGB Ramps Color Bars Stair Step Checker Horizontal Lines Vertical Lines Diagonal Lines Horizontal Ramp Vertical Ramp White Black Keystone 40 40 Advanced Security Lock Off On Wall Color Off Light Yellow Pink Light Green Blue Blackboard Presentation Timer Timer Off On ...

Страница 35: ... Color Test USB Test Reset Lamp Time Low Power Mode On Off 3D 3D Off DLP Link IR 3D Sync Invert On Off 3D Format Frame Sequential Top Bottom Side By Side Frame Packing 3D Frame Packing HDMI source only RS232 RS232 Network Network Setting Network State Disconnect Connect DHCP Off On IP Address 0 255 0 255 0 255 0 255 Subnet Mask 0 255 0 255 0 255 0 255 Gateway 0 255 0 255 0 255 0 255 DNS 0 255 0 25...

Страница 36: ...lliant Color Press the cursor button to adjust the Brilliant Color value Brightness Press the cursor button to adjust the display brightness Contrast Press the cursor button to adjust the display contrast Sharpness Press the cursor button to adjust the display sharpness level Gamma Press the cursor button to adjust the gamma correction of the display Advanced Press OK to enter the Advanced menu Se...

Страница 37: ...enu and then press OK or Press to move up and down in the Advanced menu ITEM DESCRIPTION Color Space Press the cursor button to adjust the color space Color Temperature Press the cursor button to adjust the color temperature Color Manager Press OK to enter the color manager menu See page 32 for more information on Color Manager ...

Страница 38: ...to enter the Blue Color Manager Press the buttons to adjust the Hue Saturation and Gain Cyan Select to enter the Cyan Color Manager Press the buttons to adjust the Hue Saturation and Gain Magenta Select to enter the Magenta Color Manager Press the buttons to adjust the Hue Saturation and Gain Yellow Select to enter the Yellow Color Manager Press the buttons to adjust the Hue Saturation and Gain Wh...

Страница 39: ...ngs ITEM DESCRIPTION Horizontal Position Press the cursor button to adjust the display position to left or right Vertical Position Press the cursor button to adjust the display position to up or down Tracking Press the cursor button to adjust the A D sampling clock Total Dots Press the cursor button to adjust the A D sampling dot Auto PC Press OK to automatically adjustment for phase tracking size...

Страница 40: ...tons to adjust the video saturation Video Tint Press the buttons to adjust the video tint hue Film Mode Press the buttons to select a different film mode Video Overscan Press the buttons to enable or disable video over scan Closed Captioning Press the buttons to enable or disable closed captioning Audio Press OK to enter the Audio menu See Audio on page 35 Reset Press OK to reset all settings to d...

Страница 41: ... 35 Audio Press OK to enter the Audio sub menu ITEM DESCRIPTION Volume Press the buttons to enter and adjust the audio volume Mute Press the buttons to enter and turn on or off the speaker ...

Страница 42: ...lank Screen Press the cursor button to select different color to blank the screen Image Flip H V Press the cursor button to choose from four Image Flip H V methods Aspect Press the cursor button to adjust the video aspect ratio Test Pattern Press button to select different test pattern for projector installation check Keystone Press the cursor button to adjust the display keystone Advanced Press O...

Страница 43: ...utton to enable or disable wall color function Presentation Timer Press OK to go to the Presentation Timer Menu See Presentation Timer below D Zoom Press the cursor button to adjust the D Zoom menu Presentation Timer The Presentation Timer function can indicate the presentation time on the screen to help you achieve better time management when giving presentations ITEM DESCRIPTION Timer Press the ...

Страница 44: ...r On Press the cursor button to enable or disable automatic power On when AC power is supplied Fan Mode Press the cursor button to toggle between Normal and High fan speeds Note Recommend selecting high speed when the altitude of the environment is higher than 1500m 4921ft Lamp Mode Press the cursor button to select the lamp mode for higher brightness or lower brightness to save lamp life Advanced...

Страница 45: ...est Reset Lamp Time After replacing the lamp this item should be reset See page 41 for more information on Reset Lamp Time Low Power Mode Press to turn Low Power Mode on or off 3D Press OK to enter the 3D menu See page 41 for more information on 3D settings RS232 Press to select RS232 remote or Network LAN mode depending on projector connection method Network setting Press OK to enter the Network ...

Страница 46: ...n to select OSD background translucent level Menu Display Press button to select OSD timeout delay Peripheral Test ITEM DESCRIPTION Remote Control Test Press OK to test the IR remote controller for diagnostic Color Test Press OK to select different colors on screen USB Test Press OK to test the USB connection with connected PC ...

Страница 47: ...refer to Resetting the Lamp on page 54 to reset the lamp hour counter 3D ITEM DESCRIPTION 3D Press to select Off DLP Link or IR 3D Sync Invert Press to turn 3D Sync Invert On or Off 3D Format Press to enable or disable 3D Format ...

Страница 48: ... select DHCP Off complete the IP Address Subnet Mask Gateway and DNS fields IP Address Enter a valid IP address if DHCP is turned off Subnet Mask Enter a valid Subnet Mask if DHCP is turned off Gateway Enter a valid Gateway address if DHCP is turned off DNS Enter a valid DNS name if DHCP is turned off Apply Press OK to confirm settings ...

Страница 49: ...Compatibility with Crestron AMX Device Discovery Extron control boxes enables not only collective projector management on a network but also management from a control panel on a PC or Laptop browser screen Crestron is a registered trademark of Crestron Electronics Inc of the United States Extron is a registered trademark of Extron Electronics Inc of the United States AMX is a registered trademark ...

Страница 50: ... 44 LAN RJ45 1 Connect an RJ45 cable to RJ45 ports on the projector and the PC Laptop 2 On the PC Laptop select Start Control Panel Network and Internet ...

Страница 51: ... 45 3 Right click on Local Area Connection and select Properties 4 In the Properties window select the Networking tab and select Internet Protocol TCP IP 5 Click Properties ...

Страница 52: ...ubnet Mask 255 255 255 0 Gateway 0 0 0 0 DNS Server 0 0 0 0 10 Press OK to confirm settings 11 Open a web browser for example Microsoft Internet Explorer with Adobe Flash Player 9 0 or higher 12 In the Address bar input the IP address 10 10 10 10 13 Press OK The projector is setup for remote management The LAN RJ45 function displays as follows Based on network web page for the input string in tool...

Страница 53: ...Name 10 Location 10 Assigned To 10 Network Configuration DHCP Enabled N A IP Address 15 Subnet Mask 15 Default Gateway 15 DNS Server 15 User Password Enabled N A New Password 10 Confirm 10 Admin Password Enabled N A New Password 10 Confirm 10 For more information please visit http www crestron com ...

Страница 54: ...mand control way so called RS232 by TELNET for LAN RJ45 interface Quick Start Guide for RS232 by TELNET Check and get the IP Address on OSD of the projector Make sure that laptop PC can access the web page of the projector Make sure that Windows Firewall setting to be disabled in case of TELNET function filtering out by laptop PC Start All Programs Accessories Command Prompt ...

Страница 55: ... ready and user can have RS232 command input then Enter key pressed the RS232 command will be workable How to have TELNET enabled in Windows VISTA 7 By default installation for Windows VISTA TELNET function is not included But end user can have it by way of Turn Windows features On or Off to be enabled Open Control Panel in Windows VISTA Open Programs ...

Страница 56: ...ready 5 Limitation 1 for Telnet Control there is only one connection for Telnet Control in one projector Limitation 2 for Telnet Control there is less than 50 bytes for successive network payload for Telnet Control application Limitation 3 for Telnet Control there is less than 26 bytes for one complete RS232 command for Telnet Control Limitation 4 for Telnet Control Minimum delay for next RS232 co...

Страница 57: ...tus Press the cursor button to move up and down in the Installation II menu Select the Status sub menu and press OK to enter the Status sub menu ITEM DESCRIPTION Active Source Display the activated source Video Information Displays resolution video information for RGB source and color standard for Video source Lamp Time Power Saver Full power Lamp Time used information is displayed Firmware Versio...

Страница 58: ...f this happens immediately open the windows and doors to provide ventilation to the room If you inhale any gas emitted from the lamp or it has come into contact with your eyes or mouth consult a doctor immediately Caution When replacing the lamp turn off the projector wait until the cooling fan stops disconnect the power plug from the electrical outlet and let the projector stand for at least 45mi...

Страница 59: ...ull firmly on the module handle to remove the lamp 6 Reverse steps 1 to 5 to install the new lamp While installing align the lamp module with the connector and ensure it is level to avoid damage Note The lamp must sit securely in place and the lamp connector must be connected properly before tightening the screws ...

Страница 60: ...on to open the OSD menu 2 Press the cursor button to move to the Installation II menu Press the cursor button to move down to Advanced 3 Press the cursor button to move down to Reset Lamp Time 4 Press the cursor or Enter button A message screen appears 5 Press buttons to reset the lamp hour 6 Press the MENU button to get back to Installation II ...

Страница 61: ...lens use a commonly available air blower or lens cleaning paper The lens surface is easily damaged so do not use a hard cloth or tissues Caution 1 Always turn the projector off and allow to cool for at least 30 minutes prior to cleaning Caution 1 Never touch the projector mirror or Lens directly by hand 2 Do not use abrasive cleaners solvents or other harsh chemical cleaners ...

Страница 62: ...ject with the Kensington slot and a security cable Note Contact your vendor for details on purchasing a suitable Kensington security cable Using the Security Bar In addition to the password protection function and the Kensington lock the Security Bar helps protect the projector from unauthorized removal See the following picture ...

Страница 63: ... quickly Try to pin point the problem and thus avoid replacing non defective parts For example if you replace batteries and the problem remains put the original batteries back and go to the next step Keep a record of the steps you take when troubleshooting The information may be useful when calling for technical support or for passing on to service personnel ...

Страница 64: ... and power up again in the correct order Problem The image is blurred 1 Adjust the Focus on the projector 2 Press the Auto button on the remote control 3 Ensure the projector to screen distance is within the specified range 4 Check that the projector lens is clean Problem The image is wider at the top or bottom keystone distortion 1 Position the projector so it is as perpendicular to the screen as...

Страница 65: ...ontrol towards remote sensor on the projector 2 Ensure the path between remote and sensor is not obstructed 3 Turn off any fluorescent lights in the room 4 Check the battery polarity 5 Replace the battery 6 Turn off other Infrared enabled devices in the vicinity 7 Have the remote control serviced Audio Problems Problem There is no sound 1 Adjust the volume on the remote control 2 Adjust the volume...

Страница 66: ...onent video 1080p 1080i 720p 576p 576i 480p 480i Video S video NTSC PAL SECAM NTSC4 43 PAL M PAL N PAL 60 Audio signal Impedance 47KΩ or more Terminal Input output control Input VGA in 1 2 Analog PC component video mini D sub15 pin HDMI 1 2 Digital PC digital video S VIDEO S video VIDEO Video AUDIO IN R L Audio input 2RCA AUDIO IN Audio input 3 5φ stereo mini jack Output VGA OUT Monitor out mini D...

Страница 67: ...Installation Distance and Size Table WXGA 16 10 Diagonal 80 87 97 100 Distance 282 3 20mm 340 3 20mm 421 4 20mm 445 8 20mm Image Width 1723mm 1874mm 2088mm 2154mm Image height 1077mm 1171mm 1305mm 1346mm H 280 50mm 300 2 50mm 325 5 50mm 336 9 50mm ...

Страница 68: ...5 1 O O 800 x 600 76 3 120 0 O O 1024 x 576 35 8 60 0 O O 1024 x 600 37 3 60 0 O O 1024 x 600 41 5 65 0 O O 1024 x 768 48 4 60 0 O O 1024 x 768 56 5 70 1 O O 1024 x 768 60 0 75 0 O O 1024 x 768 68 7 85 0 O O 1024 x 768 97 6 120 0 O O 1024 x 768 99 0 120 0 O O 1152 x 864 67 5 75 0 O O 1280 x 720 45 0 60 0 O O 1280 x 720 90 0 120 0 O O 1280 x 768 47 4 60 0 O O 1280 x 768 47 8 59 9 O O 1280 x 800 49 ...

Страница 69: ...i 28 1 50 0 O O 1080p 27 24 O O 1080p 28 25 O O 1080p 33 7 30 O O 1080p 67 5 60 0 O O 1080p 56 3 50 0 O O O Frequency supported Frequency not supported 3D note It means the timing can support non 3D and 3D signal with Frame Sequential and Top Bottom format It means the timing can support non 3D and 3D signal with Frame Sequential format It means the timing can support non 3D and 3D signal with Top...

Страница 70: ... 64 Projector Dimensions LV WX300UST ...

Страница 71: ... 65 Projector Dimensions LV WX300USTi 122 6mm 374 5mm ...

Страница 72: ...ceived a command If the command isn t received correctly the projector will not send the return code Operation Command The operation commands execute the basic operation setting of this projector Operation ASCII HEX Power On P N CR 7Eh 50h 4Eh 0Dh Power Off P F CR 7Eh 50h 46h 0Dh Auto Image A I CR 7Eh 41h 49h 0Dh Lamp Hour Reset R L CR 7Eh 52h 4Ch 0Dh Input Select RGB S R CR 7Eh 53h 52h 0Dh Input ...

Страница 73: ...r r N CR 7Eh 72h 4Eh 0Dh Set Value Command ITEM ASCII HEX Brightness s B CR 7Eh 73h 42h h 0Dh Contrast s C CR 7Eh 73h 43h h 0Dh Color s R CR 7Eh 73h 52h h 0Dh Tint s N CR 7Eh 73h 4Eh h 0Dh Scaling s A CR 7Eh 73h 41h h 0Dh Color Temperature s T CR 7Eh 73h 54h h 0Dh Projection Mode s J CR 7Eh 73h 4Ah h 0Dh Sharpness s H CR 7Eh 73h 48h h 0Dh ASCII Data Data Range ITEM Set Data Range Source Brightness...

Страница 74: ... 0Dh Freeze Status q Z CR 7Eh 71h 5Ah 0Dh Mute Status q U CR 7Eh 71h 55h 0Dh Blank Status q K CR 7Eh 71h 4Bh 0Dh Response message ITEM Response Message examples Software Version Power State On Off Input Select RGB1 RGB2 DVI Video S Video Component HDMI Lamp Hours 2000 Brightness 100 Contrast 100 Color Video 100 Tint Video 100 Scaling Fill 4 3 16 9 LetterBox Native Color Temperature Native 6500K 75...

Страница 75: ...likon Switzerland CANON GMBH Zetschegasse 11 A 1230 Wien Austria CANON España S A Av De Europa 6 Alcobendas 28108 Madrid Spain CANON PORTUGAL S A Rua Alfredo da Silva 14 Alfragide 2610 016 Amadora Portugal CANON Belgium N V S A Berkenlaan 3 1831 Diegem Mechelen Belgium CANON Netherland NV Neptunusstraat 1 2132 JA Hoofddorp The Netherlands CANON LUXEMBOURG S A Rue des Joncs 21 L 1818 Howald Luxembo...

Отзывы: