background image

12

Charging the Battery Pack

Charge the supplied battery pack in advance. Fully 
charging the supplied battery pack will take about 7 hours 
and 45 minutes.

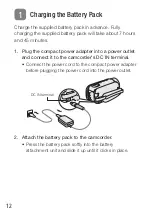
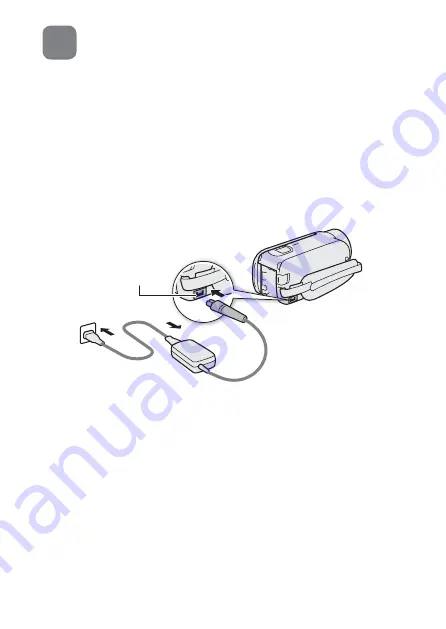
1.  Plug the compact power adapter into a power outlet 

and connect it to the camcorder’s DC IN terminal.

•  Connect the power cord to the compact power adapter 

before plugging the power cord into the power outlet.

DC IN terminal

2.  Attach the battery pack to the camcorder.

•  Press the battery pack softly into the battery 

attachment unit and slide it up until it clicks in place.

1

Содержание LEGRIA HFR86

Страница 1: ...D Guida rapida Italiano В настоящем руководстве описаны только базовые функции О загрузке Руководства по эксплуатации содержащего более подробные сведения см стр 12 Краткое руководство Pусский Қазақша Հայերեն Кыргызча Ce guide présente uniquement les fonctions de base Pour télécharger le mode d emploi contenant des informations plus approfondies consultez la page 11 Caméscope HD Guide rapide Franç...

Страница 2: ...ble to disconnect the plug in case of an accident While using the compact power adapter do not wrap it or cover it with a piece of cloth and do not place it in confined narrow spaces CA 110E identification plate is located on the bottom Important Usage Instructions COPYRIGHT WARNING Unauthorized recording of copyrighted materials may infringe on the rights of copyright owners and be contrary to co...

Страница 3: ... product should be handed over to a designated collection point e g on an authorized one for one basis when you buy a new similar product or to an authorized collection site for recycling waste electrical and electronic equipment EEE and batteries and accumulators Improper handling of this type of waste could have a possible impact on the environment and human health due to potentially hazardous s...

Страница 4: ...tein Lithuania Luxembourg Malta Netherlands New Zealand Norway Poland Portugal Romania Russia Singapore Slovakia Slovenia Spain Sweden Switzerland United Kingdom Statement on EC directive Hereby Canon Inc declares that this equipment is in compliance with Directive 2014 53 EU The full text of the EU declaration of conformity is available at the following internet address http www canon europe com ...

Страница 5: ...with the card manufacturer Availability of FlashAir cards also varies by region Safety Instructions Be sure to read these instructions in order to operate the product safely Follow these instructions to prevent injury or harm to the operator of the product or others WARNING Denotes the risk of serious injury or death Stop using the product in any case of unusual circumstances such as the presence ...

Страница 6: ... assistance When disposing of batteries battery packs insulate the termi nals with tape or other means This may cause electric shock explosion or fire Keep the product out of the reach of young children Use only power sources specified in this instruction manual for use with the product Observe the following instructions when using a battery charger or AC adapter Do not plug in or unplug the produ...

Страница 7: ...njury Do not leave the product in places exposed to extremely high or low temperatures The product may become extremely hot cold and cause burns or injury when touched Only mount the product on a tripod that is sufficiently sturdy Do not look at the screen or through the viewfinder for prolonged periods of time This may induce symptoms similar to motion sickness In such a case stop using the produ...

Страница 8: ...orum Inc in the United States and in other countries Other names and products not mentioned above may be trademarks or registered trademarks of their respective companies This device incorporates exFAT technology licensed from Microsoft Full HD 1080 refers to Canon camcorders compliant with high definition video composed of 1 080 vertical pixels scanning lines This product is licensed under AT T p...

Страница 9: ...9 English Supplied Accessories CA 110E Compact Power Adapter incl power cord BP 727 Battery Pack WA H43 Wide Attachment f only IFC 300PCU S USB Cable HTC 100 SS High Speed HDMI Cable ...

Страница 10: ...portant handling precautions and to consult the troubleshooting section if an error message is displayed be sure to read the full version Instruction Manual PDF file Access the following website Click on your country region and follow the onscreen instructions to download the latest version of the PDF file www canon com icpd A PDF viewer such as Adobe Reader is required to open the PDF file ...

Страница 11: ...structions 9 Supplied Accessories 10 Installing the Camcorder s Instruction Manual PDF File 12 Charging the Battery Pack 14 Inserting a Memory Card 15 Basic Setup 17 Shooting Video and Taking Photos 18 Playing Back Video and Viewing Photos 22 e Wi Fi Functions 23 Optional Accessories ...

Страница 12: ...he compact power adapter into a power outlet and connect it to the camcorder s DC IN terminal Connect the power cord to the compact power adapter before plugging the power cord into the power outlet DC IN terminal 2 Attach the battery pack to the camcorder Press the battery pack softly into the battery attachment unit and slide it up until it clicks in place 1 ...

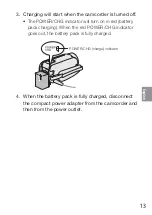
Страница 13: ...indicator will turn on in red battery pack charging When the red POWER CHG indicator goes out the battery pack is fully charged POWER CHG charge indicator 4 When the battery pack is fully charged disconnect the compact power adapter from the camcorder and then from the power outlet ...

Страница 14: ... time Initializing the Memory 1 Open the LCD panel The camcorder will turn on and the first screen of the basic setup will appear 2 Press to turn off the camcorder Make sure the POWER CHG indicator is off 3 Open the memory card slot cover and insert the memory card Insert the memory card at a slight angle with the label facing toward the lens 4 Close the memory card slot cover POWER CHG indicator ...

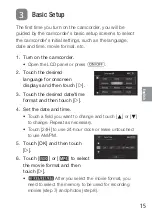
Страница 15: ...esired language for onscreen displays and then touch æ 3 Touch the desired date time format and then touch æ 4 Set the date and time Touch a field you want to change and touch Í or Î to change Repeat as necessary Touch 24H to use 24 hour clock or leave untouched to use AM PM 5 Touch OK and then touch æ 6 Touch or to select the movie format and then touch æ e After you select the movie format you n...

Страница 16: ...ettings are necessary Skip to step 9 7 Touch built in memory or 8 memory card and then touch æ 8 Touch built in memory or 8 memory card and then touch æ 9 Touch OK to complete the basic setup and close the setup screen ...

Страница 17: ... press and then slide down the lens cover switch 2 Video Press Y to start recording video Press again to stop recording Flashes while recording Photos Touch to record a photo 3 When you finish recording close the lens cover and turn off the camcorder Shooting Video and Taking Photos ...

Страница 18: ...een 0 Photo Playback for the photos index screen 0 9 Baby Album for the 9 index screen only scenes recorded in Baby mode 0 Video Snapshot for the index screen only AVCHD video snapshot scenes Index screen button 2 Touch the thumbnail of the scene or photo you want to play back During playback touch the screen to display the playback controls ...

Страница 19: ... format or of the recordings you wish to play back and then touch OK e only To delete recordings From the index screen 1 Touch Edit Delete 2 Select whether to delete scenes photos by date folder selected scenes photos or all scenes photos To select individual recordings Touch all the scenes photos you wish to delete to mark them with a then touch OK 3 Touch Yes OK ...

Страница 20: ...when you play back your recordings on the camcorder Transfer music files to the memory that contains the recordings you want to play back e The music files come pre installed in the built in memory and are restored when you initialize the memory You can transfer music files to a memory card connected to the computer For details about downloading and transferring the music files refer to the camcor...

Страница 21: ...nstalling the software You can find the full system requirements for the software and installation details on PIXELA s website A PDF viewer such as Adobe Reader is required to open the PDF file Note Model availability differs from area to area Web ...

Страница 22: ...r to upload recordings to the Web You can also use the NFC function to effortlessly connect the camcorder to an NFC enabled Android device 1 If necessary install the required app on the smartphone or tablet 2 Select the desired Wi Fi function on the camcorder 3 Wirelessly connect the device to the camcorder Note The necessary procedure may differ according to the Wi Fi function you wish to use For...

Страница 23: ...n shall not be liable for any damage to this product and or accidents such as fire etc caused by the malfunction of non genuine Canon accessories e g a leakage and or explosion of a battery pack Please note that this warranty does not apply to repairs arising out of the malfunction of non genuine Canon accessories although you may request such repairs on a chargeable basis This mark identifies gen...

Страница 24: ...ifications and outer appearance are subject to change without previous notice Les informations contenues dans ce guide ont été vérifiées en janvier 2017 Les spécifications et l apparence extérieure sont sujettes à de changement sans préavis Die in dieser Anleitung enthaltenen Informationen sind auf dem Stand von Januar 2017 Die Spezifikationen und das äußere Erscheinungsbild können jederzeit ohne ...

Отзывы: