background image


4-59


Setting Up the Pr

inting En

vironment


4


Printing from a Network Computer by Sharing the Printer on a Network


For Windows XP/Server 2003


1


Turn the computer on and start up Windows XP/Server 2003.


2


Log on to Windows XP/Server 2003.

NOTE


A user without administrator rights can also install the printer driver.


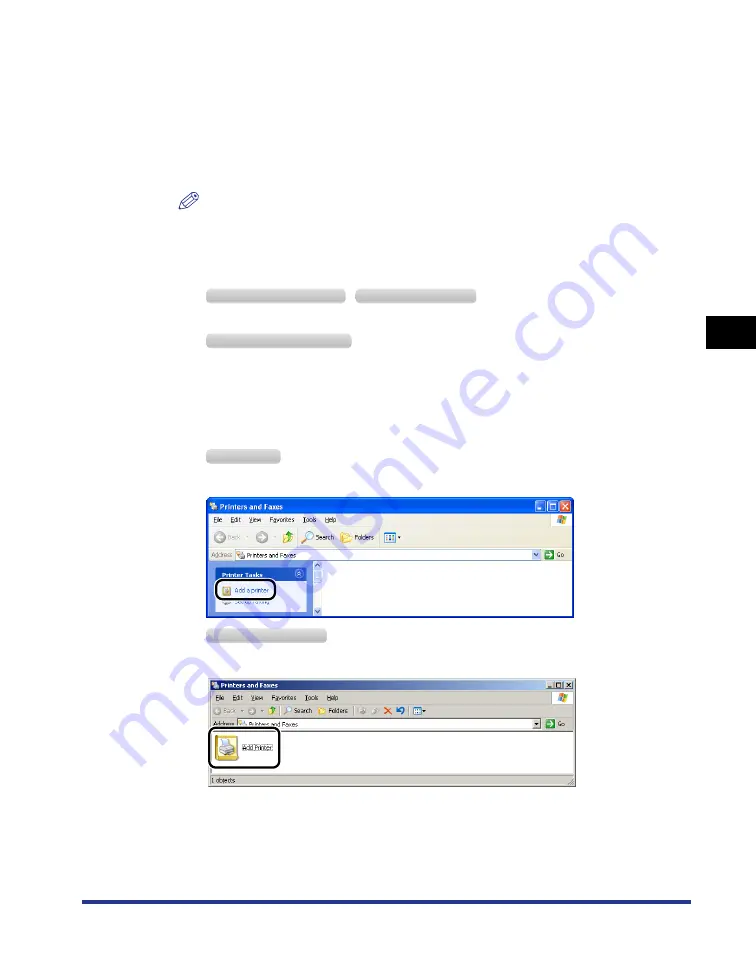
3


Display the [Printers and Faxes] folder.


From the [Start] menu, select [Printers and Faxes].

From the [Start] menu, select [Control Panel], and then click [Printers and Other Hardware]


 [Printers and Faxes].


4


Display [Add Printer Wizard].


Click [Add a printer].

Double-click [Add Printer].

W

indows


XP P

rofessional

W

indows


S

erver 

2003

W

indows


XP H

ome 

E

dition

W

indows


XP

W

indows


S

erver 

2003

Содержание LBP3310

Страница 1: ...ENG IMPORTANT Read this manual carefully before using your printer Save this manual for future reference User s Guide User s Guide ...

Страница 2: ...LBP3310 Laser Printer User s Guide ...

Страница 3: ...Up the Network Environment for Printing Managing the Printer in the Network Environment Only if the optional network board is installed Network Guide CD ROM Operating Setting the Printer from the Web Browser Only if the optional network board is installed Remote UI Guide CD ROM To view the manual in PDF format Adobe Reader Adobe Acrobat Reader is required If Adobe Reader Adobe Acrobat Reader is no...

Страница 4: ...tions Routine Maintenance Troubleshooting Installing the Optional Accessories Appendix Chapter 1 Chapter 2 Chapter 3 Chapter 4 Chapter 5 Chapter 6 Chapter 7 Chapter 8 Chapter 9 Chapter 10 Considerable effort has been made to ensure that this manual is free of inaccuracies and omissions However as we are constantly improving our products if you need an exact specification please contact Canon ...

Страница 5: ...iii Laser Safety xiii International Energy Star Program xiv WEEE Directive xv Trademarks xv Copyright xvi Disclaimers xvi Legal Limitations on the Usage of Your Product and the Use of Images xvii Important Safety Instructions xviii Installation xviii Power Supply xx Handling xxi Maintenance and Inspections xxiii Consumables xxiv Others xxiv Chapter 1 Before You Start Features and Benefits 1 2 CD R...

Страница 6: ...ing the Toner Cartridge 2 14 Precautions on Installing the Toner Cartridge 2 14 Installing the Toner Cartridge 2 15 Removing the Packing Materials of the Paper Cassette and Loading Paper 2 23 Connecting the Power Cord 2 26 Connecting to a Computer 2 28 Connecting the Printer to a Computer 2 28 Using a USB Cable 2 29 Precautions on Connecting a USB Cable 2 29 Connecting a USB Cable 2 30 Using a LAN...

Страница 7: ... 3 37 Loading Custom Size Paper Non Standard Paper 3 42 Paper Loading Orientation 3 49 Chapter 4 Setting Up the Printing Environment System Requirements 4 2 Checking Your Printing Environment 4 3 Installing the Printer Driver 4 4 Installing from CD ROM 4 5 Installing with Plug and Play 4 12 For Windows Vista 4 12 For Windows XP Server 2003 4 19 For Windows 2000 4 24 After Completing Installation 4...

Страница 8: ...000 XP Server 2003 Vista 32 bit 5 33 For Windows Vista 64 bit 5 33 Printer Status Window 5 34 Functions on the Printer Status Window 5 34 Displaying the Printer Status Window 5 35 Preferences Users Dialog Box 5 36 Preferences Administrators Dialog Box 5 36 Utility Menu 5 37 Device Settings Menu 5 37 Remote UI Only If the Network Board Is Installed 5 38 Refresh 5 38 Resolve Error 5 38 Cancel Job 5 ...

Страница 9: ...ured Images 6 45 Printing with Toner Density Adjusted 6 47 Printing with the Brightness and Contrast Adjusted 6 49 Printing a Grayscale Sample 6 51 Using Profiles 6 53 Selecting a Profile 6 53 Adding a Profile 6 55 Editing a Profile 6 56 Deleting a Profile 6 57 Editing Jobs with PageComposer 6 59 Chapter 7 Routine Maintenance Replacing the Toner Cartridge 7 2 Precautions on Replacing the Toner Car...

Страница 10: ...age 8 41 If Uninstallation Fails 8 42 Uninstalling the USB Class Driver 8 45 When Data Is Not Sent to the Printer 8 48 If the Printer and Computer Are Connected by a USB Cable 8 48 When the Printer Is Shared on a Network 8 51 Miscellaneous Problems 8 54 Confirming the Printer Features 8 56 Chapter 9 Installing the Optional Accessories Paper Feeder 9 2 Moving the Printer 9 3 Removing the Packing Ma...

Страница 11: ...pecifications 10 2 Software Specifications 10 4 Dimensions of Each Part 10 5 NetSpot Device Installer 10 7 Checking the Processor Version of Windows Vista 10 8 Confirming the Setting for Spooling at Host 10 9 Index 10 11 Location of the Serial Number 10 15 ...

Страница 12: ...e the printer safely always pay attention to these warnings CAUTION Indicates a caution concerning operations that may lead to injury to persons or damage to property if not performed correctly In order to use the printer safely always pay attention to these cautions IMPORTANT Indicates operational requirements and restrictions Be sure to read these items carefully in order to operate the printer ...

Страница 13: ...own below If multiple buttons can be clicked for a procedure all such buttons will be marked on the illustration Select the appropriate button Illustrations Used in This Manual The illustrations of the toner cartridge used in this manual mean the toner cartridge Canon Genuine Cartridge of which printable pages are approximately 3 000 pages 10 Click Next Click this button for operation ...

Страница 14: ...illustration the form of the power cord may differ depending on the country or region Abbreviations Used in This Manual In this manual product names and model names are abbreviated as follows Microsoft Windows 2000 Windows 2000 Microsoft Windows XP Windows XP Microsoft Windows Server 2003 Windows Server 2003 Microsoft Windows Vista operating system Windows Vista Microsoft Windows operating system ...

Страница 15: ...energy and if not installed and used in accordance with the instructions may cause harmful interference to radio communications However there is no guarantee that interference will not occur in a particular installation If this equipment does cause harmful interference to radio or television reception which can be determined by turning the equipment off and on the user is encouraged to try to corr...

Страница 16: ...ns input 230 V 50 Hz although the rated input of the product is 220 240 V 50 60 Hz Laser Safety This product complies with 21 CFR Chapter 1 Subchapter J as a Class I laser product under the U S Department of Health and Human Services DHHS Radiation Performance Standard according to the Radiation Control for Health and Safety Act of 1968 Also this product is certified as a Class 1 laser product und...

Страница 17: ...Y STAR Partner Canon Inc has determined that this product meets the ENERGY STAR Program for energy efficiency The International ENERGY STAR Office Equipment Program is an international program that promotes energy saving through the use of computers and other office equipment The program backs the development and dissemination of products with functions that effectively reduce energy consumption I...

Страница 18: ... product should be handed over to a designated collection point e g on an authorized one for one basis when you buy a new similar product or to an authorized collection site for recycling waste electrical and electronic equipment EEE Improper handling of this type of waste could have a possible negative impact on the environment and human health due to potentially hazardous substances that are gen...

Страница 19: ...sclaimers The information in this manual is subject to change without notice CANON INC MAKES NO WARRANTY OF ANY KIND WITH REGARD TO THIS MATERIAL EITHER EXPRESS OR IMPLIED EXCEPT AS PROVIDED HEREIN INCLUDING WITHOUT LIMITATION THEREOF WARRANTIES AS TO MARKETABILITY MERCHANTABILITY FITNESS FOR A PARTICULAR PURPOSE OF USE OR AGAINST INFRINGEMENT OF ANY PATENT CANON INC SHALL NOT BE LIABLE FOR ANY DI...

Страница 20: ... print or otherwise reproduce any particular document and or of the use of the images scanned printed or otherwise reproduced you should consult in advance with your legal advisor for guidance Paper Money Travelers Checks Money Orders Food Stamps Certificates of Deposit Passports Postage Stamps canceled or uncanceled Immigration Papers Identifying Badges or Insignias Internal Revenue Stamps cancel...

Страница 21: ...anty Installation WARNING Do not install the printer near alcohol paint thinner or other flammable substances If flammable substances come into contact with electrical parts inside the printer this may result in a fire or electrical shock Do not place the following items on the printer If these items come into contact with a high voltage area inside the printer this may result in a fire or electri...

Страница 22: ...electrical shock A location exposed to high humidity or excess dust A location exposed to smoke and steam such as in cookeries or near or humidifiers A location exposed to rain or snow A location near water faucets or water A location exposed to direct sunlight A location subject to high temperatures A location near open flames When placing the printer lower the printer onto the floor or other sur...

Страница 23: ...g the following points at the user s own risk If you use extension cords improperly this may result in a fire or electrical shock Do not connect one extension cord to another Make sure that the voltage of the power plug is the one indicated in the rating label attached to the back of the printer when you use the printer Use an extension cord of greater electrical current capacity than the value in...

Страница 24: ...o not spill water liquids or flammable substances such as alcohol benzene and paint thinner inside the printer If these items come into contact with a high voltage area inside the printer this may result in a fire or electrical shock If these items are dropped or slipped inside the printer immediately turn OFF the printer and computer and disconnect the USB cable if it is connected Then unplug the...

Страница 25: ...ously Otherwise this may result in burns The laser beam can be harmful to humans Since radiation emitted inside the printer is completely confined within protective housings and external covers the laser beam cannot escape from the printer during any phase of user operation Read the following remarks and instructions for safety Do not open covers other than those instructed in this manual Do not r...

Страница 26: ...o not attempt to service this printer yourself except for procedures outlined in this manual There are no user serviceable parts inside the printer Adjust only those controls that are covered in the operating instructions Improper adjustment could result in personal injury and or damage requiring extensive repair that may not be covered under your Limited Warranty The fixing unit and its surroundi...

Страница 27: ...store toner cartridges or copy paper in places exposed to open flames as this may cause the toner or paper to ignite and result in burns or a fire Place the toner cartridge into a plastic bag to prevent its toner from scattering and then dispose of the toner cartridge according to local regulations CAUTION Keep toner cartridges and other consumables out of the reach of small children If these item...

Страница 28: ...escribes the major features and basic functions of this printer Features and Benefits 1 2 CD ROM 1 4 CD ROM Setup 1 5 Parts and Their Functions 1 7 Printer Unit 1 7 Control Panel 1 10 Optional Accessories 1 12 Paper Feeder 1 12 Network Board 1 13 ...

Страница 29: ...attern photographs and graphics can be printed with beautifully subtle reproduction Duplex Unit Installed as Standard LBP3310 is supplied with a duplex unit Therefore you can automatically perform 2 sided printing with paper A4 Legal and Letter size loaded in the multi purpose tray or paper cassette By doing so you can save paper and storage space for files Simple Maintenance and Printer Status Wi...

Страница 30: ...o reduce the standard paper sizes As you can also print irregular custom size paper this printer supports a wide array of uses Supporting Various Types of Media Supports various types of media including plain paper heavy paper Index Card envelopes labels and transparencies Network capable Printer LBP3310 can be used as a printer directly connected to an Ethernet network by installing the optional ...

Страница 31: ...w before installing NetSpot Device Installer NetSpot Device Installer is software that allows you to easily initialize the settings of printers connected to the network When the printer driver is installed from CD ROM Setup however the initial settings for the network are performed automatically Use NetSpot Device Installer as needed if you want to reset the IP address manually without using CD RO...

Страница 32: ...ite CD ROM Setup When the supplied CD ROM is inserted into the CD ROM drive the following CD ROM Setup appears automatically Operations such as software installation can be performed from the CD ROM Setup NOTE If you are using Windows Vista and the AutoPlay dialog box appears click Run AUTORUN EXE If CD ROM Setup does not appear display it using the following procedures The CD ROM drive name is in...

Страница 33: ... Installer see Chapter 2 Setting Up the Network Environment for Printing in Network Guide Display Manuals Clicking this button allows you to display the manuals PDF manuals Clicking next to each guide displays the respective PDF manuals The following PDF manuals are included in the Manuals folder in the supplied CD ROM User s Guide UsersGuide pdf Network Guide NetworkGuide pdf Remote UI Guide Remo...

Страница 34: ...ay Extension Open to prevent the paper from hanging out of the multi purpose tray when loading long size paper such as A4 d d d d Paper Guides Adjust the position of the paper guides to the width of the paper loaded in the multi purpose tray e e e e Paper Level Indicator Shows the amount of paper remaining in the paper cassette If the paper cassette is full the indicator is at the top Because the ...

Страница 35: ...n Cover Open this cover when using the face up output slot or removing paper jammed in the output area See p 3 16 c c c c Power Socket See p 2 26 d d d d Rating Label The current value indicated in this rating label shows the average power current consumption e e e e Duplex Unit Cover Open when specifying the size of the paper for 2 sided printing or removing paper jammed in the duplex unit f f f ...

Страница 36: ...a a a Toner Cartridge Guide When setting the toner cartridge push it while aligning the projections on each side of the toner cartridge with this guide See p 7 2 b b b b Transport Guide Lift the guide when removing paper jammed inside the front cover See p 8 7 a b ...

Страница 37: ...ndow see Printer Status Window on p 5 34 Though not shown in the above illustration the control panels are labeled with names in certain countries or regions Indicators Number Name Status See a Load Paper Indicator Blinking Printing cannot be performed because no paper is loaded or paper of an inappropriate size is loaded p 3 17 p 3 31 b Paper Jam Indicator Blinking A paper jam is occurring disabl...

Страница 38: ...f processing or operation such as printing warming up or cleaning e Cancel Job Indicator On The Cancel Job key is being pressed p 5 23 Blinking A job cancel process is being performed p 5 23 Number Name Function See e Cancel Job Key Pressing this key cancels the job in which an error is occurring and that in a printing process p 5 23 Number Name Status See ...

Страница 39: ...supplied multi purpose tray and paper cassette up to three paper sources can be used by installing the optional paper feeder The paper feeder can be loaded with up to approximately 250 sheets of plain paper 64 g m2 of A4 B5 A5 Legal Letter Executive and the following custom paper sizes Width 148 0 to 215 9 mm Length 210 0 to 355 6 mm IMPORTANT Be sure to use a paper feeder designed for this printe...

Страница 40: ...ed directly to the network using a LAN cable The network board allows you to specify the printer settings and manage them through a built in web browser Remote UI NOTE For details on Remote UI see Remote UI Guide For details on the procedure for installing the network board see Network Board on p 9 15 ERR LNK 100 Network board NB C2 ...

Страница 41: ...1 14 Before You Start 1 Optional Accessories ...

Страница 42: ... Packing Materials on the Outside of the Printer 2 10 Removing the Packing Materials Inside the Printer and Installing the Toner Cartridge 2 14 Precautions on Installing the Toner Cartridge 2 14 Installing the Toner Cartridge 2 15 Removing the Packing Materials of the Paper Cassette and Loading Paper 2 23 Connecting the Power Cord 2 26 Connecting to a Computer 2 28 Connecting the Printer to a Comp...

Страница 43: ...onal accessories skip the procedures indicated with Optional 1 Installing the Paper Feeder See p 9 2 Optional 2 Installing the Printer See p 2 10 3 Installing the Toner Cartridge See p 2 14 4 Loading Paper See p 2 23 5 Installing the Network Board See p 9 15 Optional 6 Connecting the Power Cord See p 2 26 7 Connecting the Printer to a Computer See p 2 28 8 Installing the Printer Driver See p 4 1 ...

Страница 44: ... to 80 RH no condensation IMPORTANT Water droplets condensation may form inside the printer under the following circumstances Leave the printer for two hours or more to adjust the surrounding temperature and humidity before using it When the room where the printer is installed is heated rapidly When the printer is moved from a cool or dry location to a hot or humid location If water condenses insi...

Страница 45: ...ng locations A location where sufficient space can be ensured A well ventilated location A flat even surface A sturdy platform that can easily support the weight of the printer and optional accessories WARNING Do not install the printer near alcohol paint thinner or other flammable substances If flammable substances come into contact with electrical parts inside the printer this may result in a fi...

Страница 46: ... a poorly ventilated room or to perform a large amount of printing ventilate the room to keep the working environment comfortable A location near products that generate magnetism or electromagnetic waves In rooms such as laboratories where chemical reactions may occur A place where salt corrosive gases such as ammonia or toxic gases are found A platform that may warp from the weight of the printer...

Страница 47: ...ce is 12 mm square The rear feet are 7 8 mm high the top surface of the left foot is a rectangle of 21 7 mm x 40 mm and that of the right foot is 18 6 mm x 40 mm and is L shaped mm 100 100 100 1072 9 500 599 7 200 546 8 Front Surface Output selection cover Paper cassette Front cover mm 62 3 283 2 54 2 43 9 294 2 40 5 54 3 277 6 52 7 43 9 294 2 40 5 Front Surface ...

Страница 48: ...t are 7 8 mm high and their top surface is 12 mm square The rear feet are 7 8 mm high the top surface of the left foot is a rectangle of 21 7 mm x 40 mm and that of the right foot is 31 7 mm x 40 mm and is L shaped mm 26 7 294 40 3 26 7 305 8 28 5 62 7 282 4 54 6 61 9 276 61 8 Front Surface ...

Страница 49: ...ridge yield for monochromatic electrophotographic printers and multi function devices that may contain printer components issued by ISO International Organization for Standardization The following two types of replacement toner cartridges with different lifetimes are available The one with the same lifetime as that of the included toner cartridge The one with a longer lifetime than that of the inc...

Страница 50: ...stalling the Printer 2 Confirming the Contents of the Box This printer does not come with a USB cable Have an appropriate one available for the computer you are using Use a USB cable with the following symbol ...

Страница 51: ...rinter IMPORTANT If you want to install the optional paper feeder place it at the installation site before taking the printer out of the box For details on installing the paper feeder see Paper Feeder on p 9 2 The removed packing materials are required when transporting the printer for relocation or maintenance Be sure not to misplace them NOTE The packing materials may be changed in form or place...

Страница 52: ...of the Printer 1 Carry the printer unit to the installation site From the front side securely hold the printer by the lift handles on the lower portion of the printer with both hands CAUTION This printer weighs approximately 12 kg Please be careful not to hurt your back or other portions of your body when carrying the printer ...

Страница 53: ...t hold the printer by the front portion rear portion or any portions other than the lift handles If you do so you may drop the printer resulting in personal injury The rear portion A of the printer is relatively heavy Be careful not to become off balance when lifting the printer If you do so you may drop the printer resulting in personal injury A ...

Страница 54: ...ion Site and Removing the Packing Materials on the Outside of the Printer 2 Put the printer down carefully at the installation site CAUTION Put the printer down slowly and carefully Be careful not to hurt your hands 3 Remove the tape attached to the printer 2 locations ...

Страница 55: ...Installing the Toner Cartridge CAUTION Take care not to allow the toner to come into contact with your hands or clothing as this will dirty your hands or clothing If your hands or clothing become stained with toner wash them immediately with cold water Washing them with warm water may fix the toner and make it not possible to remove the toner stains IMPORTANT Dispose of the packing materials accor...

Страница 56: ... Packing Materials Inside the Printer and Installing the Toner Cartridge Installing the Toner Cartridge 1 Open the front cover While pressing the open button on the top of the front cover a open it gently b 2 Turn over the paper toward you b a ...

Страница 57: ...als Inside the Printer and Installing the Toner Cartridge 2 16 Installing the Printer 2 IMPORTANT Do not remove the paper alone with the toner cartridge and packing materials installed in the printer 3 Remove the packing material ...

Страница 58: ...terials Inside the Printer and Installing the Toner Cartridge 4 Remove the toner cartridge from the printer IMPORTANT Do not touch the high voltage contact A or the electrical contacts B shown in the figure as this may result in damage to the printer A B ...

Страница 59: ...r 6 times to evenly distribute the toner inside the cartridge IMPORTANT If toner is not distributed evenly this may result in deterioration in print quality Do not skip this step Be sure to shake the toner cartridge gently If you do not shake the cartridge gently toner may spill out 6 Remove the packing material shown in the figure Raise the tab of the packing material A then remove it A ...

Страница 60: ...nd fold it back Pull out the sealing tape approx 45 cm long straight in the direction of the arrow gently b CAUTION If the sealing tape is pulled out forcefully or stopped at midpoint toner may spill out If the toner gets into your eyes or mouth wash them immediately with cold water and immediately consult a physician IMPORTANT Do not pull the sealing tape diagonally upwards or downwards If the ta...

Страница 61: ...tape completely from the toner cartridge If any tape remains in the toner cartridge this may result in poor print quality When pulling out the sealing tape be careful not to touch the toner cartridge memory A or not to hold the drum protective shutter B with your hands 9 Remove the packing material with paper inside the front cover A B ...

Страница 62: ... cartridge properly with the arrowed side facing up as shown in the figure 11 Install the toner cartridge Push the toner cartridge into the printer firmly until it touches the back of the printer while aligning A on both sides of the toner cartridge with the toner cartridge guides inside the printer A Side View Left Side View Right ...

Страница 63: ...nt cover gently and firmly IMPORTANT If you cannot close the front cover make sure that the toner cartridge is installed properly If you try to close the front cover forcefully this may result in damage to the printer Do not leave the front cover open for a long time after installing the toner cartridge This may result in deterioration in print quality ...

Страница 64: ... details on handling the paper cassette see Precautions for Handling the Multi purpose Tray or Paper Cassette on p 3 12 The removed packing materials are required when transporting the printer for relocation or maintenance Be sure not to misplace them NOTE The packing materials may be changed in form or placement or may be added or removed without notice 1 Pull out the paper cassette ...

Страница 65: ... packing material in the paper cassette 4 Load paper in the paper cassette For details on the procedure for loading paper in the paper cassette see Loading Paper in the Paper Cassette on p 3 17 NOTE If you want to load paper in the multi purpose tray load the paper after Step 5 For details on the procedure for loading paper in the multi purpose tray see Loading Paper in the Multi purpose Tray on p...

Страница 66: ...nt surface of the printer CAUTION When setting the paper cassette in the printer be careful not to catch your fingers This printer s paper cassette cannot automatically detect the paper size Therefore you need to register the size of the loaded paper Install the printer driver See p 4 1 then register the paper size For details on the procedure for registering a paper size see Step 6 and subsequent...

Страница 67: ...not plug the power plug into the auxiliary outlet on a computer One AC power outlet should be reserved exclusively for the printer Do not connect this printer to an uninterruptible power source This may cause printer malfunction or breakdown in the event of a power failure 1 Make sure that the printer is OFF The printer is OFF when the side of the power switch is pressed ...

Страница 68: ...inter 2 Connecting the Power Cord 2 Plug the supplied power cord into the power socket 3 Plug the power plug into the AC power outlet NOTE The form of the supplied power cord may differ from the one in the above illustration ...

Страница 69: ...your network environment Only if the optional network board is installed Using a USB Cable See p 2 29 Using a LAN Cable See p 2 31 Using a Print Server If your computer is the print server Using a USB Cable See p 2 29 Using a LAN Cable See p 2 31 Only if the optional network board is installed If your computer is a client computer You do not need to connect this printer to the computer directly Pr...

Страница 70: ...his printer uses bi directional communication Operation of the printer when connected via unidirectional communication equipment has not been tested and as a result Canon cannot guarantee printer operation if the printer is connected using unidirectional print servers USB hubs or switching devices NOTE The USB interfaces appropriate for this printer are as follows For more details contact your loc...

Страница 71: ...he A type flat end of the USB cable to the USB port on the computer NOTE If a Wizard or dialog box appears after connecting the USB cable through the Plug and Play automatic setup install the printer driver for this printer using either one of the following procedures Clicking Cancel and installing the printer driver from CD ROM Setup Installing with Plug and Play For more details see Installing t...

Страница 72: ...This printer and the network board do not come with a LAN cable or a hub Have cables or a hub ready as needed Use a Category 5 twisted pair cable for the LAN If you want to connect the printer to a 100BASE TX Ethernet network all the devices to be connected to the LAN hub LAN cable and network board for computer must support 100BASE TX For more details contact your local authorized Canon dealer Co...

Страница 73: ... NOTE If this printer is connected to a network the following tasks are required Specifying the network settings for the computer See the instruction manual for the computer Performing the installation of and the network settings for the printer to use it on a network See Network Guide Configure the print server See Printing from a Network Computer by Sharing the Printer on a Network on p 4 35 ...

Страница 74: ...sage appears in the Printer Status Window see Troubleshooting on p 8 1 Be sure to set the paper cassette in the printer before you turn the power ON for the first time following the printer installation Although a sheet of blank paper is output when you turn the power ON for the first time following the printer installation this is not an error 1 Press the side of the power switch on the printer A...

Страница 75: ...indicator orange comes on blinking See p 8 25 Turning the Printer OFF 1 Make sure that the printer is not in any of the following states before turning it OFF While the printer is in the middle of printing While the printer is running a self diagnostic test immediately after turning the power ON All the indicators are blinking IMPORTANT If you turn the printer OFF all print data remaining in the p...

Страница 76: ...ing the Printer 2 Turning the Printer ON OFF 2 Press the side of the power switch on the printer IMPORTANT When the side of the power switch on the right side of the printer is pressed the power consumption is 0 W ...

Страница 77: ...Turning the Printer ON OFF 2 36 Installing the Printer 2 ...

Страница 78: ... Paper Source 3 11 Precautions for Handling the Multi purpose Tray or Paper Cassette 3 12 Output Tray 3 13 Output Tray Type 3 13 Paper Capacity of the Output Tray 3 15 Selecting an Output Tray 3 16 Loading Paper in the Paper Cassette 3 17 Loading Standard Size Paper 3 17 Loading Paper of Custom Size Non Standard Size and 16K 3 23 Loading Paper in the Multi purpose Tray 3 31 Loading Standard Size P...

Страница 79: ...in stages The print speed may be slowed down to approximately 6 pages min Usable Paper Paper Size The following shows the paper sizes that can be used with this printer The paper is available for 1 sided printing and automatic 2 sided printing The paper is available for only 1 sided printing The paper cannot be used for printing Paper Size Paper Source Multi purpose Tray Cassette 1 Cassette 2 Opti...

Страница 80: ...pplies the appropriate print mode to each type by specifying Output Size in the Page Setup sheet Plain Paper This printer can print plain paper 60 89 g m2 of the following sizes Standard paper size A4 B5 A5 Legal Letter Executive 16K Custom paper size Width 76 2 to 215 9 mm Length 127 0 to 355 6 mm Paper of A4 Legal or Letter size is available for automatic 2 sided printing 100 recycled paper 60 8...

Страница 81: ...tter size labels IMPORTANT Do not use the labels in the following conditions Using inappropriate labels may result in paper jams that are difficult to clear or may result in damage to the printer Peeled labels or partly used labels Coated labels that are easily peeled off from the backing sheet Labels with uneven adhesive Index Card This printer can print Index Card Index Card can be loaded in the...

Страница 82: ... with address windows Envelopes with adhesive on the surface Wrinkled or creased envelopes Poorly manufactured envelopes in which the glued parts are uneven Irregularly shaped envelopes Before loading the envelopes flatten the stack of envelopes to release any remaining air and press the fold lines tightly along the edges Do not print on the reverse side glued side of envelopes Printing speed drop...

Страница 83: ...the printout may be partly missing depending on the property of the document to be printed For more details see Online Help in the printer driver Plain Paper Heavy Paper Transparency Label You cannot print on any area within 5 mm of the edges of paper Envelope Index Card You cannot print on any area within 10 mm of the edges of paper You may have to change the printable area before printing depend...

Страница 84: ...rinted side again Paper with jagged edges paper that has been poorly cut Wrinkled paper Paper with the corners folded Paper that changes its quality at high temperatures Paper that contains ink that melts burns evaporates or emits harmful gases at or lower than the heating temperature approx 270 C or 518 F of the fixing unit Heat sensitive paper Treated color paper Specially coated paper coated pa...

Страница 85: ... keep packed paper stack in the work area for at least one day prior to printing so that it can adapt to the new environment When paper is moved to a location where the temperature or humidity differs significantly the paper may curl or become creased Storing Printed Paper When handling or storing paper printed by this printer be careful of the following points IMPORTANT Avoid storing printouts wi...

Страница 86: ...his printer has the following paper sources A Multi purpose Tray B Cassette 1 C Cassette 2 Optional IMPORTANT If you are printing from Cassette 2 make sure that Cassette 1 is set before printing If you print from Cassette 2 when Cassette 1 is not set this will cause paper jams A B C ...

Страница 87: ...purpose Tray Cassette 1 Cassette 2 Optional Plain Paper Ex 64 g m2 Approx 50 sheets Approx 250 sheets Approx 250 sheets Heavy Paper Ex 91 g m2 Approx 40 sheets Approx 200 sheets Approx 200 sheets Heavy Paper Ex 128 g m2 Approx 25 sheets Transparency Approx 40 sheets Label Approx 20 sheets Index Card Approx 15 sheets Envelope Approx 5 sheets ...

Страница 88: ...n the procedure for displaying the Paper Source sheet in the printer driver see the following Printing from an Application See p 5 2 Changing the Default Values for Printing Preferences See p 5 8 NOTE If Paper Selection is set to a setting other than Same Paper for All Pages the setting for Paper Source is changed as follows Specify the same setting as for Paper Source First Page Second Page Cover...

Страница 89: ...efill the paper cassette after all the loaded paper runs out If the paper cassette is refilled when paper still remains in the cassette this may result in misfeeds Do not put anything other than the printing paper on the multi purpose tray Also do not press on top of or apply excessive force to the multi purpose tray This may result in damage to the multi purpose tray Do not touch the black rubber...

Страница 90: ...ly after being output Be careful when removing the paper as well as when aligning the removed paper especially after printing continuously Otherwise this may result in burns Face down Output Tray Printed paper is output to the face down output tray on the top of the printer with the printed side facing down IMPORTANT Printed paper can be output only to the face down output tray when performing aut...

Страница 91: ...n output tray can hold up to approximately 125 sheets of plain paper 64 g m2 The paper capacity varies depending on the paper size or paper type For more details see Paper Capacity of the Output Tray on p 3 15 Face up Output Slot Printed paper is output to the face up output slot on the rear side of the printer with the printed side facing up The face up output slot is suitable to print transparen...

Страница 92: ... is output to the face up output slot take out one piece at a time each time it is output Paper Capacity of the Output Tray The paper cannot be output Actual paper capacity varies depending on the installation environment paper type or paper size Paper Type Paper Capacity Face down Output Tray Face up Output Slot Plain Paper 64 g m2 Approx 125 sheets Heavy Paper 91 g m2 Approx 50 sheets Heavy Pape...

Страница 93: ...y Switching to the Face up Output Slot When switching to the face up output slot open the output selection cover as shown in the figure Switching to the Face down Output Tray When switching to the face down output tray close the output selection cover as shown in the figure ...

Страница 94: ...e see Precautions for Handling the Multi purpose Tray or Paper Cassette on p 3 12 NOTE Load paper in Cassette 2 only if the optional paper feeder is installed in the same manner as you would load paper in Cassette 1 Loading Standard Size Paper 1 Pull out the paper cassette Paper Type Paper Size Loading Procedure Plain Paper 60 89 g m2 Heavy Paper 90 120 g m2 A4 B5 A5 Legal Letter Executive p 3 17 ...

Страница 95: ...sitions of the paper guides The paper sizes indicated on the paper guides are abbreviated as follows Slide the side paper guides to the size mark for the paper to be loaded The side paper guides move together Align the position of A with the size mark of the paper to be loaded NOTE If you are using B5 size paper 182 mm x 257 mm set the paper guide to JIS B5 Paper Size Paper Guide Legal LGL Letter ...

Страница 96: ...of the paper to be loaded IMPORTANT Do not use the 8 5 x 13 position 3 Load the paper stack so that the rear edge is aligned with the paper guide CAUTION When loading paper take care not to cut your hands with the edges of the paper How to slide the rear paper guide a Hold the lock release lever b Slide the paper guide to the size mark for the paper to be loaded A a b Top View Top View ...

Страница 97: ...cut multiple sheets of paper may be fed at once In this case align the edges of the paper stack properly on a hard flat surface NOTE To print paper with letterheads or logos see Paper Loading Orientation p 3 49 and load the paper in the proper orientation 4 Hold down the paper as shown in the figure then set it under the hooks A on the paper guides Check the following points Whether the paper stac...

Страница 98: ...n the printer Push the paper cassette into the printer firmly until the front side of the paper cassette is flush with the front surface of the printer CAUTION When setting the paper cassette in the printer be careful not to catch your fingers This printer s paper cassette cannot automatically detect the paper size Therefore you need to register the size of the loaded paper 6 Display the Printer S...

Страница 99: ...Legal the following screen appears If you want to perform 2 sided printing Set the paper size switch lever on the rear side of the printer to the appropriate position then click OK If you do not want to perform 2 sided printing Simply click OK NOTE For details on the procedure for setting the paper size switch lever see Automatic 2 sided Printing on p 5 10 Loading paper is now completed For detail...

Страница 100: ... mm Length 210 0 to 355 6 mm 1 Pull out the paper cassette CAUTION Be sure to take the paper cassette out of the printer before loading paper If paper is loaded while the paper cassette is partially pulled out the paper cassette may drop or the printer may fall down resulting in personal injury 2 Load the paper so that the edges of the stacked paper are aligned with the front side of the paper cas...

Страница 101: ...paper IMPORTANT Be sure to load paper in portrait orientation If you use paper that has been poorly cut multiple sheets of paper may be fed at once In this case align the edges of the paper stack properly on a hard flat surface NOTE To print paper with letterheads or logos see Paper Loading Orientation p 3 49 and load the paper in the proper orientation ...

Страница 102: ... loaded paper The side paper guides move together IMPORTANT Be sure to align the paper guides with the width of the paper If the paper guides are too loose or too tight this may result in misfeeds or paper jams How to slide the side paper guides a Hold the lock release lever b Slide the paper guides to be aligned with the loaded paper Top View b a ...

Страница 103: ...ure then set it under the hooks A on the paper guides Check the following points Whether the paper stack does not exceed the load limit marks B Whether there is sufficient space between the hooks of the paper guides and the paper stack How to slide the rear paper guide a Hold the lock release lever b Slide the paper guide to be aligned with the loaded paper Top View b a A B A ...

Страница 104: ...ush the paper cassette into the printer firmly until the front side of the paper cassette is flush with the front surface of the printer CAUTION When setting the paper cassette in the printer be careful not to catch your fingers This printer s paper cassette cannot automatically detect the paper size Therefore you need to register the size of the loaded paper 6 Display the Printer Status Window Fo...

Страница 105: ...splay the Printers and Faxes folder or the Printers folder From the Start menu select Settings Printers From the Start menu select Printers and Faxes From the Start menu select Control Panel and then click Printers and Other Hardware Printers and Faxes From the Start menu select Control Panel and then click Printer Register the size of the loaded custom size paper using the following procedure a b...

Страница 106: ...he Paper Cassette Paper Loading and Output Tray 3 10 Right click the icon for this printer then select Printing Preferences from the pop up menu 11 Display the Page Setup sheet a a a a then click Custom Paper Size b b b b a b ...

Страница 107: ...nit Select the unit Millimeter or Inch to be used when setting the custom paper size Paper Size Specify the height and width of the custom paper size Height Width Specify the custom paper size in portrait orientation Height Width within user definable sizes 13 Click Register NOTE The number of custom paper sizes that can be added depends on the system environment 14 Confirm the settings then click...

Страница 108: ...dling the multi purpose tray see Precautions for Handling the Multi purpose Tray or Paper Cassette on p 3 12 Paper Type Paper Size Loading Procedure Plain Paper 60 89 g m2 Heavy Paper 90 163 g m2 A4 B5 A5 Legal Letter Executive 16K p 3 32 Custom Paper Size Width 76 2 to 215 9 mm Length 127 0 to 355 6 mm p 3 42 Transparency A4 Letter p 3 32 Label A4 Letter p 3 32 Index Card Index Card p 3 37 Envelo...

Страница 109: ...Standard Size Paper Other Than Index Card and Envelopes 1 Open the multi purpose tray Holding the opening at the center of the printer open the multi purpose tray 2 Pull out the auxiliary tray IMPORTANT Be sure to pull out the auxiliary tray when loading paper in the multi purpose tray ...

Страница 110: ...ading Paper in the Multi purpose Tray Paper Loading and Output Tray 3 3 When loading long size paper such as A4 etc open the tray extension 4 Spread the paper guides a little wider than the actual paper width ...

Страница 111: ...are not fanned enough multiple sheets of paper may be fed at once causing paper jams When fanning or aligning the transparencies try to hold the edges to avoid touching the printing surface Take care not to mark or stain the printing surface of the transparencies with fingerprints dust or oil This may result in poor print quality 6 Gently load the paper stack until it touches the back of the tray ...

Страница 112: ...bel Approx 20 sheets Make sure that the paper stack does not exceed the load limit guides Load the paper so that it is straight If the rear edge of the paper stack is not properly aligned this may result in misfeeds or paper jams If the paper is curled or folded at corners flatten it before loading it in the printer If you use paper that has been poorly cut multiple sheets of paper may be fed at o...

Страница 113: ...with the width of the paper IMPORTANT Be sure to align the paper guides with the width of the paper If the paper guides are too loose or too tight this may result in misfeeds or paper jams Loading paper is now completed For details on the procedure for printing see Printing from an Application on p 5 2 ...

Страница 114: ...following envelopes can be loaded Envelope Envelope DL Envelope COM10 Envelope C5 Envelope Monarch 1 Open the multi purpose tray Holding the opening at the center of the printer open the multi purpose tray 2 Pull out the auxiliary tray IMPORTANT Be sure to pull out the auxiliary tray when loading paper in the multi purpose tray ...

Страница 115: ...ttle wider than the actual paper width 4 When loading envelopes align them as follows Place the stack of envelopes on a flat surface flatten them to release any remaining air and be sure that the edges are pressed tightly CAUTION When loading paper take care not to cut your hands with the edges of the paper ...

Страница 116: ... 3 Loosen any stiff corners of the envelopes and flatten curls as shown in the figure Align the edges of the envelopes on a flat surface 5 Gently load the paper stack until it touches the back of the tray Be sure that the paper stack is loaded under the load limit guides A A ...

Страница 117: ...p as follows Feeding direction Envelope Load the envelopes so that the flap is toward the left of the printer when viewed from the front Index Card Load Index Card in portrait orientation The following shows the paper capacity of the multi purpose tray Index Card Approx 15 sheets Envelope Approx 5 sheets Make sure that the paper stack does not exceed the load limit guides You cannot print on the r...

Страница 118: ...with the width of the paper IMPORTANT Be sure to align the paper guides with the width of the paper If the paper guides are too loose or too tight this may result in misfeeds or paper jams Loading paper is now completed For details on the procedure for printing see Printing from an Application on p 5 2 ...

Страница 119: ...an load paper of the following custom paper sizes Width 76 2 to 215 9 mm Length 127 0 to 355 6 mm 1 Open the multi purpose tray Holding the opening at the center of the printer open the multi purpose tray 2 Pull out the auxiliary tray IMPORTANT Be sure to pull out the auxiliary tray when loading paper in the multi purpose tray ...

Страница 120: ...3 43 Loading Paper in the Multi purpose Tray Paper Loading and Output Tray 3 3 When loading long size paper open the tray extension 4 Spread the paper guides a little wider than the actual paper width ...

Страница 121: ...tray Plain paper Ex 64 g m2 Approx 50 sheets Heavy paper Ex 91 g m2 Approx 40 sheets Heavy paper Ex 128 g m2 Approx 25 sheets Make sure that the paper stack does not exceed the load limit guides Load the paper so that it is straight If the rear edge of the paper stack is not properly aligned this may result in misfeeds or paper jams If the paper is curled or folded at corners flatten it before loa...

Страница 122: ...ion 6 Align the paper guides with the width of the paper IMPORTANT Be sure to align the paper guides with the width of the paper If the paper guides are too loose or too tight this may result in misfeeds or paper jams If printing custom size paper you need to register the custom paper size in the printer driver previously Register the size of the loaded custom size paper using the following proced...

Страница 123: ...e Start menu select Printers and Faxes From the Start menu select Control Panel and then click Printers and Other Hardware Printers and Faxes From the Start menu select Control Panel and then click Printer 8 Right click the icon for this printer then select Printing Preferences from the pop up menu Windows 2000 Windows XP Professional Windows Server 2003 Windows XP Home Edition Windows Vista ...

Страница 124: ...e of standard paper sizes and added custom paper sizes Name of Custom Paper Size Enter the name of the custom paper size to be added Up to 31 characters can be entered Unit Select the unit Millimeter or Inch to be used when setting the custom paper size Paper Size Specify the height and width of the custom paper size Height Width Specify the custom paper size in portrait orientation Height Width w...

Страница 125: ...t Tray 3 11 Click Register NOTE The number of custom paper sizes that can be added depends on the system environment 12 Confirm the settings then click OK Loading paper is now completed For details on the procedure for printing see Printing from an Application on p 5 2 ...

Страница 126: ...h letterheads or logos load the paper in the proper orientation as follows in the table indicates the feeding directions Portrait Layout Landscape Layout Paper Cassette 1 sided Printing Paper Cassette Automatic 2 sided Printing Multi purpose Tray 1 sided Printing Multi purpose Tray Automatic 2 sided Printing ...

Страница 127: ... Orientation Paper Loading and Output Tray 3 NOTE For details on loading orientation of envelopes see Loading Index Card or Envelopes on p 3 37 Portrait Layout Landscape Layout Multi purpose Tray Manual 2 sided Printing ...

Страница 128: ...ur Printing Environment 4 3 Installing the Printer Driver 4 4 Installing from CD ROM 4 5 Installing with Plug and Play 4 12 After Completing Installation 4 29 For Windows Vista 4 29 For Windows XP Server 2003 4 30 For Windows 2000 4 31 Checking the Operations by Configuration Page Print 4 32 Printing from a Network Computer by Sharing the Printer on a Network 4 35 Print Server Settings 4 36 Instal...

Страница 129: ...equirements recommended Interface When connecting with USB USB 2 0 Hi Speed USB Full Speed USB1 1 equivalent When connecting to a network Connector 10BASE T or 100BASE TX Protocol TCP IP NOTE This printer uses bi directional communication Operation of the printer when connected via unidirectional communication equipment has not been tested and as a result Canon cannot guarantee printer operation i...

Страница 130: ... and computer are connected by a USB cable See p 4 4 If the printer and computer are connected by a LAN cable See Network Guide Using a Print Server If your computer is the print server If the printer and print server are connected by a USB cable See p 4 4 If the printer and print server are connected by a LAN cable See Network Guide Only if the optional network board is installed If your computer...

Страница 131: ...nd if you want to update the additional driver alternate driver perform the following procedure 1 Uninstall the printer driver used in the print server See p 4 67 2 Install the new printer driver on the print server See p 4 4 3 See Print Server Settings p 4 36 and install the additional driver again This printer does not come with a USB cable Have an appropriate one available for the computer you ...

Страница 132: ...ROM NOTE The screenshots used in this section are from Windows XP Professional 1 Make sure that the printer and computer are OFF 2 Connect the B type square end of the USB cable to the USB connector on the printer 3 Connect the A type flat end of the USB cable to the USB port on the computer ...

Страница 133: ...e eject the disk and re insert it into the drive IMPORTANT If you are using Windows Vista and the AutoPlay dialog box appears click Run AUTORUN EXE If CD ROM Setup does not appear display it using the following procedures The CD ROM drive name is indicated as D in this manual The CD ROM drive name may differ depending on the computer you are using If you are using an operating system other than Wi...

Страница 134: ...on or Custom Installation If you want to install the printer driver and the manuals Easy Installation If you want to install only the printer driver Custom Installation 8 Click Install If you selected Custom Installation in Step 7 clear the Online Manuals check box a and then click Install b a b ...

Страница 135: ...4 8 Setting Up the Printing Environment Installing the Printer Driver 4 9 Confirm the contents then click Yes 10 Click Next 11 Select Install with USB Connection a a a a then click Next b b b b a b ...

Страница 136: ... only if you do not use a LAN cable to connect the printer to a computer on which the printer driver is being installed 12 Click Yes NOTE If you are using Windows 2000 and the Digital Signature Not Found dialog box appears click Yes If you are using Windows XP Server 2003 and the Hardware Installation dialog box appears click Continue Anyway If you are using Windows Vista and the Windows Security ...

Страница 137: ...stallation may take a long time If the printer is not recognized automatically even after the USB cable is connected see Installation Problems on p 8 37 If you are using Windows XP Server 2003 and the Hardware Installation dialog box appears click Continue Anyway If you are using Windows Vista and the Windows Security dialog box appears click Install this driver software anyway 14 Confirm the inst...

Страница 138: ...inter Driver 15 Select the Restart Computer Now Recommended check box a a a a then click Restart b b b b Windows restarts The installation of the printer driver is completed You can take the CD ROM out of the CD ROM drive after the installation is completed a b ...

Страница 139: ...ee p 4 24 For Windows Vista IMPORTANT The printer driver is automatically installed on a computer on which the printer driver for this printer has been installed before if you perform the following procedure 1 Connect the printer and computer with a USB cable 2 Turn the printer ON If you want to update the printer driver or want to install it manually see Installing from CD ROM p 4 5 and install t...

Страница 140: ...flat end of the USB cable to the USB port on the computer 4 Press the side of the power switch to turn the printer ON 5 Turn the computer on and start up Windows Vista 6 Log on as a user with administrator rights IMPORTANT If you are not sure about the permissions ask your computer administrator ...

Страница 141: ...n a computer on which the printer driver for this printer has been installed before without the above screen being displayed If you want to update the printer driver or want to install it manually see Installing from CD ROM p 4 5 and install the printer driver NOTE If the User Account Control dialog box appears click Continue 8 If the following screen appears click Don t search online ...

Страница 142: ...4 15 Setting Up the Printing Environment 4 Installing the Printer Driver 9 Click I don t have the disc Show me other options 10 Click Browse my computer for driver software advanced ...

Страница 143: ...CD ROM Setup appears click Exit 12 Select the folder in which the printer driver is included NOTE If you are not sure whether you are using 32 bit Windows Vista or 64 bit Windows Vista see Checking the Processor Version of Windows Vista on p 10 8 If you are using 32 bit Windows Vista Select the folder in the supplied CD ROM English 32bit Win2K_Vista a then click OK b a b ...

Страница 144: ...inter Driver If you are using 64 bit Windows Vista Select the folder in the supplied CD ROM English x64 Driver a then click OK b 13 Click Next Copying files is started NOTE If the Windows Security dialog box appears click Install this driver software anyway a b ...

Страница 145: ...g Up the Printing Environment Installing the Printer Driver 4 14 Click Close The installation of the printer driver is completed You can take the CD ROM out of the CD ROM drive after the installation is completed ...

Страница 146: ...r 2003 NOTE The screenshots used in this section are from Windows XP Professional 1 Make sure that the printer and computer are OFF 2 Connect the B type square end of the USB cable to the USB connector on the printer 3 Connect the A type flat end of the USB cable to the USB port on the computer ...

Страница 147: ...dows XP Server 2003 6 Log on as a user with administrator rights IMPORTANT If you are not sure about the permissions ask your computer administrator 7 Insert the supplied LBP3310 User Software CD ROM into the CD ROM drive If CD ROM Setup appears click Exit If the following screen is displayed Select Install from a list or specific location Advanced a then click Next b a b ...

Страница 148: ...Printing Environment 4 Installing the Printer Driver If the following screen is displayed 1 Select No not this time a then click Next b 2 Select Install from a list or specific location Advanced a then click Next b a b a b ...

Страница 149: ...rocedure 1 Select Search for the best driver in these locations 2 Clear the Search removable media floppy CD ROM check box 3 Select the Include this location in the search check box 4 Click Browse 9 Select the folder in the supplied CD ROM English 32bit Win2K_Vista a a a a then click OK b b b b a b ...

Страница 150: ... Click Next The installation process is displayed NOTE If the Hardware Installation dialog box appears click Continue Anyway 11 Click Finish The installation of the printer driver is completed You can take the CD ROM out of the CD ROM drive after the installation is completed ...

Страница 151: ... the Printer Driver 4 For Windows 2000 1 Make sure that the printer and computer are OFF 2 Connect the B type square end of the USB cable to the USB connector on the printer 3 Connect the A type flat end of the USB cable to the USB port on the computer ...

Страница 152: ...nter Driver 4 Press the side of the power switch to turn the printer ON 5 Turn the computer on and start up Windows 2000 6 Log on as a user with administrator rights IMPORTANT If you are not sure about the permissions ask your computer administrator 7 Click Next ...

Страница 153: ... suitable driver for my device recommended a a a a then click Next b b b b NOTE Unknown may be displayed as the name of the device 9 Perform the following procedure 1 Clear the Floppy disk drives check box and the CD ROM drives check box 2 Select the Specify a location check box 3 Click Next a b ...

Страница 154: ...er 10 Insert the supplied LBP3310 User Software CD ROM into the CD ROM drive and then click Browse If CD ROM Setup appears click Exit 11 Open the folder in the supplied CD ROM English 32bit Win2K_Vista 12 Select CNAB7STK INF a a a a then click Open b b b b 13 Click OK a b ...

Страница 155: ...river 4 14 Click Next Copying files is started NOTE If the Digital Signature Not Found dialog box appears click Yes 15 Click Finish The installation of the printer driver is completed You can take the CD ROM out of the CD ROM drive after the installation is completed ...

Страница 156: ...n and folder for this printer will be created For Windows Vista The icon for the printer is displayed in the Printers folder Canon Printer Uninstaller is added to All Programs under the Start menu If the manuals are installed LBP3310 Online Manuals is created on the desktop and LBP3310 Online Manuals under Canon LBP3310 is added to All Programs under the Start menu ...

Страница 157: ...on for this printer is displayed in the Printers and Faxes folder Canon Printer Uninstaller is added to All Programs under the Start menu If the manuals are installed LBP3310 Online Manuals is created on the desktop and LBP3310 Online Manuals under Canon LBP3310 is added to All Programs under the Start menu ...

Страница 158: ...e icon for the printer is displayed in the Printers folder Canon Printer Uninstaller is added to Programs under the Start menu If the manuals are installed LBP3310 Online Manuals is created on the desktop and LBP3310 Online Manuals under Canon LBP3310 is added to Programs under the Start menu ...

Страница 159: ...rinted on A4 size paper Load A4 size paper The screenshots used in this section are from Windows XP Professional 1 Display the Printers and Faxes folder or the Printers folder From the Start menu select Settings Printers From the Start menu select Printers and Faxes From the Start menu select Control Panel and then click Printers and Other Hardware Printers and Faxes From the Start menu select Con...

Страница 160: ...s by Configuration Page Print 3 Display the Page Setup sheet a a a a then click Display Printer Status Window b b b b NOTE For details on the Printer Status Window see Printer Status Window on p 5 34 4 From the Options menu select Utility Configuration Page Print a b ...

Страница 161: ...Page Print 4 5 Click OK Configuration Page Print is printed IMPORTANT This is a sample of Configuration Page Print The contents may differ from the Configuration Page Print printed by your printer NOTE If Configuration Page Print is not printed properly see Chapter 8 Troubleshooting ...

Страница 162: ...nstalling the printer driver using the supplied CD ROM 2 The term Download Installation indicates downloading the printer driver from the print server to client computers and installing it without using the supplied CD ROM 3 If your print server is Windows 2000 XP Server 2003 Vista 32 bit you cannot download and install the printer driver on 64 bit Windows Vista When using a print server perform a...

Страница 163: ...elect Control Panel and then click Network and Internet Connections Network Connections From the Start menu select Control Panel Network Connections Local Area Connection click Properties and then proceed to Step 3 From the Start menu select Control Panel and then click View network status and tasks Manage network connections 2 Right click the Local Area Connection icon then select Properties from...

Страница 164: ...g Up the Printing Environment 4 Printing from a Network Computer by Sharing the Printer on a Network 3 Make sure that File and Printers Sharing for Microsoft Networks is selected a a a a then click OK b b b b a b ...

Страница 165: ...For Windows 2000 XP Server 2003 Vista 32 bit NOTE For Windows XP the printer cannot be shared on a network at the default settings the settings immediately after the installation Printer sharing settings require running Network Setup Wizard to enable the sharing settings For more details see Windows Help 1 Display the Printers and Faxes folder or the Printers folder From the Start menu select Sett...

Страница 166: ...by Sharing the Printer on a Network 2 Right click the icon for this printer then select Sharing from the pop up menu NOTE If you are using Windows Vista and Change sharing options appears click Change sharing options If the User Account Control dialog box appears click Continue ...

Страница 167: ...ange the share name as needed Select Share this printer Change the share name as needed Select the Share this printer check box Change the share name as needed NOTE You can also specify the sharing settings during the local installation Do not enter blank or special characters for the share name Windows 2000 Windows XP Professional Windows Server 2003 Windows Vista ...

Страница 168: ...e printer sharing settings use the following procedures For an operating system other than Windows Vista Select Do not share this printer Not shared for Windows 2000 in the Sharing sheet For Windows Vista Clear the Share this printer check box in the Sharing sheet If Change sharing options appears click Change sharing options to display the User Account Control dialog box and then click Continue ...

Страница 169: ...ows Vista 64 bit 1 Display the Printers folder From the Start menu select Control Panel and then click Printer 2 Right click the icon for this printer then select Sharing from the pop up menu NOTE If Change sharing options appears click Change sharing options If the User Account Control dialog box appears click Continue ...

Страница 170: ...e Share this printer check box Change the share name as needed NOTE You can also specify the sharing settings during the local installation Do not enter blank or special characters for the share name 4 Perform the following procedure If any clients are using Windows 2000 XP Server 2003 Vista 32 bit Click Additional Drivers ...

Страница 171: ... server See p 4 67 2 Install the new printer driver on the print server See p 4 4 3 Install the additional driver again If no client is using Windows 2000 XP Server 2003 Vista 32 bit Proceed to Step 10 5 Select the x86 check box a a a a then click OK b b b b 6 Insert the supplied LBP3310 User Software CD ROM into the CD ROM drive and then click Browse If CD ROM Setup appears click Exit 7 Open the ...

Страница 172: ...the Printer on a Network 8 Select CNAB7STK INF a a a a then click Open b b b b 9 Click OK Copying files is started You can take the CD ROM out of the CD ROM drive after copying files is completed NOTE If the Windows Security dialog box appears click Install this driver software anyway a b ...

Страница 173: ... box and then click Continue Installation on Clients There are two ways to install the printer driver on client computers local installation and download installation Local Installation See p 4 47 You install the printer driver using the supplied CD ROM Download Installation You install the printer driver without using the supplied CD ROM but by downloading the printer driver from the print server...

Страница 174: ...re CD ROM into the CD ROM drive If the CD ROM is already in the drive eject the disk and re insert it into the drive IMPORTANT If you are using Windows Vista and the AutoPlay dialog box appears click Run AUTORUN EXE If CD ROM Setup does not appear display it using the following procedures The CD ROM drive name is indicated as D in this manual The CD ROM drive name may differ depending on the compu...

Страница 175: ...lick Easy Installation or Custom Installation If you want to install the printer driver and the manuals Easy Installation If you want to install only the printer driver Custom Installation 5 Click Install If you selected Custom Installation in Step 4 clear the Online Manuals check box a and then click Install b a b ...

Страница 176: ...he Printing Environment 4 Printing from a Network Computer by Sharing the Printer on a Network 6 Confirm the contents then click Yes 7 Click Next 8 Select Manually Set Port to Install a a a a then click Next b b b b a b ...

Страница 177: ...ent Printing from a Network Computer by Sharing the Printer on a Network 4 9 Click Add Port 10 Select Network a a a a then click OK b b b b 11 Select the icon for the shared printer in the print server a a a a then click OK b b b b a b a b ...

Страница 178: ... Select whether or not to use this printer as the default printer a a a a then click Next b b b b 13 Click Start If you are using Windows Vista the following screen appears Click Yes Select No only if you do not use a LAN cable to connect the printer to a computer on which the printer driver is being installed a b ...

Страница 179: ... using Windows Vista the Printers dialog box appears Click Install driver If Easy Installation was selected in Step 4 the manuals are also installed at a time NOTE Depending on the system environment the installation may take a long time 15 Confirm the installation results then click Next NOTE If the printer driver is not installed properly see Installation Problems on p 8 37 ...

Страница 180: ...Folder The procedure for installing the printer driver from the Printers and Faxes folder or the Printers folder varies depending on your operating system See the following according to your operating system For Windows Vista See p 4 53 For Windows XP Server 2003 See p 4 59 For Windows 2000 See p 4 62 For Windows Vista 1 Turn the computer on and start up Windows Vista 2 Log on to Windows Vista NOT...

Страница 181: ...ter by Sharing the Printer on a Network 4 3 Display the Printers folder From the Start menu select Control Panel and then click Printer 4 Click Add a printer 5 Click Add a network wireless or Bluetooth printer Searching for the printer on the network starts automatically ...

Страница 182: ...the Printing Environment 4 Printing from a Network Computer by Sharing the Printer on a Network 6 Click The printer that I want isn t listed 7 Select Select a shared printer by name a a a a then click Next b b b b a b ...

Страница 183: ...Select the printer on the print server a a a a then click Select b b b b NOTE When specifying the path to the network using directly specify it as the print sever name the computer name of the print server the printer name 9 Click Install driver NOTE If the User Account Control dialog box appears click Continue a b ...

Страница 184: ...another printer driver has already been installed in the computer Set as the default printer appears If you want to specify the printer as the default printer select the Set as the default printer check box 11 If you want to print a test page click Print a test page A confirmation dialog box appears Click Close to close the dialog box ...

Страница 185: ...4 58 Setting Up the Printing Environment Printing from a Network Computer by Sharing the Printer on a Network 4 12 Click Finish The installation of the printer driver is completed ...

Страница 186: ...TE A user without administrator rights can also install the printer driver 3 Display the Printers and Faxes folder From the Start menu select Printers and Faxes From the Start menu select Control Panel and then click Printers and Other Hardware Printers and Faxes 4 Display Add Printer Wizard Click Add a printer Double click Add Printer Windows XP Professional Windows Server 2003 Windows XP Home Ed...

Страница 187: ...p the Printing Environment Printing from a Network Computer by Sharing the Printer on a Network 4 5 Click Next 6 Select A network printer or a printer attached to another computer a a a a then click Next b b b b a b ...

Страница 188: ...lect this option and click Next a a a a then click Next b b b b 8 Select the printer on the print server a a a a then click Next b b b b NOTE If the Connect to Printer dialog box appears follow the directions in the message When specifying the path to the network using directly specify it as the print sever name the computer name of the print server the printer name a b a b ...

Страница 189: ...n appears select whether or not to use this printer as the default printer a and then click Next b 10 Click Finish The installation of the printer driver is completed For Windows 2000 1 Turn the computer on and start up Windows 2000 2 Log on to Windows 2000 NOTE A user without administrator rights can also install the printer driver a b ...

Страница 190: ...Printing from a Network Computer by Sharing the Printer on a Network 3 Display the Printers folder From the Start menu select Settings Printers 4 Double click Add Printer 5 Click Next 6 Select Network printer a a a a then click Next b b b b a b ...

Страница 191: ...Type the printer name or click Next to browse for a printer a a a a then click Next b b b b 8 Select the printer on the print server a a a a then click Next b b b b NOTE When specifying the path to the network using directly specify it as the print sever name the computer name of the print server the printer name a b a b ...

Страница 192: ... 4 Printing from a Network Computer by Sharing the Printer on a Network 9 Select whether or not to use this printer as the default printer a a a a then click Next b b b b 10 Click Finish The installation of the printer driver is completed a b ...

Страница 193: ...with administrator rights during the installation 3 Display Windows Explorer From the Start menu select Programs Accessories Windows Explorer From the Start menu select All Programs Accessories Windows Explorer 4 Select the print server from My Network Places from Network for Windows Vista then double click the icon for this printer Alternatively you can drag and drop the icon for the printer into...

Страница 194: ...lso uninstalls the installed manuals If you are using 64 bit Windows Vista the installed manuals are not uninstalled by uninstalling the printer driver For details on uninstalling the manuals see Uninstalling the Manuals on p 5 32 If you are not sure whether you are using 32 bit Windows Vista or 64 bit Windows Vista see Checking the Processor Version of Windows Vista on p 10 8 1 Close all of the f...

Страница 195: ... box Select the name of this printer a then click Delete b If this printer is not on the list in the Delete Printer dialog box Click Delete 4 Click Yes If the printer is used as a shared printer the following screen appears Confirm the contents of the message and then click Yes if you want to uninstall the printer driver Uninstallation starts Please wait a moment a b ...

Страница 196: ...Printers and Faxes From the Start menu select Control Panel and then click Printer 7 Make sure that the icon for this printer is not displayed in the Printers and Faxes folder or Printers folder IMPORTANT If the icon for this printer is displayed be sure to delete it Unless you delete the icon you cannot install the printer driver again To delete the icon for this printer right click it and then s...

Страница 197: ...4 70 Setting Up the Printing Environment Uninstalling the Printer Driver 4 8 Restart Windows NOTE If you could not uninstall the printer driver see If Uninstallation Fails on p 8 42 ...

Страница 198: ...ng a Print Job Using the Printer Status Window 5 22 Canceling a Print Job Using the Cancel Job Key 5 23 How to Use Help 5 24 Manuals 5 29 Installing the Manuals 5 29 Uninstalling the Manuals 5 32 Printer Status Window 5 34 Functions on the Printer Status Window 5 34 Displaying the Printer Status Window 5 35 Preferences Users Dialog Box 5 36 Preferences Administrators Dialog Box 5 36 Utility Menu 5...

Страница 199: ...as an example NOTE For details on the procedures for installing the printer driver see Installing the Printer Driver on p 4 4 The printing procedure may differ depending on the application you are using 1 Load paper in the paper cassette or multi purpose tray NOTE For details on the procedure for loading paper see Chapter 3 Paper Loading and Output Tray 2 Open the PDF file to be printed using Adob...

Страница 200: ...the name of this printer for Name or Printer Name a a a a and then specify the printing preferences b b b b NOTE The printer name displayed in this dialog box can be changed in the Printers and Faxes folder the Printers folder for Windows 2000 Vista 5 Click Properties a b ...

Страница 201: ...he size of the loaded paper in Output Size as needed Leave the setting at Match Page Size if the page size specified for Page Size and the size of the paper loaded in the paper source are the same because there is no need to change the setting in this case IMPORTANT The print will be automatically reduced or enlarged to fit on the page when the settings for Page Size and Output Size are different ...

Страница 202: ...dialog box using the following procedure 1 Click Display Printer Status Window in locations such as in the Page Setup sheet 2 From the Options menu select Device Settings Cassette Settings 9 Display the Paper Source sheet a a a a then select Paper Source b b b b NOTE If Paper Selection is set to a setting other than Same Paper for All Pages the setting for Paper Source is changed as follows Specif...

Страница 203: ...d select Plain Paper L 2 When printing Index Card or envelopes the printer automatically applies the appropriate print mode to each type by specifying Output Size in the Page Setup sheet Paper Type Setting for Paper Type in the Printer Driver Plain Paper 60 89 g m2 Plain Paper L 1 Plain Paper Heavy Paper 90 120 g m2 Heavy Paper 1 121 149 g m2 Heavy Paper 2 150 163 g m2 Heavy Paper 3 Transparency T...

Страница 204: ... settings that are specified here apply only to jobs to be printed from the same application Exiting the application resets the changed settings to the default settings For details on the procedure for changing the default values for printing preferences see Changing the Default Values for Printing Preferences on p 5 8 13 Click OK The printer starts printing NOTE If you have any problems with prin...

Страница 205: ...ues for printing preferences which apply to all jobs using the following procedure 1 Display the Printers and Faxes folder or the Printers folder From the Start menu select Settings Printers From the Start menu select Printers and Faxes From the Start menu select Control Panel and then click Printers and Other Hardware Printers and Faxes From the Start menu select Control Panel and then click Prin...

Страница 206: ...or displaying Help see How to Use Help on p 5 24 4 Confirm the settings then click OK The Printers and Faxes folder or the Printers folder reappears The default values for printing preferences are now changed NOTE Chapter 6 Using the Various Printing Functions describes how to use the various functions of the printer and printer driver By specifying the settings for the printer and printer driver ...

Страница 207: ... before performing automatic 2 sided printing NOTE In cases such as where the last page for the 2 sided printing is 1 sided printing specifying the following setting allows you to print faster than normal 2 sided printing 1 Click Finishing Details in the Finishing sheet 2 Click Advanced Settings in the Finishing Details dialog box 3 Select the Print Last Page in 1 sided Mode when 2 sided Printing ...

Страница 208: ...he paper size for automatic 2 sided printing For A4 size draw the paper size switch lever toward you For Letter or Legal size push the paper size switch lever into the printer IMPORTANT When performing automatic 2 sided printing be sure to confirm the paper size switch lever is set to the appropriate position If the lever is not set to the appropriate position this may result in misfeeds or paper ...

Страница 209: ...it gently and firmly 5 Select Print from the File menu in the application The Print dialog box is displayed NOTE Printing procedures vary depending on the application you are using For details on the printing procedures see the instruction manual supplied with the application 6 Select the name of this printer then click Properties or Preferences ...

Страница 210: ...elect the size of the loaded paper in Output Size as needed Leave the setting at Match Page Size if the page size and the size of the paper loaded in the paper source are the same because there is no need to change the setting in this case IMPORTANT The print will be automatically reduced or enlarged to fit on the page when the settings for Page Size and Output Size are different a b ...

Страница 211: ...Print Style b b b b 10 Display the Paper Source sheet a a a a then select Paper Source b b b b NOTE If Paper Selection is set to a setting other than Same Paper for All Pages the setting for Paper Source is changed as follows Specify the same setting as for Paper Source First Page Second Page Other Pages Last Page a b a b ...

Страница 212: ...ording to the paper type as follows If paper curls excessively when printed with Plain Paper selected select Plain Paper L 12 Confirm the settings then click OK The Print dialog box reappears Paper Type Setting for Paper Type in the Printer Driver Plain Paper 60 89 g m2 Plain Paper L Plain Paper Heavy Paper 90 120 g m2 Heavy Paper 1 ...

Страница 213: ...multi purpose tray load paper whose other side is previously printed NOTE For details on the procedure for loading paper see Paper Loading Orientation on p 3 49 2 Select Print from the File menu in the application The Print dialog box is displayed NOTE Printing procedures vary depending on the application you are using For details on the printing procedures see the instruction manual supplied with...

Страница 214: ...ct the size of the loaded paper in Output Size as needed Leave the setting at Match Page Size if the page size and the size of the paper loaded in the multi purpose tray are the same because there is no need to change the setting in this case IMPORTANT The print will be automatically reduced or enlarged to fit on the page when the settings for Page Size and Output Size are different a b ...

Страница 215: ...5 18 Basic Usage of the Printer 5 2 sided Printing 6 Display the Paper Source sheet a a a a then select Multi purpose Tray in Paper Source b b b b 7 Select the type of the loaded paper in Paper Type a b ...

Страница 216: ... automatically applies the appropriate print mode to Index Card by specifying Output Size in the Page Setup sheet 8 Confirm the settings then click OK The Print dialog box reappears 9 Click OK or Print The printer starts printing Paper Type Setting for Paper Type in the Printer Driver Plain Paper 60 89 g m2 Plain Paper L 1 Plain Paper Heavy Paper 90 120 g m2 Heavy Paper 1 121 149 g m2 Heavy Paper ...

Страница 217: ...ork board is installed you can also cancel a print job from the Remote UI the software that allows you to manage the printer using a web browser For details on the procedure for canceling a print job using the Remote UI see Chapter 3 Various Functions of the Remote UI in Remote UI Guide Canceling a Print Job Using the Print Queue 1 Display the Printer Status Window For details on methods for displ...

Страница 218: ...her Hardware Printers and Faxes From the Start menu select Control Panel and then click Printer 2 Double click the icon for this printer For details on the print queue see Windows Help 3 Right click the job that you want to cancel then select Cancel from the pop up menu NOTE Another user s job is not displayed However all the jobs are displayed on the print server if the printer is shared on a net...

Страница 219: ...y the Printer Status Window For details on methods for displaying the Printer Status Window see Displaying the Printer Status Window on p 5 35 2 Clicking Cancel Job cancels the print job NOTE While another user s job is being printed you cannot cancel the job However you can cancel the print job from the print server if the printer is shared on a network ...

Страница 220: ...ng the key and the job cancel process starts after you release the key The Cancel Job indicator orange blinks while a job is in the cancellation process IMPORTANT You cannot cancel the following pages or jobs Pages of which data has been received already Jobs of which print copy is one sheet of paper If the job when the key is pressed and the job when the key is released are different both the job...

Страница 221: ... Use Help For details on using the printer driver or the Printer Status Window see the instructions in Help by displaying it using the following procedure 1 Click Help When displaying Help from the Printer Status Window select Help Topics from the Help menu ...

Страница 222: ...Contents See p 5 25 Displaying the option you would like information on with Index See p 5 26 Retrieving a word or phrase included in Help and displaying the option you would like information on See p 5 27 Displaying the option you would like information on with Contents Click Contents a then click the title of the option you would like information on b a b ...

Страница 223: ...How to Use Help Displaying the option you would like information on with Index 1 Click Index a then enter a keyword for the option you would like information on b 2 Double click the title of the option you would like information on a b ...

Страница 224: ...w to Use Help Retrieving a word or phrase included in Help and displaying the option you would like information on 1 Click Search a then enter a word or phrase related to the option you would like information on b 2 Click List Topics a b ...

Страница 225: ...5 28 Basic Usage of the Printer 5 How to Use Help 3 Double click the title of the desired topic in the displayed list ...

Страница 226: ...t it into the drive IMPORTANT If you are using Windows Vista and the AutoPlay dialog box appears click Run AUTORUN EXE If CD ROM Setup does not appear display it using the following procedures The CD ROM drive name is indicated as D in this manual The CD ROM drive name may differ depending on the computer you are using If you are using an operating system other than Windows Vista select Run from t...

Страница 227: ...ge of the Printer 5 Manuals 2 Click Custom Installation 3 Clear the Printer Driver check box a a a a then click Install b b b b 4 Confirm the contents then click Yes Installation of the instruction manuals starts a b ...

Страница 228: ...5 31 Basic Usage of the Printer 5 Manuals 5 When the installation completion screen appears click Next 6 Click Exit The installation of the manuals is completed ...

Страница 229: ...ser without administrator rights cannot uninstall the manuals Be sure to log on as a user with administrator rights before the uninstallation If you are not sure about the permissions ask your computer administrator NOTE If you are not sure whether you are using 32 bit Windows Vista or 64 bit Windows Vista see Checking the Processor Version of Windows Vista on p 10 8 Procedures for displaying the ...

Страница 230: ...f you are using Windows Vista and the Destination Folder Access Denied dialog box appears click Continue If the User Account Control dialog box appears click Continue For Windows Vista 64 bit The manuals are not uninstalled by uninstalling the printer driver If you want to uninstall the manuals delete the following files and folders Program Files x86 Canon LBP3310 Manuals folder Desktop LBP3310 On...

Страница 231: ...e and document name about the current print job Functions on the Printer Status Window For more details on operations of the Printer Status Window see Help For details on methods for displaying Help see How to Use Help on p 5 24 Menu Bar Job Menu You can cancel a job or resume a job which is paused during printing for some reason Options Menu Allows you to change the preferences for the Printer St...

Страница 232: ...d color changes from blue normal to orange when user action is required or to red when a warning is issued Print Queue Button Displays the print queue a function of Windows For details on the print queue see Windows Help Refresh Button Obtains the printer status and refreshes the Printer Status Window display Resolve Error Button You can resume a job when it is paused during printing for some reas...

Страница 233: ...ces Users from the Options menu to display the Preferences Users dialog box Specify the display settings for the Printer Status Window in the Preferences Users dialog box For more details see Help For details on methods for displaying Help see How to Use Help on p 5 24 Preferences Administrators Dialog Box Select Preferences Administrators from the Options menu to display the Preferences Administr...

Страница 234: ...ttings Menu The Device Settings menu in the Options menu allows you to specify the settings related to the printer such as specifying the size of the paper loaded in the paper cassette as well as specifying the network settings Cassette Settings Specifies the size of the paper loaded in the paper cassette For details see Step 6 and subsequent steps of Loading Paper in the Paper Cassette on p 3 17 ...

Страница 235: ...t by clicking Refresh in the Printer Status Window Resolve Error You can resume a job which is paused during printing for some reason by selecting Resolve Error from the Job menu However the job resumed by selecting Resolve Error may cause unexpected print results Resolve Error is disabled in any of the following cases When the job is paused due to a printer error such as a paper jam and paper out...

Страница 236: ...r if the printer is shared on a network You can obtain the same result by clicking Cancel Job in the Printer Status Window Print Queue Selecting Print Queue from the Job menu displays the print queue a function of Windows In the print queue you can perform operations such as a job checking and job canceling For details on the print queue see Windows Help You can obtain the same result by clicking ...

Страница 237: ...5 40 Basic Usage of the Printer 5 Printer Status Window ...

Страница 238: ...with Scaling 6 22 Printing with Automatic Scaling 6 22 Printing with Arbitrary Scaling 6 23 Poster Printing 6 25 Watermark Printing 6 27 Watermark Printing 6 27 Editing Watermarks 6 29 Printing Borders and Printing Date 6 31 Booklet Printing 6 33 Printing with a Gutter 6 35 Selecting the Paper Output Method 6 37 Printing with Upper Left of Sheet as Starting Point 6 39 Printing with the Data Rotate...

Страница 239: ...arious Printing Functions 6 6 Using the Various Printing Functions Using Profiles 6 53 Selecting a Profile 6 53 Adding a Profile 6 55 Editing a Profile 6 56 Deleting a Profile 6 57 Editing Jobs with PageComposer 6 59 ...

Страница 240: ...variety of ways as follows Printing Multiple Pages on One Sheet See p 6 19 Multiple pages can be printed on one sheet of paper Printing with Scaling See p 6 22 Specify this option when A4 size data is reduced in size and printed on B5 size paper or B5 size data is enlarged and printed on A4 size paper You can specify an arbitrary scaling 1 2 3 4 5 6 7 8 1 2 3 4 5 6 7 8 ...

Страница 241: ...int it out on multiple sheets of paper You can make one large poster by joining these printouts together Watermark Printing See p 6 27 You can superimpose watermarks such as COPY and DRAFT over the documents created by an application Printing Borders and Printing Date See p 6 31 You can print with borders printing date and or page numbers etc 13 June 2007 USER 01 1 ...

Страница 242: ...folding printouts in half For example when making a booklet of 8 pages 2 sheets are used in total because 2 pages are printed on each side of paper A booklet can also be made by specifying the number of sheets to be folded in half and binding the printouts if you want to perform booklet printing of a large amount of pages Printing with a Gutter See p 6 35 You can specify a gutter for paper to be p...

Страница 243: ...ntouts Printouts of a complete job are collated For example if you are printing three copies of a three page document printouts of a complete job are collated arranged in this page order 1 2 3 1 2 3 1 2 3 Print with Upper Left of Sheet as Starting Point See p 6 39 Since printing is usually performed with the upper left 5 mm margin 10 mm for envelopes and Index Card as the starting point a certain ...

Страница 244: ...and Index Card that can be fed only in specific orientations Selecting Paper for Each Page See p 6 43 You can select paper for each page such as for printing the front cover on a different type of paper Smoothing Out Rough Textured Images See p 6 45 Specify this option when printing with this kind of low resolution image data being smoothed out Printing with Toner Density Adjusted See p 6 47 You c...

Страница 245: ... 6 Utilizing a Variety of Options for Printing Printing with Brightness and Contrast Adjusted See p 6 49 You can print with the brightness and contrast adjusted Printing a Grayscale Sample See p 6 51 You can print an adjusted grayscale sample ...

Страница 246: ...y of Options for Printing Editing Jobs with PageComposer See p 6 59 You can combine two jobs into one as well as change the job settings for the combined job You can edit jobs of different applications You can also preview the job 1 1 1 2 1 2 2 2 Job A Job B Job ...

Страница 247: ...ecurity sheets in the printer driver are displayed by Windows For details on these sheets see Windows Help Page Setup Sheet See p 6 11 Finishing Sheet See p 6 12 Paper Source Sheet See p 6 13 Quality Sheet See p 6 14 Displaying from an application Page Setup Sheet See p 6 11 Finishing Sheet See p 6 12 Paper Source Sheet See p 6 13 Quality Sheet See p 6 14 Displaying from the printer icon If select...

Страница 248: ... the Printer Driver Page Setup Sheet NOTE For more details on the settings see Help For details on methods for displaying Help see How to Use Help on p 5 24 indicates the reference page for the setting procedure p 6 19 p 6 25 p 6 23 p 6 17 p 6 27 p 6 29 p 6 31 p ...

Страница 249: ...rinter Driver Finishing Sheet NOTE For more details on the settings see Help For details on methods for displaying Help see How to Use Help on p 5 24 p 6 33 p 6 35 p 5 10 p 6 33 p 6 35 p 6 17 p 6 37 p 6 39 p 6 41 indicates the reference page for the setting procedure p ...

Страница 250: ...Various Sheets in the Printer Driver Paper Source Sheet NOTE For more details on the settings see Help For details on methods for displaying Help see How to Use Help on p 5 24 p 6 43 p 6 17 indicates the reference page for the setting procedure p ...

Страница 251: ...Sheets in the Printer Driver Quality Sheet NOTE For more details on the settings see Help For details on methods for displaying Help see How to Use Help on p 5 24 p 6 51 p 6 45 p 6 47 p 6 49 p 6 49 indicates the reference page for the setting procedure p ...

Страница 252: ... the Various Printing Functions 6 Various Sheets in the Printer Driver Device Settings Sheet NOTE For more details on the settings see Help For details on methods for displaying Help see How to Use Help on p 5 24 ...

Страница 253: ...sing the Various Printing Functions 6 Various Sheets in the Printer Driver Profile Sheet NOTE For more details on the settings see Help For details on methods for displaying Help see How to Use Help on p 5 24 ...

Страница 254: ...on on the upper left on Preview or is selected the specifiable options vary When is selected You can specify the following settings according to the clicked position on Preview Binding Location Left click an edge of the document image Page Layout Repeatedly left click within the document image or right click on Preview The use of the icon on the lower right on Preview is as follows Icon Use By cli...

Страница 255: ...paper cassette Finishing Right click on Preview Also if you have selected any one of the following in Paper Selection you can specify the paper source for each page Different for First Others and Last Different for First Second Others and Last Different for Cover and Others If you want to switch the paper source automatically according to the size or type of paper to be printed left click Auto on ...

Страница 256: ...ettings sheet is set to Auto before printing See Confirming the Setting for Spooling at Host on p 10 9 1 Select Print from the File menu in the application The Print dialog box is displayed NOTE Printing procedures vary depending on the application you are using For details on the printing procedures see the instruction manual supplied with the application 2 Select the name of this printer then cl...

Страница 257: ...Setup sheet a a a a then select the number of the pages to be printed on one sheet from Page Layout b b b b The number of pages that can be selected is 1 2 4 6 8 9 or 16 Pages per Sheet 4 If you selected 2 4 6 8 9 or 16 Pages per Sheet in Step 3 Page Order appears Specify how the pages are aligned a b ...

Страница 258: ...e Pages on One Sheet NOTE The options under Page Order differ depending on the paper orientation or the number of pages to be printed on one sheet 5 Confirm the settings then click OK The Print dialog box reappears 6 Click OK or Print The printer starts printing ...

Страница 259: ...omatic Scaling 1 Select Print from the File menu in the application The Print dialog box is displayed NOTE Printing procedures vary depending on the application you are using For details on the printing procedures see the instruction manual supplied with the application 2 Select the name of this printer then click Properties or Preferences 3 Display the Page Setup sheet a a a a then select Page Si...

Страница 260: ...nt The printer starts printing Printing with Arbitrary Scaling 1 Select Print from the File menu in the application The Print dialog box is displayed NOTE Printing procedures vary depending on the application you are using For details on the printing procedures see the instruction manual supplied with the application 2 Select the name of this printer then click Properties or Preferences 3 Display ...

Страница 261: ...ing Functions 6 Printing with Scaling 5 Select the Manual Scaling check box then specify the value in the spin box 6 Confirm the settings then click OK The Print dialog box reappears 7 Click OK or Print The printer starts printing ...

Страница 262: ...pooling at Host in the Device Settings sheet is set to Auto before printing See Confirming the Setting for Spooling at Host on p 10 9 1 Select Print from the File menu in the application The Print dialog box is displayed NOTE Printing procedures vary depending on the application you are using For details on the printing procedures see the instruction manual supplied with the application 2 Select t...

Страница 263: ...play the Page Setup sheet a a a a then select Poster N x N N 2 3 4 from Page Layout b b b b A layout image of the printed paper appears on Preview 4 Confirm the settings then click OK The Print dialog box reappears 5 Click OK or Print The printer starts printing a b ...

Страница 264: ...oling at Host in the Device Settings sheet is set to Auto before printing or editing See Confirming the Setting for Spooling at Host on p 10 9 Watermark Printing 1 Select Print from the File menu in the application The Print dialog box is displayed NOTE Printing procedures vary depending on the application you are using For details on the printing procedures see the instruction manual supplied wit...

Страница 265: ...cedure a Display the Page Setup sheet b Select the Watermark check box c Select the character string to print as a watermark from the list on the right side of Watermark 4 Confirm the settings then click OK The Print dialog box reappears 5 Click OK or Print The printer starts printing a b c ...

Страница 266: ...ous Printing Functions 6 Watermark Printing Editing Watermarks 1 Perform the following procedure a Display the Page Setup sheet b Select the Watermark check box c Click Edit Watermark 2 Specify the options as needed a b c ...

Страница 267: ...more details on the settings see Help For details on methods for displaying Help see How to Use Help on p 5 24 When adding a new watermark click Add You cannot change the settings for the default watermarks 3 Confirm the settings then click OK The Page Setup sheet reappears ...

Страница 268: ... printing See Confirming the Setting for Spooling at Host on p 10 9 1 Select Print from the File menu in the application The Print dialog box is displayed NOTE Printing procedures vary depending on the application you are using For details on the printing procedures see the instruction manual supplied with the application 2 Select the name of this printer then click Properties or Preferences 3 Dis...

Страница 269: ...options as needed NOTE For more details on the settings see Help For details on methods for displaying Help see How to Use Help on p 5 24 5 Confirm the settings then click OK The Page Setup sheet reappears 6 Click OK The Print dialog box reappears 7 Click OK or Print The printer starts printing ...

Страница 270: ... of the printer is set to the appropriate position If the lever is not set to the appropriate position this may result in misfeeds or paper jams For details on the procedure for setting the paper size switch lever see Automatic 2 sided Printing on p 5 10 Make sure that Spooling at Host in the Device Settings sheet is set to Auto before printing See Confirming the Setting for Spooling at Host on p ...

Страница 271: ...ng for Print Style c Click Booklet 4 Specify the options as needed NOTE For more details on the settings see Help For details on methods for displaying Help see How to Use Help on p 5 24 5 Confirm the settings then click OK The Finishing sheet reappears 6 Click OK The Print dialog box reappears 7 Click OK or Print The printer starts printing a b c ...

Страница 272: ...the image size to fit the remaining space 1 Select Print from the File menu in the application The Print dialog box is displayed NOTE Printing procedures vary depending on the application you are using For details on the printing procedures see the instruction manual supplied with the application 2 Select the name of this printer then click Properties or Preferences 3 Perform the following procedu...

Страница 273: ...s as needed NOTE For more details on the settings see Help For details on methods for displaying Help see How to Use Help on p 5 24 5 Confirm the settings then click OK The Finishing sheet reappears 6 Click OK The Print dialog box reappears 7 Click OK or Print The printer starts printing ...

Страница 274: ...ge order 1 1 1 2 2 2 3 3 3 Collate Printouts of a complete job are collated For example if you are printing three copies of a three page document printouts of a complete job are collated arranged in this page order 1 2 3 1 2 3 1 2 3 1 Select Print from the File menu in the application The Print dialog box is displayed NOTE Printing procedures vary depending on the application you are using For det...

Страница 275: ...6 Selecting the Paper Output Method 3 Display the Finishing sheet a a a a then select the output method in Finishing b b b b 4 Confirm the settings then click OK The Print dialog box reappears 5 Click OK or Print The printer starts printing a b ...

Страница 276: ... by printing with the upper left 0 mm margin as the starting point IMPORTANT The edges of the printout may be partly missing depending on the property of the document to be printed The function of Print with Upper Left of Sheet as Starting Point may be disabled depending on the application you are using 1 Select Print from the File menu in the application The Print dialog box is displayed NOTE Pri...

Страница 277: ...isplay the Finishing sheet a a a a then click Finishing Details b b b b 4 Select the Print with Upper Left of Sheet as Starting Point check box a a a a then click OK b b b b The Finishing sheet reappears 5 Click OK The Print dialog box reappears 6 Click OK or Print The printer starts printing a b a b ...

Страница 278: ...can be fed only in specific orientations 1 Select Print from the File menu in the application The Print dialog box is displayed NOTE Printing procedures vary depending on the application you are using For details on the printing procedures see the instruction manual supplied with the application 2 Select the name of this printer then click Properties or Preferences 3 Display the Finishing sheet a ...

Страница 279: ...inting with the Data Rotated 180 Degrees 4 Select the Rotate Print Data 180 Degrees check box a a a a then click OK b b b b The Finishing sheet reappears 5 Click OK The Print dialog box reappears 6 Click OK or Print The printer starts printing a b ...

Страница 280: ... See Confirming the Setting for Spooling at Host on p 10 9 1 Select Print from the File menu in the application The Print dialog box is displayed NOTE Printing procedures vary depending on the application you are using For details on the printing procedures see the instruction manual supplied with the application 2 Select the name of this printer then click Properties or Preferences 3 Display the ...

Страница 281: ...ge IMPORTANT Different for Cover and Others can be selected only if Print Style in the Finishing sheet is set to Booklet Printing 4 Specify the paper source 5 Confirm the settings then click OK The Print dialog box reappears 6 Click OK or Print The printer starts printing ...

Страница 282: ...d You can smooth out this kind of low resolution image data 1 Select Print from the File menu in the application The Print dialog box is displayed NOTE Printing procedures vary depending on the application you are using For details on the printing procedures see the instruction manual supplied with the application 2 Select the name of this printer then click Properties or Preferences 3 Display the...

Страница 283: ...ons 6 Smoothing Out Rough Textured Images 4 Select the Enable Image Correction check box a a a a then click OK b b b b The Quality sheet reappears 5 Click OK The Print dialog box reappears 6 Click OK or Print The printer starts printing a b ...

Страница 284: ...rom the File menu in the application The Print dialog box is displayed NOTE Printing procedures vary depending on the application you are using For details on the printing procedures see the instruction manual supplied with the application 2 Select the name of this printer then click Properties or Preferences 3 Display the Quality sheet a a a a then click Details b b b b a b ...

Страница 285: ...ner density by dragging the Toner Density slider horizontally Move the slider to the right to make it darker and to the left to make it lighter 5 Confirm the settings then click OK The Quality sheet reappears 6 Click OK The Print dialog box reappears 7 Click OK or Print The printer starts printing ...

Страница 286: ... in the application The Print dialog box is displayed NOTE Printing procedures vary depending on the application you are using For details on the printing procedures see the instruction manual supplied with the application 2 Select the name of this printer then click Properties or Preferences 3 Perform the following procedure a Display the Quality sheet b Select the Manual Grayscale Settings check...

Страница 287: ... to the right to make it lighter and to the left to make it darker Move the Contrast slider to the right to make it higher and to the left to make it lower 5 Confirm the settings then click OK The Quality sheet reappears 6 Click OK The Print dialog box reappears 7 Click OK or Print The printer starts printing You can print a sample with the brightness and contrast adjusted For more details see Pri...

Страница 288: ...ing directions IMPORTANT Make sure that Spooling at Host in the Device Settings sheet is set to Auto before printing See Confirming the Setting for Spooling at Host on p 10 9 1 Select Print from the File menu in the application The Print dialog box is displayed NOTE Printing procedures vary depending on the application you are using For details on the printing procedures see the instruction manual...

Страница 289: ... the Print Grayscale Sample check box b b b b IMPORTANT When printing a grayscale sample be sure to set Page Layout in the Page Setup sheet to 1 Page per Sheet 4 Click OK The Print dialog box reappears 5 Click OK or Print The grayscale sample is printed IMPORTANT When you are finished with printing grayscale samples clear the Print Grayscale Sample check box a b ...

Страница 290: ...NOTE Up to 50 Profiles for each user account can be added If the printer name has been changed any added Profiles cannot be used To use the added Profiles change the printer name to its previous one Selecting a Profile 1 Select Print from the File menu in the application The Print dialog box is displayed NOTE Printing procedures vary depending on the application you are using For details on the pr...

Страница 291: ...6 54 Using the Various Printing Functions 6 Using Profiles 3 Select the desired Profile from the Profile list 4 Click OK The Print dialog box reappears 5 Click OK or Print The printer starts printing ...

Страница 292: ... Source and Quality sheets specify the printer settings that you want to add 2 Click Add Profile 3 Enter the name of the Profile in Name Icon allows you to select the icon for the Profile Enter any comments in Comment as needed NOTE You can enter up to 31 characters for Name and up to 255 characters for Comment ...

Страница 293: ...eeded 1 Click View Settings 2 When OK is clicked the Add Profile dialog box reappears 5 Click OK The Properties dialog box reappears Make sure that the name of the added Profile is in Profile Editing a Profile You can change information about an added Profile or export a Profile as a file 1 Click Edit Profile ...

Страница 294: ...nformation about the Profiles NOTE For more details on the settings see Help For details on methods for displaying Help see How to Use Help on p 5 24 3 Click OK The Properties dialog box reappears Deleting a Profile You can delete an added Profile 1 Click Edit Profile ...

Страница 295: ...ect the custom Profile that you want to delete a a a a and click Delete b b b b IMPORTANT You can delete only custom Profiles You cannot delete the default Profiles Also you cannot delete the Profile currently selected in each sheet 3 Click OK The Properties dialog box reappears a b ...

Страница 296: ...ing at Host in the Device Settings sheet is set to Auto before printing See Confirming the Setting for Spooling at Host on p 10 9 1 Select Print from the File menu in the application The Print dialog box is displayed NOTE Printing procedures vary depending on the application you are using For details on the printing procedures see the instruction manual supplied with the application 2 Select the n...

Страница 297: ...unctions 6 Editing Jobs with PageComposer 4 Click OK 5 Specify the printing preferences in each sheet then click OK The Print dialog box reappears 6 Click OK or Print The list of jobs are displayed in the Canon PageComposer dialog box ...

Страница 298: ... the setting procedures for the Canon PageComposer dialog box see Help for Canon PageComposer If the Edit and Preview mode is selected and Lock is set as the default values for printing preferences the Canon PageComposer dialog box appears each time you print For details on the procedure for changing the default values for printing preferences see Changing the Default Values for Printing Preferenc...

Страница 299: ...6 62 Using the Various Printing Functions 6 Editing Jobs with PageComposer ...

Страница 300: ... the Toner Cartridge 7 2 Precautions on Replacing the Toner Cartridge 7 3 Before Replacing the Toner Cartridge 7 3 Replacing the Toner Cartridge 7 8 Precautions for Handling the Toner Cartridge 7 15 Storing the Toner Cartridge 7 17 Cleaning the Fixing Roller 7 18 Cleaning the Outside of the Printer 7 21 Moving the Printer 7 24 Handling the Printer 7 30 ...

Страница 301: ...r NOTE The lifetime of the toner cartridges Canon Genuine Cartridges designed for this printer is approximately 3 000 pages or 7 000 pages The page counts are on the basis of ISO IEC 19752 when printing A4 size paper with the default print density setting The level of toner consumption varies depending on the type of documents printed If your average document contains a lot of diagrams charts or g...

Страница 302: ... IMPORTANT Dispose of the packing materials according to local regulations Be sure to use only the toner cartridges exclusively designed for this printer NOTE For details on handling the toner cartridge see Precautions for Handling the Toner Cartridge on p 7 15 The packing materials may be changed in form or placement or may be added or removed without notice Before Replacing the Toner Cartridge T...

Страница 303: ...utine Maintenance 7 Replacing the Toner Cartridge 1 If you are using the multi purpose tray close it 2 Open the front cover While pressing the open button on the top of the front cover a open it gently b b a ...

Страница 304: ... 7 Replacing the Toner Cartridge 3 Remove the toner cartridge from the printer IMPORTANT Do not touch the high voltage contact A or the electrical contacts B shown in the figure as this may result in damage to the printer A B ...

Страница 305: ...te the toner inside the cartridge Be careful not to spill the toner IMPORTANT If toner is not distributed evenly this may result in deterioration in print quality Be sure to shake the toner cartridge gently If you do not shake the cartridge gently toner may spill out 5 Hold the toner cartridge properly with the arrowed side facing up as shown in the figure ...

Страница 306: ...sh the toner cartridge into the printer firmly until it touches the back of the printer while aligning A on both sides of the toner cartridge with the toner cartridge guides inside the printer 7 Close the front cover Close the front cover gently and firmly A Side View Left Side View Right ...

Страница 307: ...nt cover forcefully this may result in damage to the printer Do not leave the front cover open for a long time after installing the toner cartridge This may result in deterioration in print quality If the print is too thin even after performing the procedure above replace the toner cartridge with a new one Replacing the Toner Cartridge 1 If you are using the multi purpose tray close it ...

Страница 308: ... Routine Maintenance 7 Replacing the Toner Cartridge 2 Open the front cover While pressing the open button on the top of the front cover a open it gently b 3 Remove the toner cartridge from the printer b a ...

Страница 309: ...tridge out of the box 5 Take the toner cartridge out of the protective bag There is a notch near the arrow on the protective bag so you can tear it open However if you cannot tear it open use scissors to open the protective bag so as not to damage the toner cartridge IMPORTANT Keep the protective bag for the toner cartridge You will need it when you take out the toner cartridge for printer mainten...

Страница 310: ...or 6 times to evenly distribute the toner inside the cartridge IMPORTANT If toner is not distributed evenly this may result in deterioration in print quality Do not skip this step Be sure to shake the toner cartridge gently If you do not shake the cartridge gently toner may spill out 7 Place the toner cartridge on a flat surface ...

Страница 311: ...ealing tape is pulled out forcefully or stopped at midpoint toner may spill out If the toner gets into your eyes or mouth wash them immediately with cold water and immediately consult a physician IMPORTANT Do not pull the sealing tape diagonally upwards or downwards If the tape is severed this may become difficult to pull out completely Pull out the sealing tape completely from the toner cartridge...

Страница 312: ...rtridge When pulling out the sealing tape be careful not to touch the toner cartridge memory A or not to hold the drum protective shutter B with your hands 9 Hold the toner cartridge properly with the arrowed side facing up as shown in the figure A B ...

Страница 313: ...ush the toner cartridge into the printer firmly until it touches the back of the printer while aligning A on both sides of the toner cartridge with the toner cartridge guides inside the printer 11 Close the front cover Close the front cover gently and firmly A Side View Left Side View Right ...

Страница 314: ...into open flames as this may cause the toner remaining inside the cartridge to ignite resulting in burns or a fire CAUTION Take care not to allow the toner to come into contact with your hands or clothing as this will dirty your hands or clothing If your hands or clothing become stained with toner wash them immediately with cold water Washing them with warm water may fix the toner and make it not ...

Страница 315: ... an environment that exposes it to sudden changes in temperature and or humidity If you move the toner cartridge to a location that is warmer or has higher humidity leave the cartridge in the new location for 2 hours or longer without opening the protective bag to allow it to adjust to the new temperature Be sure to use a new toner cartridge before the expiration date indicated on the package Keep...

Страница 316: ...e in a place exposed to direct sunlight Do not store the cartridge in a hot or humid place or a place where the temperature and humidity can change significantly Storage temperature range 0 to 35 C 32 to 95 F Storage humidity range 35 to 85 RH no condensation Do not store the toner cartridge in a place where corrosive gases such as ammonia are generated or where a considerable amount of salt is co...

Страница 317: ...ation can be prevented by cleaning the fixing roller IMPORTANT The cleaning page cannot be printed on any paper other than A4 Be sure to use A4 size paper 1 Load A4 size paper in the multi purpose tray or paper cassette 2 Display the Printer Status Window For details on methods for displaying the Printer Status Window see Displaying the Printer Status Window on p 5 35 3 From the Options menu selec...

Страница 318: ...enance 7 Cleaning the Fixing Roller 4 Click OK The cleaning page is printed 5 If any paper is loaded in the multi purpose tray remove it 6 Load the cleaning page in the multi purpose tray with the printed side facing up ...

Страница 319: ...ning the Fixing Roller The paper is fed into the printer slowly and the printer starts cleaning the fixing roller NOTE Cleaning takes approximately 80 seconds The cleaning process cannot be canceled Please wait until it is completed ...

Страница 320: ...nd then unplug the power plug Failure to observe these steps may result in a fire or electrical shock Do not use alcohol benzene paint thinner or other flammable substances If flammable substances come into contact with electrical parts inside the printer this may result in a fire or electrical shock IMPORTANT Do not use a cleaning agent other than water or a mild detergent diluted with water as t...

Страница 321: ... connected turn the computer off b and then disconnect the USB cable from the printer c Disconnect the power plug from the AC power outlet d 2 Firmly wring a soft cloth dampened with water or a mild detergent diluted with water and wipe off the dirt If you use a mild detergent for cleaning be sure to wipe away the detergent with a soft cloth dampened with water b c d a ...

Страница 322: ...Cleaning the Outside of the Printer 3 After wiping off the dirt wipe the printer with a dry cloth 4 When the printer is completely dry plug the power plug into the AC power outlet 5 Connect the USB cable to the printer as needed ...

Страница 323: ...cassette may drop resulting in personal injury IMPORTANT Make sure that the front cover and multi purpose tray are closed before carrying the printer NOTE For details on the installation site see Installation Site on p 2 3 1 Turn the printer OFF then disconnect the cables from the printer Turn the printer OFF a If a USB cable is connected turn the computer off b and then disconnect the USB cable f...

Страница 324: ...nd then disconnect all the interface cables from the printer before moving the printer Otherwise the power cord or interface cables may be damaged resulting in a fire or electrical shock 2 Remove the power cord from the printer 3 If a LAN cable is connected disconnect it from the network board 4 Pull out the paper cassette ...

Страница 325: ...m the front side securely hold the printer by the lift handles on the lower portion of the printer with both hands CAUTION This printer weighs approximately 11 kg without the paper cassette installed Please be careful not to hurt your back or other portions of your body when carrying the printer ...

Страница 326: ...tion or any portions other than the lift handles If you do so you may drop the printer resulting in personal injury The rear portion A of the printer is relatively heavy Be careful not to become off balance when lifting the printer If you do so you may drop the printer resulting in personal injury A ...

Страница 327: ...ew installation site before carrying the printer to the site For details on the procedure for installing the paper feeder see Paper Feeder on p 9 2 6 Put the printer down carefully at the new installation site CAUTION Put the printer down slowly and carefully Be careful not to hurt your hands 7 Set the paper cassette in the printer Push the paper cassette into the printer firmly until the front si...

Страница 328: ... cable to the printer as needed Transporting the Printer When transporting the printer for such situations as relocating remove the toner cartridge from the printer and securely pack the printer and the parts in the original box along with the original packing materials in order to prevent them from being damaged while being transported If the original box and packing materials are not available f...

Страница 329: ...y Instructions See p xviii Do not place any objects other than printing paper on the printer trays or covers This may result in damage to the printer Do not leave any covers open longer than required Exposing the printer to direct sunlight or strong light may result in deterioration in print quality Avoid shaking the printer This may result in poor print quality or damage to the printer Do not ope...

Страница 330: ... printer to cool down sufficiently before covering the printer If you do not plan to use the printer for a long period of time unplug the power plug from the AC power outlet Do not use or store the printer in a room where chemicals are used The face down output tray and its surroundings become hot during or immediately after using the printer Do not touch the face down output tray and its surround...

Страница 331: ...7 32 Routine Maintenance 7 Handling the Printer ...

Страница 332: ...ror Appears 8 26 The Alarm Indicator Is Blinking 8 29 Print Quality Problems 8 30 Paper Problems 8 36 Installation Problems 8 37 Problems with Local Installation 8 38 Installation Problems When the Printer Is Shared on a Network 8 39 Printing a Test Page 8 41 If Uninstallation Fails 8 42 Uninstalling the USB Class Driver 8 45 When Data Is Not Sent to the Printer 8 48 If the Printer and Computer Ar...

Страница 333: ...ed on the Printer Status Window to remedy an error See Printer Status Window on p 5 34 The power cord is not connected The printer is OFF See Turning the Printer ON OFF on p 2 33 The Load Paper Indicator is blinking See Loading Paper in the Paper Cassette on p 3 17 See Loading Paper in the Multi purpose Tray on p 3 31 The printer is installed in an adverse environment See Installation Site on p 2 ...

Страница 334: ...n the Printer Status Window Precautions on Clearing Paper Jams WARNING There are some areas inside the printer which are subject to high voltages When removing jammed paper or when inspecting the inside of the printer do not allow necklaces bracelets or other metal objects to touch the inside of the printer as this may result in burns or electrical shock ...

Страница 335: ...g them with warm water may fix the toner and make it not possible to remove the toner stains When removing paper jammed inside the printer remove the jammed paper gently to prevent the toner on the paper from dispersing and getting into your eyes or mouth If the toner gets into your eyes or mouth wash them immediately with cold water and immediately consult a physician When removing jammed paper t...

Страница 336: ...damage to the printer Do not touch the transfer roller C as this may result in deterioration in print quality The face down output tray and its surroundings become hot during or immediately after using the printer Do not touch the face down output tray and its surroundings when removing the jammed paper or performing the related operation A B C ...

Страница 337: ...he operation described in the step is required Paper Jam Area Paper Jam Area Mark Message Multi purpose tray Multi purpose Tray Inside the front cover Inside the front cover Output area Inside the output area Duplex print transport area Duplex Unit Cassette 1 Cassette 2 Cassettes A B C D E Paper Feeder Unit Optional Cassette 1 Cassette 2 Paper flow for 1 sided printing Paper flow for 2 sided print...

Страница 338: ...thout opening the front cover In this case open and close the front cover once NOTE The illustrations of the printer on the left of each step indicate paper jam areas where the operation described in the step is required 1 Remove any paper jammed in the multi purpose tray IMPORTANT If the jammed paper cannot be removed easily do not try to remove it forcefully but proceed to Step 2 A B C D E ...

Страница 339: ...8 8 Troubleshooting 8 Paper Jams 2 If you are using the multi purpose tray close it 3 Open the output selection cover A B C D E A B C D E ...

Страница 340: ...ng 8 Paper Jams 4 Press down the green pressure release levers on both sides of the fixing unit Even if you can see the paper here do not remove it but proceed to Step 5 5 Pull out the paper cassette A B C D E A B C D E ...

Страница 341: ...is installed pull out the paper cassette of the paper feeder also Even if you can see the paper here do not remove it but proceed to Step 6 6 Open the front cover While pressing the open button on the top of the front cover a open it gently b A B C D E b a ...

Страница 342: ...dling the Toner Cartridge on p 7 15 8 If you see the top of the paper jammed inside the front cover pull out the paper in the direction of the arrow to remove it Remove the jammed paper gently to prevent unfixed toner from spilling IMPORTANT If you pull the jammed paper obliquely upward unfixed toner may spill When removing the jammed paper pull it as horizontally as possible Dirt inside the print...

Страница 343: ... then tilt it toward you Raise the transport guide by holding the green tab then tilt it toward you CAUTION Do not take your hands off the transport guide The transport guide may snap back to its original position and this may result in personal injury A B C D E ...

Страница 344: ...nfixed toner from spilling If you can see the rear edge of the jammed paper Remove the paper by pulling it in the direction of the arrow If you cannot see either edge of the jammed paper Pull out the rear edge of the paper a then remove the paper by pulling it in the direction of the arrow b A B C D E a b ...

Страница 345: ...med paper cannot be removed easily do not try to remove it forcefully but proceed to Step 11 11 Move the transport guide back to its original position slowly CAUTION Do not take your hands off the transport guide until it moves back to its original position The transport guide may snap back to its original position and this may result in personal injury A B C D E ...

Страница 346: ...r Jams 12 Remove any jammed paper by pulling it in the direction of the arrow If the top edge of the paper is output If you cannot see either edge of the jammed paper If you can see only the top edge of the jammed paper A B C D E ...

Страница 347: ...8 16 Troubleshooting 8 Paper Jams 13 Move the green pressure release levers of the fixing unit back to their original positions 14 Close the output selection cover A B C D E A B C D E ...

Страница 348: ...g the opening at the center of the duplex unit cover open it gently 16 Remove any jammed paper by pulling it in the direction of the arrow IMPORTANT If the jammed paper cannot be removed easily do not try to remove it forcefully but proceed to Step 17 A B C D E A B C D E ...

Страница 349: ...ing 8 Paper Jams 17 Close the duplex unit cover Holding the opening at the center of the duplex unit cover close it gently and firmly 18 Close the front cover Close the front cover gently and firmly A B C D E A B C D E ...

Страница 350: ...8 19 Troubleshooting 8 Paper Jams 19 Remove any jammed paper while pushing it down slightly In case of the printer unit In case of the paper feeder A B C D E ...

Страница 351: ... not touch the feed rollers A in the printer unit and paper feeder This may result in damage to the printer or a printer error 20 Open the duplex print transport guide Holding the green tab push the duplex print transport guide downward A A B C D E ...

Страница 352: ...duplex print transport guide Holding the green tab close both sides of the duplex print transport guide securely IMPORTANT Be sure to check if the duplex print transport guide is closed completely If the duplex print transport guide is not closed completely this may result in misfeeds or paper jams A B C D E A B C D E ...

Страница 353: ...e into the printer firmly until the front side of the paper cassette is flush with the front surface of the printer If the paper feeder is installed set the paper cassette of the paper feeder also CAUTION When setting the paper cassette in the printer be careful not to catch your fingers A B C D E ...

Страница 354: ...e open button on the top of the front cover a open it gently b 25 Install the toner cartridge 1 Take the toner cartridge out of the protective bag or thick cloth 2 Hold the toner cartridge properly with the arrowed side facing up as shown in the figure A B C D E b a A B C D E ...

Страница 355: ...6 Close the front cover Close the front cover gently and firmly IMPORTANT If you cannot close the front cover make sure that the toner cartridge is installed properly If you try to close the front cover forcefully this may result in damage to the printer Do not leave the front cover open for a long time after installing the toner cartridge This may result in deterioration in print quality A Side V...

Страница 356: ...nking If a problem occurs in the printer the Alarm indicator orange comes on or blinks Take the following measures according to the state of the Alarm indicator On The Alarm Indicator Is On a Service Error Appears See p 8 26 Blinking The Alarm Indicator Is Blinking See p 8 29 On Blinking ...

Страница 357: ...ing properly the Alarm indicator orange comes on and the following service error appears in the Printer Status Window If the service error appears cycle the power of the printer using the following procedure This may clear the message NOTE For details on methods for displaying the Printer Status Window see Displaying the Printer Status Window on p 5 35 On ...

Страница 358: ...nter OFF wait for 10 seconds or longer and then turn it ON again If the message does not reappear the printer can be used as normal If the error message still appears proceed to Step 2 2 Note down the error code displayed in the Printer Status Window ON OFF After 10 seconds ...

Страница 359: ...n the printer OFF a If a USB cable is connected turn the computer off b and then disconnect the USB cable from the printer c Disconnect the power plug from the AC power outlet d 4 Contact your local authorized Canon dealer When contacting your Canon dealer please report the problems and the error code that you have noted b c d a ...

Страница 360: ...ter requires attention the Alarm indicator orange blinks and the following error message appears in the Printer Status Window If an error message appears follow the directions displayed in the Printer Status Window NOTE For details on methods for displaying the Printer Status Window see Displaying the Printer Status Window on p 5 35 Blinking ...

Страница 361: ...r shake it gently 5 or 6 times to evenly distribute the toner and then reinstall the toner cartridge If this does not solve the problem replace the toner cartridge with a new one See Replacing the Toner Cartridge on p 7 2 Cause 2 The drum in the toner cartridge has deteriorated Remedy Replace the toner cartridge with a new one See Replacing the Toner Cartridge on p 7 2 Printed pages have white spe...

Страница 362: ... slider toward Light Cause 2 The printer is exposed to direct sunlight or strong light Remedy Move the printer to a place where it will not be exposed to direct sunlight or strong light Alternatively move the strong light source away from the printer The print is uneven Cause 1 The toner cartridge is almost out of toner Remedy Take the toner cartridge out of the printer shake it gently 5 or 6 time...

Страница 363: ... factor according to the paper size to be used Cause 2 The position of the paper is incorrect Remedy Load the paper properly See Loading Paper in the Paper Cassette on p 3 17 Loading Paper in the Multi purpose Tray on p 3 31 Cause 3 A document with no margins was printed Remedy 1 Data cannot be printed within 5 mm margins 10 mm for envelopes and Index Card on all sides of the paper Ensure margins ...

Страница 364: ...emedy Take the toner cartridge out of the printer pull out the sealing tape and reinstall the toner cartridge See Replacing the Toner Cartridge on p 7 2 Cause 2 Multiple sheets of paper were fed at a time Remedy Align the paper stack properly and load it again If you are using transparencies or labels fan them thoroughly and load them again See Loading Paper in the Paper Cassette on p 3 17 Loading...

Страница 365: ...ong period of time Remedy Perform the following procedure in the printer driver 1 Display the Finishing sheet 2 Click Finishing Details then click Advanced Settings in the Finishing Details dialog box 3 Set Special Print Adjustment B to Mode 1 If the problem is not solved by specifying Mode 1 specify Mode 2 If the problem is not solved by specifying Mode 2 specify Mode 3 Cause 2 Depending on the p...

Страница 366: ...medy Perform the following procedure in the printer driver 1 Display the Paper Source sheet 2 Set Paper Type to the appropriate value Cause 3 A problem has occurred inside the printer Remedy 1 If Service Error is displayed in the Printer Status Window turn the printer OFF wait for 10 seconds or longer and then turn it ON again This may clear the message Remedy 2 If the message does not disappear e...

Страница 367: ...ackage See Paper Requirements on p 3 2 Cause 2 Appropriate paper is not being used Remedy Replace the paper with that which can be used with this printer See Paper Requirements on p 3 2 Cause 3 The paper is too thin Remedy Perform the following procedure in the printer driver 1 Display the Paper Source sheet 2 Set Paper Type to Plain Paper L Cause 4 Paper that curls easily is output to the face do...

Страница 368: ...2 Uninstall the USB class driver See Uninstalling the USB Class Driver on p 8 45 Uninstall the printer driver with Uninstaller See Uninstalling the Printer Driver on p 4 67 Uninstall the printer driver with Uninstaller See Uninstalling the Printer Driver on p 4 67 Uninstall the printer driver with Uninstaller See Uninstalling the Printer Driver on p 4 67 Delete Canon LBP3310 from Add or Remove Pro...

Страница 369: ...he USB cable again 4 Turn the printer ON Cause 2 The printer is not turned ON Remedy Turn the printer ON Cause 3 The USB cable is not connected properly Remedy Make sure that the printer and computer are connected with the USB cable properly Cause 4 An inappropriate USB cable is being used Remedy Use a USB cable appropriate for the USB interface of this printer The USB interface is USB 2 0 Hi Spee...

Страница 370: ...discovery is not set to On Remedy Perform the following procedure 1 From the Start menu select Control Panel 2 Click View network status and tasks 3 Set Network discovery to On The shared printer cannot be accessed Cause 1 The user of the computer to be used has not been registered or the password has not been specified yet Remedy Register the user registration of the computer to be used or specif...

Страница 371: ...rinter driver by performing either of the following procedures and following the instructions on the screen Double clicking the icon for this printer Dragging and dropping the icon for this printer into the Printers and Faxes folder or Printers folder Remedy 2 If you want to install the printer driver from the Printers and Faxes folder or the Printers folder and specify the network path using dire...

Страница 372: ... select Settings Printers From the Start menu select Printers and Faxes From the Start menu select Control Panel and then click Printers and Other Hardware Printers and Faxes From the Start menu select Control Panel and then click Printer 3 Right click the icon for this printer then select Properties from the pop up menu 4 Click Print Test Page in the General sheet When the test page is printed Pr...

Страница 373: ...and then double click Add Remove Programs From the Start menu select Control Panel and then click Add or Remove Programs From the Start menu select Control Panel Add or Remove Programs From the Start menu select Control Panel and then click Uninstall a program 2 Perform the following procedure Select Canon LBP3310 a then click Change Remove b Select Canon LBP3310 a then click Uninstall Change b Wi...

Страница 374: ...the printer driver again If you are using Windows Vista and the User Account Control dialog box appears click Continue 3 Perform the following procedure If this printer is on the list in the Delete Printer dialog box Select the name of this printer a then click Delete b If this printer is not on the list in the Delete Printer dialog box Click Delete 4 Click Yes a b ...

Страница 375: ...Faxes folder or the Printers folder From the Start menu select Settings Printers From the Start menu select Printers and Faxes From the Start menu select Control Panel and then click Printers and Other Hardware Printers and Faxes From the Start menu select Control Panel and then click Printer 7 Make sure that the icon for this printer is not displayed in the Printers and Faxes folder or Printers f...

Страница 376: ...einstalling it If you cannot uninstall the printer driver 1 Make sure that the computer is connected to the printer with the USB cable and that the printer is ON 2 Perform the following procedure From the Start menu select Settings Control Panel and then double click Add Remove Programs From the Start menu select Control Panel and then click Add or Remove Programs From the Start menu select Contro...

Страница 377: ... Manager 1 From the Start menu select Control Panel 2 Click Performance and Maintenance System 3 Click Hardware Device Manager 1 From the Start menu select Control Panel System 2 Click Hardware Device Manager 1 From the Start menu select Control Panel 2 Click Hardware and Sound View hardware and devices NOTE If you are using Windows Vista and the User Account Control dialog box appears click Conti...

Страница 378: ...own device then uninstall it Do not uninstall any drivers for other devices If you uninstall them by mistake Windows may not operate properly If the USB class driver is not installed properly USB Printing Support is not displayed 7 Click OK 8 Click Device Manager closes 9 Disconnect the USB cable from the computer then restart Windows After Windows restarts reinstall the printer driver See Install...

Страница 379: ...dy Turn the printer ON See Turning the Printer ON on p 2 33 Cause 2 The power plug is unplugged from the AC power outlet Remedy Plug the power plug into the AC power outlet Cause 3 The printer is plugged to an extension cord or multiple power strip Remedy Plug the power plug of the printer directly into an AC power outlet on the wall Cause 4 The breakers have tripped Remedy Reset the breakers on t...

Страница 380: ...ble with the following symbol The port to be used has a problem Cause The port to be used is not selected properly Remedy Perform the following procedure 1 Display the Printers and Faxes folder or the Printers folder From the Start menu select Settings Printers From the Start menu select Printers and Faxes From the Start menu select Control Panel and then click Printers and Other Hardware Printers...

Страница 381: ...ctional communication is not enabled Remedy Perform the following procedure 1 Enable bi directional communication 2 Restart the computer 3 Restart the printer Turn OFF the printer once wait for 10 seconds or longer and then turn it ON NOTE Specify the setting for bi directional communication using the following procedure 1 Display the Printers and Faxes folder or the Printers folder From the Start...

Страница 382: ...er outlet Remedy Plug the power plug into the AC power outlet Cause 3 The printer is plugged to an extension cord or multiple power strip Remedy Plug the power plug of the printer directly into an AC power outlet on the wall Cause 4 The breakers have tripped Remedy Reset the breakers on the switch board Cause 5 There is a break in the power cord Remedy Replace the power cord with a similar type us...

Страница 383: ... runs on 64 bit Windows Vista and the additional driver alternate driver is not updated properly Remedy If you want to update the additional driver alternate driver perform the following procedure 1 Uninstall the printer driver used in the print server See p 4 67 2 Install the new printer driver on the print server See p 4 4 3 See Print Server Settings p 4 36 and install the additional driver agai...

Страница 384: ...8 53 Troubleshooting 8 When Data Is Not Sent to the Printer Cause 2 The network path to the print server was changed Remedy Ask your network administrator about the problem ...

Страница 385: ...s after finishing a job Cause The printer cools down the fixing unit so that the print quality is maintained Especially after paper with a narrower width is printed Remedy Please wait a moment The printer cools down the fixing unit automatically When the printer finished cooling down the fixing unit the printer begins printing CD ROM Setup does not appear automatically Windows Vista only Cause CD ...

Страница 386: ...res If you want to print paper of the size specified for B Printing from the paper cassette Load the appropriate paper then specify the appropriate paper size for C Printing from the multi purpose tray Load the appropriate paper If you want to print the currently loaded paper Click Resolve Error in the Printer Status Window A The Size of theLoaded Paper B Output Size 1 C Register Paper Sizes 2 Pri...

Страница 387: ...ter installing and connecting the printer for example when you want to check the operation NOTE Configuration Page Print is designed to be printed on A4 size paper Load A4 size paper For details on Network Status Print that allows you to check the version of the optional network board as well as the TCP IP settings see Chapter 4 Troubleshooting in Network Guide 1 Display the Printer Status Window ...

Страница 388: ...rming the Printer Features 3 Click OK 4 Confirm the contents of the Configuration Page Print IMPORTANT This is a sample of Configuration Page Print The contents may differ from the Configuration Page Print printed by your printer ...

Страница 389: ...8 58 Troubleshooting 8 Confirming the Printer Features ...

Страница 390: ...der 9 2 Moving the Printer 9 3 Removing the Packing Materials and Installing the Paper Feeder 9 7 Specifying the Status of the Paper Feeder 9 11 Removing the Paper Feeder 9 13 Network Board 9 15 Parts and Their Functions 9 18 Installing the Network Board 9 19 Setting the Network Board 9 24 Resetting the Network Board 9 27 Removing the Network Board 9 31 ...

Страница 391: ...d from the printer before installing the paper feeder Otherwise the power cord or interface cables may be damaged resulting in a fire or electrical shock IMPORTANT Do not touch the connector A in the paper feeder This may result in damage to the printer or misfeeds If you are printing from Cassette 2 make sure that Cassette 1 is set before printing If you print from Cassette 2 when Cassette 1 is n...

Страница 392: ...inter and computer OFF unplug the power plug and then disconnect all the interface cables from the printer before moving the printer Otherwise the power cord or interface cables may be damaged resulting in a fire or electrical shock CAUTION Do not carry the printer with the paper cassette attached If you do so the paper cassette may drop resulting in personal injury 1 Turn the printer OFF then dis...

Страница 393: ...9 4 Installing the Optional Accessories 9 Paper Feeder 2 Remove the power cord from the printer 3 If a LAN cable is connected disconnect it from the network board 4 Pull out the paper cassette ...

Страница 394: ...e From the front side securely hold the printer by the lift handles on the lower portion of the printer with both hands CAUTION This printer weighs approximately 11 kg without the paper cassette installed Please be careful not to hurt your back or other portions of your body when carrying the printer ...

Страница 395: ...r portion or any portions other than the lift handles If you do so you may drop the printer resulting in personal injury The rear portion A of the printer is relatively heavy Be careful not to become off balance when lifting the printer If you do so you may drop the printer resulting in personal injury A ...

Страница 396: ...p resulting in personal injury Do not carry the printer with the paper feeder installed If you do so the paper feeder may drop resulting in personal injury IMPORTANT If there are any packing materials remaining inside the paper feeder this may result in misfeeds or damage to the printer when operating the printer Be sure to remove all the packing materials following the procedure The removed packi...

Страница 397: ...9 8 Installing the Optional Accessories 9 Paper Feeder 1 Pull out the paper cassette 2 Remove the tape that is securing the packing material in the paper cassette 2 locations ...

Страница 398: ...cessories 9 Paper Feeder 3 Remove the packing material in the paper cassette 4 Place the paper feeder at the installation site When carrying the paper feeder hold the lift handles on both sides with both hands as shown in the figure ...

Страница 399: ...liable to sink such as a carpet or mat 5 Gently place the printer on the paper feeder so that each surface of the printer is flush with the front or side surfaces of the paper feeder Also match the positioning pins A and connector B when placing the printer IMPORTANT If the printer cannot be placed on the paper feeder properly lift the printer once hold it horizontally and place it again If you tr...

Страница 400: ...r the first time after installing the paper feeder Specifying the Status of the Paper Feeder Specify the status of the paper feeder after installing it using the following procedure 1 Display the Printers and Faxes folder or the Printers folder From the Start menu select Settings Printers From the Start menu select Printers and Faxes From the Start menu select Control Panel and then click Printers...

Страница 401: ... Properties from the pop up menu 3 Display the Device Settings sheet a a a a then click Get Device Status b b b b The status of the paper feeder is obtained automatically NOTE If you cannot obtain the status of the paper feeder automatically select the 250 Sheet Cassette check box in Paper Source Options a b ...

Страница 402: ...er Otherwise the power cord or interface cables may be damaged resulting in a fire or electrical shock CAUTION Do not carry the printer with the paper cassette attached If you do so the paper cassette may drop resulting in personal injury Do not carry the printer with the paper feeder installed If you do so the paper feeder may drop resulting in personal injury IMPORTANT When moving or servicing t...

Страница 403: ...cable is connected disconnect it from the network board 6 Pull out the paper cassettes from the printer and paper feeder 7 Lift the printer unit and remove it from the paper feeder 8 Move the paper feeder 9 Move back the printer to the installation site 10 Set the paper cassette in the printer 11 Connect the LAN cable to the network board as needed 12 Connect the power cord to the printer 13 Plug ...

Страница 404: ...ional Accessories Network Board Install the network board in the expansion slot located on the rear of the printer Depending on the network board a CD ROM may be supplied with it Network board NB C2 Screws 2 pieces ERR LNK 100 Guide booklet ...

Страница 405: ...wer plug and then disconnect all the interface cables and power cord from the printer before installing the network board If a USB cable is connected turn the computer off and then remove the USB cable If you attempt to install the network board when the printer is ON or when any cables are connected to the printer this may result in an electrical shock Be careful when handling the network board T...

Страница 406: ... the network board to hold it Keep the protective bag Dot not discard it The firmware versions of the network board compatible with this printer are as follows If the firmware version is not 1 30 or later the printer may not operate properly Make sure that the version is 1 30 or later after installing the network board and the printer driver If the version is not 1 30 or later update the firmware ...

Страница 407: ...een Comes on if the network board is connected to the network by 100BASE TX Does not come on when connected by 10BASE T d d d d LNK Indicator Green Comes on if the network board is connected to the network properly e e e e ERR Indicator Orange Comes on or blinks if the network board is not working properly f f f f MAC Address Required when setting the IP address using the ARP PING command This may...

Страница 408: ...iver ready in advance that matches the size of the screws 1 Turn the printer OFF then disconnect the cables from the printer Turn the printer OFF a If a USB cable is connected turn the computer off b and then disconnect the USB cable from the printer c Disconnect the power plug from the AC power outlet d 2 Remove the power cord from the printer If there is insufficient space to install the network...

Страница 409: ...e the printer do not plug the power plug into the AC power outlet and contact your local authorized Canon dealer Be sure not to misplace the removed protective plate and screws You will need them after you remove the network board 4 Insert the network board into the expansion slot in the orientation shown in the figure Hold the metal panel portions of the network board and insert the board straigh...

Страница 410: ...e network board securely so that there is no space between the expansion slot and the panel portion of the network board Keep the protective bag for the network board You will need it after you remove the network board 5 Secure the top and bottom portions of the network board with the two screws supplied with the network board There is space There is no space ...

Страница 411: ...nnect the LAN cable to the LAN connector of the network board NOTE This network board does not come with a LAN cable or a hub Have cables or a hub ready as needed Use a Category 5 twisted pair cable for the LAN 7 Connect the other end of the LAN cable to the hub ...

Страница 412: ... sure that the LNK indicator green on the network board is on If the network board is connected by 10BASE T the board is working properly when the LNK indicator is on If the network board is connected by 100BASE TX the board is working properly when the LNK indicator and 100 indicator are on A ERR Indicator B LNK Indicator C 100 Indicator If the network board is not working properly Turn the print...

Страница 413: ...board is set at Auto detect Usually you do not need to change the setting since the transmission speed and transfer mode of 10BASE T 100BASE TX are detected automatically If the printer cannot communicate with other devices on the network you can specify the transmission speed and transfer mode by setting the DIP switches using the following procedure Set the DIP switches according to the transmis...

Страница 414: ...nect the power plug from the AC power outlet 4 Remove the power cord from the printer 5 Disconnect the LAN cable from the network board 6 Remove the two screws and remove the network board Communication speed and Transmission mode of LAN 10BASE T Half duplex ON OFF ON OFF ON OFF ON OFF ON OFF Auto detect default setting 10BASE T Full duplex 100BASE TX Half duplex 100BASE TX Full duplex DIP switch ...

Страница 415: ...he tip of a ball point pen For details on methods for setting the DIP switches see the table of p 9 25 IMPORTANT When setting the DIP switches be careful not to damage the main board with a small tool such as the tip of a ball point pen Do not use a sharp object such as a mechanical pencil 8 Insert the network board into the expansion slot Hold the metal panel portions of the network board and ins...

Страница 416: ...to the printer as needed Resetting the Network Board If you want to reset the network board to the default values use any one of the following methods For details see Network Guide Remote UI FTP Client NetSpot Device Installer Even if none of the above methods work you can reset the settings for the network board by setting the DIP switches using the following procedure NOTE A Phillips screwdriver...

Страница 417: ...parts printed circuits or connectors with your hands Do not drop screws paper clips staples or other metal objects inside the printer If any of these objects should drop inside the printer do not plug the power plug into the AC power outlet and contact your local authorized Canon dealer 7 Switch the DIP switch 1 to ON Set the DIP switches with a small tool such as the tip of a ball point pen IMPOR...

Страница 418: ...twork board parts printed circuits or connectors with your hands Insert the network board securely 9 Secure the top and bottom portions of the network board with the two screws supplied with the network board 10 Connect the power cord to the printer 11 Plug the power plug into the AC power outlet 12 Turn the printer ON then wait until the Ready indicator comes on 13 Turn the printer OFF 14 Disconn...

Страница 419: ...of these objects should drop inside the printer do not plug the power plug into the AC power outlet and contact your local authorized Canon dealer When setting the DIP switches be careful not to damage the main board with a small tool such as the tip of a ball point pen Do not use a sharp object such as a mechanical pencil 17 Install the network board 18 Connect the LAN cable to the network board ...

Страница 420: ... Touching the edges or any sharp parts of the network board may result in personal injury 1 Turn the printer OFF 2 If a USB cable is connected turn the computer off and then disconnect the USB cable from the printer 3 Disconnect the power plug from the AC power outlet 4 Remove the power cord from the printer 5 Disconnect the LAN cable from the network board 6 Remove the two screws and remove the n...

Страница 421: ...ies 9 Network Board 7 Attach the protective plate to the expansion slot and secure it with the screws 8 Connect the power cord to the printer 9 Plug the power plug into the AC power outlet 10 Connect the USB cable to the printer as needed ...

Страница 422: ...Specifications 10 2 Hardware Specifications 10 2 Software Specifications 10 4 Dimensions of Each Part 10 5 NetSpot Device Installer 10 7 Checking the Processor Version of Windows Vista 10 8 Confirming the Setting for Spooling at Host 10 9 Index 10 11 Location of the Serial Number 10 15 ...

Страница 423: ...onditions such as the toner cartridge you are using availability of the optional accessories and installation environment First print time When printing A4 outputting face down Approx 6 5 seconds or less May vary depending on the toner cartridge you are using or output environment Paper size Cassette 1 Standard sizes A4 B5 A5 Legal Letter Executive 16K Custom paper sizes Width 148 0 to 215 9 mm Le...

Страница 424: ... 45 Full duplex Half duplex User interface 5 LED indicators 1 Operation key Power supply 110 127 V 10 50 60 Hz 2 Hz 220 240 V 10 50 60 Hz 2 Hz Power consumption at temperature of 20 C 68 F 110 127 V Average during operation approx 372 W Average during standby approx 4 W Maximum 890 W or less 220 240 V Average during operation approx 392 W Average during standby approx 4 W Maximum 950 W or less Con...

Страница 425: ...P Including the cassette approx 3 5 kg Printing software CAPT Canon Advanced Printing Technology Printable area Data cannot be printed within 5 0 mm margins on all sides of the paper 10 mm for envelopes and Index Card If you print a document with no margins specify the following setting 1 Click Finishing Details in the Finishing sheet 2 Select the Print with Upper Left of Sheet as Starting Point c...

Страница 426: ... installed mm 385 60 130 100 378 6 94 3 399 7 258 150 Front Surface Output selection cover Paper cassette Front cover Tray extension Auxiliary tray Multi purpose tray mm 385 60 130 100 378 6 94 3 399 7 346 8 150 Front Surface Output selection cover Paper cassette Front cover Tray extension Auxiliary tray Multi purpose tray ...

Страница 427: ...10 6 Dimensions of Each Part 10 Appendix Paper Feeder Unit PF 35P 117 4 116 6 399 7 421 1 mm Front Surface ...

Страница 428: ...nter driver NetSpot Device Installer is software that allows you to easily initialize the settings of printers connected to the network For more details on NetSpot Device Installer see Network Guide NOTE When the printer driver is installed from CD ROM Setup the initial settings for the network are performed automatically Use NetSpot Device Installer as needed if you want to reset the IP address m...

Страница 429: ...ng 32 bit Windows Vista or 64 bit Windows Vista you can check that using the following procedure 1 From the Start menu select Control Panel 2 Click System and Maintenance System 3 Check the processor version of Windows Vista in System type For 32 bit Windows Vista 32 bit Operating System appears For 64 bit Windows Vista 64 bit Operating System appears ...

Страница 430: ...folder or the Printers folder From the Start menu select Settings Printers From the Start menu select Printers and Faxes From the Start menu select Control Panel and then click Printers and Other Hardware Printers and Faxes From the Start menu select Control Panel and then click Printer 2 Right click the icon for this printer then select Properties from the pop up menu Windows 2000 Windows XP Prof...

Страница 431: ...firming the Setting for Spooling at Host 10 Appendix 3 Display the Device Settings sheet a a a a then confirm the setting for Spooling at Host b b b b NOTE If Disabled is specified some options are disabled a b ...

Страница 432: ... 1 2 CD ROM 1 4 Changing the Default Values for Printing Preferences 5 8 Cleaning Fixing Roller 7 18 Outside of the Printer 7 21 Client 4 35 4 46 Contrast 6 49 Control Panel 1 8 1 10 D Device Settings Sheet 6 15 Dimensions 10 5 Download Installation 4 35 4 46 Duplex Unit Cover 1 8 E Edit and Preview 6 59 Enable Image Correction 6 45 Envelopes 3 4 ERR Indicator Orange 9 18 Expansion Slot 1 8 F Face...

Страница 433: ...MAC Address 9 18 Manuals 5 29 Miscellaneous Problems 8 54 Multi purpose Tray 1 7 3 12 3 31 N NB C2 9 15 NetSpot Device Installer 10 7 Network Board 1 13 9 15 Initialization 9 27 Installation 9 19 Parts and Their Functions 9 18 Removal 9 31 Setting the DIP Switches 9 24 Network Environment 2 31 4 35 O Open Button 1 8 Optional Accessories 1 12 9 1 Options Network Board 1 13 9 15 Paper Feeder 1 12 9 ...

Страница 434: ...7 30 Moving 7 24 Parts and Their Functions 1 7 Printer Connector 9 18 Printer Driver Installation 4 4 Uninstallation 4 67 Printer Sharing Settings 4 38 Printer Status Window Cancel Job 5 39 Canceling a Job 5 22 Device Settings Menu 5 37 Display 5 35 Parts and Their Functions 5 34 Preferences Administrators Dialog Box 5 36 Preferences Users Dialog Box 5 36 Print Queue 5 39 Refresh 5 38 Remote UI 5 ...

Страница 435: ...Precautions for Handling 7 15 Replacement 7 2 Storage 7 17 Toner Cartridge Guide 1 9 Toner Density 6 47 Transparency 3 4 Transport Guide 1 9 Tray Extension 1 7 Troubleshooting Flowchart 8 2 U Ultrasonic Humidifier 2 3 Uninstallation Manuals 5 32 Printer Driver 4 67 Unusable Paper 3 7 Usable Paper 3 2 USB Cable 2 29 Class Driver 8 45 Connector 1 8 V Ventilation Slots 1 8 W Watermark 6 27 ...

Страница 436: ...maintenance service The serial number for this printer can be found at the locations shown in the following figure IMPORTANT The labels on which the serial number is indicated are required for printer service or maintenance Do not remove them Rear of the Printer Outside View of the Packaging Box Serial Number Serial Number ...

Страница 437: ...10 16 Location of the Serial Number 10 Appendix ...

Страница 438: ...ie 92414 Courbevoie Cedex France CANON U K LTD Woodhatch Reigate Surrey RH2 8BF United Kingdom CANON DEUTSCHLAND GmbH Europark Fichtenhain A10 47807 Krefeld Germany CANON ITALIA S p A Via Milano 8 20097 San Donato Milanese MI Italy CANON LATIN AMERICA INC 703 Waterford Way Suite 400 Miami Florida 33126 U S A CANON AUSTRALIA PTY LTD 1 Thomas Holt Drive North Ryde Sydney N S W 2113 Australia CANON C...

Отзывы: