background image

Send

ng Documents

4-54

Using Favorites Buttons (LASER CLASS 830i Only)

To use ths feature, you must regster destnatons n favortes buttons beforehand. (See “Storng/Edtng 
Address Book,” on p. 4-12.)

1


Set documents.

2


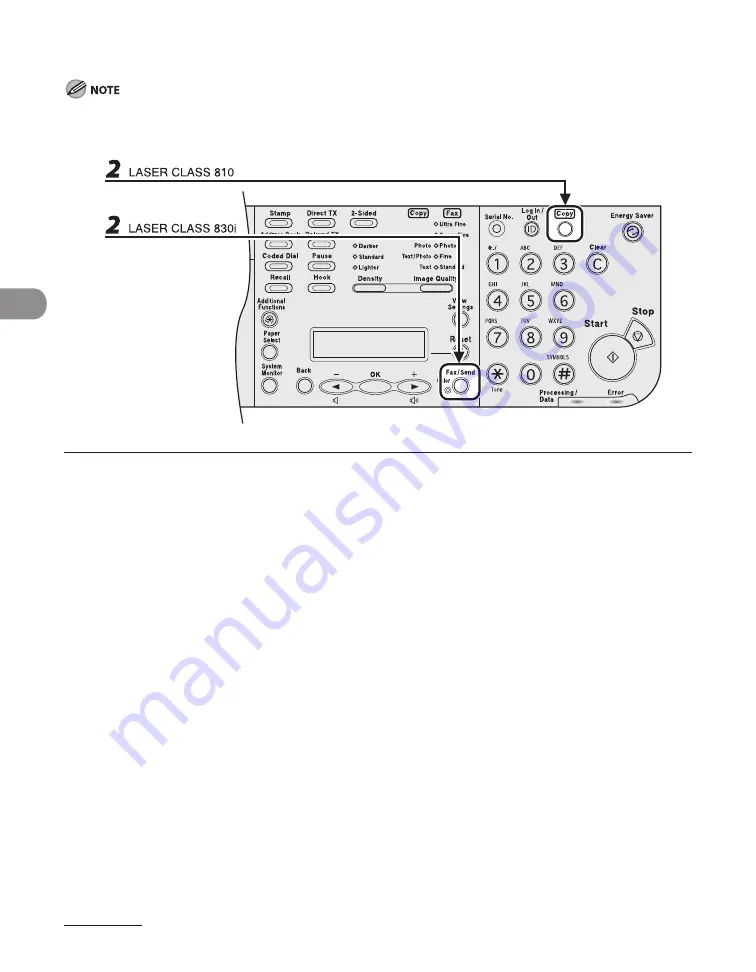
Press [Fax/Send].

If usng the LASER CLASS 810, you can swtch to the Fax mode by pressng [Copy/Fax].

Содержание Laser Class 810

Страница 1: ...s Receiving Documents Printing PC Faxing Remote UI System Manager Settings Troubleshooting Machine Settings Appendix Maintenance What Can I Do with This Machine Please read this guide before operating this product After you finish reading this guide store it in a safe place for future reference ...

Страница 2: ......

Страница 3: ... Specifications All functions including those that use a network or driver Reference Guide CD ROM CD ROM Indicates the manual is supplied in HTML format in the accompanying CD ROM Considerable effort has been made to make sure that the manuals for the machine are free of inaccuracies and omissions However as we are constantly improving our products if you need an exact specification please contact...

Страница 4: ... with This Machine Copy Features Select a scan mode depending on the type of image Image Quality p 3 4 Adjust the density level of scanned images Density p 3 5 Sort copies by page order Collate Copy p 3 7 Make two sided copies Two Sided Copying p 3 9 ...

Страница 5: ... methods Fax E Mail I Fax and File Server LASER CLASS 830i Only Chapter 4 Send documents in a variety of file formats LASER CLASS 830i ONLY Send Settings p 4 8 Specify a recipient with a single key Using One Touch Keys p 4 44 Specify a recipient with a three digit code Using Coded Dial Codes p 4 46 ...

Страница 6: ...ecipients as a group Using Group Addresses p 4 48 Look up a particular recipient Using Address Book Key p 4 50 Retry sending documents automatically LASER CLASS 830i Only Auto Retry Reference Guide Send documents to multiple recipients Broadcasting p 4 65 ...

Страница 7: ...is Machine Recall the last three sending jobs Job Recall Redial LASER CLASS 830i Only p 4 69 Forward received documents Forwarding Documents Reference Guide Receive faxes in memory without printing out Memory Reception p 5 8 ...

Страница 8: ...ature Print a document from a PC Printing For the LASER CLASS 810 an optional network printer kit is required Online Help PC Fax Feature Send a fax from a PC PC Faxing For the LASER CLASS 810 an optional network printer kit is required Online Help ...

Страница 9: ...re Access and manage the machine from a PC Remote UI For the LASER CLASS 810 an optional network printer kit is required Reference Guide System Manager Settings Restrict the use of the machine with department IDs Department ID Management Reference Guide ...

Страница 10: ...xvii Power Supply xix Customer Support U S A xix Customer Support Canada xx How to Use This Guide xxi Symbols Used in This Manual xxi llustrations Used in This Manual xxi Legal Notices xxii Copyright xxii Disclaimers xxii For CA USA only xxii Legal Limitations on the Usage of Your Product and the Use of Images xxiii Trademarks xxiv IPv6 Ready Logo xxiv Users in the U S A xxv Pre Installation Requi...

Страница 11: ...n Panel 1 4 Right Side of the Operation Panel 1 4 Left Side of the Operation Panel 1 7 LCD Standby Mode 1 9 Fax Send Mode 1 9 Log In Mode 1 9 Copy Mode 1 9 Optional Handset 1 10 Maintaining the Handset 1 10 Department User ID Management 1 11 Procedure before Using the Machine 1 11 Procedure after Using the Machine 1 12 Toner Cartridge 1 13 Maintaining the Toner Cartridge 1 14 Timer Settings 1 16 S...

Страница 12: ... 3 2 Scan Settings 3 4 Image Quality 3 4 Density 3 5 Auto Zoom 3 6 Collate Copy 3 7 Two Sided Copying 3 9 1 to 2 Sided Copying 3 9 2 to 2 Sided Copying 3 13 2 to 1 Sided Copying 3 15 Reserved Copy 3 18 Canceling Copy Jobs 3 19 Checking and Deleting Jobs 3 20 Checking and Deleting Copy Jobs 3 20 4 Sending Documents 4 1 Basic Sending Method 4 3 Scan Settings 4 5 Image Quality Fax 4 5 Density 4 7 Sen...

Страница 13: ...ding 4 63 Broadcasting 4 65 Delayed Sending 4 67 Job Recall Redial 4 69 Setting Up and Using the Optional Stamp Feature 4 71 Setting Up the Stamp Action 4 71 Turning the Stamp Feature ON OFF 4 73 TX Document Archiving 4 75 Before You Set Up the TX Document Archiving 4 75 Turning the TX Document Archiving ON 4 76 Setting Automatic Redialing Fax 4 78 Switching Temporarily to Tone Dialing 4 80 Checki...

Страница 14: ...ory 5 18 Forwarding Documents with Forwarding Errors 5 20 Printing or Erasing Documents with Forwarding Errors 5 21 Remote Reception 5 22 Registering Remote Reception ID 5 22 Receiving a Fax Remotely 5 24 Printing Received Documents 5 25 Two Sided Printing 5 25 Received Image Reduction 5 27 Canceling RX Jobs 5 29 Checking and Deleting Jobs 5 30 Checking Reception Results 5 30 Checking and Deleting...

Страница 15: ...T INFO LIST 9 18 Accepting Print Jobs with Unknown IDs 9 19 Managing User IDs 9 20 Handling Documents with Forwarding Errors 9 22 Restricting Access to Destinations 9 24 Setting a Password for the Address Book 9 24 Restricting the New Address 9 26 Restricting PC Faxing 9 27 Restricting Job Recall LASER CLASS 830i Only 9 28 Restricting Redialing LASER CLASS 810 Only 9 29 Confirming Entered Fax Numb...

Страница 16: ...nt Jams 11 3 Paper Jams 11 4 LCD Messages 11 7 Error Codes 11 13 If LOAD CORRECT PAPER is displayed 11 18 Re Loading the Paper 11 18 Changing the Paper Size Setting 11 19 General Problems 11 21 Paper Feeding Problems 11 23 Sending Receiving Problems 11 24 Sending Problems 11 24 Receiving Problems 11 29 Copying Problems 11 35 Telephone Problems 11 37 If a Power Failure Occurs 11 39 If You Cannot So...

Страница 17: ...inting Reports Automatically 12 52 TX REPORT 12 52 RX REPORT 12 55 ACTIVITY REPORT 12 57 Printing Reports and Lists Manually 12 59 Printing ACTIVITY REPORT 12 60 Printing 1 TOUCH LIST CODED DIAL LIST and GROUP DIAL LIST 12 61 Printing 1 TOUCH LIST 2 CODED DIAL LIST 2 12 62 Checking and Deleting Jobs 12 63 Checking and Deleting Report Jobs 12 63 Checking Remaining Memory 12 64 13 Appendix 13 1 Spec...

Страница 18: ...e machine suddenly starts printing To avoid paper jams never unplug the power cord open the scanning platform or add or remove paper in the machine while printing When transporting the machine be sure to remove the toner cartridge from the machine Place the toner cartridge in its original protective bag or wrap it in a thick cloth to prevent exposure to light Be careful when removing printed paper...

Страница 19: ... When using telephone equipment basic safety precautions should always be followed to reduce the risk of fire electric shock and injury to persons including the following 1 Do not use this machine near water i e near a bathtub kitchen sink or laundry tub or in a wet basement or near a swimming pool 2 Avoid using the telephone during an electrical storm as there may be a remote risk of electric sho...

Страница 20: ...n the machine by placing it on a bed sofa rug or other similar surface Do not place the machine in a cupboard or built in installation or near a radiator or other heat source unless proper ventilation is provided Leave at least 4 10 cm around all sides of the machine Do not stack boxes or furniture around the power outlet Keep the area free so you can reach the outlet quickly If you notice anythin...

Страница 21: ...e power supply UPS This product emits low level magnetic flux If you use a cardiac pacemaker and feel abnormalities please move away from this product and consult your doctor Customer Support U S A Your machine is designed with the latest technology to provide trouble free operation If you encounter a problem with the machine s operation try to solve it by using the information in Chapter 11 If yo...

Страница 22: ...ical support 9 A M to 8 P M EST Monday through Friday excluding holidays for products still under warranty 1 800 652 2666 For the location of the authorized service facility nearest you visit http www canon ca or 1 800 652 2666 If the problem cannot be corrected by using one of the above technical support options repair options are available at the time of your call to the live technical support n...

Страница 23: ...es distinctive notations to identify keys and information in the LCD The keys you press appear in square brackets Stop Information in the LCD appears in angle brackets LOAD PAPER The numbers that point to the keys on the operation panel diagram correspond to the order of steps to take in the procedure llustrations Used in This Manual Unless otherwise mentioned illustrations used in this manual are...

Страница 24: ...ion in this document is subject to change without notice CANON INC MAKES NO WARRANTY OF ANY KIND WITH REGARD TO THIS MATERIAL EITHER EXPRESS OR IMPLIED EXCEPT AS PROVIDED HEREIN INCLUDING WITHOUT LIMITATION THEREOF WARRANTIES AS TO MARKETABILITY MERCHANTABILITY FITNESS FOR A PARTICULAR PURPOSE OF USE OR NON INFRINGEMENT CANON INC SHALL NOT BE LIABLE FOR ANY DIRECT INCIDENTAL OR CONSEQUENTIAL DAMAG...

Страница 25: ...r product to scan print or otherwise reproduce any particular document and or of the use of the images scanned printed or otherwise reproduced you should consult in advance with your legal advisor for guidance Paper Money Travelers Checks Money Orders Food Stamps Certificates of Deposit Passports Postage Stamps canceled or uncanceled Immigration Papers Identifying Badges or Insignias Internal Reve...

Страница 26: ...ned that this product meets the ENERGY STAR Program for energy efficiency The International ENERGY STAR Office Equipment Program is an international program that promotes energy saving through the use of computers and other office equipment The program backs the development and dissemination of products with functions that effectively reduce energy consumption It is an open system in which busines...

Страница 27: ...UNICATE OVERSEAS Canon recommends an individual line following industry standards e g the 2500 Touch Tone or 500 Rotary Pulse Dial telephones A dedicated extension off a PBX machine without Call Waiting can be used with the machine Key telephone systems are not recommended because they send non standard signals to individual telephones for ringing and special codes which may cause a fax error This...

Страница 28: ...eas the sum of RENs should not exceed five 5 0 To be certain of the number of devices that may be connected to a line as determined by the total RENs contact the local telephone company The REN for this product is part of the product identifier that has the format US AAAEQ TXXXX The digits represented by are the REN without a decimal point e g 10 is a REN of 1 0 This equipment may not be used on c...

Страница 29: ...d to comply with the limits for a class B digital device pursuant to Part 15 of the FCC Rules These limits are designed to provide reasonable protection against harmful interference in a residential installation This equipment generates uses and can radiate radio frequency energy and if not installed and used in accordance with the instructions may cause harmful interference to radio communication...

Страница 30: ...600 The Telephone Consumer Protection Act of 1991 makes it unlawful for any person to use a computer or other electronic device to send any message via a telephone fax machine unless such message clearly contains in a margin at the top or bottom of each transmitted page or on the first page of the transmission the date and time it is sent and an identification of the business or other entity or ot...

Страница 31: ...uivalent Use one line per machine DDD DIRECT DISTANCE DIAL LINE or IDDD INTERNATIONAL DIRECT DISTANCE DIAL LINE IF YOU COMMUNICATE OVERSEAS Canon recommends an individual line following industry standards e g the 2500 touch tone or 500 rotary pulse dial telephones A dedicated extension off a PBX machine without Camp On signals is also permissible with the machine Key telephone systems are not reco...

Страница 32: ...ns techniques du Canada Ceci n implique pas que le produit ait été approuvé par I industrie du Canada Before installing this equipment users should ensure that it is permissible to be connected to the facilities of the local telecommunications company The equipment must also be installed using an acceptable method of connection The customer should be aware that compliance with the above conditions...

Страница 33: ...of terminals allowed to be connected to a telephone interface The termination on an interface may consist of any combination of devices subject only to the requirement that the sum of the Ringer Equivalence Numbers of all the devices does not exceed five Le Nombre d équivalence Ringer REN de cet appareil terminal est 1 0 Le REN attribué à chaque équipement terminal fournit une indication sur le no...

Страница 34: ...automatique interurbaine ou Ligne automatique internationale si vous communiquez avec les pays étrangers Canon vous conseille d utiliser une ligne individuelle conforme aux normes industrielles à savoir ligne téléphonique 2 500 pour appareil à clavier ou 500 pour appareil à cadran impulsions Il est également possible de raccorder ce télécopieur à un système téléphonique à poussoirs car la plupart ...

Страница 35: ...ne interface peut consister en une combinaison quelconque de dispositifs à la seule condition que la somme d indices d équivalence de la sonnerie de tous les dispositifs n excède pas 5 Le nombre d équivalents sonnerie REN de ce produit est 1 0 Les réparations sur un appareil certifié doivent être faites par une société d entretien canadienne autorisée par le Gouvernement canadien et désignée par l...

Страница 36: ...nd external covers the laser beam cannot escape from the machine during any phase of user operation CDRH Regulations The Center for Devices and Radiological Health CDRH of the U S Food and Drug Administration implemented regulations for laser products on August 2 1976 These regulations apply to laser products manufactured from August 1 1976 Compliance is mandatory for products marketed in the Unit...

Страница 37: ...nd Mode 1 9 Log In Mode 1 9 Copy Mode 1 9 Optional Handset 1 10 Maintaining the Handset 1 10 Department User ID Management 1 11 Procedure before Using the Machine 1 11 Procedure after Using the Machine 1 12 Toner Cartridge 1 13 Maintaining the Toner Cartridge 1 14 Timer Settings 1 16 Setting the Sleep Mode 1 16 Setting Auto Clear Time 1 18 Setting Time Zone 1 20 Setting Daylight Saving Time 1 21 ...

Страница 38: ...s documents E Paper delivery tray Receives copies prints and faxes F Paper stopper Prevents the paper from falling off the paper delivery tray Open the stopper from its original position for A4 LTR size paper For LGL size paper pull out the extension first and then open the stopper G Operation panel Machine controls H Paper cassette Holds the paper supply I Stacking support Helps prevent paper cur...

Страница 39: ...er N Multi purpose tray extension Pull out to load paper stack O USB port Connect the USB Universal Serial Bus cable P Ethernet port Connect the network cable For the LASER CLASS 810 the machine is equipped with an Ethernet port if an optional printer kit is attached Q Telephone line jack Connect the external telephone cable R External device jack Connect an external device S Handset jack Connect ...

Страница 40: ...s you send D 2 Sided key Press to set two sided copying or faxing E Density indicator Indicates the density you set in the Copy Fax mode F Image Quality indicator Indicates the image quality you set in the Copy Fax mode G View Settings key Press to confirm settings of the copy function H Serial No key Press to confirm the serial number I Log In Out key Press to operate the machine when the ID mana...

Страница 41: ...itch from rotary pulse to tone dialing U Reset key Press to return the machine to standby mode V Fax Send key Press to switch to the Fax Send mode W Color indicator Lights up when color sending is selected X Image Quality key Press to select image quality for copy or fax Y key Press to increase the value for various settings Also press to see the next item in the menu Z OK key Press to accept a se...

Страница 42: ...Before Using the Machine 1 6 LASER CLASS 810 K K Copy Fax key Press to switch to the Copy Fax mode ...

Страница 43: ...h pre registered destinations under one touch keys or coded dial codes by name number or address D Stamp key Press to set the Watermark mode E Delayed TX key Press to set Delayed Sending F Direct TX key Press to set Direct Sending G Hook key Press when you want to dial without lifting the optional handset of the external telephone H Pause key Press to enter a pause between or after the telephone f...

Страница 44: ...Before Using the Machine 1 8 LASER CLASS 810 J Redial key Press to redial the last number dialed manually with the numeric keys when a fax is standing by ...

Страница 45: ...ears It is also possible to see the standby display without having INITIALIZING shown Depending on the number of destinations registered after the main power switch is turned ON you may not be able to perform operations using the operation panel when the standby display appears If this happens wait until the machine responses to the key operations If the Auto Clear function is activated the displa...

Страница 46: ...ailable from your local authorized Canon dealer or the Canon help line For how to install the handset see Set Up the Machine in the Starter Guide Maintaining the Handset Do not leave the handset exposed to direct sunlight Do not install the handset in hot or humid conditions Do not spray aerosol polish on the handset as it may cause damage Use a damp cloth to wipe clean the handset ...

Страница 47: ... your ID and password to be able to operate the machine For details see System Manager Settings on p 9 1 Procedure before Using the Machine 1 Enter the department ID or the user ID with the numeric keys then press OK or Log In Out ID 2 If the password is set enter the password with the numeric keys then press OK or Log In Out ID The standby display appears ...

Страница 48: ...Before Using the Machine 1 12 Procedure after Using the Machine 1 Be sure to press Log In Out ID ...

Страница 49: ... your average document contains a lot of graphics tables or charts the life of the toner cartridge will be shorter as they consume more toner When you are replacing a toner cartridge be sure to use a toner cartridge designed for this product To purchase this cartridge contact your local Canon dealer or Canon Customer Care Center 1 800 828 4040 Toner Cartridge name Canon FX11 Cartridge Model Name S...

Страница 50: ...e the toner cartridge s protective bag in case you need to repack and transport the toner cartridge at a later date Do not store the toner cartridge in a salty atmosphere or where there are corrosive gases such as from aerosol sprays Do not remove the toner cartridge from the machine unnecessarily Do not open the drum protective shutter on the toner cartridge Print quality may deteriorate if the d...

Страница 51: ...remove it carefully If not removed with care the toner powder may scatter and come in contact with your eyes and mouth If this happens rinse with water and consult a doctor immediately Keep the toner cartridge away from small children If they ingest the toner powder consult a doctor immediately Do not disassemble the toner cartridge The toner powder may scatter and come in contact with your eyes a...

Страница 52: ...tting the Sleep Mode When the machine remains idle for a certain period of time it automatically enters the Sleep mode 1 Press Additional Functions 2 Press or to select TIMER SETTINGS then press OK 3 Press or to select AUTO SLEEP TIME then press OK ...

Страница 53: ...ration panel The machine will not enter the Sleep mode when the machine is in operation the Processing Data indicator lights or flashes a message appears on the display and the Error indicator flashes paper is loaded in the multi purpose tray a paper jam occurs in the machine the optional handset of the external telephone is off the hook The machine will leave the Sleep mode when you press Energy ...

Страница 54: ...Time If the machine remains idle for a certain period of time the display returns to the standby mode Auto Clear function 1 Press Additional Functions 2 Press or to select TIMER SETTINGS then press OK 3 Press or to select AUTO CLEAR TIME then press OK ...

Страница 55: ...or to select ON then press OK 5 Press or to select the desired interval then press OK You can set the interval from 1 to 9 minutes in one minute increments You can also enter values using numeric keys 6 Press Stop to return to standby mode ...

Страница 56: ...time difference is the same 1 Press Additional Functions 2 Press or to select TIMER SETTINGS then press OK 3 Press or to select TIME ZONE SETTING then press OK 4 Press or to select the time zone then press OK 5 Press Stop to return to the standby mode The specified time zone setting becomes effective after the machine is restarted When restarting the machine wait at least 10 seconds before turning...

Страница 57: ... advanced throughout the summer season This is called Daylight Saving Time 1 Press Additional Functions 2 Press or to select TIMER SETTINGS then press OK 3 Press or to select DAYLIGHT SV TIME then press OK 4 Press or to select ON then press OK 5 Press or to select START DATE TIME then press OK ...

Страница 58: ...Before Using the Machine 1 22 6 Press or to select MONTH then press OK 7 Press or to select the month then press OK 8 Press or to select WEEK then press OK 9 Press or to select the week then press OK ...

Страница 59: ...23 Before Using the Machine 10 Press or to select DAY then press OK 11 Press or to select the day then press OK 12 Press or to select END DATE TIME then press OK 13 Press or to select MONTH then press OK ...

Страница 60: ...to select the month then press OK 15 Press or to select WEEK then press OK 16 Press or to select the week then press OK 17 Press or to select DAY then press OK 18 Press or to select the day then press OK 19 Press Stop to return to standby mode ...

Страница 61: ... and Paper Document Requirements 2 2 Scanning Area 2 4 Loading Documents 2 5 In the ADF 2 5 Paper Requirements 2 7 Printable Area 2 9 Loading Paper 2 10 In the Multi Purpose Tray e g Envelopes 2 10 Setting Paper Size and Type 2 12 ...

Страница 62: ...4 7 8 Max 297 x 432 mm Max 630 mm Min 5 7 8 x 5 7 8 Min 148 x 148 mm LASER CLASS 810 Max 8 1 2 x 14 Max 24 7 8 Max 216 x 355 6 mm Max 630 mm Min 5 7 8 x 5 7 8 Min 148 x 148 mm Weight One Sided Scanning 13 to 34 lb bond 50 to 128 g m2 Two Sided Scanning 13 to 28 lb bond 50 to 105 g m2 Quantity Max 50 sheets 1 Max 20 sheets for LGL documents 1 2 1 21 lb bond 80 g m2 paper 2 LASER CLASS 830i Only ...

Страница 63: ...paper clips etc before loading the document in the ADF To prevent document jams in the ADF do not use any of the following Wrinkled or creased paper Carbon paper or carbon backed paper Curled or rolled paper Coated paper Torn paper Onion skin or thin paper Documents with staples or paper clips attached Paper printed with a thermal transfer printer Transparencies ...

Страница 64: ...er 2 4 Scanning Area Make sure your document s text and graphics fall within the shaded area in the following diagram Note that the margin widths listed are approximate and there may be slight variations in actual use ...

Страница 65: ...2 5 Document and Paper Loading Documents In the ADF 1 Fan the document stack and even the edges 2 Neatly place the documents face up in the document feeder tray ...

Страница 66: ...ned When scanning is complete remove the documents from the document delivery tray to avoid paper jams Avoid using ADF to scan the same document more than 30 times When scanned repeatedly documents can become folded or torn which may cause paper jams If the feeder rollers are soiled from scanning a document written in pencil clean them See Cleaning the Machine on p 10 2 ...

Страница 67: ...eavy 3 5 Bond 6 3hole punch paper 7 Transparency 8 Labels Envelopes available not available 1 21 lb bond 80 g m2 paper 2 From 17 to 21 lb bond 64 to 80 g m2 3 From 22 to 24 lb bond 81 to 90 g m2 4 From 24 to 28 lb bond 91 to 105 g m2 5 From 28 to 34 lb bond 106 to 128 g m2 6 20 lb bond 75 g m2 7 LTR size only 8 Use only LTR transparencies made especially for this machine The default paper size is ...

Страница 68: ...not print well Highly textured paper Very smooth paper Shiny paper Make sure the paper is free from dust lint and oil stains Be sure to test paper before purchasing large quantities Store all paper wrapped and on a flat surface until ready for use Keep opened packs in their original packaging in a cool dry location Store paper at 64 4 F 75 2 F 18 C 24 C 40 60 relative humidity Use only the transpa...

Страница 69: ...ent and Paper Printable Area The shaded area indicates the approximate printable area of LTR paper and envelope Note that the margin widths listed are approximate and there may be slight variations in actual use ...

Страница 70: ...onal seams and flaps To prevent jams do not use the following Envelopes with windows holes perforations cutouts or double flaps Envelopes made with special coated paper or deeply embossed paper Envelopes with peel off sealing strips Envelopes with letters enclosed Make sure to set the correct envelope size in the printer driver See online help 1 Open the multi purpose tray 2 Pull out the multi pur...

Страница 71: ...urface first then press down firmly on the edges to make the folds crisp 4 Adjust the slide guides to the width of the paper stack Make sure that the paper stack does not exceed the paper limit guide Some types of paper may not feed properly into the multi purpose tray For high quality copies be sure to use the paper and transparencies recommended by Canon When making copies of a small document or...

Страница 72: ...o change the settings The procedure is same for paper cassette and multi purpose tray except for selecting the paper cassette or multi purpose tray in step 3 and 6 1 Press Additional Functions 2 Press or to select PAPER SETTINGS then press OK 3 Press or to select CASSETTE 1 or MP TRAY then press OK If an optional paper cassette is attached you can also select CASETTE2 ...

Страница 73: ...LTR LGL A4 B5 A5R STMTR EXECUTIV COM10 MONARCH DL ISO C5 ISO B5 OFICIO BRAZIL OFICIO MEXICO OFICIO FOLIO G LTR G LGL FLSP CUSTOM SIZE When selecting this size enter the height and press OK Enter the width and press OK The paper sizes available will vary depending on the country where the unit was purchased 6 Press or to select SELECT PAPER TYPE then press OK If you have selected EXECUTIV COM10 MON...

Страница 74: ...aper types If you select CASETTE 1 or CASETTE 2 in step3 PLAIN PAPER COLOR RECYCLED HEAVY PAPER1 BOND 3 HOLE PUNCH PAPER If you select MP TRAY in step3 PLAIN PAPER COLOR RECYCLED HEAVY PAPER 1 HEAVY PAPER 2 HEAVY PAPER 3 BOND 3 HOLE PUNCH PAPER TRANSPARENCY LABELS ENVELOPE 8 Press Stop to return to standby mode ...

Страница 75: ... Quality 3 4 Density 3 5 Auto Zoom 3 6 Collate Copy 3 7 Two Sided Copying 3 9 1 to 2 Sided Copying 3 9 2 to 2 Sided Copying 3 13 2 to 1 Sided Copying 3 15 Reserved Copy 3 18 Canceling Copy Jobs 3 19 Checking and Deleting Jobs 3 20 Checking and Deleting Copy Jobs 3 20 ...

Страница 76: ... you can copy see Document Requirements on p 2 2 Press Copy If using the LASER CLASS 810 you can switch to the Copy mode by pressing Copy Fax You want to adjust the image quality and density See Scan Settings on p 3 4 To copy using paper loaded in the multi purpose tray or the optional paper cassette Press Paper Select and select the paper source ...

Страница 77: ...E T T E 1 L T R Press Start You enter a wrong number Press Clear and enter a new number You want to cancel copying Press Stop on the operation panel When the STOP KEY PRESSED message appears press OK When the CANCEL message appears press to select YES If ORIGINAL SIZE is displayed after you press Start Press or to specify the original size ...

Страница 78: ...t values if the Auto Clear function is activated or if you press Reset Image Quality 1 Press Copy If using the LASER CLASS 810 you can switch to the Copy mode by pressing Copy Fax 2 Press Image Quality repeatedly to select the document type Photo For documents that contain fine text or photos TEXT PHOTO For documents that contain text and photos Text For text documents ...

Страница 79: ...ect the density mode Darker to make light documents darker Standard Suitable for copying regular originals Lighter to make dark documents lighter To cancel all settings press Reset When you switch the mode by pressing the mode keys such as Fax Send all settings will be also canceled If you want to keep the settings set the density as following Additional Functions COPY SETTINGS STANDARD SETTINGS D...

Страница 80: ... can be set from 50 to 145 When this setting is enabled if you are using the LASER CLASS 810 you must specify the original size when copying 1 Press Additional Functions 2 Press or to select COPY SETTINGS then press OK 3 Press or to select AUTO ZOOM then press OK 4 Press or to select ON then press OK 5 Press Stop to return to the standby mode ...

Страница 81: ...e can be used together with Two Sided Copying see p 3 9 1 Press Additional Functions 2 Press or to select COPY SETTINGS then press OK If you want to use the Collate Copying function together with Two Sided Copying see p 3 9 proceed to step 3 of 1 to 2 Sided Copying 2 to 2 Sided Copying or 2 to 1 Sided Copying ...

Страница 82: ...Copying 3 8 3 Press or to select COL then press OK 4 Press to select ON then press OK 5 Press Stop to return to the standby mode ...

Страница 83: ...ed copies must conform to the following specifications Paper size LGL LTR and A4 Paper weight 17 to 24 lb 64 to 90 g m2 1 to 2 Sided Copying You can make two sided copies from one sided documents The illustrations are the results of the output for the following circumstances If using the LASER CLASS 830i If the orientation of an image in a document is set vertically If using the LASER CLASS 810 If...

Страница 84: ...Copying 3 10 1 Set documents 2 Press Copy If using the LASER CLASS 810 you can switch to the Copy mode by pressing Copy Fax 3 Press 2 sided repeatedly to select 1 2 SIDED then press OK ...

Страница 85: ...ont and back sides of the document have the same top bottom orientations CALENDAR TYPE The front and back sides of the document have opposite top bottom orientations When images on 11x17 landscape documents are orientated horizontally select BOOK TYPE if the images on the front and back sides of the copy have opposite orientations Select CALENDAR TYPE if images on the front and back sides of a cop...

Страница 86: ... vertically the front and back sides of the copy will have opposite top bottom orientations when BOOK TYPE is selected When CALENDAR TYPE is selected the front and back sides of the copy will have the same top bottom orientations 5 Use the numeric keys to enter the desired copy quantity 1 to 99 6 Press Start To cancel all settings press Stop When you switch the mode by pressing the mode keys such ...

Страница 87: ...d documents The illustrations are the results of the output for the following circumstances If using the LASER CLASS 830i If the orientation of an image in a document is set vertically If using the LASER CLASS 810 If the orientation of an image in a document is set horizontally ...

Страница 88: ...r CALENDAR TYPE for the documents then press OK BOOK TYPE The front and back sides of the document have the same top bottom orientation CALENDAR TYPE The front and back sides of the document have opposite top bottom orientations 5 Use or to select BOOK TYPE or CALENDAR TYPE for the copies then press OK 6 Use the numeric keys to enter the desired copy quantity 1 to 99 7 Press Start To cancel all se...

Страница 89: ...d documents The illustrations are the results of the output for the following circumstances If using the LASER CLASS 830i If the orientation of an image in a document is set vertically If using the LASER CLASS 810 If the orientation of an image in a document is set horizontally ...

Страница 90: ...t BOOK TYPE or CALENDAR TYPE then press OK If using the LASER CLASS 830i When images in documents are set vertically as illustrated above select the desired output BOOK TYPE Select if images on the back side of a document have the same top bottom orientations as the front side of the document CALENDAR TYPE Select if images on the front and back sides of a document have opposite top bottom orientat...

Страница 91: ...he back side of a document have the same top bottom orientations as the front side of the document CALENDAR TYPE Select if images on the front and back sides of a document have opposite top bottom orientations For landscape documents such as LTRR documents with an image set vertically the images on the front and back sides of the document will have opposite top bottom orientations when BOOK TYPE i...

Страница 92: ...The scanned documents are processed after the current job is complete 1 Set documents 2 Press Copy If using the LASER CLASS 810 you can switch to the Copy mode by pressing Copy Fax 3 Set the desired copy mode and quantity 1 to 99 then press Start You can reserve up to 5 copy jobs with different settings for each job ...

Страница 93: ...3 19 Copying Canceling Copy Jobs Cancel an ongoing job as follows 1 Press Stop 2 When the STOP KEY PRESSED message appears press OK When the CANCEL message appears press to select YES ...

Страница 94: ...bs currently being processed Checking and Deleting Copy Jobs 1 Press System Monitor repeatedly to select COPY STATUS then press OK 2 Press or to scroll through the job list and check the status of the copy jobs If you want to delete the job go to step 3 Otherwise press Stop to return to the standby mode ...

Страница 95: ... 3 Press or to select the desired job then press OK 4 Press or to select CANCEL then press OK 5 Press to select YES If you do not want to cancel the job press to select NO 6 Press Stop to return to the standby mode ...

Страница 96: ...Copying 3 22 ...

Страница 97: ...4 44 Using One Touch Keys 4 44 Using Coded Dial Codes 4 46 Using Group Addresses 4 48 Using Address Book Key 4 50 Using Favorites Buttons LASER CLASS 830i Only 4 54 Manual Sending Fax 4 56 Sending Two Sided Documents 4 59 Direct Sending 4 63 Broadcasting 4 65 Delayed Sending 4 67 Job Recall Redial 4 69 Setting Up and Using the Optional Stamp Feature 4 71 Setting Up the Stamp Action 4 71 Turning th...

Страница 98: ... to Tone Dialing 4 80 Checking Dialing Line 4 82 Dialing an Overseas Number With Pauses 4 83 Canceling TX Jobs 4 85 Checking and Deleting Jobs 4 86 Checking Transmission Results 4 86 Checking and Deleting Sending Documents Stored in Memory 4 87 ...

Страница 99: ... document in the ADF For documents you can send see Document Requirements on p 2 2 Press Fax Send repeatedly to select the sending method then press OK If using the LASER CLASS 810 you can switch to the Fax mode by pressing Copy Fax When sending color images always specify the sending method before specifying the destination You want to send document to a file server You can specify the file serve...

Страница 100: ... B E R You enter a wrong number when specifying a fax number Go back to the wrong digit with You enter a wrong character when specifying an e mail or I fax address Go back to the wrong character with then press Clear Or press and hold Clear to delete the entire entry You want to cancel sending Press Stop on the operation panel When the STOP KEY PRESSED message appears press OK When the CANCEL mess...

Страница 101: ...d documents to a file server you can optionally set the file format if multiple images are sent as separate files or a single file resolution and original type according to the type of document you are sending LASER CLASS 830i Only See Send Settings E Mail I Fax File Server LASER CLASS 830i Only on p 4 8 Image Quality Fax 1 Press Fax Send to select FAX then press OK If using the LASER CLASS 810 yo...

Страница 102: ...hat of Standard 400 x 400 dpi Super Fine for documents that contain fine print and images the resolution is four times that of Standard 200 x 400 dpi Photo for documents that contain photographs the resolution is twice that of Standard 200 x 200 dpi Fine for fine print documents the resolution is twice that of Standard 200 x 200 dpi Standard for most text only documents 200 x 100 dpi ...

Страница 103: ...peatedly to select the density Darker to make light documents darker Standard Suitable for copying regular originals Lighter to make dark documents lighter These settings return to the default values after all documents are scanned If you want to keep the settings set the density as following Additional Functions TX RX SETTINGS TX RX COMMON SET TX SETTINGS SCANNING DENSITY See Setting Menu on p 12...

Страница 104: ... the sending method then press OK To send documents to a file server select any sending method If you want to send color images to a file server or attached to an e mail message select E MAIL COLOR as a sending method When sending color images always specify the sending method before specifying the destination 3 Specify the destination For instructions on specifying destinations see Specifying Des...

Страница 105: ...B W PDF TIFF B W File server Color JPEG PDF COMPACT 6 Press or to select ON or OFF for DIVIDE INTO PAGES then press OK OFF Sends multiple images as a single file without dividing them ON Separates multiple images and send them as separate files If you have selected JPEG in step 5 this setting is not available DIVIDE INTO PAGES is automatically set to ON when sending documents in JPEG format ...

Страница 106: ...l Color 200X200dpi 300X300dpi 100X100dpi 150X150dpi I fax 200X200dpi 200X100dpi File server B W 200X200dpi 300X300dpi 400X400dpi 600X600dpi 150X150dpi 200X100dpi File server Color 200X200dpi 300X300dpi 100X100dpi 150X150dpi If PDF COMPACT is selected as the file format only 300X300dpi can be selected for sending color images attached to an e mail message ...

Страница 107: ...set to TEXT PHOTO Skip to step 9 9 Press Start When TIME OUT is set to ON in TX SETTINGS in FAX SETTINGS in TX RX SETTINGS and if you have specified the destination by any other method than using numeric keys the machine starts scanning automatically without pressing Start after the preset time for this setting is elapsed You can set the document s name a subject line message body text and reply t...

Страница 108: ...ions by pressing Address Book and searching a destination from Address Book Using Favorites Buttons LASER CLASS 830i Only p 4 54 You can register a destination together with any possible combination of send setteings in a favorites button One touch keys 01 to 04 can be registered as favorites buttons Depending on the number of destinations registered after the main power switch is turned ON you ma...

Страница 109: ... select 1 TOUCH SPD DIAL or CODED SPD DIAL then press OK 4 Press or to select a one touch key 01 to 80 or coded dial code LASER CLASS 810 000 to 119 LASER CLASS 830i 000 to 419 for which you want to register the fax number then press OK You can also select a one touch key or coded dial code by pressing the corresponding one touch key or Coded Dial followed by the desired three digit code ...

Страница 110: ...K 6 Press or to select TEL NUMBER ENTRY then press OK 7 Enter the fax number you register max 120 digits including spaces and pauses with the numeric keys then press OK 0 1 2 X X X X X X X _ T E L N U M B E R E N T R Y Ex 8 Press or to select NAME then press OK ...

Страница 111: ...OK If you want to specify the following optional settings LONG DISTANCE TX SPEED and ECM for the fax number you are registering proceed to the next step If you do not need to set these options skip to step 18 N A M E a C a n Ex 10 Press or to select OPTIONAL SETTING then press OK 11 Press or to select ON then press OK ...

Страница 112: ...receiving from other machines that support ECM then press OK To register another one touch key or coded dial code repeat the procedure from step 4 14 Press or to select TX SPEED then press OK 15 Press or to select the sending speed 33600 bps 14400 bps 9600 bps or 4800 bps then press OK If transmission errors occur frequently lower the speed ...

Страница 113: ...ffective transmission option then press OK DOMESTIC Normally select this option LONG DISTANCE 1 3 Select one of these options when you make an international call If errors occur during fax transmissions try the setting from LONG DISTANCE 1 through LONG DISTANCE 3 18 Press Stop to return to the standby mode ...

Страница 114: ...t 1 TOUCH SPD DIAL or CODED SPD DIAL then press OK 4 Press or to select a one touch key 01 to 80 or coded dial code LASER CLASS 810 000 to 119 LASER CLASS 830i 000 to 419 for which you want to register the address then press OK You can also select a one touch key or coded dial code by pressing the corresponding one touch key or Coded Dial followed by the desired three digit code ...

Страница 115: ... ADDRESS or I FAX ADDRESS then press OK 7 Enter the address you register max 120 digits with the numeric keys then press OK To register another one touch key or coded dial code repeat the procedure from step 4 E M A I L A D D R E S S a s a l e s X X X c o m Ex _ 8 Press or to select NAME then press OK ...

Страница 116: ...Sending Documents 4 20 9 Enter the destination name max 16 letters including spaces with the numeric keys then press OK N A M E a C a n Ex 10 Press Stop to return to the standby mode ...

Страница 117: ...ocuments Registering File Server Addresses LASER CLASS 830i Only 1 Press Additional Functions 2 Press or to select ADDRESS BOOK SET then press OK 3 Press or to select 1 TOUCH SPD DIAL or CODED SPD DIAL then press OK ...

Страница 118: ...can also select a one touch key or coded dial code by pressing the corresponding one touch key or Coded Dial followed by the desired three digit code 5 Press or to select the server protocol FTP or SMB then press OK 6 Press or to select HOST NAME then press OK 7 Use the numeric keys to enter the name of the file server on the network up to 120 characters then press OK H O S T N A M E 1 c a n o n 0...

Страница 119: ...ric keys to enter the destination s name up to 16 characters then press OK 10 Press or to select FILE PATH then press OK 11 Use the numeric keys to specify the folder to which the job is to be sent up to 120 characters then press OK 12 Press or to select LOGIN NAME then press OK ...

Страница 120: ... Press or to select PASSWORD then press OK 15 Use the numeric keys to enter the password then press OK You can enter up to 24 characters 14 characters when SMB is selected as the server protocol for the password To register another one touch key or coded dial code repeat the procedure from step 4 16 Press Stop to return to the standby mode ...

Страница 121: ...or to select 1 TOUCH SPD DIAL or CODED SPD DIAL then press OK 4 Press or to select the one touch key 01 to 80 or coded dial code LASER CLASS 810 000 to 119 LASER CLASS 830i 000 to 419 you want to edit then press OK You can also select a one touch key or coded dial code by pressing the corresponding one touch key or Coded Dial followed three digit code ...

Страница 122: ...edit file server addresses 6 Go back to the wrong digit with when you edit a fax number Or press repeatedly to go back to a wrong number or character then press Clear when you edit an e mail or I fax address To delete the entire entry press and hold Clear 7 Enter a new number or character with the numeric keys then press OK 8 Press or to select NAME then press OK ...

Страница 123: ...ire entry press and hold Clear 10 Enter a new character with the numeric keys then press OK If you are editing a one touch key or coded dial code under which a fax number is registered you can also change the optional settings For instructions see Registering Fax Numbers on p 4 13 11 Press Stop to return to the standby mode ...

Страница 124: ...lect 1 TOUCH SPD DIAL or CODED SPD DIAL then press OK 4 Press or to select the one touch key 01 to 80 or coded dial code LASER CLASS 810 000 to 119 LASER CLASS 830i 000 to 419 you want to delete then press OK You can also select a one touch key or coded dial code by pressing the corresponding one touch key or Coded Dial followed by the desired three digit code ...

Страница 125: ... E MAIL ADDRESS or HOST NAME then press OK 6 Press and hold Clear to delete the entire entry then press OK If you delete the fax number e mail address or file server address the registered name is cleared automatically 7 Press Stop to return to the standby mode ...

Страница 126: ... then press OK If a password has been set for the Address Book use the numeric keys to enter the password then press OK 3 Press or to select FAVORITES BUTTONS then press OK 4 Press or to select a one touch key 01 to 04 then press OK If a one touch destination is already registered in the desired one touch key select another key or delete the destination first 5 Press or to select FAX then press OK...

Страница 127: ... that IMAGEQUALITY is displayed then press OK 11 Press or to select the image quality FINE PHOTO SUPER FINE ULTRA FINE or STANDARD then press OK 12 Confirm that OPTIONAL SETTING is displayed then press OK 13 Press or to select ON or OFF then press OK If you do not want to set the optional settings select OFF then skip to step 20 If you want to set the options for sending faxes select ON ...

Страница 128: ...ing speed 33600 bps 14400 bps 9600 bps or 4800 bps then press OK 18 Confirm that INTERNATIONAL is displayed then press OK 19 Press or to select the transmission option DOMESTIC LONG DISTANCE 1 LONG DISTANCE 2 or LONG DISTANCE 3 then press OK If errors occur during international fax transmissions try the setting from LONG DISTANCE 1 through LONG DISTANCE3 20 Press Stop to return to the standby mode...

Страница 129: ...nal Functions 2 Press or to select ADDRESS BOOK SET then press OK 3 Press or to select GROUP DIAL then press OK 4 Press or to select an empty one touch key or coded dial code that you want to set as the group address then press OK You can also select a one touch key or coded dial code by pressing the corresponding one touch key or Coded Dial followed by the desired three digit code ...

Страница 130: ...l destinations are registered then press OK To enter a destination stored under a one touch key press the desired one touch key To enter a destination stored under a coded dial code press Coded Dial then enter the three digit code with the numeric keys For multiple entries press Coded Dial between each entry You can review the destinations which have been already entered with or 7 Press or to sele...

Страница 131: ...8 Enter the group name max 16 letters including spaces with the numeric keys then press OK To register another group repeat the procedure from step 4 N A M E a C a n o n G r o u p Ex 9 Press Stop to return to the standby mode ...

Страница 132: ...ctions 2 Press or to select ADDRESS BOOK SET then press OK 3 Press or to select GROUP DIAL then press OK 4 Press or to select a group to edit then press OK To select a group stored under the coded dial code press Coded Dial then enter the three digit code using the numeric keys ...

Страница 133: ...t SELECT ADD TEL NO then press OK 6 Select the destination you want to add to the group then press OK For details on specifying a destination from Address Book see Registering Group Addresses on p 4 33 7 Press Stop to return to the standby mode ...

Страница 134: ...t ADDRESS BOOK SET then press OK 3 Press or to select GROUP DIAL then press OK 4 Press or to select a group to edit then press OK To select a group stored under the coded dial code press Coded Dial then enter the three digit code using the numeric keys 5 Press or to select SELECT ADD TEL NO then press OK ...

Страница 135: ...g Documents 6 Press or to display the destination you want to delete from the group then press Clear Repeat this step if you want to delete another destination 7 Press OK 8 Press Stop to return to the standby mode ...

Страница 136: ...t ADDRESS BOOK SET then press OK 3 Press or to select GROUP DIAL then press OK 4 Press or to select a group to edit then press OK To select a group stored under the coded dial code press Coded Dial then enter the three digit code using the numeric keys 5 Press or to select NAME then press OK ...

Страница 137: ...nts 6 Press repeatedly to go back to a wrong character then press Clear To delete the entire name press and hold Clear 7 Enter a new character with the numeric keys then press OK 8 Press Stop to return to the standby mode ...

Страница 138: ...RESS BOOK SET then press OK 3 Press or to select GROUP DIAL then press OK 4 Press or to select a group to delete then press OK To select a group stored under the coded dial code press Coded Dial then enter the three digit code using the numeric keys 5 Press or to select SELECT ADD TEL NO then press OK ...

Страница 139: ...ding Documents 6 Press Clear repeatedly until all destinations are deleted then press OK When you delete all destinations the registered name is cleared automatically 7 Press Stop to return to the standby mode ...

Страница 140: ...Using One Touch Keys You can specify up to 80 destinations using one touch keys To use this feature you must register destinations in one touch keys beforehand See Storing Editing Address Book on p 4 12 1 Set documents 2 Press Fax Send repeatedly to select the sending method then press OK If using the LASER CLASS 810 you can switch to the Fax mode by pressing Copy Fax To send documents to a file s...

Страница 141: ...nsity see Scan Settings on p 4 5 0 1 2 3 X X X X X X 0 5 C A N O N U S A Ex 4 Press Start When TIME OUT is set to ON in TX SETTINGS in FAX SETTINGS in TX RX SETTINGS and if you have specified the destination by any other method than using numeric keys the machine starts scanning automatically without pressing Start after the preset time for this setting is elapsed ...

Страница 142: ... must register destinations in coded dial code beforehand See Storing Editing Address Book on p 4 12 1 Set documents 2 Press Fax Send repeatedly to select the sending method then press OK If using the LASER CLASS 810 you can switch to the Fax mode by pressing Copy Fax To send documents to a file server select any sending method LASER CLASS 830i Only 3 Press Coded Dial ...

Страница 143: ...ress Clear then try again from step 3 If you want to adjust the image quality and density see Scan Settings on p 4 5 5 Press Start When TIME OUT is set to ON in TX SETTINGS in FAX SETTINGS in TX RX SETTINGS and if you have specified the destination by any other method than using numeric keys the machine starts scanning automatically without pressing Start after the preset time for this setting is ...

Страница 144: ...sses To use this feature you must register destinations in a group address beforehand See Storing Editing Address Book on p 4 12 1 Set documents 2 Press Fax Send If using the LASER CLASS 810 you can switch to the Fax mode by pressing Copy Fax ...

Страница 145: ... and perform step 3 again If you want to adjust the image quality and density see Scan Settings on p 4 5 4 Press Start When TIME OUT is set to ON in TX SETTINGS in FAX SETTINGS in TX RX SETTINGS and if you have specified the destination by any other method than using numeric keys the machine starts scanning automatically without pressing Start after the preset time for this setting is elapsed ...

Страница 146: ...useful when you forget which one touch key or coded dial code the recipient you want is registered under To use this feature you must register destinations in Address Book beforehand See Storing Editing Address Book on p 4 12 1 Set documents 2 Press Fax Send If using the LASER CLASS 810 you can switch to the Fax mode by pressing Copy Fax ...

Страница 147: ...NAME SEARCH or ADD TEL SEARCH then press OK If no recipient is registered in Address Book NOT REGISTERED is displayed NAME SEARCH searches a destination by name ADD TEL SEARCH searches a destination by address or fax number If using the LASER CLASS 810 skip to step 4 ...

Страница 148: ...ter C press 2 ABC Entries starting with the letter you entered are displayed if any entries are registered Press to switch between input modes A Letter mode 1 Number mode N A M E S E A R C H A C A N O N Ex A D D T E L S E A R C H A c a n o n X X X X X X Ex A D D R E S S B O O K A H I J K Ex 5 Press or to search for the recipient displays recipients in alphabetical order displays recipients in reve...

Страница 149: ...sity see Scan Settings on p 4 5 7 Press Start When TIME OUT is set to ON in TX SETTINGS in FAX SETTINGS in TX RX SETTINGS and if you have specified the destination by any other method than using numeric keys the machine starts scanning automatically without pressing Start after the preset time for this setting is elapsed ...

Страница 150: ...CLASS 830i Only To use this feature you must register destinations in favorites buttons beforehand See Storing Editing Address Book on p 4 12 1 Set documents 2 Press Fax Send If using the LASER CLASS 810 you can switch to the Fax mode by pressing Copy Fax ...

Страница 151: ...necessary settings for your document For details see Scan Settings on p 4 5 5 Press Start When TIME OUT is set to ON in TX SETTINGS in FAX SETTINGS in TX RX SETTINGS and if you have specified the destination by any other method than using numeric keys the machine starts scanning automatically without pressing Start after the preset time for this setting is elapsed ...

Страница 152: ...nect the optional handset to the machine if you want to talk to the recipient before sending a document For details on how to connect an optional handset to the machine see Set Up the Machine in the Starter Guide 2 Load the document in the ADF 3 Press Fax Send repeatedly to select FAX then press OK If using the LASER CLASS 810 you can switch to the Fax mode by pressing Copy Fax If you want to adju...

Страница 153: ...p the optional handset 5 Dial the recipient s fax telephone number Make sure to confirm the dial tone before entering a fax number If you enter the number before the dial tone can be heard the call may not connect or the wrong number may be dialed ...

Страница 154: ... step 4 you can pick up the handset when you hear the recipient s voice If you hear a high pitched signal instead of the recipient s voice go to step 8 7 Ask the recipient to set their fax machine to receive faxes 8 When you hear a high pitched signal press Start then hang up the handset ...

Страница 155: ...hine to automatically turn over two sided documents in the ADF and scan each side separately 1 Set documents in the ADF 2 Press Fax Send repeatedly to select FAX then press OK If using the LASER CLASS 810 you can switch to the Fax mode by pressing Copy Fax 3 Press 2 Sided ...

Страница 156: ...k side of a document have the same top bottom orientations as the front side of the document 2 SIDED CALENDAR Select if images on the front and back sides of a document have opposite orientations When images on 11x17 landscape documents are orientated horizontally select 2 SIDED BOOK if the images on the front and back sides of a document have opposite orientations Select 2 SIDED CALENDAR if image...

Страница 157: ... side of the document 2 SIDED CALENDAR Select if images on the front and back side of the document have opposite top bottom orientations For landscape documents such as LTRR documents with an image set vertically the images on the front and back sides of the document will have opposite top bottom orientations when 2 SIDED BOOK is selected When 2 SIDED CALENDAR is selected the front and back sides ...

Страница 158: ...de press Stop When TIME OUT is set to ON in TX SETTINGS in FAX SETTINGS the machine starts dialing automatically after the preset time for this setting is passed However when you manually enter a recipient be sure to press Start If the specified time for delayed sending passes during a temporary power failure that recovers within a hour the fax document will be sent at the specified time on the ne...

Страница 159: ...y at once and sends it right away Therefore when MEMORY FULL is displayed even if you have selected direct sending wait until there is enough space in memory to scan one page or delete the documents in memory and try again See Reference Guide Send Receive Direct Sending You cannot use direct sending for e mail I faxs or sending to a file server 1 Load the document in the ADF 2 Press Fax Send If us...

Страница 160: ...ial the recipient s fax telephone number If you select delayed transmission or sequential broadcasting memory sending is automatically selected 6 Press Start Each page is sent as it is scanned During transmission TRANSMITTING and the recipient s fax telephone number alternately appear as messages on the LCD display ...

Страница 161: ...EST MULTI DEST is set to PROHIBIT you cannot send the documents to multiple recipients See Restricting Broadcasting on p 9 31 You cannot send color images to multiple recipients using broadcasting If you want to send color images to multiple recipients send documents one by one or otherwise send documents as black and white images See Send Settings E Mail I Fax File Server LASER CLASS 830i Only on...

Страница 162: ... the specified destinations press or to scroll the display If e mail addresses and file server addresses are included in the destinations you can enter the send settings by pressing OK after specifying destinations All the addresses without fax will use the same send settings For details see Send Settings E Mail I Fax File Server LASER CLASS 830i Only on p 4 8 5 Press Start When TIME OUT is set to...

Страница 163: ...delayed sending See p 4 87 of the Checking and Deleting Sending Documents Stored in Memory section in the Basic Operation Guide delete the job and send the color image again without using delayed sending 1 Set documents 2 Press Fax Send repeatedly to select the sending method then press OK If using the LASER CLASS 810 you can switch to the Fax mode by pressing Copy Fax ...

Страница 164: ...ling key coded speed dialing code or address book dialing to enter a recipient 6 Press Start When TIME OUT is set to ON in TX SETTINGS in FAX SETTINGS the machine starts dialing automatically after the preset time for this setting is passed However when you manually enter a recipient be sure to press Start If the specified time for delayed sending passes during a temporary power failure that recov...

Страница 165: ...h the LASER CLASS 830i this can be used as a Recall function With the LASER CLASS 810 this can be used as a Redial function When REST REDIAL CALL is set to ON Recall is not available See Restricting Job Recall LASER CLASS 830i Only on p 9 28 1 Set documents 2 Press Fax Send If using the LASER CLASS 810 you can switch to the Fax mode by pressing Copy Fax 3 Press Recall ...

Страница 166: ...ings such as the resolution when using the Recall function see Scan Settings on p 4 5 6 Press Start When TIME OUT is set to ON in TX SETTINGS in FAX SETTINGS in TX RX SETTINGS and if you have specified the destination by any other method than using numeric keys the machine starts scanning automatically without pressing Start after the preset time for this setting is elapsed ...

Страница 167: ...page you scan for sending Setting Up the Stamp Action Follow this procedure to set up the stamp action when the stamp feature is turned ON If you are using the LASER CLASS 830i this setting is enabled when sending to a fax I fax e mail or file server destination 1 Press Additional Functions 2 Press or to select TX RX SETTINGS then press OK 3 Press or to select FAX SETTINGS then press OK ...

Страница 168: ...to select STAMP DOCUMENT then press OK 6 Press or to select DIRECT TX or DIRECT MEMORY TX then press OK DIRECT TX Stamps only documents you scan for direct sending DIRECT MEMORY TX Stamps all documents you scan for direct and memory sending 7 Press Stop to return to the standby mode ...

Страница 169: ...nding or scanning them The originals are stamped according to the stamping conditions you set See Setting Up the Stamp Action on p 4 71 1 Set documents 2 Press Fax Send repeatedly to select the sending method then press OK If using the LASER CLASS 810 you can switch to the Fax mode by pressing Copy Fax ...

Страница 170: ...meric keys one touch speed dialing key coded speed dialing code or address book dialing to enter a recipient 4 Press Stamp 5 Press Start If the stamp becomes faint replace the stamp cartridge See Replacing the Stamp Cartridge on p 10 17 ...

Страница 171: ...ments are supported by TX Document Archiving LASER CLASS 810 Fax LASER CLASS 830i Fax I fax The sending method sending speed and ECM Error Correction Mode settings specified for the destination set in FW W OUT CNDITION in SYSTEM SETTINGS also apply when sending for TX Document Archiving TX Document Archiving only works for memory sending and black and white sending including Relay Broadcasting TX ...

Страница 172: ...t is necessary to set the machine to forward received documents See When Forwarding Destinations Do Not Match the Forwarding Conditions on p 5 15 1 Press Additional Functions 2 Press or to select SYSTEM SETTINGS then press OK If the System Manager ID and System Password have been set enter the System Manager ID and SystemPassword using the numeric keys then press Log In Out ID 3 Press or to select...

Страница 173: ... using sequential broadcasting after all transmissions including redialing or error redialing finish if there is at least one destination to which all pages were sent successfully then TX Document Archiving will be performed once In the Activity Management Report regarding the Mode field Transaction Mode TRANSFER will be printed and regarding the NO field Transaction Number the number of the origi...

Страница 174: ... turned ON or OFF If you set AUTO REDIAL to ON you can set how many times the machine redials the number and the redial interval 2 3 4 5 6 7 1 1 Press Additional Functions 2 Press or to select TX RX SETTINGS then press OK 3 Press or to select FAX SETTINGS then press OK 4 Press or to select TX SETTINGS then press OK 5 Press or to select AUTO REDIAL then press OK 6 Press or to select ON then press O...

Страница 175: ... 10 Use or numeric keys to enter the time 2 to 99 minutes in one minute increments between redials then press OK 11 Press or to select TX ERROR REDIAL then press OK 12 Press or to select ON or OFF then press OK ON Resends all pages if an error occurs during transmission OFF Does not redial even if an error occurs during transmission 13 Press Stop to return to the standby mode ...

Страница 176: ... to the machine 1 Press Fax Send If using the LASER CLASS 810 you can switch to the Fax mode by pressing Copy Fax 2 Press Fax Send repeatedly to select FAX then press OK 3 Press Hook Make sure to confirm the dial tone before entering a fax number If you enter the number before the dial tone can be heard the call may not be connected or the wrong number may be dialed 4 Use the numeric keys to dial ...

Страница 177: ...Documents 6 Use the numeric keys to enter the numbers requested by the information service 7 If you want to receive faxes press Start If you are using the external telephone hang up the handset after pressing Start ...

Страница 178: ...r to check for a dial tone 1 Press Additional Functions 2 Use or to select TX RX SETTINGS then press OK 3 Use or to select FAX SETTINGS then press OK 4 Use or to select TX SETTINGS then press OK 5 Use or to select DIALING LINE CHCK then press OK 6 Use or to select ON then press OK 7 Press Stop to return to the standby mode ...

Страница 179: ...3 Use the numeric keys to dial the international access code For details on international access codes contact your local telephone company 4 If necessary press Pause to insert a pause F A X N U M B E R 1 2 3 p 1 2 X X X X Ex The letter p is displayed between the numbers You can enter successive pauses within the fax number to make the pause time longer You can change the length of a pause inserte...

Страница 180: ... letter P appears at the end of the fax number Pauses entered at the end of fax numbers are always 10 seconds long 7 Press Start When TIME OUT is set to ON in TX SETTINGS in FAX SETTINGS in TX RX SETTINGS and if you have specified the destination by any other method than using numeric keys the machine starts scanning automatically without pressing Start after the preset time for this setting is el...

Страница 181: ...ng TX Jobs Cancel an ongoing job as follows 1 Press Stop 2 When the STOP KEY PRESSED message appears press OK P R E S S O K K E Y S T O P K E Y P R E S S E D When the CANCEL message appears press to select YES Y E S N O C A N C E L ...

Страница 182: ...obs currently being processed Checking Transmission Results 1 Press System Monitor repeatedly to select TX RX LOG then press OK If you set CHECKING THE LOG to OFF in SYSTEM SETTINGS transmission reception result does not appear in the LCD 2 Press or to view the required transmission reception result 3 Press Stop to return to the standby mode ...

Страница 183: ... Press or to scroll through the job list If you want to delete the job go to step 3 Otherwise press Stop to return to the standby mode 3 Press or to select the desired document then press OK 4 Press or to select CANCEL then press OK 5 Press to select YES If you do not want to cancel the job press to select NO 6 Press Stop to return to the standby mode ...

Страница 184: ...Sending Documents 4 88 ...

Страница 185: ...ons Do Not Match the Forwarding Conditions 5 15 Forwarding Documents Received in Memory 5 18 Forwarding Documents with Forwarding Errors 5 20 Printing or Erasing Documents with Forwarding Errors 5 21 Remote Reception 5 22 Registering Remote Reception ID 5 22 Receiving a Fax Remotely 5 24 Printing Received Documents 5 25 Two Sided Printing 5 25 Received Image Reduction 5 27 Canceling RX Jobs 5 29 C...

Страница 186: ... receiving faxes For advanced receiving features see Reference Guide Send Receive Enter the Setting Menu Enter the Receive Mode 04 08 12 16 20 Press Additional Functions Select TX RX SETTINGS with or then press OK Select FAX SETTINGS with or then press OK Select RX MODE with or then press OK ...

Страница 187: ... telephone Manual Does not answer any calls You have to manually receive faxes For details on these settings see Reference Guide Send Receive For AnsMode make sure an answering machine is connected to the machine For DRPD subscription to a DRPD service is required Press Stop to return to the standby mode You press Stop to cancel a job The CANCEL message appears Press to select Yes The job is cance...

Страница 188: ... press OK 4 Press or to select RX SETTINGS then press OK 5 Press or to select FAX TEL OPT SET then press OK 6 Press or to select RING START TIME then press OK 7 Use or the numeric keys to specify the duration 0 to 30 seconds for which the machine attempts to detect the fax tone before it starts ringing then press OK If the machine receives a fax the machine does not ring and switches to the receiv...

Страница 189: ...ecify the duration 15 to 300 seconds of ringing then press OK 10 Press or to select F T SWITCH ACTION then press OK 11 Press or to select the action the machine will take after the ringing ends then press OK RECEIVE Receives a fax DISCONNECT Disconnects the call 12 Press Stop to return to the standby mode ...

Страница 190: ... select TX RX SETTINGS then press OK 3 Press or to select FAX SETTINGS then press OK 4 Press or to select RX SETTINGS then press OK 5 Press or to select DRPD SELECT FAX then press OK 6 Press or to select a ring pattern then press OK DOUBLE RING SHORT SHORT LONG SHORT LONG SHORT OTHER RING TYPE NORMAL RING 7 Press Stop to return to the standby mode ...

Страница 191: ...ptional handset or the external telephone 2 Confirm that the modem s connecting sound is heard then press Start If you picked up the receiver of an external telephone in step 1 enter the two digit remote reception ID using the numeric keys of the external telephone See Receiving a Fax Remotely on p 5 24 3 Hang up the optional handset or the external telephone ...

Страница 192: ... CLASS 810 can store data for a maximum of 90 jobs or approximately 512 1 500 2 pages 1 1 Based on the condition that the other party sends the fax by the LASER CLASS 830i with ITU T Standard Chart No 1 standard mode The maximum number of pages that the machine s memory can store differs depending on the other party s machine Once the pages are printed they are deleted from the memory If the memor...

Страница 193: ...s 2 Press or to select SYSTEM SETTINGS then press OK If the System Manager ID and System Password have been set enter the System Manager ID and System Password using the numeric keys then press Log In Out 3 Press or to select COMMUNICATIONS then press OK 4 Press or to select MEMORY LOCK then press OK If the memory lock password has already been set enter the password then press OK 5 Press or to se...

Страница 194: ...s then press OK P A S S W O R D 1 2 3 4 5 6 7 Ex 8 Press or to select REPORT PRINT then press OK 9 Press or to select ON or OFF then press OK OFF Does not print a RX report ON Prints a RX report RX REPORT should also be set to ON so that RX reports are automatically printed when documents are received in memory For instructions see RX REPORT on p 12 55 ...

Страница 195: ...f you do not need to set the timer for memory lock skip to step 16 11 Press or to select ON then press OK 12 Press or to select MEM RX START TIME then press OK 13 Use the numeric keys to enter the start time in 24 hour format then press OK M E M R X S T A R T T I M E 0 0 0 0 Ex ...

Страница 196: ...Receiving Documents 5 12 14 Press or to select MEM RX END TIME then press OK 15 Use the numeric keys to enter the end time then press OK 16 Press Stop to return to the standby mode ...

Страница 197: ...to 3 in Memory Lock Reception on p 5 9 2 Press or to select MEMORY LOCK then press OK 3 Use the numeric keys to enter the memory lock reception password then press OK 4 Press or to select OFF then press OK The received documents are printed 5 Press Stop to return to the standby mode ...

Страница 198: ...der s machines 1 Press Additional Functions 2 Press or to select TX RX SETTINGS then press OK 3 Press or to select FAX SETTINGS then press OK 4 Press or to select RX SETTINGS then press OK 5 Press or to select RX RESTRICTION then press OK 6 Press or to select ON then press OK 7 Press Stop to return to the standby mode ...

Страница 199: ...d how to turn on and off the forward mode see Reference Guide Settings Management from a PC Specifying Forwarding Settings When Forwarding Destinations Do Not Match the Forwarding Conditions If a forwarding destination is not registered or if the received document does not match all of the forwarding conditions that you have specified you can specify the forwarding destination using the operation ...

Страница 200: ... OK 3 Press or to select FW W OUT CONDITION then press OK 4 Press or to select FAX or IFax then press OK 5 Press or to select ON then press OK 6 Press or to select FORWARD then press OK 7 Specify the forwarding destination using the one touch speed dialing key and press OK ...

Страница 201: ...FF B W or PDF then press OK 10 Press or to select DIVIDE INTO PAGES then press OK 11 Press or to select ON or OFF then press OK OFF Sends multiple images as a single file without dividing them ON Separates multiple images and send them as separate files 12 Press Stop to return to the standby mode ...

Страница 202: ...ed in Memory 1 Press System Monitor repeatedly to select TX RX STATUS then press OK 2 Press or to select the desired document then press OK You can transfer only the documents received in memory which appears with the message STNDBY in the system monitor ...

Страница 203: ...ents 3 Press or to select FORWARD then press OK 4 Specify the destination then press OK The machine starts to send the selected document You can specify only one destination registered in a one touch key or coded dial code ...

Страница 204: ...eatedly to select FORWARD ERR STATUS then press OK 2 Press or to select the desired document then press OK 3 Press or to select FORWARD then press OK 4 Specify the destination then press OK The machine starts to send the selected document You can specify only one destination registered in a one touch key or coded dial code The document is erased from memory if transferring is successful ...

Страница 205: ...S then press OK 2 Press or to select the desired document then press OK 3 Press or to select PRINT or CANCEL then press OK If MEMORY LOCK is ON in COMMUNICATIONS in SYSTEM SETTINGS the documents cannot be printed 4 Press to select YES If you do not want to print or erase the job press to select NO 5 Press Stop to return to the standby mode ...

Страница 206: ...ion is not available when ENERGY IN SLEEP in COMMON SETTINGS is set to LOW Registering Remote Reception ID Follow this procedure if you want to change the default remote reception ID of 25 1 Press Additional Functions 2 Press or to select TX RX SETTINGS then press OK 3 Press or to select FAX SETTINGS then press OK 4 Press or to select RX SETTINGS then press OK 5 Press or to select REMOTE RX then p...

Страница 207: ...Press Clear twice to delete the default remote reception ID of 25 8 Use the numeric keys to enter a new remote reception ID a combination of two characters using 0 to 9 and then press OK 9 Press Stop to return to the standby mode ...

Страница 208: ...up the external telephone 2 Use the numeric keys to enter the two digit remote reception ID to start reception If the machine is set for pulse dialing press Tone to switch to tone dialing before pressing the remote reception ID 3 When the reception is complete hang up the telephone ...

Страница 209: ...ed documents on both sides of the paper only when PAPER SIZE is set to LTR LGL or A4 The received documents are printed on one side of the paper when PAPER SIZE is not set to LTR LGL or A4 See Setting Paper Size and Type on p 2 12 1 Press Additional Functions 2 Press or to select TX RX SETTINGS then press OK 3 Press or to select TX RX COMMON SET then press OK 4 Press or to select RX SETTINGS then ...

Страница 210: ...Receiving Documents 5 26 6 Press or to select ON then press OK 7 Press Stop to return to the standby mode ...

Страница 211: ...n a reduced size 1 Press Additional Functions 2 Press or to select TX RX SETTINGS then press OK 3 Press or to select TX RX COMMON SET then press OK 4 Press or to select RX SETTINGS then press OK 5 Press or to select RECEIVE REDUCTION then press OK 6 Press or to select ON then press OK ...

Страница 212: ...O adjust the image reduction automatically Skip to step 10 9 Press or to select a preset reduction ratio 90 95 97 or 75 then press OK 10 Press or to select REDUCE DIRECTION then press OK 11 Press or to select VERTICAL ONLY or HORIZ VERTICAL then press OK VERTICAL ONLY Reduces the document vertically only HORIZ VERTICAL Reduces the document both horizontally and vertically 12 Press Stop to return t...

Страница 213: ...5 29 Receiving Documents Canceling RX Jobs Cancel an ongoing job as follows 1 Press Stop 2 When the CANCEL message appears press to select YES Y E S N O C A N C E L ...

Страница 214: ...s of the receive jobs currently being processed Checking Reception Results 1 Press System Monitor repeatedly to select TX RX LOG then press OK If you set CHECKING THE LOG to OFF in SYSTEM SETTINGS reception result does not appear in the LCD 2 Press or to view the required reception result 3 Press Stop to return to the standby mode ...

Страница 215: ... 2 Press or to scroll through the job list If you want to delete the job go to step 3 Otherwise press Stop to return to the standby mode 3 Press or to select the desired document then press OK 4 Press or to select CANCEL then press OK 5 Press to select YES If you do not want to cancel the job press to select NO 6 Press Stop to return to the standby mode ...

Страница 216: ...Receiving Documents 5 32 ...

Страница 217: ...Printing 6 Printing Printing Documents 6 2 Checking and Deleting Jobs 6 4 Checking and Deleting Print Jobs 6 4 ...

Страница 218: ...o print a document from a computer on the LASER CLASS 810 an optional network printer kit is required How to display the print screen or items on the screen may vary depending on your application and or OS Start the Print Command Select the Printer From an open document on an application click File Print Select the printer icon for the machine Canon LC800 L3000 UFRII LT Canon LC800 L3000 PCL5e Can...

Страница 219: ...3 Printing Adjust Preferences Print the Document After finished setting click OK Click Print or OK Printing speed may be slower when sending an e mail You want to cancel printing See Reference Guide Print ...

Страница 220: ...s turned on When the Processing Data indicator is turned off all print jobs are erased from the memory Checking and Deleting Print Jobs 1 Press System Monitor repeatedly to select PRINT STATUS then press OK 2 Press or to scroll through the job list and check the status of the print jobs If you want to delete the job go to step 3 Otherwise press Stop to return to the standby mode ...

Страница 221: ... 3 Press or to select the desired job then press OK 4 Press or to select CANCEL then press OK 5 Press to select YES If you do not want to cancel the job press to select NO 6 Press Stop to return to the standby mode ...

Страница 222: ...Printing 6 6 ...

Страница 223: ...PC Faxing 7 PC Faxing PC Faxing 7 2 ...

Страница 224: ... may vary depending on your application and or OS When the TX Document Archiving function is set to ON faxes cannot be sent from a computer Jobs that could not be sent are recorded on the activity report printed every 40 transmissions If TX Document Archiving is set to ON the activity report is set to automatically be printed every 40 transmissions Start the Print Command Select the Fax From an op...

Страница 225: ...umber in Sending Settings then click Add to Recipient List Click OK in the Fax Sending Settings You want to send a fax with a cover sheet Click the Cover Sheet tab and set the format for the cover sheet attachment You want to cancel sending a fax See Reference Guide Send Receive ...

Страница 226: ...PC Faxing 7 4 ...

Страница 227: ...Remote UI 8 Remote UI Remote UI 8 2 ...

Страница 228: ...he LASER CLASS 810 an optional network printer kit is required Prepare the Network Startup Set up the machine for use in a network then connect the machine and the PC to your network router or a hub For details see Set the Machine for Network Usage in the Starter Guide Start the web browser enter the IP address of the machine then press Enter on the keyboard ...

Страница 229: ...8 3 Remote UI Log on Operate the Machine I Select the user mode then click OK Now you can manage the machine on the web browser For details see Reference Guide Settings Management from a PC ...

Страница 230: ...Remote UI 8 4 ...

Страница 231: ...9 14 Clearing Page Totals 9 16 Printing Counter Information DEPT INFO LIST 9 18 Accepting Print Jobs with Unknown IDs 9 19 Managing User IDs 9 20 Handling Documents with Forwarding Errors 9 22 Restricting Access to Destinations 9 24 Setting a Password for the Address Book 9 24 Restricting the New Address 9 26 Restricting PC Faxing 9 27 Restricting Job Recall LASER CLASS 830i Only 9 28 Restricting ...

Страница 232: ...em Manager s name The maximum number of digits that you can store for the System Manager ID and System Password is seven If you enter fewer than seven digits for either setting the machine stores them with leading zeros Example If 321 is entered 0000321 is stored You cannot store a System Manager ID with only zeros as the number such as 0000000 If you enter a number that begins with zeros the lead...

Страница 233: ...oth a System Manager ID and password to manage the operations of the machine 6 Press or to select SYSTEM PASSWORD then press OK 7 Use the numeric keys to enter a number then press OK 8 Press or to select SYSTEM MANAGER then press OK 9 Use the numeric keys to enter the System Manager s name then press OK 10 Press Stop to return to the standby mode ...

Страница 234: ...ord have been set enter the System Manager ID and System Password using the numeric keys then press Log In Out ID 3 Press or to select DEVICE INFO then press OK 4 Press or to select DEVICE NAME then press OK 5 Use the numeric keys to enter a name up to 32 characters then press OK 6 Press or to select LOCATION then press OK 7 Use the numeric keys to enter the location of the machine up to 32 charac...

Страница 235: ...eration panel or using the Remote UI Otherwise all users will be considered as System Manager and anyone can access the SYSTEM SETTINGS menu from the operation panel or use the Remote UI without restriction See Specifying the System Manager Settings on p 9 2 The pages of received fax I fax documents and automatically printed reports are not counted as prints The maximum number of digits that you c...

Страница 236: ...ng the numeric keys then press Log In Out ID 3 Press or to select MANAGE DEPT ID then press OK 4 Press or to select ON then press OK 5 Press or to select REGISTER DEPT ID then press OK 6 Press or to select the number to which department will be designated then press OK 7 Use the numeric keys to enter the Department ID then press OK If you do not want to set a password you can use the machine by en...

Страница 237: ...OR SCAN LIMIT LASER CLASS 830i Only or PRINT LIMIT TOTAL PRINT is the sum of COPY LIMIT and PRINT LIMIT 12 Press or to select ON or OFF then press OK OFF Does not set a page limit restriction Skip to step 15 ON Set a page limit restriction 13 Press or to select PAGE TOTALS when TOTAL PRINT LIMIT is selected then press OK The message displayed will vary depending on which function you selected in s...

Страница 238: ...registered Department ID then press OK You can set the page limit from 0 to 999 999 pages Once a page limit is reached copying scanning or printing is not possible The page limit refers to the number of printed surfaces Therefore a two sided print is counted as two pages 15 Press Stop to return to the standby mode ...

Страница 239: ...em Password have been set enter the System Manager ID and System Password using the numeric keys then press Log In Out ID 3 Press or to select MANAGE DEPT ID then press OK 4 Press or to select ON then press OK 5 Press or to select REGISTER DEPT ID then press OK 6 Press or to select the Department ID whose password and page limit you want to change then press OK twice 7 Press or to select PASSWORD ...

Страница 240: ...lect ON or OFF then press OK OFF Does not set a page limit restriction Skip to step 16 ON Set a page limit restriction 13 Press or to select PAGE TOTALS when TOTAL PRINT LIMIT is selected then press OK The message displayed will vary depending on which function you selected in step 11 Example COPY LIMIT appears when COPY LIMIT is selected 14 Press Clear to clear the current number of page limit re...

Страница 241: ...9 11 System Manager Settings 16 Press Stop to return to the standby mode ...

Страница 242: ...ETTINGS then press OK If the System Manager ID and System Password have been set enter the System Manager ID and System Password using the numeric keys then press Log In Out ID 3 Press or to select MANAGE DEPT ID then press OK 4 Press or to select ON then press OK 5 Press or to select REGISTER DEPT ID then press OK 6 Press or to select the Department ID that you want to erase then press OK twice ...

Страница 243: ...select ERASE then press OK 8 Press or to select YES or NO then press OK NO Does not erase the selected Department ID and all of its settings YES Erase the selected Department ID and all of its settings 9 Press Stop to return to the standby mode ...

Страница 244: ... Press Additional Functions 2 Press or to select SYSTEM SETTINGS then press OK If the System Manager ID and System Password have been set enter the System Manager ID and System Password using the numeric keys then press Log In Out ID 3 Press or to select MANAGE DEPT ID then press OK 4 Press or to select ON then press OK ...

Страница 245: ...OK If you select CLEAR ALL TOTAL the counter information is deleted 7 Press or to select the desired function then press OK You can select TOTAL PRINT COPY SCAN COLOR SCAN LASER CLASS 830i Only or PRINT 8 Press or to display the desired Department ID and check the counter information 9 Press Stop to return to the standby mode ...

Страница 246: ...Press or to select SYSTEM SETTINGS then press OK If the System Manager ID and System Password have been set enter the System Manager ID and System Password using the numeric keys then press Log In Out ID 3 Press or to select MANAGE DEPT ID then press OK 4 Press or to select ON then press OK 5 Press or to select PAGE TOTALS then press OK ...

Страница 247: ...anager Settings 6 Press or to select CLEAR ALL TOTAL then press OK 7 Press or to select YES or NO then press OK NO Does not clear the page totals YES Clear the page totals 8 Press Stop to return to the standby mode ...

Страница 248: ...ssword have been set enter the System Manager ID and System Password using the numeric keys then press Log In Out ID 3 Press or to select MANAGE DEPT ID then press OK 4 Press or to select ON then press OK 5 Press or to select PAGE TOTALS then press OK 6 Press or to select PRINT LIST then press OK 7 Press to select YES Printing starts and the screen automatically returns to the standby mode If you ...

Страница 249: ...r the System Manager ID and System Password using the numeric keys then press Log In Out ID 3 Press or to select MANAGE DEPT ID then press OK 4 Press or to select ON then press OK 5 Press or to select PDL JOBS W OUT ID then press OK 6 Press or to select ON or OFF then press OK ON The machine accepts print jobs from computers that do not correspond with a registered Department ID OFF The machine do...

Страница 250: ...he Remote UI without restriction See Reference Guide Settings Management from a PC Managing the Department User ID from a Computer The User ID and password can be registered only from the Remote UI For details about the User ID Management see Reference Guide Settings Management from a PC Managing the Department User ID from a Computer You need to register the User ID and password before you set th...

Страница 251: ...9 21 System Manager Settings 4 Press or to select ON or OFF then press OK ON User ID Management is enabled OFF User ID Management is disabled 5 Press Stop to return to the standby mode ...

Страница 252: ...s or to select SYSTEM SETTINGS then press OK If the System Manager ID and System Password have been set enter the System Manager ID and System Password using the numeric keys then press Log In Out ID 3 Press or to select FORWARD ERR SET then press OK 4 Press or to select PRINT then press OK 5 Press or to select ON or OFF then press OK ON The machine prints received documents when document forwardi...

Страница 253: ... Settings 7 Press or to select ON or OFF then press OK ON The machine stores received documents in memory when document forwarding fails OFF The machine does not store the image 8 Press Stop to return to the standby mode ...

Страница 254: ...asting Setting a Password for the Address Book If you set a password the screen for entering the password appears when you attempt to edit the Address Book If you want to cancel password protection select OFF in step 5 1 Press Additional Functions 2 Press or to select SYSTEM SETTINGS then press OK If the System Manager ID and System Password have been set enter the System Manager ID and System Pas...

Страница 255: ...to select ON then press OK 6 Use the numeric keys to enter a password up to seven digits then press OK 7 Use the numeric keys to enter the password for confirmation then press OK If you enter a wrong password you have to start over from the first entry 8 Press Stop to return to the standby mode ...

Страница 256: ...nations Registering new destinations 1 Press Additional Functions 2 Press or to select SYSTEM SETTINGS then press OK If the System Manager ID and System Password have been set enter the System Manager ID and System Password using the numeric keys then press Log In Out ID 3 Press or to select RESTRICT TX FUNC then press OK 4 Press or to select RESTRICT NEW ADD then press OK 5 Press or to select ON ...

Страница 257: ... 810 1 Press Additional Functions 2 Press or to select SYSTEM SETTINGS then press OK If the System Manager ID and System Password have been set enter the System Manager ID and System Password using the numeric keys then press Log In Out ID 3 Press or to select RESTRICT TX FUNC then press OK 4 Press or to select FAX DRIVER TX then press OK 5 Press or to select ON or OFF then press OK 6 Press Stop t...

Страница 258: ... SYSTEM SETTINGS then press OK If the System Manager ID and System Password have been set enter the System Manager ID and System Password using the numeric keys then press Log In Out ID 3 Press or to select RESTRICT TX FUNC then press OK 4 Press or to select REST REDIAL CALL then press OK 5 Press or to select ON or OFF then press OK 6 Press Stop to return to the standby mode ...

Страница 259: ... SYSTEM SETTINGS then press OK If the System Manager ID and System Password have been set enter the System Manager ID and System Password using the numeric keys then press Log In Out ID 3 Press or to select RESTRICT TX FUNC then press OK 4 Press or to select RESTRICT REDIAL then press OK 5 Press or to select ON or OFF then press OK 6 Press Stop to return to the standby mode ...

Страница 260: ... ID and System Password have been set enter the System Manager ID and System Password using the numeric keys then press Log In Out ID 3 Press or to select RESTRICT TX FUNC then press OK 4 Press or to select CONFIRM FAX NO then press OK 5 Press or to select ON or OFF then press OK OFF The confirmation screen does not appear ON The confirmation screen appears when you enter a fax number using the nu...

Страница 261: ...D and System Password using the numeric keys then press Log In Out ID 3 Press or to select RESTRICT TX FUNC then press OK 4 Press or to select REST MULTI DEST then press OK 5 Press or to select OFF PROHIBIT or CONFIRMATION then press OK OFF Allows sending the documents to multiple recipients CONFIRMATION The message appears after pressing Start to confirm whether or not to send documents to multip...

Страница 262: ... Monitor screen When you set CHECKING THE LOG to OFF the Activity Report will not print automatically 1 Press Additional Functions 2 Press or to select SYSTEM SETTINGS then press OK If the System Manager ID and System Password have been set enter the System Manager ID and System Password using the numeric keys then press Log In Out ID 3 Press or to select CHECKING THE LOG then press OK 4 Press or ...

Страница 263: ...tically 10 9 Transcription Roller 10 10 Replacing the Toner Cartridge 10 11 Redistributing Toner 10 11 Replacing the Toner Cartridge with a New One 10 14 Replacing the Stamp Cartridge 10 17 Recycling Used Cartridges 10 19 The Clean Earth Campaign 10 19 U S A PROGRAM 10 21 CANADA PROGRAM CANADA PROGRAMME 10 24 Transporting the Machine 10 26 ...

Страница 264: ...These can damage the machine components When you turn off the main power switch the documents stored in memory will be erased To check the jobs stored in memory see the following Checking and Deleting Copy Jobs on p 3 20 Checking and Deleting Sending Documents Stored in Memory on p 4 87 Checking and Deleting Receiving Documents Stored in Memory on p 5 31 Checking and Deleting Print Jobs on p 6 4 E...

Страница 265: ...er powder and paper dust from accumulating inside 1 Turn off the main power switch and disconnect the power cord 2 Open the left cover 3 Grasp the blue plastic pull tab A on the toner cartridge 4 Pull the blue plastic pull tab until you can easily hold the handle of the toner cartridge ...

Страница 266: ...urface is exposed to light or is damaged 6 Use a clean soft dry lint free cloth to remove any toner or paper debris from the machine s interior Do not touch the fixing assembly A as it becomes very hot during use Do not touch the transfer roller B as this can damage the machine If loose toner comes into contact with your skin or clothing wash with cold water Warm water will set the toner 7 Hold th...

Страница 267: ...ne 9 Push the toner cartridge to make sure it is properly set in the machine Do not touch the fixing assembly A as it becomes very hot during use 10 Close the left cover Be careful not to get your fingers caught If you cannot close the left cover do not force it to close Open the cover and make sure the toner cartridge is properly set in the machine 11 Reconnect the power cord and turn on the main...

Страница 268: ...t available 1 Press Additional Functions 2 Press or to select ADJUST CLEANING then press OK 3 Open the multi purpose tray 4 Pull out the multi purpose tray extension until it clicks then open it 5 Load a sheet of blank LTR paper 6 Press or to select FIX UNIT CLEANING then press OK Cleaning starts When finished press Stop to return to the standby mode Use standard paper as the cleaning paper Throw ...

Страница 269: ...e power cord 2 Lift the lever and open the ADF cover 3 Open the feeder front cover 4 Clean the rollers A inside the ADF with a cloth dampened with water Then wipe the area with a soft dry cloth Do not dampen the cloth too much as this may tear the document or damage the machine 5 Clean the narrow glass plate B and the white plate C with a cloth dampened with water Then wipe the area with a soft dr...

Страница 270: ...y with a cloth dampened with water Then wipe the area with a soft dry cloth 8 Lower the document feeder tray Be careful not to get your fingers caught 9 Close the ADF Be careful not to get your fingers caught 10 Reconnect the power cord and turn on the main power switch Cleaning the ADF Automatically ...

Страница 271: ... the ADF roller by repeatedly feeding blank sheets of paper through it 1 Press Additional Functions 2 Press or to select ADJUST CLEANING then press OK 3 Press or to select FEEDER CLEANING then press OK 4 Load 5 sheets of blank paper into the ADF then press OK ADF cleaning starts When finished the display returns to standby mode Use LTR paper ...

Страница 272: ...transcription roller may be dirty Clean the transcription roller in the following procedure 1 Press Additional Functions 2 Press or to select ADJUST CLEANING then press OK 3 Confirm that TRANS ROLR CLEAN is displayed then press OK Cleaning starts When finished the display returns to standby mode ...

Страница 273: ...tridge set CONT PRINTING to KEEP PRINTING in RX SETTINGS of TX RX COMMON SET in TX RX SETTINGS See Setting Menu on p 12 5 When CONT PRINTING is set to KEEP PRINTING the printed documents may be light or blurred because of lack of toner The data is erased when the documents are printed out so you can not print the same documents again Do not touch the rollers and parts which have labels CAUTION Hot...

Страница 274: ...r cartridge by its handle Do not open the drum protective shutter on the toner cartridge Print quality may deteriorate if the drum surface is exposed to light or is damaged 5 Gently rock the toner cartridge 5 or 6 times to distribute toner evenly 6 Hold the toner cartridge by its handle The arrows A on the toner cartridge should be pointing toward the machine ...

Страница 275: ...th the guides inside the machine 8 Push the toner cartridge to make sure it is properly set in the machine Do not touch the fixing assembly A as it becomes very hot during use 9 Close the left cover Be careful not to get your fingers caught If you cannot close the left cover do not force it to close Open the cover and make sure the toner cartridge is properly set in the machine ...

Страница 276: ...toner cartridge 3 Pull the blue plastic pull tab until you can easily hold the handle of the toner cartridge 4 Remove the toner cartridge Always hold the toner cartridge by its handle Do not open the drum protective shutter on the toner cartridge Print quality may deteriorate if the drum surface is exposed to light or is damaged ...

Страница 277: ...ck the toner cartridge 5 or 6 times to distribute toner evenly 7 Remove the seals 2 places 8 Bend back the blue plastic pull tab Do not remove the pull tab as it is used to pull out the toner when the cartridge needs replaced 9 Pull out the seal completely Do not pull out the seal at an angle ...

Страница 278: ...rotrusions B C of the toner cartridge should be aligned with the guides inside the machine 12 Push the toner cartridge to make sure it is properly set in the machine Do not touch the fixing assembly A as it becomes very hot during use 13 Close the left cover Be careful not to get your fingers caught If you cannot close the left cover do not force it to close Open the cover and make sure the toner ...

Страница 279: ... hands or clothing If ink gets onto your hands or clothing wash it off immediately with cold water 1 Open the feeder cover half way 2 With the feeder cover open half way push the link arm as you open the feeder cover completely Push the link arm A before it catches onto the hook B The feeder cover opens as below and the stamp cartridge C can be replaced If the feeder cover does not open properly c...

Страница 280: ... until it clicks using tweezers Make sure that the stamp cartridge is not protruding from the surface Insert the stamp cartridge properly or it may cause paper jams 5 Gently close the feeder cover When closing the covers be careful not to get your fingers caught as this may result in personal injury ...

Страница 281: ...osed in each Cartridge box The Clean Earth Campaign THE Canon CARTRIDGE RECYCLING PROGRAM The Canon Cartridge Recycling Program fulfills the first initiative of Canon s Clean Earth Campaign which supports four critical environmental areas Recycling in the Workplace Conserving Environmental Resources Scientific Research and Education Encouraging Outdoors Appreciation The remaining Clean Earth initi...

Страница 282: ...ources Becoming a part of this worthwhile program is easy When your cartridge is of no further use simply follow the instructions detailed for U S or Canadian residents We appreciate your support of The Canon Cartridge Recycling Program Working together we can make a significant contribution to a cleaner planet Cartridges collected through this program are not refilled You are not entitled to a ta...

Страница 283: ...e new cartridge s box Place the empty cartridge in the box of your new cartridge Seal the box Option B Volume Box Return We encourage you to use this option as a more efficient way to ship cartridges Place as many cartridges as possible into one box Carefully seal the box with tape or Call 1 800 OK Canon to receive your free eight cartridge collection box ...

Страница 284: ...does not exceed UPS specifications Maximum weight 70 lb 31 8 kg Maximum length 108 in 2 743 mm Maximum girth length 2 x width 2 x height 130 in 3 302 mm If your shipment exceeds the above limits please call 1 800 OK Canon for special shipping information Please Note Do not send defective cartridges for replacement Defective cartridges under warranty should be exchanged by an authorized dealer or s...

Страница 285: ...ized returning label For Alaska and Hawaii Canon set up alternative mail service with the U S Postal Service Please call 1 800 OK Canon to receive U S Postal Service merchandise returning label Option UPS Pick up Give the shipment to your UPS driver when you receive your next regular delivery or Take the shipment to your local UPS receiving point ...

Страница 286: ... are specially marked so that Canon pays the postage Deposit your empty cartridge in any full size street mailbox or take it to your local Canada Post outlet or franchise Option B Volume Box Return eight or more cartridges We encourage you to use this option as a more efficient way to ship cartridges Call 1 800 667 2666 to receive your free Canon collection box kit The collection box can accommoda...

Страница 287: ...their collection box picked up Working to preserve endangered species is a long standing Canon interest To this end for every cartridge collected Canon Canada donates 1 shared equally between World Wildlife Fund Canada and the Nature Conservancy of Canada This donation is utilized in Canada For further information about The Clean Earth Campaign in Canada please call or write to Canon 1 800 667 266...

Страница 288: ... cover 3 Grasp the blue plastic pull tab A on the toner cartridge 4 Pull the blue plastic pull tab until you can easily hold the handle of the toner cartridge 5 Remove the toner cartridge Always hold the toner cartridge by its handle To avoid exposing the toner cartridge to light place it in its protective bag or wrap it in a thick cloth Do not open the drum protective shutter on the toner cartrid...

Страница 289: ... original position 8 Pick up the machine using the provided hand grips on the left and right sides Be sure at least two people carry the machine Do not lift the machine by any of its attachments Dropping the machine can cause personal injury If you have a back problem make sure to check the weight of this machine before carrying See Specifications on p 13 2 ...

Страница 290: ...Maintenance 10 28 ...

Страница 291: ...Loading the Paper 11 18 Changing the Paper Size Setting 11 19 General Problems 11 21 Paper Feeding Problems 11 23 Sending Receiving Problems 11 24 Sending Problems 11 24 Receiving Problems 11 29 Copying Problems 11 35 Telephone Problems 11 37 If a Power Failure Occurs 11 39 If You Cannot Solve a Problem 11 40 Customer Support U S A 11 40 Customer Support Canada 11 40 ...

Страница 292: ...k that the paper you are using meets the requirements for use See Paper Requirements on p 2 7 Make sure you have removed any scraps of paper from the inside of the machine When removing jammed documents or paper take care not to cut your hands on the edges of the document or paper When removing jammed paper or when inspecting the inside of the machine do not allow necklaces bracelets or other meta...

Страница 293: ...document or paper When removing jammed paper or when inspecting the inside of the machine do not allow necklaces bracelets or other metal objects to touch the inside of the machine as this may result in burns or electrical shock 1 Lift the lever and open the ADF 2 Remove any jammed documents Do not pull the document forcefully as it may tear 3 Lift the document feeder tray 4 Remove any jammed docu...

Страница 294: ...sing meets the requirements for use Make sure you have removed any scraps of paper from inside the machine 1 Open the left cover 2 Carefully pull the jammed paper out of the machine Do not touch the fixing assembly A as it becomes very hot during use If you tear the paper remove any torn pieces to avoid further jams If loose toner comes into contact with your skin or clothing wash with cold water ...

Страница 295: ...ided copying 5 Close the left cover Be careful not to get your fingers caught 6 If you use the optional paper cassette open the cover on the left side of the optional paper cassette Remove any jammed paper then close the cover 7 Pull out the paper cassette and push the corners of the stack under the tabs ...

Страница 296: ...Troubleshooting 11 6 8 Gently push the paper cassette back into the machine until it clicks Be careful not to get your fingers caught ...

Страница 297: ...achine temporarily received the data in memory because an error of some kind has occurred in the machine This error message appears with one of the messages below LEFT COVER OPEN CLOSE COVER LOAD CORRECT PAPER CHANGE REG D SIZE PAPER SETTINGS TONER LOW PREPARE NEW TONER TONER IS NOT SET INSERT TONER LOAD PAPER PAPER JAM PAPER JAM OPEN LEFT COVER This error message appears with another message When...

Страница 298: ...e document fed from the ADF is longer than 24 7 8 630 mm or is not feeding correctly The document is longer than 17 432 mm when you are sending e mail I fax or sending a document to a file server Reduce the length of the document to within 24 7 8 630 mm then try again If the document is shorter than 17 432 mm then try the procedure again FEEDER GLASS DIRTY CLEAN FEEDER GLASS The ADF scanning area ...

Страница 299: ...he paper correctly by inserting it all the way to the back of the paper cassette If the paper size is not appropriate for printing an error message appears with one of the messages below CHANGE REG D SIZE PAPER SETTINGS or CANNOT PRINT RX DATA FIX ERROR TO PRINT Set the appropraite size paper for printing and specify the correct size of paper in PAPER SETTINGS For printing reports or lists set the...

Страница 300: ...ar the paper jam from the ADF The number of TX RX jobs that can be stored in memory reached the maximum The maximum numbers of jobs that can be stored in memory are as follows Based on the condition that the other party sends the fax by the LASER CLASS 810 LASER CLASS 830i with ITU T No 1 Chart standard mode Up to 70 jobs for sending or 90 jobs for receiving 95 fax jobs including sending and recei...

Страница 301: ... to contain more than three levels of subgroups Modify the group so that it contains three levels of groups or less Register the one touch key or coded dial code that is not used NOT REGISTERED No destination is registered for the one touch key or coded dial code you pressed Register the destinations before using the Address Book function NO PAPER RECIPIENT No paper is loaded in the recipients fax...

Страница 302: ...ESSED PRESS OK KEY Stop has been pressed while scanning the document using the ADF Press OK then set the document again SYSTEM ERROR Some kind of error has occurred in the machine Turn off the main power switch wait for more than 10 seconds then turn it on again If the message persists turn off the main power switch disconnect the power cord and contact Canon Customer Care Center TONER IS NOT SET ...

Страница 303: ...ion 0001 A document may be jammed Remove the jammed document 0003 An attempt was made to send a document of 24 7 8 630 mm or longer from the ADF Divide the document into smaller parts and send from the platen glass A document takes a long time to send because it contains too much data Reduce the scanning resolution before sending A document takes a long time to receive Contact the other party and ...

Страница 304: ...send because your fax signal was not returned as the other party s line was engaged Check that the other party s line is not engaged and try again from the beginning 0037 The memory is full Print send or delete any documents stored in memory 0703 The memory for image data is full when sending documents Wait a few moments and then try sending again after other send jobs are complete Erase documents...

Страница 305: ...CP RARP or BOOTP server Check TCP IP SETTINGS in NETWORK SETTINGS in SYSTEM SETTINGS Or wait a while and then try sending again 0801 A timeout error occurred while the machine was communicating with the SMTP server to send an e mail message Check that the SMTP server is functioning normally or check the network status The SMTP server returned an error while trying to connect The destination is not...

Страница 306: ...an error during the connection A timeout error occurred on the server while connecting to the POP server Check the POP Server name in E MAIL I FAX in NETWORK SETTINGS in SYSTEM SETTINGS Confirm that the POP server is functioning normally Check the network status 0812 The POP password setting is incorrect Check the POP Server password in E MAIL I FAX in NETWORK SETTINGS in SYSTEM SETTINGS 0813 The ...

Страница 307: ... to use a file format other than HTML and then resend the data 0829 Data containing more pages that the machine can hold in the memory is received Print the received documents and ask the sender to resend the remaining pages 0839 The user name or password for the SMTP authentication in SMTP AUTH is incorrect Check the user name and password for SMTP AUTH in AUTH ENC SETTINGS in E MAIL I FAX in NET...

Страница 308: ...of the paper specified in CASSETTE or MP TRAY of the PAPER SETTINGS menu You need to load the correct size paper or change the paper size in CASSETTE or MP TRAY of the PAPER SETTINGS menu For print jobs you need to specify the paper size from your computer Re Loading the Paper 1 Load the correct size paper as shown on LCD display Printing resumes when you return the paper cassette to the machine ...

Страница 309: ...oting Changing the Paper Size Setting 1 Press Additional Functions 2 Press or to select PAPER SETTINGS then press OK 3 Press or to select CASSETTE or MP TRAY then press OK 4 Press or to select PAPER SIZE then press OK ...

Страница 310: ...per loaded into the machine then press OK 6 Press Stop to return to the standby mode 7 Pull out the paper cassette and then slowly return it to the machine until it clicks It is not necessary to pull the paper casette out as far as it goes The machine re starts printing ...

Страница 311: ... cassette or multi purpose tray For instructions on clearing paper jam See Clearing Jams on p 11 2 For instructions on loading paper see Set Up the Machine in the Starter Guide If the machine has no paper jam or paper is loaded in the paper cassette or multi purpose tray turn off the main power switch and wait for more than 10 seconds then turn it on again If the problem is fixed the Error indicat...

Страница 312: ...Troubleshooting 11 22 Is the main power switch turned on Turn on the main power switch Is the machine in the Sleep mode Press Energy Saver on the operation panel to cancel the Sleep mode ...

Страница 313: ...tly loaded See Set Up the Machine in the Starter Guide Does the machine contain too many sheets Make sure you load the correct quantity See Paper Requirements on p 2 7 Are different types of paper loaded in the machine Load only one type of paper Make sure you load paper that meets the requirements for use See Paper Requirements on p 2 7 Let the paper run out before refilling the machine Avoid mix...

Страница 314: ...ss Book correct Make sure the e mail address you entered or the e mail or file server address registered in the Address Book is correct If you are sending an e mail or I fax message are the SMTP Server and DNS Server settings correct Check the SMTP Server and DNS Server settings If you are sending to a file server are the user and password settings correct Check the user and password settings and ...

Страница 315: ...d correctly Make sure the document is correctly loaded See Loading Documents on p 2 5 Make sure the scanning platform and rear cover are fully closed See Paper Jams on p 11 4 Is the one touch key or coded dial code you entered registered correctly Check that the Address Book settings are registered correctly See Storing Editing Address Book on p 4 12 Did you dial the correct number Check that you ...

Страница 316: ...ternal telephone connected to the machine If there is no dial tone contact your local telephone company Is the recipient s machine a G3 fax machine Make sure the recipient s machine is compatible with your machine Is BUSY NO SIGNAL shown on the ERROR TX REPORT The fax number you dialed is busy Try sending the document later The recipient s machine is not working Ask the recipient to check the mach...

Страница 317: ...nd it directly rather than using a memory transmission Is a document stored in memory leaving little memory available Print send or delete any documents stored in memory Faxes sent from the machine are spotted or dirty Is the recipient s machine working properly Check the machine by making a copy If the copy is clear the problem may be in the recipient s machine If the copy is spotted or dirty cle...

Страница 318: ... ECM TX to OFF See TX RX SETTINGS on p 12 11 Cannot send using Error Correction Mode ECM Does the recipient s machine support ECM If the recipient s machine does not support ECM the document is sent in normal mode without error checking Errors occur frequently while sending Are the telephone lines in poor condition or do you have a bad connection Check if there is a device nearby that interferes w...

Страница 319: ...receive documents e mail or file server Are network settings specified Documents cannot be received if the appropriate network settings are not specified Confirm this with your system administrator Cannot receive a fax automatically Is the machine set to receive automatically For the machine to receive faxes automatically the receive mode must be set to FaxOnly FaxTel AnsMode or DRPD If you have s...

Страница 320: ...lephone and fax calls For the machine to switch between fax and telephone calls automatically the receive mode must be set to FaxTel AnsMode or DRPD If you have set AnsMode confirm that an answering machine is connected to the machine and that it is turned on with an outgoing message properly recorded See Basic Receiving Method on p 5 2 Are documents stored in memory leaving little or no memory av...

Страница 321: ...ng the remote reception ID Always press Start or dial the remote reception ID before hanging up Otherwise you will disconnect the call Are documents set on the ADF After removing the document from the ADF please attempt manual receiving again If you press Start when documents are set on the ADF it automatically switches to manual sending Print quality is poor Is the toner low or unevenly distribut...

Страница 322: ... of toner Replace the toner cartridge See Replacing the Toner Cartridge on p 10 11 Is the correct size of paper loaded in the machine Make sure you load paper that meets the requirements for use See Paper Requirements on p 2 7 Change PAPER SETTINGS See Setting Paper Size and Type on p 2 12 Received faxes print blotched or unevenly Is ECM RX set to ON ECM Error Correction Mode should eliminate such...

Страница 323: ...toner cartridge See Replacing the Toner Cartridge on p 10 11 Cannot receive using Error Correction Mode ECM Does the sender s machine support ECM If the sender s machine does not support ECM the document is received in normal mode without error checking Receiving of documents is too slow Is ECM Error Correction Mode set to ON Because ECM corrects errors during a transmission any problems on the li...

Страница 324: ...ccur frequently while receiving Are the telephone lines in poor condition or do you have a bad connection Check if there is a device nearby that interferes with signal reception e g microwave oven Lower the reception speed See SYSTEM SETTINGS on p 12 36 Is the sender s machine functioning properly Ask the sender to check that the machine is functioning properly Cannot print received documents on b...

Страница 325: ...as uneven density Is the toner low or unevenly distributed Redistribute the toner inside the toner cartridge If the problem persists replace the toner cartridge See Replacing the Toner Cartridge on p 10 11 Copy has vertical white streaks Is the toner low or unevenly distributed Redistribute the toner inside the toner cartridge If the problem persists replace the toner cartridge See Replacing the T...

Страница 326: ...per loaded in the machine Make sure you load paper that meets the requirements for use See Paper Requirements on p 2 7 Are you copying on the wrong side of the paper Some papers have a right side for copying If the copy quality is not as clear as you think it should be try copying on the other side of the paper Documents are copied in CALENDAR TYPE even if BOOK TYPE is selected or vice versa Are y...

Страница 327: ...ely plugged into the machine and into the wall outlet If the machine is plugged into a power strip make sure the power strip is plugged in and turned on Is the main power switch turned on Turn on the main power switch Is the machine set for the correct telephone line type Make sure the machine is set for the correct telephone line type See Set the Machine for Sending Faxes in the Starter Guide Tel...

Страница 328: ... is dialed Did you confirm the dial tone before entering the telephone number Make sure to confirm the dial tone before entering a telephone number If you enter the number before the dial tone can be heard the call may not connect or the wrong number may be dialed ...

Страница 329: ...ower cut functions are limited as follows You cannot send receive copy or print documents You may not be able to make telephone calls using an external telephone depending on the type of telephone you use You can receive telephone calls using an external telephone depending on the type of telephone you use To fully charge the built in battery it takes approximately 14 hours when the main power swi...

Страница 330: ...er warranty 1 800 652 2666 For the location of the authorized service facility nearest you visit http www canon ca or 1 800 652 2666 If the problem cannot be corrected by using one of the above technical support options repair options are available at the time of your call to the live technical support number above or via the website at http www canon ca Support program specifics are subject to ch...

Страница 331: ...ETTINGS 12 30 ADJUST CLEANING 12 32 REPORT SETTINGS 12 34 SYSTEM SETTINGS 12 36 Summary of Reports and Lists 12 51 Printing Reports Automatically 12 52 TX REPORT 12 52 RX REPORT 12 55 ACTIVITY REPORT 12 57 Printing Reports and Lists Manually 12 59 Printing ACTIVITY REPORT 12 60 Printing 1 TOUCH LIST CODED DIAL LIST and GROUP DIAL LIST 12 61 Printing 1 TOUCH LIST 2 CODED DIAL LIST 2 12 62 Checking ...

Страница 332: ...nt out USER S DATA LIST Printing USER S DATA LIST 1 Press Additional Functions 2 Press or to select REPORT SETTINGS then press OK 3 Press or to select LIST PRINT then press OK 4 Press or to select USER DATA LIST then press OK 5 Press to select YES Printing starts and the screen automatically returns to the standby mode If you do not want to print the list press to select NO ...

Страница 333: ...s Additional Functions 2 Press or to select the menu you want to access then press OK PAPER SETTINGS VOLUME CONTROL COMMON SETTINGS COPY SETTINGS TX RX SETTINGS ADDRESS BOOK SET PRINTER SETTINGS TIMER SETTINGS ADJUST CLEANING REPORT SETTINGS SYSTEM SETTINGS ...

Страница 334: ...the submenu see Setting Menu on p 12 5 4 To register the settings or go to a submenu item press OK 5 When finished press Stop to return to standby mode If you press Stop before pressing OK the setting will not be registered Press Additional Functions to return to the previous display ...

Страница 335: ...er Size and Type on p 2 12 2 MP TRAY Sets the paper size and type on the multi purpose tray See Setting Paper Size and Type on p 2 12 VOLUME CONTROL Setting Item Description 1 MONITOR VOLUME Sets the volume for monitor tone during the fax transmission ON 1 3 OFF 2 RING VOLUME Sets the volume of the ring produced when the machine detects a call 1 3 3 ENTRY TONE Beeps when pressing the keys on the o...

Страница 336: ...TX JOB DONE TONE Beeps when a document is sent ERROR ONLY 1 3 OFF ON 1 3 6 RX JOB DONE TONE Beeps when a document is received ERROR ONLY 1 3 OFF ON 1 3 7 SCAN DONE TONE Beeps when scanning is completed ERROR ONLY 1 3 OFF ON 1 3 8 PRINT DONE TONE Beeps when printing is completed ERROR ONLY 1 3 OFF ON 1 3 ...

Страница 337: ...e based on the original s size and copy ratio settings when making a copy or the set ratio of the image when receiving a fax 1 COPY Sets whether to activate the Auto Cassette Select function when copying 1 CASSETTE 1 ON OFF 2 CASSETTE 2 ON OFF 3 MP TRAY OFF ON 2 PRINTER Sets whether to activate the Auto Cassette Select function when printing 1 CASSETTE 1 ON OFF 2 CASSETTE 2 ON OFF 3 RECEIVE FAX Se...

Страница 338: ...sage will appear when the ADF is dirty DO NOT DISPLAY DISPLAY 7 INIT COMMON SET Restores all COMMON SETTINGS to the default except for DISPLAY LANGUAGE Press to select YES If you do not want to restore all settings press to select NO Only for users of the optional paper cassette For the LASER CLASS 810 an optional network printer kit is required LASER CLASS 810 Only ...

Страница 339: ...STANDARD SETTINGS Sets the default setting for copying 1 IMAGE QUALITY Sets the document type for copying TEXT PHOTO TEXT PHOTO 2 DENSITY Sets the density for copying STANDARD DARK LIGHT 3 COPIES Sets the number of copies 1 99 4 2 SIDED Sets whether to make the two sided copies automatically OFF 1 2 SIDED 2 2 SIDED 2 1 SIDED 5 PAPER SELECT Sets the paper source for copying CASSETTE 1 CASSETTE 2 5 ...

Страница 340: ...E GROUP Selects a paper size group for your machine INCHES A AB 7 INIT COPY SET Restores all COPY SETTINGS to the default Press to select YES If you do not want to restore all settings press to select NO Only for users of the optional paper cassette ...

Страница 341: ...ow quality images On the contrary a low compression ratio increases the amount of memory used for the document but results in high quality images NORMAL HIGH RATIO LOW RATIO 3 RETRY TIMES Sets the number of retry attempts for sending jobs to an e mail or file server address 0 5 See Reference Guide Send Receive 4 SCANNING DENSITY Adjusts the scanning density for sending documents 1 9 5 STANDARD SET...

Страница 342: ...TAMP DOCUMENT as default OFF ON 6 SEND SETTINGS Sets the options for sending documents to an e mail address or file server 1 TX FILE NAME Sets the name of the document you send to an e mail address or file server max 24 characters including spaces 2 SUBJECT Sets the subject for your e mail message max 40 characters including spaces 3 MESSAGE TEXT Sets the message body text for your e mail message ...

Страница 343: ...iginal GAMMA 1 8 GAMMA 2 2 GAMMA 1 0 GAMMA 1 4 9 SHARPNESS Sets the contrast of the images you scan 1 7 10 ROTATE TX Sets whether to use the TX Rotation function TX Rotation function automatically corrects the orientation of the document by rotating the image when sending For example if you set a document that has a horizontal orientation vertically on the machine the machine rotates the image and...

Страница 344: ...Receive OFF ON 3 RECEIVE REDUCTION Sets whether the received images print out at a reduced size See Reference Guide Send Receive ON Image reduction is turned on 1 RX REDUCTION Selects the reducing type AUTO FIXED REDUCTION 90 95 97 75 2 REDUCE DIRECTION Selects the reducing direction VERTICAL ONLY HORIZ VERTICAL OFF Image reduction is turned off 4 RX PAGE FOOTER Sets whether to insert the machine ...

Страница 345: ...ncluding spaces See Set the Machine for Sending Faxes in the Starter Guide 2 TEL LINE TYPE Selects the telephone line type See Set the Machine for Sending Faxes in the Starter Guide TOUCH TONE ROTARY PULSE 3 OFFHOOK ALARM Sets whether the alarm sounds when the handset of the external telephone is off the hook ON OFF 3 TX SETTINGS Sets the transmission features 1 ECM TX Sets whether the ECM Error C...

Страница 346: ...redialing is not attempted 4 TIME OUT Sets whether to scan a document automatically after specifying the destination This function is not available when you dial with the numeric keys OFF ON 5 STAMP DOCUMENT Sets whether to stamp documents when sending with Direct TX or Memory TX or to stamp documents only when sending with Direct TX If you are using the LASER CLASS 830i this setting is enabled wh...

Страница 347: ...r the external telephone rings when the machine receives a fax This function is only available when the RX MODE is set to FaxOnly or FaxTel ON The telephone rings when the machine receives a fax if an external telephone is connected RING COUNT Sets the number of incoming rings before the machine answers 1TIMES 99TIMES OFF The telephone does not ring when the machine receives a fax In the Sleep mod...

Страница 348: ... call manually ON The machine switches to the document receive mode after the external telephone rings for a specified time F T RING TIME Sets the length of time to elapse before the machine switches to document receiving 1SEC 99SEC 7 RX RESTRICTION You can reject faxes from senders with no fax telephone number in their sender information OFF All receptions are conducted ON Receives the fax only f...

Страница 349: ...ed functional settings for each one touch key registered in the machine OFF The optional setting is not set for this destination ON The optional setting is set for this destination 1 ECM Selects whether to use ECM Error Correction Mode ON OFF 2 TX SPEED Select the transmission speed 33600bps 14400bps 9600bps 4800bps 3 INTERNATIONAL Selects a mode for documents you are sending DOMESTIC LONG DISTANC...

Страница 350: ...pient s name max 16 characters including spaces 3 DIVIDE INTO PAGES Sets if multiple images are sent as separate files or as a single file OFF Sends multiple images as a single file without dividing them ON Separates multiple images and send them as separate files 4 IMAGEQUALITY Sets the resolution of the document you send 200x200dpi 200x400dpi 300x300dpi 400x400dpi 600X600dpi 100X100dpi 150X150dp...

Страница 351: ...L TYPE Sets the original type for the document you send TEXT PHOTO TEXT PHOTO SMB Registers SMB addresses 1 HOST NAME Registers the name of the file server max 120 characters 2 NAME Registers the recipient s name max 16 characters including spaces 3 FILE PATH Registers the path to the file server max 120 characters 4 LOGIN NAME Registers the login name to access the file server max 24 characters 5...

Страница 352: ... ENTRY Registers the recipient s fax number max 120 digits including spaces 2 NAME Registers the recipient s name max 16 characters including spaces 3 OPTIONAL SETTING Sets the optional settings for sending faxes OFF The optional setting is not set ON The optional setting is set 1 ECM Selects whether to use ECM Error Correction Mode ON OFF 2 TX SPEED Selects the transmission speed 33600bps 14400bp...

Страница 353: ...s SMB Registers SMB addresses 1 HOST NAME Registers the name of the file server max 120 characters 2 NAME Registers the recipient s name max 16 characters including spaces 3 FILE PATH Registers the path to the file server max 120 characters 4 LOGIN NAME Registers the login name to access the file server max 24 characters 5 PASSWORD Registers the password to access the file server max 14 characters...

Страница 354: ...ient s name max 16 characters including spaces FTP Registers FTP addresses 1 HOST NAME Registers the name of the file server max 120 characters 2 NAME Registers the recipient s name max 16 characters including spaces 3 FILE PATH Registers the path to the file server max 120 characters 4 LOGIN NAME Registers the login name to access the file server max 24 characters 5 PASSWORD Registers the passwor...

Страница 355: ...ecified A4 B5 A5 LGL LTR EXECUTIV STMT ISO B5 ISO C5 COM10 MONARCH DL 2 DEFAULT PAPERTYPE Sets the default paper type for print jobs This machine has internally defined optimal print modes for each specified paper type PLAIN PAPER COLOR RECYCLED HEAVY PAPER 1 HEAVY PAPER 2 HEAVY PAPER 3 BOND TRANSPARENCY LABELS ENVELOPE 3 COPIES Sets the number of documents printed 1 999 4 2 SIDED PRINTING Sets wh...

Страница 356: ...celed 8 COLLATE Sets whether to collate the printouts automatically OFF COLLATE 9 ERROR TIME OUT Sets the length of time before the machine returns an error when no data is received from the computer ON Sets the error time out period 5SEC 300SEC OFF The error time out is off 10 INIT PRINTER SET Restores all PRINTER SETTINGS to the default Press to select YES If you do not want to restore all setti...

Страница 357: ... of the host computer 8 CUSTOM PAPER Sets whether to use a custom paper size OFF Disables you to specify a custom paper size ON Enables you to specify a custom paper size 1 UNIT OF MEASURE Selects the unit of measurement to specify a custom paper size INCHES MILLIMETERS 2 X DIMENSION Specifies the horizontal size of the custom paper 05 00 14 00 127 356 mm 3 Y DIMENSION Specifies the vertical size ...

Страница 358: ... the left and right edges is available for printing on A4 paper Only the width increases 11 HALFTONES Specifies the display pattern of subtle gradation medium gradation for black and white data for each text part graphics part and image part 1 TEXT Enables this function to text parts RESOLUTION Prints precisely so that the lines of text data appear clearly This setting is appropriate for printing ...

Страница 359: ... IMAGE Enables this function to image parts such as picture images TONE GRADATION RESOLUTION 12 RESET PRINTER Clears all print jobs in progress and resets the printer function Press to select YES If you do not want to restore all settings press to select NO For the LASER CLASS 810 an optional network printer kit is required LASER CLASS 830i Only ...

Страница 360: ...EEP TIME Sets the auto sleep mode when the machine remains idle for a certain period of time 3MIN 30MIN See Setting the Sleep Mode on p 1 16 ON OFF 5 AUTO CLEAR TIME Sets the auto clear mode when the machine has no operation idle for a certain period of time 1MIN 9MIN The machine returns to the standby mode See Setting Auto Clear Time on p 1 18 ON OFF 6 DAYLIGHT SV TIME Sets the daylight saving ti...

Страница 361: ...12 31 Machine Settings TIMER SETTINGS 1 START DATE TIME Sets the start date 1 MONTH 2 WEEK 3 DAY 2 END DATE TIME Sets the end date 1 MONTH 2 WEEK 3 DAY ...

Страница 362: ...red for a long time at high temperatures and high humidity HIGH Selects to compensate for poor quality that occurs when using heavyweight paper 5 SPECIAL MODE N When the two sided printing function is used paper may curl severely or become jammed Enable this setting to prevent paper curling or jamming OFF ON 6 SPECIAL MODE P Sets to activate when lightweight paper or paper which is easy to get une...

Страница 363: ...ed image also appears faintly on the next output may occur 10 CONT PRINT MODE Sets whether to prevent the back edge of the previous page from appearing on the following page during continuous printing of half tone prints or photographs OFF ON 11 BACK EDGE MODE Sets whether to prevent back edge of paper from smudging OFF ON 12 LARGE PAPER MODE Sets whether to improve toner fix on large sized paper ...

Страница 364: ... send a document REPORT WITH TX IMAGE Sets whether to print the first page of the document under the report OFF ON OUTPUT NO No report is printed 2 RX REPORT Sets whether the reception report prints out OUTPUT NO PRINT ERROR ONLY OUTPUT YES 3 ACTIVITY REPORT Sets whether to automatically print the transaction report and selects its type 1 AUTO PRINT Sets whether an activity report is printed autom...

Страница 365: ... CODED DIAL LIST 3 GROUP DIAL LIST Press to select YES If you do not want to print the list press to select NO 3 ADD BOOK DETAILS Prints the details of Address Book 1 1 TOUCH DETAILS 2 CODED DETAILS Press to select YES If you do not want to print the list press to select NO 4 USER DATA LIST Prints the setting list registered in the menu See Printing USER S DATA LIST on p 12 2 Press to select YES I...

Страница 366: ...32 characters including spaces 2 DEVICE INFO Sets device information 1 DEVICE NAME Registers the machine name max 32 characters including spaces 2 LOCATION Registers the machine location max 32 characters including spaces 3 MANAGE DEPT ID Sets if the department ID management is used OFF The department ID management is not used ON The department ID management is used 1 REGISTER DEPT ID Registers th...

Страница 367: ...the print limit is used OFF ON 000000 999999 3 ERASE Erases the department ID and password Press to select YES If you do not want to erase all settings press to select NO 2 PAGE TOTALS Displays clears and prints counter information 1 VIEW PAGE TOTALS Displays how much paper was used by each department 1 TOTAL PRINT 2 COPY 3 SCAN 4 COLOR SCAN 5 PRINT 2 CLEAR ALL TOTAL Clears counter information Pre...

Страница 368: ...etwork 1 IPv4 SETTINGS Sets TCP IPv4 network 1 IP ADDRESS Sets IPv4 Address settings 1 IP ADDRESS AUTO 2 IP ADDRESS 3 SUBNET MASK 4 GATEWAY ADDRESS 1 IP ADDRESS AUTO Sets whether to automatically set an IP address ON Enables an IP address to the machine automatically 1 DHCP ON OFF 2 BOOTP OFF ON 3 RARP OFF ON OFF Allocates an IP address to the machine manually 2 IP ADDRESS Registers a fixed IP add...

Страница 369: ...ets the DNS server settings 1 DNS SERVER SET Registers the DNS server address 1 PRIM DNS SERVER Registers the primary server address 2 SECOND DNS SERVER Registers the secondary server address 2 HOST DOMAIN NAME Registers the host name and domain name of the DNS server 1 HOST NAME Registers the host name of the DNS server 2 DOMAIN NAME Registers the domain name of the DNS server 3 DNS DYNAMIC SET S...

Страница 370: ...heck whether the machine can connect to a device on the network 1 PING COMMAND Enter the IPv6 address of a device on the network and press OK to check whether the machine can connect to that device 2 HOST NAME Enter the host name of a device on the network and press OK to check whether the machine can connect to that device 6 SET IP ADD RANGE Sets whether to restrict the range of IP addresses OFF ...

Страница 371: ...e DNS server 1 SAME HOST DOMAIN ON OFF 2 HOST NAME Registers the host name of the DNS server 3 DOMAIN NAME Registers the domain name of the DNS server 3 DNS DYNAMIC SET Sets whether to use the DNS server dynamic update setting 1 DNS DYNA UPDATE Sets whether to use the DNS server dynamic update function ON Enable the DNS server dynamic update function 1 REG MANUAL ADD Registers the manual address O...

Страница 372: ...mmunication ON OFF OFF Disables to use RAW 6 USE PASV MODE Sets the PASV mode for FTP OFF ON 7 FTP EXTENSION Sets the FTP Extension settings OFF ON 8 USE HTTP Sets whether to activate HTTP Hyper Text Transfer Protocol for the Remote UI ON OFF 9 PROXY SETTINGS Sets whether to use Proxy server 1 USE PROXY Enables to use Proxy server OFF Proxy server is not used ON Enables the use of a proxy server 1...

Страница 373: ... specified 1 USER 2 PASSWORD 10 PORT NO Sets the port number settings 1 LPD 0 65535 default 515 2 RAW 0 65535 default 9100 3 HTTP 0 65535 default 80 4 SMTP RX 0 65535 default 25 5 POP3 RX 0 65535 default 110 6 FTP SENDING 0 65535 default 21 7 SMTP TX 0 65535 default 25 8 SNMP 0 65535 default 161 11 PERMIT RX MAC ADD Sets whether to activate a MAC address filter OFF Disables MAC address filter ...

Страница 374: ...ifies the LAN Manager of its existence OFF ON 3 SNMP SETTINGS Sets detailed information about SNMP 1 USE SNMP Sets whether to activate SNMP ON OFF 2 COMMUNITY NAME 1 Sets SNMP community name 1 default public 3 COMMUNITY NAME 2 Sets SNMP community name 2 4 SNMP WRITABLE 1 Enables computers on the network to access the machine and modify its settings ON OFF 5 SNMP WRITABLE 2 Enables computers on the...

Страница 375: ...cation mode HALF DUPLEX FULL DUPLEX 2 ETHERNET TYPE Selects the Ethernet type 10 BASE T 100 BASE TX 6 NETWORK INFO Checks the current network settings 1 IPv4 Checks the IPv4 settings 1 IP ADDRESS Checks the IP address 2 SUBNET MASK Checks the subnet mask 3 GATEWAY ADDRESS Checks the gateway address 4 DOMAIN NAME Checks the domain name 5 HOST NAME Checks the host name 2 IPv6 Checks the IPv6 setting...

Страница 376: ...ing function OFF ON 2 SMTP SERVER Registers the host name of the machine with the DNS server 3 POP Sets whether to receive e mail using a POP server OFF ON 4 AUTH ENC SETTINGS Specifies authenticating method before sending e mail 1 POP BEFORE SEND Sets whether to use the SMTP server requires POP before SMTP method for authenticating users who have logged in the POP server before sending e mail OFF...

Страница 377: ...e limit it is split up into several e mail messages before being sent 0MB 99MB 2 DIVIDED OVER MAX Sets whether to divide a document into separate files when it is sent if its size exceeds the data size you specify OFF ON 2 FAX SETTINGS Sets the facsimile communication 1 TX START SPEED Sets the transmission start speed for faxes 33600bps 2400bps 4800bps 7200bps 9600bps 14400bps 2 RX START SPEED Set...

Страница 378: ... coded dial code 2 IMAGE FORMAT Sets the file format to use when forwarding TIFF B W PDF 3 DIVIDE INTO PAGES Sets whether multiple images are sent as separate files or as a single file OFF ON 2 I FAX Sets whether to forward received I faxes OFF Does not perform forwarding when the forwarding conditions are not met ON Performs forwarding using the settings below when the forwarding conditions are n...

Страница 379: ...dress Book OFF ON 2 1 Registration of group addresses is not restricted 2 You can still make calls using an external phone if all of the following conditions are set The machine is in the Sleep mode RX MODE is set to FaxOnly ENERGY IN SLEEP is set to LOW 3 FAX DRIVER TX Sets whether to restrict sending faxes from a computer using the fax driver ON OFF 4 REST REDIAL CALL RESTRICT REDIAL Sets whethe...

Страница 380: ...ELECT PnP Sets which driver to install when installing printer drivers to your computer through the USB port For example after installing the PCL Printer driver you can also install the UFR II Printer Driver via the USB port by switching this setting to UFRII LT FAX UFRII LT PCL 5e PCL 6 Press or select which printer driver to install press OK 14 UPDATE FIRMWARE This function is used only when the...

Страница 381: ...ST GROUP DIAL LIST Lists groups registered for group addresses USER S DATA LIST Lists all the current settings and registered sender information DEPT INFO LIST Lists the Department IDs page totals of scans prints and copies that have been processed by each department and page limits of scans prints and copies that can be processed ACTIVITY REPORT Shows the last 40 transactions performed by the mac...

Страница 382: ...Press or to select REPORT SETTINGS then press OK 3 Press or to select SETTINGS then press OK 4 Press or to select TX REPORT then press OK 5 Press or to select the setting you want then press OK PRINT ERROR ONLY Prints a report only when a transmission error occurs OUTPUT YES Prints a report every time you send a document OUTPUT NO Does not print a report Skip to step 7 ...

Страница 383: ... page of the documents under the report then press OK OFF Does not print the first page ON Prints the first page When forwarding the received documents the machine does not print the first page of the documents under the report even if REPORT WITH TX IMAGE is set to ON 7 Press Stop to return to the standby mode ...

Страница 384: ...on fax telephone number DESTINATION ID Destination name registered in Address Book ST TIME Transmission time TIME USE Transmission duration PAGES SENT Number of pages sent RESULT Result of transaction OK Transmission successful NG Transmission failed STOP Transmission manually canceled before completion BUSY NO SIGNAL The line is busy or the recipient does not answer your call Error code For descr...

Страница 385: ...ct SETTINGS then press OK 4 Press or to select RX REPORT then press OK 5 Press or to select the setting you want then press OK OUTPUT NO Does not print a report PRINT ERROR ONLY Prints a report only when a reception error occurs OUTPUT YES Prints a report every time you receive a document 6 Press Stop to return to the standby mode ...

Страница 386: ...ient s fax telephone number address DESTINATION ID Sender s name registered in Address Book ST TIME Transmission time TIME USE Transmission duration PGS Number of pages received RESULT Result of transaction OK Reception successful NG Reception failed STOP Reception manually canceled before completion Error code For descriptions of error codes see Error Codes on p 11 13 ...

Страница 387: ... transmissions and the settings under AUTO PRINT are not displayed Proceed to step 7 6 Press or to select the setting you want then press OK OUTPUT YES Prints a report after every 40 transactions OUTPUT NO Does not print a report Skip to step 9 7 Press or to select TX RX SEPARATE then press OK 8 Use or to select the setting you want then press OK OFF Prints a report with the transmission and recep...

Страница 388: ...rtment ID is printed Transmission logs are listed according to Department ID ST TIME Transmission time DESTINATION TEL ID Destination name and fax number address NO Transaction number MODE Transaction Error correction mode PGS Number of pages sent RESULT Result of transaction transaction duration OK Transaction successful NG Transaction failed ...

Страница 389: ...H LIST 2 CODED DIAL LIST 2 USER S DATA LIST DEPT INFO LIST FORWARDING CONDITION LIST To print USER S DATA LIST see Printing USER S DATA LIST on p 12 2 For information on each report or list see Summary of Reports and Lists on p 12 51 To print DEPT INFO LIST see Printing Counter Information DEPT INFO LIST on p 9 18 Reports can be printed on LGL or LTR paper plain or recycled paper ...

Страница 390: ...to select REPORT SETTINGS then press OK 3 Press or to select LIST PRINT then press OK 4 Press or to select ACTIVITY REPORT then press OK 5 Press to select YES Printing starts and the screen automatically returns to the standby mode If you do not want to print the report press to select NO ...

Страница 391: ...T PRINT then press OK 4 Press or to select SPEED DIAL LIST then press OK 5 Press or to select the desired list then press OK 1 TOUCH LIST Prints 1 TOUCH LIST CODED DIAL LIST Prints CODED DIAL LIST GROUP DIAL LIST Prints GROUP DIAL LIST 6 Press to select YES Printing starts and the screen automatically returns to the standby mode If you do not want to print the list press to select NO ...

Страница 392: ...elect LIST PRINT then press OK 4 Press or to select ADD BOOK DETAILS then press OK 5 Press or to select the desired list then press OK 1 TOUCH DETAILS Prints 1 TOUCH LIST 2 CODED DETAILS Prints CODED DIAL LIST 2 6 Press to select YES Printing starts and the screen automatically returns to the standby mode If you do not want to print the list press to select NO ...

Страница 393: ...the report jobs currently being processed Checking and Deleting Report Jobs 1 Press System Monitor repeatedly to select REPORT STATUS then press OK 2 Press or to scroll through the job list When you delete the report job press OK twice then press to select YES 3 Press Stop to return to the standby mode ...

Страница 394: ...an check the remaining memory according to the status of the machine 1 Press System Monitor repeatedly to select AVAILABLE MEMORY then press OK to confirm the remaining memory 7 5 A V A I L A B L E M E M O R Y Ex 2 Press Stop to return to the standby mode ...

Страница 395: ...Appendix 13Appendix Specifications 13 2 General 13 2 Facsimile 13 3 Telephone 13 5 Send LASER CLASS 830i Only 13 5 Copier 13 6 Printer 13 7 Index 13 8 ...

Страница 396: ...uding toner cartridge Dimensions 17 3 4 in H x 19 in D x 20 1 2 in W 452mm H x 481mm D x 520 mm W 22 7 8 in H x 19 in D x 20 1 2 in W 580mm H x 481mm D x 520 mm W with optional cassette Installation Space 38 3 4 in D x 43 1 4 in W 984 mm D x 1097 mm W including optional handset Environmental Conditions Temperature 59 F 86 F 15 C 30 C Humidity 10 80 RH Display Languages ENGLISH FRENCH SPANISH PORTU...

Страница 397: ...memory Transmission Reception Memory LASER CLASS 810 Maximum approx 512 1500 3 pages 2 total pages of transmission reception LASER CLASS 830i Maximum approx 1500 pages 2 total pages of transmission reception 1 The Public Switched Telephone Network PSTN currently supports 28 8 Kbps modem speed or lower depending on telephone line conditions 2 Based on ITU T Standard Chart No 1 JBIG standard mode 3 ...

Страница 398: ...utomatic redialing Manual redialing with Redial Pause key Sequential broadcast 201 destinations Automatic reception Remote reception by telephone Default ID 25 ACTIVITY REPORT after every 40 transactions TX Transmission RX Reception REPORT TTI Transmit Terminal Identification LASER CLASS 830i Speed dialing One touch speed dialing 80 destinations Coded speed dialing 420 destinations Group dialing 4...

Страница 399: ...DF B W JPEG Color PDF Compact Color Resolution 100 x 100 dpi 150 x 150 dpi 200 x 100 dpi 200 x 200 dpi 200 x 400 dpi 300 x 300 dpi 400 x 400 dpi 600 x 600 dpi System Environment Windows 98 Me Windows XP Professional Home Edition Windows 2000 Server Professional SP1 or later Windows Server 2003 Windows Vista Solaris Version 2 6 or later Mac OS X Red Hat Linux 7 2 Interface 100BASE TX 10BASE T Color...

Страница 400: ... Compact Color Original Size E mail LTR LTRR LGL LDR A3 B4 A4 A4R A5 A5R B5 B5R I Fax LTR LTRR LGL 1 LDR 1 A3 1 B4 1 A4 1 A4R 1 A5 1 A5R 1 B5 1 B5R 1 1 Sent as LTR Server Software Microsoft Exchange Server 5 5 SP2 Sendmail 8 11 2 Lotus Domino R4 5 R5 Copier Scanning Resolution TEXT mode TEXT PHOTO mode PHOTO mode 600 dpi x 600 dpi Printing Resolution 1200 dpi enhanced x 600 dpi Magnification Auto ...

Страница 401: ... Handling Paper cassette 500 sheets x 1 cassette 21 lb 80 g m2 Multi purpose tray 100 sheets 21 lb 80 g m2 Paper Delivery 100 sheets 17 to 21 lb bond 64 to 80 g m2 Print Speed See Copy Speed on p 13 6 Printing Resolution 1200 dpi enhanced x 600 dpi Number of Tones 256 Toner Cartridge p 1 13 ...

Страница 402: ...g 4 75 Broadcasting 4 65 C CANADA PROGRAM CANADA PROGRAMME 10 24 Canceling Canceling Copy Jobs 3 19 Canceling RX Jobs 5 29 Canceling TX Jobs 4 85 Canceling Copy Jobs 3 19 Canceling RX Jobs 5 29 Canceling TX Jobs 4 85 CDRH Regulations xxxiv Changing Group Name 4 40 Changing the Paper Size Setting 11 19 Changing the Password and Page Limit 9 9 Checking Checking and Deleting Copy Jobs 3 20 Checking a...

Страница 403: ... d un Télécopieur Canon xxxii Confirming Entered Fax Numbers 9 30 Connection of the Equipment xxvi Contents viii Copier 13 6 Copy Fax key 1 6 Copy Features ii Copying Problems 11 35 Copy job Canceling Copy Jobs 3 19 Checking and Deleting Copy Jobs 3 20 Copy key 1 4 Copy Mode 1 9 Copyright xxii Customer Support Customer Support Canada xx Customer Support U S A xix Customer Support Canada xx Custome...

Страница 404: ...esses LASER CLASS 830i Only 4 18 Editing One Touch Keys Coded Dial Codes 4 25 Energy Saver key 1 5 Erasing the Department ID and Password 9 12 Error Codes 11 13 Error indicator 1 5 Ethernet port 1 3 Exterior 10 2 External device jack 1 3 F Facsimile 13 3 Fax Send key 1 5 Fax Send Mode 1 9 Fax numbers Confirming Entered Fax Numbers 9 30 Registering a Fax Number 4 30 Registering Fax Numbers 4 13 Fax...

Страница 405: ...se Tray e g Envelopes 2 10 J Jams Clearing Jams 11 2 Document Jams 11 3 Paper Jams 11 4 Job Recall Redial 4 69 L LASER CLASS 810 1 6 LASER CLASS 830i 1 4 Laser Safety xxxiv LCD LCD Standby Mode 1 9 LCD display 1 5 LCD Messages 11 7 LCD Standby Mode 1 9 LCD display 1 5 LCD Messages 11 7 Left cover 1 3 Left Side of the Operation Panel 1 7 Legal Limitations on the Usage of Your Product and the Use of...

Страница 406: ... Requirements 2 7 Re Loading the Paper 11 18 Setting Paper Size and Type 2 12 Paper cassette 1 2 Paper delivery tray 1 2 Paper Feeding Problems 11 23 Paper Jams 11 4 Paper Requirements 2 7 Paper Select key 1 4 Paper stopper 1 2 Password Changing the Password and Page Limit 9 9 Erasing the Department ID and Password 9 12 Registering the Department ID Password and Page Limit 9 6 Setting a Password f...

Страница 407: ...on Restriction 5 14 Recycling Used Cartridges 10 19 CANADA PROGRAM CANADA PROGRAMME 10 24 The Clean Earth Campaign 10 19 U S A PROGRAM 10 21 Redial key 1 8 Redistributing Toner 10 11 Registering a Fax Number 4 30 Registering E Mail I Fax Addresses LASER CLASS 830i Only 4 18 Registering Fax Numbers 4 13 Registering File Server Addresses LASER CLASS 830i Only 4 21 Registering Group Addresses 4 33 Re...

Страница 408: ...se tray 1 3 Specifications 13 2 Specifying Destinations 4 44 Specifying the System Manager Settings 9 2 Stamp key 1 7 Start key 1 5 Stop key 1 5 Storing Editing Storing Editing Address Book 4 12 Storing Editing Group Addresses 4 33 Storing Editing One Touch Keys Coded Dial Codes 4 13 Storing Editing Address Book 4 12 Storing Editing Group Addresses 4 33 Storing Editing One Touch Keys Coded Dial Co...

Страница 409: ... Dial Codes 4 46 Using Favorites Buttons LASER CLASS 830i Only 4 54 Using Group Addresses 4 48 Using One Touch Keys 4 44 Using Address Book Key 4 50 Using Coded Dial Codes 4 46 Using Favorites Buttons LASER CLASS 830i Only 4 54 Using Group Addresses 4 48 Using One Touch Keys 4 44 Utilisation au Canada xxxii V View Settings key 1 4 W When Forwarding Destinations Do Not Match the Forwarding Conditio...

Страница 410: ...Appendix 13 16 ...

Страница 411: ......

Страница 412: ...ON U K LTD Woodhatch Reigate Surrey RH2 8BF United Kingdom CANON DEUTSCHLAND GmbH Europark Fichtenhain A10 47807 Krefeld Germany CANON ITALIA S p A Via Milano 8 20097 San Donato Milanese MI Italy CANON ESPAÑA S A Joaquín Costa 41 28002 Madrid Spain CANON LATIN AMERICA INC 703 Waterford Way Suite 400 Miami Florida 33126 U S A CANON AUSTRALIA PTY LTD 1 Thomas Holt Drive North Ryde Sydney N S W 2113 ...

Отзывы: