background image

P/N:

88M003A

1

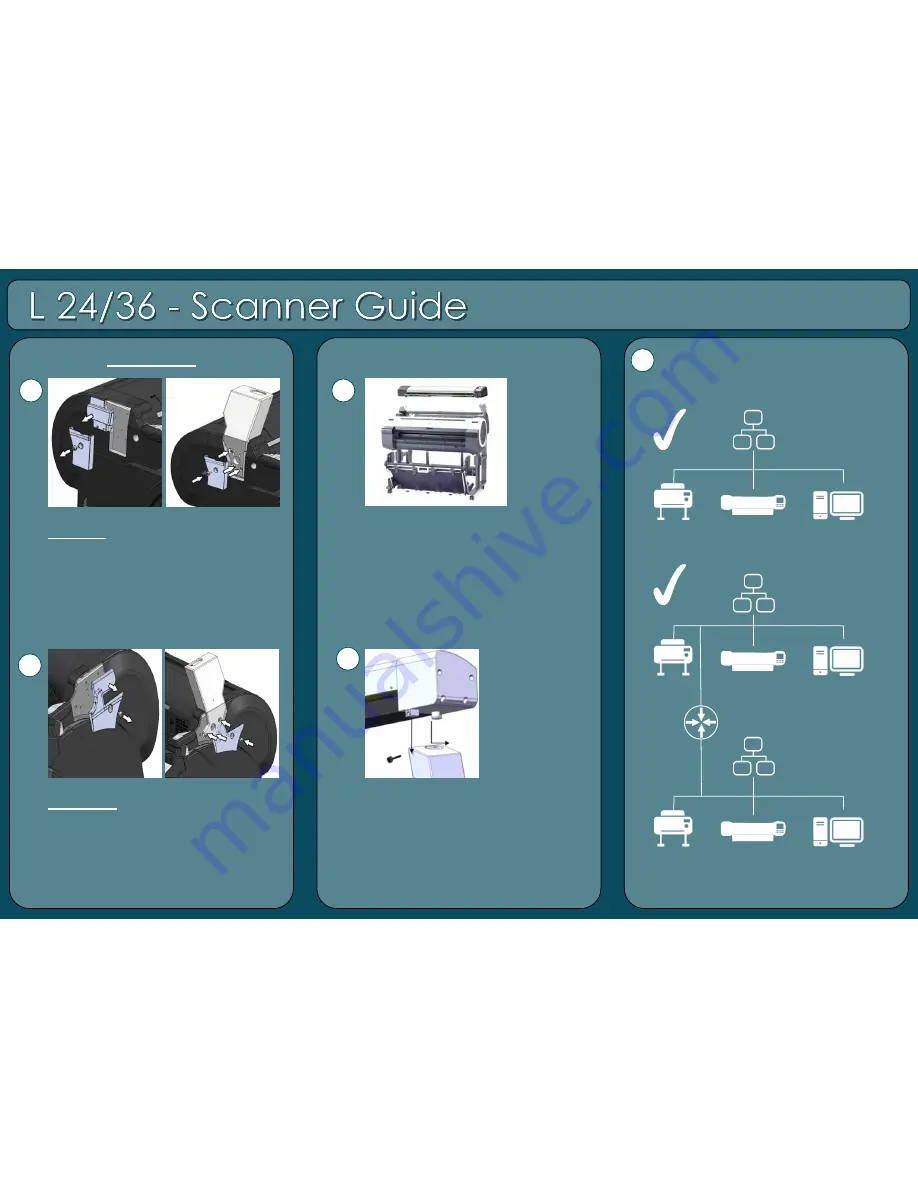
Left side: Remove panels from
the printer as shown.
Fit the left scanner mount using 3
of the screws supplied, and then
replace lower cover only.

2

Right side: Remove panels from
the printer as shown.
Fit the right scanner mount using
3 of the screws supplied, and then
replace lower cover only.

3

Place scanner on scanner
mounts.

4

Place the scanner’s  feet in the
holes on top of the scanner
mounts and pull the scanner to
the front.
Secure in place using the 2
thumb screws provided.

5

Only one L series MFP system
per network subnet.

192.168.

001

.XXX

255.255.255.000

192.168.

002

.XXX

255.255.255.000

Installation

Содержание L24

Страница 1: ...x 2 x 1 x 1 x 5 x 1 x 1 80 35 95 F 35 C 50 F 10 C Beware of finger trap when opening or closing the scanner Beware of exposed electrical connectors if covers removed Keep out of direct sunlight Do not shock Keep dry Operating Environment Relative humidity 35 80 Temperature 10 C 35 C ...

Страница 2: ...INA Model name L24 L36 Function Large Format Scanner Rating voltage 19V Rating current 3 42A Power supply FSP065 REBXX X 0 9 A Z or Blank Название модели L24 L36 Функция Широкоформатная сканер Рейтинг напряжение 19V Рейтинг ток 3 42A Мощность блок FSP065 REBXX Х 0 9 A Z или пустой Warning This is a Class A product In a domestic environment this product may cause radio interference in which case th...

Страница 3: ...n Fit the right scanner mount using 3 of the screws supplied and then replace lower cover only 3 Place scanner on scanner mounts 4 Place the scanner s feet in the holes on top of the scanner mounts and pull the scanner to the front Secure in place using the 2 thumb screws provided 5 Only one L series MFP system per network subnet 192 168 001 XXX 255 255 255 000 192 168 002 XXX 255 255 255 000 Inst...

Страница 4: ...leshooting 3 8 xxx xxx xxx xxx xxx xxx 9 10 11 Only one L Scan App per network subnet See Troubleshooting 3 Power on Configure scanner network address Insert CD into PC Browse CD Select Auto run Install L Scan App Select Maintenance videos Select documentation folder 7 6 ...

Страница 5: ...rom the printer Insert document into the centre of the scanner face up Insert USB memory stick FAT32 128GB max Select SCAN to USB function and press the Green button Wait before removing USB stick Ensure L Scan App is running on one PC only Insert document into the centre of the scanner face up Select SCAN to PC function and press the Green button Wait for transfer to PC 1 2 3 ...

Страница 6: ... Top drive rollers Scan glass Hold up plate Bottom rollers Rotate rollers by hand to clean all round Remove the document return guides Insert the calibration target into the scanner Face up black end first Select the Settings Select Calibration The calibration target will be scanned back forth until complete Please wait 1 3 2 ...

Страница 7: ...te from scanner Check network PC or select a lower scan Quality mode 1 2 Variations in background Clean and calibrate the scanner 1 5 3 4 2 The scanner communicates with the printer or L Scan App on the PC via network broadcast If more than one of the supported printers iPF 670 671 770 771 is on the subnet there is no way of defining which printer will receive the copy Other printer models are not...

Отзывы: