background image

Page


29


of


39


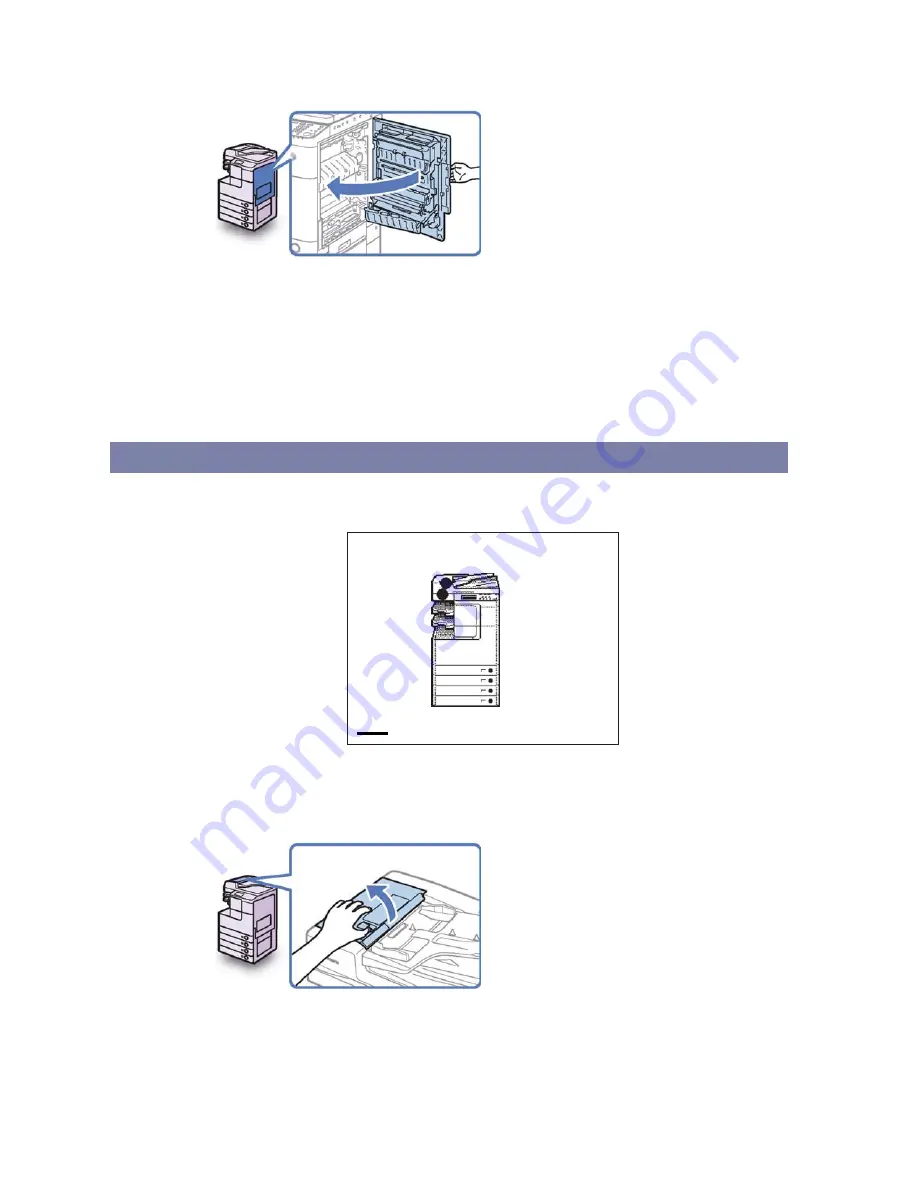
Place your hand where the hand 
symbol () is located on the right 
cover of the main unit, and then 
gently close the right cover until 
it clicks into place. 

CAUTION 

When closing the cover, be careful 
not to get your fingers caught, as 
this may result in personal injury. 


IMPORTANT


After you have cleared all the paper jams, make sure to return all the levers and 
covers to their original positions. Once you have removed all of the jammed paper, 
printing resumes. 

Feeder 

If paper is 

jammed in the feeder, remove the jammed paper as described below. 

IMPORTANT 

The Feeder (DADF-AA1/-AB1) is optional for the imageRUNNER 2545/2535/2530/ 
2525/2520. 

Paper is jammed in the indicated area. 

Open the ADF cover to remove the 
paper. Check the area below ADF also. 

111

 The paper has jammed. 

System Monitor 


Open the feeder cover. 

Содержание iR2545i

Страница 1: ...t Quality Problems 3 Other Problems 4 Self diagnostic Display 5 Error Messages 5 Error Codes 10 Clearing Paper Jams 17 Locating Paper Jams 18 Fixing Unit 19 Inside of the Right Cover 21 Stack Bypass 22 Paper Drawers 1 and 2 23 Paper Drawers 3 and 4 27 Feeder 29 Paper Output Unit 31 Inner Finisher B1 Optional 33 Clearing Staple Jams 36 Service Call Message 39 Restarting the Machine 39 ...

Страница 2: ... paper guides in each paper drawer match the size of the paper loaded Incorrectly set paper guides may cause frequent paper jams Adjust Paper Drawer to Hold the Correct Paper Size Cause The paper used is not suitable for the machine Remedy Make sure that the paper used meets the paper requirements Set Machine up for the correct paper Special paper Mode may reduce the frequency of paper curls and j...

Страница 3: ...ler Print density is irregular Cause The machine s transfer output is not appropriate for the paper used Remedy Depending on device use special modes or select the correct media type These mode s enables you to select the machine s transfer output from three levels Cause The machine s print speed is too high for the media used Remedy Depending on device use special modes or select the correct medi...

Страница 4: ...or bleed on prints Remedy Depending on device switch on special mode designed to prevent excessive moisture inside the machine from adversely affecting prints Other Problems Staples are jammed Cause Staples are jammed in the finisher Remedy Remove the jammed staples from the finisher Prints are not delivered to the correct paper output tray Cause The functions for required tray has not been select...

Страница 5: ...ctions Cannot complete searching due to timeout Check the settings Cause The machine could not search for destinations within the specified time Remedy Increase the time setting for Search Timeout in Register LDAP Server Cause The machine could not authenticate a user against an authentication server and retrieve attributes about the user from the server within the specified time Remedy Increase t...

Страница 6: ...heck whether the DNS server s DNS settings are correct Cause If Login Information is set to Use security authent for the LDAP server the machine cannot determine the host name Remedy Check the DNS Domain Name System server settings Check the TCP IP Cause The machine s TCP IP is not operating Remedy Check the IP address settings IP address DHCP RARP BOOTP Cause The machine and the network cable are...

Страница 7: ...r I fax Remedy Check that the network cables and connectors are properly connected No response from the server Check the settings Cause The specified server settings are incorrect or the server is not turned ON Alternatively the machine s TCP IP resources may be low Remedy Wait for a while and try browsing again If you still fail try selecting another server Out of resources Wait for a moment then...

Страница 8: ...acters that cannot be used with the selected server Cause is used in the search criterion Remedy Remove from the search criterion and then search again The combination of characters used in the search criterion does not constitute an acceptable search criterion There is an unequal number of and is not placed within Remedy Make sure that the characters for the search criterion are combined properly...

Страница 9: ... the maximum number of subdirectory levels allowed Remedy The directory level that you are trying to access cannot be specified Specify a different destination The send function currently cannot be used Confirm with administrator Cause All the sending functionalities are disabled Remedy Check the following settings Send Restriction Settings on the Send Function Authentication Settings page Use Sca...

Страница 10: ...ng it 0005 Cause 1 The recipient did not answer within 35 seconds Remedy Confirm that the recipient s machine is able to communicate and try again Cause 2 The recipient s machine is not a G3 fax Remedy Check the type of receiving machine with the receiving party 0009 Cause 1 There is no paper Remedy Load paper Cause 2 The paper drawer is not correctly inserted into the machine Remedy Insert the pa...

Страница 11: ...ber registered on the other party s fax machine Remedy Check to see that the correct fax number is registered on the other party s fax machine 0099 Cause A job was canceled during transmission to a USB memory media device Remedy Try sending again if necessary 0401 Cause The USB memory media device is full or the maximum number of files that can be stored in the root directory the top level of the ...

Страница 12: ...er to which the data is saved 0701 Cause The specified Department ID does not exist or the password has changed Remedy Enter the correct Department ID or password using numeric keys on the control panel and try again 0703 Cause The memory for image data is full when sending color documents Remedy Wait for a few moments and try again after other send jobs are complete Remedy Delete documents stored...

Страница 13: ...bs cannot be sent because TCP IP is not functioning correctly Remedy Check that TCP IP Settings in Network Settings is set correctly Cause The IP address is not set Remedy Check that TCP IP Settings in Network Settings Cause When the machine was turned ON an IP address was not assigned to the machine by the DHCP RARP or BOOTP server Remedy After the machine is turned ON communication with a networ...

Страница 14: ... server Cause An incorrect destination was specified when sending an e mail or I fax Remedy Check the e mail or I fax address 0808 Cause A timeout error occurred while the machine was communicating with the FTP server Remedy Check that the FTP server is functioning normally Remedy Check the network status Cause The FTP server returned an error while trying to connect The destination is not correct...

Страница 15: ... resend the data 0819 Cause You have received data that cannot be processed MIME information is incorrect Remedy Check the settings and ask the sender to resend the data 0820 Cause You have received data that cannot be processed BASE 64 or uuencode is incorrect Remedy Check the settings and ask the sender to resend the data 0821 Cause You have received data that cannot be processed TIFF analysis e...

Страница 16: ...s limit Ask the sender to resend the remaining pages 0839 Cause The user name or password for the SMTP Authentication is incorrect Remedy Check that User and Password on the Authentication Encryption Settings screen are set correctly 0852 Cause An error occurred because the main power switch was turned OFF while a job was being processed Remedy Check to see if the main power switch is turned ON Re...

Страница 17: ...When removing paper which has become jammed inside the machine take care not to allow the toner on the jammed paper to come into contact with your hands or clothing as this will dirty your hands or clothing If they become dirty wash them immediately with cold water Washing with warm water may set the toner and make it impossible to remove the toner stains When removing paper which has become jamme...

Страница 18: ...umber of copies or prints even if you are printing multiple sets When paper is jammed inside the machine the machine detects the jammed paper and displays where you can find it Approximate locations of the jammed paper are indicated with dots on the machine s image Check for all paper jam locations on the touch panel display and see the appropriate pages below for instructions on how to remove jam...

Страница 19: ...Fixing Unit If paper is jammed in the fixing unit remove the jammed paper as described below A CAUTION The fixing unit and its surroundings are subject to high temperatures When removing jammed paper do not touch anything in this area except the jammed paper or the upper cover h Open right cover and follow the label Recover instruction to remove paper Later When finished close all covers The paper...

Страница 20: ...fixing unit by the tab and remove any jammed paper A CAUTION The fixing unit and its surroundings are subject to high temperatures When removing jammed paper do not touch anything in this area except the jammed paper or the upper cover Place your hand where the hand symbol is located on the right cover of the main unit and then gently close the right cover until it clicks into place A CAUTION When...

Страница 21: ... paper is jammed inside the machine s right cover remove the jammed paper as described below NOTE Example The 2 Way Unit B1 is optional for Models in the Canon the image RUNNER 1 Press the button on the right cover of the main unit and open the right cover 2 Remove any jammed paper Open right cover and follow the label Recover instruction to remove paper Later When finished close all covers 1 1 Th...

Страница 22: ...may result in personal injury Troubleshooting IMPORTANT After you have cleared all the paper jams make sure to return all the levers and covers to their original positions Once you have removed all of the jammed paper printing resumes If paper is jammed in the stack bypass follow the procedure below to remove the jammed paper M Open right cover and follow the label Recover instruction to remove pa...

Страница 23: ...s and covers totheir original positions Once you have removed allof the jammed paper printing resumes Paper Drawers 1 and 2 If paper is jammed inside Paper Drawers 1 and 2 remove the jammed paper as described below IMPORTANT The procedure described in this section assumes that the machine is equipped with four paper drawers The number of available paper drawers may vary depending on the machine co...

Страница 24: ...he right cover of the main unit and open the right cover Remove any jammed paper 3 Open the paper drawer s right cover and remove any jammed paper 4 Press the button on Paper Drawer 1 and pull out the drawer until it stops Troubleshooting ...

Страница 25: ...l it clicks into place A CAUTION When returning the paper drawer to its original position be careful not to get your fingers caught as this may result in personal injury 7 Press the button on the Paper Drawer 2 and pull out the drawer until it stops 6 8 Remove any jammed paper Troubleshooting ...

Страница 26: ...l not to get your fingers caught as this may result in personal injury IMPORTANT After you have cleared all the paper jams to their original positions Once you have resumes Place your hand where the hand symbol is located on the right cover of the main unit and then gently close the right cover until it clicks into place A CAUTION When closing the cover be careful not to get your fingers caught as...

Страница 27: ...The number of available paper drawers may vary depending on the machine configuration 1 Press the button on the right cover of the main unit and open the right cover 2 Open the right cover of the cassette feeding unit and remove any jammed paper h Open right cover and follow the label Recover instruction to remove paper Later When finished close all covers The paper has jammed System Monitor Paper...

Страница 28: ...into the machine until it clicks into place A CAUTION When returning the paper drawer to its original position be careful not to get your fingers caught as this may result in personal injury 6 Close the right cover of the cassette feeding unit A CAUTION When closing the cover be careful not to get your fingers caught as this may result in personal injury ...

Страница 29: ...eared all the paper jams make sure to return all the levers and covers to their original positions Once you have removed all of the jammed paper printing resumes Feeder If paper is jammed in the feeder remove the jammed paper as described below IMPORTANT The Feeder DADF AA1 AB1 is optional for the imageRUNNER 2545 2535 2530 2525 2520 h Paper is jammed in the indicated area Open the ADF cover to re...

Страница 30: ...n the feed dial and remove any jammed originals Do not pull the original forcibly because it may tear Feed Dial 4 Close the inner cover and then the feeder cover A CAUTION When closing the covers be careful not to get your fingers caught as this may result in personal injury ...

Страница 31: ...njury Be aware that the light emitted from the platen glass may be very bright when closing the feeder IMPORTANT After you have cleared all the paper jams make sure to return all the levers and covers to their original positions Once you have removed all of the jammed paper printing resumes If paper is jammed in the paper output unit remove the jammed paper as described below I System Monitor 161T...

Страница 32: ...mmed paper 4 Place your hand where the hand symbol is located on the right cover of the main unit and then gently close the right cover until it clicks into place A CAUTION When closing the cover be careful not to get your fingers caught as this may result in personal injury IMPORTANT After you have cleared all the paper jams make sure to return all the levers and covers to their original position...

Страница 33: ...ttempt to pull out the jammed paper by force Doing so may damagethemachine 2 Open the front cover of the finisher and then close it A CAUTION When closing the cover be careful not to get your fingers caught as this may result in personal injury System Monitor 111Thepaperhasjammed h Remove jammed paper from output tray Recover and openiclose finisher cover Later When finished close an covers e e r ...

Страница 34: ... cover of the main unit and open the right cover 4 Pull out the paper output unit 5 Remove any jammed paper If paper is jammed far inside hold down the inner guide and remove the jammed paper 6 Return the paper output unit to its original position ...

Страница 35: ...over until it clicks into place A CAUTION When closing the cover be careful not to get your fingers caught as this may result in personal injury IMPORTANT After you have cleared all the paper jams make sure to return all the levers and covers to their original positions Once you have removed all of the jammed paper printing resumes ...

Страница 36: ...the jammed staples as described below Stapler is jammed System Monitor Fo I low label instruction in the finisher Recover cover to remove staple Later When finished close all covers 1 2 Open the front cover of the finisher Grasp the staple case by the green tab to lift and pull it from the stapler unit ...

Страница 37: ...le case be careful not to cut your fingers on the staples 4 Slide and remove the full row of jammed staples remaining in the slot Return the metal part of the staple case to its original position Make sure that the metal part clicks into place 5 6 Return the staple case to its original position in the stapler unit Make sure that the staple case clicks into place ...

Страница 38: ...he finisher A CAUTION When closing the cover be careful not to get your fingers caught as this may result in personal injury NOTE As soon as the cover is closed the stapler unit automatically conducts several dry fires to reposition the staples ...

Страница 39: ...low A Turn the main power switch on the main unit s left side OFF ON again If the machine still does not operate normally contact your service representative with the error code below I E000000 Troubleshooting RestartingtheMachine If a service call message is displayed restart the machine IMPORTANT If the main power is turned OFF all the jobs in the machine s memory will be erased 1 Turn OFF the m...

Отзывы: