


List of Error Messages
8-46
8
T
ro
u
b
les
ho
oti
n
g
List of Error Messages
This section explains the various messages that appear on the touch panel display, along with
possible causes and remedies.
For explanations of messages that are not listed here, see the
Sending and Facsimile Guide
and the
Network Guide
.
Self-Diagnostic Display
If the machine displays a self-diagnostic error message, follow the instructions on the touch
panel display.
Self-diagnostic error messages appear on the touch panel display when:
•
scanning or printing cannot be performed because of an operational error.
•
you need to make a decision or take some action during scanning, copying, or printing.
•
you need to make a decision or take some action while browsing the network.
The following is a list of self-diagnostic error messages, along with their possible causes and
remedies.
A4 Load Paper.
Cause
The optimum paper size selected by the Automatic Paper Selection mode is not available in
the machine.
Remedy
Load the indicated paper size into the machine. If you press
(Start) while this message is
displayed, prints are made with the currently selected paper size.
Remedy 1
If the message continues to be displayed even if the indicated paper size is loaded, set
Drawer Eligibility For APS/ADS in Common Settings (from the Additional Functions screen)
for that paper drawer to ‘On’. (See “Auto Paper Selection/Auto Drawer Switching,” on
p. 4-27.)
Check your document.
Cause
Paper or originals are jammed.
Remedy
Remove the jammed paper or originals. (See “Clearing Paper Jams” on p. 8-3, and “Feeder
(DADF-P2)” on p. 8-16.)
Load Paper.
Cause 1
The machine has run out of paper. No more prints can be made.
Remedy
Load paper. (See “Paper Drawers,” on p. 7-2.)
Cause 2
The paper drawer is not inserted correctly.
Remedy
Insert the paper drawer properly. (See “Paper Drawers,” on p. 7-2.)
Содержание iR2018i
Страница 2: ...iR2030 iR2025 iR2022i iR2018i Reference Guide 0 Ot ...
Страница 115: ...Available Paper Stock 2 58 2 Basic Operations ...
Страница 144: ...Card Reader E1 3 29 3 Optional Equipment 11 Press OK ...
Страница 151: ...Card Reader E1 3 36 3 Optional Equipment 4 Press Done 5 Press OK ...
Страница 154: ...Card Reader E1 3 39 3 Optional Equipment 5 Press Done 6 Press OK ...
Страница 215: ...Timer Settings 4 60 4 Customizing Settings 1 Press Additional Functions Timer Settings 2 Press Date Time Settings ...
Страница 241: ...Cleaning and Adjusting the Machine 4 86 4 Customizing Settings ...
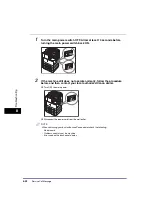
Страница 346: ...Drum Unit 7 29 7 Routine Maintenance 2 Open the front cover 3 Release the unlock lever to its horizontal position ...
Страница 443: ...Index 9 16 9 Appendix ...