Canon iP3000 - PIXMA Photo Printer Скачать руководство пользователя страница 15

Basic Printing

11

5

Prepare the Paper Output Tray.

You can also select the paper source with the printer driver. For details, 
refer to “Changing the Paper Source” in the 

User’s Guide

.

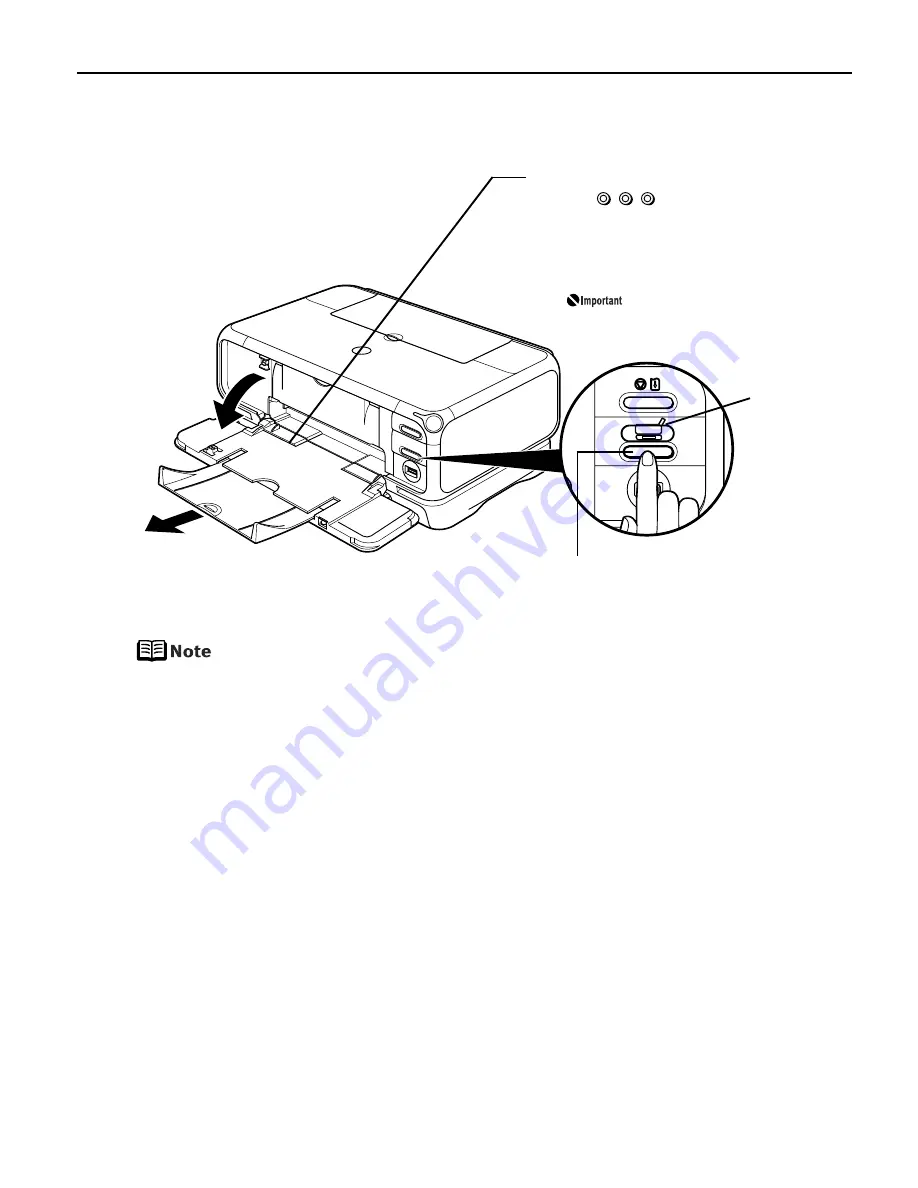
(1) 1 Push the upper center 

(

) of the Front Cover to 

open the Paper Output Tray.

2 Pull out the Paper Output Tray 

Extension completely.

Support the Front Cover with 
your hand when opening the 
tray.

Cassette 
Lamp

(2) Press the Paper Feed Switch so 

that the Cassette Lamp lights.

1

2

Содержание iP3000 - PIXMA Photo Printer

Страница 1: ...Photo Printer Series Quick Start Guide...

Страница 2: ...estions product information and where to buy instructions are found here 2 Email Tech Support www canontechsupport com For individual attention to a special issue try emailing our friendly technical e...

Страница 3: ...Photo Printer Quick Start Guide...

Страница 4: ...o be representation or warranties concerning the products described Specifications are subject to change without notice As an ENERGY STAR partner Canon U S A Inc has determined that this product meets...

Страница 5: ...attern 49 Print Head Cleaning 53 Print Head Deep Cleaning 57 Aligning the Print Head 61 Troubleshooting Cannot Install the Printer Driver 66 Print Quality is Poor or Contains Errors 67 Troubleshooting...

Страница 6: ...ndow press the F F1 key or click in the upper right corner Then click the feature you want to know more about or click the Help button when displayed While in the P Page Setup dialog box or P Print di...

Страница 7: ...sing such paper will not only produce unsatisfactory results but can also cause the printer to jam or malfunction Folded curled or wrinkled paper Damp paper Excessively thin paper less than 64 gsm or...

Страница 8: ...that Letter sized plain paper is always fed from the Cassette whenever you print For information on the printer driver settings refer to Changing the Paper Source in the User s Guide Continuous print...

Страница 9: ...curled corners and gently bend them in the opposite direction until the paper becomes completely flat 2 Prepare to load paper You can also select the paper source with the printer driver For details...

Страница 10: ...m or 0 52 inches in height in the Sheet Feeder However do not stack more than 50 sheets in the Paper Output Tray 2 Align the paper stack against the right side of the Sheet Feeder 3 Slide the paper gu...

Страница 11: ...on page 15 or P Printing with Macintosh on page 18 1 Load the paper into the Sheet Feeder and align the paper stack against the right side of the Sheet Feeder Load the paper lengthways regardless of t...

Страница 12: ...en paper is curled hold the opposing curled corners and gently bend them in the opposite direction until the paper becomes completely flat 2 Prepare to load paper 1 Pull out the Cassette from the prin...

Страница 13: ...17 lb 13 mm or 0 52 inches in height in the Cassette However do not stack more than 50 sheets in the Paper Output Tray 2 Align the paper stack against the right side of the Cassette 3 Slide the paper...

Страница 14: ...Cassette had been extended to accommodate paper sizes larger than 5 x7 the front edge of the cassette will extend beyond the front of the printer 1 Set the Cover on the Cassette 2 Insert the Cassette...

Страница 15: ...efer to Changing the Paper Source in the User s Guide 1 1 Push the upper center of the Front Cover to open the Paper Output Tray 2 Pull out the Paper Output Tray Extension completely Support the Front...

Страница 16: ...driver settings refer to P Printing with Windows on page 15 or P Printing with Macintosh on page 18 1 Load the paper into the Cassette with the print side facing DOWN 2 Align the paper stack against...

Страница 17: ...enuine Canon media to ensure optimal print quality Photo Quality Media Photo Paper Pro Photo Paper Plus Glossy Photo Paper Plus Semi gloss Matte Photo Paper Glossy Photo Paper High Resolution Paper Me...

Страница 18: ...aper Pro Letter up to 10 sheets 4 x 6 up to 20 sheets Letter up to 10 sheets 4 x 6 up to 20 sheets Photo Paper Pro Photo Paper Plus Glossy Letter up to 10 sheets 5 x 7 up to 10 sheets 4 x 6 up to 20 s...

Страница 19: ...tion are for printing in Windows XP 1 Turn on the printer See T Turning on the Printer on page 2 2 Load the paper in the printer See L Loading Paper on page 3 3 Ensure that the proper paper source is...

Страница 20: ...tware s F File menu The P Print dialog box opens 6 Specify the required settings 2 Ensure that your printer is selected 3 Click P Preferences or Properties 1 Click M Media Type to select the type of m...

Страница 21: ...er Driver Functions Windows in the User s Guide or H Help z Selecting the P Preview before printing check box displays a preview screen that allows you to confirm the selected printing effects and how...

Страница 22: ...n are for printing in Mac OS X v 10 3 x 1 Turn on the printer See T Turning on the Printer on page 2 2 Load the paper on the printer See L Loading Paper on page 3 3 Ensure that the proper paper source...

Страница 23: ...enu The P Print dialog box opens 3 Select the desired paper size from the Paper Size pop up menu 4 Click O OK 2 Select your printer from the F Format for pop up menu 2 Select Q Quality Media from the...

Страница 24: ...nting tables and charts Select when printing documents consisting mainly of graphs and graphics illustrations with strong color definition P Printing a composite document Select when printing document...

Страница 25: ...at prompts you to confirm the status of the print job s To cancel a job in progress select the desired document then click D Delete To temporarily stop a job in progress click P Pause To cancel all th...

Страница 26: ...e digital still cameras or digital video camcorders without the need to use a computer z Canon Bubble Jet Direct allows you to print photos from Canon Bubble Jet Direct compatible PictBridge incompati...

Страница 27: ...omputer and then executing automatic print head alignment Refer to A Aligning the Print Head on page 61 z Depending on the model or brand of your camera you may have to select a print mode compliant w...

Страница 28: ...s will display on the LCD display of the digital camera when the printer is correctly connected A PictBridge compliant digital camera A Canon Bubble Jet Direct compatible digital camera Direct Printin...

Страница 29: ...default 4 4 x 6 is selected from P Paper size and P Photo Photo Paper Plus Glossy is selected from P Paper type for this printer To use Photo Paper Pro select F Fast Photo from Paper type If using a C...

Страница 30: ...the shooting date recorded in Exif image data is printed on the lower right corner of each photo z This printer can handle only Exif JPEG image data to produce photos using PictBridge z Never disconn...

Страница 31: ...function can be used If date printing is set from the digital camera the date when the photograph was taken is to be printed excluding the index print Images will be scaled automatically according to...

Страница 32: ...es or Properties The P Printer Properties dialog box opens Opening the Printer Properties Dialog Box Directly from the Start Menu This method is used for maintenance operations such as P Print Head Cl...

Страница 33: ...creatively enhance the colors and output of your photographs Many of these features are covered in this chapter You can also access the online help in either of the following ways depending on your op...

Страница 34: ...ge 28 2 On the M Main tab select C Custom from P Print Quality then click S Set to open the S Set Print Quality dialog box 3 Move the slide bar to adjust the print quality 4 When the process is comple...

Страница 35: ...s feature to compensate for unsatisfactory color balance and over or under exposure before printing P Photo Optimizer PRO is available for Windows only In Windows Me Windows 98 or Windows 95 If B Back...

Страница 36: ...tensifies background colors such as fields trees oceans and skies while maintaining natural skin tones in the images In Windows Me Windows 98 or Windows 95 If B Background Printing has been disabled t...

Страница 37: ...Noise Reduction function reduces noise from blue portions such as the sky and dark portions of the images taken with your digital camera In Windows Me Windows 98 or Windows 95 If B Background Printin...

Страница 38: ...Advanced Printing 34 To use P Photo Noise Reduction select the P Photo Noise Reduction check box under Special Effects...

Страница 39: ...Open the P Printer Properties dialog box See O Opening the Printer Properties Dialog Box from Your Application Program on page 28 2 In each tab set all necessary items 3 Click the P Profiles tab 4 Re...

Страница 40: ...h Macintosh on page 18 2 Set all necessary items 3 Register new printer driver settings The S Save Preset dialog box opens 4 Click O OK This registers your printer driver settings You can retrieve or...

Страница 41: ...rd Windows You can create fun and unique photo albums with the decorative themes such as frame background and clip art You can also copy or move the decorated photos It is compatible with ExifPrint Ea...

Страница 42: ...results select the correct media type that matches the paper you are loading in the printer z Borderless Printing may not assure high print quality on the edges of the print or may cause the edges of...

Страница 43: ...C Canon Utilities E Easy PhotoPrint and E Easy PhotoPrint to open the Easy PhotoPrint In Macintosh double click the hard disk icon the A Applications folder the E Easy PhotoPrint folder and then doubl...

Страница 44: ...n Guide 6 Select the paper This section only describes the steps when you have selected P Paper Feed Switch from P Paper Source For information about the other settings refer to Changing the Paper Sou...

Страница 45: ...t and print the photograph 1 Click the L Layout Print tab 2 Select B Borderless full 3 In Windows click P Print In Macintosh click P Print When the confirmation message is displayed click O OK And the...

Страница 46: ...n ink tank needs replacing the P POWER lamp will change from green to orange and flash four times as soon as printing begins It is important to quickly identify the empty tank using the B BJ Status Mo...

Страница 47: ...ain a replacement tank as soon as possible z Click C Cancel Printing to cancel the current print job The ink tank with X symbol is out of ink Replace with a new ink tank z Press the R RESUME CANCEL bu...

Страница 48: ...S X v 10 3 x select the name of your printer from the N Name list and click C Configure 4 Select the name of your printer from the P Product list and click M Maintenance BJ Printer Utility appears 5 S...

Страница 49: ...own the Inner Cover forward to open The Print Head Holder moves to the center 3 Remove the empty ink tank z Handle ink tanks carefully to avoid staining clothing or the surrounding area z Discard empt...

Страница 50: ...s failure to follow this step may cause the ink to leak and stain your clothes and hands z Do not squeeze the side of ink tanks as this may cause the ink to leak out and stain your clothes and hands z...

Страница 51: ...ths of its first use z Once an ink tank has been used do not remove it from the printer and leave it out in the open This will cause the ink tank to dry out and the printer may not operate properly if...

Страница 52: ...tank has been peeled off z Press on the mark on the ink tank and ensure that the ink tank is installed securely z Ensure that each ink tank is installed at the correct location z Increase the P Print...

Страница 53: ...ad a sheet of Letter sized plain paper in the Sheet Feeder or Cassette 2 Press the Paper Feed Switch to select the paper source in which you loaded the paper 3 Hold down the R RESUME CANCEL button unt...

Страница 54: ...click O OK 5 Ensure that the pattern is printed properly See E Examining the Nozzle Check Pattern on page 52 6 If you want to start P Print Head Cleaning click C Cleaning on the P Pattern Check dialo...

Страница 55: ...10 3 x select the name of your printer from the N Name list and click C Configure 4 Select the name of your printer from the P Product list and click M Maintenance 4 Print the Nozzle Check Pattern 3...

Страница 56: ...placing an Ink Tank on page 42 1 If lines of this pattern are missing the B Black print head nozzle needs cleaning 2 If these patterns have white stripes the C Color print head nozzle needs cleaning C...

Страница 57: ...self With the printer on hold down the R RESUME CANCEL button until the P POWER lamp flashes once The P Print Head Cleaning dialog box of step 3 3 is directly displayed when you click C Cleaning on th...

Страница 58: ...ck pattern The nozzle check pattern is printed 4 Check the Print Head condition with the printed nozzle check pattern See P Printing the Nozzle Check Pattern on page 49 z The nozzle check pattern will...

Страница 59: ...n using versions of Mac OS other than Mac OS X v 10 3 x select the name of your printer from the N Name list and click C Configure 4 Select the name of your printer from the P Product list and click M...

Страница 60: ...nozzle check pattern The nozzle check pattern is printed 4 Check the Print Head condition with the printed nozzle check pattern See P Printing the Nozzle Check Pattern on page 49 z The nozzle check p...

Страница 61: ...an standard Print Head Cleaning so perform this procedure only when necessary Ensure that the Inner Cover is closed 1 Ensure that the printer is on 2 Open the P Printer Properties dialog box See O Ope...

Страница 62: ...zzles are still not clean open the Top Cover and ensure that there are sufficient ink levels in all ink tanks and turn off the printer Be sure to perform another P Print Head Deep Cleaning 24 hours af...

Страница 63: ...tial Check Items displays the items to be checked before cleaning 5 When the confirmation message is displayed click O OK Print Head Deep Cleaning starts when the P POWER lamp starts blinking Do not p...

Страница 64: ...nk of that color See R Replacing an Ink Tank on page 42 z If the print head nozzles are still not clean open the Top Cover and ensure that there are sufficient ink levels in all ink tanks and turn off...

Страница 65: ...re that the Inner Cover is closed z The Print Head can also be aligned from the printer itself 1 With the printer on load a sheet of Letter sized plain paper in the Sheet Feeder 2 Hold down the R RESU...

Страница 66: ...er is now ready to use z If the pattern is not printed successfully open the Top Cover and Inner Cover and ensure that the ink tanks are correctly installed z If the pattern is still not printed succe...

Страница 67: ...ac OS X v 10 3 x double click the Print Center icon 3 Select the name of your printer from the N Name list and click U Utility When using versions of Mac OS other than Mac OS X v 10 3 x select the nam...

Страница 68: ...gned automatically The printer is now ready to use z If the pattern is not printed successfully open the Top Cover and Inner Cover and ensure that the ink tanks are correctly installed z If the patter...

Страница 69: ...page 69 z P Paper Does Not Feed Properly on page 71 z P Paper Jams on page 72 z H Handling Error Messages on page 75 z A An Error Message Appears on the Screen on page 77 z C Cannot Print Properly fr...

Страница 70: ...allation did not start automatically when you inserted the Setup Software User s Guide CD ROM into the CD ROM drive 1 Click S Start and select M My Computer 2 Double click the C CD ROM icon For non Wi...

Страница 71: ...r Follow the instructions packaged with your specialty media for loading and handling Incorrect paper type On the M Main tab of the printer driver confirm that the M Media Type selected matches the pa...

Страница 72: ...ypes Suitable for Borderless Printing on page 38 Thick paper is used Select the P Prevent paper abrasion check box to widen the clearance between the Print Head and the loaded paper 1 Open the P Print...

Страница 73: ...t Menu on page 28 2 Click the M Maintenance tab and then S Start Status Monitor 3 Click D Display Print Queue 4 Select C Cancel All Documents in the P Printer menu In Windows Me Windows 98 Windows 95...

Страница 74: ...if the size of the data is too large part of it may be lost When the spool format is EMF follow the procedure below 1 Open the P Printer Properties dialog box 2 On the M Main tab click P Print Options...

Страница 75: ...or more sheets of Letter sized plain paper lengthways in the Sheet Feeder or Cassette selected in step 2 6 Hold down the R RESUME CANCEL button and release after the P POWER lamp flashes three times P...

Страница 76: ...he printer open the Top Cover and remove it After removing all paper close the Top Cover Be careful not to touch the components inside the printer 3 Reload the paper into the printer and press the R R...

Страница 77: ...6 If any paper is sticking out of the Cassette reload the paper in the Cassette 7 Reload the paper in the Sheet Feeder if necessary and press the R RESUME CANCEL button on the printer When reloading...

Страница 78: ...med paper 4 If any paper is sticking out of the Cassette reload the paper in the Cassette Reload paper in the Sheet Feeder if necessary 5 Insert the Cassette into the printer 6 Press the R RESUME CANC...

Страница 79: ...is already installed remove the Print Head and check the electrical contacts for foreign matter then reinstall After reinstalling the Print Head you may need to realign it If this error still remains...

Страница 80: ...d nozzles are clogged Press the R RESUME CANCEL button See P Printing the Nozzle Check Pattern on page 49 for information on how to print a nozzle check pattern z The Paper Output Slot has been expose...

Страница 81: ...alog box See O Opening the Printer Properties Dialog Box Directly from the Start Menu on page 28 2 Click the P Port tab or the D Details tab to confirm the port settings A parallel port is selected if...

Страница 82: ...ck whether the G General tab shows any unusual condition 5 Click the R Resources tab and check C Conflicting device list The conflicting devices may cause errors Refer to the manuals of devices and de...

Страница 83: ...procedures described in the Easy Setup Instructions and reinstall the driver Error No 1700 Waste ink absorber almost full The printer has a built in waste ink absorber to hold the ink used during prin...

Страница 84: ...p Instructions If the Print Head has already been installed remove it to check for any dirt or debris at its contacts After cleaning reinstall the Print Head If the error still remains the Print Head...

Страница 85: ...the camera press the R RESUME CANCEL button on the printer and reconnect the cable between the printer and the camera Then turn the camera on if it does not automatically turn on If the problem is st...

Страница 86: ...t if you agree 5 Click I Install The printer driver will load automatically 6 If the message No other applications can be running appears click Continue 7 When the Installation was successful screen i...

Страница 87: ...14 To ensure highest quality output carry out Print Head alignment Refer to the Printer Driver Guide for Mac OS 9 located on the Setup Software User s Guide CD ROM for instructions on how to align the...

Страница 88: ...er Photo Paper Pro Photo Paper Plus Glossy Photo Paper Plus Semi gloss Matte Photo Paper Transparencies T Shirt Transfers Envelopes Checking the Status of the Printer BJ Status Monitor Functions Windo...

Страница 89: ...USB IEEE 1284 compatible iP4000 only USB Acoustic noise level Approx 35 dB A in the highest print quality mode Operating environment Temperature 5 to 35 C 41 to 95 F Humidity 10 to 90 RH no condensat...

Страница 90: ...the USB cable supplied with the camera Compatible digital cameras and digital video camcorders iP4000 or iP3000 compatible digital cameras and digital video camcorders Compatible Paper Card 1 Photo P...

Страница 91: ...perate iP4000 only z USB interface z Standard 25 pin parallel interface iP4000 only z Available hard disk space for printer driver installation Windows XP Windows 2000 Windows NT 4 0 50 MB Windows Me...

Страница 92: ...supply and call for service Periodically unplug the printer and use a dry cloth to wipe off any dust or dirt collected on the plug and the power outlet If the printer is placed at a location exposed t...

Страница 93: ...the plug by pulling on the cord Do not use an extension lead cord Never use a power supply source other than the one rated for the printer in the country where you purchased the printer AC 110 120 V 5...

Страница 94: ...raged to try to correct the interference by one or more of the following measures z Reorient or relocate the receiving antenna z Increase the separation between the equipment and receiver z Connect th...

Страница 95: ...s will be presumed to have resulted from misuse abuse or failure to operate the Product as set forth in the user s manual or other documentation for the Product b Use of parts or supplies other than t...

Страница 96: ...w canontechsupport com Please note that under the InstantExchange program a replacement product will be provided to you prior to your return of the defective product Since the defective product become...

Страница 97: ...int 37 G Glossy Photo Paper 14 H Handling Error Messages 75 Help button 2 High Resolution Paper 14 I Installing the Printer Driver when Using Mac OS 9 x 82 L Load Limit Mark 6 9 Loading Paper 3 Loadin...

Страница 98: ...ws 15 R Recalling Driver Settings 35 Regulatory Information 90 Replacing an Ink Tank 42 RESUME CANCEL button 17 21 S Safety Precautions 88 Saving Driver Setting 35 Specialty Media 14 Specifications 85...

Страница 99: ...5 x 11 50 sheets 7981A004 Photo Paper Plus Glossy 4 x 6 20 sheets 7980A007 Photo Paper Plus Glossy 4 x 6 50 sheets 7980A012 Photo Paper Plus Glossy 4 x 6 120 sheets 7980A022 Photo Paper Plus Glossy 5...

Страница 100: ...11042 U S A Canon Inc 30 2 Shimomaruko 3 Chome Ohta ku Tokyo 146 8501 Japan Canon Canada Inc 6390 Dixie Road Mississauga Ontario L5T 1P7 Canada Canon Latin America Inc 703 Waterford Way Suite 400 Miam...

Отзывы: