Canon imageRUNNER ADVANCE DX 6870i Скачать руководство пользователя страница 44

44

Ap

pe

ndi

x

Appendix

Notices

Product Name

Safety regulations require the product's name to 

be registered. In some regions where this product 

is sold, the following name(s) in parentheses ( ) may 

be registered instead.

imageRUNNER ADVANCE DX 6870i/6860i (F171400)

FCC (Federal Communications Commission) 

Users in the U.S.A.

Multi Function Printer, Model F171400

Contains Transmitter Module FCC ID: AZDK30365

This device complies with part 15 of the FCC 

Rules. Operation is subject to the following two 

conditions: (1) This device may not cause harmful 

interference, and (2) this device must accept any 

interference received, including interference that 

may cause undesired operation.

FCC CAUTION

Changes or modifications not expressly 

approved by the party responsible for 

compliance could void the user's authority to 

operate the equipment.

[NOTE]

This equipment has been tested and found to 

comply with the limits for a Class A digital device, 

pursuant to Part 15 of the FCC Rules. 

These limits are designed to provide reasonable 

protection against harmful interference when 

the equipment is operated in a commercial 

environment.

This equipment generates, uses, and can radiate, 

radio frequency energy and, if not installed and 

used in accordance with the Operator's Manual, 

may cause harmful interference to radio 

communications.

Operation of this equipment in a residential area 

is likely to cause harmful interference in which 

case the user will be required to correct the 

interference at his own expense.

This transmitter must not be co-located or 

operated in conjunction with any other antenna 

or transmitter.

This equipment complies with FCC radiation 

exposure limits set forth for an uncontrolled 

environment and meets the FCC radio frequency 

(RF) Exposure Guidelines as this equipment has 

very low levels of RF energy. But it is desirable 

that it should be installed and operated keeping 

the radiator at least 20cm or more away from 

person's body.

Use of shielded cables are required to comply 

with Class A limits in Subpart B of Part 15 of the 

FCC Rules.

Do not make any changes or modifications to 

the equipment unless otherwise specified in the 

manual. If you make such changes or 

modifications, you could be required to stop 

operation of the equipment.

CANON U.S.A., INC

One Canon Park, Melville, NY 11747, U.S.A.

TEL No. 1-800-OK-CANON

Consumables

WARNING

• 

Do not throw toner cartridges or waste toner 

containers into open flame, or do not store 

them or printing/copy paper in a place 

exposed to open flame. This may cause them 

to ignite, resulting in burns or fire.

• 

If you accidentally spill or scatter toner, 

carefully gather the toner particles together 

or wipe them up with a soft, damp cloth in a 

way that prevents inhalation. Never use a 

vacuum cleaner that does not have 

safeguards against dust explosions to clean 

up spilled toner. Doing so may cause a 

malfunction in the vacuum cleaner, or result 

in a dust explosion due to static discharge.

CAUTION

• 

Keep toner and other consumables out of the 

reach of small children. If these items are 

ingested, consult a physician immediately.

• 

If toner touches your clothes or skin, wash it 

away with water immediately. Do not use 

warm water, as this may cause toner to fix, 

resulting in a permanent stain.

• 

Do not dismantle the toner cartridge, as 

doing so may cause toner to fly out and enter 

your eyes or mouth. If toner gets into your 

eyes or mouth, wash them immediately with 

cold water and immediately consult a 

physician.

• 

If toner escapes from the toner cartridge, 

make sure not to ingest the toner or allow it 

to directly touch your skin. If toner touches 

your skin, wash it away with soap and water. If 

your skin still feels irritated after washing it or 

you ingest toner, consult a physician 

immediately.

• 

When pulling out the waste toner container, 

be careful not to let it fall. This may result in 

injury.

• 

Do not touch the electrical contacts.

IMPORTANT

• 

Store toner cartridges in a cool location, away 

from direct sunlight.

• 

Do not store toner cartridges in an upright 

position.

Telephone Equipment

WARNING

When using your telephone equipment, basic 

safety precautions should always be followed to 

reduce the risk of fire, electric shock and injury to 

persons, including the following:

1.  Do not use this product near water, for example, 

near a bath tub, wash bowl, kitchen sink, or 

laundry tub, in a wet basement or near 

swimming pool.

2.  Avoid using a telephone during an electrical 

storm. There may be remote risk of electric 

shock form lightning.

3.  Do not use the telephone to report a gas leak in 

the vicinity of the leak.

IMPORTANT

• 

Follow the caution instructions on labels and 

the like found on this machine.

• 

Do not subject the machine to strong shocks 

or vibration.

• 

Do not forcibly open and close doors, covers, 

and other parts. Doing so may result in 

damage to the machine.

• 

Do not turn the main power switch OFF or 

open the covers while the machine is in 

operation. This may result in paper jams.

• 

Use a modular cable that is shorter than 3 

meters.

• 

Use a USB cable that is shorter than 3 meters.

Safety-Related Symbols

Power switch: “ON” position
Power switch: “OFF” position
Power switch: “STAND-BY” position
Push-push switch 

“ON” 

“OFF”

Protective earthing terminal
Dangerous voltage inside. Do not open 

covers other than instructed.
CAUTION: Hot surface. Do not touch.
Class II equipment
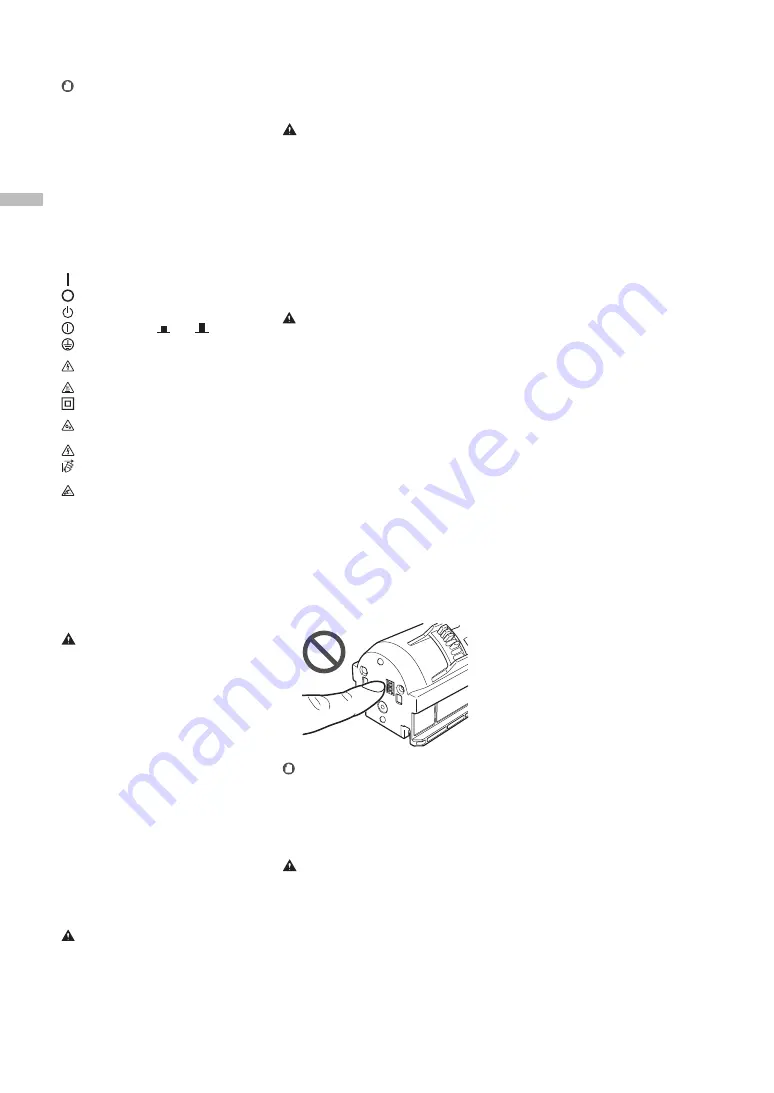
Moving parts: Keep body parts away from 

moving parts
CAUTION: An electrical shock may occur. 

Remove all the power plugs from the power 

outlet.
There are sharp edges. Keep body parts 

away from sharp edges.

[NOTE]

Some of symbols shown above may not be 

affixed depending on the product.

Maintenance and Inspections

Clean this machine periodically. If dust 

accumulates, the machine may not operate 

properly. When cleaning, be sure to observe the 

following. If a problem occurs during operation, 

see “Troubleshooting” in the User's Guide.

WARNING

• 

Before cleaning, turn OFF the power and 

unplug the power plug from the AC power 

outlet. Failure to do so may result in a fire or 

electrical shock.

• 

Unplug the power plug periodically and clean 

with a dry cloth to remove dust and grime. 

Accumulated dust may absorb humidity in the 

air and may result in a fire if it comes into 

contact with electricity.

• 

Use a damp, well wrung-out cloth to clean the 

machine. Dampen cleaning cloths with water 

only. Do not use alcohol, benzine, paint 

thinner, or other flammable substances. Do 

not use tissue paper or paper towels. If these 

substances come into contact with electrical 

parts inside the machine, they may generate 

static electricity or result in a fire or electrical 

shock.

• 

Check the power cord and plug periodically 

for damage. Check the machine for rust, dents, 

scratches, cracks, or excessive heat generation. 

Use of poorly-maintained equipment may 

result in a fire or electrical shock.

CAUTION

• 

The inside of the machine has high-

temperature and high-voltage components. 

Touching these components may result in 

burns. Do not touch any part of the machine 

that is not indicated in the manual.

• 

When loading paper or removing jammed 

paper, be careful not to cut your hands with 

the edges of the paper.

Содержание imageRUNNER ADVANCE DX 6870i

Страница 1: ...FAQ Guide...

Страница 2: ......

Страница 3: ...ease read Important Safety Instructions before operating this product P 42 After you finish reading this guide store it in a safe place for future reference The information in this document is subject...

Страница 4: ...and Send 27 Stopping Scanning Faxing 27 Scanned Documents Cannot Be E Mailed 28 If You Cannot Send Forward Faxes 29 If You Cannot Receive Faxes 30 The Machine Does Not Operate P 6 Scan Fax Cannot Be...

Страница 5: ...d on the Expected Side of Paper 25 Printing Cannot Be Performed with the Expected Size 25 In Two Sided Printing the Print Direction Differs between the Front and Back Sides of the Paper 26 Canceling C...

Страница 6: ...N check the power plug Main power indicator Note that the power plug or outlet may be different in shape depending on the region Check 3 Is sleep mode activated Tap the touch panel display to cancel S...

Страница 7: ...g to be printed 2 Check that the main power indicator has turned off 3 Press the power switch again Download the printer driver again N OT E For more information P 32 Solution 1 Solution 2 The Machine...

Страница 8: ...3 First fan the paper stack well and then load it The print side face up Paper Envelope Make sure that this line is not exceeded Paper Orientation Paper Paper Drawer LTR LTRR 4 Place the paper drawer...

Страница 9: ...User s Guide To load tab paper You need an optional tab paper attachment Search 108A 029 Loading Tab Paper User s Guide How to use the search number P 51 1 Select the paper type 1 2 Press Preferences...

Страница 10: ...paper 3 Fan the paper stack well align the edges on a flat surface and then load it Make sure that this line is not exceeded The print side face down 4 Adjust the paper guides to match the size of the...

Страница 11: ...umber P 51 Printing on the back side of printed paper 1 Load paper in the multi purpose tray the print side face down 2 In the Paper Type selection screen press 2nd Side of 2 Sided Page CAUTION For th...

Страница 12: ...wer 2 Paper drawer 2 is taken as example Multi Purpose Tray Paper Drawer Co Ltd Logo Paper C o L t d Multi Purpose Tray ABC Co Ltd Co Ltd C o L t d A B C Co Ltd Co Ltd Can be loaded only in paper draw...

Страница 13: ...the side with the glued areas For the paper drawer load envelopes the front side face up and for the multi purpose tray load them the front side face down For the loading orientation see the table bel...

Страница 14: ...lopes only in the multi purpose tray Search 0YAS 02F Specifying Paper Size and Type in the Multi purpose Tray User s Guide How to use the search number P 51 Press Select the type of envelopes Preparat...

Страница 15: ...ment B to the left paper guide Envelope Feeder Attachment B CAUTION When loading ISO C5 it is not necessary to attach the Envelope Feeder Attachment B Proceed to step 3 3 Attach the Envelope Feeder At...

Страница 16: ...er 2 Load the envelopes The front side of the envelopes face up 3 Insert the paper drawer into the machine 4 5 Press Preferences Paper Settings Paper Settings Press 6 1 Select the paper source 2 Press...

Страница 17: ...lti purpose tray Solution The paper may have absorbed moisture Replace it with paper that has not absorbed moisture Perform gradation adjustment 1 Press 2 Press Adjustment Maintenance Adjust Image Qua...

Страница 18: ...er or an alcohol solution etc as they will strip away the stain proof coating a b 3 Open the cover 2 1 Solution 4 Open the inner cover 5 Wipe the original scanning area and feeder white plate Wipe the...

Страница 19: ...cleaning stick Slide the stick to the right to take it out Solution 4 Insert the cleaning stick into the hole with the pad on its tip facing down Pad 5 Insert the cleaning stick in until it hits the...

Страница 20: ...on the Home screen 2 Press Yes Set a lower background density If bleed through is observed with the original setting a lower background density can improve the problem giving a neat copy 1 Press 2 Se...

Страница 21: ...m locations Use these buttons and bar to operate the video POINT The screen disappears once all the jammed paper is removed and all the machine s covers and drawers are closed correctly If you do not...

Страница 22: ...remove the jammed paper torn scraps of paper may remain in the main unit or optional devices If paper tears check that there are no scraps of paper inside and try to remove all of the scraps Do not tr...

Страница 23: ...r available paper see the following Search AVPP TBM Available Paper User s Guide How to use the search number P 51 Solution 1 Remove the excess amount of paper Make sure that the paper stack does not...

Страница 24: ...e setting For paper drawer P 8 For multi purpose tray P 10 For optional paper sources User s Guide Make sure that the original size and output paper size are correct 1 Check the original size and poss...

Страница 25: ...orrect printing side The print side face up Multi Purpose Tray The print side face down N OT E For optional paper sources User s Guide 2 If the check result indicates that the paper is not loaded corr...

Страница 26: ...eferences screen of the driver set Orientation for the direction selected in step 1 3 While viewing the preview image make settings in the order of Page Layout Page Order 1 sided 2 sided Booklet Print...

Страница 27: ...the registered information Example Address book POINT To check the connection after changing the registered information press Check Connection N OT E For more information P 28 To change registered inf...

Страница 28: ...r For the setting procedures see the User s Guide To specify the port number for SMTP TX POP RX 1 Press 2 Press Function Settings Send E Mail I Fax Settings Specify Port Number for SMTP TX POP RX 3 Sp...

Страница 29: ...the machine cannot be connected to the destination fax number no fax dial tone is heard There may be a problem with the destination or your telephone carrier Contact the destination If you cannot forw...

Страница 30: ...r code Search 0YRY 0JW Countermeasures for Each Error Code User s Guide How to use the search number P 51 Solution 1 Solution 2 If you are using an optical line or IP telephone line Communication erro...

Страница 31: ...a copy job waiting to be output 4 Press 2 Select Copy from the drop down list 3 Select the copy job you want to cancel 1 Press 5 Press Yes For Windows OS 1 In the computer screen double click the pri...

Страница 32: ...n see the Driver Installation Guide The Guide can be downloaded from or viewed on the same page of the Canon website as for the printer driver Latest OS support information See the Canon website https...

Страница 33: ...display Replace the consumable in question by referring to the screen 1 POINT Depending on the condition of the consumable a screen like the one shown under step 2 may appear first 2 Prepare the consu...

Страница 34: ...h the following options Booklet Finisher AB CAUTION Avoid storing toner cartridges vertically Store toner cartridges in a cool place not exposed to direct sunlight A preferable environment is one wher...

Страница 35: ...follow the procedure below to contact the service representative 1 Make a note of the code number displayed on the screen POINT Multiple code numbers may be displayed 2 Turn the machine OFF and discon...

Страница 36: ...ne 1 Press The machine enters the limited functions mode When the problem is resolved the Call service representative message disappears in the screen at the bottom left Search 0YAS 0K0 A Message Sayi...

Страница 37: ...If the Contact your service representative Message Is Displayed 37...

Страница 38: ...is described The illustrations assume that the machine is equipped with a Cassette Feeding Unit AQ Cassette Feeding Unit AQ Main Unit Paper size label P 8 Attach the paper size label so that it align...

Страница 39: ...Main Unit 39 Power switch P 7 Multi purpose tray P 10 Paper guides P 15 Paper drawer 2 P 8 Paper drawer 1 P 8 Paper guides P 15 Envelope Feeder Attachment A P 15 Tray extension Paper guides...

Страница 40: ...ons 2 Settings Registration P 9 Press to specify settings or make a registration 3 Menu Customize the screen such as by rearranging buttons or creating shortcut keys 4 Energy Saver P 6 Press to put th...

Страница 41: ...a log for settings specified in Copy Scan and Send 8 Counter Device Information Press to display the copy and print count totals on the touch panel display 9 Stop P 27 Press to stop the current opera...

Страница 42: ...rom a cool or dry location to a hot or humid location Using the machine under these conditions may result in paper jams poor print quality or damage to the machine Let the machine adjust to the ambien...

Страница 43: ...mergency IMPORTANT When connecting power Do not connect the power cord to an uninterruptible power source Doing so may result in malfunction of or damage to the machine at power failure If you plug th...

Страница 44: ...y consult a physician If toner escapes from the toner cartridge make sure not to ingest the toner or allow it to directly touch your skin If toner touches your skin wash it away with soap and water If...

Страница 45: ...OF WARRANTIES AS TO MARKETABILITY MERCHANTABILITY FITNESS FOR A PARTICULAR PURPOSE OF USE OR NON INFRINGEMENT CANON INC SHALL NOT BE LIABLE FOR ANY DIRECT INCIDENTAL OR CONSEQUENTIAL DAMAGES OF ANY NA...

Страница 46: ...transmission the date and time it is sent and an identification of the business or other entity or other individual sending the message and the telephone number of the sending machine or such business...

Страница 47: ...and intellectual property rights in and to the SOFTWARE Except as expressly provided herein no license or right expressed or implied is hereby conveyed or granted by rights holders of the SOFTWARE to...

Страница 48: ...ll not download the firmware software or data files for purposes other than mentioned above You can read more about CDS Service in Canon published materials available from your dealer or on the web si...

Страница 49: ...have been defaced removed or altered ANY SOFTWARE THAT IS DISTRIBUTED WITH THE PRODUCT AND HAS AN ASSOCIATED END USER AGREEMENT IS LICENSED WARRANTED AND PROVIDED ACCORDING TO THE TERMS OF THAT AGREE...

Страница 50: ...50...

Страница 51: ...page appears in no time at all You can search through the User s Guide by the search number Search number Example Search ABCD 123 Setting the network environment User s Guide How to use the search nu...

Страница 52: ...52...

Страница 53: ...a ol Lea Instrucciones de seguridad importantes antes de utilizar este producto P 92 Al acabar de leer esta gu a gu rdelo en un lugar seguro para consultas futuras La informaci n de este documento pue...

Страница 54: ...mpleando Leer y enviar 77 Detenci n del escaneado env o por fax 77 No se pueden enviar por correo electr nico los documentos escaneados 78 Si no puede enviar reenviar faxes 79 Si no puede recibir faxe...

Страница 55: ...cara prevista del papel 75 No se puede imprimir con el tama o previsto 75 En la impresi n de doble cara la direcci n de impresi n difiere entre el anverso y el reverso del papel 76 Cancelaci n de trab...

Страница 56: ...chufe Indicador Alimentaci n principal I ON Tenga en cuenta que el enchufe o la toma de corriente pueden tener una forma diferente en funci n de la regi n Compruebe 3 Est activado el modo de reposo Pu...

Страница 57: ...ebe que el indicador de alimentaci n principal se ha apagado 3 Vuelva a pulsar el interruptor de alimentaci n Vuelva a descargar el controlador de impresora NOTA Para obtener m s informaci n P 82 Solu...

Страница 58: ...ada 3 En primer lugar airee perfectamente la pila de papel y c rguela La cara de impresi n hacia arriba Papel Sobres Aseg rese de que no se supere esta l nea Orientaci n del papel Papel Papel casete L...

Страница 59: ...separador Necesitar un accesorio del papel de separadores opcional Buscar 108A 029 Carga de papel separador Gu a de usuario C moutilizareln merodeb squeda P 99 1 Seleccione el tipo de papel 1 2 Pulse...

Страница 60: ...3 Airee perfectamente la pila de papel alinee los bordes sobre una superficie plana y c rguela Aseg rese de que no se supere esta l nea La cara de impresi n hacia abajo 4 Ajuste las gu as del papel c...

Страница 61: ...P 99 Impresi n en el reverso de papel impreso 1 Cargue papel en la bandeja multiuso con la cara de impresi n hacia abajo 2 En la pantalla de selecci n Tipo de papel pulse 2 cara hoja a doble cara ATE...

Страница 62: ...Casete 2 Se utiliza como ejemplo el casete 2 Bandeja multiuso Casete Co Ltd Logotipo Papel C o L t d Bandeja multiuso ABC Co Ltd Co Ltd C o L t d A B C Co Ltd Co Ltd Se puede cargar nicamente en el c...

Страница 63: ...el lado del pegamento En el casete cargue los sobres con el anverso hacia arriba y en la bandeja multiuso c rguelos con el anverso hacia abajo Para ver la orientaci n en que se deben cargar consulte...

Страница 64: ...ma o personalizado nicamente en la bandeja multiuso Buscar 0YAS 02F Especificar el tama o y el tipo de papel en la bandeja multiuso Gu a de usuario C moutilizareln merodeb squeda P 99 Pulse Seleccione...

Страница 65: ...izquierda Alimentador de sobres B ATENCI N Cuando cargue ISO C5 no ser necesario acoplar el Alimentador de sobres B Contin e con el paso 3 3 Instale el Alimentador de sobres A Inst lelo aline ndolo co...

Страница 66: ...Cargue los sobres Los sobres con el anverso hacia arriba 3 Introduzca el casete en el equipo 4 5 Pulse Preferencias Opciones de papel Opciones de papel Pulse 6 1 Seleccione el origen del papel 2 Pulse...

Страница 67: ...a gu a exactamente Bandeja multiuso Soluci n El papel podr a haber absorbido humedad Sustit yalo por papel que no haya absorbido humedad Lleve a cabo un ajuste de la gradaci n 1 Pulse 2 Pulse Ajuste M...

Страница 68: ...lcohol etc ya que estos podr an eliminar el revestimiento resistente contra las manchas a b 3 Abra la tapa 2 1 Soluci n 4 Abra la tapa interior 5 Limpie el rea de lectura de originales y la placa blan...

Страница 69: ...palillo a la derecha para extraerlo Soluci n 4 Introduzca el palillo de limpieza en el orificio con la almohadilla de la punta mirando hacia abajo Almohadilla 5 Introduzca el palillo de limpieza hasta...

Страница 70: ...la pantalla Inicio 2 Pulse S Establezca una densidad de fondo inferior Si se observara que el t ner se transparenta en el reverso del original la configuraci n de una densidad de fondo inferior podr a...

Страница 71: ...os de papel Utilice estos botones y la barra para controlar el v deo NOTA La pantalla desaparecer cuando se retire todo el papel atascado y se cierren correctamente todas las tapas y los casetes del e...

Страница 72: ...a fuerza el papel podr a romperse y alg n trozo podr a quedarse en la unidad principal o en los dispositivos opcionales Si el papel se rasgara compruebe que no existan trozos de papel en el interior y...

Страница 73: ...papel disponible Buscar AVPP TBM Papel disponible Gu a de usuario C moutilizareln merodeb squeda P 99 Soluci n 1 Retire la cantidad sobrante de papel Aseg rese de que la pila de papel no exceda la l...

Страница 74: ...a bandeja multiuso P 60 Para or genes de papel opcionales Gu a de usuario Aseg resedequeeltama odeloriginalyel tama odelpapeldeimpresi nsoncorrectos 1 Compruebe el tama o del original y los posibles t...

Страница 75: ...ia arriba Bandeja multiuso La cara de impresi n hacia abajo NOTA Para or genes de papel opcionales Gu a de usuario 2 Si el resultado de la comprobaci n indica que el papel no est bien cargado vuelva a...

Страница 76: ...controlador establezca Orientaci n en la direcci n seleccionada en el paso 1 3 Mientras ve la imagen de vista preliminar configure las siguientes opciones en este orden Formato de p gina Orden de p gi...

Страница 77: ...bie la informaci n registrada Ejemplo Libreta de direcciones NOTA Para comprobar la conexi n tras cambiar la informaci n registrada pulse Compruebe conexi n NOTA Para obtener m s informaci n P 78 Para...

Страница 78: ...mientos de configuraci n consulte la Gu a de usuario Para especificar el n mero de puerto para TX SMTP RX POP 1 Pulse 2 Pulse Opciones de funciones Env o Opciones de e mail I fax Especifique n mero de...

Страница 79: ...ipo no puede conectarse al n mero de fax de destino no se oye ning n tono de marcaci n de fax Es posible que haya alg n problema con el destino o la compa a telef nica P ngase en contacto con el desti...

Страница 80: ...c digos de error Gu a de usuario C moutilizareln merodeb squeda P 99 Soluci n 1 Soluci n 2 Si utiliza una l nea de fibra ptica o de telefon a a trav s de IP Podr an producirse errores de comunicaci n...

Страница 81: ...un trabajo de copia a la espera de realizarse 4 Pulse 2 Seleccione Copia en la lista desplegable 3 Seleccione el trabajo de copia que desee cancelar 1 Pulse 5 Pulse S Para el SO Windows 1 En la pantal...

Страница 82: ...nsulte la Gu a de instalaci n del controlador Dicha gu a puede descargarse de la misma p gina del sitio web de Canon que el controlador de impresora o bien consultarse all Informaci n m s reciente de...

Страница 83: ...esti n consultando la pantalla 1 NOTA En funci n del estado del consumible podr a aparecer primero una pantalla como la que se muestra en el paso 2 2 Prepare el consumible Compruebe el n mero de art c...

Страница 84: ...ones Unidad de Acabado de Cuadernillos AB ATENCI N Evite almacenar los cartuchos de t ner verticalmente Guarde los cartuchos de t ner en un lugar fresco no expuesto a la luz solar directa Es preferibl...

Страница 85: ...o el siguiente procedimiento para ponerse en contacto con el servicio al cliente 1 Apunte el n mero de c digo que aparece en la pantalla NOTA Podr an aparecer varios n meros de c digo 2 Apague el equi...

Страница 86: ...nes limitadas Hasta que se resuelva el problema aparecer en pantalla el mensaje Llame a un representante del servicio t cnico en la esquina inferior izquierda de la pantalla Buscar 0YAS 0K0 Aparece un...

Страница 87: ...87 Si aparece el mensaje P ngase en contacto con su servicio al cliente...

Страница 88: ...el equipo est equipado con una Unidad de Alimentaci n por Casete AQ Unidad de Alimentaci n por Casete AQ Unidad principal Etiqueta de tama o de papel P 58 Acople la etiqueta de tama o de papel de mod...

Страница 89: ...principal 89 Extensi n de la bandeja Gu as del papel Interruptor de alimentaci n P 57 Bandeja multiuso P 60 Gu as del papel P 65 Casete 2 P 58 Casete 1 P 58 Gu as del papel P 65 Alimentador de sobres...

Страница 90: ...ar opciones o realizar un registro 3 Men Personalice la pantalla por ejemplo reorganizando los botones o creando teclas de acceso directo 4 Ahorro de energ a P 56 Pulse poner el equipo en el modo de r...

Страница 91: ...opciones especificadas en Copiar Leer y Enviar 8 Informaci n de dispositivo contador Pulse para ver los recuentos totales de copia e impresi n en la pantalla t ctil 9 Detener P 77 Pulse para detener...

Страница 92: ...iales para la salud No obstante podr an percibirse con mayor facilidad durante el uso prolongado del equipo o durante los ciclos de producci n largos especialmente en habitaciones poco ventiladas Para...

Страница 93: ...o Aseg rese de que la alimentaci n del equipo es segura y el voltaje estable Mantenga el cable de la alimentaci n apartado de fuentes de calor de lo contrario podr a derretirse la funda del cable y oc...

Страница 94: ...uncionamiento en la aspiradora o tener como resultado una explosi n de polvo debido a las descargas est ticas ATENCI N Mantenga el t ner y otros consumibles fuera del alcance de los ni os peque os En...

Страница 95: ...nos que se especifique expresamente en el manual Si efectuara tales cambios o modificaciones podr a verse obligado a dejar de utilizar el equipo CANON U S A INC One Canon Park Melville NY 11747 U S A...

Страница 96: ...ensiones y el peso espec ficos B Informaci n sobre pedidos 1 Deber utilizarse una l nea telef nica sencilla tonos o pulsos Si estuviera instalada la tarjeta de fax de 2 l nea S per G3 podr emplearse u...

Страница 97: ...tre de 115 volts et 15 amp res Pour faciliter l installation le jack CA11A doit tre assez proche de la prise de courant Remarques Le pr sent produit est conforme aux sp cifications techniques applicab...

Страница 98: ...e los derechos del SOFTWARE conservan en todos los aspectos la titularidad la propiedad y los derechos de la propiedad intelectual inherentes y relativos al SOFTWARE Salvo que aqu se indique expresame...

Страница 99: ...la Gu a de usuario con el n mero de b squeda N mero de b squeda ejemplo Buscar ABCD 123 Configuraci n del entorno de red Gu a de usuario C moutilizareln merodeb squeda P 47 Consulte la p gina de preg...

Страница 100: ...NY 11747 U S A CANON CANADA INC 8000 Mississauga Road Brampton ON L6Y 5Z7 Canada CANON EUROPA N V Bovenkerkerweg 59 1185 XB Amstelveen The Netherlands See http www canon europe com for details on your...

Отзывы: