background image


20

Ble

ed

-th

ro

ug

h O
cc

ur

s

Bleed-through Occurs

Set the type of original properly.

If bleed-through is observed with the copy result, 
setting the type of original can improve the 
problem, giving a neat copy.

1.

 Press

2.

 Press [Copy]   [Options]   [Original Type].

3.

 Press [Text/Photo (BleedReduce)].

4.

 Press [OK].

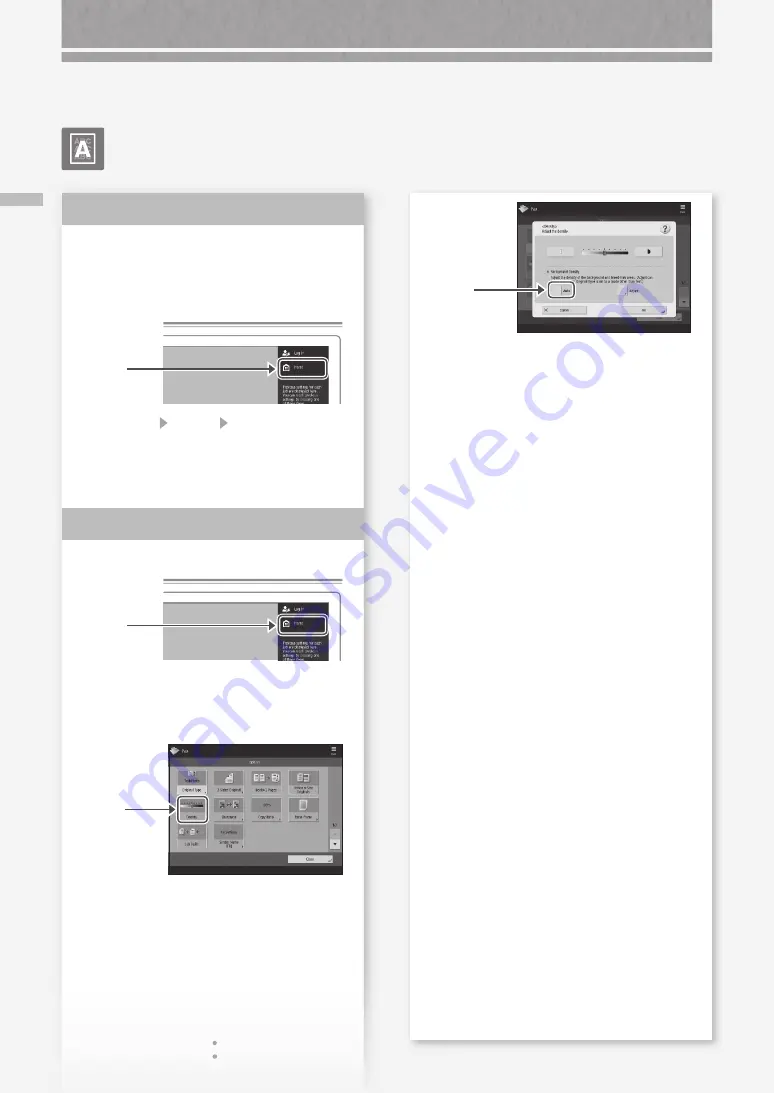
Set a lower background density. 

1.

 Press

2.

 Select the function on the touch panel display.

3.

 Press [Options].

4.

 Press

Example: Fax

Solution 

1

Solution 

2


5.

 Press

6.

 Press [OK].

Printing Results Are Not Satisfactory

Содержание imageRUNNER ADVANCE C7565i III

Страница 1: ... What is Your Question FAQ Guide English P 3 Español P 51 ...

Страница 2: ......

Страница 3: ...this product P 42 After you finish reading this guide store it in a safe place for future reference The information in this document is subject to change without notice You can access canon com oip manual to read the User s Guide that describes all functions of this machine English Español 3 ...

Страница 4: ...nts Cannot Be E Mailed 29 If You Cannot Send Forward Faxes 30 If You Cannot Receive Faxes 31 The Machine Does Not Operate P 6 Scan Fax Cannot Be Performed Successfully Loading Paper in the Paper Deck 8 Loading Paper in the Paper Drawer 8 When You Have Loaded a Different Type of Paper than the Preset One 10 Loading Paper in the Multi Purpose Tray 11 When loading paper in the optional Document inser...

Страница 5: ...tisfactory P 18 Loading Paper or Paper Settings Cannot Be Done Successfully Illustrated Index P 38 Appendix P 42 You Can Consult the User s Guide 50 If You Notice a Search Number 50 Do You Want to Know More P 50 P 24 Paper Is Not Fed 24 If the Load paper Message Is Displayed 25 Printing Cannot Be Performed on the Expected Side of Paper 26 Printing Cannot Be Performed with the Expected Size 26 In T...

Страница 6: ... power ON check the power plug and breaker Main power indicator I ON Search OSUS 01F Location of the breaker User s Guide How to use the search number P 50 Check 3 Is lit Press this to cancel the Sleep mode Check 2 Is the machine correctly connected to the computer Check the network connection Search 10H3 006 Setting the network environment User s Guide How to use the search number P 50 Check 4 Th...

Страница 7: ...ng to be printed 2 Check that the main power indicator has turned off 3 Press the power switch again Download the printer driver again N OT E For more information P 33 Solution 1 Solution 2 The Machine Does Not Respond to the Computer The Authentication Screen Logon Screen Is Displayed and You Cannot Go Further Log on to the machine using a registered user ID To continue the operation when the aut...

Страница 8: ... fan the paper stack well and then load it Make sure that this line is not exceeded The print side face down 3 Return the paper deck to its original position CAUTION Be careful not to get your fingers caught between the paper drawer and the machine 1 2 Squeeze the light blue tabs and adjust the positions of the slide guides 3 First fan the paper stack well and then load it Make sure that this line...

Страница 9: ...drawer and the machine POINT When you have changed the paper size replace the paper size label with an appropriate one as necessary P 38 When you have loaded a different type of paper than the preset one be sure to change the paper type setting P 10 Search 10H3 0KL Specifications How to use the search number P 50 For available paper see the following ...

Страница 10: ...e paper custom size paper User s Guide To load tab paper The Tab Feeding Attachment is required Search 10H3 029 Loading Tab Paper User s Guide How to use the search number P 50 1 Select the paper type 1 2 Press Preferences Paper Settings Paper Settings on the touch panel display 3 1 2 3 4 POINT Paper sources other than 1 to 4 are optional For more information User s Guide 4 POINT If the displayed ...

Страница 11: ...ray extension POINT Pull out the tray extension when loading large sized paper 3 Fan the paper stack well align the edges on a flat surface and then load it Make sure that this line is not exceeded The print side face up 4 If the paper size type setting does not match the paper you have loaded In the screen for this step 4 change the setting manually 1 2 3 Press Change in Paper Type 4 1 Check the ...

Страница 12: ...ck side of printed paper 1 Load paper in the multi purpose tray the print side face up 2 In the Paper Type selection screen press 2nd Side of 2 Sided Page CAUTION For this operation paper can only be loaded in the multi purpose tray POINT You can use only paper printed with this machine When loading paper in the optional Document insertion For the loading procedures see the User s Guide Search 0WR...

Страница 13: ... Paper Co Ltd Multi Purpose Tray ABC Co Ltd C o L t d Co Ltd A B C Co Ltd C o L t d Cannot be loaded in the Paper Deck Co Ltd A B C Co Ltd Co Ltd Cannot be loaded in the Paper Deck Co Ltd ABC Co Ltd N OT E When copying to paper with printed logos User s Guide N OT E Basic Paper Loading Operations For Paper Deck Paper Drawer P 8 For multi purpose tray P 11 For optional paper sources User s Guide Se...

Страница 14: ...pes the front side face down and for the multi purpose tray load them the front side face up For the loading orientation see the table below Paper Drawer Multi Purpose Tray Yougatanaga 3 ISO C5 Paper Drawer Envelope Multi Purpose Tray Nagagata 3 Kakugata 2 Monarch COM10 No 10 DL Preparation before Loading Envelopes 1 Take five or so pieces of envelopes fan them well to eliminate curls and level th...

Страница 15: ...ser s Guide How to use the search number P 50 Press Select the orientation and type of envelopes When loading envelopes in the paper drawer 1 Attach the Envelope Feeder Attachment to the paper drawer CAUTION It is not necessary to attach the Envelope Feeder Attachment if you are loading Nagagata 3 Kakugata 2 ISO C5 or nonstandard size envelopes Proceed to step 3 1 Remove the Envelope Feeder Attach...

Страница 16: ... envelopes The front side of the envelopes face down 3 Insert the paper drawer into the machine 4 5 Press Preferences Paper Settings Paper Settings on the touch panel display 6 Press 1 Select the paper source 2 Press 3 Select the envelope type 4 Press ...

Страница 17: ...e preset one be sure to change the paper type setting P 10 CAUTION You cannot load tab paper in the paper deck or the optional paper deck unit N OT E When loading paper in the Multi Purpose Tray User s Guide When loading paper in the POD Deck Lite User s Guide When loading paper in the Multi drawer Paper Deck User s Guide When loading paper in the Document Insertion User s Guide 1 2 Move the slide...

Страница 18: ...tray Solution The paper may have absorbed moisture Replace it with paper that has not absorbed moisture Perform gradation adjustment 1 Press 2 Press Adjustment Maintenance Adjust Image Quality Auto Adjust Gradation on the touch panel display Follow the instructions in the screen to perform gradation adjustment For more information see the User s Guide Search 10H3 0HR Adjusting gradation User s Gui...

Страница 19: ...anning area using the supplied glass cleaning sheet 3 Open the cover 1 2 4 Open the inner cover 5 Wipe the original scanning area Wipe the thin and long glass area 6 Close the cover and inner cover 7 Close the feeder 8 Insert the power plug into the power outlet and turn the power ON N OT E If black streaks still appear after dirt removal perform the following procedure to execute Clean Feeder For...

Страница 20: ...pe of original can improve the problem giving a neat copy 1 Press 2 Press Copy Options Original Type 3 Press Text Photo BleedReduce 4 Press OK Set a lower background density 1 Press 2 Select the function on the touch panel display 3 Press Options 4 Press Example Fax Solution 1 Solution 2 5 Press 6 Press OK Printing Results Are Not Satisfactory ...

Страница 21: ...per jam locations Use these buttons and bar to operate the video POINT The screen disappears once all the jammed paper is removed and all the machine s covers and drawers are closed correctly If you do not understand the remedy by referring to the screen See the User s Guide to make sure of the remedy Search 10H3 0JY Paper jams User s Guide How to use the search number P 50 If Paper Jams Occur ...

Страница 22: ... match the loaded paper change the setting For paper deck paper drawer P 8 For multi purpose tray P 11 For optional paper sources User s Guide Solution 3 Adjust the paper guides Adjust the guide exactly Multi purpose tray Check if the paper is bent Example Paper Deck Unbend or remove the bent paper Solution 1 Solution 2 If Paper Jams Occur ...

Страница 23: ...u forcibly remove the jammed paper torn scraps of paper may remain in the main unit or optional devices If paper tears check that there are no scraps of paper inside and try to remove all of the scraps Do not try to pull out the jammed paper forcibly Solution 4 ...

Страница 24: ...or available paper see the following Search 10H3 0KL Available paper User s Guide How to use the search number P 50 Solution 1 Remove the excess amount of paper Make sure that the paper stack does not exceed the load limit line Load paper of the same size and same type in the same paper source You cannot load paper of different sizes or different types in one paper source Check the paper type sett...

Страница 25: ...atch the loaded paper change the setting For paper drawer P 8 For multi purpose tray P 11 For optional paper sources User s Guide Make sure that the original size and output paper size are correct 1 Check the original size and possible output sizes on the Printing Preferences screen of the printer driver 2 Load paper of the size matching the original size setting POINT To print on paper of a size ...

Страница 26: ...t orientation and correct printing side Paper Deck Paper Drawer The print side face down Multi Purpose Tray The print side face up N OT E For optional paper sources User s Guide 2 If the check result indicates that the paper is not loaded correctly reload the paper correctly Solution Make sure that the paper size setting matches the size of the loaded paper 1 Replace the loaded paper with paper of...

Страница 27: ... direction 2 In the Printing Preferences screen of the driver set Orientation for the direction selected in step 1 3 While viewing the preview image make settings in the order of Page Layout Page Order 1 sided 2 sided Booklet Printing Binding Location POINT Page Order is only displayed when you set Page Layout to 2 on 1 or other option for printing multiple pages on one physical 2 3 Orientation Po...

Страница 28: ...ch buttons 1 Press 2 Press Dest Fwd Settings Register Destinations on the touch panel display 6 Press 4 Press 3 Select the destination 5 Change the registered information Example Address book POINT To check the connection after changing the registered information press Check Connection N OT E For more information P 29 To change registered information Solution To stop the paper feed 1 Press 2 Press...

Страница 29: ...orrect communication settings for the SMTP DNS server For the setting procedures see the User s Guide To specify the port number for SMTP TX POP RX 1 Press 2 On the touch panel display press Function Settings Send E Mail I Fax Settings Specify Port Number for SMTP TX POP RX 3 Specify the port number 4 Press OK Search 10H3 017 Search 10H3 00X E mail I fax communication settings User s Guide Configu...

Страница 30: ...d or if the machine cannot be connected to the destination fax number no fax dial tone is heard There may be a problem with the destination or your telephone carrier Contact the destination If you cannot forward faxes Check the information of the forwarding destination registered to the address book one touch buttons If anything is wrong with the information correct it 1 Press 2 Press Dest Fwd Set...

Страница 31: ...ng the error code Search 10H3 0JX Countermeasures for Each Error Code User s Guide How to use the search number P 50 Solution 1 Solution 2 If you are using an optical line or IP telephone line Communication errors may occur depending on the line quality For more information contact your telephone carrier Reduce the fax transmission speed Reducing the fax transmission speed may result in a communic...

Страница 32: ...l To cancel a copy job waiting to be output 1 Press 4 Press 2 Select Copy from the drop down list 3 Select the copy job you want to cancel 5 Press Yes For Windows OS 1 In the computer screen double click the printer icon 2 Select the file you want to cancel 3 Click 4 Select Cancel 5 Click Yes For Mac OS 1 In the computer screen click the printer icon on the Dock 2 Select the file you want to cance...

Страница 33: ...on see the Driver Installation Guide The Guide can be downloaded from or viewed on the same page of the Canon website as for the printer driver Latest OS support information See the Canon website http www canon com If a printer driver for this machine is already installed on your computer Depending on your system environment it is necessary to uninstall the old driver and install the new one For t...

Страница 34: ...replace it appears on the touch panel display Replace the consumable in question by referring to the screen 1 POINT Depending on the condition of the consumable a screen like the one shown under step 2 may appear first 2 Prepare the consumable Check the item number This is an item number identifying a Canon genuine consumables For high quality printouts we recommend that you use Canon genuine cons...

Страница 35: ...ith the following options Booklet Finisher X Staple Cartridge Y1 This can be used with the following options Booklet Finisher V Depending on the machine you are using the Stamp Unit B is standard equipped CAUTION Avoid storing toner cartridges vertically Store toner cartridges in a cool place not exposed to direct sunlight A preferable environment is one where temperature is not higher than 30 C a...

Страница 36: ...follow the procedure below to contact the service representative 1 Make a note of the error code number displayed on the screen POINT Multiple code numbers may be displayed 2 Turn the machine OFF and disconnect the power plug from the power outlet 3 Contact the service representative CAUTION For any inquiries have the following information ready Product name Dealer where you purchased the machine ...

Страница 37: ...machine enters the limited functions mode When the problem is resolved the Call service representative message disappears in the screen at the bottom left Search 10H3 0JU Functions available in the limited functions mode User s Guide How to use the search number P 50 POINT When you select a restricted function in the limited functions mode the following screen appears Press on the touch panel disp...

Страница 38: ...ify the name of a part and find the page where that part is described Main Unit Paper size label P 8 Attach the paper size label so that it aligns with the cassette number indicator horizontally Separate by approx 1 4 5 mm Cassette number indicator 1 4 ...

Страница 39: ...39 Main Unit Tray extension Paper guides Power switch P 7 Multi purpose tray P 11 Paper Deck P 8 Envelope Feeder Attachment P 15 Paper guides P 8 Paper drawer P 8 Tab Feeding Attachment P 17 ...

Страница 40: ...splay the Home screen 3 Touch panel display P 6 Displays the settings screen and messages Touch the panel to perform setting and other operations 4 Timeline Displays a log for settings specified in Copy Scan and Send 5 Status Monitor P 22 Press to check the status of a job or cancel a job 6 Reset key Press to cancel the settings and restore the previously specified settings Control Panel ...

Страница 41: ... when the machine is waiting for a command 8 Error indicator Flashes or lights if there is an error in the machine When the Error indicator maintains a steady red light contact your local authorized Canon dealer 9 Main Power indicator P 6 Lights when the power is turned ON 10 Start key Press this to start an operation or data reading 11 Stop key P 28 Press to stop the current operation 12 Clear ke...

Страница 42: ...dry location to a hot or humid location Using the machine under these conditions may result in paper jams poor print quality or damage to the machine Let the machine adjust to the ambient temperature and humidity for at least 2 hours before use Avoid installing the machine near computers or other precision electronic equipment Electrical interference and vibrations generated by the machine while p...

Страница 43: ...the following remarks and instructions for safety Never open covers other than those instructed in the manuals for this machine If the laser beam should escape and enter your eyes exposure may cause damage to your eyes Use of controls adjustments or performance coating to melt resulting in a fire or electrical shock Avoid the following situations If excessive stress is applied to the connection pa...

Страница 44: ...e the toner cartridge as doing so may cause toner to fly out and enter your eyes or mouth If toner gets into your eyes or mouth wash them immediately with cold water and immediately consult a physician If toner escapes from the toner cartridge make sure not to ingest the toner or allow it to directly touch your skin If your skin still feels irritated after washing it or you ingest toner consult a ...

Страница 45: ...e may result in the devices not ringing in response to an incoming call In most but not all areas the sum of RENs should not exceed five 5 0 To be certain of the number of devices that may be connected to a line as determined by the total RENs contact the local telephone company For products approved after July 23 2001 the REN for this product is part of the product identifier that has the format ...

Страница 46: ...e may consist of any combination of devices subject only to the requirement that the sum of the RENs of all the devices not exceed five The REN of this product is 1 0 Repairs to certified equipment should be made by an authorized Canadian maintenance facility designated by the supplier Any repairs or alterations made by the user to this equipment or equipment malfunctions may give the telecommunic...

Страница 47: ...oftware modules described in Appendix of Manual for the corresponding Platform Version This Manual is available at http canon com oip manual By using the PRODUCT you shall be deemed to have agreed to all applicable license conditions If you do not agree to these license conditions please contact your service representative ACCEPTANCE THE TERMS OF THIS THIRD PARTY SOFTWARE STATED HERE OR IN RELATED...

Страница 48: ...on that you have an internet connection and internal network bandwidth available for the Canon Server to download files to each of the Products receiving the CDS Service Downloaded files may vary in size some will be on the order of several hundred MB The CDS Service Technology White Paper contains further details iii authorization by you for the Canon Seller to establish and perform during the pe...

Страница 49: ...on which the original identification marks or serial numbers have been defaced removed or altered ANY SOFTWARE THAT IS DISTRIBUTED WITH THE PRODUCT AND HAS AN ASSOCIATED END USER AGREEMENT IS LICENSED WARRANTED AND PROVIDED ACCORDING TO THE TERMS OF THAT AGREEMENT INCLUDING ANY LIMITATIONS AND DISCLAIMERS THEREIN SUCH SOFTWARE IS SOLD WITHOUT WARRANTY OF ANY KIND BY CANON PLEASE CONTACT CANON IMME...

Страница 50: ... Search by Contents Search by Search Opening the User s Guide 1 Display the online manual website canon com oip manual 2 Select the appropriate user s guide imageRUNNER ADVANCE Color Select this machine The wanted page appears in no time at all You can search through the User s Guide by the search number Search number Example Search ABCD 123 Setting the network environment User s Guide How to use ...

Страница 51: ...ste producto P 90 Al acabar de leer esta guía guárdelo en un lugar seguro para consultas futuras La información de este documento puede ser modificada sin previo aviso En canon com oip manual tiene a su disposición el Guía de usuario en el que se describen todas las funciones de este equipo English Español 51 ...

Страница 52: ...ar por fax 76 No se pueden enviar por correo electrónico los documentos escaneados 77 Si no puede enviar reenviar faxes 78 Si no puede recibir faxes 79 El equipo no funciona P 54 Nosehapodidoescanear enviarporfaxcorrectamente Cargar papel en el depósito 56 Cargar papel en el casete 56 Si ha cargado un tipo de papel distinto del preestablecido 58 Carga de papel en la bandeja multiuso 59 Al cargar p...

Страница 53: ...l 68 Losresultadosdeimpresión nosonsatisfactorios P 66 No se puede cargar papel o configurar las opciones de papel correctamente Índice ilustrado P 86 Apéndice P 90 Puede consultar la Guía de usuario 97 Si ve un número de búsqueda 97 Quiere saber más P 97 P 72 El papel no se ha introducido 72 Si aparece el mensaje Cargue papel 73 No se puede imprimir en la cara prevista del papel 74 No se puede im...

Страница 54: ...n principal compruebe el enchufe y el interruptor Alimentación indicador I ON Buscar OSUS 01F Localización del interruptor Guía de usuario Cómoutilizarelnúmerodebúsqueda P 97 Compruebe 3 Está encendido Púlselo para cancelar el modo de reposo Compruebe 2 Está bien conectado el equipo al ordenador Revise la conexión de red Buscar 10H3 006 Configurar el entorno de red Guía de usuario Cómoutilizarelnú...

Страница 55: ...irse 2 Compruebe que el indicador de alimentación principal se ha apagado 3 Vuelva a pulsar el interruptor de alimentación Vuelva a descargar el controlador de impresora N OTA Para obtener más información P 81 Solución 1 Solución 2 Elequiponorespondeal ordenador Aparece la pantalla de autenticación pantalla de inicio de sesión y no se puede avanzar más Inicie sesión en el equipo con un ID de un us...

Страница 56: ...ila de papel y luego cárguela Asegúrese de no superar esta línea La cara de impresión hacia abajo 3 Coloque de nuevo el depósito en su posición original ATENCIÓN Tenga cuidado de no pillarse los dedos entre el casete y el equipo 1 2 Apriete las pestañas azul claro y ajuste las posiciones de las guías deslizantes 3 Primero ventile bien la pila de papel y luego cárguela Asegúrese de no superar esta ...

Страница 57: ...y el equipo PUNTO Cuando cambie el tamaño de papel sustituya la etiqueta de tamaño de papel por otra según corresponda P 86 Si ha cargado un tipo de papel distinto del preestablecido recuerde cambiar el tipo de papel configurado P 58 Buscar 10H3 0KL Especificaciones Cómoutilizarelnúmerodebúsqueda P 97 Consulte aquí el papel disponible ...

Страница 58: ...íadeusuario Para cargar papel separador Se requiere el Accesorio de Alimentación de Separadores Buscar 10H3 029 Cargar papel separador Guía de usuario Cómoutilizarelnúmerodebúsqueda P 97 1 Seleccione el tipo de papel 1 2 Pulse Preferencias Opciones de papel Opciones de papel en la pantalla táctil 3 1 2 3 4 PUNTO Los orígenes de papel que no sean 1 a 4 son opcionales Para obtener más información Gu...

Страница 59: ...Despliegue la extensión de la bandeja cuando cargue papel de gran tamaño 3 Ventile bien la pila de papel alinee los bordes sobre una superficie plana y luego cárguela Asegúrese de no superar esta línea La cara de impresión hacia arriba 4 Si el tamaño tipo del papel no coincide con el papel que ha cargado En la pantalla de este paso 4 cambie la configuración manualmente 1 2 3 Pulse Cambiar en Tipo ...

Страница 60: ...e papel impreso 1 Cargue papel en la bandeja multiuso con la cara de impresión hacia arriba 2 En la pantalla de selección Tipo de papel pulse 2 ª cara hoja a doble cara ATENCIÓN Para esta operación solo se puede cargar papel en la bandeja multiuso PUNTO Solo puede utilizar papel impreso con este equipo Al cargar papel en la Unidad de Inserción opcional Para ver los procedimientos de carga consulte...

Страница 61: ... Logotipo Papel Co Ltd Bandeja multiuso ABC Co Ltd C o L t d Co Ltd A B C Co Ltd C o L t d No se puede cargar en el depósito Co Ltd A B C Co Ltd Co Ltd No se puede cargar en el depósito Co Ltd ABC Co Ltd N OTA Al copiar en papel con logotipos impresos Guía de usuario N OTA Operaciones básicas de carga de papel Para Depósito Casete P 56 Para la bandeja multiuso P 59 Para orígenes de papel opcionale...

Страница 62: ... el anverso hacia abajo y en la bandeja multiuso cárguelos con el anverso hacia arriba Para ver la orientación en que se deben cargar consulte la tabla siguiente Casete de papel Bandeja multiuso Yougatanaga 3 ISO C5 Casete de papel Sobres Bandeja multiuso Nagagata 3 Kakugata 2 Monarch COM10 No 10 DL Preparativos para cargar los sobres 1 Coja un taco de unos cinco sobres airéelo para eliminar las d...

Страница 63: ...rsonalizado Guía de usuario Cómoutilizarelnúmerodebúsqueda P 97 Pulse Seleccione la orientación y el tipo de sobres Al cargar sobres en el casete 1 Acople el Alimentador de sobres en el casete ATENCIÓN Cuando cargue Nagagata 3 Kakugata 2 ISO C5 o sobres de tamaño no estándar no es necesario que instale el Alimentador de sobres Continúe con el paso 3 1 Saque el Alimentador de sobres que está guarda...

Страница 64: ... sobres Los sobres con el anverso hacia abajo 3 Introduzca el casete en el equipo 4 5 Pulse Preferencias Opciones de papel Opciones de papel en la pantalla táctil 6 Pulse 1 Seleccione el origen del papel 2 Pulse 3 Seleccione el Tipo de sobre 4 Pulse ...

Страница 65: ...de papel configurado P 58 ATENCIÓN No se puede cargar papel separador en el depósito ni en el depósito de papel opcional N OTA Cuando cargue papel en la bandeja multiuso Guía de usuario Al cargar papel en el Depósito POD Sencillo Guía de usuario Al cargar papel en el depósito multibandeja Guía de usuario AlcargarpapelenlaUnidaddeInserción Guíadeusuario 1 2 Mueva la guía deslizante completamente a ...

Страница 66: ... guía exactamente Bandeja multiuso Solución El papel puede haber absorbido humedad Sustitúyalo por papel que no haya absorbido humedad Realice el ajuste de gradación 1 Pulse 2 Pulse Ajuste Mantenimiento Ajustar calidad de imagen Ajuste auto de gradación en la pantalla táctil Siga las instrucciones de la pantalla para realizar el ajuste de la gradación Para obtener más información consulte la Guía ...

Страница 67: ...ntos mediante la hoja de limpieza del cristal provista 3 Abra la tapa 1 2 4 Abra la tapa interior Solución 5 Pase un paño por el área de lectura de originales Paseunpañoporel áreadecristalestrecha yalargada 6 Cierre la tapa y la tapa interior 7 Cierre el alimentador 8 Conecte el enchufe a la toma de corriente y encienda el equipo Si siguieran apareciendo rayas negras después de limpiar la suciedad...

Страница 68: ... puede resolver el problema y se obtendrá una copia limpia 1 Pulse 2 Pulse Copia Opciones Tipo de original 3 Pulse Texto Foto Reducción de sangrado 4 Pulse Aceptar Establezca una densidad de fondo inferior 1 Pulse 2 Seleccione la función en la pantalla táctil 3 Pulse Opciones 4 Pulse Ejemplo Fax Solución 1 Solución 2 5 Pulse 6 Pulse Aceptar Los resultados de impresión no son satisfactorios ...

Страница 69: ...es de atascos de papel Utilice estos botones y la barra para controlar el vídeo PUNTO La pantalla desaparece cuando el papel atascado se retira y se cierran correctamente todas las tapas y casetes del equipo Si no entiende el remedio consultando la pantalla Consulte la Guía de usuario para confirmar los detalles de la solución Buscar 10H3 0JY Atascos de papel Guía de usuario Cómoutilizarelnúmerode...

Страница 70: ...no coincide con el papel cargado cambie la configuración Para depósito casete P 56 Para la bandeja multiuso P 59 Para orígenes de papel opcionales Guía de usuario Solución 3 Ajuste las guías del papel Ajuste la guía exactamente Bandeja multiuso Compruebe si el papel está doblado Ejemplo Depósito Desdoble o extraiga el papel doblado Solución 1 Solución 2 Si se produce un atasco de papel ...

Страница 71: ...re los trozos de papel Si intenta retirar el papel atascado a la fuerza el papel puede romperse y algún trozo puede quedarse en el equipo Acceda a todos los puntos donde se ha atascado el papel y retire los posibles trozos de papel existentes Solución 4 ...

Страница 72: ...uí el papel disponible Buscar 10H3 0KL Papel disponible Guía de usuario Cómoutilizarelnúmerodebúsqueda P 97 Solución 1 Retire la cantidad sobrante de papel Asegúrese de que la pila de papel no excede la línea de límite de carga Cargue papel del mismo tamaño y del mismo tipo en el mismo origen de papel No puede cargar papel de distintos tamaños o distintos tipos en un origen de papel Compruebe la c...

Страница 73: ...uración Para casete P 56 Para la bandeja multiuso P 59 Paraorígenesdepapelopcionales Guíadeusuario Asegúresedequeeltamañodeloriginalyel tamañodelpapeldeimpresiónsoncorrectos 1 Compruebe el tamaño del original y los posibles tamaños de impresión en la pantalla Preferencias de impresión del controlador de impresora 2 Cargue papel del mismo tamaño que la configuración de tamaño del original PUNTO Par...

Страница 74: ...La cara de impresión hacia arriba N OTA Para orígenes de papel opcionales Guía de usuario 2 Si el resultado de la comprobación indica que el papel no está bien cargado vuelva a cargarlo correctamente Solución Asegúrese de que el tamaño del papel configurado coincide con el tamaño del papel cargado 1 Sustituya el papel cargado por papel del tamaño que desee imprimir PUNTO Si desea imprimir en el pa...

Страница 75: ...pantalla Preferencias de impresión del controlador establezca Orientación en la dirección seleccionada en el paso 1 3 Al ver la imagen de vista preliminar configure las siguientes opciones en este orden Diseño de página Orden de páginas Una cara Doble cara Impresión en cuadernillo Posición de encuadernación PUNTO Diseño de página solo aparece cuando se establece Formato de página en 2 en 1 o en ot...

Страница 76: ...s botones de acceso directo 1 Pulse 2 Pulse Opciones dest reenv Guardar destinos en la pantalla táctil 6 Pulse 4 Pulse 3 Seleccione el destino 5 Cambie la información registrada Ejemplo Libreta de direcciones PUNTO Para comprobar la conexión tras cambiar la información registrada pulse Compruebe conexión N OTA Para obtener más información P 77 Para cambiar la información registrada Solución Para d...

Страница 77: ...tas para el servidor SMTP DNS Para ver los procedimientos de configuración consulte la Guía de usuario Para especificar el número de puerto para SMTP TX POP RX 1 Pulse 2 En la pantalla táctil pulse Opciones de funciones Envío Opciones de e mail I fax Especificar número de puerto para SMTP TX POP RX 3 Especifique el número de puerto 4 Pulse Aceptar Buscar 10H3 017 Buscar 10H3 00X Opciones de comuni...

Страница 78: ...audio o si el equipo no puede conectarse al número de fax de destino no se oye ningún tono de marcación de fax Es posible que haya algún problema con el destino o la compañía telefónica Póngase en contacto con el destino Si no puede reenviar faxes Compruebe la información del destino de reenvío registrada en la libreta de direcciones botones de acceso directo Si la información es incorrecta corríj...

Страница 79: ...nes para los códigos de error Guía de usuario Cómoutilizarelnúmerodebúsqueda P 97 Solución 1 Solución 2 Si utiliza una línea de fibra óptica o de telefonía a través de IP Pueden producirse errores de comunicación en función de la calidad de la línea Para obtener más información póngase en contacto con su compañía telefónica Reduzca la velocidad de transmisión del fax Reducir la velocidad de transm...

Страница 80: ...un trabajo de copia a la espera de realizarse 1 Pulse 4 Pulse 2 Seleccione Copia en la lista desplegable 3 Seleccione el trabajo de copia que desea cancelar 5 Pulse Sí Para el SO Windows 1 En la pantalla del ordenador haga doble clic en el icono de la impresora 2 Seleccione el archivo que desee cancelar 3 Haga clic 4 Seleccione Cancelar 5 Haga clic en Sí Para Mac OS 1 En la pantalla del ordenador ...

Страница 81: ...e la Guía de instalación del controlador Dicha guía puede descargarse de la misma página del sitio web de Canon que el controlador de impresora o bien consultarse allí Información más reciente de asistencia del SO Consulte el sitio web de Canon http www canon com Si ya hay un controlador de impresora para este equipo instalado en su ordenador En función de su entorno de sistema puede ser preciso d...

Страница 82: ...ctil Sustituya el consumible en cuestión consultando la pantalla 1 PUNTO En función del estado del consumible puede aparecer primero una pantalla como la que se muestra en el paso 2 2 Prepare el consumible Consulte el número de artículo Se trata de un número de artículo que identifica un consumible original de Canon Para conseguir una alta calidad de impresión se recomienda utilizar consumibles or...

Страница 83: ...entes Booklet Finisher X Cartucho de Grapas Y1 Puede utilizarse con las opciones siguientes Unidad de Acabado de Cuadernillos V En función del equipo que esté utilizando la Unidad de Sello B está equipada de manera estándar ATENCIÓN Evite almacenar los cartuchos de tóner verticalmente Guarde los cartuchos de tóner en un lugar fresco no expuesto a la luz solar directa Es preferible un entorno donde...

Страница 84: ...ontacto con el servicio al cliente 1 Apunte el número de código de error que aparece en la pantalla 2 Si el mensaje no desaparece siga el procedimiento a continuación para ponerse en contacto con el representante del servicio técnico PUNTO Pueden aparecer varios números de código 3 Póngase en contacto con el representante del servicio técnico ATENCIÓN Para cualquier solicitud o pregunta tenga prep...

Страница 85: ...unciones limitadas Hasta que se resuelva el problema aparecerá en pantalla el mensaje Llame a un representante del servicio técnico en la esquina inferior izquierda de la pantalla Buscar 10H3 0JU Funciones disponibles en el modo de funciones limitadas Guía de usuario Cómoutilizarelnúmerodebúsqueda P 97 PUNTO Al seleccionar una función restringida en el modo de funciones limitadas aparecerá la pant...

Страница 86: ...bre de una pieza y buscar la página donde se describe Unidad principal Etiquetadetamañodepapel P 56 Coloquelaetiquetadetamañodepapelde talformaquequedealineadaenhorizontal conelindicadordenúmerodelcasete Deje una separación de aprox 1 4 5 mm Indicadordenúmero delcasete 1 4 ...

Страница 87: ...pal Extensión de la bandeja Guías del papel Interruptor de alimentación P 55 Bandeja multiuso P 59 Depósito P 56 Alimentador de sobres P 63 Guías del papel P 56 Casete P 56 Accesorio de Alimentación de Separadores P 65 ...

Страница 88: ...icio 3 Pantalla táctil P 54 Muestra la pantalla de opciones y mensajes Toque el panel para configurar opciones y otras operaciones 4 Cronograma Muestra un registro de las opciones especificadas en Copiar Leer y enviar 5 Monitor estado P 70 Púlsela para consultar el estado de un trabajo o cancelar un trabajo 6 Tecla Reiniciar Pulse aquí para cancelar las opciones y restaurar las opciones que se hab...

Страница 89: ...sión 7 Indicador Procesando datos Pa r p a d e a c u a n d o e l e q u i p o e s t á e n funcionamiento Se ilumina cuando el equipo está esperando un comando 8 Indicador de error Parpadea o se ilumina si hay un error en el equipo Si el indicador de Error se enciende en rojo constante póngase en contacto con su distribuidor autorizado local de Canon 9 Indicador de alimentación principal P 54 Se enc...

Страница 90: ...prolongado o durante los ciclos de producción largos en salas mal ventiladas Para que el entorno de trabajo sea cómodo se recomienda que la sala en la que vaya a utilizarse el equipo esté bien ventilada Evite también lugares donde pueda haber personas expuestas a las emisiones del equipo No instale el equipo en lugares en los que se produzca condensación Pueden formarse gotas de agua condensación ...

Страница 91: ...ongado Tenga cuidado cuando abra y cierre las tapas para no lastimarse las manos Mantenga las manos y la ropa alejadas de los rodillos del área de salida Si sus manos o su ropa quedan atrapadas entre los rodillos podrían producirse lesiones personales La parte interna del equipo y la ranura de impresión se calientan mucho durante e inmediatamente después de su uso Evite tocar estas zonas para evit...

Страница 92: ...s tapas u otras piezas a la fuerza Podría causar daños en el equipo si lo hiciera No apague el interruptor de alimentación principal ni abra las tapas durante el funcionamiento del equipo Si lo hace pueden producirse atascos de papel Utilice un cable modular de longitud inferior a 3 metros Utilice un cable USB de longitud inferior a 3 metros Símbolos relacionados con la seguridad Interruptordealim...

Страница 93: ...una lista no exhaustiva de dichos documentos Esta lista solo pretende orientarle a este respecto Si tiene dudas sobre la legalidad del uso de su producto para escanear imprimir o reproducir cualquier documento específico y o del uso de las imágenes escaneadas impresas o reproducidas debe ponerse en contacto previamente con su asesor legal para obtener consejo Papel moneda Cheques de viaje Giros po...

Страница 94: ...cable de la línea telefónica no deberá volverse a conectar ni tampoco encenderse el interruptor de alimentación principal hasta que no se haya resuelto totalmente el problema Los usuarios deberán ponerse en contacto con su distribuidor local de equipos de Fax de Canon autorizado para la reparación del equipo Si el equipo no funciona correctamente póngase en contacto con el distribuidor local Canon...

Страница 95: ... risquent de perturber le fonctionnement du télécopieur C Condition d alimentation Raccordez le télécopieur à une prise de courant plus terre à trois branches du type simple ou double et qui ne sert pas à alimenter un copieur un appareil de chauffage un climatiseur ou tout autre appareil électrique à thermostat L alimentation doit être de 115 volts et 15 ampères Pour faciliter l installation le ja...

Страница 96: ... el consentimiento previo por escrito de los titulares de los derechos del SOFTWARE 5 Sin perjuicio de lo anterior puede transferir el SOFTWARE únicamente cuando a ceda a un cesionario todos sus derechos respecto al PRODUCTO y todos los derechos y obligaciones expresados en las condiciones que rigen el SOFTWARE y el PRODUCTO y b cuando dicho cesionario acepte por escrito la obligación de atenerse ...

Страница 97: ...ontenido Buscar por Búsqueda Abrir la Guía del Usuario 1 Visualice el sitio web del manual canon com oip manual 2 Seleccione la guía del usuario correspondiente imageRUNNER ADVANCE Color Seleccione este equipo La página desea da aparece ense guida Puede buscar en la Guía del Usuario con el número de búsqueda Número de búsqueda ejemplo Buscar ABCD 123 Configurar el entorno de red Guía del Usuario C...

Страница 98: ......

Страница 99: ......

Страница 100: ... The Netherlands See http www canon europe com for details on your regional dealer CANON AUSTRALIA PTY LTD Building A The Park Estate 5 Talavera Road Macquarie Park NSW 2113 Australia CANON CHINA CO LTD 2F Jinbao Building No 89 Jinbao Street Dongcheng District Beijing 100005 China CANON SINGAPORE PTE LTD 1 Fusionopolis Place 15 10 Galaxis Singapore 138522 FT6 2130 010 XXXXXXXXXX Copyright CANON IN...

Отзывы: