background image

23

Sc

an

ne

d D
oc

um

en

ts C

an

no

t B

e E
-M

ail

ed

Scanned Documents Cannot Be 

E-Mailed

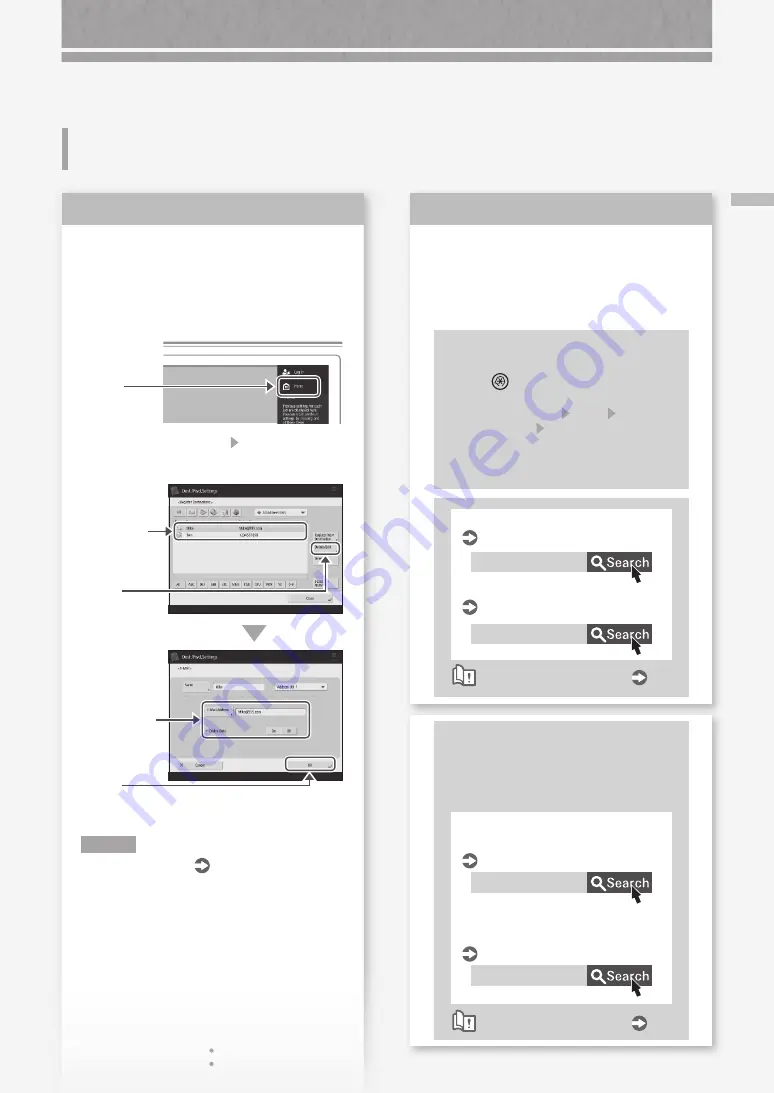
Check the information of the 

destination. 

If any update has been done, change the 
information registered to the address book/one-
touch buttons.

1.

 Press

2.

 Press [Dest./Fwd. Settings]   [Register 

Destinations] on the touch panel display.

Example: Address book

4.

 Press

3.

 Select the 

destination.

5.

 Change the 

registered 
information.

6.

 Press

N O T E

For more information  


"Editing the address 

book/one-touch buttons" on the right

Solution 

1

If e-mailing of documents is  

not possible at all, make correct 

communication settings for the SMTP/

DNS server. For the setting procedures, 

see the User's Guide.

To specify the port number for SMTP 

TX/POP RX

1.

 Press 

2.

 On the touch panel display, press

[Function Settings]   [Send]   [E-Mail/
I-Fax Settings]   [Specify Port Number for 
SMTP TX/POP RX].

3.

 Specify the port number.

4.

 Press [OK].

0YAS-017

0YAS-00X

Setting E-mail/I-Fax Communication 


User's Guide

Making DNS Settings


User's Guide


How to use the search number 


P.43

Solution 

2

When the information registered to 

the address book/one-touch buttons 

includes errors.

Edit the information to correct the errors, 
and re-register the correct information.

0YAS-038

0YAS-03A

Editing the Registered Destinations 
in the Address Book


User's Guide

Editing the Registered Destinations 
in One-Touch Buttons 


User's Guide


How to use the search number 


P.43

Содержание imageRUNNER ADVANCE 525 I

Страница 1: ...nstructions before operating this product P 36 After you finish reading this guide store it in a safe place for future reference The information in this document is subject to change without notice What is Your Question https oip manual canon ...

Страница 2: ...an and Send 22 Stopping Scanning Faxing 22 Scanned Documents Cannot Be E Mailed 23 If You Cannot Send Forward Faxes 24 If You Cannot Receive Faxes 25 The Machine Does Not Operate P 4 Scan Fax Cannot Be Performed Successfully Loading Paper in the Paper Drawer 6 When You Have Loaded a Different Type of Paper than the Preset One 6 Loading Paper in the Multi Purpose Tray 8 Loading Paper with Printed L...

Страница 3: ...tisfactory P 13 Loading Paper or Paper Settings Cannot Be Done Successfully Illustrated Index P 32 Appendix P 36 You Can Consult the User s Guide 43 If You Notice a Search Number 43 Do You Want to Know More P 43 P 18 Paper Is Not Fed 18 If the Load paper Message Is Displayed 19 Printing Cannot Be Performed on the Expected Side of Paper 20 Printing Cannot Be Performed with the Expected Size 20 In T...

Страница 4: ... the main power ON check the power plug Main power indicator I ON Note that the power plug or outlet may be different in shape depending on the region Check 3 Is lit Press this to cancel the Sleep mode Check 2 Is the machine correctly connected to the computer Check the network connection 0YAS 006 Setting up the Network Environment User s Guide How to use the search number P 43 Check 4 The Machine...

Страница 5: ...ng to be processed 2 Check that the main power indicator has turned off 3 Press the power switch again Install the printer driver again N OT E For more information P 27 Solution 1 Solution 2 The Machine Does Not Respond to the Computer The Authentication Screen Logon Screen Is Displayed and You Cannot Go Further Log on to the machine using a registered user ID To continue the operation when the au...

Страница 6: ...rint side face up 4 Place the paper drawer back into the machine CAUTION Be careful not to get your fingers caught between the paper drawer and the machine POINT When you have changed the paper size replace the paper size label with an appropriate one as necessary P 32 When you have loaded a different type of paper than the preset one be sure to change the paper type setting on the right half of t...

Страница 7: ...te basis weight 2 Press OK 6 Press OK When you have loaded custom size paper Specify the paper size manually 0YAS 02E Specifying custom size paper User s Guide How to use the search number P 43 1 Select the paper type 0YAS 0KU Hardware Specifications How to use the search number P 43 For available paper see the following ...

Страница 8: ... when loading large sized paper 3 First fan the paper stack well align the edges on a flat surface and then load it Make sure that this line is not exceeded The print side face down 4 If the paper type setting does not match the paper you have loaded Change the setting manually 1 2 3 Press OK 2 Press 1 Select the paper size Press 1 Select the paper type 2 Press Loading Paper in the Multi Purpose T...

Страница 9: ...ide of printed paper 1 Load paper in the multi purpose tray the print side face down 2 In the Paper Type selection screen press 2nd Side of 2 Sided Page CAUTION For this operation paper can only be loaded in the multi purpose tray POINT You can use only paper printed with this machine 0YAS 0KU Hardware Specifications How to use the search number P 43 For available paper see the following ...

Страница 10: ... Example When printing on A4 size paper Orientation Printing result Paper Drawer Multi Purpose Tray Co Ltd Paper Drawer Paper Logo C o t d L Multi Purpose Tray A B C Co Ltd Co Ltd Co td L ABC Co Ltd N OT E When copying to paper with printed logos User s Guide N OT E Basic Paper Loading Operations For paper drawer P 6 For multi purpose tray P 8 ...

Страница 11: ...the glued areas For the multi purpose tray load envelopes with the front side face down For the loading orientation see the table below Multi Purpose Tray No 10 COM10 ISO C5 DL Monarch Multi Purpose Tray Envelope Preparation before Loading Envelopes 1 Take five or so pieces of envelopes fan them well to eliminate curls and level the stack flat Press the stack along the four side edges 2 To prevent...

Страница 12: ...loading envelopes in the multi purpose tray 1 Check the orientation of the stack of envelopes and load it in the multi purpose tray N OT E Basic Handling Operations for the Multi Purpose Tray P 8 2 3 4 Press OK Press Select the type of envelopes ...

Страница 13: ...s 2 Press Adjustment Maintenance Adjust Image Quality Auto Adjust Gradation on the touch panel display Follow the instructions in the screen to perform gradation adjustment For more information see the User s Guide 0YAS 0HU Adjusting Gradation User s Guide How to use the search number P 43 Solution 1 Solution 2 Printing Results Are Not Satisfactory Images Are Shifted Slanted Adjust the paper guide...

Страница 14: ... the roller while cleaning 4 Close the feeder cover 5 Open the feeder and clean the upper side white plate and thin and long glass area using the supplied glass cleaning sheet 6 Clean the lower side white plate and thin and long glass area using the supplied glass cleaning sheet 7 Close the feeder 8 Insert the power plug into the power outlet and turn the power ON N OT E If black streaks still app...

Страница 15: ...15 Bleed through Occurs Bleed through Occurs Adjust a background density 1 Press 2 Select the function on the touch panel display 3 Press Options 4 Press Example Fax 5 Press 6 Press OK Solution ...

Страница 16: ...er jam locations Use these buttons and bar to operate the video POINT The screen disappears once all the jammed paper is removed and all the machine s covers and drawers are closed correctly If you do not understand the remedy by referring to the screen See the User s Guide to make sure of the remedy 0YAS 0JF Clearing Paper Jams User s Guide How to use the search number P 43 If Paper Jams Occur ...

Страница 17: ...u forcibly remove the jammed paper torn scraps of paper may remain in the main unit or optional devices If paper tears check that there are no scraps of paper inside and try to remove all of the scraps Do not try to pull out the jammed paper forcibly Solution 3 Solution 4 Adjust the paper guides Adjust the guide exactly Multi purpose tray Check the paper feed If paper jams occur due to overlapping...

Страница 18: ...ce For available paper see the following 0YAS 0KU Available paper User s Guide How to use the search number P 43 Solution 1 Remove the excess amount of paper Make sure that the paper stack does not exceed the load limit line Load paper of the same size and same type in the same paper source You cannot load paper of different sizes or different types in one paper source Check the paper type setting...

Страница 19: ...atch the loaded paper change the setting For paper drawer P 6 For multi purpose tray P 8 For optional paper sources User s Guide Make sure that the original size and output paper size are correct 1 Check the original size and possible output sizes on the Printing Preferences screen of the printer driver 2 Load paper of the size matching the original size setting POINT To print on paper of a size d...

Страница 20: ...awer The print side face up Multi Purpose Tray The print side face down N OT E For optional paper sources User s Guide 2 If the check result indicates that the paper is not loaded correctly reload the paper correctly Solution Make sure that the paper size setting matches the size of the loaded paper 1 Replace the loaded paper with paper of the size you want to print POINT If you want to print on t...

Страница 21: ... direction 2 In the Printing Preferences screen of the driver set Orientation for the direction selected in step 1 3 While viewing the preview image make settings in the order of Page Layout Page Order 1 sided 2 sided Booklet Printing Binding Location POINT Page Order is only displayed when you set Page Layout to 2 on 1 or other option for printing multiple pages on one physical 2 3 Orientation Po...

Страница 22: ...ttons 1 Press 2 Press Dest Fwd Settings Register Destinations on the touch panel display 6 Press 4 Press 3 Select the destination 5 Change the registered information Example Address book POINT To check the connection after changing the registered information press Check Connection N OT E For more information P 23 Editing the address book one touch buttons Solution To stop the paper feed 1 Press 2 ...

Страница 23: ...r the SMTP DNS server For the setting procedures see the User s Guide To specify the port number for SMTP TX POP RX 1 Press 2 On the touch panel display press Function Settings Send E Mail I Fax Settings Specify Port Number for SMTP TX POP RX 3 Specify the port number 4 Press OK 0YAS 017 0YAS 00X Setting E mail I Fax Communication User s Guide Making DNS Settings User s Guide How to use the search...

Страница 24: ...if the machine cannot be connected to the destination fax number no fax dial tone is heard There may be a problem with the destination or your telephone carrier Contact the destination If you cannot forward faxes Check the information of the forwarding destination registered to the address book one touch buttons If anything is wrong with the information correct it 1 Press 2 Press Dest Fwd Settings...

Страница 25: ... using the error code 0YAS 0K2 Countermeasures for Each Error Code User s Guide How to use the search number P 43 Solution 1 Solution 2 If you are using an optical line or IP telephone line Communication errors may occur depending on the line quality For more information contact your telephone carrier Reduce the fax transmission speed Reducing the fax transmission speed may result in a communicati...

Страница 26: ...l To cancel a copy job waiting to be output 1 Press 4 Press 2 Select Copy from the drop down list 3 Select the copy job you want to cancel 5 Press Yes For Windows OS 1 In the computer screen double click the printer icon 2 Select the file you want to cancel 3 Click 4 Select Cancel 5 Click Yes For Mac OS 1 In the computer screen click the printer icon on the Dock 2 Select the file you want to cance...

Страница 27: ... driver from the Canon website https global canon POINT For details of printer driver installation see the Driver Installation Guide The Guide can be downloaded from or viewed on the Canon website https global canon Latest OS support information See the Canon website https global canon If a printer driver for this machine is already installed on your computer Depending on your system environment i...

Страница 28: ... the screen 1 Prepare the consumable Check the item name This is an item name identifying a Canon genuine consumables For high quality printouts we recommend that you use Canon genuine consumables N OT E List of Consumables P 29 To check the item name of a consumable in the normal operation screen 1 Press on the touch panel display 2 Check Consumables Others Check Consumables on the touch panel di...

Страница 29: ...re temperature is not higher than 30 C and humidity is not higher than 80 Be careful of counterfeit toner cartridges Please be aware that there are counterfeit Canon toner cartridges in the marketplace Use of counterfeit toner cartridge may result in poor print quality or machine performance Canon is not responsible for any malfunction accident or damage caused by the use of counterfeit toner cart...

Страница 30: ...the procedure below to contact the service representative 1 Make a note of the code number displayed on the screen POINT Multiple code numbers may be displayed 2 Turn the machine OFF and disconnect the power plug from the power outlet 3 Contact the service representative CAUTION For any inquiries have the following information ready Product name Dealer where you purchased the machine Detailsofyour...

Страница 31: ...he machine enters the limited functions mode When the problem is resolved the Call service representative message disappears in the screen at the bottom left POINT When you select a restricted function in the limited functions mode the following screen appears Press on the touch panel display to return to the Home and then select a different function 140K 04Y Functions available in the limited fun...

Страница 32: ...ntify the name of a part and find the page where that part is described Main Unit Paper size label P 6 Attach the paper size label so that it aligns with the cassette number indicator horizontally Separate by approx 5 mm Cassette number indicator 1 3 ...

Страница 33: ...33 Main Unit Power switch P 5 Multi purpose tray P 8 Tray extension Paper guides Paper guides Paper drawer P 6 ...

Страница 34: ... the Home screen 3 Touch panel display P 4 Displays the settings screen and messages Touch the panel to perform setting and other operations 4 Timeline Displays a log for settings specified in Copy Scan and Send 5 Status Monitor P 17 Press to check the status of a job or cancel a job 6 Reset key Press to cancel the settings and restore the previously specified settings Control Panel ...

Страница 35: ...9 Main Power indicator P 4 Lights when the power is turned ON 10 Start key Press this to start an operation or data reading 11 Stop key P 22 Press to stop the current operation 12 Clear key Press to clear the entered values or characters 13 Volume Settings key Press to adjust the sound volume 14 Brightness Adjustment key Adjusts the brightness of the screen 15 Counter Device Information key Press ...

Страница 36: ...extended use or long production runs in poorly ventilated rooms To maintain a comfortable working environment it is recommended that the room where the machine operates be appropriately ventilated Also avoid locations where people would be exposed to emissions from the machine Do not install in a location where condensation occurs Water droplets condensation may form inside the machine when the ro...

Страница 37: ...ct is completely confined within protective housings and external covers the laser beam cannot escape from the machine during any phase of user operation Read the following remarks and instructions for safety Never open covers other than those instructed in the manuals for this machine If the laser beam should escape and enter your eyes exposure may cause damage to your eyes Use of controls adjust...

Страница 38: ...de only If you are uncertain about the legality of using your product to scan print or otherwise reproduce any particular document and or of the use of the images scanned printed or otherwise reproduced you should consult in advance with your legal advisor for guidance Paper Money Travelers Checks Money Orders Food Stamps Certificates of Deposit Passports Postage Stamps canceled or uncanceled Immi...

Страница 39: ...cept as expressly provided herein no license or right expressed or implied is hereby conveyed or granted by rights holders of the SOFTWARE to you for any intellectual property of rights holders of the SOFTWARE 3 You may use the SOFTWARE solely for use with the PRODUCT 4 You may not assign sublicense market distribute or transfer the SOFTWARE to any third party without prior written consent of righ...

Страница 40: ......

Страница 41: ......

Страница 42: ......

Страница 43: ...at all You can search through the User s Guide by the search number If you notice a search number in a topic in this guide you are reading Search number Example ABCD 123 Setting the network environment User s Guide How to use the search number P 43 Opening the User s Guide 1 Display the online manual website https oip manual canon 2 Select the appropriate user s guide imageRUNNER ADVANCE Black Whi...

Страница 44: ...on ON L6Y 5Z7 Canada CANON EUROPA N V Bovenkerkerweg 59 1185 XB Amstelveen The Netherlands See http www canon europe com for details on your regional dealer CANON AUSTRALIA PTY LTD Building A The Park Estate 5 Talavera Road Macquarie Park NSW 2113 Australia CANON CHINA CO LTD 2F Jinbao Building No 89 Jinbao Street Dongcheng District Beijing 100005 China CANON SINGAPORE PTE LTD 1 Fusionopolis Place...

Отзывы: