


4
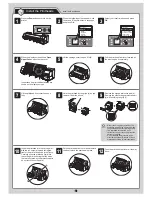
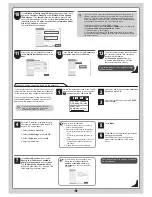
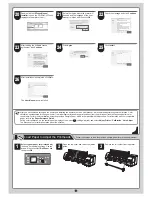
Install the Ink Tanks
Load all 12 ink tanks.
13
Repeat steps 6 to 12 to install the second
printhead set.
14
Pull the carriage cover forward.
15
Close the top cover.
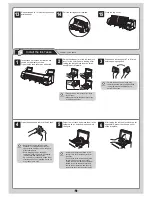
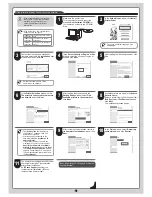
1
Instructions on ink tank installation are
shown on the display screen.
Open the ink tank covers as instructed.
2
Raise the stopper (a) of the ink tank lock
lever for the color you are loading. After
raising the ink tank lock lever as far as
possible, pull it forward.
PM
R
G
BK
M
PM
R
G
BK
M
G
B
B
PM
R
G
BK
M
B
B
a
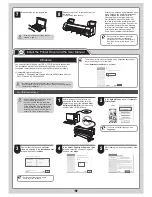
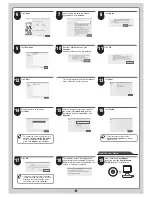
• Press down on the ink tank lock lever
until it locks.
• Make sure the ink tank lock lever stays
in the locked position.
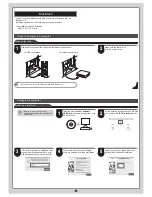
3
Shake each ink tank gently 7 to 8 times
before opening its pouch.
• Failure to shake the ink tanks may
result in reduced print quality because
ink ingredients have settled on the
bottom of the tank.
4
Open the pouch and remove the ink tank.
• Never touch the ink holes or metal
contacts. Touching these parts may
cause stains, damage the ink tank, and
affect print quality.
• Avoid dropping the ink tank after
removing it from the pouch. Otherwise,
ink may leak and cause stains.
• Do not remove ink tanks to shake them
after they have been installed. Doing so
may cause ink to spill.
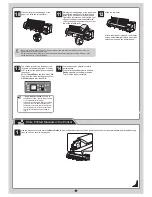
5
Orient the ink tanks and place them in the
holders with ink holes down as shown in
the figure.
PM
R
G
BK
M
B
• An ink tank cannot be placed in the
holder if it is not oriented correctly for
the color.
• Do not try to force an ink tank into the
holder if it does not go in normally.
Check the color indicated on the label
affixed to the ink tank lock lever and
the ink tank orientation, and then try
placing the tank into the holder again.
6
After raising the ink tank lock lever as far
as possible, press it back down until it
clicks into place.
PM
R
G
BK
M
B