


• If using the roll unit as a feed device and using the Position 1 basket, the ejected roll paper's cut
•
end enters the roll unit and may cause a paper jam or affect the print quality when set to
Borderless
Printing
or
Trim edge first
when loading the paper.
• Roll paper up to 62 inches (1,575 mm) in length can be collected in the basket. If printing on longer
•
roll paper, use as described in "
Printing on Large-Format or Easily Damaged Paper (Position 3)
" or
use with the roll unit as the take-up device.
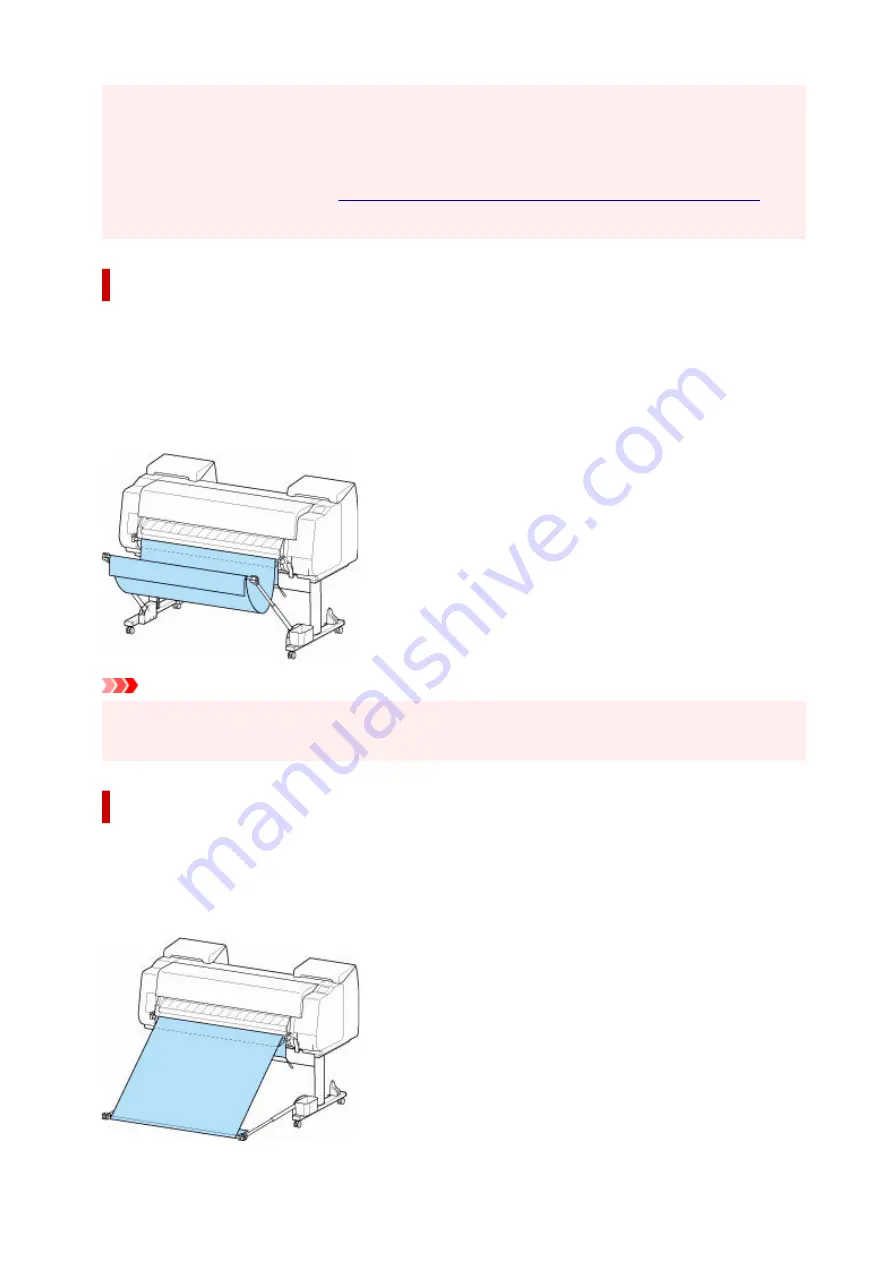
Using With roll unit (Position 2)
You can use the basket in the following positions when using the roll unit as a feed device.
This position is useful also when rewinding printed roll paper by hand.
Move the basket rod (cord side) to the upper of the two pairs of attachment locations on the front of the
printer, and extend the basket arm as far as possible at the angle shown to achieve this position.
You can adjust the basket length so that it is easy to use.
Important
• You can place up to approximately 4.41 lbs (2 kg) of printed materials in the basket. If the weight of
•
the printed materials is greater than that, the basket may fall over.
Printing on Large-Format or Easily Damaged Paper (Position 3)
If printing on large-format or easily damaged paper, you can use the basket in the following position.
Move the basket rod (cord side) to the upper of the two pairs of attachment locations on the front of the
printer, extend the basket arm as far as possible, and lower it to the angle shown. Next, adjust the length
so that the basket is pulled into this position.
159
Содержание ImagePrograf GP-4000
Страница 1: ...Online Manual English GP 4000 GP 2000 GP 540 GP 520 ...
Страница 41: ...Printer Parts Front Back Top Cover Inside Carriage Ink Tank Cover Inside Operation Panel 41 ...
Страница 51: ...Optional accessories Stand Stand Parts Roll Unit Parts of the Roll Unit Roll Holder Set 51 ...
Страница 66: ...4 Send the print job 4 Printing in Windows Printing from macOS Start printing 66 ...
Страница 73: ...Note The screen may differ slightly depending on the model you are using 73 ...
Страница 75: ...Pausing Printing Pausing Printing 75 ...
Страница 110: ...3 Check the entered length and tap OK 3 110 ...
Страница 116: ... To load new paper in the printer at this point see Loading the Lower Roll on the Roll Unit Option 116 ...
Страница 138: ...5 Tap Cut dust reduction 5 6 Tap ON 6 138 ...
Страница 151: ...151 ...
Страница 152: ...Basket Using the Basket Example Basket Configurations Storing the Basket 152 ...
Страница 163: ...163 ...
Страница 164: ...Roll Unit Switching Roll Unit Modes Using the Roll Unit In Take Up Mode Removing Printed Paper from the Roll Unit 164 ...
Страница 214: ...Preparing to Transfer the Printer 214 ...
Страница 273: ...3 Select OK 3 The resending setting is completed 273 ...
Страница 309: ... XX represents alphanumeric characters 309 ...
Страница 321: ...Adjusting the Print Head Adjusting the Print Head Troubleshooting Paper Abrasion and Blurry Images 321 ...
Страница 329: ...Adjusting Feed Amount Adjusting Feed Amount Adjusting Vacuum Strength 329 ...
Страница 333: ...6 Tap paper to adjust 6 A test pattern is printed for adjustment and adjustment is finished 333 ...
Страница 341: ...Color Calibration Managing Colors Performing Color Calibration Adjustment Types of Color Calibration 341 ...
Страница 349: ...Performing Color Calibration 349 ...
Страница 352: ...Ink Tanks Ink Tanks Replacing Ink Tanks Checking Ink Tank Levels When to Replace Ink Tanks 352 ...
Страница 355: ...Note For instructions on replacing the ink tanks see Replacing Ink Tanks 355 ...
Страница 365: ...6 Make sure ink lamp is lit 6 Note If the ink lamp is not lit reload the tank 7 Close ink tank cover 7 365 ...
Страница 369: ...Note If the ink lamp is not lit reload the tank 7 Close ink tank cover 7 369 ...
Страница 373: ...Print Head Print Head Checking for Nozzle Clogging Cleaning the Print Head Replacing the Print Head 373 ...
Страница 376: ...Cleaning the Print Head 376 ...
Страница 379: ...Checking for Nozzle Clogging 379 ...
Страница 394: ...394 ...
Страница 397: ...Cutter Blade Cutter Blade Replacing the Cutter Blade 397 ...
Страница 418: ...Other Maintenance Preparing to Transfer the Printer Reinstalling the Printer Firmware update 418 ...
Страница 430: ...Specifications Specifications Print Area 430 ...
Страница 438: ...Appendix Manuals and Their Contents Safety Online Manual Using This Online Manual Trademarks and Licenses 438 ...
Страница 440: ...Safety Safety Precautions Regulatory Information WEEE EU EEA When Repairing Lending or Disposing of the Printer 440 ...
Страница 491: ...Adjusting Color Balance Adjusting Brightness Adjusting Contrast 491 ...
Страница 496: ...Related Topic Interpreting the ICC Profile 496 ...
Страница 509: ...Click Print When you print the document is expanded or reduced to match the roll paper width and then printed 509 ...
Страница 550: ...Printing from Printer Printing Data Saved on USB Flash Drive 550 ...
Страница 572: ...Printer Driver Windows Printer Driver macOS Printer Driver 572 ...
Страница 573: ...macOS Printer Driver Overview of the Printer Driver Description of Print Dialog Updating the Printer Driver 573 ...
Страница 589: ...Adjusting Color Balance Adjusting Brightness Adjusting Contrast 589 ...
Страница 600: ...Specify Fluorescent Colors and Print 600 ...
Страница 623: ...3 Select Save in Job Box in Output Method 3 623 ...
Страница 624: ...624 ...
Страница 636: ...5 In the list select the target job 5 6 Select Edit 6 7 Select Delete 7 8 Select Yes 8 636 ...
Страница 670: ...4 Lift up the release lever 4 670 ...
Страница 672: ...8 Turn on the power to the printer 8 Turning the Printer On and Off 672 ...
Страница 698: ...4913 698 ...
Страница 709: ...Cleaning the Printer Exterior 709 ...
Страница 711: ...Move the printer to a different environment or let the paper dry before rolling it 711 ...
Страница 773: ... A000 to ZZZZ B20A B510 773 ...
Страница 801: ...1201 Cause The ink tank cover is open What to Do Close the ink tank cover 801 ...
Страница 802: ...1210 Cause The ink tank cover is open What to Do Close the ink tank cover 802 ...
Страница 830: ...1485 Cause Cannot use attached print head What to Do Attach the correct print head Replacing the Print Head 830 ...
Страница 834: ...1500 Cause The ink in the ink tank is running low What to Do Prepare a new ink tank 834 ...
Страница 836: ...1552 Cause A genuine Canon ink tank has been inserted What to Do To dismiss the message tap OK on the touch screen 836 ...
Страница 839: ...1660 Cause Ink tank not inserted What to Do Insert the ink tank correctly Replacing Ink Tanks 839 ...
Страница 846: ...1752 Cause The ink has run out What to Do Open the ink tank cover and then replace the ink tank Replacing Ink Tanks 846 ...
Страница 870: ...3331 Cause Print results may be abnormal as there is a large volume of print data What to Do Check the print job 870 ...
Страница 918: ...If this does not apply there may be a cutter blade malfunction Contact your Canon dealer for assistance 918 ...


