background image

Copying

3-12

2 on 1 Combination

2 on 1 combination automatically reduces two-page document to fit on the selected 
paper size. This feature can be used together with both “Collate Copy”
 (see p. 3-10) 
and “Two-Sided Copy” (see p. 3-14).

1


Set documents.

Place the first page on the platen glass if you are not using the ADF.

2


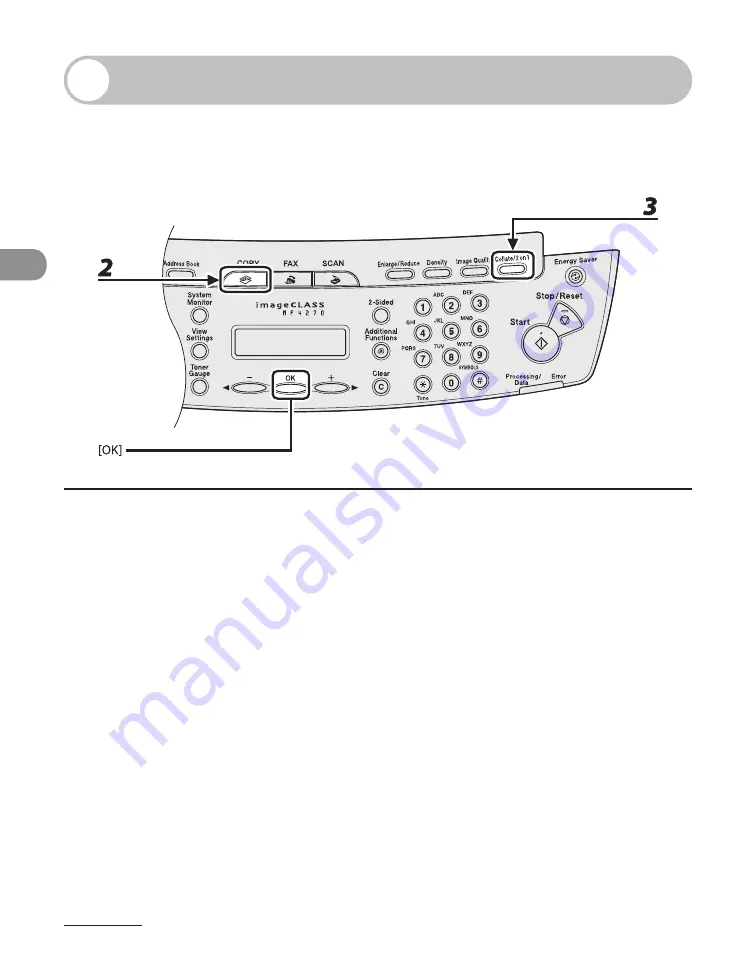
Press [COPY].

3


Press [Collate/2 on 1] repeatedly to select <2 ON 1>, then press [OK].

If you want to use <2 ON 1> with “Collate Copy” (see p. 3-10) at the same time, select <2 ON 
1>, then press [OK].
If you want to use with “Two-Sided Copy” at the same time, go to step 3 on p. 3-14.

Содержание ImageCLASS MF4270

Страница 1: ...u finish reading this guide store it in a safe place for future reference What Can I Do with This Machine Before Using the Machine Document and Paper Copying Sending Faxes Receiving Documents Printing...

Страница 2: ...ated website Considerable effort has been made to make sure that the manuals for the machine are free of inaccuracies and omissions However as we are constantly improving our products if you need an e...

Страница 3: ...This Machine Copy Features Select a scan mode depending on the type of image Image Quality p 3 4 Adjust the density level of scanned images Density p 3 5 Enlarge or reduce copied images Zoom Ratio p...

Страница 4: ...What Can I Do with This Machine iii Make two sided copies Two Sided Copy p 3 14 Copy two documents on one sheet 2 on 1 Combination p 3 12...

Страница 5: ...recipient with a single key One Touch Speed Dialing Keys p 4 22 Specify a recipient with a two digit code Coded Speed Dialing Codes p 4 24 Specify multiple recipients as a group Group Dialing p 4 26...

Страница 6: ...ference Guide Send documents to multiple recipients Broadcasting Reference Guide Receive faxes in memory without printing out Memory Reception Reference Guide Reject faxes without their numbers Recept...

Страница 7: ...Machine vi Printer Feature Print a document from a PC Printing p 6 2 Sort printouts by page order Collate Printing p 6 4 Print two pages on one sheet 2 on 1 Combination p 6 5 Make two sided printouts...

Страница 8: ...h This Machine Scanner Feature USB connection only Specify detailed scanning options to suit various images Scanning Scanner Driver Guide Remote UI Feature Access and manage the machine from a PC Remo...

Страница 9: ...What Can I Do with This Machine viii System Manager Settings Restrict the use of the machine with a password System Manager Settings Reference Guide...

Страница 10: ...i Scanner Feature USB connection only vii Remote UI Feature vii System Manager Settings viii Contents ix How to Use This Guide xvii Symbols Used in This Manual xvii Legal Notices xviii Trademarks xvii...

Страница 11: ...the Toner Cartridge 1 12 Checking the Toner Level 1 14 Telephone Line Setting 1 15 Setting the Telephone Line Type 1 15 Timer Settings 1 17 Setting the Sleep Mode 1 17 Setting the Daylight Saving Time...

Страница 12: ...Size and Type 2 15 3 Copying 3 1 Basic Copying Method 3 2 Scan Settings 3 4 Image Quality 3 4 Density 3 5 Zoom Ratio 3 7 Collate Copy 3 10 2 on 1 Combination 3 12 Two Sided Copy 3 14 Canceling Copy Jo...

Страница 13: ...ents 4 22 Using One Touch Speed Dialing Keys 4 22 Using Coded Speed Dialing Codes 4 24 Group Dialing 4 26 Using Address Book Key 4 28 Manual Sending 4 32 Canceling TX Jobs 4 35 Checking and Deleting T...

Страница 14: ...1 Combination 6 5 Two Sided Printing 6 6 Checking and Deleting Print Jobs 6 7 Checking and Deleting Print Jobs 6 7 7 Scanning 7 1 Scanning to a Computer USB connection only 7 2 Canceling Scan Jobs 7...

Страница 15: ...ibuting Toner 10 11 Replacing the Toner Cartridge with a New One 10 14 Transporting the Machine 10 19 11 Troubleshooting 11 1 Clearing Jams 11 2 Document Jams 11 3 Paper Jams 11 4 LCD Messages 11 12 E...

Страница 16: ...T 12 2 Accessing the Setting Menu 12 4 Setting Menu 12 6 PAPER SETTINGS 12 6 VOLUME CONTROL 12 7 BROADCAST 12 7 COMMON SETTINGS 12 8 COPY SETTINGS 12 9 FAX SETTINGS 12 10 ADDRESS BOOK SET 12 14 PRINTE...

Страница 17: ...What Can I Do with This Machine xvi 13 Appendix 13 1 Specifications 13 2 General 13 2 Copier 13 3 Printer 13 4 Facsimile 13 4 Telephone 13 6 Index 13 7...

Страница 18: ...s injury if not observed Explains how to avoid actions that could injure you or damage your machine Explains operating restrictions and how to avoid minor difficulties In addition this guide uses dist...

Страница 19: ...hat effectively reduce energy consumption It is an open system in which business proprietors can participate voluntarily The targeted products are office equipment such as computers displays printers...

Страница 20: ...ut the prior written permission of Canon Inc Disclaimers The information in this document is subject to change without notice CANON INC MAKES NO WARRANTY OF ANY KIND WITH REGARD TO THIS MATERIAL EITHE...

Страница 21: ...What Can I Do with This Machine xx...

Страница 22: ...Standby Mode 1 9 Copy Mode 1 9 Fax Mode 1 9 Scan Mode 1 9 Optional Handset 1 10 Maintaining the Handset 1 10 Toner Cartridge 1 11 Maintaining the Toner Cartridge 1 12 Checking the Toner Level 1 14 Tel...

Страница 23: ...s them automatically into the scanning area B Slide guides Adjust to the width of the document C Document feeder tray Holds documents D Document delivery tray Receives documents E Operation panel Cont...

Страница 24: ...om its original position for A4 paper L Slide guides for multi purpose tray Adjust to the width of the paper M Paper guide rail Holds the paper supply N Dust cover Protects the paper supply in the pap...

Страница 25: ...onnect the USB Universal Serial Bus cable T Rear cover Open this cover when clearing paper jams U Power socket Connect the power cord V Telephone line jack Connect the telephone cable W External devic...

Страница 26: ...copy function C COPY key Press to switch to the Copy mode D FAX key Press to switch to the Fax mode E SCAN key Press to switch to the Scan mode F Additional Functions key Press to select or cancel the...

Страница 27: ...to return the machine to the standby mode N Error indicator Flashes when an error has occurred O Processing Data indicator Flashes while sending or receiving faxes Lights when the machine has waiting...

Страница 28: ...item in the menu U OK key Press to accept a set function or mode V key Press to decrease the value for various settings Also press to see the previous item in the menu W LCD display Displays messages...

Страница 29: ...nsert a pause when entering a fax number C Coded Dial key Press to specify recipients registered under coded speed dialing codes D Address Book key Press to search pre registered recipients under one...

Страница 30: ...ime B Receive mode C Image quality Depending on your needs you can change the standby display which appears when the main power switch is turned on For details see Setting Menu on p 12 6 When the main...

Страница 31: ...ilable from your local authorized Canon dealer or the Canon help line For how to install the handset see Before FAX Setting in the Starter Guide Maintaining the Handset Do not leave the handset expose...

Страница 32: ...be shorter as they consume more toner When you are replacing a toner cartridge be sure to use a toner cartridge designed for this product To purchase the Canon genuine replacement toner cartridge cont...

Страница 33: ...the toner cartridge s protective bag in case you need to repack and transport the toner cartridge at a later date Do not store the toner cartridge in a salty atmosphere or where there are corrosive g...

Страница 34: ...emove it carefully If not removed with care the toner powder may scatter and come in contact with your eyes and mouth If this happens rinse with water and consult a doctor immediately Keep the toner c...

Страница 35: ...in the LCD at four levels If the toner gauge indicates that the toner is empty it is recommended that the toner cartridge be replaced See Replacing the Toner Cartridge on p 10 10 Toner full 0 1 0 0 T...

Страница 36: ...Machine Telephone Line Setting Setting the Telephone Line Type The default setting is TOUCH TONE 1 Press Additional Functions 2 Press or to select FAX SETTINGS then press OK 3 Press or to select USER...

Страница 37: ...then press OK 5 Press or to select the telephone line type then press OK TOUCH TONE Tone dialing ROTARY PULSE Pulse dialing If you do not know the type of telephone line you use contact your local te...

Страница 38: ...e remains idle for a certain period of time it automatically enters the Sleep mode The default settings are ON and 5MIN 1 Press Additional Functions 2 Press or to select TIMER SETTINGS then press OK 3...

Страница 39: ...the operation panel The machine will not enter the Sleep mode when the machine is in operation the Processing Data indicator lights or flashes a message appears on the display and the Error indicator...

Страница 40: ...roughout the summer season This is called Daylight Saving Time The default setting is ON 1 Press Additional Functions 2 Press or to select TIMER SETTINGS then press OK 3 Press or to select DAYLIGHT SV...

Страница 41: ...Before Using the Machine 1 20 6 Press or to select MONTH then press OK 7 Press or to select the month then press OK 8 Press or to select WEEK then press OK 9 Press or to select the week then press OK...

Страница 42: ...the Machine 10 Press or to select DAY then press OK 11 Press or to select the day then press OK 12 Press Additional Functions 13 Press or to select END DATE TIME then press OK 14 Press or to select MO...

Страница 43: ...elect the month then press OK 16 Press or to select WEEK then press OK 17 Press or to select the week then press OK 18 Press or to select DAY then press OK 19 Press or to select the day then press OK...

Страница 44: ...per Document Requirements 2 2 Scanning Area 2 4 Loading Documents 2 5 On the Platen Glass 2 5 In the ADF 2 7 Paper Requirements 2 9 Printable Area 2 11 Loading Paper 2 12 Into the Multi Purpose Tray 2...

Страница 45: ...4 mm Plain paper Multipage documents of the same size thickness and weight or one page documents Size W x L Max 216 x 297 mm Max 216 x 356 mm Min 105 x 148 5 mm Weight Max 2 kg 40 to 105 g m2 Quantity...

Страница 46: ...ment is completely dry To prevent document jams in the ADF do not use any of the following Wrinkled or creased paper Carbon paper or carbon backed paper Curled or rolled paper Coated paper Torn paper...

Страница 47: ...r 2 4 Scanning Area Make sure your document s text and graphics fall within the shaded area in the following diagram Note that the margin widths listed are approximate and there may be slight variatio...

Страница 48: ...2 5 Document and Paper Loading Documents On the Platen Glass 1 Lift up the ADF 2 Place your document face down...

Страница 49: ...your document with the arrow mark 4 Gently close the ADF The document is ready for scanning When closing the ADF be careful not to get your fingers caught as this may result in personal injury Do not...

Страница 50: ...2 7 Document and Paper In the ADF 1 Fan the document stack and even the edges 2 Adjust the slide guides to the width of the documents...

Страница 51: ...canned When scanning is complete remove the documents from the document delivery tray to avoid paper jams Avoid using ADF to scan the same document more than 30 times When scanned repeatedly documents...

Страница 52: ...co Oficio Folio Government LTR Government LGL Foolscap LTR LGL 76 x 127 to 216 x 356 mm Weight 60 to 163 g m2 Quantity Max 250 sheets Height max 25 mm Max 1 sheet Type Plain Paper Plain Paper L Heavy...

Страница 53: ...per do not print well Highly textured paper Very smooth paper Shiny paper Make sure the paper is free from dust lint and oil stains Be sure to test paper before purchasing large quantities Store all p...

Страница 54: ...ent and Paper Printable Area The shaded area indicates the approximate printable area of A4 paper and envelope Note that the margin widths listed are approximate and there may be slight variations in...

Страница 55: ...e paper in the multi purpose tray is fed prior to the paper in the paper cassette The recommended envelopes are COM10 MONARCH DL and ISO C5 Using other envelopes may affect the quality of the printout...

Страница 56: ...When you load paper with a logo on position the paper with the print side up logo side and insert it so that the top of the paper feeds first in the multi purpose tray When setting an envelope gently...

Страница 57: ...o both sides of the paper If the paper guides do not fit the size of the paper the print quality may be deteriorated 4 Specify the size and the type of the paper you load For details on how to specify...

Страница 58: ...of paper follow this procedure to change the settings The procedure is same for the paper cassette and multi purpose tray except for selecting the paper cassette or multi purpose tray in step 3 and 6...

Страница 59: ...can select from the following paper sizes A4 B5 A5 EXECUTIVE COM10 MONARCH DL ISO C5 OFICIO BRAZIL OFICIO MEXICO OFICIO FOLIO GOVERNMENT LETTER GOVERNMENT LEGAL FOOLSCAP LTR LGL The available paper s...

Страница 60: ...lowing paper types PLAIN PAPER or PLAIN PAPER L 1 for Plain paper 64 g m2 to 90 g m2 HEAVY PAPER or HEAVY PAPER H 2 for Heavy paper Paper cassette 105 g m2 to 128 g m2 Multi purpose tray 105 g m2 to 1...

Страница 61: ...Document and Paper 2 18...

Страница 62: ...Copying 3 Copying Basic Copying Method 3 2 Scan Settings 3 4 Image Quality 3 4 Density 3 5 Zoom Ratio 3 7 Collate Copy 3 10 2 on 1 Combination 3 12 Two Sided Copy 3 14 Canceling Copy Jobs 3 16...

Страница 63: ...Mode Place the document on the platen glass or load it in the ADF For documents you can copy see Document Requirements on p 2 2 Press COPY The COPY indicator lights up and the machine enters the copy...

Страница 64: ...ic keys to enter the desired copy quantity 1 to 99 A 4 1 0 0 T E X T P H O T O 1 Ex Press Start You enter a wrong number Press Clear and enter a new number You want to cancel copying Press Stop Reset...

Страница 65: ...or if you press Stop Reset Image Quality The default setting is TEXT PHOTO 1 Press COPY 2 Press Image Quality repeatedly to select the document type TEXT PHOTO For documents that contain text and phot...

Страница 66: ...the most appropriate level for the document either automatically or manually The default setting is MANUAL 5 Adjusting Automatically 1 Press COPY 2 Press Density repeatedly to select AUTO then press...

Страница 67: ...T D K to make dark documents lighter to make light documents darker To cancel all settings press Stop Reset When you switch the mode by pressing the mode keys such as FAX all settings will be also ca...

Страница 68: ...3 7 Copying Zoom Ratio The default setting is 100 Preset Zoom You can enlarge or reduce documents from one standard paper size to another 1 Press COPY 2 Press Enlarge Reduce...

Страница 69: ...y ratio then press OK 200 MAX 141 A5 A4 122 A5 B5 115 B5 A4 86 A4 B5 81 70 50 MIN When PAPER SIZE GROUP in the COPY SETTINGS menu is set to INCHES or A the preset copy ratios change as follows INCHES...

Страница 70: ...200 1 Press COPY 2 Press Enlarge Reduce twice 3 Enter the copy ratio with the numeric keys then press OK 1 0 0 Z O O M 5 0 2 0 0 Ex You can also use or to adjust the zoom ratio To increase the zoom r...

Страница 71: ...he first page on the platen glass if you are not using the ADF 2 Press COPY If AUTO COLLATE is set to ON in STANDARD SETTINGS in COPY SETTINGS skip to step 4 3 Press Collate 2 on 1 repeatedly to selec...

Страница 72: ...e machine prints the remaining sets of copies To cancel all settings press Stop Reset When you switch the mode by pressing the mode keys such as FAX all settings will be also canceled If you want to k...

Страница 73: ...3 10 and Two Sided Copy see p 3 14 1 Set documents Place the first page on the platen glass if you are not using the ADF 2 Press COPY 3 Press Collate 2 on 1 repeatedly to select 2 ON 1 then press OK...

Страница 74: ...ond page only the first page will be printed on the left side of the paper A maximum of 4 mm margin will be produced between the two reduced documents in 2 on 1 combination copying To cancel all setti...

Страница 75: ...both Collate Copy see p 3 10 and 2 on 1 Combination see p 3 12 Paper used to make two sided copies must conform to the following specifications Paper size A4 and LTR Paper weight 64 to 80 g m2 1 Set...

Страница 76: ...ected the front and back sides of the copy will have the same top bottom orientation 5 Use the numeric keys to enter the desired copy quantity 1 to 99 6 Press Start When you set the document on the pl...

Страница 77: ...opy Jobs Follow the procedures to cancel an outgoing job 1 Press Stop Reset 2 When the CANCEL COPYING message appears press to select YES Y E S N O C A N C E L C O P Y I N G The job is canceled and th...

Страница 78: ...d Dialing Codes 4 7 Storing Editing Recipients for Group Dialing 4 13 Specifying Recipients 4 22 Using One Touch Speed Dialing Keys 4 22 Using Coded Speed Dialing Codes 4 24 Group Dialing 4 26 Using A...

Страница 79: ...g in the Reference Guide Set a Document Enter the Fax Mode Place the document on the platen glass or load it in the ADF For documents you can send see Document Requirements on p 2 2 Press FAX The FAX...

Страница 80: ...on p 4 22 Press Start When you set the document on the platen glass press Start for each document When scanning is complete press OK to start dialing You enter a wrong number Go back to the wrong digi...

Страница 81: ...NDARD 1 Press FAX 2 Press Image Quality repeatedly to select the resolution then press OK STANDARD for most text only documents 200 x 100 dpi FINE for fine print documents the resolution is twice that...

Страница 82: ...D K to make dark documents lighter to make light documents darker These settings return to the default values after all documents are scanned If you want to keep the settings set the image quality and...

Страница 83: ...ax telephone numbers by pressing Coded Dial followed by two digit code You can register up to 100 coded speed dialing codes Using Group Dialing p 4 26 You can specify groups of fax telephone numbers r...

Страница 84: ...ress OK 3 Press or to select 1 TOUCH SPD DIAL or CODED DIAL then press OK 4 Press or to select a one touch speed dialing key 01 to 07 or coded speed dialing code 00 to 99 for which you want to registe...

Страница 85: ...6 Enter the fax telephone number you register max 50 digits including spaces and pauses with the numeric keys then press OK 0 1 2 X X X X X X X _ T E L N U M B E R E N T R Y Ex To register another one...

Страница 86: ...or to select 1 TOUCH SPD DIAL or CODED DIAL then press OK 4 Press or to select the one touch speed dialing key 01 to 07 or coded speed dialing code 00 to 99 you want to edit then press OK You can als...

Страница 87: ...e entry press and hold Clear 6 Enter a new character with the numeric keys then press OK 7 Press repeatedly to go to the wrong digit then press Clear to delete it To delete the entire entry press and...

Страница 88: ...or to select 1 TOUCH SPD DIAL or CODED DIAL then press OK 4 Press or to select the one touch speed dialing key 01 to 07 or coded speed dialing code 00 to 99 you want to delete then press OK You can a...

Страница 89: ...4 12 5 Press OK 6 Press and hold Clear to delete the entire entry then press OK If you delete the fax telephone number the registered name is cleared automatically 7 Press Stop Reset to return to the...

Страница 90: ...g Recipients for Group Dialing 1 Press Additional Functions 2 Press or to select ADDRESS BOOK SET then press OK 3 Press or to select GROUP DIAL then press OK 4 Press or to select an empty one touch sp...

Страница 91: ...ients until all recipients are registered then press OK To enter a recipient stored under a one touch speed dialing key press the desired one touch speed dialing key To enter a recipient stored under...

Страница 92: ...4 Press or to select a group to edit then press OK You can specify a group to edit by pressing the corresponding one touch speed dialing key 5 Press OK 6 Select the recipient you want to add to the gr...

Страница 93: ...onal Functions 2 Press or to select ADDRESS BOOK SET then press OK 3 Press or to select GROUP DIAL then press OK 4 Press or to select a group to edit then press OK You can specify a group to edit by p...

Страница 94: ...g Faxes 6 Press or to display the recipient you want to delete from the group then press Clear Repeat this step if you want to delete another recipient 7 Press OK 8 Press Stop Reset to return to the s...

Страница 95: ...onal Functions 2 Press or to select ADDRESS BOOK SET then press OK 3 Press or to select GROUP DIAL then press OK 4 Press or to select a group to edit then press OK You can specify a group to edit by p...

Страница 96: ...tedly to go to the character you want to change then press Clear To delete the entire name press and hold Clear 6 Enter a new character with the numeric keys then press OK 7 Press OK 8 Press Stop Rese...

Страница 97: ...unctions 2 Press or to select ADDRESS BOOK SET then press OK 3 Press or to select GROUP DIAL then press OK 4 Press or to select a group to delete then press OK You can specify a group to delete by pre...

Страница 98: ...ding Faxes 6 Press Clear repeatedly until all recipients are deleted then press OK When you delete all recipients the registered name is cleared automatically 7 Press Stop Reset to return to the stand...

Страница 99: ...peed Dialing Keys To use this feature you must register recipients in one touch speed dialing keys beforehand See Storing Editing Address Book on p 4 6 1 Set documents Place the first page on the plat...

Страница 100: ...ng key 01 to 07 If you pressed a wrong key press Stop Reset and try again 0 1 2 3 X X X X X X 0 5 C A N O N U S A Ex 4 Press Start When you set the documents on the platen glass press Start for each d...

Страница 101: ...use this feature you must register recipients in coded speed dialing codes beforehand See Storing Editing Address Book on p 4 6 1 Set documents Place the first page on the platen glass if you are not...

Страница 102: ...the numeric keys 0 1 2 X X X X X X X 0 1 C A N O N Ex If you entered a wrong code press Stop Reset then try again from step 3 5 Press Start When you set the documents on the platen glass press Start f...

Страница 103: ...ister recipients in a group dialing beforehand See Storing Editing Address Book on p 4 6 1 Set documents Place the first page on the platen glass if you are not using the ADF 2 Press FAX If you want t...

Страница 104: ...der which the desired group dialing is registered If you pressed a wrong key press Stop Reset and perform step 3 again 4 Press Start When you set the documents on the platen glass press Start for each...

Страница 105: ...ant is registered under You can either go through all the recipients registered in the machine LIST or look up a particular one by their name SEARCH Listing All Recipients 1 Set documents Place the fi...

Страница 106: ...ne touch speed dialing keys 01 to 07 and coded speed dialing codes 00 to 99 For a one touch speed dialing key or coded speed dialing code with no recipient name registered their fax number is displaye...

Страница 107: ...Place the first page on the platen glass if you are not using the ADF 2 Press FAX If you want to adjust the image quality and density see Scan Settings on p 4 4 3 Press Address Book If no recipient is...

Страница 108: ...in uppercase letters and enter lowercase letters for a recipient registered in lowercase letters When the search is complete the number of recipients that match the characters you entered is displaye...

Страница 109: ...ding You cannot use group dialing for manual sending 1 Connect the optional handset or an external telephone to the machine if you want to talk to the recipient before sending a document For details o...

Страница 110: ...u press Hook you can temporarily adjust the monitor tone volume with and 5 Dial the recipient s fax telephone number Make sure to confirm the dial tone before entering a fax telephone number If you en...

Страница 111: ...ep 4 you can pick up the handset when you hear the recipient s voice If you hear a high pitched signal instead of the recipient s voice go to step 8 7 Ask the recipient to set their fax machine to rec...

Страница 112: ...ob 1 Press Stop Reset 2 When the CANCEL DURING TX RX message appears press to select YES Y E S N O C A N C E L D U R I N G T X R X Remove any unscanned documents from the ADF If you are in the copy or...

Страница 113: ...he transmission results monitor the status of the send jobs currently being processed Checking Transmission Results 1 Press System Monitor 2 Press or to select TX RX LOG then press OK 3 Press or to vi...

Страница 114: ...e job list If you want to delete the job go to step 4 Otherwise press Stop Reset to return to the standby mode 4 Press or to select the desired job then press OK NOTE For BROADCAST all recipients ente...

Страница 115: ...Sending Faxes 4 38...

Страница 116: ...Receiving Documents 5 Receiving Documents Basic Receiving Method 5 2 Canceling RX Jobs 5 4 Checking Reception Results 5 5...

Страница 117: ...hapter 4 Sending and Receiving in the Reference Guide Any data stored in the memory including received fax documents will be deleted if you turn off the main power switch of the machine Enter the Sett...

Страница 118: ...xTel or MANUAL make sure an optional handset or external telephone is connected to the machine For AnsMode make sure an external telephone with built in answering machine is connected to the machine T...

Страница 119: ...cancel an ongoing receive job 1 Press Stop Reset 2 When the CANCEL DURING TX RX message appears press to select YES Y E S N O C A N C E L D U R I N G T X R X If you are in the copy or scan standby mod...

Страница 120: ...eption Results System monitor enables you to view the reception result 1 Press System Monitor 2 Press or to select TX RX LOG then press OK 3 Press or to view the required reception result 4 Press Stop...

Страница 121: ...Receiving Documents 5 6...

Страница 122: ...Printing 6 Printing Printing Documents 6 2 Collate Printing 6 4 2 on 1 Combination 6 5 Two Sided Printing 6 6 Checking and Deleting Print Jobs 6 7 Checking and Deleting Print Jobs 6 7...

Страница 123: ...r in the Starter Guide For details on printer driver settings see Online Help How to display the print screen or items on the screen may vary depending on your application and or OS Start the Print Co...

Страница 124: ...6 3 Printing Adjust Preferences Print the Document After finished setting click OK Click Print or OK You want to cancel printing See Chapter 5 Printing and Scanning in the Reference Guide...

Страница 125: ...cument the print order is 1 2 3 1 2 3 and so on 1 From an open document on an application click File Print 2 Select the printer icon for the machine Canon MF4200 Series UFRII LT then click Preferences...

Страница 126: ...Click the Page Setup tab 4 For Page Layout select 2 Pages per Sheet then click OK 5 On the Print dialog box click Print or OK Other than 2 Pages per Sheet you can also select 4 Pages per Sheet 6 Page...

Страница 127: ...en document on an application click File Print 2 Select the printer icon for the machine Canon MF4200 Series UFRII LT then click Preferences or Properties to open the dialog box 3 Click the Finishing...

Страница 128: ...turned on When the Processing Data indicator is turned off all print jobs are erased from the memory Checking and Deleting Print Jobs 1 Press System Monitor 2 Press or to select PRINT STATUS then pre...

Страница 129: ...Printing 6 8 4 Press or to select the desired job then press OK 5 Press to select YES If you do not want to cancel the job press to select NO 6 Press Stop Reset to return to the standby mode...

Страница 130: ...Scanning 7 Scanning Scanning to a Computer USB connection only 7 2 Canceling Scan Jobs 7 4 Canceling Scan Jobs to a Computer 7 4...

Страница 131: ...see Software Settings with Computer in the Starter Guide For details on scanner driver settings see the Scanner Driver Guide in the User Software CD Set Documents Enter the Scan Mode Place the first...

Страница 132: ...Start Scanning Start MF Toolbox then select the scan format The mark will be displayed above the button you select Press Start You want to cancel scanning Press Stop Reset on the operation panel then...

Страница 133: ...Scanning 7 4 Canceling Scan Jobs Follow the procedure below to cancel an ongoing scan job Canceling Scan Jobs to a Computer 1 Press Stop Reset 2 Click OK on the computer screen...

Страница 134: ...PC Faxing 8 PC Faxing PC Faxing 8 2...

Страница 135: ...e For details on fax driver settings see Online Help How to display the print screen or items on the screen may vary depending on your application and or OS Start the Print Command Select the Fax From...

Страница 136: ...g Settings then click Add to Recipient List Click OK in the Fax Sending Settings You want to send a fax with a cover sheet Click the Cover Sheet tab and set the format for the cover sheet attachment Y...

Страница 137: ...PC Faxing 8 4...

Страница 138: ...Remote UI 9 Remote UI Remote UI 9 2...

Страница 139: ...up the machine for use in a network then connect the machine and the PC to your network router or a hub For details see Software Settings with Computer in the Starter Guide Start the web browser ente...

Страница 140: ...te the Machine I Select the user mode then click OK If no password is set you can log on without entering a password Now you can manage the machine on the web browser For details see Chapter 7 Remote...

Страница 141: ...Remote UI 9 4...

Страница 142: ...ing the Machine 10 2 Exterior 10 2 Interior 10 3 Fuser Roller 10 7 Scanning area 10 8 Replacing the Toner Cartridge 10 10 Redistributing Toner 10 11 Replacing the Toner Cartridge with a New One 10 14...

Страница 143: ...tone or any other chemical cleaner to clean the machine These can damage the machine components When you turn off the main power switch the documents stored in memory will be erased To check the jobs...

Страница 144: ...per dust from accumulating inside 1 Turn off the main power switch and disconnect the power cord 2 Hold the front side of the operation panel with your hands 3 Lift the scanning platform A until it is...

Страница 145: ...d contact on They become very hot during use To avoid exposing the toner cartridge to light place it in its protective bag or wrap it in a thick cloth Do not open the drum protective shutter A on the...

Страница 146: ...e toner comes into contact with your skin or clothing wash with cold water Warm water will set the toner 8 Hold the toner cartridge by its handle A Hold the toner cartridge by its handle A 9 Insert th...

Страница 147: ...e toner cover 13 Lower the scanning platform Be careful not to get your fingers caught If you cannot close the toner cover do not force it to close Open the cover and make sure the toner cartridge is...

Страница 148: ...of blank A4 paper into the multi purpose tray and start cleaning Cleaning the roller takes approximately 130 seconds When some jobs are stored in memory this function is not available 1 Press Addition...

Страница 149: ...t Platen glass 1 Open the ADF 2 Clean the platen glass and the underside of the ADF with a cloth dampened with water Then wipe the area with a soft dry cloth Do not dampen the cloth too much as this m...

Страница 150: ...and roller 1 Turn off the main power switch and disconnect the power cord 2 Open the ADF cover 3 Clean the rollers A inside the ADF with a cloth dampened with water Then wipe the area with a soft dry...

Страница 151: ...eived data will be stored in the memory If you set CONT PRINTING in PRINTER SETTINGS in FAX SETTINGS to ON you can keep printing fax documents or reports without replacing the toner cartridge The defa...

Страница 152: ...Toner 1 Hold the front side of the operation panel with your hands 2 Lift the scanning platform A until it is locked You will hear an audible click 3 Hold the grip A on the right front side of the to...

Страница 153: ...use 6 Gently rock the toner cartridge several times to evenly distribute toner inside 7 Hold the toner cartridge by its handle A Hold the toner cartridge by its handle A Do not open the drum protecti...

Страница 154: ...of the toner cartridge A fits into the guide B located on the right side of the machine and slide it down parallel to the guide 9 Push the toner cartridge to make sure it is properly set in the machin...

Страница 155: ...e the toner cover do not force it to close Open the cover and make sure the toner cartridge is properly set in the machine Replacing the Toner Cartridge with a New One 1 Hold the front side of the ope...

Страница 156: ...right front side of the toner cover 4 Open the toner cover 5 Remove the toner cartridge 6 Remove the new toner cartridge from the protective bag Save the protective bag You may need it later when you...

Страница 157: ...e on a flat surface and pull the seal completely out Do not pull the seal out at an angle If toner is adhered on the removed seal be careful that your hands or clothes do not get dirty from touching t...

Страница 158: ...eteriorate if the drum surface is exposed to light or is damaged Always hold the toner cartridge by its handle 10 Insert the toner cartridge so that the protrusion on the right side of the toner cartr...

Страница 159: ...e of the toner cover 13 Close the toner cover 14 Lower the scanning platform Be careful not to get your fingers caught If you cannot close the toner cover do not force it to close Open the cover and m...

Страница 160: ...main power switch 2 Disconnect the power cord and all the cables from the back of the machine 3 If you are using the output tray extension fold the paper stopper and then push the output tray extensi...

Страница 161: ...toner cartridge To avoid exposing the toner cartridge to light place it in its protective bag or wrap it in a thick cloth Do not open the drum protective shutter on the toner cartridge Print quality m...

Страница 162: ...ance 9 Hold the grip A on the right front side of the toner cover 10 Close the toner cover 11 Lower the scanning platform Be careful not to get your fingers caught 12 Remove the dust cover from the pa...

Страница 163: ...pen the front panel of the paper cassette 14 Remove the paper from the paper cassette 15 Remove the paper cassette by lifting up the front end of the paper cassette and pulling it forward 16 Detach th...

Страница 164: ...s of the machine and lift it carefully as shown in the illustration below Do not lift the machine by any of its attachments Dropping the machine can cause personal injury If you have a back problem ma...

Страница 165: ...Maintenance 10 24...

Страница 166: ...1 2 Document Jams 11 3 Paper Jams 11 4 LCD Messages 11 12 Error Codes 11 19 If LOAD CORRECT PAPER is displayed 11 21 Re loading the Paper 11 21 Changing the Paper Size Setting 11 22 If a Power Failure...

Страница 167: ...ck that the paper you are using meets the requirements for use See Paper Requirements on p 2 9 Make sure you have removed any scraps of paper from the inside of the machine When removing jammed docume...

Страница 168: ...ent from the ADF 1 Open the ADF cover 2 Hold both sides of any jammed documents and gently pull them out straight upward Do not pull the document forcefully as it may tear 3 Hold both sides of any jam...

Страница 169: ...rs caught Paper Jams When PAPER JAM or PAPER JAM LIFT PANEL TO OPEN appears on the LCD display remove jammed paper from the inside of the machine first then from the paper cassette or multi purpose tr...

Страница 170: ...Remove watches and any bracelets or rings when touching the inside of the machine These items might be damaged if they come into contact with the parts inside of the machine To avoid exposing the tone...

Страница 171: ...of the jammed paper and gently pull it out 7 Gently pull the jammed paper between the fixing assembly A and transfer roller B until the leading edge emerges from the machine Do not touch the fixing a...

Страница 172: ...teriorate if the drum surface is exposed to light or is damaged Always hold the toner cartridge by its handle 10 Insert the toner cartridge so that the protrusion on the right side of the toner cartri...

Страница 173: ...Close the toner cover 14 Lower the scanning platform Be careful not to get your fingers caught If you cannot close the toner cover do not force it to close Open the cover and make sure the toner cart...

Страница 174: ...of the paper cassette 17 Remove the paper in the paper cassette 18 Hold both sides of the jammed paper and slowly pull it out in the direction of the arrow When feeding paper from the paper cassette W...

Страница 175: ...the paper into the paper cassette 20 Close the front panel of the paper cassette 21 Set the dust cover on the paper cassette 22 Open the rear cover This operation is required only when OPEN REAR COVE...

Страница 176: ...LCD display If the jammed paper is badly folded similar to the folds of an accordion ease the jammed paper loose and then pull it out from the machine 24 Close the rear cover This operation is requir...

Страница 177: ...RX DATA The machine temporarily received the fax in memory because an error of some kind has occurred in the machine This error message appears with one of the messages below CLOSE COVER TONER COVER L...

Страница 178: ...A4 OFICIO BRAZIL OFICIO MEXICO OFICIO FOLIO GOVERNMENT LETTER GOVERNMENT LEGAL FOOLSCAP LTR or LGL For details see Setting Paper Size and Type on p 2 15 To print received data on both sides of paper s...

Страница 179: ...LIFT PANEL TO OPEN OPEN TONER COVER Appears alternately with other messages Varies by the message that appears For details see the explanation for the message i e SET PAPER AGAIN SET TONER AGAIN LOAD...

Страница 180: ...ow CHANGE REG D SIZE PAPER SETTINGS CANNOT PRINT RX DATA Load paper correctly Then press OK when using the paper cassette For report or list set the paper size to A4 OFICIO BRAZIL OFICIO MEXICO OFICIO...

Страница 181: ...end the document with low resolution The number of TX RX jobs that can be stored in memory reached the maximum The machine memory can store up to 256 fax jobs including sending and receiving jobs Base...

Страница 182: ...pients before using the Address Book function OUT OF TONER CHANGE TONER The toner ran out completely Replace the toner cartridge PAPER JAM Paper jams have occurred in the machine LIFT PANEL TO OPEN OP...

Страница 183: ...per cassette see Set Up the Machine in the Starter Guide and to load paper in the multi purpose tray see Loading Paper on p 2 12 Set the toner cartridge in the machine see Set Up the Machine in the St...

Страница 184: ...achine Resend the document if necessary 00A1 There is a document jam Clear the document jam 00FF All redialing attempts have failed Check if the recipient s number is correct or the telephone cable is...

Страница 185: ...e did not respond within 35 seconds Resend the document Ask the other party to check their machine If you are making an overseas call add a pause to the number 008D The recipient s machine has run out...

Страница 186: ...f the paper specified in CASSETTE or MP TRAY of the PAPER SETTINGS menu You need to load the correct size paper or change the paper size in CASSETTE or MP TRAY of the PAPER SETTINGS menu For print job...

Страница 187: ...etting through Additional Functions In this case cancel the job first then press Additional Functions and change the paper size setting For instructions on how to cancel copy jobs see Canceling Copy J...

Страница 188: ...per size same as paper loaded into the machine then press OK 6 Press Stop Reset to return to the standby mode Now ready to copy your document For a fax job or report printing go to step 7 7 Press OK t...

Страница 189: ...ou cannot send receive or copy documents If power is suddenly lost due to a power failure or accidental unplugging the machine may lose any data stored in the memory including received fax documents I...

Страница 190: ...S MF4270 Serial number On the label located at the back of the machine Place of purchase Nature of problem Steps you have taken to solve the problem and the results If the machine makes strange noises...

Страница 191: ...Troubleshooting 11 26...

Страница 192: ...sing the Setting Menu 12 4 Setting Menu 12 6 PAPER SETTINGS 12 6 VOLUME CONTROL 12 7 BROADCAST 12 7 COMMON SETTINGS 12 8 COPY SETTINGS 12 9 FAX SETTINGS 12 10 ADDRESS BOOK SET 12 14 PRINTER SETTINGS 1...

Страница 193: ...ust the machine settings from the Setting Menu to customize the way the machine works To see the list of current settings print out USER DATA LIST Printing USER DATA LIST 1 Press Additional Functions...

Страница 194: ...12 3 Machine Settings 3 Press or to select LIST PRINT then press OK 4 Press or to select USER DATA LIST then press OK Printing starts and the screen automatically returns to the standby mode...

Страница 195: ...itional Functions 2 Press or to select the menu you want to access then press OK PAPER SETTINGS VOLUME CONTROL BROADCAST COMMON SETTINGS COPY SETTINGS FAX SETTINGS ADDRESS BOOK SET PRINTER SETTINGS TI...

Страница 196: ...menu see Setting Menu on p 12 6 4 To register the settings or go to a submenu item press OK 5 When finished press Stop Reset to return to standby mode If you press Stop Reset before pressing OK the se...

Страница 197: ...OFICIO MEXICO OFICIO FOLIO GOVERNMENT LETTER GOVERNMENT LEGAL FOOLSCAP LTR and LGL 2 PAPER TYPE Sets the paper type from the following options PLAIN PAPER PLAIN PAPER L HEAVY PAPER HEAVY PAPER H and...

Страница 198: ...ng produced when the machine detects a call 0 3 2 3 ENTRY TONE Beeps when pressing the keys on the operation panel 0 3 2 4 ERROR TONE Beeps when an error e g TX error occurs 0 3 2 BROADCAST Setting It...

Страница 199: ...COPY FAX SCAN 2 TONER SAVER MODE Sets whether to reduce toner consumption OFF ON This function is not effective for print jobs 3 DISPLAY LANGUAGE Selects the language on the display See Specifications...

Страница 200: ...RATIO Sets the zoom ratio for copying PRESET RATIO Selects the zoom from the preset ratios 100 115 B5 A4 122 A5 B5 141 A5 A4 200 MAX 50 MIN 70 A4 A5 81 B5 A5 86 A4 B5 MANUAL Enters the zoom ratio by 1...

Страница 201: ...NAME Registers your name company name max 32 characters including spaces See Set the Machine for Sending Faxes in the Starter Guide 3 TX TERMINAL ID Sets the options for sender information ON Sender...

Страница 202: ...attempt at dialing fails redialing is not attempted 2 DIALING LINE CHCK Sets whether to check the telephone line condition OFF ON 4 RX SETTINGS Sets the reception features 1 FAX TEL OPT SET Sets the...

Страница 203: ...es not ring In the Sleep mode the optional handset or external telephone may ring one or two times 3 REMOTE RX Sets whether to use remote receiving See Chapter 4 Sending and Receiving in the Reference...

Страница 204: ...RX REDUCTION Sets whether to reduce or truncate the image when a faxed page is larger than the size of paper loaded See Chapter 4 Sending and Receiving in the Reference Guide ON Reduces the image to...

Страница 205: ...codes Up to 100 recipients can be registered See Storing Editing One Touch Speed Dialing Keys Coded Speed Dialing Codes on p 4 7 NAME Registers the recipient s name max 20 characters including spaces...

Страница 206: ...ter Guide 2 DATE TYPE SELECT Sets the date format DD MM YYYY YYYY MM DD MM DD YYYY 3 AUTO SLEEP Sets the auto Sleep mode when the machine remains idle for a certain period of time 3MIN 30MIN 5MIN See...

Страница 207: ...r in low temperature and low humidity conditions OFF Select in normal condition MODE1 Select to improve print quality in low temperature and low humidity conditions or when using thick paper or an env...

Страница 208: ...PUT YES OUTPUT NO 2 LIST PRINT Prints reports lists 1 TX REPORT Prints the fax transmission report manually 2 RX REPORT Prints the fax reception report manually 3 ACTIVITY REPORT Prints the fax transa...

Страница 209: ...DDRESS AUTO Sets whether to automatically set an IP address ON Enables an IP address to the machine automatically 1 DHCP ON OFF 2 BOOTP OFF ON 3 RARP OFF ON OFF Allocates an IP address to the machine...

Страница 210: ...ult 80 4 SNMP 0 65535 default 161 2 SNMP SETTINGS Sets detailed information about SNMP 1 USE SNMP Sets whether to activate SNMP ON OFF 2 COMMUNITY NAME 1 Sets SNMP community name 1 default public 3 CO...

Страница 211: ...d Ethernet type manually 1 COMMUNICATN MODE Selects the communication mode FULL DUPLEX HALF DUPLEX 2 ETHERNET TYPE Selects the Ethernet type 100 BASE TX 10 BASE T 2 MAC ADDRESS Displays the twelve dig...

Страница 212: ...mory lock reception OFF Disables setting a period of memory lock reception ON Enables setting a period of memory lock reception MEM RX START TIME MEM RX END TIME 2 R KEY SETTING Registers the R key to...

Страница 213: ...Machine Settings 12 22...

Страница 214: ...Appendix 13Appendix Specifications 13 2 General 13 2 Copier 13 3 Printer 13 4 Facsimile 13 4 Telephone 13 6 Index 13 7...

Страница 215: ...0 sec temperature 20 C humidity 65 from when the main power switch is turned on until standby display appears Warm up time may differ depending on the condition and environment of the machine Weight...

Страница 216: ...Documents p 2 2 Acceptable Paper Stock p 2 9 Printable Area p 2 11 Scanning Area p 2 4 Copier Scanning Resolution TEXT PHOTO mode 300 dpi x 300 dpi TEXT mode PHOTO mode TEXT PHOTO mode 600 dpi x 600 d...

Страница 217: ...n p 13 3 Printing Resolution 600 dpi x 600 dpi Number of Tones 256 Toner Cartridge p 1 11 Facsimile Applicable Line Public Switched Telephone Network PSTN 1 Compatibility G3 Data Compression Schemes M...

Страница 218: ...cipients Coded dialing 100 recipients Group dialing 7 x 50 recipients Address Book dialing with Address Book key Regular dialing with numeric keys Automatic redialing Manual redialing with Recall Paus...

Страница 219: ...ne with built in answering machine data modem 1 The Public Switched Telephone Network PSTN currently supports 28 8 Kbps modem speed or lower depending on telephone line conditions 2 Based on ITU T Sta...

Страница 220: ...6 Automatic document feeder 1 2 B Before using the machine 1 1 BROADCAST 12 7 C Canceling Copy job 3 16 RX job 5 4 Scan jobs 7 4 TX job 4 35 Checking Documents stored in memory 4 37 Print job 6 7 Tran...

Страница 221: ...Jams 11 3 Loading 2 5 Printing 6 2 Receiving 5 1 Requirements 2 2 Scanning area 2 4 Sending 4 1 Document and paper 2 1 Document delivery tray 1 2 Document feeder tray 1 2 Document requirements 2 2 Do...

Страница 222: ...e quality Copying 3 4 Faxes 4 4 Image Quality key 1 6 J Jams Document 11 3 Paper 11 4 L LCD Display 1 7 Messages 11 12 Standby mode 1 9 Loading Document 2 5 Envelopes 2 12 Paper 2 12 M Machine compone...

Страница 223: ...essage 11 4 Paper requirements 2 9 PAPER SETTINGS 12 6 Paper stopper 1 3 PC Faxing 8 1 Platen glass 1 3 2 5 Power failure 11 24 Power socket 1 4 Printable area 2 11 Printer feature vi PRINTER SETTINGS...

Страница 224: ...INGS 12 18 TIMER SETTINGS 12 15 VOLUME CONTROL 12 7 Setting paper size and type 2 15 Sleep mode 1 17 Slide guides 1 2 2 7 Slide guides for multi purpose tray 1 3 Specifications Copier 13 3 Facsimile 1...

Страница 225: ...1 14 Transporting the machine 10 19 Troubleshooting 11 1 Two sided copying 3 14 Two sided Printing 6 6 U USB port 1 4 USER DATA LIST Printing 12 2 Using Address Book key 4 28 Coded speed dialing codes...

Страница 226: ...ngdom CANON DEUTSCHLAND GmbH Europark Fichtenhain A10 47807 Krefeld Germany CANON ITALIA S p A Via Milano 8 20097 San Donato Milanese MI Italy CANON ESPA A S A c Joaqu n Costa 41 28002 Madrid Spain CA...

Отзывы: