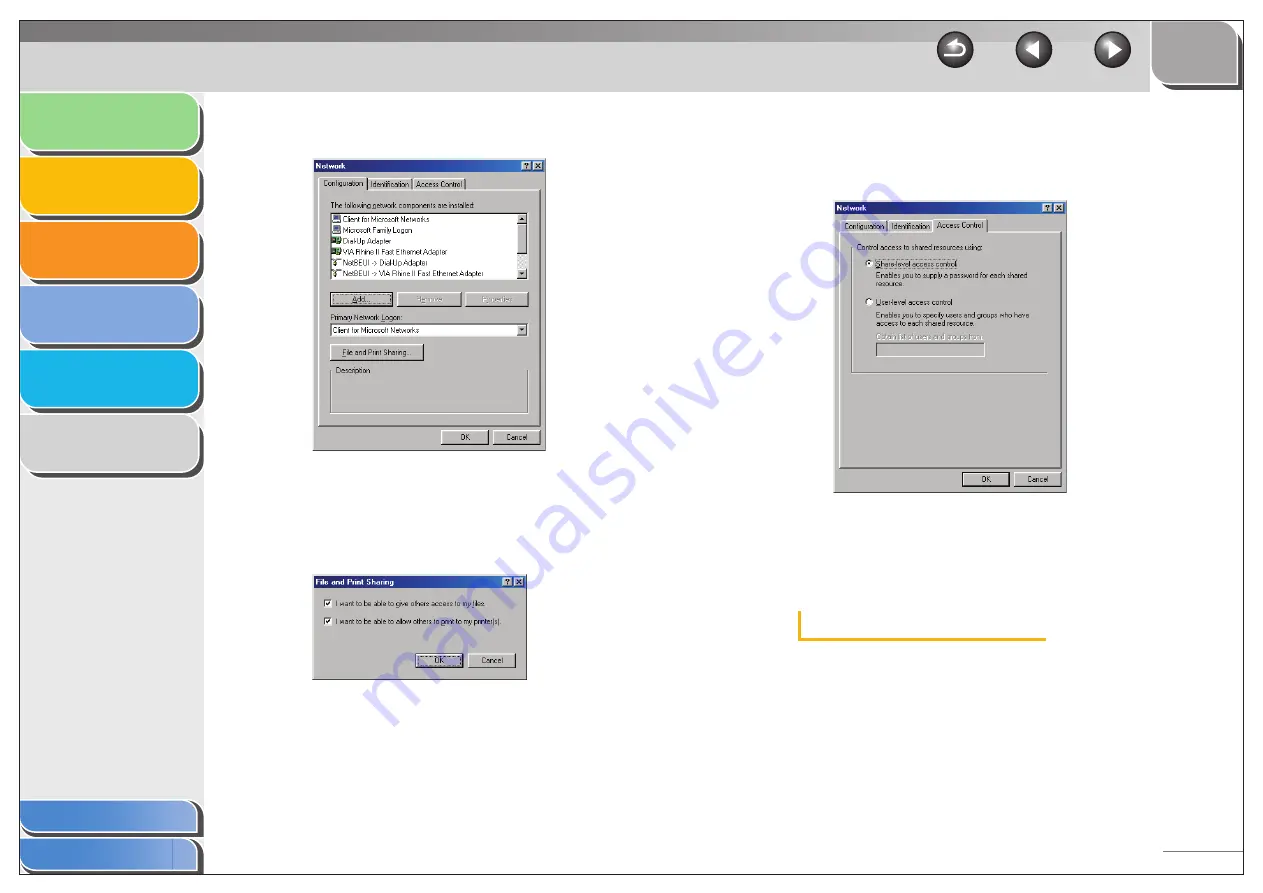
background image

1

2

3

4

5

6

TOP

Back

Previous

Next

2-58

Table of Contents

Index

Introduction

Printing

Scanning a 
Document

PC Faxing

Troubleshooting

Appendix

6.

Click [File and Print Sharing].

The [File and Print Sharing] dialog box appears.

7.

Make sure that [I want to be able to allow 
others to print to my printer(s).] is selected 


click [OK].

8.

Select the [Access Control] tab 

 [Share-

level access control] or [User-level access 
control].

9.

Click [OK].

The server service is added.
If the confirmation message dialog box appears, click [Yes] to 
restart your computer.

Windows Vista/7 Server Settings

Adding Server Service

1.

Click [Start] on the Windows task bar 


select [Network].

The [Network] folder appears.
Windows 7: Click [Start] on the Windows task bar 

 [Control 

Panel] 

 select [View network status and tasks] under the 

[Network and Internet]. 

Содержание ImageCLASS MF3240 Series

Страница 1: ...de TOP Back Previous Next Introduction Printing Scanning a Document PC Faxing Software Guide Please read this guide before operating this equipment After you finish reading this guide store it in a safe place for future reference Troubleshooting Appendix Series ...

Страница 2: ...t Indicates the manual is supplied in PDF format in the accompanying CD ROM To view the manuals in PDF format Adobe Reader Acrobat Reader Acrobat is required If Adobe Reader Acrobat Reader Acrobat is not installed on your system please download it from the Adobe Systems Incorporated website http www adobe com Considerable effort has been made to make sure that the manuals for the machine are free ...

Страница 3: ...x Table of Contents Manuals for the Machine i How to Use This Guide viii Legal Notices xi 1 Introduction 1 1 Where to Find Help 1 2 Canon Support Center 1 2 System Requirements 1 3 Checking Installation 1 4 Uninstalling and Reinstalling the Software 1 5 Removing the MF Toolbox 1 5 Removing the MF Drivers 1 5 Reinstalling the Software 1 6 ...

Страница 4: ...t Settings 2 4 From a Windows Application 2 4 From the Printers and Faxes Windows 98 Me 2000 Vista Printers Windows 7 Devices and Print ers Folder 2 5 Windows 98 Me Properties 2 7 Windows 2000 XP Vista 7 Properties and Printing Preferences 2 26 Properties 2 27 Printing Preferences 2 34 Using the Machine on Your Network 2 54 Setting the Machine as a Shared Printer 2 54 Using the Shared Printer on Y...

Страница 5: ...canning Function for Start 3 4 Setting Up Start to Operate in a Different Way from Save 3 4 Setting Up Start in the Settings Dialog Box 3 5 Setting Up Start in the Scanners and Cameras Folder 3 5 Scanning with the MF Toolbox 3 7 MF Toolbox Settings 3 9 Scanner Settings 3 9 Save Scanned Image to 3 11 External Program Mail Program 3 12 Confirmation of the Scanned Image and Exif Settings Confirm the ...

Страница 6: ...and Advanced Mode 3 17 Using Simple Mode 3 17 Using Advanced Mode 3 20 Advanced Mode Specifying the Parameters of a Scan 3 22 Advanced Mode Settings 3 23 Determining Resolution 3 38 Scanning with the WIA Driver Windows XP Only 3 40 Scanning from the Scanner and Camera Wizard Dialog Box Windows XP Only 3 40 Scanning from the Windows FAX Scan Dialog Box Windows Vista 7 Only 3 43 Scan from Windows Ph...

Страница 7: ...rom the Printers and Faxes Windows 98 Me 2000 Vista Printers Windows 7 Devices and Printers Folder 4 15 Windows 98 Me Fax Properties 4 17 Windows 2000 XP Vista 7 FAX Properties and FAX Printing Preferences 4 28 FAX Properties 4 28 FAX Printing Preferences 4 32 Canon Cover Sheet Editor 4 42 Installing and Uninstalling Cover Sheet Editor 4 43 Opening Saving and Closing a File 4 46 Creating an Origin...

Страница 8: ...nning a Document PC Faxing Troubleshooting Appendix 5 Troubleshooting 5 1 Printer Problems 5 2 Driver Problems 5 5 Scanning Problems 5 7 Installing and Uninstalling Problems 5 13 6 Appendix 6 1 Specifications 6 2 Printer Specifications 6 2 Scanner Specifications 6 2 Glossary 6 3 Index 6 10 ...

Страница 9: ... Introduction Printing Scanning a Document PC Faxing Software Guide Please read this guide before operating this equipment After you finish reading this guide store it in a safe place for future reference Troubleshooting Appendix Series Displays the previous or next page Returns to the last page opened Returns to the top page Displays the How to Use This Guide page Quick links to the list of thing...

Страница 10: ...Faxing Troubleshooting Appendix 1 Introduction Where to Find Help 1 2 System Requirements 1 3 Checking Installation 1 4 Uninstalling and Reinstalling the Software 1 5 Removing the MF Toolbox 1 5 Removing the MF Drivers 1 5 Reinstalling the Software 1 6 Returns to the last page opened Displays the previous or next page Returns to the top page Table of contents for the chapter Quick links to the lis...

Страница 11: ... in mind when using the machine WARNING Indicates a warning that may lead to death or serious injury if not observed CAUTION Explains how to avoid actions that could injure you or damage your machine NOTE Explains operating restrictions and how to avoid minor difficulties In addition this guide uses a distinctive notation to identify buttons and information in the LCD Menu items you select and the...

Страница 12: ...be reproduced transmitted transcribed stored in a retrieval system or translated into any language or computer language in any form or by any means electronic mechanical magnetic optical chemical manual or otherwise without the prior written permission of Canon Inc Disclaimer The information in this document is subject to change without notice CANON INC MAKES NO WARRANTY OF ANY KIND WITH REGARD TO...

Страница 13: ...nting Scanning a Document PC Faxing Troubleshooting Appendix 1 Introduction Where to Find Help 1 2 System Requirements 1 3 Checking Installation 1 4 Uninstalling and Reinstalling the Software 1 5 Removing the MF Toolbox 1 5 Removing the MF Drivers 1 5 Reinstalling the Software 1 6 ...

Страница 14: ...nline Help You can locate additional help in the online help file provided with the driver software In the Properties dialog box you can click Help to display information about every feature and option in the drivers Context Sensitive Help This Help displays the explanation of each item in the current dialog box Use one of the following procedures to activate a context sensitive help Click Help in...

Страница 15: ...recommended USB 1 1 128 MB of RAM USB 2 0 Microsoft Windows XP CPU Intel Pentium 300 MHz or higher USB 1 1 Intel Pentium II Celeron 300 MHz or higher USB 2 0 Memory 64 MB of RAM 128 MB or more is recommended USB 1 1 128 MB of RAM USB 2 0 Microsoft Windows Vista CPU 800 MHz or higher Memory 512 MB or more Microsoft Windows 7 CPU 1 GHz or faster Memory 1 GB or more NOTE The USB 2 0 Hi Speed connecti...

Страница 16: ...Click Start on the Windows task bar click Start select Devices and Printers Make sure the driver icon is displayed 2 Select the default printer Select the printer icon for this machine then select Set as Default Printer Windows 98 Me Set as Default 3 Open the Scanners and Cameras folder Windows 98 2000 the Scanners and Cameras Properties dialog box Click start on the Windows task bar select Contro...

Страница 17: ...ll the software in Windows 2000 XP Vista 7 you must be the user with administrative privileges When removing the software first remove the MF Toolbox and then the MF drivers For Windows Vista 7 click Continue or Yes to proceed if the User Account Control dialog box appears Removing the MF Toolbox 1 Click start on the Windows task bar All Programs Canon MF Toolbox 4 9 Toolbox Uninstall 2 Click Remo...

Страница 18: ...talling the Software On the Windows desktop click start My Computer Windows 98 Me 2000 double click My Computer Open the CD ROM icon double click MInst MInst exe The MF Setup screen appears For instructions on reinstalling the software see Installing Software in the Starter Guide If you install the software using a copy on network or hard disk open the setup screen by double clicking the Setup exe...

Страница 19: ...2 2 Changing Print Settings 2 4 From a Windows Application 2 4 From the Printers and Faxes Windows 98 Me 2000 Printers Folder 2 5 Windows 98 Me Properties 2 7 Windows 2000 XP Vista 7 Properties and Printing Preferences 2 26 Properties 2 27 Printing Preferences 2 34 Using the Machine on Your Network 2 54 Setting the Machine as a Shared Printer 2 54 Using the Shared Printer on Your Network 2 60 ...

Страница 20: ...t settings in the corresponding tab sheet Only for Windows 2000 5 Specify the required settings click OK NOTE For details see Changing Print Settings on p 2 4 6 Click Print or OK Printing starts NOTE To cancel printing click Cancel Canceling Printing Windows 2000 XP 1 Open the Printers and Faxes Windows 98 Me 2000 Printers folder Click start on the Windows task bar select Printers and Faxes Window...

Страница 21: ... click Printer under Hardware and Sound Windows 7 Click Start on the Windows task bar click Devices and Printers on the Start menu 2 Double click the corresponding printer driver icon 3 Right click the print job click Cancel Yes You can cancel the print job also by selecting the print job click Cancel from Document on the toolbar click Yes NOTE You can display the print job by clicking the printer...

Страница 22: ...you are using and the method you use to access the dialog box The method you use to access the dialog boxes determines how long the printing options remain in effect If you access the dialog box from an application s Print dialog box your selected printing options apply only to the current print job They will not be stored when you close the application If you access the dialog box from the Printe...

Страница 23: ...k Properties You can also open the properties dialog box by right clicking the corresponding printer driver icon and selecting Properties from the pop up menu The Canon MF3200 Series Properties dialog box appears Opening the Printing Preferences Dialog Box Windows 2000 XP 1 Open the Printers and Faxes Windows 2000 Printers folder Click start on the Windows task bar select Printers and Faxes 2 Clic...

Страница 24: ...operties from the pop up menu You can open the properties dialog box also by clicking the corresponding printer driver icon Set printer properties on the toolbar Opening the Printing Preferences Dialog Box 1 Open the Printers folder Windows Vista Click Start on the Windows task bar select Control Panel click Printer under Hardware and Sound Windows 7 Click Start on the Windows task bar click Devic...

Страница 25: ...on MF3200 Series Properties from the Printers folder The number of tabs displayed in the properties dialog box depends on how you have your system set up General Tab Lets you print a test page or define separator pages Refer to your Windows operating system documentation for more information Details Tab Specifies the printer port and timeout settings Refer to your Windows operating system document...

Страница 26: ...uction Printing Scanning a Document PC Faxing Troubleshooting Appendix Spool Settings The installer sets the following defaults Color Management Tab Associate color profiles with your color printer Refer to your Windows operating system documentation for more information ...

Страница 27: ...nly when the printer sharing is enabled See Using the Machine on Your Network on p 2 54 Refer to your Windows operating system documentation for more information Page Setup Tab Specifies the page settings including the paper size scaling number of copies orientation number of pages per sheet etc For information on Profile and Output Method see Profiles on p 2 22 Default settings depend on the coun...

Страница 28: ...er Size Settings on p 2 14 Copies Specifies the number of copies to be printed 1 to 99 Orientation Selects the direction of printing relative to the paper Portrait or Landscape Page Layout Selects the number 1 2 4 6 8 9 or 16 of original pages per sheet or Poster 2 x 2 3 x 3 or 4 x 4 pages to comprise one sheet When this option is set to anything other than 1 Page per Sheet and Poster the original...

Страница 29: ...arch Envelope COM10 Envelope DL or Envelope C5 as Page Size and Match Page Size as Output Size Paper Type is automatically set to Envelope If you select Envelope Monarch Envelope COM 10 Envelope DL or Envelope C5 as Output Size Paper Type is automatically set to Envelope regardless of the setting of Page Size Watermark Inserts the selected watermark to be printed on each page Eight types of pre de...

Страница 30: ...hen the Watermark check box is selected in the Page Setup tab sheet See Page Setup Tab on p 2 9 Restore Defaults Resets all the current settings to their default values View Settings Click this button to display the View Settings dialog box This dialog box allows you to view and confirm all of the current page settings in a listed from See View Settings on p 2 25 Watermark List Displays the names ...

Страница 31: ...ark to the center of the page Angle Specifies the angle of watermark Upward Left to Right Downward Left to Right or Set Angle You can select the corresponding radio button or use the slide bar to move the angle Name Displays and allows you to change the name of the currently selected watermark Text Displays and allows you to change the text string of the currently selected watermark Font Selects t...

Страница 32: ...s opened from a Windows application Paper List Displays the paper sizes actually available Selects a paper size from which you can create a custom paper size NOTE You can share the custom paper sizes with all printers connected to your computer Up to 50 sizes can be defined for Custom Paper Size Name of Custom Paper Size Specifies the name of custom paper Unit Selects the unit of measurement of pa...

Страница 33: ... on each page 11 options are available Print Date Selects if the date is printed on each page or not Six positions to print the date are available Print User Name Selects if the user name is printed on each page or not Six positions to print the user name are available Print Page Number Selects if the page number is printed on each page or not Six positions to print the page number are available F...

Страница 34: ...ects the Collate option to print a document in correct binding order For example when printing multiple copies of a 3 page document the print order is 1 2 3 1 2 3 and so on Off or Collate NOTE If you select Collate in Finishing the image on the left bottom of the preview image will change Advanced Settings Click this button to display Advanced Settings dialog box for specifying the finishing detai...

Страница 35: ...e settings for print quality including the resolution and contrast For more information on Profile and Output Method see Profiles on p 2 22 Gutter Specifies the gutter width in a range from 0 0 to 1 1 4 in 0 to 30 mm Image Refinement Sets the Super Smoothing function of the printer NOTE If the Resolution in the Detailed Settings dialog box is set to 300 dpi a document is always printed with Super ...

Страница 36: ...o set the grayscale for images See Grayscale Settings on p 2 19 Grayscale Settings Click this button after selecting the Manual Grayscale Settings check box to manually adjust the grayscale settings The Grayscale Settings dialog box allows you to specify Brightness Contrast and Matching Mode See Grayscale Settings on p 2 19 NOTE This option is enabled only when Manual Grayscale Settings is selecte...

Страница 37: ...n 1 Applies dither pattern of high quality gradient for printing Web pages or other generic documents Pattern 2 Applies dither pattern of high quality tone for printing pictures Pattern 3 Applies dither pattern of clear cut for printing documents included with lines and figures None Solid Prints all colors in black except for white Enable Image Correction Select Enable Image Correction to smooth o...

Страница 38: ...justs the brightness of the preview image in the range from 5 to 5 Contrast Adjusts the contrast of the preview image in the range from 5 to 5 Restore Defaults Resets all the current settings to their default values Matching Mode You can specify the procedure for Color correction Driver Matching Mode Processes color in the printer driver The settings specified in Matching Method and Monitor Profil...

Страница 39: ... is selected in the Matching Mode box NOTE In the case where several gamma values are provided for one option select the higher gamma value to obtain better results if the printed image is lighter than that of the monitor If the monitor is set to a custom setting it is difficult to produce printed output similar to the color of the monitor when performing matching Gamma Specifies the gamma correct...

Страница 40: ...Profiles from the drop down list enables the printer to perform a variety of print jobs A frequently performed print job can also be saved as a Profile Preview image Displays the image with the currently selected settings reflected Changes the setting for Page Layout every time you click anywhere inside the image of the page The setting changes in the following order 1 Page per Sheet 2 Pages per S...

Страница 41: ...it and Preview mode is locked Add Profile Click this button to display the Add Profile dialog box to add a new Profile to the list See Add Profile on p 2 23 Edit Profile Click this button to display the Edit Profile dialog box to edit the name icon or comment of a stored Profile See Edit Profile on p 2 24 View Settings Click this button to display the View Settings dialog box This dialog box allow...

Страница 42: ...tings in a listed form See View Settings on p 2 25 Move Up Moves the profile selected in the Profile List one position up Move Down Moves the profile selected in the Profile List one position down Delete Removes the selected profile from Profile List NOTE You cannot delete the pre defined profiles and the profile that is currently selected in Profile of the Page Setup tab Name Displays and allows ...

Страница 43: ...llows you to change the comment on the currently selected profile NOTE You cannot change the comments for the pre defined profiles Import Enables you to import profile information from a file Export Enables you to export the selected profile information to a file NOTE When one of the pre defined profiles is selected this button is disabled Apply Settings from Application Applies the selected profi...

Страница 44: ...printer driver for Windows 2000 XP has the following two main dialog boxes The Properties Dialog Box This dialog box enables you to set up the printer configuration and configure the print settings for all Windows applications The Printing Preferences Dialog Box This dialog box enables you to specify the default settings for the printing options available when you print on the Canon MF3200 Series ...

Страница 45: ...up the printer configuration and configure the print settings NOTE The number of tabs displayed in the properties dialog box depends on how you have your system set up For more information about the following features see the online help See Online Help on p 1 2 The screen shots shown are from Windows XP General Tab Lets you print a test page and define printing preferences Refer to your Windows o...

Страница 46: ...pecifies the printer sharing settings This tab sheet is available only when the sharing is enabled See Using the Machine on Your Network on p 2 54 Refer to your Windows operating system documentation for more information Ports Tab Specifies the port to which the printer is attached Refer to your Windows operating system documentation for more information ...

Страница 47: ...rint spooling Refer to your Windows operating system documentation for more information NOTE Spool print documents so program finishes printing faster and Start printing immediately are set automatically when you install the printer driver Color Management Tab Associates color profiles with your color printer Refer to your Windows operating system documentation for more information ...

Страница 48: ...ing system documentation for more information Profile Tab Enables you to add edit and select a profile to be applied to print jobs Profile List Displays the list of registered profiles Name Displays the name of the profile currently selected in Profile List Comment Describes the currently selected profile View Settings Displays the settings of the currently selected profile See View Settings on p ...

Страница 49: ...files is selected in Profile List this button is disabled Delete Removes the selected profile from Profile List NOTE When one of the pre defined profiles is selected this button is disabled Import Enables you to import profile information from a file Export Enables you to export the selected profile information to a file NOTE When one of the pre defined profiles is selected this button is disabled...

Страница 50: ...n and number of pages per sheet Name Specifies the name of the new profile or allows you to change the name of the profile selected in the Profile tab sheet Icon Selects an icon to represent the new profile or allows you to change the icon of the profile selected in the Profile tab sheet Comment Adds comments on the new profile or allows you to change the comments on the profile selected in the Pr...

Страница 51: ...Introduction Printing Scanning a Document PC Faxing Troubleshooting Appendix Finishing Tab Specifies the finishing settings for the printed pages including the collating and binding Quality Tab Specifies the print quality including resolution brightness and contrast ...

Страница 52: ... more information about the following features see the online help See Online Help on p 1 2 The screen shots shown are from Windows XP Page Setup Tab Specifies the page settings including the paper size scaling number of copies orientation number of pages per sheet etc For information on Profile and Output Method see Profiles on p 2 48 Default settings depend on the country region of purchase Prev...

Страница 53: ...6 8 9 or 16 of original pages per sheet or Poster 2 x 2 3 x 3 or 4 x 4 pages to comprise one sheet When this option is set to anything other than 1 Page per Sheet and Poster the original page size is reduced to fit the selected page layout when printed NOTE When 1 Page per Sheet is selected Manual Scaling appears When this option is set to anything other than 1 Page per Sheet or Poster Page Order ...

Страница 54: ...o Poster Edit Watermark Click this button to specify detailed watermark settings See Edit Watermark on p 2 37 Custom Paper Size Click this button to specify the dimensions for a paper size other than the provided standard paper sizes See Custom Paper Size Settings on p 2 39 NOTE You can specify the dimensions for a paper size only in the Printer Properties dialog box start Printers and Faxes Windo...

Страница 55: ...ed only when the Watermark check box is selected in the Page Setup tab sheet Page Options Click this button to select options for printing dates user name page numbers and borders etc See Page Options on p 2 41 NOTE This option is disabled when Page Layout is set to Poster Restore Defaults Resets all the current settings to their default values View Settings Click this button to display the View S...

Страница 56: ... the position where the watermark is printed on each page You can enter the values in the X and Y edit boxes in a range from 50 to 50 or use the X and Y slide bars to move the position Move to Center Relocates the watermark to the center of the page Angle Sets the angle of watermark Upward Left to Right Downward Left to Right or Set Angle You can select the corresponding radio button or use the sl...

Страница 57: ... This setting is available only when you open the Canon MF3200 Series Printing Preferences dialog box from the Printers and Faxes Windows 98 Me 2000 Vista Printers Windows 7 Devices and Printers folder Depending on the application you are using you can specify the dimensions for a paper size from the Print dialog box accessed from the application Only for Windows 2000 Border Adds the frame to the ...

Страница 58: ...nt of paper size Millimeter or Inch Paper Size Specifies the width and height of the custom paper NOTE Be sure that Width does not exceed Height when specifying the values Register Registers the custom paper and adds its name to Paper List NOTE To register a new custom paper size be sure to log on as a member of Administrators or Power User Windows 2000 only To change the paper size for the existi...

Страница 59: ... with Print Grayscale Sample in the Quality tab sheet See Quality Tab on p 2 43 Print Date Selects if the date is printed on each page or not Six positions to print the date are available Print User Name Selects if the user name is printed on each page or not Six positions to print the user name are available Print Page Number Selects if the page number is printed on each page or not Six positions...

Страница 60: ...inding a printed document See Gutter Settings on p 2 43 Finishing Select the Collate option to print a document in correct binding order For example when printing multiple copies of a 3 page document the print order is 1 2 3 1 2 3 and so on Off or Collate NOTE If you select Collate in Finishing the image on the left bottom of the preview image will change Advanced Settings Click this button to dis...

Страница 61: ... Settings dialog box Quality Tab Specifies the settings for print quality including the resolution and contrast For information on Profile and Output Method see Profiles on p 2 48 Gutter Specifies the gutter width in a range from 0 0 to 1 1 4 in 0 to 30 mm Image Refinement Sets the Super Smoothing function of the printer NOTE If the Resolution in the Detailed Settings dialog box is set to 300 dpi ...

Страница 62: ...o provide the print samples with the current grayscale settings when printing the document NOTE This option is enabled only when Manual Grayscale Settings is selected Grayscale Settings Click this button after selecting the Manual Grayscale Settings check box to manually adjust the grayscale settings The Grayscale Settings dialog box allows you to specify Brightness Contrast and Matching Mode See ...

Страница 63: ...cts the printer s resolution in dot per inch 600 dpi or 300 dpi B W Halftones Specifies the use of dithering for printing halftone data Pattern1 Applies dither pattern of high quality gradient for printing graphics and graphs with gradation Pattern2 Applies dither pattern of high quality tone with sharpness and stability for printing image data such as pictures Pattern3 Applies dither pattern of s...

Страница 64: ... Image Correction to smooth out the streaking and coarse features that tend to occur when printing enlarged image files and photographs using a software application Toner Save Modifies print data to print lighter and conserve toner Printer Default Prints using the settings in the operation panel of the printer Off Prints using normal density On Prints text lighter in printouts for proofreading and...

Страница 65: ...to reducing the color difference between the original document on the screen a logo for example and the printed output Saturation Gives priority to vividness in matching NOTE This option can be selected only when Driver Matching Mode is selected for Matching Mode Monitor Profile Specifies the setting suitable for your monitor when the Driver Matching Mode is selected in the Matching Mode box NOTE ...

Страница 66: ...can be adjusted without losing the brightest and darkest portion of the document This option is useful when the printout result is brighter than the original image for example a photograph before scanning or graphics displayed on the monitor or when you want to intentionally change the brightness of the output Four gamma correction values are provided The larger the value the darker the printout i...

Страница 67: ... the pop up menu from which you can also change the setting for Page Layout Clicking the edges of the preview image of the page changes the binding location NOTE Settings made on the Quality tab are not reflected in the preview image Output Method Switches the job mode between Print and Edit and Preview Print Executes a normal print job Edit and Preview Saves the data in the Canon PageComposer dia...

Страница 68: ... display the Edit Profile dialog box to edit the name icon or comment of a stored Profile See Edit Profile on p 2 51 View Settings Click this button to display the View Settings dialog box This dialog box allows you to view and confirm all of the current page settings in a listed form See View Settings on p 2 53 Name Specifies the name of the profile to be registered Icon Selects an icon to repres...

Страница 69: ...alog box This dialog box allows you to view and confirm all of the current page settings in a listed form See View Settings on p 2 53 Move Up Moves the profile selected in the Profile List one position up Move Down Moves the profile selected in the Profile List one position down Delete Removes the selected profile from Profile List NOTE You cannot delete the pre defined profiles and the profile th...

Страница 70: ...les Comment Displays and allows you to change the comment on the currently selected profile NOTE You cannot change the comments for the pre defined profiles Import Enables you to import profile information from a file Export Enables you to export the selected profile information to a file NOTE When one of the pre defined profiles is selected this button is disabled Apply Settings from Application ...

Страница 71: ...canning a Document PC Faxing Troubleshooting Appendix View Settings Clicking View Settings opens the View Settings dialog box This dialog box displays the current settings in the Page Setup Finishing and Quality tab sheets Copy Copies the contents of the current settings to the clipboard ...

Страница 72: ... If the server is running on Windows 2000 XP Vista 7 you can print even if no one is logged into the server Setting the Machine as a Shared Printer If you plan to share your machine on a network install the print server locally then make the following settings For more information see your print server system documentation Windows 2000 XP Server Settings The following is the procedure to make your...

Страница 73: ...ervice is added Adding Server Service Windows 2000 1 Click Start on the Windows task bar select Settings Network and Dial up Connections The Network and Dial up Connections folder appears 2 Right click the Local Area Connection icon select Properties from the pop up menu The Local Area Connection Properties dialog box appears 3 Select File and Printer Sharing for Microsoft Networks click OK The se...

Страница 74: ...ngs on p 2 4 2 Enter a share name in the edit box as needed NOTE Do not enter a space or special character in the Share name edit box 3 Click OK The printer driver icon changes to indicate sharing Windows 98 Me Server Settings The following is the procedure to make your machine available to your network users under Windows 98 Me The screen shots shown are from Windows 98 Adding Server Service 1 Cl...

Страница 75: ...canning a Document PC Faxing Troubleshooting Appendix 3 Click Add in the Configuration tab sheet The Select Network Component Type dialog box appears 4 Select Service click Add The Select Network Service dialog box appears 5 Select File and printer sharing for Microsoft Networks click OK ...

Страница 76: ...s is selected click OK 8 Select the Access Control tab Share level access control or User level access control 9 Click OK The server service is added If the confirmation message dialog box appears click Yes to restart your computer Windows Vista 7 Server Settings Adding Server Service 1 Click Start on the Windows task bar select Network The Network folder appears Windows 7 Click Start on the Windo...

Страница 77: ... Continue to proceed 3 Right click the Local Area Connection icon select Properties from the pop up menu The Local Area Connection Properties dialog box appears 4 Select File and Printer Sharing for Microsoft Networks click OK The server service is added Setting Printer Sharing 1 Open the printer properties dialog box click Change sharing options select Share this printer in the Sharing tab sheet ...

Страница 78: ...n your network and set as a shared printer you can use it via network The easiest way to make the machine available for your computer is using network download If your operating system is Windows 2000 XP Vista 7 you cannot download the driver from Windows 98 Me servers In that case use Add Printer Wizard Network Download The following is the procedure to connect to the shared printer on your netwo...

Страница 79: ... Printers 2 Open the Add Printer Wizard dialog box Click Add a printer in Printer Tasks Windows 2000 double click the Add Printer icon 3 Click Next 4 Select A network printer or a printer attached to another computer Windows 2000 Network printer then click Next The Specify a Printer Windows 2000 Locate Your Printer dialog box appears 5 Select Connect to this printer or to browse for a printer sele...

Страница 80: ...2 Double click the Add Printer icon The Add Printer Wizard dialog box appears 3 Click Next 4 Select Network printer click Next 5 Enter the network path or print queue that you want to connect to or select the location of the shared printer To enter the location directly Enter the path name or print queue in the edit box To select the location Click Browse Select the location of the printer click O...

Страница 81: ...til it comes back online 11 Follow the instructions on the screen to complete the installation Windows Vista 7 1 Open the Printers folder Windows Vista Click Start on the Windows task bar select Control Panel click Printer under Hardware and Sound Windows 7 Click Start menu on the Windows task bar Devices and Printers 2 Open the Add Printer Wizard dialog box Click Add a printer on the toolbar 3 Cl...

Страница 82: ...anning Function for Start 3 4 Setting Up Start to Operate in a Different Way from Save 3 4 Setting Up Start in the Settings Dialog Box 3 5 Setting Up Start in the Scanners and Cameras Folder 3 5 Scanning with the MF Toolbox 3 7 MF Toolbox Settings 3 9 Scanner Settings 3 9 Save Scanned Image to 3 11 External Program Mail Program 3 12 Confirmation of the Scanned Image and Exif Settings Confirm the S...

Страница 83: ...Preferences and Scanning with ScanGear MF 3 17 Switching between Simple Mode and Advanced Mode 3 17 Using Simple Mode 3 17 Using Advanced Mode 3 20 Advanced Mode Specifying the Parameters of a Scan 3 22 Advanced Mode Settings 3 23 Determining Resolution 3 38 Scanning with the WIA Driver Windows XP Only 3 40 Scanning from the Scanner and Camera Wizard Dialog Box Windows XP Only 3 40 Scanning from a...

Страница 84: ... connected via USB and the USB printer driver must be loaded to scan This machine does not support network scanning 1 Set documents 2 Press SCAN on the machine 3 Press Start on the machine If you are asked to select a program to launch select MF Toolbox Ver4 9 The scanned document will be processed according to your settings When you use Start for the first time a folder with the scanning date wil...

Страница 85: ... when you click Save in the MF Toolbox You can change the scanning function set for Start on the machine Setting Up Start to Operate in a Different Way from Save 1 On the Windows desktop double click the Canon MF Toolbox 4 9 icon to open the MF Toolbox You can also open the MF Toolbox by clicking Start on the Windows task bar All Programs Canon MF Toolbox 4 9 Toolbox 4 9 2 Drag the mark over the b...

Страница 86: ...tart in the Scanners and Cameras Folder 1 Open the Scanners and Cameras folder Windows 98 2000 the Scanners and Cameras Properties dialog box Click start on the Windows task bar select Control Panel Printers and Other Hardware Scanners and Cameras Windows 98 Me 2000 Start Settings Control Panel double click Scanners and Cameras Windows Vista Start Control Panel Hardware and Sound Scanners and Came...

Страница 87: ...Select the Events tab select the option corresponding to your machine from Select an event select the operation for Start in Actions click OK On Windows 98 Me 2000 Select the Events tab select the option corresponding to your machine from Scanner events select the operation for Start in Send to this application click OK NOTE If the settings you specified in the scanner property dialog box do not w...

Страница 88: ... bar All Programs Canon MF Toolbox 4 9 Toolbox 4 9 3 Click one of the scanning buttons Mail The document will be scanned and attached to an e mail message in your e mail application OCR The text will be scanned and read by the OCR software Save The document will be scanned and saved PDF The text will be scanned and saved as a PDF file Scan 1 Scan 2 Scan 3 Scan 4 The text will be scanned and appear...

Страница 89: ...required settings For details see Setting Preferences and Scanning with ScanGear MF on p 3 17 7 Click Scan If you click Mail Save or PDF in step 3 a folder with the scanning date will be created in the My Pictures folder in the My Documents folder and your document will be saved in this folder If you have applications registered to the Mail OCR PDF Scan 1 Scan 2 Scan 3 or Scan 4 buttons the scanne...

Страница 90: ...box Scanner Settings You can specify the scanning mode resolution document size and file size of the scanned image Select Source Selects where the document is placed NOTE You can select Platen Glass only Paper Size Selects the size and orientation of the document to be scanned Selecting Custom opens the Paper Size Settings dialog box which enables you to set the custom paper size ...

Страница 91: ...mit of Attached File Selects an approximate upper size limit after compression for the image you will send For an ordinary mail message 150 KB is recommended You cannot select this item when PDF PDF Multiple Pages or PDF Add Page is selected in Save as Type Image Quality Selects the scan resolution up to 600 dpi When scanning using the OCR button or PDF PDF Single Page PDF Multiple Pages or PDF Ad...

Страница 92: ...ave the scanned image BMP Bitmap format JPEG Exif JPEG Exif format This option is available when Grayscale Color or Color Magazine is selected in Scan Mode TIFF TIFF format PDF PDF format PDF Single Page Creates a single page PDF file PDF Multiple Pages Creates one PDF file from two or more scanned pages See Creating One PDF File from Two or More Pages on p 3 16 PDF Add Page Adds the scanned image...

Страница 93: ...d you need to attach the image file manually PDF Settings Opens the PDF Settings dialog box which enables you to make advanced settings of the PDF file See Creating One PDF File from Two or More Pages on p 3 16 This button appears when PDF PDF Single Page PDF Multiple Pages or PDF Add Page is selected in Save as Type Save Scanned Image to Shows the location to save the scanned images when an optio...

Страница 94: ...Scanned Image to on p 3 11 Exif Settings Opens the Exif Settings dialog box which enables you to set the Exif information when JPEG Exif is selected in Save as Type See Exif Settings on p 3 14 PDF Settings Opens the PDF Settings dialog box which enables you to make advanced settings of the PDF file See Creating One PDF File from Two or More Pages on p 3 16 This button appears when PDF PDF Single P...

Страница 95: ...ard the scanned images to the application you specified in the Mail Program or the External Program setting Save Press to save the scanned images in the specified location This button appears instead of Forward Cancel Cancels the operation and returns to the previous window Deletes all the images scanned in the operation Basic Information Displays the information automatically acquired by scanning...

Страница 96: ...wing is an example of the procedure 1 Set documents 2 Open the application you want to use 3 Select the command to scan 4 Select the scanner driver to be used With Windows XP Vista 7 you can use the ScanGear MF or the WIA driver as the scanner driver NOTE You may not select the TWAIN driver on the Paint tool that is attached to Windows XP 5 Specify the scanner settings click Scan For details see S...

Страница 97: ...box appears 6 Specify the required settings click OK Create Searchable PDF Converts the characters in the document to text data and makes the PDF document searchable with keywords Text Language Select the language of the text to be scanned The characters may be recognized more accurately if you select English from this drop down list and set Image Quality to 300 dpi or higher in Scanner Settings S...

Страница 98: ...o be scanned and make detailed adjustments for the image To use the ScanGear MF select Display the Scanner Driver in the MF Toolbox or scan from the application Switching between Simple Mode and Advanced Mode The ScanGear MF has two modes Simple Mode and Advanced Mode With Advanced Mode you can perform detailed settings such as resolution and contrast To switch between two modes click the correspo...

Страница 99: ...3 36 3 Click Preview A preview of the scanned image appears in the preview window 4 Select the use for the scanned image in Select Purpose You can select from Print 300dpi Image display 150dpi or OCR 300dpi depending on the document type you selected in step 2 For details see Determining Resolution on p 3 38 5 Select the output size of the scanned image in Output Size The options you can select va...

Страница 100: ... the output size Unit Selects the unit of measurement for the output size Add Adds the output size to the Output Size List Delete Deletes the selected output size from the Output Size List Save Apply the settings specified in the Add Delete the Output Size dialog box NOTE You cannot delete the output size that is currently selected in Output Size of the Simple Mode tab Auto Crop Crops the image bo...

Страница 101: ...ings and Image Settings and adjust the color settings For details on the settings see Advanced Mode Settings on p 3 23 3 Click Preview NOTE Selecting the range in the preview window and clicking Zoom reloads the selected image to be enlarged To delete the displayed preview image click 4 If you want to scan only part of the document specify the parameters For details see Advanced Mode Specifying th...

Страница 102: ...om in and right click on the image to zoom out Left Rotate Rotates the image 90 degrees left Right Rotate Rotates the image 90 degrees right Information Lists the scanning information Auto Crop Crops the image border automatically Remove Cropping Frame Removes the selected cropping frames Select All Crops When this button is used all the cropping frames reflect the settings made on the Advanced Mo...

Страница 103: ...nts drag the corner or edge of the selected frame or enter the desired parameter values for Width and Height in Input Settings To move the cropping frame you have selected click inside the cropping frame and drag NOTE To maintain the current width and height proportion of the image click in Input Settings Creating Multiple Cropping Frames You can create another cropping frame even if there is alre...

Страница 104: ...eting Cropping Frames If you want to remove cropping frames select the frame or frames and do one of the following Click Delete on the keyboard Click Remove Cropping Frame on the toolbar Right click on the cropped area and select Delete Hold down Ctrl on the keyboard right click outside the cropped area and select Delete Advanced Mode Settings ...

Страница 105: ...hen this option is selected specify a value for each setting Default Restores the default settings The preview image will be cleared Add Delete Opens the Add Delete Favorite Settings dialog box This dialog box enables you to name and register a set of settings for the current preview image Original Input Method Selects where the document is placed NOTE You can select Platen Glass only Input Size S...

Страница 106: ...and B lue Text Enhanced To scan texts crisply particularly to process it with OCR software The image is displayed in black and white Output Resolution Selects the resolution for the scan Enter a resolution from 25 to 9 600 dpi For details see Determining Resolution on p 3 38 Output Size Selects the output size of the scanned image If you select Add Delete the Add Delete the Output Size dialog box ...

Страница 107: ...using output Print or Image Display Output Size Name Specifies the output size name you want to register Width Specifies the width of the output size Height Specifies the height of the output size Unit Selects the unit of measurement for the output size Add Adds the output size to the Output Size List Delete Deletes the selected output size from the Output Size List Save Apply the settings specifi...

Страница 108: ...le is selected in Color Mode Descreen Set to ON to reduce the distorted pattern moiré when scanning printed photographs and pictures NOTE This setting is available when Color Color Documents or Grayscale is selected in Color Mode Even if Descreen is set to ON some moiré effect may remain if Unsharp Mask is also set to ON In this case disable Unsharp Mask You cannot set Descreen to ON when scanning...

Страница 109: ...mage NOTE This setting is available when Color or Color Documents is selected in Color Mode and Color Correction is set to Recommended in the Preferences dialog box See Color Settings Tab on p 3 36 Grain Correction Smooths out the film grain of the image recorded on fast film The result is smoother tones and higher overall quality None No grain correction will be made Low Select this setting when ...

Страница 110: ...e Threshold button is displayed instead of the Color Settings buttons When Color Color Documents or Grayscale is selected in Color Mode When Black and White is selected in Color Mode By selecting Add Delete from the drop down list you can name and save a set of color or threshold settings For details see Tone Curve Threshold Drop Down List on p 3 34 Clicking a button opens the dialog box for each ...

Страница 111: ...and the middle of the tonal range of the image Channel Select a color to adjust either Red Green or Blue or select Master to adjust three colors together when Color or Color Documents is selected in Color Mode Adjust the elements of grayscale when Grayscale is selected in Color Mode Brightness Adjust the brightness of the image by moving the slider or entering values 127 to 127 Contrast Adjust the...

Страница 112: ... tool Click this button then click a point inside the focal crop in the preview image to specify the midtone point You can also enter a value 5 to 250 or move the slider to an appropriate level White point eyedropper tool Click this button then click a point inside the focal crop in the preview image to specify the highlighted point You can also enter a value 10 to 255 or move the slider to an app...

Страница 113: ...rve is a graph showing the balance of tone input and output Channel Select a color to adjust either Red Green or Blue or select Master to adjust three colors together when Color or Color Documents is selected in Color Mode Adjust the elements of grayscale when Grayscale is selected in Color Mode Select Tone Curve Select the tone curve from No Correction Over Exposure Under Exposure High Contrast o...

Страница 114: ...x Final Review This dialog box enables you to confirm the color settings Threshold This dialog box enables you to adjust the threshold By adjusting the threshold you can sharpen characters in a text document and reduce back printing such as in newspapers Threshold Level Adjust the threshold by moving the slider or entering a value 0 to 255 ...

Страница 115: ... Preview Tab Reset Resets the current setting to the default value NOTE The brightness of color and grayscale images are expressed as a value from 0 to 255 but the brightness of black and white images is expressed in terms of either black or white including the parts of an image which are a color between the two The boundary at which black and white is divided is called threshold Custom When this ...

Страница 116: ...pping frame is displayed when you preview images Execute Auto Cropping on Previewed Images The image will be automatically cropped to match the document size Display the Last Frame on Previewed Images Displays the last frame None No frame will be displayed Scan without Using ScanGear s Window Enables you to scan in a specific color mode when using an application that will not display the ScanGear ...

Страница 117: ...gs Tab Automatically Quit ScanGear after Scanning If selected the ScanGear MF dialog box quits automatically after the image is scanned Some applications will automatically quit ScanGear MF after scanning irrespective of this setting Color Correction Selects the type of color correction Recommended Vividly reproduces the tone of a document on the screen ...

Страница 118: ...e This setting is available when Color Color Documents or Grayscale is selected in Color Mode Always Execute the Auto Tone If selected the image color will always be automatically corrected This setting is available when Color Color Documents or Grayscale is selected in Color Mode Monitor Gamma Enables you to perform gamma correction Specify the gamma value 0 10 to 10 00 of the monitor for viewing...

Страница 119: ...d should be scanned at a resolution which corresponds to the resolution of the printer NOTE With a color printer the colors are expressed as a certain percentage of ink pigment so scanning your document at half the resolution of the printer should be fine Sound Settings Sets the scanner to play music during scanning or play a sound when scanning is completed Play Music During Scanning If selected ...

Страница 120: ...ble the resolution so that you can print the document with sufficient quality even if you double the size of the document Conversely if you want to print a document at a reduced size it should be sufficient to scan at half the resolution Resolution and Data Size If you double the resolution the image data will be four times greater If the data is too large processing speed will slow down significa...

Страница 121: ...ning from the Scanner and Camera Wizard Dialog Box Windows XP Only 1 Open the Scanners and Cameras folder Click start on the Windows task bar select Control Panel Printers and Other Hardware Scanners and Cameras 2 Double click the corresponding WIA driver icon 3 Click Next 4 Select a picture type You can select from Color picture Grayscale picture Black and white picture or text and Custom ...

Страница 122: ... Properties dialog box 5 Specify the scanned area Click Preview drag to specify the scanned area 6 Click Next 7 Specify a name a file format and the location for saving the group of pictures NOTE When you save more than one picture in the same location sequential numbers are automatically added at the ends of file names You can select a file format from BMP Bitmap Image JPG JPEG Image TIF TIF Imag...

Страница 123: ...nts Index Introduction Printing Scanning a Document PC Faxing Troubleshooting Appendix 8 Click Next to start scanning 9 Click Next If you want to publish these pictures to a Web site or order printouts online select the corresponding option 10 Click Finish ...

Страница 124: ...dows task bar click View scanners and cameras 2 Click New Scan to open the New Scan dialog box You can open it also from the File menu by selecting New Scan 3 Make sure the corresponding scanner driver icon is displayed on Scanner If you want to use other scanners click Change to select a desired scanner driver icon 4 Specify required scan settings For details on the settings see New Scan Dialog B...

Страница 125: ...scanner driver icon then press Import 4 Make sure the corresponding scanner driver is displayed on Scanner If you want to use other scanners click Change to select a desired scanner driver icon 5 Specify required scan settings For details on the settings see New Scan Dialog Box on p 3 45 6 Click Scan You can classify the scanned image by typing tag in Tag these pictures optional If you save the sc...

Страница 126: ...elete or edit added profiles click Delete or Edit in the Scan Profiles dialog box in the Scanners and Cameras folder Source Selects from Flatbed Platen glass or Feeder Scan one side NOTE If you have selected Flatbed as the paper source click Preview drag to specify the scanned area If you have selected Feeder Scan one side as the paper source select the page size from the Paper size Color format S...

Страница 127: ...river see Scanning an Image from an Application on p 3 15 1 Select the picture type You can select from Color picture Grayscale picture Black and white picture or text and Custom Settings 2 If necessary click Adjust the quality of the scanned picture The Advanced Properties dialog box appears 3 Adjust the quality of the image click OK For details on the settings see Advanced Properties on p 3 47 4...

Страница 128: ...n the type of picture you select Appearance Shows the preview of sample image Brightness Specifies the brightness 127 to 127 Contrast Specifies the contrast 127 to 127 only for color or grayscale scanning Resolution DPI Selects the scanning resolution in dot per inch 50 to 600 Picture type Selects the scanning color type Color picture Grayscale picture or Black and white picture or text Reset Rese...

Страница 129: ...a Fax 4 3 Characters and Symbols for Fax Numbers 4 4 Fax Sending Settings 4 4 Changing Fax Settings 4 14 From a Windows Application 4 14 From the Printers and Faxes Windows 98 Me 2000 Printers Folder 4 15 Windows 98 Me Fax Properties 4 17 Windows 2000 XP Vista 7 FAX Properties and FAX Printing Preferences 4 28 FAX Properties 4 28 FAX Printing Preferences 4 32 ...

Страница 130: ...ing a Document PC Faxing Troubleshooting Appendix Canon Cover Sheet Editor 4 42 Installing and Uninstalling Cover Sheet Editor 4 43 Opening Saving and Closing a File 4 46 Creating an Original Cover Sheet 4 48 Printing a Cover Sheet 4 69 Registering an Original Cover Sheet as a Template 4 69 ...

Страница 131: ...the Recipient Name and Fax Number or select them from the Address Book click Add to Recipient List or Add to List For details on how to use the Fax Sending Settings dialog box see Fax Sending Settings on p 4 4 For details on the characters and symbols you can use for fax numbers see Characters and Symbols for Fax Numbers on p 4 4 For details on how to select a recipient from the Address Book see S...

Страница 132: ...ddress Book Fax Sending Settings If you select the command to print from an application the Fax Sending Settings dialog box appears The Fax Sending Settings dialog box has three tab sheets NOTE For more information about the following features see the online help See Online Help on p 1 2 The screen shots shown are from Windows XP Character symbol Explanation 0 9 For use in telephone and fax number...

Страница 133: ...x Numbers on p 4 4 Add to Address Book Adds the recipient name and fax numbers you entered in Recipient Name and Fax Number to the Address Book Add to Recipient List Adds the recipient name and fax numbers you entered in Recipient Name and Fax Number to the Recipient List Recipient List Shows the list of the recipient names and fax numbers of the destinations you are going to send a fax Address Bo...

Страница 134: ...k The entries can be sorted by their information Recipient Name Company Dept Div Fax Number and Description Search by Recipient Searches the destination by the recipient name Details Displays the information about the selected destination in the Address List Add to List Adds the recipient names and fax numbers you selected in the Address List Recipient List Shows the list of the recipient names an...

Страница 135: ...g Appendix Edit Address Book Tab Allows you to edit the Address Book For details see Edit Address Book Tab on p 4 33 Cover Sheet Tab Specifies the cover sheet to be attached to the document you fax NOTE You can create your original cover sheets using the Canon Cover Sheet Editor For details see Canon Cover Sheet Editor on p 4 42 ...

Страница 136: ... All Recipients Style Selects the style of the cover sheet from the list of the cover sheet templates supplied with the fax driver or the cover sheets you registered in the Register Cover Sheet dialog box for Windows 98 Me see Register Cover Sheet Tab on p 4 24 for Windows 2000 XP Vista 7 see Register Cover Sheet Tab on p 4 38 Items to Include Displays the items to be included in the cover sheet S...

Страница 137: ... in Sender Name text box up to 85 characters Include Company Enables you to enter the company name in the Company text box up to 40 characters Include Dept Div Enables you to enter the department or division name of the sender in the Dept Div text box up to 40 characters Include Fax Number Enables you to enter the fax number in the Fax Number text box up to 45 characters up to 38 characters exclud...

Страница 138: ... is attached to the cover sheet and sets how the logo is attached Include Recipient Name Enters the recipient name Include Company Enters the recipient s company name Include Dept Div Enters the recipient s department or division name Include Fax Number Enters the recipient s fax number For details on the characters and symbols you can use for fax numbers see Characters and Symbols for Fax Numbers...

Страница 139: ...ver sheet File Name Selects the data file of the logo to be attached to the cover sheet You can select a bitmap data only Browse Allows you to search for the logo file in your computer Manual Scaling Enables you to specify the size of the logo in Scaling from 50 to 200 Position Specifies the vertical and horizontal position where the logo is printed You can enter the values in the X and Y edit box...

Страница 140: ...gnature to the cover sheet File Name Selects the data file of the signature to be attached to the cover sheet You can select a bitmap data only Browse Allows you to search for the signature file in your computer Manual Scaling Enables you to specify the size of the signature in Scaling from 50 to 200 Position Specifies the vertical and horizontal position where the signature is printed You can ent...

Страница 141: ...Document PC Faxing Troubleshooting Appendix Include Number of Sheets to Send Enables you to specify the number of sheets in the Number of Sheets to Send text box up to maximum of 9999 NOTE Number of sheet to send is not counted automatically The number you entered will be printed on the cover page ...

Страница 142: ...e using and the method you use to access the dialog box The method you use to access the dialog boxes determines how long the faxing options remain in effect If you access the dialog box from an application s Print dialog box your selected faxing options apply to the fax jobs that sent from the application They will not be stored when you close the application If you access the dialog box from the...

Страница 143: ...eries FAX Properties dialog box by right clicking the corresponding printer driver icon and selecting Properties from the pop up menu The Canon MF3200 Series FAX Properties dialog box appears Opening the Canon MF3200 Series FAX Printing Preferences Dialog Box Windows 2000 XP Only 1 Open the Printers and Faxes Windows 2000 Printers folder Click start on the Windows task bar select Printers and Faxe...

Страница 144: ...Properties from the pop up menu You can also open the properties dialog box by clicking the corresponding fax driver icon Set printer properties on the toolbar Opening the fax printing preferences dialog box 1 Open the Printers folder Windows Vista Click Start on the Windows task bar select Control Panel click Printer under Hardware and Sound Windows 7 Click Start on the Windows task bar Devices a...

Страница 145: ...bleshooting Appendix Windows 98 Me Fax Properties General Tab Lets you print a test page or define separator pages Refer to your Windows operating system documentation for more information Details Tab Specifies the printer port and timeout settings Refer to your Windows operating system documentation for more information ...

Страница 146: ...ubleshooting Appendix Spool Settings The installer sets the following defaults Sharing Tab Specifies the printer sharing settings This tab sheet is available only when the printer sharing is enabled See Using the Machine on Your Network on p 2 54 Refer to your Windows operating system documentation for more information ...

Страница 147: ... Edit Edits the selected entry in the Address Book list If you select a person the Edit Person dialog box appears See Edit Person on p 4 22 If you select a group the Edit Group dialog box appears See Edit Group on p 4 23 Delete Deletes the selected entry from the Address Book Details Displays the information about the selected destination in the Address Book Specify a Folder Opens the Browse for F...

Страница 148: ...to the recipient s name or selects the suffix from the drop down list Jr MD or Sr Recipient Name Enters the recipient name Company Enters the recipient s company name Dept Div Enters the recipient s department or division name Fax Number Enters the recipient s fax number You can enter two numbers and descriptions Notes Enters the additional information about the recipient NOTE When you press OK wi...

Страница 149: ...owing information Group Name Enters the group name Show Selects the category of the list displayed in Available Recipients from the drop down list Person Group or All Available Recipients Displays the list of recipients already registered in the Address Books Add Adds a person group to the group Delete Deletes a person group from the group Current Group Members Displays the members currently regis...

Страница 150: ...the recipient s name or selects the suffix from the drop down list Jr MD or Sr Recipient Name Enters the recipient name Company Enters the recipient s company name Dept Div Enters the recipient s department or division name Fax Number Enters the recipient s fax number You can enter two numbers and descriptions Notes Enters the additional information about the recipient NOTE When you press OK witho...

Страница 151: ...ng information Group Name Enters the group name Show Selects the category of the list displayed in Available Recipients from the drop down list Person Group or All Available Recipients Displays the list of recipients already registered in the Address Books Add Adds a person group to the group Delete Deletes a person group from the group Current Group Members Displays the members currently register...

Страница 152: ...ng the Canon Cover Sheet Editor For details see Canon Cover Sheet Editor on p 4 42 Preview image Displays the image with the currently selected settings reflected Style Displays the list of the registered cover sheets Preview Displays the preview image of the selected cover sheet Register Registers the cover sheet template Delete Deletes the registered cover sheet template Select a cover sheet tem...

Страница 153: ... region of purchase Preview image Displays the image with the currently selected settings reflected Page Size Selects the original page size to work with in an application Letter Legal A4 or A5 Orientation Selects the direction of printing relative to the paper Portrait or Landscape Specify Outside Dialing Prefix Enables you to enter the prefix number in Outside Dialing Prefix up to 5 digits Addre...

Страница 154: ...ax Register Address Book This dialog box enables you to register the Address Books to be used when you send a fax Address Book List Displays the list of the registered Address Books Register Opens the Register Address Book dialog box See Register Address Book on p 4 26 Edit Opens the Add Edit Canon Fax Driver Address Book dialog box See Add Edit Canon Fax Driver Address Book on p 4 27 Delete Delet...

Страница 155: ...g Troubleshooting Appendix Add Edit Canon Fax Driver Address Book This dialog box enables you to edit the properties of the Address Books to be used when you send a fax Configuration Tab Name Changes the name of the Address Book You can enter up to 64 characters About Displays the version information on the driver ...

Страница 156: ...x settings for all Windows applications The FAX Printing Preferences Dialog Box This dialog box enables you to edit the address book register the cover sheets and set up the page settings FAX Properties The Canon MF3200 Series FAX Properties dialog box contains several tab sheets that enable you to set up the fax configuration and configure the fax settings NOTE The number of tabs displayed in the...

Страница 157: ...pendix General Tab Lets you print a test page and define faxing preferences Refer to your Windows operating system documentation for more information Sharing Tab Specifies the printer sharing settings This tab sheet is available only when the sharing is enabled Refer to your Windows operating system documentation for more information ...

Страница 158: ... the printer is attached Refer to your Windows operating system documentation for more information Advanced Tab Specifies the settings for print spooling Refer to your Windows operating system documentation for more information NOTE Spool print documents so program finishes printing faster and Start printing immediately are set automatically when you install the printer driver ...

Страница 159: ...a Document PC Faxing Troubleshooting Appendix Color Management Tab Associates color profiles with your color printer Refer to your Windows operating system documentation for more information Security Tab Specifies security settings Refer to your operating system documentation for more information ...

Страница 160: ...s three tab sheets that enable you to edit the address book register the cover sheets and set up the page settings NOTE If you access the equivalent dialog box from an application s Print dialog box your selected faxing options apply only to the current fax job For more information about the following features see the online help See Online Help on p 1 2 The screen shots shown are from Windows XP ...

Страница 161: ...tries can be sorted by their information Recipient Name Company Dept Div Fax Number and Description Add Person Opens the Add Person dialog box See Add Person on p 4 34 Add Group Opens the Add Group dialog box See Add Group on p 4 35 Edit Edits the selected entry in the Address Book list If you select a person the Edit Person dialog box appears See Edit Person on p 4 36 If you select a group the Ed...

Страница 162: ... Enables you to make changes to the Address book folder Import Enables you to import address book data from files Importable file types are some CSV files with file extension csv and some Canon Data Files with file extension abk Export Exports the address book data to an outside file You can select the exported file type from a CSV file with file extension csv or a Canon Data File with file extens...

Страница 163: ...he recipient s name or selects the suffix from the drop down list Jr MD or Sr Recipient Name Enters the recipient name Company Enters the recipient s company name Dept Div Enters the recipient s department or division name Fax Number Enters the recipient s fax number You can enter two numbers and descriptions Notes Enters the additional information about the recipient NOTE When you press OK withou...

Страница 164: ... in the Address Book Group Name Enters the group name Show Selects the category of the list displayed in Available Recipients from the drop down list Person Group or All Available Recipients Displays the list of recipients already registered in the Address Books Add Adds a person group to the group Delete Deletes a person group from the group Current Group Members Displays the members currently re...

Страница 165: ...recipient s name or selects the suffix from the drop down list Jr MD or Sr Recipient Name Enters the recipient name Company Enters the recipient s company name Dept Div Enters the recipient s department or division name Fax Number Enters the recipient s fax number You can enter two numbers and descriptions Notes Enters the additional information about the recipient NOTE When you press OK without e...

Страница 166: ...he Canon Cover Sheet Editor For details see Canon Cover Sheet Editor on p 4 42 Group Name Enters the group name Show Selects the category of the list displayed in Available Recipients from the drop down list Person Group or All Available Recipients Displays the list of recipients already registered in the Address Books Add Adds a person group to the group Delete Deletes a person group from the gro...

Страница 167: ...e country region of purchase Preview image Displays the image with the currently selected settings reflected Style Selects the style of the cover sheet A bitmap image of the selected cover sheet style is displayed in the preview area to the left of the options Preview Displays the preview image of the selected cover sheet Register Registers the cover sheet template Delete Deletes the registered co...

Страница 168: ... or A5 Orientation Selects the direction of printing relative to the paper Portrait or Landscape Specify Outside Dialing Prefix Enables you to enter the prefix number in Outside Dialing Prefix up to 5 digits Address Books Opens the Address Books dialog box See Address Books on p 4 40 Restore Defaults Resets all the current settings to their default values Address Book List Displays the list of the...

Страница 169: ...alog box enables you to register the Address Books to be used when you send a fax Add Edit Canon Fax Driver Address Book This dialog box enables you to edit the properties of the Address Books to be used when you send a fax Available Address Books Displays the list of the available Address Books Name Changes the name of the Address Book You can enter up to 64 characters ...

Страница 170: ...y fields instead of manually entering data for sender or recipient information the actual sender or recipient information that you select in the fax driver is automatically entered in the cover sheet when the fax is sent With the Canon Cover Sheet Editor you can do the following Insert text using different fonts font styles and font sizes into a cover sheet Insert a variety of objects such as draw...

Страница 171: ... 7 click Computer 3 Open the CD ROM icon double click the following folders FAX us_eng CSE 4 Double click the setup setup exe icon to start the installation process NOTE For Windows Vista 7 click Allow or Yes to proceed if the User Account Control dialog box appears 5 Click Next follow the instructions on the screen to continue the installation The License Agreement dialog box is displayed 6 Read ...

Страница 172: ...roubleshooting Appendix 7 In the dialog box for selecting a setup type select Complete or Custom click Next NOTE If you select Custom in the dialog box for selecting Setup Type you can specify the directory into which Canon Cover Sheet Editor is to be installed 8 Click Install to start copying the files 9 Click Finish ...

Страница 173: ...ry to uninstall the Canon Cover Sheet Editor follow the procedure below 1 Open the Add or Remove Programs dialog box Click start on the Windows task bar select Control Panel Click Add or Remove Programs Windows 98 Me 2000 Start Settings Control Panel double click Add Remove Programs Windows Vista 7 Start Control Panel Uninstalling a program 2 Select Canon Cover Sheet Editor click Change or Remove ...

Страница 174: ...he New dialog box appears 2 Select a paper size for the new cover sheet click OK The New Cover Sheet screen appears Opening a Saved Cover Sheet You can open a saved cover sheet by specifying its file name To open a saved cover sheet follow the procedure below 1 Click Open on the toolbar Alternatively select Open from the File menu The Open dialog box appears 2 Specify the file name of the cover sh...

Страница 175: ... in File name specify the location where you want to save the file click Save The file extension is automatically set to cse Saving an Existing File Follow the procedure below to save an existing cover sheet after editing it 1 Click Save on the toolbar Alternatively select Save from the File menu NOTE To preserve the opened file as it was before editing select Save as from the File menu and specif...

Страница 176: ...ncel if you do not want to close the cover sheet Creating an Original Cover Sheet This section explains how to insert text adjust text properties specify fields create objects adjust objects and specify grid options in order to create an original cover sheet Inserting Text You can insert text and numbers into the cover page The properties of any text or the text box itself can also be changed To e...

Страница 177: ...the Font drop down list on the toolbar Font Size 1 Click inside the text box The text box is now ready for editing 2 Select the desired font size from the Font Size drop down list on the toolbar You can also specify the font size by directly entering it into Font Size and pressing Enter on the keyboard Font Color 1 Click inside the text box The text box is now ready for editing 2 Select the desire...

Страница 178: ...gn Left Align Center or Align Right on the toolbar Specifying Text Properties You can specify all of the properties for text inside a text box simultaneously Preview inside the Text Properties dialog box displays a preview of how the text would appear with the currently selected settings Use it as a guide if you are specifying settings 1 Click inside the text box The text box is now ready for edit...

Страница 179: ...Troubleshooting Appendix 3 Select Font Font Style and Size from the respective list boxes Alternatively enter the desired font size directly into Size 4 Select Strikethrough or Underline to draw a line through or to underline text 5 Select the desired text color from Color 6 Specify Alignment for the text 7 Click OK ...

Страница 180: ...rties from the Edit menu You can also display the Text Box Properties dialog box by double clicking anywhere on the border of the text box The Text Box Properties dialog box appears 3 Select the desired border type from Line Style 4 Specify the Width setting to set the thickness of the border 0 1 to 50 0 NOTE The Width setting is available only if Line Style is set to Solid You can change the unit...

Страница 181: ... called a repeating field This feature is convenient for using the same cover sheet to send faxes to multiple recipients The repeating field is used to insert data for every recipient specified in the fax driver In addition to the Sender Information and Recipient Information fields you can also insert Sheets to Send Remark and Comment fields on the cover sheet When the fax is sent the number of sh...

Страница 182: ...d simultaneously The fields are inserted in this order Name Fax Number Company and Dept Div You can change the position of the fields as needed Inserting Sender and Recipient Information Fields When Not Editing Text 1 Click the Insert menu Sender Information or Recipient Information select the field such as Name Fax Number Company and Dept Div to insert 2 Drag the pointer on the area of the cover ...

Страница 183: ...he field to repeat 5 Click the Insert menu Recipient Information End Repeat The End Repeat field is inserted The field between the Begin Repeat and End Repeat fields is replaced with multiple recipients information when sending a fax NOTE The text box may not be able to accommodate all of the actual data for a repeating field if a large number of recipients are specified for sending a fax In this ...

Страница 184: ... The Width setting is available only if Line Style is set to Solid You can change the unit of measure for the width in the Unit Setting dialog box displayed by selecting Unit from the View menu 5 Select the desired color of the borders from Color 6 Click OK Inserting Sheets to Send Field When Editing Text 1 Inside the text box place the cursor where you want to insert the field 2 From the Insert m...

Страница 185: ...heet to insert the field A square or rectangular text box containing the selected field appears Creating Objects You can draw lines rectangles rounded rectangles or ovals on the cover sheet You can also change their properties once they are drawn Lines 1 Click Line on the toolbar You can also select Line from the Drawing menu 2 Drag the pointer on the area of the cover sheet to draw the line To dr...

Страница 186: ...do so click anywhere outside the newly created rounded rectangle click the rounded rectangle again click and drag the inner handle in its upper right corner to change the degree of the curve Ovals 1 Click Oval on the toolbar You can also select Oval from the Drawing menu 2 Drag the pointer on the area of the cover sheet to draw the oval To draw a circle hold down SHIFT on the keyboard while draggi...

Страница 187: ...bjects that you want to deselect Moving an Object within the Same Cover Sheet 1 Select the object to move You can select multiple objects and move them at the same time 2 Drag the selected object to the desired location Alternatively use any of the four arrow keys or to move the object in the desired direction in 0 0039 0 1 mm increments NOTE Hold down SHIFT on the keyboard while dragging to move ...

Страница 188: ...lick Paste on the toolbar Alternatively select Paste from the Edit menu The selected object is moved to the active cover sheet Resizing an Object 1 Select the object whose size you want to change NOTE You can select multiple objects and change all of their sizes at the same time 2 Drag any handle on the selected object to change its size NOTE The shape of the pointer changes depending on which han...

Страница 189: ...eyboard moves the object to the new location instead of copying it Copying an Object by Using Button or Menu Commands You can use button and menu commands to copy an object such as a line rectangle rounded rectangle oval image or text box on the same cover sheet or to another cover sheet 1 Select the object to copy NOTE You can select multiple objects and copy them at the same time 2 Click Copy on...

Страница 190: ...e command If you want to copy text within the same text box hold down CTRL on the keyboard while dragging the selected text Duplicating an Object Duplicating enables you to copy and paste an object in one operation 1 Select the object to duplicate NOTE You can select multiple objects and duplicate them at the same time 2 Click Duplicate on the toolbar Alternatively select Duplicate from the Edit m...

Страница 191: ...the toolbar Alternatively select Group from the Layout menu You can ungroup objects by selecting the group of objects that you want to ungroup and clicking Ungroup on the toolbar or selecting Ungroup from the Layout menu Specifying Object Properties Follow the procedure below to change the line style line color and background color of objects such as lines rectangles rounded rectangles ovals and i...

Страница 192: ... the selected object is either a line or an image 7 Click OK Arranging Objects You can rearrange the order and appearance of objects such as lines rectangles rounded rectangles ovals images and text boxes on the cover sheet Changing the Order of Display If multiple objects overlap you can specify the order in which they overlap Use the following four commands to change the order of display of over...

Страница 193: ...yout menu Aligning Multiple Objects You can align multiple selected objects according to their left edge right edge top edge bottom edge or center in one operation The position of the last selected object becomes the point of reference of alignment Use the following commands to change the alignment of the selected objects Align Left Aligns the left edge of all objects along the left edge of the la...

Страница 194: ...cts are overlapped the object positioned in the front is used as the point of reference 2 Click Align Left Align Center Align Right Align Top Align Middle or Align Bottom on the toolbar Alternatively click the Layout menu point to Distribute Horizontally or Distribute Vertically select the type of alignment you want Specifying Grid Options The grid function is useful for arranging created objects ...

Страница 195: ...cking the activated Snap to Grid or by clicking Snap to Grid from the View menu NOTE Snap to Grid is available only after this setting is specified It does not affect objects that are modified before this setting is specified Specifying Grid Properties Follow the procedure below to specify the properties for the grid on the cover sheet such as type color and spacing You can also specify whether to...

Страница 196: ...o the color you want Define Custom Colors adjusting the color clicking Add to Custom Colors 6 Click OK in the Color Setting dialog box 7 Specify the Horizontal and Vertical spacing for the grid NOTE You can change the unit of measure for the spacing in the Unit Setting dialog box displayed by selecting Unit from the View menu 8 To align objects along the grid select Snap to Grid To deactivate Snap...

Страница 197: ...on for the Print range setting because the cover sheet consists of only one page 4 Click OK Registering an Original Cover Sheet as a Template You can register the cover sheet created with the Canon Cover Sheet Editor with the fax driver for use as a template 1 Open the Printers and Faxes Windows 98 Me 2000 Vista Printers Windows 7 Devices and Printers folder Click start on the Windows task bar sel...

Страница 198: ...oting Appendix 3 Click the Register Cover Sheet tab 4 Click Register The Register Cover Sheet dialog box appears 5 Select the cover sheet template file click Open The selected template is added to Style in the Register Cover Sheet sheet NOTE In addition to the default templates you can add up to 30 templates to the fax driver ...

Страница 199: ...Next 5 1 Table of Contents Index Introduction Printing Scanning a Document PC Faxing Troubleshooting Appendix 5 Troubleshooting Printer Problems 5 2 Driver Problems 5 5 Scanning Problems 5 7 Installing and Uninstalling Problems 5 13 ...

Страница 200: ...ectly See Install Toner Cartridge in the Starter Guide Q Does your BIOS port setting need to be modified A See your computer s documentation concerning available ports Q Is your computer working properly A Make sure your computer is turned on If so see your computer s documentation for troubleshooting No power is supplied Q Is the power cord plugged in A Make sure the power cord is securely plugge...

Страница 201: ... Is there a communication problem between the printer and your computer A Make sure your cable connections are secure A Make sure your USB cable is less than 9 8 ft 3 m long A Make sure you are not using a USB hub A Make sure you have selected the correct printer driver in Windows Q Is a wrong printer driver selected in the Printers and Faxes Windows 98 Me 2000 Vista Printers Windows 7 Devices and...

Страница 202: ...r s documentation for details A Verify that your physical memory is working correctly A If you have a Toshiba laptop change the following line in your CONFIG SYS file c winutils mxtime exe to REM c winutils mxtime exe Computer indicates a device time out Q Is the machine off offline or not connected to the computer A Make sure the machine s interface cable is securely connected to both the machine...

Страница 203: ...erent from the MF3200 Series printer driver Cannot install the MF3200 Series printer driver using the USB port Q Is the USB driver installed properly A Perform the following steps 1 Make sure the machine is connected to your computer using a USB cable and the machine is turned on Windows Vista 7 2 Click Start on the Windows task bar select Control Panel System and Maintenance Under Device Manager ...

Страница 204: ...r is displayed under Other device delete ONLY one of the following depending on your operating system USB Printing Support Canon MF3200 Series or Unknown Select USB Printing Support select Uninstall from the Action menu Windows 98 Me select Canon MF3200 Series click Remove 5 Close the Control Panel folder unplug the USB cable 6 Restart your computer 7 For instructions on installing the printer dri...

Страница 205: ...ing see Chapter 5 Troubleshooting in the Advanced Guide Q Is the document placed correctly A Remove the document and place it on the platen glass correctly See Chapter 2 Document Handling in the Basic Guide Q Is your computer working properly A Restart your computer Q Is a USB hub or repeater working properly A When using a USB hub or repeater try connecting a USB cable directly to the computer to...

Страница 206: ...After installing the software did you install a TWAIN compatible application A The TWAIN system file is replaced with something inappropriate and you will be unable to scan images If this happens remove the software see Uninstalling and Reinstalling the Software on p 1 5 then reinstall it see Installing Software in the Starter Guide Q Is the machine recognized in Scanners and Cameras of the Contro...

Страница 207: ...ar after Scanning check box in Preferences selected A If you scan with the Automatically Quit ScanGear after Scanning setting selected only the documents placed at one time on the platen glass will be scanned Click a button on the MF Toolbox and in the settings dialog box select Display the Scanner Driver to open the ScanGear MF In the Preferences dialog box of Advanced Mode clear the Automaticall...

Страница 208: ...A Change the allocated memory From the Edit menu select Preferences click Memory Image Cache Change the Physical Memory Usage or Memory Usage in a range of approximately 10 to 20 Q Is the driver installed properly A Remove the software see Uninstalling and Reinstalling the Software on p 1 5 then reinstall it see Installing Software in the Starter Guide You installed the applications in the CD ROM ...

Страница 209: ...your computer after changing the settings A If you open Scanners and Cameras in the Control Panel folder and change the settings in the Events tab the settings will not be activated unless you restart your computer Once you have changed your settings restart your computer Scanned images look dirty Q Is the platen glass or the platen glass cover clean A Clean the platen glass or the platen glass co...

Страница 210: ... to Color Matching A In Advanced Mode in ScanGear MF set Color Correction to Color Matching See Color Settings Tab on p 3 36 Scanned image is displayed at a larger smaller size on the computer screen Q Is the resolution setting correct A Do one of the following Enlarge or reduce the image display in the application If you open the image in Paint or Imaging it may display at a large size and you wi...

Страница 211: ...ing the software Removal of the software was completed but Canon remains Q Did you remove the MF drivers before removing the MF Toolbox A You have to remove the MF Toolbox first then the MF driver Perform the following steps to remove the folder Right click the start menu to open the Windows Explorer select Start Menu in All Users Programs delete the Canon folder Windows 7 Click Start on the Windo...

Страница 212: ...u click installation thereafter will continue trouble free Cannot use the software after upgrading to Windows XP Q Have you upgraded Windows 98 Me 2000 to Windows XP without removing the software A Remove the software see Uninstalling and Reinstalling the Software on p 1 5 then reinstall it see Installing Software in the Starter Guide In Device Manager green mark is displayed Windows Me Q Is green...

Страница 213: ...evious Next 6 1 Table of Contents Index Introduction Printing Scanning a Document PC Faxing Troubleshooting Appendix 6 Appendix Specifications 6 2 Printer Specifications 6 2 Scanner Specifications 6 2 Glossary 6 3 Index 6 10 ...

Страница 214: ...10 Envelope C5 Envelope DL Envelope Monarch Valid Printing Area Max 1 4 5 mm margin at each edge For Envelope Monarch Envelope COM10 Envelope DL and Envelope C5 Max 1 4 5 mm margin at each edge NOTE Specifications are subject to change without notice Type Color scanner Max Scanning Size 8 1 2 x 11 3 4 215 9 mm x 297 0 mm Scanning Resolution 600 dpi x 1200 dpi optical 9600 dpi x 9600 dpi interpolat...

Страница 215: ...mphasized or double strike printing Brightness The relative proportion of light and dark areas Decreasing brightness darkens the overall image increasing brightness lightens it C Client A computer that is connected to the printer over a network A client does not control the printer directly It interacts with the printer through a server See also Server Collate To print multiple copies of a multi p...

Страница 216: ...ages are reproduced as rows and columns of dots When an item is scanned with a scanner the resolution or dot density of the scanned image is measured as the number of dots per inch dpi dpi Dots per inch A unit of measurement for indicating a machine s resolution Driver A program that controls how the computer and an external device interact For example the printer driver supplies Windows with info...

Страница 217: ...ugh which they communicate with each other The machine features a USB interface which makes it compatible with IBM and similar personal computers Italic A font style distinguished by slanted characters the upright strokes of the characters are at an angle to the vertical axis J Jam A situation created when paper becomes caught along the paper path You must remove jammed paper before you can contin...

Страница 218: ...e paper path You must remove jammed paper before you can continue printing Paper path The route that paper travels through the machine Paper source Source of paper feed The machine has a paper cassette and a multi purpose feeder Paper type All kinds of paper plain paper heavy paper transparencies and envelopes are grouped under several paper types PDF Stands for Portable Document Format A widely u...

Страница 219: ... information about a particular device such as a printer Q Queue A list of files that are either waiting to be printed or are currently printing Once a file has been printed it is removed from the print queue R Random Access Memory RAM The working memory of the computer in which programs and data are temporarily stored while you use them Resetting or shutting off the computer clears all informatio...

Страница 220: ...d in the order they are received T Title bar The horizontal bar that contains the title of a window or dialog box On many windows the title bar contains the Control menu box and Maximize and Minimize buttons Toner A black resin coated powder contained in the toner cartridge The machine applies the toner to the surface of the photosensitive drum inside the machine via an electrophotographic mechani...

Страница 221: ...efers to the thickness of paper WIA Windows Image Acquisition Standard for downloading images from scanners or digital cameras The machine includes a TWAIN compliant driver and a WIA compliant driver The WIA driver can only be used with Windows XP With either driver you can scan documents with the machine in applications which support the TWAIN interface Photoshop etc Windows Explorer The Windows ...

Страница 222: ...s dialog box 3 47 Advanced Settings Windows 2000 XP 2 43 Windows 98 Me 2 17 Advanced tab Windows 2000 XP 2 29 4 30 Application 3 15 Attribution tab Windows 2000 XP 2 32 Auto Tone 3 27 B Brightness 3 29 C Color Management tab Windows 2000 XP 2 29 4 31 Windows 98 Me 2 8 Color Matching 3 37 Color Settings 3 29 Color Settings tab 3 36 Configuration tab Windows 2000 XP 4 32 Windows 98 Me 4 27 Contrast ...

Страница 223: ...rayscale Adjustment tab Windows 2000 XP 2 46 Windows 98 Me 2 20 Grayscale image 6 5 Grayscale Settings Windows 2000 XP 2 46 Windows 98 Me 2 19 Gutter Settings Windows 2000 XP 2 43 Windows 98 Me 2 17 H Histogram 3 30 I Image Settings 3 27 Import 6 5 Input Settings 3 24 Installing and Uninstalling Problems 5 13 Interface 6 5 Item Settings dialog box 4 8 L Landscape 6 5 Logo tab 4 10 M Matching tab W...

Страница 224: ...2000 XP 2 30 Profiles Windows 2000 XP 2 48 Windows 98 Me 2 22 Q Quality tab Windows 2000 XP 2 33 2 43 Windows 98 Me 2 17 R Random Access Memory 6 7 Recipient tab 4 9 Reduce Dust and Scratches 3 27 Register Address Book dialog box Windows 2000 XP 4 41 Windows 98 Me 4 26 Register Cover Sheet tab Windows 2000 XP 4 38 Windows 98 Me 4 24 Reinstall 1 6 Reinstalling 1 5 Removing Uninstalling 1 5 Resoluti...

Страница 225: ...tching 3 17 toolbar 3 19 using 3 17 Special tab Windows 2000 XP 4 39 Windows 98 Me 4 25 Spool Settings Windows 98 Me 2 8 4 18 System Requirements 1 3 T Threshold 3 33 Tone Curve 3 32 Tone Curve Threshold drop down list 3 34 Troubleshooting 5 1 TWAIN driver 3 15 U Uninstalling 1 5 Uninstalling Reinstalling 1 5 Unsharp Mask 3 27 V Version conflict 5 14 View Settings Windows 2000 XP 2 53 Windows 98 M...

Страница 226: ...E FRANCE S A S 12 rue de l Industrie 92414 Courbevoie Cedex France CANON U K LTD Woodhatch Reigate Surrey RH2 8BF United Kingdom CANON DEUTSCHLAND GmbH Europark Fichtenhain A10 47807 Krefeld Germany CANON ITALIA S p A Via Milano 8 20097 San Donato Milanese MI Italy CANON ESPAÑA S A c Joaquín Costa 41 28002 Madrid Spain CANON LATIN AMERICA INC 703 Waterford Way Suite 400 Miami Florida 33126 U S A C...

Отзывы: