background image

Loading Paper

0W20-00R

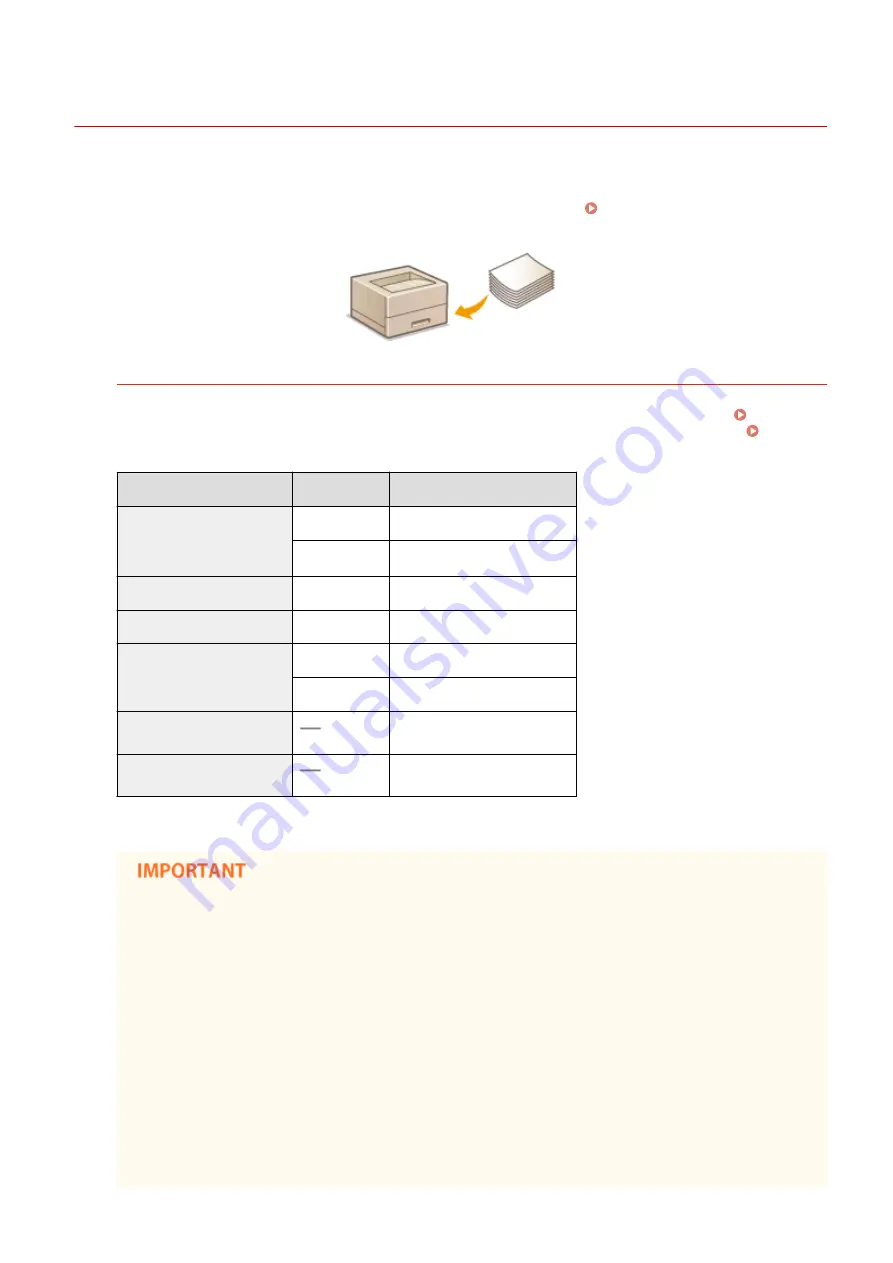
You can load the paper into the paper drawer or multi-purpose tray. Load the paper you usually use into the paper

drawer. The paper drawer is convenient when using large amounts of paper. Use the multi-purpose tray when you

temporarily use size or type of paper that is not loaded in the paper drawer. See  Paper(P. 440)  for available paper

sizes.

Paper Type and Setting for the Machine

See the table below to specify the paper settings according to the type and weight of the paper to load into the

paper source. For more information about how to specify the paper settings on the machine, see  Specifying

Paper Size and Type(P. 50) . For the amount of paper that can be loaded in each paper source, see 

Paper(P. 440) .

Paper Type

Paper Weight Paper Setting on the Machine

Plain paper

60 to 89 g/m²

<Plain>

60 to 69 g/m²

<Plain L> 

*1

Recycled paper

60 to 89 g/m²

<Recycled>

Color paper

60 to 89 g/m²

<Color>

Heavy paper

90 to 150 g/m² <Heavy 1>

151 to 163 g/m² <Heavy 2>

Envelope

<Envelope>

Label

<Labels>

*1 

Specify <Plain L> as the paper type if printouts come out curled with <Plain> specified.

Do not use the following types of paper:

Wrinkled or creased paper

Curled or rolled paper

Torn paper

Damp paper

Very thin paper

Paper printed by a thermal transfer printer

Highly textured paper

Glossy paper

Paper handling and storage

Store the paper on a flat surface.

Basic Operations

35

Содержание imageclass LBP251dw

Страница 1: ...LBP252dw LBP251dw User s Guide USRMA 0786 00 2016 06 en Copyright CANON INC 2015 ...

Страница 2: ...per in the Multi Purpose Tray 41 Loading Envelopes 44 Loading Preprinted Paper 46 Specifying Paper Size and Type 50 Specifying Paper Size and Type in the Paper Drawer 51 Specifying Paper Size and Type in the Multi Purpose Tray 53 Registering Default Paper Settings for the Multi Purpose Tray 55 Registering a Custom Paper Size 57 Limiting the Paper Sizes Displayed 60 Saving Energy 61 Entering Sleep ...

Страница 3: ...Used Conveniently with a Mobile Device 123 Connecting to a Mobile Device 124 Make Direct Connection Access Point Mode 125 Making the Best Use of the Machine by Utilizing Applications 127 Managing the Machine Remotely 129 Network 131 Connecting to a Network 132 Selecting Wired LAN or Wireless LAN 134 Connecting to a Wired LAN 135 Connecting to a Wireless LAN 136 Setting Up Connection Using WPS Push...

Страница 4: ...r Firewall Rules 219 Specifying MAC Addresses for Firewall Rules 223 Changing Port Numbers 226 Setting a Proxy 228 Restricting the Machine s Functions 230 Restricting USB Functions 231 Disabling HTTP Communication 232 Disabling Remote UI 233 Implementing Robust Security Features 234 Enabling SSL Encrypted Communication for the Remote UI 235 Configuring IPSec Settings 239 Configuring IEEE 802 1X Au...

Страница 5: ...rint Properly 376 Printing Results Are Not Satisfactory 378 Paper Creases or Curls 385 Paper Is Fed Incorrectly 387 When a Problem Cannot Be Solved 388 Maintenance 390 Cleaning the Machine 392 Exterior 393 Fixing Unit 394 Replacing Toner Cartridges 396 Using Up Toner 398 How to Replace Toner Cartridges 400 Relocating the Machine 402 Maintaining and Improving Print Quality 404 Adjusting Print Densi...

Страница 6: ...proving Efficiency 431 So Much More 433 Specifications 436 Machine Specifications 437 Wireless LAN Specifications 439 Paper 440 Consumables 443 Optional Items 444 Using AirPrint 445 Printing with AirPrint 449 If AirPrint Cannot Be Used 451 Using Google Cloud Print 452 Manuals Included with the Machine 456 Using e Manual 457 Installing e Manual 458 Uninstalling e Manual 462 Screen Layout of e Manua...

Страница 7: ...Important Safety Instructions Important Safety Instructions 2 Installation 3 Power Supply 5 Handling 6 Maintenance and Inspections 9 Consumables 10 Important Safety Instructions 1 ...

Страница 8: ...re using this machine read this chapter and follow the instructions to properly use this machine Do not perform any operations not described in this manual Canon will not be responsible for any damages resulting from use not described in this manual improper use or repair changes not performed by Canon or a third party authorized by Canon Important Safety Instructions 2 ...

Страница 9: ...n installing and removing the optional accessories be sure to turn OFF the power unplug the power plug and then disconnect all the interface cables and power cord from the machine Otherwise the power cord or interface cables may be damaged resulting in a fire or electrical shock Do not use near any medical equipment Radiowaves emitted from this machine may interfere with medical equipment which ma...

Страница 10: ...ople would be exposed to emissions from the machine Do not install in a location where condensation occurs Water droplets condensation may form inside the machine when the room where the machine is installed is heated rapidly and when the machine is moved from a cool or dry location to a hot or humid location Using the machine under these conditions may result in paper jams poor print quality or d...

Страница 11: ...wer strips with the machine Doing so may result in a fire or electrical shock Do not wrap the power cord or tie it in a knot as this may result in a fire or electrical shock Insert the power plug completely into the AC power outlet Failure to do so may result in a fire or electrical shock Remove the power plug completely from the AC power outlet during a thunder storm Failure to do so may result i...

Страница 12: ...cord or interface cables resulting in a fire or electrical shock When plugging or unplugging a USB cable when the power plug is plugged into an AC power outlet do not touch the metal part of the connector as this may result in an electrical shock If you are using a cardiac pacemaker This machine generates a low level magnetic flux If you use a cardiac pacemaker and feel abnormalities please move a...

Страница 13: ... radiation exposure If the laser beam should escape and enter your eyes exposure may cause damage to your eyes When transporting the machine To prevent damage to the machine during transport perform the following Remove the toner cartridges Securely pack the machine in the original box with packing materials If the operating noise concerns you Depending on the use environment and operating mode if...

Страница 14: ... To prevent a paper jam do not turn OFF the power open close the covers and load unload the paper when printing Important Safety Instructions 8 ...

Страница 15: ...o not use alcohol benzenes paint thinners or other flammable substances Do not use tissue paper or paper towels If these substances come into contact with electrical parts inside the machine they may generate static electricity or result in a fire or electrical shock Check the power cord and plug periodically for damage Check the machine for rust dents scratches cracks or excessive heat generation...

Страница 16: ...r consult a physician immediately Use caution so that toner does not get into your eyes or mouth If toner should get into your eyes or mouth immediately wash with cold water and consult a physician Use caution so that toner does not come into contact with your skin If it should wash with soap and cold water If there is any irritation on your skin consult a physician immediately Keep the toner cart...

Страница 17: ... in the following locations Locations exposed to open flames Locations exposed to direct sunlight or bright light for five minutes or more Locations exposed to excessive salty air Locations where there are corrosive gases i e aerosol sprays and ammonia Locations subject to high temperature and high humidity Locations subject to dramatic changes in temperature and humidity where condensation may ea...

Страница 18: ... local regulations When disposing of a used toner cartridge Place the toner cartridge into its protective bag to prevent the toner from scattering and then dispose of the toner cartridge according to local regulations Important Safety Instructions 12 ...

Страница 19: ...7 Loading Paper in the Multi Purpose Tray 41 Loading Envelopes 44 Loading Preprinted Paper 46 Specifying Paper Size and Type 50 Specifying Paper Size and Type in the Paper Drawer 51 Specifying Paper Size and Type in the Multi Purpose Tray 53 Registering Default Paper Settings for the Multi Purpose Tray 55 Registering a Custom Paper Size 57 Limiting the Paper Sizes Displayed 60 Saving Energy 61 Ent...

Страница 20: ... the operation panel and how to view the display Parts and Their Functions P 16 Using the Operation Panel This section describes how to use the keys on the operation panel to perform various operations such as adjusting and checking the settings Using the Operation Panel P 30 Logging on to the Machine This section describes how to log on when a logon screen is displayed Logging on to the Machine P...

Страница 21: ...is section describes how to reduce power consumption Saving Energy P 61 Setting Auto Shutdown Time This section describes how to enable the Auto Shutdown Time setting Setting Auto Shutdown Time P 66 Basic Operations 15 ...

Страница 22: ...ng the parts of the machine used for such basic operations as loading paper and replacing the toner cartridges this section also describes the keys on the operation panel and display Read this section for tips on how to use the machine properly Front Side P 17 Back Side P 19 Interior P 21 Multi Purpose Tray P 22 Paper Drawer P 23 Operation Panel P 24 Basic Operations 16 ...

Страница 23: ...i purpose tray Load the paper into the multi purpose tray when you want to temporarily use a type of paper different from that which is loaded in the paper drawer Loading Paper in the Multi Purpose Tray P 41 Paper stopper Open the paper stopper to prevent paper in the output tray from falling Front cover Open the front cover when replacing the toner cartridge or clearing paper jams How to Replace ...

Страница 24: ...the inside of the machine Note that placing objects in front of the ventilation slots prevents ventilation Installation P 3 Power switch Turns the power ON or OFF To restart the machine turn OFF the machine wait for at least 10 seconds and turn it back ON Basic Operations 18 ...

Страница 25: ...switch lever or remove jammed paper Interior P 21 Clearing Jams P 350 Ventilation slots Air from inside the machine is vented out to cool down the inside of the machine Note that placing objects in front of the ventilation slots prevents ventilation Installation P 3 Sub output tray When using a paper type that easily curls such as labels or envelopes you can reduce curl by opening this tray Paper ...

Страница 26: ...omputer connection Connect a USB cable when connecting the machine and a computer LAN port Connect a LAN cable when connecting the machine to a wired LAN router etc Connecting to a Wired LAN P 135 Basic Operations 20 ...

Страница 27: ...aring Jams P 350 Paper size switch lever Before starting 2 sided printing change the position of this lever properly to match the size of the paper to print on A4 size Pull the lever towards you Letter Legal size Push the lever away from you In addition to A4 Letter and Legal sizes some other paper sizes can be used for 2 sided printing Paper P 440 When using those paper sizes set the paper size s...

Страница 28: ...ly the width of the loaded paper to ensure that paper is fed straight into the machine Paper tray Pull out the paper tray when loading paper Tray extension Open the tray extension when loading large paper LINKS Loading Paper in the Multi Purpose Tray P 41 Basic Operations 22 ...

Страница 29: ...into the machine Press the lock release levers that are marked with arrows in the illustrations to release the locks and slide the paper guides Paper level indicator Indicates the remaining amount of paper The mark moves downward as the remaining amount of paper decreases LINKS Loading Paper in the Paper Drawer P 37 Basic Operations 23 ...

Страница 30: ...nu You can specify settings of the machine Setting Menu List P 287 Back key Press to return to the previous screen If you press this key when specifying settings for example the settings are not applied and the display returns to the previous screen Numeric keys 0 9 keys Press to enter numbers and text Entering Text P 32 key Press to switch the type of text that is entered Basic Operations 24 ...

Страница 31: ...ne press this key again to log off Logging on to the Machine P 34 Clear key Press to delete the entered numbers and text Stop key Press to cancel the current operation including printing key Press to enter symbols such as or Processing Data indicator Blinks while printing or other operation is being performed Lights up when there are documents waiting to be processed Wi Fi indicator Lights up when...

Страница 32: ...ntly selected item When changing setting values press to decrease a value OK key Press to apply settings or specified details Secure Print key LBP252dw Press to print secured documents Printing a Document Secured by a PIN Secure Print LBP252dw P 109 Paper Settings key LBP251dw Press to specify paper sizes and types Specifying Paper Size and Type P 50 LINKS Using the Operation Panel P 30 Basic Oper...

Страница 33: ...On this screen you can start specifying general machine settings such as Preferences or Timer Settings as well as many of the settings for printing such as paper settings and density adjustment Setting Menu List P 287 Status Monitor Screen When you press a screen is displayed that enables you to check the status of document that is being printed as well as the status of the machine amount remainin...

Страница 34: ...g a Document Secured by a PIN Secure Print LBP252dw P 109 Version Information Displays firmware version information Serial Number Displays the serial number Print Job Displays the status of the current print job Network Information Displays the network settings such as the IP address of the machine and status such as the condition of wireless LAN communications Viewing Network Settings P 161 When ...

Страница 35: ...LINKS Using the Operation Panel P 30 Basic Operations 29 ...

Страница 36: ...he text and background colors of an item are inverted when it is selected Changing a Setting Value Use to enter values If an icon such as below is displayed at the upper left of the screen you can enter values directly using the numeric keys Entering Text P 32 Values in displayed below the entry box are the enterable value range Using Proceeding to the Next Screen Returning to the Previous Screen ...

Страница 37: ...ing on the scale Moving the Cursor Use to enter text and values Entering Text P 32 Using Press to apply a setting Using the Numeric Keys Use the numeric keys to enter text and values Entering Text P 32 You can change a variety of display related settings such as the scrolling speed or display language Display Settings P 303 Basic Operations 31 ...

Страница 38: ...ing the Type of Text Press to switch the type of text that is entered You can also select Entry Mode and press to switch the type of text Types of Text That Can Be Entered Text that can be entered is listed below Key A a 12 _ 1 ABC abc 2 DEF def 3 GHI ghi 4 Basic Operations 32 ...

Страница 39: ...ress or to move the cursor To enter a space move the cursor to the end of the text and press Example of Entering Text and Numbers Example Canon 1 1 Press repeatedly until A is selected 2 Press repeatedly until the letter C is selected 3 Press repeatedly until a is selected 4 Press repeatedly until the letter a is selected 5 Press repeatedly until the letter n is selected 6 Press repeatedly until t...

Страница 40: ...lect Department ID or System Manager ID and press 2 Enter an ID using the numeric keys and press If no PIN is registered proceed to step 3 2 Enter the PIN 1 Select PIN and press 2 Enter an ID using the numeric keys and press 3 Press The logon screen will be changed to the main screen After you finish using the machine press again to display the logon screen LINKS Setting the Department ID Manageme...

Страница 41: ... settings on the machine see Specifying Paper Size and Type P 50 For the amount of paper that can be loaded in each paper source see Paper P 440 Paper Type Paper Weight Paper Setting on the Machine Plain paper 60 to 89 g m Plain 60 to 69 g m Plain L 1 Recycled paper 60 to 89 g m Recycled Color paper 60 to 89 g m Color Heavy paper 90 to 150 g m Heavy 1 151 to 163 g m Heavy 2 Envelope Envelope Label...

Страница 42: ... high humidity dryness or drastic changes in temperature or humidity When printing on paper that has absorbed moisture Steam may emit from the paper output area or water droplets may form around the paper output area There is nothing unusual about any of these occurrences which occur when the heat generated from fixing toner on the paper causes moisture in the paper to evaporate most likely to occ...

Страница 43: ...r cannot be loaded in landscape orientation Make sure to load the paper in portrait orientation as shown in the illustrations below Follow the procedure below when loading paper into the optional paper feeder 1 Pull out the paper drawer Make sure to hold the paper drawer with both hands and pull it out gently Otherwise you may damage the paper drawer by dropping it if it slides out too easily 2 Sl...

Страница 44: ...ace to align the edges Do not exceed the load limit line when loading paper Make sure that the paper stack does not exceed the load limit line or Loading too much paper can cause paper jams For A5 or larger paper size For paper size smaller than A5 When loading paper with a logo see Loading Preprinted Paper P 46 4 Align the paper guides against the edges of the paper Press the lock release lever a...

Страница 45: ...sides against the edges of the paper Press the lock release lever and slide the paper guides inward until they are aligned securely against the edges of the paper 2 Align the paper guide on the rear side against the edge of the paper Press the lock release lever and slide the paper guide toward the front side and beyond its position for A5 size paper until it is securely aligned against the edge o...

Страница 46: ...perly Printing on the Back Side of Printed Paper Manual 2 Sided Printing You can print on the back side of printed paper Flatten any curls on the printed paper and insert it into the multi purpose tray Loading Paper in the Multi Purpose Tray P 41 with the side to print face up previously printed side face down Load one sheet of paper each time you print You can use only the paper printed with this...

Страница 47: ...r Drawer P 37 Make sure to load paper in portrait orientation Paper cannot be loaded in landscape orientation Make sure to load the paper in portrait orientation as shown in the illustrations below 1 Open the cover Hold the top center of the cover to open it 2 Pull out the paper tray and the tray extension Pull out the tray extension when loading large paper 3 Spread the paper guides apart Slide t...

Страница 48: ...at surface to align the edges Do not exceed the load limit guide when loading paper Make sure that the paper stack does not exceed the load limit guide Loading too much paper can cause paper jams When loading envelopes or paper with a logo see Loading Envelopes P 44 or Loading Preprinted Paper P 46 5 Align the paper guides against the edges of the paper Slide the paper guides inward until they are...

Страница 49: ...ide of Printed Paper Manual 2 Sided Printing You can print on the back side of printed paper Flatten any curls on the printed paper and insert it into the multi purpose tray with the side to print face up previously printed side face down Load one sheet of paper each time you print You can use only the paper printed with this machine You cannot print on the side that has previously been printed on...

Страница 50: ...es in the orientation you want as well as procedures that you need to complete before loading envelopes For a description of the general procedure for loading envelopes in the multi purpose tray see Loading Paper in the Multi Purpose Tray P 41 Before Loading Envelopes Follow the procedure below to prepare the envelopes before loading 1 Close the flap of each envelope 2 Flatten them to release any ...

Страница 51: ...lopes Monarch COM10 DL or ISO C5 in portrait orientation with the short edge toward the machine with the non glued side front side face up You cannot print on the reverse side of envelopes Load the envelopes so that the edge with the flap is toward the left side as shown in the illustration Basic Operations 45 ...

Страница 52: ...ed paper with the proper facing and orientation For a description of the general procedure for loading paper in the paper drawer or multi purpose tray see Loading Paper in the Paper Drawer P 37 or Loading Paper in the Multi Purpose Tray P 41 Making 1 Sided Printouts on Paper with Logos Printing on Paper with Logos in Portrait Orientation When loading the paper in the paper drawer Load the paper wi...

Страница 53: ...n loading the paper in the multi purpose tray Load the paper with the logo side the side to print the document face up Making 2 Sided Printouts on Paper with Logos Printing on Paper with Logos in Portrait Orientation When loading the paper in the paper drawer Load the paper with the front logo side the side to print the first page of the document face up Basic Operations 47 ...

Страница 54: ...ng on Paper with Logos in Landscape Orientation When loading the paper in the paper drawer Load the paper with the front logo side the side to print the first page of the document face up When loading the paper in the multi purpose tray Load the paper with the front logo side the side to print the first page of the document face down Basic Operations 48 ...

Страница 55: ...ever if Switch Paper Feed Method is set to Print Side Priority the facing that you use for loading preprinted paper for 2 sided printing logo side face up for paper drawer or down for multi purpose tray can also be used for 1 sided printing This setting is especially useful if you frequently perform both 1 sided and 2 sided printing Switch Paper Feed Method P 311 Basic Operations 49 ...

Страница 56: ... settings to match the paper that is loaded Make sure to change the paper settings when you load the paper that is different from the previously loaded paper If the setting does not match the size and type of loaded paper a paper jam or printing error may occur Basic Operations 50 ...

Страница 57: ...al paper feeder is installed 3 Select the paper size and press If the loaded paper size is not displayed Select Other Sizes and press About Free Size If you frequently change sizes of paper to load you can specify Free Size which saves you the trouble of changing the paper size setting each time you print You can make a setting so that an error message will be displayed when the paper size set in ...

Страница 58: ...LINKS Loading Paper in the Paper Drawer P 37 Limiting the Paper Sizes Displayed P 60 Paper P 440 Notify to Check Paper Settings P 343 Basic Operations 52 ...

Страница 59: ...y registering the paper size and type as the default setting When the default setting is registered however the screen shown above is not displayed To display the screen select Specify When Loading Paper Registering Default Paper Settings for the Multi Purpose Tray P 55 1 Use to select the paper size and press When loading custom size paper 1 Select Custom and press 2 Specify the length of the X s...

Страница 60: ...etting each time you print You can make a setting so that an error message will be displayed when the paper size set in the printer driver is rather different from the size of the loaded paper Action When Free Paper Size Mismatch P 313 2 Select the paper type and press LINKS Loading Paper in the Multi Purpose Tray P 41 Limiting the Paper Sizes Displayed P 60 Paper P 440 Basic Operations 54 ...

Страница 61: ...same setting is always used If you load a different paper size or type without changing the paper settings the machine may not print properly To avoid this problem select Specify When Loading Paper in step 3 and then load the paper 1 Display the Paper Settings screen LBP252dw Press use to select Paper Settings press LBP251dw Press 2 Select Multi Purpose Tray and press 3 Select the paper size and p...

Страница 62: ...an specify Free Size which saves you the trouble of changing the paper size setting each time you print You can make a setting so that an error message will be displayed when the paper size set in the printer driver is rather different from the size of the loaded paper Action When Free Paper Size Mismatch P 313 4 Select the paper type and press LINKS Loading Paper in the Multi Purpose Tray P 41 Li...

Страница 63: ... Registered and press If paper sizes 1 to 3 have already been registered either change or delete the setting to continue The procedures for changing and deleting these settings are described below Changing a setting 1 Select the registered size you want to change and press 2 Select Edit press and proceed to step 4 Deleting a setting 1 Select the registered size you want to delete and press 2 Selec...

Страница 64: ...a Registered Custom Paper Setting The paper sizes that are registered in the procedure above are displayed on the screen for selecting the paper size When selecting the paper size for the paper drawer On the screen to specify the size of the paper that is loaded in the paper drawers the registered paper sizes are displayed Specifying Paper Size and Type in the Paper Drawer P 51 Of the registered p...

Страница 65: ...ing Paper Size and Type in the Multi Purpose Tray P 53 The registered paper sizes are displayed when you set the default paper settings for the multi purpose tray From the screen you can select one of the displayed sizes as thedefault paper size for the multi purpose tray Registering Default Paper Settings for the Multi Purpose Tray P 55 LINKS Loading Paper in the Paper Drawer P 37 Loading Paper i...

Страница 66: ...the optional paper feeder is installed 4 Clear the check boxes for the paper sizes you do not want to be displayed Select a paper size and press to clear the check box Ensure that only the check boxes for the paper sizes you use frequently are selected To display the paper sizes whose check boxes have been cleared select Other Sizes in the paper size selection screen 5 Select Apply and press LINKS...

Страница 67: ...wer saving state sleep mode or automatically turns OFF if no operation is performed for a certain period of time or that the machine is automatically turned OFF at a fixed time on each day of the week Entering Sleep Mode P 62 Powering OFF at a Fixed Time P 64 Setting Auto Shutdown Time P 66 Basic Operations 61 ...

Страница 68: ...machine is performing an operation such as adjustment or cleaning When a paper jam occurs When the menu screen is displayed When an error message is displayed on the screen There are some exceptions The machine sometimes enters sleep mode when error messages are displayed When the SSID network key screen for Direct Connection is displayed When settings data is being imported exported When You Want...

Страница 69: ...Exiting Sleep Mode Press any key on the operation panel Basic Operations 63 ...

Страница 70: ...id useless power consumption that may occur due to failure to turn OFF the power By default this function is disabled 1 Start the Remote UI and log on in System Manager Mode Starting Remote UI P 270 2 Click Settings Registration 3 Click Timer Settings Edit 4 Select the check box for Set Auto Shutdown Weekly Timer and set the time to turn OFF the power Basic Operations 64 ...

Страница 71: ...f the power is not turned OFF automatically at the specified time When the Processing Data indicator is lit up or blinking When the menu screen or Check Counter screen is displayed When settings data is being imported exported When the firmware is being updated If the power cannot be turned OFF automatically at the specified time a retry will be performed up to ten times at intervals of one minute...

Страница 72: ...wn Time setting is enabled the machine may automatically shut down even if you are operating the machine from the Remote UI A malfunction may occur particularly if the machine shuts down while data is being imported When you import data using the Remote UI set Auto Shutdown Time to 0 Off in advance The default setting is 4 hours If any setting of the Timer Settings is changed from the Remote UI wh...

Страница 73: ...ers 93 Printing Dates and Page Numbers 94 Printing Watermarks 96 Printing Specific Pages onto Different Paper 98 Selecting Document Type 100 Saving Toner 102 Combining and Printing Multiple Documents 104 Configuring Printer Settings on the Machine 108 Printing a Document Secured by a PIN Secure Print LBP252dw 109 Preparing for Using Secure Print 110 Printing via Secure Print 112 Configuring Print ...

Страница 74: ...river you are using the printer driver screens in this manual may differ from your screens You can use the PCL6 printer driver as well as the UFR II printer driver The available print settings vary depending on the printer driver For more information click Help on each printer driver screen About the Printer Driver Help Clicking Help on the printer driver screen displays the Help screen On this sc...

Страница 75: ...Printing 69 ...

Страница 76: ...P 35 Specifying Paper Size and Type P 50 1 Open a document in an application and display the print dialog box How to display the print dialog box differs for each application For more information see the instruction manual for the application you are using 2 Select your printer and click Preferences or Properties The screen that is displayed differs depending on the application you are using 3 Spe...

Страница 77: ...fied in Page Size the document is printed enlarged reduced automatically according to the size specified in Output Size Enlarging or Reducing P 82 Clickable UI You can easily specify the page layout binding position etc intuitively on the preview image For more information click Help on the printer driver screen 4 Click the Paper Source tab and specify the paper source and paper type Printing 71 ...

Страница 78: ... Drawer 1 Paper is fed from the paper drawer of the machine Drawer 2 Paper is fed from the optional paper feeder Paper Type Specify the setting according to the type and basis weight of the paper to print on Loading Paper P 35 5 Specify other print settings as necessary Various Print Settings P 80 You can register the settings you specified in this step as a profile and use the profile whenever yo...

Страница 79: ...ing in other ways Canceling Prints P 75 When printing from the Windows Store app in Windows 8 Server 2012 Display the charms on the right side of the screen and use the procedure shown below Windows 8 Server 2012 Devices the printer you are using tap or click Print Windows 8 1 Server 2012 R2 Devices Print the printer you are using tap or click Print If you print using this method only a limited nu...

Страница 80: ...o take care of it is displayed go to the desktop and follow the instructions in the displayed dialog box This message appears when the machine is set to display the user name during printing and similar instances LINKS Checking the Printing Status and Log P 78 Printing 74 ...

Страница 81: ... displayed Open the printer folder Displaying the Printer Folder P 474 right click your printer icon and click See what s printing or double click the icon of the printer driver for the machine 2 Select the document you want to cancel and click Document Cancel 3 Click Yes Printing of the selected document is canceled Several pages may be output after you cancel printing Canceling from the Remote U...

Страница 82: ...e Operation Panel Cancel printing using or Press to Cancel If the Screen Displays a List of Documents When is Pressed Select the document to cancel Yes Check the Print Job Status before Canceling Print Job Job Status Select the document on the Print Job Status screen Yes Several pages may be output after you cancel printing Printing 76 ...

Страница 83: ...LINKS Basic Printing Operations P 70 Checking the Printing Status and Log P 78 Printing 77 ...

Страница 84: ...ant to see the waiting list of the documents waiting to be printed When you cannot find your printouts that you thought had been printed you may want to see whether an error has occurred 1 Press 2 Use to select Print Job and press 3 Check the print statuses or logs To check the print statuses 1 Select Job Status and press 2 Select the document whose status you want to check and press Print Job Sta...

Страница 85: ...printed successfully and Error is displayed when a document failed to be printed because it was canceled or there was some error Details Displays detailed information about the document selected from the list The displayed document name or user name may not reflect the actual document or user name If the Result column shows a three digit number This number represents an error code See When an Erro...

Страница 86: ... and 2 sided Printing Enlarging or Reducing P 82 Switching 1 Sided and 2 Sided Printing P 84 Collating Printouts by Page P 86 Printing Multiple Pages onto One Sheet P 88 Printing Posters P 90 Printing Booklet P 91 Printing Borders P 93 Printing Dates and Page Numbers P 94 Printing Watermarks P 96 Printing 80 ...

Страница 87: ...nting Specific Pages onto Different Paper P 98 Selecting Document Type P 100 Saving Toner P 102 Combining and Printing Multiple Documents P 104 Configuring Printer Settings on the Machine P 108 Printing 81 ...

Страница 88: ...by Specifying the Original Document and Paper Size Preset Ratio The print ratio is automatically set based on the document and paper size you have specified Basic Settings tab Select the document size in Page Size Select the paper size in Output Size OK Specifying Print Ratio in Increments of 1 Basic Settings tab Select the Manual Scaling check box Enter the print ratio in Scaling OK Printing 82 ...

Страница 89: ...enlarging reducing ratio For example there may be large blank spaces on your printout or portions of the document that are missing The enlarging reducing settings on some applications have priority over those on the printer driver LINKS Basic Printing Operations P 70 Printing 83 ...

Страница 90: ...ng make sure that the paper size switch lever is set properly for the size of the paper to be used Interior P 21 Make sure that the sub output tray is closed When the sub output tray is open you cannot perform 2 sided printing When performing 2 sided printing always make sure that the sub output tray is closed Back Side P 19 2 sided printing may not be available with some sizes and types of paper ...

Страница 91: ...ed depending on the specified binding position To specify the margin width for the binding position click Gutter Long Edge Left Prints images in such a way that the printed pages are opened horizontally when bound Short Edge Top Prints images in such a way that the printed pages are opened vertically when bound Gutter Specify a binding margin LINKS Basic Printing Operations P 70 Printing Multiple ...

Страница 92: ... sorting method of the printouts when printing multiple page documents Collate The printouts are grouped into complete sets in sequential page order For example if you are printing three copies of a five page document the printouts will be arranged in the following page order 1 2 3 4 5 1 2 3 4 5 1 2 3 4 5 Group The printouts are not collated For example if you are printing three copies of a five p...

Страница 93: ... If you select Off whether the printouts are collated or not depends on the setting made on the application LINKS Basic Printing Operations P 70 Printing 87 ...

Страница 94: ... Switching 1 Sided and 2 Sided Printing P 84 Basic Settings tab In Page Layout select the number of pages to print onto a single sheet In Page Order select the page distribution layout OK Page Layout Select the number of pages to print onto a single sheet from 1 on 1 to 16 on 1 For example to print 16 pages onto a single sheet select 16 on 1 For options such as Poster 2 x 2 see Printing Posters P ...

Страница 95: ... layout For example if you select Across from Left the first page is printed on the top left and then the rest of the pages are arranged rightward LINKS Basic Printing Operations P 70 Switching 1 Sided and 2 Sided Printing P 84 Printing 89 ...

Страница 96: ...ter for example Poster 2 x 2 OK There are four size settings Poster 1 x 2 Poster 2 x 2 Poster 3 x 3 and Poster 4 x 4 Poster size settings cannot be selected when 2 sided printing is enabled Select 1 sided Printing in 1 sided 2 sided Booklet Printing and then select a poster size setting Select the Print Border check box to add borders on your printouts The borders are helpful if you want to paste ...

Страница 97: ...g make sure that the paper size switch lever is set properly for the size of the paper to be used Interior P 21 Make sure that the sub output tray is closed When the sub output tray is open you cannot perform booklet printing When performing booklet printing always make sure that the sub output tray is closed Back Side P 19 Booklet printing may not be available with some sizes and types of paper T...

Страница 98: ...ges in half Divide into Sets Prints as multiple bundles divided by the number of the pages specified on Sheets per Set Bind each bundle and then combine them as one booklet Select this option when the document has so many pages that you cannot bind them all into a single booklet Specify Booklet Gutter If you are using a stapler or other binding tools specify the margin width for binding your bookl...

Страница 99: ...he margins of printouts Page Setup tab Click Page Options Select the border type in Edging OK OK Edging Select the border type Preview Displays a preview with the selected border LINKS Basic Printing Operations P 70 Printing Dates and Page Numbers P 94 Printing Watermarks P 96 Printing 93 ...

Страница 100: ...r OK OK Print Date Specify the position to print the print date Print User Name Specify the position to print the user name logon name for the computer used to print the document Print Page Number Specify the position to print the page number Changing the Print Format of Dates and Page Numbers You can change formatting details such as font and font size when printing dates logon names or page numb...

Страница 101: ...LINKS Basic Printing Operations P 70 Printing Borders P 93 Printing Watermarks P 96 Printing 95 ...

Страница 102: ...istered watermarks Page Setup tab Select the Watermark check box Select a watermark from Watermark Name OK Watermark Watermark Name Select the Watermark check box to display the list of the watermarks in the Watermark Name drop down list Select a watermark from the menu Edit Watermark Displays the screen to create or edit watermarks Printing 96 ...

Страница 103: ...ted watermark name Attributes Alignment Print Style Click each tab to specify the text color or print position of the watermark For more information click Help on the printer driver screen LINKS Basic Printing Operations P 70 Printing Borders P 93 Printing Dates and Page Numbers P 94 Printing 97 ...

Страница 104: ... the same paper and does not print any specific pages on different paper All the pages are printed on paper specified in Paper Source Different for First Others and Last You can use different paper for the first page body pages and last page respectively For example you can specify the paper in the multi purpose tray for First Page the paper in the paper drawer for Other Pages body pages and the p...

Страница 105: ...ting Booklet P 91 You can specify different paper for the cover and body pages respectively For example you can specify the paper in the multi purpose tray for Cover Page and the paper in the paper drawer for Other Pages body pages LINKS Basic Printing Operations P 70 Printing 99 ...

Страница 106: ... For example select General for general use or select Photos when you want to print photo images in optimal print quality General A versatile option that is suitable when printing most documents Publications Suitable when printing documents that have a mix of photo images charts and graphs Graphics Suitable when printing documents that have charts or graphs Photos Suitable when printing photo imag...

Страница 107: ... To specify detailed settings for each item selected on Objective click Advanced Settings For more information click Help on the printer driver screen LINKS Basic Printing Operations P 70 Printing 101 ...

Страница 108: ...rtions with lighter print density may become blurred Quality tab Select the document type in Objective Click Advanced Settings Select Toner Save in the Advanced Settings screen Select On from the drop down list OK OK Objective Selecting Document Type P 100 Select the document type for which you want to enable the toner save setting Printing 102 ...

Страница 109: ...fy whether to enable the toner save setting for each document type Specify the toner save setting for each document type listed in Objective In the Advanced Settings screen you can specify various print settings other than toner save settings For more information click Help on the printer driver screen LINKS Basic Printing Operations P 70 Printing 103 ...

Страница 110: ...d print all of the pages in the same paper size 1 Open a document in an application and display the print dialog box How to display the print dialog box differs for each application For more information see the instruction manual for the application you are using 2 Select your printer and click Preferences or Properties 3 Select Edit and Preview in Output Method Click OK on the Information pop up ...

Страница 111: ...ne The documents are added to the Canon PageComposer 6 From the Document Name list select the documents to combine and click To select multiple documents click the documents while holding down SHIFT key or CTRL key 7 Change the settings as necessary and click Combine The documents selected in step 6 are combined Printing 105 ...

Страница 112: ...elete from List Click the Print Settings tab to display the screen for specifying print settings such as the number of copies or 1 sided 2 sided printing The settings specified here are applied to the whole print job For more information click Help on the Canon PageComposer screen Details Displays the print setting screen of the printer driver There are fewer settings available than when using the...

Страница 113: ...ent Name list select the combined document print job you want to print and click Printing starts For instructions on how to cancel printing see Canceling Prints P 75 LINKS Basic Printing Operations P 70 Printing 107 ...

Страница 114: ... Printer Settings Paper Size Override Select Off or On Off Does not perform paper size substitution Printing stops and an error message is displayed when the machine runs out of the paper that has been specified On Performs paper size substitution However if no paper to substitute is loaded in any paper sources the substitution cannot be performed Other Printer Settings There are other printer set...

Страница 115: ...until the correct PIN is entered on the operation panel of the machine This function is called Secure Print and the document that is protected by a PIN is called a secured document Using Secure Print keeps printouts of confidential documents from being left unattended Before you can use this function you need to complete some procedures Preparing for Using Secure Print P 110 Printing 109 ...

Страница 116: ...trator account 1 Open the printer folder Displaying the Printer Folder P 474 2 Right click your printer icon and click Printer properties or Properties 3 Click the Device Settings tab and make sure that the Allow Use of Secured Print check box is selected If the check box is selected Secure Print is enabled If the check box is not selected select it and click OK Printing 110 ...

Страница 117: ...LINKS Printing via Secure Print P 112 Printing 111 ...

Страница 118: ...hanging the Valid Time Period for Secured Documents P 115 Sending a Secured Document from a Computer to the Machine 1 Open a document in an application and display the print dialog box How to display the print dialog box differs for each application For more information see the instruction manual for the application you are using 2 Select your printer and click Preferences or Properties 3 Select S...

Страница 119: ...ic characters for a new user name Enter the PIN of up to seven digits 4 Specify the print settings and click OK Click the Basic Settings Page Setup Finishing Paper Source or Quality tabs to specify the print settings on each screen as necessary Various Print Settings P 80 5 Click Print or OK After the secured document is sent to the machine it is held in the memory of the machine waiting to be pri...

Страница 120: ...cured document will be deleted from the memory of the machine and can no longer be printed If secured documents are left unprinted they occupy the memory and may prevent the machine from printing even ordinary not secured documents Make sure that you print your secured documents as soon as you can You can check how much memory is being used for secured documents Device Status Secure Print Memory U...

Страница 121: ...een appears enter the correct ID and PIN using numeric keys and then press Logging on to the Machine P 34 3 Select Secure Print Settings and press 4 Select On and press Disabling Secure Print Select Off and press and restart the machine 5 Specify how long the machine holds secured documents and press Use or the numeric keys to enter the time The secured document is erased from the memory of the ma...

Страница 122: ...Checking the Printing Status and Log P 78 Printing 116 ...

Страница 123: ...layed on the printer driver screen and you can skip the operations to specify the print settings and print immediately Specify TOP SECRET for a watermark and register it as a Profile Just select this Profile when you need it Registering Combinations of Frequently Used Print Settings P 118 Specify 2 on 1 as the user default in the printer driver The next and following print jobs will be performed s...

Страница 124: ...cting a Profile P 119 Registering a Profile 1 Change the settings that you want to register as a profile and click Add Click the Basic Settings Page Setup Finishing Paper Source or Quality tabs to specify the print settings on each screen as necessary Various Print Settings P 80 2 Enter a profile name in Name select an icon and then click OK Enter comments on the profile in Comment as necessary Cl...

Страница 125: ... and click OK Changing the settings of the selected profile You can change the settings of a selected profile In addition the changed settings can be registered as another profile LINKS Basic Printing Operations P 70 Changing Default Settings P 120 Printing 119 ...

Страница 126: ...nter driver will be opened with 2 on 1 specified as page layout setting and you will not have to change settings each time you print To perform the following procedure log on to your computer with an administrator account 1 Open the printer folder Displaying the Printer Folder P 474 2 Right click your printer icon and click Printing preferences 3 Change the settings on the print setting screen and...

Страница 127: ...LINKS Basic Printing Operations P 70 Registering Combinations of Frequently Used Print Settings P 118 Printing 121 ...

Страница 128: ...veniently with a Mobile Device 123 Connecting to a Mobile Device 124 Make Direct Connection Access Point Mode 125 Making the Best Use of the Machine by Utilizing Applications 127 Managing the Machine Remotely 129 Can Be Used Conveniently with a Mobile Device 122 ...

Страница 129: ...priate application to perform printing with ease You can also use a mobile device to operate the machine remotely check the printing status and change machine s settings Connecting to a Mobile Device P 124 Making the Best Use of the Machine by Utilizing Applications P 127 Managing the Machine Remotely P 129 Can Be Used Conveniently with a Mobile Device 123 ...

Страница 130: ...t a mobile device and the machine via a wireless LAN router Connecting to a Wireless LAN P 136 Making Direct Connection Connect the mobile device and the machine directly without using a wireless LAN router Even where no wireless LAN environment is available you can quickly connect the machine and a mobile device Make Direct Connection Access Point Mode P 125 When Direct Connection has been establ...

Страница 131: ...ction using Access Point Mode Put the machine into Access Point Mode Set Enable Direct Connection to On Enable Direct Connection P 292 Put the machine into a connection waiting state Press use to select Enable Direct Connection press The machine enters the state in which you can connect your mobile device to the machine Connecting from a mobile device Based on the SSID and network key displayed in...

Страница 132: ... mobile device You cannot connect 2 or more mobile devices to the machine at a time If wireless connection from the mobile device is not performed within 5 minutes while the SSID and network key are displayed the connection waiting state terminates If while in communication by Direct Connection a duration when there is no data transmission between the machine and the mobile device lasts for some t...

Страница 133: ...cated driver Using AirPrint P 445 Using Google Cloud Print You can print from an application or service that supports Google Cloud Print You can print by remotely operating the machine at any time and from anywhere for example even while you are on the go Using Google Cloud Print P 452 Printing with Mopria This machine also supports Mopria Using Mopria allows you to print with printers of differen...

Страница 134: ... on to the Remote UI in System Manager Mode Starting Remote UI P 270 Settings Registration Network Settings Mopria Settings Edit Check that the Use Mopria check box is selected OK Can Be Used Conveniently with a Mobile Device 128 ...

Страница 135: ... the machine into the Web browser and start the Remote UI Check the IP address set to the machine in advance Viewing Network Settings P 161 If you have any questions ask your Network Administrator 1 Start the Web browser on your mobile device 2 Enter http the IP address of the machine in the address field If you want to use an IPv6 address enclose the IPv6 address with brackets example http fe80 2...

Страница 136: ...ses 153 Setting IPv4 Address 154 Setting IPv6 Addresses 157 Viewing Network Settings 161 Configuring the Machine for Printing from a Computer 164 Configuring Printing Protocols and WSD Functions 165 Configuring Printer Ports 168 Setting Up Print Server 173 Configuring the Machine for Your Network Environment 176 Configuring Ethernet Settings 177 Changing the Maximum Transmission Unit 179 Setting a...

Страница 137: ...ime Connecting to a Computer Viewing the Machine s Network Settings Connecting to a Network P 132 Viewing Network Settings P 161 Configuring for Printing Configuring the Machine for Printing from a Computer P 164 Customizing the Machine for More Convenient Network Experience Configuring the Machine for Your Network Environment P 176 Direct Connection to a mobile device You can directly communicate...

Страница 138: ...er Before You Start Follow these steps to connect the machine to a network Check your computer settings Make sure that the computer is correctly connected to the network For more information see the instruction manuals for the devices you are using or contact the device manufacturers Make sure that the network settings have been completed on the computer If the network has not been set up properly...

Страница 139: ...d or wireless LAN Proceed to the section that corresponds to the setting you selected in step 2 Connecting to a Wired LAN P 135 Connecting to a Wireless LAN P 136 Set the IP address as necessary At the time of purchase the machine is set to automatically acquire an IP address Change this setting if you want to use a specific IP address Setting IP Addresses P 153 Network 133 ...

Страница 140: ...printer driver installed on your computerand then reinstall it For more information see the Printer Driver Installation Guide 1 Press 2 Use to select Network Settings and press If the logon screen appears enter the correct ID and PIN using the numeric keys and then press Logging on to the Machine P 34 3 Select Network Settings and press 4 Select Wired LAN or Wireless LAN and press LINKS Connecting...

Страница 141: ...he router 1 Connect a LAN cable Connect the machine to a router by using a LAN cable Push the connector in until it clicks into place 2 Wait approximately 2 minutes While you wait the IP address is set automatically You can set the IP address manually Setting IP Addresses P 153 LINKS Connecting to a Network P 132 Network 135 ...

Страница 142: ...personal information might be leaked to a third party because radio waves used in wireless communication can go anywhere nearby even beyond walls Wireless LAN security The wireless LAN security that is supported by the machine is listed below For the wireless security compatibility of your wireless router see the instruction manuals for your networking devices or contact your manufacturer 128 104 ...

Страница 143: ...setting up a wireless connection you can either select a wireless router or manually enter the required information Regardless of the method make sure that you have the required setup information including the SSID and network key Checking the SSID and Network Key P 150 Selecting a Wireless Router Select this setup option if you need to manually set up the connection but want to complete the setup...

Страница 144: ... keys and then press Logging on to the Machine P 34 3 Select Wireless LAN Settings and press If the Do you want to enable the wireless LAN message is displayed select Yes and press 4 Read the message that is displayed and press 5 Select WPS Push Button Mode and press 6 Select Yes and press A PIN code is generated 7 Press and hold the WPS button on the wireless router The button must be pressed wit...

Страница 145: ...n more than one wireless router is available for connection the machine connects to the device with the strongest signal Signal strength is measured using RSSI Received Signal Strength Indication Reducing power consumption You can set the machine to enter Power Save Mode based on signals emitted from the wireless router Power Save Mode P 291 If the IP address of the machine has changed In a DHCP e...

Страница 146: ...the screen for entering a WPS PIN code For more information see the instruction manuals for your networking device From the Operation Panel 2 Press 3 Use to select Network Settings and press If the logon screen appears enter the correct ID and PIN using the numeric keys and then press Logging on to the Machine P 34 4 Select Wireless LAN Settings and press If the Do you want to enable the wireless ...

Страница 147: ...s when a wireless router is detected When the setup is completed the screen below is displayed and approximately 2 seconds later the Wi Fi indicator lights up Wait approximately 2 minutes until the IP address settings of the machine are completed Signal strength When more than one wireless router is available for connection the machine connects to the device with the strongest signal Signal streng...

Страница 148: ... In a DHCP environment the IP address of the machine may be changed automatically If this happens the connection is maintained as long as the machine and the computer belong to the same subnet LINKS Connecting to a Wireless LAN P 136 Network 142 ...

Страница 149: ...to AES CCMP or TKIP If you want to select Shared Key for WEP authentication or AES CCMP for WPA WPA2 encryption you need to set up the connection using the manual entry method Setting Up Connection by Specifying Detailed Settings P 146 1 Press 2 Use to select Network Settings and press If the logon screen appears enter the correct ID and PIN using the numeric keys and then press Logging on to the ...

Страница 150: ...hat you have written down Enter the network key using the numeric keys select Apply and press Entering Text P 32 WEP WPA PSK or WPA2 PSK 9 Select Yes and press If an error message is displayed during setup Press check whether the network key is correct and return to step 5 10 Check that the Wi Fi indicator is blinking on the operation panel The Wi Fi indicator blinks when a wireless router is dete...

Страница 151: ...ceived Signal Strength Indication Reducing power consumption You can set the machine to enter Power Save Mode based on signals emitted from the wireless router Power Save Mode P 291 If the IP address of the machine has changed In a DHCP environment the IP address of the machine may be changed automatically If this happens the connection is maintained as long as the machine and the computer belong ...

Страница 152: ...he logon screen appears enter the correct ID and PIN using the numeric keys and then press Logging on to the Machine P 34 3 Select Wireless LAN Settings and press If the Do you want to enable the wireless LAN message is displayed select Yes and press 4 Read the message that is displayed and press 5 Select SSID Settings Enter Manually 6 Enter the SSID that you have written down Enter the SSID using...

Страница 153: ...utomatically changes the setting to Shared Key and retries the connection 3 Select Edit WEP Key and press 4 Select the WEP key 1 to 4 you want to edit and press Up to four WEP keys can be registered 5 Enter the network key that you have written down Enter the network key using the numeric keys select Apply and press Entering Text P 32 6 Select Select WEP Key and press 7 Select the WEP key you have...

Страница 154: ... are correct and return to step 5 9 Check that the Wi Fi indicator is blinking on the operation panel The Wi Fi indicator blinks when a wireless router is detected When the setup is completed the screen below is displayed and approximately 2 seconds later the Wi Fi indicator lights up Wait approximately 2 minutes until the IP address settings of the machine are completed Signal strength When more ...

Страница 155: ... router Power Save Mode P 291 If the IP address of the machine has changed In a DHCP environment the IP address of the machine may be changed automatically If this happens the connection is maintained as long as the machine and the computer belong to the same subnet LINKS Connecting to a Wireless LAN P 136 Network 149 ...

Страница 156: ... Encryption When manually setting up a wireless connection by specifying detailed settings you need to specify security settings Check the following information Security types WEP WPA PSK WPA2 PSK Authentication method Open System Shared Key Encryption method TKIP AES CCMP Checking the SSID and Network Key from a Computer The SSID or the network key may have been changed If you do not know the SSI...

Страница 157: ...splayed Displaying the Software Programs Manuals Setup Screen P 476 If AutoPlay is displayed click Run MInst exe 3 Click Start for Canon MF LBP Wireless Setup Assistant 4 Read the License Agreement and click Yes to agree Network 151 ...

Страница 158: ...the information that is displayed If wireless routers are not found Click Refresh If nothing happens check that the settings are correctly configured on the computer and the wireless router LINKS Connecting to a Wireless LAN P 136 Setting Up Connection by Selecting a Wireless Router P 143 Setting Up Connection by Specifying Detailed Settings P 146 Network 152 ...

Страница 159: ... a network requires a unique network IP address Two versions of IP addresses are available IPv4 and IPv6 Configure these settings depending on the network environment To use IPv6 addresses you need to properly configure the IPv4 address settings Network 153 ...

Страница 160: ...gs and press If the logon screen appears enter the correct ID and PIN using the numeric keys and then press Logging on to the Machine P 34 3 Select TCP IP Settings IPv4 Settings IP Address Settings 4 Configure IP address settings Auto Acquire Select to automatically assign an IP address via DHCP protocol When Auto Acquire On is displayed automatic addressing is enabled Manually Acquire Select to c...

Страница 161: ... to Off If On is displayed select Auto Acquire press and set both Select Protocol and Auto IP to Off 2 Select Manually Acquire and press 3 Specify the IP address subnet mask and gateway address or default gateway Specify the settings in the following order IP Address Subnet Mask Gateway Address Enter each setting using the numeric keys and press 5 Restart the machine Turn OFF the machine wait for ...

Страница 162: ...ort you are using see Checking the Printer Port P 478 Testing the Network Connection 1 Press 2 Use to select Network Settings and press If the logon screen appears enter the correct ID and PIN using the numeric keys and then press Logging on to the Machine P 34 3 Select TCP IP Settings IPv4 Settings PING Command 4 Enter the IPv4 address of another device on the network and press If a proper connec...

Страница 163: ...outer A link local address is automatically set when the IPv6 function of the machine is enabled Manual address 1 An address that is entered manually When using this address specify the prefix length and default router address Stateless address 6 An address that is generated automatically using the MAC address of the machine and the network prefix that is advertised by the router Stateless address...

Страница 164: ...4 Click Edit in IPv6 Settings 5 Select the Use IPv6 check box and configure the required settings Network 158 ...

Страница 165: ...refix length and default router address in the corresponding text boxes IP Address Enter an IPv6 address Addresses that start with ff or multicast address cannot be entered Prefix Length Enter a number that indicates how many bits are available for the network address Default Router Address Specify the IPv6 address of the default router as necessary Addresses that start with ff or multicast addres...

Страница 166: ...ter by using the IPv6 address of the machine Starting Remote UI P 270 Selecting settings from the operation panel IPv6 settings can also be accessed by pressing on the operation panel IPv6 Settings P 294 If you changed the IP address after installing the printer driver You need to add a new port Configuring Printer Ports P 168 LINKS Setting IPv4 Address P 154 Viewing Network Settings P 161 Network...

Страница 167: ...result in a connection failure even when the IP address is correctly configured This problem can be solved by setting a certain interval before the machine starts communicating Setting a Wait Time for Connecting to a Network P 180 You can print a list of the current network settings User Data List System Manager Data List P 411 Viewing IPv4 Settings Network Information IPv4 Select the setting to v...

Страница 168: ...ss and Information for Wireless LAN 1 Press 2 Use to select Network Settings and press If the logon screen appears enter the correct ID and PIN using the numeric keys and then press Logging on to the Machine P 34 3 Select Wireless LAN Settings and press If the Do you want to enable the wireless LAN message is displayed select Yes and press 4 Read the message that is displayed and press 5 Select Co...

Страница 169: ...d None is displayed 3 Select the setting to view and press WEP WPA WPA2 PSK Wireless LAN Status and Latest Error Information can be viewed from Press Network Information Network Connection Method Connect Info and select the setting to view LINKS Connecting to a Wireless LAN P 136 Setting IPv4 Address P 154 Setting IPv6 Addresses P 157 Configuring DNS P 181 Network 163 ...

Страница 170: ... setup procedures including the printer driver installation For more information see the Printer Driver Installation Guide Printing protocols are rules for delivering document data created on a computer to the machine and can be selected according to the printing purpose or the network environment Ports are gateways for passing document data from a computer to the printer Incorrect port settings a...

Страница 171: ...The protocols supported by the machine include LPD RAW and WSD Web Services on Devices To change protocols port numbers see Changing Port Numbers P 226 1 Start the Remote UI and log on in System Manager Mode Starting Remote UI P 270 2 Click Settings Registration 3 Click Network Settings TCP IP Settings 4 Configure printing protocols Network 165 ...

Страница 172: ...ing LPD printing clear the check box Use RAW Printing Select the check box to print via RAW When not using RAW printing clear the check box RX Timeout Set a value between 1 and 60 minutes as the restart wait time for data reception If data reception does not resume within the set time printing is canceled 3 Click OK Configuring WSD 1 Click Edit in WSD Settings Network 166 ...

Страница 173: ...ages are flowing on the network 3 Click OK 5 Restart the machine Turn OFF the machine wait for at least 10 seconds and turn it back ON Selecting settings from the operation panel LPD RAW and WSD settings can also be accessed by pressing on the operation panel LPD Settings P 295 RAW Settings P 296 WSD Settings P 296 Setting up WSD network devices on Windows Vista 7 8 The WSD printer can be added fr...

Страница 174: ...may have been specified In such situations your attempt to print fails because the document data cannot reach the machine To fix this type of problem configure the printer port settings on the computer To perform the following procedure log on to your computer with an administrator account 1 Open the printer folder Displaying the Printer Folder P 474 2 Right click your printer icon and click Print...

Страница 175: ...e of port You can add an MFNP port only when you installed the printer driver from the provided DVD ROM or when you downloaded and installed the printer driver from the Canon website Standard TCP IP Port This is a standard Windows port When you use this type of port you need to add a new port every time that the IP address of the machine is changed Select this type of port when you are using the m...

Страница 176: ...dard TCP IP Port in Available port types and click New Port 3 Click Next 4 Enter the IP address or the DNS name of the machine and click Next The Port Name is entered automatically If necessary you can change it When the next screen is displayed follow the instructions on the screen Network 170 ...

Страница 177: ...ctions P 165 or the port number has been changed Changing Port Numbers P 226 the corresponding settings on the computer must also be configured This operation is not needed for WSD ports MFNP port 1 Click Configure Port 2 Under Protocol Type select RAW or LPR and change the Port Number 3 Click OK Standard TCP IP port 1 Click Configure Port 2 Under Protocol select Raw or LPR If you selected Raw cha...

Страница 178: ...3 Click OK 4 Click Close LINKS Setting Up Print Server P 173 Network 172 ...

Страница 179: ...to install drivers over the network depending on the operating system and the bit architecture 32 bit or 64 bit of the print server and client computers When implementing a print server in a domain environment consult your Network Administrator To carry out Department ID Management when using a print server Canon Driver Information Assist Service must be added during the printer driver installatio...

Страница 180: ...rver 1 Click Additional Drivers 2 Select the check box for the bit architecture that other computers are running and click OK Select additional drivers from the following according to the operating system of the print server Print server Select the check box for 32 bit operating systems x64 64 bit operating systems Windows Server 2003 Windows 2000 Windows XP and Windows Server 2003 under Version W...

Страница 181: ...ating system select DRIVERS x64 Driver folders on the provided DVD ROM If the print server runs a 64 bit operating system select DRIVERS 32bit Driver folders on the provided DVD ROM 4 Follow the on screen instructions to install the additional drivers 5 Click OK Installing Printer Drivers on a Computer via the Print Server 1 Locate the shared printer in the print server Displaying Shared Printers ...

Страница 182: ...varies depending on the purpose of the network The machine has been designed to be compatible with as many network configurations as possible and it is equipped with a variety of technologies Consult your Network Administrator and set a configuration to suit your network environment Network 176 ...

Страница 183: ...ss Logging on to the Machine P 34 3 Select Ethernet Driver Settings Auto Detect 4 Select whether to configure Ethernet settings automatically or manually Configuring Ethernet settings automatically Select On and press The machine detects and automatically sets the communication mode and the Ethernet type that can be used Configuring Ethernet settings manually 1 Select Off and press 2 Select the co...

Страница 184: ...n Mode is set to Half Duplex you cannot select 1000BASE T 4 Select Apply and press 5 Restart the machine Turn OFF the machine wait for at least 10 seconds and turn it back ON LINKS Changing the Maximum Transmission Unit P 179 Setting a Wait Time for Connecting to a Network P 180 Network 178 ...

Страница 185: ...machine as necessary For more information contact your Network Administrator 1 Press 2 Use to select Network Settings and press If the logon screen appears enter the correct ID and PIN using the numeric keys and then press Logging on to the Machine P 34 3 Select TCP IP Settings MTU Size 4 Select the MTU and press 5 Restart the machine Turn OFF the machine wait for at least 10 seconds and turn it b...

Страница 186: ...e the way that network devices are connected or if you add a new device If this type of problem occurs set a wait time for connecting to the network 1 Press 2 Use to select Network Settings and press If the logon screen appears enter the correct ID and PIN using the numeric keys and then press Logging on to the Machine P 34 3 Select Waiting Time for Connection at Startup and press 4 Enter the wait...

Страница 187: ...P address Configure the DNS mDNS or DHCP option settings as necessary Note that the procedures for configuring DNS are different for IPv4 and IPv6 1 Start the Remote UI and log on in System Manager Mode Starting Remote UI P 270 2 Click Settings Registration 3 Click Network Settings TCP IP Settings 4 Configure DNS settings Network 181 ...

Страница 188: ...alphanumeric characters for the host name of the machine that is to be registered to the DNS server Domain Name Enter up to 47 alphanumeric characters for the name of the domain the machine belongs to such as example com DNS Dynamic Update Select the check box to dynamically update the DNS records whenever the machine s IP address is changed When specifying the interval between updates enter the t...

Страница 189: ...ic Update Select the check box to enable Option 81 to dynamically update the DNS records through the DHCP server Acquire DNS Server Address Select the check box to enable Option 6 to obtain a DNS server address from the DHCP server Acquire Domain Name Select the check box to enable Option 15 to obtain a domain name from the DHCP server Acquire WINS Server Address Select the check box to enable Opt...

Страница 190: ...eric characters for the name of the domain the machine belongs to such as example com DNS Dynamic Update Select the check box to dynamically update the DNS records whenever the machine s IP address is changed To specify the type s of addresses you want to register to the DNS server select the check box for Register Manual Address Register Stateful Address or Register Stateless Address To specify t...

Страница 191: ...to obtain a domain name from the DHCP server 3 Click OK 5 Restart the machine Turn OFF the machine wait for at least 10 seconds and turn it back ON Selecting settings from the operation panel DNS settings can also be accessed by pressing on the operation panel IPv4 Settings P 292 IPv6 Settings P 294 LINKS Setting IPv4 Address P 154 Setting IPv6 Addresses P 157 Viewing Network Settings P 161 Networ...

Страница 192: ...S server must be specified The function is not available in an IPv6 network The machine s NetBIOS name will be registered to the WINS server as letters Canon followed by the last six digits of the MAC address and its work group name as WORKGROUP 1 Start the Remote UI and log on in System Manager Mode Starting Remote UI P 270 2 Click Settings Registration 3 Click Network Settings TCP IP Settings Ne...

Страница 193: ...ddress of the WINS server If the IP address of the WINS server is obtained from a DHCP server the obtained IP address overrides the IP address entered in the WINS Server Address text box 6 Restart the machine Turn OFF the machine wait for at least 10 seconds and turn it back ON Selecting settings from the operation panel WINS settings can also be accessed by pressing on the operation panel WINS Se...

Страница 194: ...ate The time is adjusted based on Coordinated Universal Time UTC so specify the time zone setting before configuring SNTP Date Time Settings P 307 SNTP settings can be specified via the Remote UI The SNTP of the machine supports both NTP version 3 and SNTP versions 3 and 4 servers 1 Start the Remote UI and log on in System Manager Mode Starting Remote UI P 270 2 Click Settings Registration 3 Click...

Страница 195: ...me Enter the IP address of the NTP or the SNTP server If DNS is available on the network you can enter a host name or FQDN of up to 255 alphanumeric characters instead example ntp example com Polling Interval Specify the interval between one synchronization and the next Specify an interval from 1 to 48 hours 6 Click OK 7 Restart the machine Turn OFF the machine wait for at least 10 seconds and tur...

Страница 196: ...tered server by clicking Settings Registration Network Settings TCP IP Settings and then clicking Check NTP Server in SNTP Settings that appears If a proper connection has been established the result is displayed as shown below Note that this operation does not adjust the system clock Network 190 ...

Страница 197: ...he network in plain text your network will be vulnerable to attacks If you want to ensure network security disable SNMPv1 and use SNMPv3 SNMPv3 With SNMPv3 you can implement network device management that is protected by robust security features Note that SSL must be enabled for the Remote UI before configuring SNMPv3 Enabling SSL Encrypted Communication for the Remote UI P 235 The machine does no...

Страница 198: ...3 Click Network Settings SNMP Settings 4 Click Edit 5 Specify SNMPv1 settings If you do not need to change SNMPv1 settings proceed to the next step Network 192 ...

Страница 199: ...community select Read Write or Read Only for the access privileges to MIB objects Read Write Permits both viewing and changing the values of MIB objects Read Only Permits only viewing the values of MIB objects Use Dedicated Community Dedicated Community is a preset community intended exclusively for Administrators using Canon software such as imageWARE Enterprise Management Console Select the chec...

Страница 200: ...tication On Encryption On or Authentication On Encryption Off for Security Settings for the algorithm that corresponds to your environment Encryption Algorithm Click the Authentication On Encryption On for Security Settings for the algorithm that corresponds to your environment Set Change Password To set or change the password select the check box and enter between 8 and 16 alphanumeric characters...

Страница 201: ...ning machine information via the printer driver Using the operation panel You can enable or disable the SNMP settings by pressing on the operation panel SNMP Settings P 298 Enabling Both SNMPv1 and SNMPv3 If both versions of SNMP are enabled it is recommended that MIB access permission in SNMPv1 be set to Read Only MIB access permission can be set independently in SNMPv1 and SNMPv3 and for each us...

Страница 202: ...tion also describes how to configure communication settings for the imageWARE Enterprise Management Console plug ins For more information about imageWARE Enterprise Management Console contact your local authorized Canon dealer Configuring SLP Communication with Device Management Software P 196 Configuring Settings for Device Settings Management P 199 To use imageWARE Enterprise Management Console ...

Страница 203: ...y check box and specify the required settings Respond to Discovery Select the check box to set the machine to respond to device management software multicast discovery packets and enable monitoring by device management software Scope Name To include the machine into a specific scope enter up to 32 characters for the scope name Network 197 ...

Страница 204: ...lected you can expect the machine to avoid unnecessary communication during sleep mode and reduce the total power consumption Port Number Change the port number for this function according to the network environment Number of Routers to Traverse Specify how many routers the notification packets can pass Enter a number from 0 to 254 Notification Interval Specify how often the machine notifies a dev...

Страница 205: ...onsole plug in is enabled Use of a plug in allows you to manage the machine s settings from the imageWARE Enterprise Management Console 1 Start the Remote UI and log on in System Manager Mode Starting Remote UI P 270 2 Click Settings Registration 3 Click Network Settings Settings for Device Settings Management 4 Click Edit Network 199 ...

Страница 206: ... check box is cleared the machine cannot be recognized as a device that is to be managed from the plug in Using the operation panel You can also configure settings for device settings management from on the operation panel Device Settings Management On Off P 300 LINKS Entering Sleep Mode P 62 Network 200 ...

Страница 207: ...rewall Rules 223 Changing Port Numbers 226 Setting a Proxy 228 Restricting the Machine s Functions 230 Restricting USB Functions 231 Disabling HTTP Communication 232 Disabling Remote UI 233 Implementing Robust Security Features 234 Enabling SSL Encrypted Communication for the Remote UI 235 Configuring IPSec Settings 239 Configuring IEEE 802 1X Authentication 248 Configuring Settings for Key Pairs ...

Страница 208: ...rity functions Set the necessary configuration depending on your network environment You can configure the best security system by building an environment that inhibits access to printers on your in house network via the Internet and using such environment together with the machine s security features Preventing Unauthorized Access P 204 Establishing the Basics of Information Security Protecting t...

Страница 209: ...horized Access 0W20 03Y Prevent unauthorized third parties from accessing and using the machine You can implement multiple security measures such as managing user access privileges using firewalls and changing port numbers Security 203 ...

Страница 210: ...participating in a computer network A global IP address is used for the communication connecting to the Internet and a private IP address is used for the communication within a local area network such as a LAN in the company If a global IP address is assigned your printer multifunction machine is open to the public and can be accessed via the Internet Thus the risk of information leakage due to un...

Страница 211: ...on the SSL Encrypted Communication see Implementing Robust Security Features P 234 and on the procedures to specify see Enabling SSL Encrypted Communication for the Remote UI P 235 Setting PIN to Manage Information Stored in the Printer If a malicious third party attempts to gain unauthorized access to a printer multifunction machine setting PIN to information stored in the machine will reduce the...

Страница 212: ...ou need to log on to the machine using the System Manager ID information in order to access Network Settings or System Management Settings Set the System Manager ID when you need different access privilege levels for Administrators and general users Only one System Manager ID can be registered Setting the System Manager ID P 207 Department ID Department ID Management You can specify access privile...

Страница 213: ...screen appears enter the correct ID and PIN using the numeric keys and then press Logging on to the Machine P 34 3 Select System Manager Information Settings System Manager ID and PIN 4 Specify the System Manager ID and PIN Specify the System Manager ID and then specify the System Manager PIN Enter a number of up to seven digits using the numeric keys and press When PIN Confirm is displayed enter ...

Страница 214: ...istrator comments the installation location of the machine as well as to the settings that you can register by using the operation panel The registered information can be viewed on the Device Information page of the Remote UI Checking System Manager Information P 278 Logging on to the machine If you try to access Network Settings or System Management Settings when only the System Manager ID is ena...

Страница 215: ... and then enable Department ID Management function Additional settings are required if you want to enable Department ID Management for printing from a computer Registering Editing Department ID and PIN P 209 Enabling the Department ID Management P 211 Setting the Department ID Management for Printing from the Computer P 213 Blocking Jobs When Department ID Is Unknown P 214 Registering Editing Depa...

Страница 216: ...o seven digits both in the PIN and Confirm text boxes Select the check box for Black White Print under Restrict Functions to make it impossible to print with the machine Editing the settings of the registered Department ID 1 Click the corresponding text link under Department ID to edit 2 Change the settings as necessary and click OK Deleting a Department ID Click Delete on the right of the Departm...

Страница 217: ... click Clear Count OK If you want to return the counts of all Department IDs to zero click Clear All Counts OK Enabling the Department ID Management After you register as many Department IDs as necessary enable Department ID Management 1 Start the Remote UI and log on in System Manager Mode Starting Remote UI P 270 2 Click Settings Registration 3 Click Department ID Management Edit Security 211 ...

Страница 218: ...formation on the Allow Print Jobs with Unknown IDs check box see Blocking Jobs When Department ID Is Unknown P 214 Using the operation panel You can also switch Department ID Management On Off by pressing on the operation panel Department ID Management On Off P 338 Logging on to the machine When you try to operate the machine when Department ID Management is enabled the following logon screen is d...

Страница 219: ... and PIN as necessary To perform the following procedure log on to your computer with an administrator account 1 Open the printer folder Displaying the Printer Folder P 474 2 Right click your printer icon and click Printer properties or Properties 3 Click the Device Settings tab and specify the required settings 1 Select the Use Department ID Management check box and click Settings on the right of...

Страница 220: ...partment ID PIN at Device Select the check box if the machine and the computer are connected via a USB or WSD port 3 Click OK Logging on to the machine When you try to print from a computer when Department ID Management is enabled the following pop up screen is displayed unless the Confirm Department ID PIN When Printing check box is cleared Blocking Jobs When Department ID Is Unknown The factory ...

Страница 221: ...3 Click Department ID Management Edit 4 Clear the Allow Print Jobs with Unknown IDs check box and click OK LINKS Setting Access Privileges P 206 Setting the System Manager ID P 207 Security 215 ...

Страница 222: ...on PIN When Department ID Management is enabled setting here is not required Setting the Department ID Management P 209 1 Start the Remote UI and log on in System Manager Mode Starting Remote UI P 270 2 Click Settings Registration 3 Click Security Settings Remote UI Settings 4 Click Edit Security 216 ...

Страница 223: ...ber of up to seven digits both in the PIN and Confirm text boxes 6 Click OK Using the operation panel You can also set a Remote UI Access PIN by pressing on the operation panel Remote UI Settings P 341 If Remote UI settings are initialized The Remote UI Access PIN is also initialized After an initialization reset the PIN Initializing Menu P 423 LINKS Setting Access Privileges P 206 Setting the Sys...

Страница 224: ...rized third parties can access computers and other communication devices that are connected to a network To prevent this unauthorized access specify the settings for packet filter a feature that restricts communication to devices with specified IP addresses or MAC addresses Security 218 ...

Страница 225: ...P address or a range of IP addresses Up to 16 IP addresses or ranges of IP addresses can be specified for both IPv4 and IPv6 The packet filters described in this section control communications over TCP UDP and ICMP 1 Start the Remote UI and log on in System Manager Mode Starting Remote UI P 270 2 Click Settings Registration 3 Click Security Settings IP Address Filter 4 Click Edit for the filter ty...

Страница 226: ...fying IPv6 addresses IPv6 Address Inbound Filter Select to restrict receiving data from the machine to a computer by specifying IPv6 addresses 5 Specify the settings for packet filtering Select the default policy to allow or reject the communication of other devices with the machine and then specify IP addresses for exceptions 1 Select the Use Filter check box and click the Reject or Allow radio b...

Страница 227: ...unable to access the machine from the Remote UI in which case you need to set IPv4 Address Filter or IPv6 Address Filter to Off IPv4 Address Filter P 339 IPv6 Address Filter P 339 Entry form for IP addresses Description Example Entering a single address IPv4 Delimit numbers with periods 192 168 0 10 IPv6 Delimit alphanumeric characters with colons fe80 10 Specifying a range of addresses Insert a h...

Страница 228: ...ion panel You can also enable or disable IP address filtering by pressing on the operation panel IPv4 Address Filter P 339 IPv6 Address Filter P 339 LINKS Specifying MAC Addresses for Firewall Rules P 223 Security 222 ...

Страница 229: ...AC addresses but permit other communications Up to 32 MAC addresses can be specified This function is unavailable when the machine is connected to a wireless LAN 1 Start the Remote UI and log on in System Manager Mode Starting Remote UI P 270 2 Click Settings Registration 3 Click Security Settings MAC Address Filter 4 Click Edit for a filter type Security 223 ...

Страница 230: ... radio button for the Default Policy Use Filter Select the check box to restrict communication Clear the check box to disable the restriction Default Policy Select the precondition to allow or reject other devices to communicate with the machine Reject Select to pass communication packets only when they are sent to or received from devices whose MAC addresses are entered in Exception Addresses Com...

Страница 231: ... MAC Address Filter P 340 When Reject is selected for an outbound filter Outgoing multicast and broadcast packets cannot be filtered Deleting a MAC address from exceptions Select a MAC address and click Delete 3 Click OK 6 Restart the machine Turn OFF the machine wait for at least 10 seconds and turn it back ON Using the operation panel You can also enable or disable MAC address filtering by press...

Страница 232: ...t number for proxy server see Setting a Proxy P 228 1 Press 2 Use to select Network Settings and press If the logon screen appears enter the correct ID and PIN using the numeric keys and then press Logging on to the Machine P 34 3 Select TCP IP Settings Port Number Settings 4 Select a port and press Learning more about the ports LPD RAW WSD Multicast Discovery Configuring Printing Protocols and WS...

Страница 233: ...LINKS Configuring Printer Ports P 168 Security 227 ...

Страница 234: ...gement of traffic between in house and outside networks but also blocks unauthorized access and consolidates anti virus protection for enhanced security When you use Google Cloud Print to print over the Internet you can enhance security by setting a proxy When setting a proxy make sure that you have the necessary proxy information including the IP address port number and a user name and password f...

Страница 235: ...nd 65535 Use Proxy within Same Domain Select the check box to also use the specified proxy server for communication with devices in the same domain Use Proxy Authentication To enable authentication by the proxy server select the check box and enter up to 24 alphanumeric characters for the user name in the User Name text box Set Change Password To set or change the password for the proxy authentica...

Страница 236: ...ties for misuse For security purposes the machine can be set to limit its capabilities by partially or completely disabling these functions Restricting USB Functions Restricting USB Functions P 231 Disabling HTTP Communication and Remote Management Disabling HTTP Communication P 232 Disabling Remote UI P 233 Security 230 ...

Страница 237: ...and press If the logon screen appears enter the correct ID and PIN using the numeric keys and then press Logging on to the Machine P 34 3 Select Use as USB Device and press 4 Select Off and press Off Disables the USB port of the machine On Enables the USB port of the machine 5 Restart the machine Turn OFF the machine wait for at least 10 seconds and turn it back ON Security 231 ...

Страница 238: ...rk capabilities such as the Remote UI WSD printing and printing with Google Cloud Print 1 Press 2 Use to select Network Settings and press If the logon screen appears enter the correct ID and PIN using the numeric keys and then press Logging on to the Machine P 34 3 Select TCP IP Settings Use HTTP 4 Select Off and press Off Disables HTTP communication On Enables HTTP communication LINKS Using Remo...

Страница 239: ...e risk of having your machine controlled remotely over the network by malicious third parties 1 Press 2 Use to select System Management Settings and press If the logon screen appears enter the correct ID and PIN using the numeric keys and then press Logging on to the Machine P 34 3 Select Remote UI Settings Use Remote UI 4 Select Off and press Off Disables the Remote UI On Enables the Remote UI 5 ...

Страница 240: ... browser or an e mail application IPSec encrypts the whole or payloads of IP packets This enables IPSec to offer a more versatile security system than SSL Configuring IPSec Settings P 239 IEEE 802 1X Authentication IEEE 802 1X is a standard and mechanism for blocking unauthorized access to the network by collectively managing user authentication information If a device tries to connect to the 802 ...

Страница 241: ...e UI is used for specifying settings for IPSec Pre Shared Key Method IEEE 802 1X authentication TTLS PEAP or SNMPv3 To use SSL for the Remote UI you need to set a key pair and enable the SSL function Generate or install the key pair for SSL before enabling SSL Configuring Settings for Key Pairs and Digital Certificates P 253 1 Start the Remote UI and log on in System Manager Mode Starting Remote U...

Страница 242: ...iewing details of a certificate You can check the details of the certificate or verify the certificate by clicking the corresponding text link under Key Name or the certificate icon Verifying Key Pairs and Digital Certificates P 266 6 Enable SSL for the Remote UI 1 Click Security Settings Remote UI Settings Security 236 ...

Страница 243: ... click OK 7 Restart the machine Turn OFF the machine wait for at least 10 seconds and turn it back ON Using the operation panel You can also enable or disable SSL encrypted communication by pressing on the operation panel Use SSL P 338 Security 237 ...

Страница 244: ... check that the correct URL is entered in the address field and then proceed to display the Remote UI screen Starting Remote UI P 270 LINKS Generating Key Pairs P 254 Using CA issued Key Pairs and Digital Certificates P 262 Configuring IPSec Settings P 239 Configuring IEEE 802 1X Authentication P 248 Monitoring and Controlling the Machine with SNMP P 191 Security 238 ...

Страница 245: ...RFC2401 RFC2402 RFC2406 and RFC4305 Operating system Windows Vista 7 8 Server 2003 Server 2008 Server 2012 Connection mode Transport mode Key exchange protocol IKEv1 main mode Authentication method Pre shared key Digital signature Hash algorithm and key length HMAC SHA1 96 HMAC SHA2 256 bits or 384 bits Encryption algorithm and key length 3DES CBC AES CBC 128 bits 192 bits or 256 bits Key exchange...

Страница 246: ...e that instructions vary depending on the authentication method selected Pre Shared Key Method A key of up to 24 alphanumeric characters can be shared with the other devices Enable SSL for the Remote UI before specifying this authentication method Enabling SSL Encrypted Communication for the Remote UI P 235 Digital Signature Method The machine and the other devices authenticate each other by mutua...

Страница 247: ...c check box and click OK If you want the machine to only receive packets that match one of the security policies that you define in the steps below clear the Receive Non Policy Packets check box 6 Click Register New Policy Security 241 ...

Страница 248: ...acters for a name that is used for identifying the policy 2 Select the Enable Policy check box 8 Specify the Selector Settings Local Address Click the radio button for the type of IP address of the machine to apply the policy All IP Addresses Select to use IPSec for all IP packets Security 242 ...

Страница 249: ...ual Settings or IPv6 Manual Settings is selected for Remote Address enter the IP address to apply the policy You can also enter a range of addresses by inserting a hyphen between the addresses Entering IP addresses Description Example Entering a single address IPv4 Delimit numbers with periods 192 168 0 10 IPv6 Delimit alphanumeric characters with colons fe80 10 Specifying a range of addresses Ins...

Страница 250: ...rs and Digital Certificates P 253 Valid for Specify how long a session lasts for IKE SA ISAKMP SA Enter the time in minutes Authentication Encryption DH Group Select an algorithm from the drop down list Each algorithm is used in the key exchange Authentication Select the hash algorithm Encryption Select the encryption algorithm DH Group Select the Diffie Hellman group which determines the key stre...

Страница 251: ...ttings 10 Specify the IPSec Network Settings Use PFS Select the check box to enable Perfect Forward Secrecy PFS for IPSec session keys Enabling PFS enhances the security while increasing the load on the communication Make sure that PFS is also enabled for the other devices Specify by Time Specify by Size Set the conditions for terminating a session for IPSec SA IPSec SA is used as a communication ...

Страница 252: ...o disable the ESP encryption Connection Mode The connection mode of IPSec is displayed The machine supports transport mode in which the payloads of IP packets are encrypted Tunnel mode in which whole IP packets headers and payloads are encapsulated is not available 11 Click OK If you need to register an additional security policy return to step 6 12 Arrange the order of policies listed under Regis...

Страница 253: ...on panel You can also enable or disable IPSec communication by pressing on the operation panel Use IPSec P 339 LINKS Configuring Settings for Key Pairs and Digital Certificates P 253 IPSec Policy List P 413 Security 247 ...

Страница 254: ...tion server authenticate each other by mutually verifying their certificates A key pair issued by a certification authority CA is required for the client authentication when authenticating the machine For the server authentication a CA certificate installed via the Remote UI can be used in addition to a CA certificate preinstalled in the machine The TLS method cannot be used with TTLS or PEAP at t...

Страница 255: ...3 Click Network Settings IEEE 802 1X Settings 4 Click Edit 5 Select the Use IEEE 802 1X check box enter the login name in the Login Name text box and specify the required settings Security 249 ...

Страница 256: ...ey and Certificate 2 Click Register Default Key on the right of the key pair you want to use for the client authentication Viewing details of a key pair or certificate You can check the details of the certificate or verify the certificate by clicking the corresponding text link under Key Name or the certificate icon Verifying Key Pairs and Digital Certificates P 266 Setting TTLS PEAP 1 Select the ...

Страница 257: ... Change User Name Password To specify a user name other than the login name clear the Use Login Name as User Name check box Select the check box if you want to use the login name as the user name 3 Set the user name password and click OK User Name Enter up to 24 alphanumeric characters for the user name Security 251 ...

Страница 258: ...nd Confirm text boxes 6 Click OK 7 Restart the machine Turn OFF the machine wait for at least 10 seconds and turn it back ON Using the operation panel You can also enable or disable IEEE 802 1X authentication by pressing on the operation panel IEEE 802 1X Settings P 299 LINKS Configuring Settings for Key Pairs and Digital Certificates P 253 Security 252 ...

Страница 259: ... detect any spoofing or tampering of data It is extremely difficult for third parties to abuse digital certificates A digital certificate that contains a public key of a certification authority CA is referred to as a CA certificate CA certificates are used for verifying the device the machine is communicating with for features such as printing with Google Cloud Print or IEEE 802 1X authentication ...

Страница 260: ...s are used with key pairs generated in Network Communication With a Key and Certificate Signing Request CSR you can apply for a CA issued digital certificate for the key pair generated by the machine Generate Network Communication Key P 254 Generate Key and Certificate Signing Request CSR P 257 Generate Network Communication Key 1 Start the Remote UI and log on in System Manager Mode Starting Remo...

Страница 261: ...ck OK A key pair cannot be deleted if it is currently used for some purpose such as when SSL or IEEE 802 1X is displayed under Key Usage In this case disable the function or replace the key pair before deleting it 5 Select Network Communication and click OK 6 Specify settings for the key and certificate Security 255 ...

Страница 262: ...00 and31 12 2037 in the order of year month day Validity End Date YYYY MM DD Enter the validity end date of the certificate in the range between 01 01 2000 and31 12 2037 in the order of year month day A date earlier than Validity Start Date YYYY MM DD cannot be set Country Region Click the Select Country Region radio button and select the country region from the drop down list You can also click t...

Страница 263: ... generated it is automatically registered to the machine Generate Key and Certificate Signing Request CSR 1 Start the Remote UI and log on in System Manager Mode Starting Remote UI P 270 2 Click Settings Registration 3 Click Security Settings Key and Certificate Settings 4 Click Generate Key Security 257 ...

Страница 264: ... deleted if it is currently used for some purpose such as when SSL or IEEE 802 1X is displayed under Key Usage In this case disable the function or replace the key pair before deleting it 5 Select Key and Certificate Signing Request CSR and click OK 6 Specify settings for the key and certificate Key Settings Security 258 ...

Страница 265: ... drop down list You can also click the Enter Internet Country Code radio button and enter a country code such as US for the United States State City Enter up to 24 alphanumeric characters for the location as necessary Organization Organization Unit Enter up to 24 alphanumeric characters for the organization name as necessary Common Name Enter up to 48 alphanumeric characters for the common name of...

Страница 266: ...ed the digital certificate register it using the procedure below 1 Start the Remote UI and log on in System Manager Mode Starting Remote UI P 270 2 Click Settings Registration 3 Click Security Settings Key and Certificate Settings 4 Click Key Name or Certificate for the certificate to be registered 5 Click Register Certificate 6 Click Browse specify the file for the certificate signing request and...

Страница 267: ...ng CA issued Key Pairs and Digital Certificates P 262 Verifying Key Pairs and Digital Certificates P 266 Enabling SSL Encrypted Communication for the Remote UI P 235 Configuring IPSec Settings P 239 Security 261 ...

Страница 268: ...e machine Key and Certificate Requirements P 253 Up to 5 key pairs including the preinstalled ones can be registered and up to 67 CA certificates including the 62 preinstalled ones can be registered 1 Start the Remote UI and log on in System Manager Mode Starting Remote UI P 270 2 Click Settings Registration 3 Click Security Settings Key and Certificate Settings or CA Certificate Settings Click Ke...

Страница 269: ...nder Key Usage In this case disable the function or replace the key pair before deleting it The preinstalled CA certificate cannot be deleted Disabling or enabling the preinstalled CA certificates Click Disable on the right of the preinstalled CA certificate you want to disable To enable the certificate again click Enable on the right of the certificate 5 Click Install Deleting a key pair or CA ce...

Страница 270: ...er 2 Enter the name of the key pair and password and then click OK Key Name Enter up to 24 alphanumeric characters for the name of the key pair to be registered Password Enter up to 24 alphanumeric characters for the password of the private key set for the file to be registered Registering a CA certificate Click Register on the right of the CA certificate you want to register Security 264 ...

Страница 271: ...Key Pairs P 254 Verifying Key Pairs and Digital Certificates P 266 Enabling SSL Encrypted Communication for the Remote UI P 235 Configuring IPSec Settings P 239 Configuring IEEE 802 1X Authentication P 248 Security 265 ...

Страница 272: ...1 Start the Remote UI and log on in System Manager Mode Starting Remote UI P 270 2 Click Settings Registration 3 Click Security Settings Key and Certificate Settings or CA Certificate Settings Click Key and Certificate Settings to verify a key pair or CA Certificate Settings to verify a CA certificate 4 Click the icon for the key pair or certificate that you want to verify Security 266 ...

Страница 273: ...creen 5 Check the details of the certificate and click Verify Certificate The result from verifying the certificate is displayed as shown below LINKS Generating Key Pairs P 254 Using CA issued Key Pairs and Digital Certificates P 262 Security 267 ...

Страница 274: ...g Remote UI 270 Remote UI Screens 272 Managing Documents and Checking the Machine Status 275 Setting Up Menu Options from Remote UI 279 Saving Loading Registered Data 281 Saving Registered Data 282 Loading Registered Data 284 Using Remote UI 268 ...

Страница 275: ...anaging Documents and Checking the Machine Status P 275 Setting Up Menu Options from Remote UI P 279 Saving Loading Registered Data P 281 Basics of the Remote UI Starting Remote UI P 270 Remote UI Screens P 272 System Requirements The following environment is required to use the Remote UI In addition set the Web browser to enable Cookies Windows Windows Vista 7 8 Microsoft Internet Explorer 9 0 or...

Страница 276: ...cff fe4e dbce If a security alert is displayed A security alert may be displayed when the Remote UI communication is encrypted Enabling SSL Encrypted Communication for the Remote UI P 235 When certificate settings or SSL settings have no errors continue browsing the Web site 3 Log on to the Remote UI When the Department ID Management is disabled Select System Manager Mode or General User Mode Syst...

Страница 277: ...rint documents based on information such as your computer name or computer logon name Remote UI Access PIN If Remote UI Access PIN is displayed enter the PIN Setting a Remote UI PIN P 216 When the Department ID Management is enabled Enter the appropriate ID in Department ID and PIN in PIN Setting the Department ID Management P 209 4 Click Log In Portal Page main page will be displayed Remote UI Sc...

Страница 278: ...ystem Manager Displays a window for creating an e mail to the system manager specified in System Manager Information under System Management Refresh Icon Refreshes the currently displayed page Device Basic Information Displays the current status of the machine and error information If an error has occurred the link to the Error Information page will be displayed Consumables Information Displays pa...

Страница 279: ...e settings items and save load the registered data Setting Up Menu Options from Remote UI P 279 Status Monitor Cancel Page To Portal Returns to Portal Page main page Menu Click an item and the content is displayed in the right page Managing Documents and Checking the Machine Status P 275 Breadcrumb Trail Indicates the series of pages you opened to display the currently displayed page You can check...

Страница 280: ...of pages you opened to display the currently displayed page You can check what page is currently displayed Top Icon Moves the scroll box up to the top of the page when the page is scrolled down System Management Settings You can only set System Management Settings when you have logged on in System Manager Mode When you have logged on in General User Mode only System Management will be displayed Us...

Страница 281: ...us of Print Documents The list of the documents currently printing or waiting to be printed is displayed Log on to the Remote UI Starting Remote UI P 270 Status Monitor Cancel Job Status You can delete a document job by clicking Cancel Regardless of the Department ID Management setting all the print documents currently printing and waiting to be printed will be listed If you entered your user name...

Страница 282: ...g the message displayed under Error Information on Portal Page main page Portal Page Main Page P 272 Log on to the Remote UI Starting Remote UI P 270 Status Monitor Cancel Error Information Checking Consumables Paper size and paper type for the paper source toner cartridge model number etc are displayed You can also click Check Consumables Details in the Portal Page main page to display the screen...

Страница 283: ...sing Site is not displayed On the operation panel set Display Consumables Purchase Button RUI to On Display Consumables Information RUI Toner Status P 342 Checking Device Specifications Information including maximum print speed and machine s hardware features is displayed Log on to the Remote UI Starting Remote UI P 270 Status Monitor Cancel Device Features Using Remote UI 277 ...

Страница 284: ...egistration page System Management Settings P 337 Log on to the Remote UI Starting Remote UI P 270 Status Monitor Cancel Device Information Checking Print Total Counter The total number of pages that have been printed is displayed Log on to the Remote UI Starting Remote UI P 270 Status Monitor Cancel Check Counter LINKS Remote UI Screens P 272 Using Remote UI 278 ...

Страница 285: ...e settings can only be set using the Remote UI Some settings can only be changed when you have logged on in System Manager Mode 1 Start the Remote UI Starting Remote UI P 270 2 Click Settings Registration 3 Click the menu item you want to set and click Edit For more information about the settings menu see each item below Menu items Referents Preferences Using Remote UI 279 ...

Страница 286: ...ettings Printer Settings P 313 Output Report Settings Printing Reports and Lists P 409 System Management Settings System Management System Management Settings P 337 Department ID Management Setting the Department ID Management P 209 Network Settings Network P 131 Security Settings Security P 202 Import Export Saving Loading Registered Data P 281 Initialize Setting Information Initializing Menu P 4...

Страница 287: ... Registered Data P 284 Do not turn OFF the machine until the export import process is complete It may take a few minutes to complete the process If the machine is turned OFF during the process it may result in damage to data or the machine Do not operate the machine during the export import process Before exporting importing check that no operation such as printing documents is currently processin...

Страница 288: ...e them in your computer It is recommended that you regularly back up important settings 1 Start the Remote UI and log on in System Manager Mode Starting Remote UI P 270 2 Click Settings Registration 3 Click Import Export Export 4 Set the encryption password Using Remote UI 282 ...

Страница 289: ...rt the data you must set an encryption password The password is required when exported data is imported 5 Click Start Exporting 6 Follow the on screen instructions to specify the location where the exported setting data is saved The setting data will be saved LINKS Remote UI Screens P 272 Setting Menu List P 287 Using Remote UI 283 ...

Страница 290: ... also import settings from another machine if it is the same model as your machine 1 Start the Remote UI and log on in System Manager Mode Starting Remote UI P 270 2 Click Settings Registration 3 Click Import Export Import 4 Specify the file to import and enter the password Using Remote UI 284 ...

Страница 291: ...in File Path directly Decryption Password Enter the password set when the settings were exported 5 Click Start Importing 6 Click OK The selected settings data is loaded into the machine 7 Click OK The machine automatically restarts LINKS Remote UI Screens P 272 Setting Menu List P 287 Using Remote UI 285 ...

Страница 292: ...per Settings LBP252dw 288 Direct Connection 289 Network Settings 290 Output Reports 301 Preferences 302 Timer Settings 307 Common Settings 311 Printer Settings 313 Adjustment Maintenance 332 System Management Settings 337 Setting Menu List 286 ...

Страница 293: ... this machine You can adjust each of the settings in detail Access these settings by pressing on the operation panel You can print the setting menu in list form to check the current settings User Data List System Manager Data List P 411 Setting Menu List 287 ...

Страница 294: ... sizes and limit the paper sizes that will be displayed Specifying Paper Size and Type P 50 Asterisks Settings marked with an asterisk are only available when the optional paper feeder drawer 2 is attached Multi Purpose Tray Drawer 1 Drawer 2 Register Custom Paper Select Frequently Used Paper Sizes Setting Menu List 288 ...

Страница 295: ...Direct Connection 0W20 088 Connect the mobile device and the machine directly without using a wireless LAN router Make Direct Connection Access Point Mode P 125 Setting Menu List 289 ...

Страница 296: ...ss LAN to Wired LAN you need to specify the setting Conversely when switching the machine from Wired LAN to Wireless LAN you do not need to specify this setting You can switch using the following Wireless LAN Settings Selecting Wired LAN or Wireless LAN P 134 Wired LAN Wireless LAN Wireless LAN Settings Specify settings for connecting the machine to a wireless LAN You can also view the current set...

Страница 297: ...specify authentication and encryption settings in detail Setting Up Connection by Specifying Detailed Settings P 146 Security Settings None WEP Open System Select WEP Key 1 2 3 4 Edit WEP Key Shared Key Select WEP Key 1 2 3 4 Edit WEP Key WPA WPA2 PSK Auto AES CCMP Power Save Mode Select whether or not the machine enters Power Save Mode based on signals emitted from the wireless router Off On Netw...

Страница 298: ... than Direct Connection TCP IP Settings Specify settings for using the machine in a TCP IP network such as IP address settings IPv4 Settings Specify settings for using the machine in an IPv4 network IP Address Settings Configure the IP address which is used for identifying devices such as computers and printers on a TCP IP network Setting IPv4 Address P 154 Auto Acquire Select Protocol Off DHCP Au...

Страница 299: ...Host Name Domain Name DNS Dynamic Update Settings Off On DNS Dynamic Update Interval 0 to 24 to 48 hr mDNS Settings Specify settings for using DNS functions without DNS servers Configuring DNS P 181 Off On mDNS Name DHCP Option Settings If DHCP is enabled use these settings to select whether to use the DHCP optional functions to acquire the DNS server address or the domain name Configuring DNS P 1...

Страница 300: ...etting IPv6 Addresses P 157 Off On Check Settings Stateless Address Prefix Length Use DHCPv6 Enable or disable the stateful address that is acquired via DHCPv6 Setting IPv6 Addresses P 157 Off On Check Settings Stateful Address Prefix Length DNS Settings Specify settings for Domain Name System DNS which provides a host name for IP address resolutions Configuring DNS P 181 DNS Host Name Domain Name...

Страница 301: ...onfiguring DNS P 181 Acquire DNS Server Address Off On Acquire Domain Name Off On WINS Settings Specify settings for Windows Internet Name Service WINS which provides a NetBIOS name for IP address resolutions in a mixed network environment of NetBIOS and TCP IP Configuring WINS P 186 WINS Resolution Off On WINS Server Address 0 0 0 0 LPD Settings Enable or disable LPD a printing protocol that can ...

Страница 302: ...ter by using the WSD protocol that is available on Windows Vista 7 8 Server 2008 Server 2012 Configuring Printing Protocols and WSD Functions P 165 WSD Print Settings Use WSD Print Off On Use WSD Browsing Off On Use Multicast Discovery Off On Use HTTP Enable or disable HTTP which is required for communications with a computer such as when using the Remote UI WSD printing or printing with Google Cl...

Страница 303: ... Port Number Settings Change port numbers for protocols according to the network environment Changing Port Numbers P 226 LPD 1 to 515 to 65535 RAW 1 to 9100 to 65535 WSD Multicast Discovery 1 to 3702 to 65535 HTTP 1 to 80 to 65535 Multicast Discovery 1 to 427 to 65535 SNMP 1 to 161 to 65535 MTU Size Select the maximum size of packets the machine sends or receives Changing the Maximum Transmission ...

Страница 304: ...se the Remote UI to specify detailed settings that are applied when SNMPv3 is enabled Off On Network Settings SNMP Settings SNMPv3 Settings Select Off or On Restart the machine Acquire Printer Management Information from Host Enable or disable the monitoring of printer management information from a networked computer running SNMP compatible software Off On Network Settings SNMP Settings Acquire Pr...

Страница 305: ...ernet half duplex full duplex You can also view the MAC address for wired LAN MAC Address Check the MAC address of the machine which is a number unique to each communication device Viewing the MAC Address for Wired LAN P 162 Auto Detect Select whether to automatically detect or manually select the communication mode and the Ethernet type Configuring Ethernet Settings P 177 Off Communication Mode H...

Страница 306: ...data by using an imageWARE Enterprise Management Console plug in For details of the imageWARE Enterprise Management Console contact your local authorized Canon dealer Off On Network Settings Device Settings Management On Off Select Off or On Initialize Network Settings Select to return the Network Settings to the factory defaults Initialize Menu P 345 Setting Menu List 300 ...

Страница 307: ...rts and lists Printing Reports and Lists P 409 Asterisks Reports and lists marked with an asterisk are only available for the LBP252dw Print List Consumables Status Report User Data List System Manager Data List Department ID Management Report IPSec Policy List PCL Font List PS Font List Setting Menu List 301 ...

Страница 308: ...e volume of a notification beep the machine generates when a key is pressed on the operation panel printing is complete etc Entry Tone Select whether the machine beeps when a key is pressed on the operation panel Off On Preferences Volume Settings Entry Tone Select Off or On Invalid Entry Tone Select whether the machine beeps when an invalid settings value is entered such as when a user is trying ...

Страница 309: ...eps when printing is complete Off On Preferences Volume Settings Job Done Tone Select Off or On Energy Saver Alert Select whether the machine beeps when the machine enters or wakes from sleep mode Off On Preferences Volume Settings Energy Saver Alert Select Off or On Display Settings Brightness Adjust the brightness of the display to suit the installation location of the machine Five Levels Settin...

Страница 310: ... Select On to invert the display colors Select On if the display is hard to view even after the brightness was adjusted in Brightness Off On Preferences Display Settings Invert Screen Colors Select Off or On Millimeter Inch Entry Switch Select the unit of measurement Millimeter Inch Preferences Display Settings Millimeter Inch Entry Switch Select Millimeter or Inch Message Display Time Specify the...

Страница 311: ...ct Manual to manually move the cursor to the right of the entered character Auto Manual Preferences Display Settings Cursor Movement Type Select Auto or Manual Language Select the display language used for the display reports and lists English Japanese French Spanish German Italian Dutch Finnish Portuguese Norwegian Swedish Danish Slovene Czech Hungarian Russian Turkish Greek Estonian Romanian Slo...

Страница 312: ...rman Italian Dutch Finnish Portuguese Norwegian Swedish Danish Czech Hungarian Russian Turkish Polish Chinese Simplified Chinese Traditional Korean Preferences Display Settings Remote UI Language Select a language Setting Menu List 306 ...

Страница 313: ...Reset Time P 309 Auto Sleep Time P 309 Auto Shutdown Time P 309 Date Time Settings Specify date and time settings including the date format and the 12 or 24 hour clock display setting The date and time that are printed on each report and list are determined by these settings Date Format 1 Select the date format order of year month and day YYYY MM DD MM DD YYYY DD MM YYYY Timer Settings Date Time S...

Страница 314: ...e date and time Apply The current date and time cannot be changed for 1 hour after daylight saving time is in effect Time Zone Select the time zone If the time zone setting is changed the values set in Current Date Time Settings are also changed accordingly UTC 12 00 International Date Line West to UTC Coordinated Universal Time to UTC 14 00 Christmas Island UTC Coordinated Universal Time UTC is t...

Страница 315: ...g documents An error message is displayed and the Error indicator is blinking However Auto Reset is performed when the error does not prevent the user from continuing to use a function 0 Auto Reset is disabled 1 to 2 to 9 min Timer Settings Auto Reset Time Set the Auto Reset time Auto Sleep Time If the machine has not been operated or has had no data to print for a specified period of time the mac...

Страница 316: ...0 Auto Shutdown is disabled 1 to 4 to 8 hr Setting Menu List 310 ...

Страница 317: ...2 sided printing However if you change the setting to Print Side Priority you can use just the same way of paper loading which side up or down both for 1 and 2 sided printing the logo side face up when using the paper drawer or the logo side face down when using the multi purpose tray For more information see Loading Preprinted Paper P 46 Multi Purpose Tray Speed Priority Print Side Priority Drawe...

Страница 318: ...paper you do not need to flip over paper in the paper source whether 1 or 2 sided printing is selected If Print Side Priority is set for a paper source that is loaded with paper you cannot use for 2 sided printing Paper P 440 Speed Priority is applied to the paper source instead In this case you need to load the paper in the same way as when Speed Priority is selected Loading Preprinted Paper P 46...

Страница 319: ...e machine are not available Availability of settings All the printer settings described in this section except for Paper Size Override Paper Size Override P 315 are only available for PS PCL printing Specifying these settings is unnecessary for example when you print using the UFR II printer driver Action When Free Paper Size Mismatch P 313 Copies P 314 2 Sided Printing P 315 Default Paper P 315 P...

Страница 320: ...tion Force Output Perform printing even when the paper size setting in the printer driver and the size of the loaded paper are rather different Display Error Display an error message and do not perform printing when the paper size setting in the printer driver and the size of the loaded paper are rather different If the settings in the printer driver do not match the size and type of the loaded pa...

Страница 321: ...e Override Select whether to switch between printing on A4 and LTR size paper if one of these paper sizes is loaded but the other is not Configuring Printer Settings on the Machine P 108 Off On Most print settings such as setting for number of copies or 1 sided 2 sided printing can be made from the printer driver or an application software Basic Printing Operations P 70 but the setting for Paper S...

Страница 322: ... other appearance characteristics before proceeding to final printing of a large job Off On Printer Settings Print Quality Toner Save Select Off or On Resolution Specify the resolution to be used for print data processing 1200 dpi 600 dpi Printer Settings Print Quality Resolution Select 1200 dpi or 600 dpi Barcode Adjustment Mode If bar codes printed with this machine cannot be read set this item ...

Страница 323: ...em to one of Mode 1 to Mode 3 Special Printing Mode A is automatically set to Off Special Printing Mode A P 334 Layout Specify the page layout settings such as binding position and margin values Binding Location If you are binding the printouts with a binding tool such as a stapler use this item to specify whether to bind on the long or short edge Specify the setting of this item in combination wi...

Страница 324: ...hift width Whether the setting value is a or value determines the binding edge along which to adjust the binding margin You can adjust the binding margin in units of 0 5 mm Use to move the cursor and to switch between and to increase or decrease the value Setting Value Long Edge Short Edge A value with a sign Left edge of paper Top edge of paper A value with a sign Right edge of paper Bottom edge ...

Страница 325: ...ft to right direction For Offset Long Edge Front Offset Long Edge Back specify a value with a sign to shift the print position in the up to down direction To shift in the reverse direction specify a value with a sign Use to move the cursor and to switch between and to increase or decrease the value Offset Short Edge Front Offset Short Edge Back Offset Long Edge Front Offset Long Edge Back Auto Err...

Страница 326: ...L XPS Printer Settings Personality Select the Personality mode UFR II You can change the settings that become effective when printing from the UFR II printer driver Halftones You can select the printing method to reproduce halftones the intermediate range between the lighter and darker areas of an image for optimal image quality For each document you can make settings by type of image Text Resolut...

Страница 327: ...image data such as photo image data Gradation Produces a print with smooth gradation or smooth edges It is suitable for printing figures or graphs containing gradation areas High Resolution As compared to Resolution this produces a finer print but quality stability is slightly lower It is suitable to obtain a print of character data or fine line data or CAD data with sharp edges PCL Specify the PC...

Страница 328: ... panel PCL Font List P 414 0 to 54 Printer Settings PCL Font Number Select the font number Point Size Set the font size in points adjustable in 0 25 increments You can specify this setting only when a proportionally spaced scalable font is selected in Font Number 4 00 to 12 00 to 999 75 point Printer Settings PCL Point Size Specify the point size Pitch Set the font pitch or cpi characters per inch...

Страница 329: ...e computer you send print data from The specified setting is ignored when the character code is controlled by the font specified in Font Number DESKTOP ISO4 ISO6 ISO11 ISO15 ISO17 ISO21 ISO60 ISO69 ISOL1 ISOL2 ISOL5 ISOL6 LEGAL MATH8 MCTEXT MSPUBL PC775 PC8 PC850 PC852 PC8DN PC8TK PC1004 PIFONT PSMATH PSTEXT ROMAN8 VNINTL VNMATH VNUS WIN30 WINBALT WINL1 WINL2 WINL5 Printer Settings PCL Character C...

Страница 330: ...ettings PCL X dimension Specify the dimension Y dimension Specify the vertical dimension long edge of the custom paper 127 to 356 mm Printer Settings PCL Y dimension Specify the dimension Append CR to LF Select whether to append a carriage return CR when the machine receives a line feed code LF If Yes is selected the print position moves to the beginning of the next line when the machine receives ...

Страница 331: ...er Settings PCL Enlarge A4 Print Width Select Off or On Halftones You can select the printing method to reproduce halftones the intermediate range between the lighter and darker areas of an image for optimal image quality For each document you can make settings by type of image Text Resolution Color Tone Gradation High Resolution Graphics Resolution Color Tone Gradation High Resolution Image Setti...

Страница 332: ...and darkness It is suitable for printing image data such as photo image data Gradation Produces a print with smooth gradation or smooth edges It is suitable for printing figures or graphs containing gradation areas High Resolution As compared to Resolution this produces a finer print but quality stability is slightly lower It is suitable to obtain a print of character data or fine line data or CAD...

Страница 333: ...elect the printing method to reproduce halftones the intermediate range between the lighter and darker areas of an image for optimal image quality For each document you can make settings by type of image Text Resolution Gradation High Resolution Graphics Resolution Gradation High Resolution Image Resolution Gradation High Resolution Printer Settings PS Halftones Select the type of image Select the...

Страница 334: ...o obtain a print of character data or fine line data or CAD data with sharp edges Grayscale Conversion You can select ways to convert color values to a grayscale value when you print color print data sRGB NTSC Uniform RGB This section describes the settings to convert the color data into grayscale data This setting is invalid for black and white data Printer Settings PS Grayscale Conversion Specif...

Страница 335: ...a fine print with clear edges of text It is suitable for printing characters and fine lines Gradation Produces a print with smooth gradation or smooth edges It is suitable for printing figures or graphs containing gradation areas High Resolution As compared to Resolution this produces a finer print but quality stability is slightly lower It is suitable to obtain a print of character data or fine l...

Страница 336: ...nces so that a smooth gradation is achieved NTSC Color data is converted to monochrome so that the resulting image looks like a television picture of the NTSC system Uniform RGB Color data is converted to monochrome so that R G and B are uniformly converted to the same gray level Compressed Image Output As time passes after a print job starts image quality may decrease depending on the print data ...

Страница 337: ...an print by AirPrint Halftones You can select the printing method to reproduce halftones the intermediate range between the lighter and darker areas of an image for optimal image quality Gradation Error Diffusion Printer Settings Imaging Halftones Select the halftone reproduction method Gradation Prints images with fine gradation such as digital camera images with a smooth finish Error Diffusion P...

Страница 338: ... Adjust Print Position P 333 Special Processing P 334 Clean Fixing Assembly P 336 Display Timing for Cartridge Preparation Notification Set the display timing for the message notifying you that the amount remaining in the toner cartridge is low Auto Custom 1 to 20 to 99 Adjustment Maintenance Display Timing for Cartridge Preparation Notification Custom Enter toner level Printer Density Adjust the ...

Страница 339: ...tically Back Side 0 20 to 0 00 to 0 20 or 5 0 to 0 0 to 5 0 mm Adjust Horizontally Back Side 0 12 to 0 00 to 0 12 or 3 0 to 0 0 to 3 0 mm Drawer 1 Adjust Vertically Front Side 0 20 to 0 00 to 0 20 or 5 0 to 0 0 to 5 0 mm Adjust Horizontally Front Side 0 12 to 0 00 to 0 12 or 3 0 to 0 0 to 3 0 mm Adjust Vertically Back Side 0 20 to 0 00 to 0 20 or 5 0 to 0 0 to 5 0 mm Adjust Horizontally Back Side ...

Страница 340: ...n panel takes precedence Smudges Appear on Printouts P 378 This item cannot be set when Barcode Adjustment Mode is set to one of Mode 1 to Mode 3 Barcode Adjustment Mode P 316 Print density will be lighter when you select stronger improvement It may also result in less sharp edges and rougher details If the problem cannot be solved in spite of this item having been set set Special Printing Mode D ...

Страница 341: ... Mode 1 Off Mode 1 Mode 2 Adjustment Maintenance Special Processing Special Printing Mode V Select the mode Printing speed becomes slower when you select stronger improvement Special Printing Mode B Streaks may appear on printouts immediately after you replace the toner cartridge or when you print for the first time after a long time In this case setting this item may solve the problem The improve...

Страница 342: ... to On may solve the problem Also setting this item to On will reduce the operating noise during printing Off On Adjustment Maintenance Special Processing Special Printing Mode D On If you set this item to On the printing speed becomes slower Clean Fixing Assembly Clean the fixing unit after a toner cartridge is replaced or if black streaks appear on printouts Fixing Unit P 394 Setting Menu List 3...

Страница 343: ...e Product Extended Survey Program P 342 Display Consumables Information RUI Toner Status P 342 Google Cloud Print Settings P 343 Notify to Check Paper Settings P 343 Import Export of Settings P 343 Secure Print Settings P 343 PDL Selection Plug and Play P 344 Update Firmware P 345 Initialize Key and Certificate P 345 Initialize Menu P 345 Initialize All Data Settings P 346 Network Settings See Net...

Страница 344: ...nt ID Management On Off Select whether to use the Department ID Management a feature that uses IDs as user accounts to specify access privileges and maintain information on how the machine is used Setting the Department ID Management P 209 Off On System Management Settings Department ID Management On Off Select Off or On Security Settings Enable or disable settings for encrypted communication via ...

Страница 345: ... settings for filtering packets sent to or received from devices with specified IPv4 addresses Specifying IP Addresses for Firewall Rules P 219 Outbound Filter Off On Inbound Filter Off On System Management Settings Security Settings IPv4 Address Filter Select Outbound Filter or Inbound Filter Select Off or On Restart the machine IPv6 Address Filter Enable or disable settings for filtering packets...

Страница 346: ...C Address Filter Select Outbound Filter or Inbound Filter Select Off or On Restart the machine Select Country Region 1 2 Specify the country or region where the machine is used The default setting may vary depending on the setting selected at initial power on Austria AT Belarus BY Belgium BE Czech Republic CZ Denmark DK Egypt EG Finland FI France FR Germany DE Greece GR Hungary HU Ireland IE Italy...

Страница 347: ...isabling Remote UI P 233 Off On Remote UI Access Security Settings Set whether a PIN is required for accessing the Remote UI Set a PIN of up to 7 digits All users use a common PIN Setting a Remote UI PIN P 216 Off On Remote UI Access PIN System Management Settings Remote UI Settings Remote UI Access Security Settings On Enter PIN Apply PIN Confirm Apply Display Job Log Select whether to display th...

Страница 348: ...ble Product Extended Survey Program Select Off or On Restart the machine Display Consumables Information RUI Toner Status Set whether to display a button in the Remote UI or Toner Status for accessing the Web site for purchasing toner cartridges Also set whether to use Toner Status Display Consumables Purchase Button RUI Off On Toner Status Settings Off On Displ Consmbls Purchase Btn Off On System...

Страница 349: ...e Google Cloud Print Changing Google Cloud Print Settings P 452 Enable Google Cloud Print Off On Google Cloud Print Registration Status Notify to Check Paper Settings Specify whether to display a message prompting you to check paper settings when loading the paper drawer into the machine Off On System Management Settings Notify to Check Paper Settings Select Off or On Restart the machine Import Ex...

Страница 350: ...ork UFR II UFR II V4 PCL5 PCL6 PS 3 USB Select a page description language so that the machine is detected as a printer that is compatible with that language when it is connected to a computer via USB UFR II UFR II V4 PCL5 PCL6 PS 3 System Management Settings PDL Selection Plug and Play Select Network or USB Select a page description language Restart the machine UFR II Detects and connects the mac...

Страница 351: ... the current firmware Via PC Via Internet Version Information Initialize Key and Certificate 1 Select to restore Key and Certificate Settings and CA Certificate Settings to the factory defaults Initializing Key and Certificate P 425 Initialize Menu 1 Select to restore the settings listed below to the factory defaults You can restore all the settings listed below at once or you can restore individu...

Страница 352: ...here data including logs and settings are stored Perform this as necessary for example in such cases as when you want to dispose of the machine after erasing all usage logs When initializing is complete the machine restarts automatically System Management Settings Initialize All Data Settings Yes To use the machine after initializing it is necessary to specify all settings again from scratch Setti...

Страница 353: ...n an Error Code Appears 366 Common Problems 368 Installation Settings Problems 369 Printing Problems 373 When You Cannot Print Properly 376 Printing Results Are Not Satisfactory 378 Paper Creases or Curls 385 Paper Is Fed Incorrectly 387 When a Problem Cannot Be Solved 388 Troubleshooting 347 ...

Страница 354: ...or Message Appears P 357 When an Error Code Appears P 366 Common Problems If you suspect that the machine is malfunctioning see the following sections before contacting Canon Common Problems P 368 Installation Settings Problems P 369 Printing Problems P 373 Printing Results are Not Satisfactory If printing results are not satisfactory see When You Cannot Print Properly P 376 When a Problem Cannot ...

Страница 355: ...Troubleshooting 349 ...

Страница 356: ... OFF the machine deletes the data that is being printed If paper tears Remove all the paper fragments to prevent them from becoming jammed If paper jams repeatedly Tap the paper stack on a flat surface to even the edges of the paper before loading it into the machine Check that the paper is appropriate for the machine Paper P 440 Check that no jammed paper fragments remain in the machine Do not fo...

Страница 357: ...follow the procedure for a different paper jam location indicated by the message 1 Pull out the paper drawer Make sure to hold the paper drawer with both hands and pull it out gently Otherwise you may damage the paper drawer by dropping it if it slides out too easily 2 Gently pull out the paper When the optional paper feeder drawer 2 is attached gently pull out the paper in the same way Troublesho...

Страница 358: ...yed use to select Yes and press Paper Jams in the Back Side Do not forcibly remove jammed paper from the machine If the jammed paper cannot be removed easily proceed to the next step 1 Remove the jammed paper inside the upper rear cover 1 Open the upper rear cover 2 Gently pull out the paper 3 Close the upper rear cover 2 Remove the jammed paper in the duplex unit 1 Open the lower rear cover Troub...

Страница 359: ...isplayed use to select Yes and press Paper Jams inside the Machine Do not forcibly remove jammed paper from the machine If the jammed paper cannot be removed easily proceed to the next step 1 Gently pull out the paper 2 Open the front cover while holding down on the button Troubleshooting 353 ...

Страница 360: ...l returning it back to position in step 6 5 Gently pull out the paper Pull out the paper while holding it as horizontally as possible to prevent unfixed toner from falling 6 Gently return the transport guide back to position 7 Hold the green knob and open the roller cover 8 Gently pull out the paper Troubleshooting 354 ...

Страница 361: ...aper cannot be removed easily do not forcibly pull it out but follow the procedure for a different paper jam location indicated by the message 1 Pull out the paper drawer Make sure to hold the paper drawer with both hands and pull it out gently Otherwise you may damage the paper drawer by dropping it if it slides out too easily 2 Hold the green knob and push down the duplex transport guide Trouble...

Страница 362: ...ack to position Fully close the guide until it clicks 5 Set the paper drawer When you insert the paper drawer with Notify to Check Paper Settings set to On a confirmation screen is displayed Notify to Check Paper Settings P 343 6 When the screen shown below is displayed use to select Yes and press Troubleshooting 356 ...

Страница 363: ...nnection Using WPS Push Button Mode P 138 Setting Up Connection Using WPS PIN Code Mode P 140 An SSID or network key of a wireless router was entered manually but the entry was incorrect Check the SSID and network key and enter the correct ones again Checking the SSID and Network Key P 150 Setting Up Connection by Specifying Detailed Settings P 146 A wireless router could not be detected due to se...

Страница 364: ... and then restart it Could not connect using the wireless LAN A connection failed due to an error while setting wireless LAN connection Restart the machine and set again If the problem persists even after restarting the machine check whether the machine is properly installed and ready to connect to the network Installation Settings Problems P 369 If the problem persists even after checking the wir...

Страница 365: ... of clients For the maximum number of devices that can be connected to a wireless LAN router see the instruction manual for the router or contact the manufacturer of the router Could not detect any connections from wireless devices It was not possible to detect any mobile device within the predetermined length of time Connect again paying attention to the time limit Make Direct Connection Access P...

Страница 366: ...on by Specifying Detailed Settings P 146 Connect again by selecting a wireless router or by manually changing the WEP authentication method to Open System Setting Up Connection by Selecting a Wireless Router P 143 Setting Up Connection by Specifying Detailed Settings P 146 The authentication method of the machine is set to Shared Key but that of the wireless router is set to Open System Change the...

Страница 367: ...is used for Cloud Print may be blocked by a firewall or other protection Check whether the 5222 port is available with your computer If a proxy server is used on the network check whether the proxy settings on the machine and the server are correct For details contact your Network Administrator Setting a Proxy P 228 Incorrect number of characters invalid characters entered The network key the WPA ...

Страница 368: ...Recycled Color or Heavy 1 depending on the loaded paper Loading Paper P 35 Specifying Paper Size and Type P 50 No reply from the destination A network cable may be disconnected or there may be a problem in a switch Check the status of the network cables and switches No response from host The machine is not connected to a network correctly Check the machine and network settings and connect again Co...

Страница 369: ... Administrator Setting the Department ID Management P 209 Set the correct authentication information The client authentication information key pair and certificate user name and password or CA certificate is not set correctly Check the specified authentication method and authentication information key pair and certificate user name and password and CA certificate Configuring IEEE 802 1X Authentica...

Страница 370: ...entication server certificate is incorrect There is no CA certificate registered in the printer that is compatible with the authentication server certificate Check that there is a CA certificate registered in the printer that is compatible with the authentication server certificate Configuring IEEE 802 1X Authentication P 248 The drawer paper guide may not be set to the correct position Adjust the...

Страница 371: ...od to Shared Key at the wireless router and connect again For more information about how to change see the instruction manuals for your networking devices or contact your manufacturer Use Remote UI to set info necessary for authentication The IEEE 802 1X settings are incorrect Check whether Login Name is set correctly Check whether the Use TLS Use TTLS or Use PEAP check box is selected If using TL...

Страница 372: ...d but this is not abnormal Try printing documents again as necessary 701 Authentication failed because an incorrect Department ID or PIN was entered when the Department ID Management was activated Enter the correct Department ID and PIN Continuing operating without entering a Department ID was attempted even though unknown ID jobs functions that permit operations without a Department ID and PIN we...

Страница 373: ...ocument again and print it within the period Printing via Secure Print P 112 Printing using Secure Print was attempted when Secure Print was restricted When Secure Print Settings is set to Off you cannot use Secure Print Set the setting to On and print again Printing via Secure Print P 112 Print without using Secure Print Basic Printing Operations P 70 You tried to print a file that is either corr...

Страница 374: ... Getting Started Manuals Included with the Machine P 456 Are the LAN cable and USB cable connected correctly Check whether these cables are connected correctly Parts and Their Functions P 16 Is sleep mode activated If you leave the machine unattended for a specific period of time it enters sleep mode for power conservation not allowing you to operate it To cancel sleep mode press Is any message di...

Страница 375: ...onnected firmly and the IP address is set correctly and then start the Remote UI again Connecting to a Wired LAN P 135 Viewing Network Settings P 161 Are you using a proxy server If so add the machine s IP address to the Exceptions list addresses that do not use the proxy server in the Web browser s proxy settings dialog Is communication not limited by the firewall on your computer If IP addresses...

Страница 376: ...he SSID auto detection of other devices Check whether the machine is properly installed and ready to connect to the network When the machine cannot connect to the wireless LAN P 370 The machine dials up to an unintended connection destination if a dialup router is connected to a network If a dialup router does not need to pass broadcast packets set the dialup router so that the broadcast packets w...

Страница 377: ... Button Mode P 138 Setting Up Connection Using WPS PIN Code Mode P 140 Setting Up Connection by Selecting a Wireless Router P 143 Setting Up Connection by Specifying Detailed Settings P 146 When you need to manually set up the connection If the wireless router is set as described below manually enter all the required information for the wireless LAN connection Setting Up Connection by Specifying D...

Страница 378: ...nnot find the print server to connect to Are the print server and computer connected correctly Is the print server running Do you have user rights to connect to the print server If you are not sure contact the server administrator Is Network discovery enabled Windows Vista 7 8 Server 2008 Server 2012 Enabling Network discovery P 474 You cannot connect to a shared printer On the network does the ma...

Страница 379: ...ter SSID If they are different reset the wireless LAN connection settings of this machine Viewing Network Settings P 161 Checking the SSID to Which Your Computer Is Connected P 480 Connecting to a Wireless LAN P 136 When you reset wireless LAN connection settings As the wireless LAN router select the one with the SSID to which the computer is connected Have you selected the correct port If there i...

Страница 380: ...tically Checking the Printer Port P 478 Is bidirectional communication enabled Enable bidirectional communication and restart the computer Checking Bidirectional Communication P 479 Disable security software and other resident software Connect to another USB port on the computer Can you print from a USB connection to another computer If you also cannot print from other computers contact your local...

Страница 381: ...e the next job is printed Wait until the machine is ready to print Printing will resume when the temperature inside the machine has fallen A blank sheet is output nothing is printed Did you pull the sealing tape out when loading the toner cartridge If you did not pull it out remove the toner cartridge pull the sealing tape out and reload the toner cartridge How to Replace Toner Cartridges P 400 Tr...

Страница 382: ...d Canon dealer or the Canon help line Smudge Marks Appear on the Bottom Edge of Printouts P 378 Smudges Appear on Printouts P 378 Toner Smudges and Splatters Appear P 379 Afterimages Appear in Blank Areas P 380 Printouts Are Faded P 380 A Portion of the Page Is Not Printed P 381 Streaks Appear Printing is Uneven P 381 White Spots Appear P 382 Black Spots Appear P 382 Troubleshooting 376 ...

Страница 383: ...ide of Paper is Smudged P 383 Printed Barcode Cannot Be Read P 383 Paper Creases P 385 Paper Curls P 385 Paper Is Not Fed Two or More Sheets Are Fed Together P 387 Printouts Are Skewed P 387 Troubleshooting 377 ...

Страница 384: ...g Paper Size and Type P 50 Do you print data without margins This symptom occurs if a margin is set to none in the printer driver The marginal areas within the first 5 mm from the respective edges of paper are not printable for envelopes the top and bottom marginal areas within the first 10 mm from the top bottom edge are not printable Make sure to have margins around the document to print Finishi...

Страница 385: ...ment Mode P 316 Print density will be lighter when you select stronger improvement It may also result in less sharp edges and rougher details If the problem cannot be solved in spite of this item having been set set Special Printing Mode D to On Special Printing Mode D P 336 Do streaks appear immediately after you replace the toner cartridge or when you print for the first time after a long time C...

Страница 386: ...lank Areas Are you using appropriate paper Check usable paper and replace with appropriate paper Paper P 440 Loading Paper P 35 Is it time to replace the toner cartridge Materials inside the toner cartridge may have deteriorated Replace the toner cartridge How to Replace Toner Cartridges P 400 Printouts Are Faded Is the amount remaining in toner cartridge running low Remove the toner cartridge sha...

Страница 387: ...ted Loading Paper P 35 Do you print data without margins This symptom occurs if a margin is set to none in the printer driver The marginal areas within the first 5 mm from the respective edges of paper are not printable for envelopes the top and bottom marginal areas within the first 10 mm from the top bottom edge are not printable Make sure to have margins around the document to print Finishing t...

Страница 388: ...eteriorated Replace the toner cartridge How to Replace Toner Cartridges P 400 White Spots Appear Are you using paper that has absorbed moisture Replace with appropriate paper Loading Paper P 35 Are you using appropriate paper Check usable paper and replace with appropriate paper Paper P 440 Loading Paper P 35 Is it time to replace the toner cartridge Materials inside the toner cartridge may have d...

Страница 389: ...rge the barcode If the direction of lines in the barcode is perpendicular to the paper output direction turn the image 90 degrees to make the lines parallel to the paper output direction If the problem persists even after performing the above operation change the mode by using Barcode Adjustment Mode The improvement effect is weakest with Mode 1 and strongest with Mode 3 Try the adjustment startin...

Страница 390: ...precedence When the setting of Graphics Mode in the printer driver is changed to UFR II Mode and Barcode Adjustment Mode is changed to Printer Default the setting in the operation panel takes precedence When you set Barcode Adjustment Mode to one of Mode 1 to Mode 3 Special Print Adjustment A is automatically set to Off Troubleshooting 384 ...

Страница 391: ... Are you using appropriate paper Check usable paper and replace with appropriate paper Paper P 440 Loading Paper P 35 Paper Curls Are you using paper that has absorbed moisture Replace with appropriate paper Loading Paper P 35 When the current setting of Paper Type is Plain change it to Plain L Specifying Paper Size and Type P 50 Change the setting for Special Printing Mode V The improvement effec...

Страница 392: ...hen you select stronger improvement Are you using appropriate paper Check usable paper and replace with appropriate paper Also specify the paper size and type settings properly Paper P 440 Loading Paper P 35 Specifying Paper Size and Type P 50 Troubleshooting 386 ...

Страница 393: ...rectly Loading Paper P 35 Check whether the number of sheets of paper loaded is appropriate and whether the appropriate paper is used Paper P 440 Loading Paper P 35 Check whether mixed sizes and types of paper are loaded together Printouts Are Skewed Do the paper guides align with the edges of the paper If the paper guides are too loose or too tight the printouts are skewed Loading Paper P 35 Trou...

Страница 394: ...elf it may not be covered by warranty When Contacting Canon When contacting us have the following information ready Product name LBP252dw LBP251dw Dealer where you purchased the machine Details about your problem such as what you did and what happened as a result Serial number 10 alphanumeric characters long found on the label on the back side of the machine Checking the serial number from the ope...

Страница 395: ...rinting Reports and Lists 409 Consumables Status Report 410 User Data List System Manager Data List 411 Department ID Management Report 412 IPSec Policy List 413 PCL Font List 414 PS Font List LBP252dw 415 Viewing the Counter Value 416 Using a USB Memory Device to Save Load Registered Data 417 Saving Registered Data to a USB Memory Device 418 Loading Registered Data from a USB Memory Device 420 In...

Страница 396: ...er Cartridges P 400 Relocating the Machine Relocating the machine for maintenance or an office move see Relocating the Machine P 402 Managing Print Quality Maintaining and Improving Print Quality P 404 If you want to adjust the toner density to be used for printing see Adjusting Print Density P 405 If you want to adjust the print position see Adjusting Print Position P 407 Printing Reports and Lis...

Страница 397: ...ou want to save the machine s settings data or load the saved data see Using a USB Memory Device to Save Load Registered Data P 417 Initializing Settings If you want to restore the settings see Initializing Settings P 422 Maintenance 391 ...

Страница 398: ...inting quality and to ensure that you use it safely and easily Carefully read the safety instructions before you start cleaning Maintenance and Inspections P 9 Where to Clean Exterior of the machine and ventilation slots Exterior P 393 Internal fixing unit Fixing Unit P 394 Maintenance 392 ...

Страница 399: ...en you turn OFF the machine data that is waiting to be printed is deleted 2 Clean the exterior of the machine and the ventilation slots Use a soft well wrung out cloth dampened with water or a mild detergent diluted with water To locate the ventilation slots see Front Side P 17 and Back Side P 19 3 Wait for the exterior of machine to dry completely 4 Reconnect the power cord and turn ON the machin...

Страница 400: ...aper Drawer P 37 Loading Paper in the Multi Purpose Tray P 41 before performing the following procedure Cleaning consumes the toner cartridge Make sure that there is sufficient toner cartridge remaining beforehand Checking the Amount Remaining in the Toner Cartridge P 397 1 Press 2 Use to select Adjustment Maintenance and press 3 Select Clean Fixing Assembly and press 4 Check that the size and typ...

Страница 401: ...paper remains in the multi purpose tray Remove the loaded paper before loading the cleaning sheet 7 Press Cleaning starts When the Finished message is displayed approximately 1 minute later Maintenance 395 ...

Страница 402: ...you have a replacement toner cartridge ready Replace the toner cartridge if you see this message before you start to print a large job When this message is displayed You can continue printing the document Specify when this message is displayed You can set any value as the percentage of the amount remaining in the toner cartridge that triggers this message Display Timing for Cartridge Preparation N...

Страница 403: ...n the toner cartridge according to the following whenever you want to It is recommended that you check the level before you start to print a large job Device Status Amount Remaining in Cartridge Check the amount remaining in the toner cartridge Toner Level Displays the amount remaining in the toner cartridge Depending on your environment other internal parts may reach the end of their lifetime bef...

Страница 404: ...t fine print again for some time until the toner is used up If the symptom does not improve after you perform the following procedure replace the toner cartridge How to Replace Toner Cartridges P 400 Before starting the procedure read the precautions given in Maintenance and Inspections P 9 and Consumables P 10 1 Open the front cover while holding down on the button 2 Remove the toner cartridge 3 ...

Страница 405: ...4 Install the toner cartridge Fully push it in until it cannot go any further 5 Close the front cover Maintenance 399 ...

Страница 406: ... the toner cartridges 1 Open the front cover while holding down on the button 2 Remove the toner cartridge 3 Remove the replacement toner cartridge from the protective bag 4 Shake the toner cartridge five or six times as shown below to evenly distribute the toner inside the cartridge and then place it on a flat surface Maintenance 400 ...

Страница 407: ...dge the quality of printouts may deteriorate Do not pull out the sealing tape at an angle or sideways If the tape breaks you may not be able to pull it out completely If the sealing tape becomes stuck when pulling it out keep pulling until it is completely removed 6 Install the toner cartridge Fully push it in until it cannot go any further 7 Close the front cover Maintenance 401 ...

Страница 408: ...r as in the illustration below Whether the cables with are connected depends on your environment Power plug Power cord USB cable LAN cable 3 When transporting the machine across a long distance remove the toner cartridge How to Replace Toner Cartridges P 400 4 Pull out the paper drawer Make sure to hold the paper drawer with both hands and pull it out gently Otherwise you may damage the paper draw...

Страница 409: ...hed the optional paper feeder leave the optional drawer on the floor and move it after moving the main unit of the machine 6 Carefully place the machine at the new installation site For information about how to install the machine after relocating it see Getting Started Manuals Included with the Machine P 456 Maintenance 403 ...

Страница 410: ... or print position is different than expected try the following adjustments Density Adjustment Adjust the toner density You can make fine adjustment of toner density by density level Adjusting Print Density P 405 Print Position Adjustment For each paper source you can adjust the print position Adjusting Print Position P 407 Maintenance 404 ...

Страница 411: ...not use this adjustment function Toner Save P 316 1 Press 2 Use to select Printer Settings and press 3 Select Print Quality Density 4 Adjust the density 1 Select Density and press 2 Use to adjust the density 3 Press Making fine adjustment of toner density by density level You can make fine adjustment of toner density on three density levels high medium and low 1 Select Density Fine Adjust and pres...

Страница 412: ...evels repeat the operations in steps 2 to 4 5 Select Apply and press 5 Select Apply and press When the printed text or thin lines are faded You can make the whole print job darker by using Printer Density under Adjustment Maintenance in the Setting Menu of the operation panel Maintenance 406 ...

Страница 413: ...y Front Side Adjust Vertically Back Side specify a value with a sign to shift the print position in the up to down direction For Adjust Horizontally Front Side Adjust Horizontally Back Side specify a value with a sign to shift the print position in the left to right direction To shift in the reverse direction specify a value with a sign Adjust Vertically Front Side Adjust Vertically Back Side Adju...

Страница 414: ...int Jobs You can use Printer Settings in the setting menu of the operation panel to adjust the print position for all print jobs regardless of the paper source You can adjust the print position in the range of 50 0 to 50 0 mm in 0 5 mm increments in vertical horizontal direction Offset Short Edge Offset Long Edge P 318 Maintenance 408 ...

Страница 415: ...s been registered in the machine User Data List System Manager Data List P 411 Department ID Management Report You can check the total volume of printouts for each Department ID Department ID Management Report P 412 IPSec Policy List You can check the list of policy names and the content of the IPSec settings that are registered in the machine IPSec Policy List P 413 PCL Font List You can check th...

Страница 416: ...he consumables status installed in the machine Output Report Print List Consumables Status Report Check that the size and type of paper displayed on the screen is loaded in the machine Yes Example LINKS Replacing Toner Cartridges P 396 Maintenance 410 ...

Страница 417: ...nd type registered in the machine Output Report Print List User Data List or System Manager Data List Check that the size and type of paper displayed on the screen is loaded in the machine Yes Example The User Data List does not include the setting lists of Network Settings and System Management Settings To check all the settings items including Network Settings and System Management Settings prin...

Страница 418: ...inting a Department ID Management Report By checking the printout totals you can better manage your paper and toner cartridge supplies Output Report Print List Department ID Management Report Check that the size and type of paper displayed on the screen is loaded in the machine Yes Example LINKS Setting the Department ID Management P 209 Maintenance 412 ...

Страница 419: ...he IPSec settings registered in the machine by printing an IPSec Policy List Output Report Print List IPSec Policy List Check that the size and type of paper displayed on the screen is loaded in the machine Yes Example LINKS Configuring IPSec Settings P 239 Maintenance 413 ...

Страница 420: ... 06L You can print a list to check the fonts available in PCL mode Output Report Print List PCL Font List Check that the size and type of paper displayed on the screen is loaded in the machine Yes Example Maintenance 414 ...

Страница 421: ... 06R You can print a list to check the fonts available in PS mode Output Report Print List PS Font List Check that the size and type of paper displayed on the screen is loaded in the machine Yes Example Maintenance 415 ...

Страница 422: ...er Value 0W20 06S You can check the total number of pages printed by the machine The total number also includes pages of reports and lists Device Status Check Counter Checking the number of pages printed Maintenance 416 ...

Страница 423: ...hine is turned OFF during the process it may result in damage to data or the machine Do not operate the machine during the export import process Before exporting importing check that no operations such as printing documents are currently in progress For the settings that cannot be imported or exported see Setting Menu List P 287 Available USB Memory Devices You can use USB memory devices with the ...

Страница 424: ... Press 3 Use to select System Management Settings and press If the logon screen appears enter the correct ID and PIN using the numeric keys and then press Logging on to the Machine P 34 4 Select Import Export of Settings Export 5 Enter the password select Apply and press Enter a password for the export data consisting of up to 32 alphanumeric characters This password will be required when you impo...

Страница 425: ...USB memory device from the USB port 1 Press 2 Select Device Status and press 3 Select Remove Memory Media and press Wait until the Memory media can be safely removed message is displayed 4 Disconnect the USB memory device Maintenance 419 ...

Страница 426: ...B memory device while data is being imported or exported 2 Press 3 Use to select System Management Settings and press If the logon screen appears enter the correct ID and PIN using the numeric keys and then press Logging on to the Machine P 34 4 Select Import Export of Settings Import 5 Check the message select Yes and press 6 Enter the password select Apply and press Enter the password that was s...

Страница 427: ...y device from the USB port 1 Press 2 Select Device Status and press 3 Select Remove Memory Media and press Wait until the Memory media can be safely removed message is displayed 4 Disconnect the USB memory device Maintenance 421 ...

Страница 428: ...Initializing Settings 0W20 06Y You can restore the following settings Initializing Menu P 423 Initializing Key and Certificate P 425 Maintenance 422 ...

Страница 429: ...s for initializing Select the setting you want to initialize When System Management Settings is selected Select the specific system management settings that you want to initialize select Yes and press Settings to be initialized Select the settings to be initialized Initialize All Initializes all the system management settings If Remote UI settings are initialized The Remote UI Access PIN is also i...

Страница 430: ...dure below to restore the default Network Settings set at the time of purchase Network Settings Initialize Network Settings Yes Restart the machine Initialize All Initializes all the settings on the machine Maintenance 424 ...

Страница 431: ...ates will be deleted after initializing After initializing functions that require key pairs such as SSL encrypted communication and TLS of the IEEE 802 1X authentication are not available To use these functions configure the settings for the key pairs and activate the functions again System Management Settings Initialize Key and Certificate Yes LINKS Configuring Settings for Key Pairs and Digital ...

Страница 432: ... 443 Optional Items 444 Using AirPrint 445 Printing with AirPrint 449 If AirPrint Cannot Be Used 451 Using Google Cloud Print 452 Manuals Included with the Machine 456 Using e Manual 457 Installing e Manual 458 Uninstalling e Manual 462 Screen Layout of e Manual 465 Viewing e Manual 470 Manual Display Settings 472 Others 473 Basic Windows Operations 474 For Mac OS Users 481 Notice 482 Office Locat...

Страница 433: ...ix 0W20 072 This chapter contains technical specifications of this machine instructions on how to use the e Manual disclaimers copyright information and other important information for customers Appendix 427 ...

Страница 434: ...re Highlights 0W20 073 Give the features that are described in this section a try The features are grouped under three headings Going Green and Saving Money Improving Efficiency and So Much More Appendix 428 ...

Страница 435: ...ing P 84 To print multiple pages onto one sheet from your computer Printing Multiple Pages onto One Sheet P 88 Print Multiple Pages on a Single Sheet When there are many pages in a document the printout can be inconveniently bulky hard to to carry around and store and also hard to read But there is a solution Print multiple pages onto one sheet This allows you to save paper and make your documents...

Страница 436: ...These convenient functions work in the background to save power and money every day To save power by putting the machine into sleep mode Entering Sleep Mode P 62 To configure the machine to be automatically turned OFF Powering OFF at a Fixed Time P 64 Save Toner To economize on toner you can use draft mode for drafts and test printouts Or you can switch between modes according to purpose using nor...

Страница 437: ... to be printed Save time and trouble by eliminating trips between your desk and the printer For more information about this function see Using Remote UI P 269 Register Favorite Settings and Call Them Up at Any Time Everyone in the office uses the printer If you register the most popular settings as the default settings you can use them right away You can also register frequently used combinations ...

Страница 438: ...nt them all at once These shortcuts save time and allow you to work more efficiently For more information about this function see Combining and Printing Multiple Documents P 104 Make Print Settings Quickly with Intuitive Operation You can easily specify the page layout as well as binding position switching between 1 sided and 2 sided printing etc intuitively on the preview image in the printer dri...

Страница 439: ...irelessly and directly PCless quick and easy An even broader range of possibilities for work play with functionality made for this age of speed For more information about this function see Can Be Used Conveniently with a Mobile Device P 123 Easy Printing with Google Cloud Print Hook up to Google Cloud Print with your laptop or cell phone send your data and out come your printed documents With this...

Страница 440: ...atermarks such as CONFIDENTIAL over the document Printing Watermarks P 96 Go Wireless No cables easy installation simple maintenance If you ve got a WPS wireless LAN router bypass the settings process altogether and be ready to go before you know it Enjoy the kind of clutter free and easy to use document system that you can only get from wireless Compatible with IEEE 802 11b g n for stress free wi...

Страница 441: ...long the middle For more information about this function see Printing Booklet P 91 Automatically Collate Meeting Handouts When you print multiple copies of a multi page document you can use the collate function to print one copy after another with all of the pages in the correct order This is convenient when preparing handouts for meetings or presentations For more information about this function ...

Страница 442: ...cations 0W20 077 The machine specifications are subject to change without prior notice due to improvements of the machine Machine Specifications P 437 Wireless LAN Specifications P 439 Paper P 440 Appendix 436 ...

Страница 443: ...he output tray used Approx 6 0 seconds Acceptable Paper Stock Paper P 440 Printable Area Printable Area P 442 Paper Capacity Drawer 1 Approx 250 sheets Drawer 2 optional Approx 500 sheets Multi purpose tray Approx 50 sheets 2 Sided Printing Standard size A4 Legal Letter Oficio Oficio Brazil Oficio Mexico Foolscap and Legal India Paper Output Face down output tray Face up sub output tray Output Cap...

Страница 444: ...Approx 11 5 kg Toner cartridge Approx 0 8 kg Consumables and optional accessories Toner cartridge Canon Cartridge 719 Approx 0 8 kg Toner cartridge Canon Cartridge 719 H Approx 1 0 kg Paper Feeder Unit PF 44 including the drawer Approx 4 1 kg 1 The print speed may be slower depending on the output resolution paper size paper type paper orientation and number of copies printed 2 May vary depending ...

Страница 445: ...mission Scheme DS SS System OFDM System Frequency Range 2 412 to 2 472 MHz Maximum Radio Frequency Power Transmitte 15 98 dBm Communication Mode Infrastructure Mode Security WEP WPA PSK TKIP AES CCMP WPA2 PSK TKIP AES CCMP Connection Method WPS Wi Fi Protected Setup Manual setup Appendix 439 ...

Страница 446: ...x 279 4 mm Statement STMT 139 7 x 215 9 mm Executive EXEC 184 1 x 266 7 mm Oficio 215 9 x 317 5 mm 2 Oficio Brazil 215 9 x 355 0 mm 2 Oficio Mexico 215 9 x 341 0 mm 2 Letter Government 203 2 x 266 7 mm 1 Automatic 2 sided printing is available without necessity of paper reloading 2 Set the paper size switch lever in the same position as that for Letter Legal size Interior P 21 3 Custom size paper ...

Страница 447: ...t for Letter Legal size Interior P 21 3 Custom size paper with width 105 0 to 216 0 mm and length 148 0 to 356 0 mm can be loaded 4 Custom size paper with width 76 2 to 216 0 mm and length 127 0 to 356 0 mm can be loaded The default paper size of the machine is set to A4 Change the paper size setting when using a different size of paper Specifying Paper Size and Type in the Paper Drawer P 51 Paper...

Страница 448: ...eets 50 sheets Color paper 60 to 89 g m 250 sheets 50 sheets Label 20 sheets Envelope 5 sheets Automatic 2 sided printing is available without replacing paper Paper Type and Setting for the Machine Loading Paper P 35 Printable Area The shaded areas in the image below indicate the printable area of the document For envelope the top bottom left and right margins are all 10 mm Appendix 442 ...

Страница 449: ...omes with the machine is 2 100 sheets The average yield is based on ISO IEC 19752 the global standard related to Method for the determination of toner cartridge yield for monochromatic electrophotographic printers and multi function devices that contain printer components issued by ISO International Organization for Standardization when printing A4 size paper with the default print density setting...

Страница 450: ...ion to the provided standard paper drawer and multi purpose tray you can install the optional paper feeder to the machine Adding the drawer enables you to load different sizes of paper in each drawer and enables the machine to hold up to 800 sheets with the original drawer multi purpose tray and optional paper feeder Paper Capacity 500 sheets Available Paper Paper P 440 Power Supply From main unit...

Страница 451: ...irPrint Settings You can register information including the name of the machine and installation location that is used for identifying the machine You can also disable the AirPrint function of the machine Use the Remote UI to change these settings 1 Start the Remote UI and log on in System Manager Mode Starting Remote UI P 270 2 Click Settings Registration If you are using a mobile device such as ...

Страница 452: ...ble AirPrint To disable AirPrint clear the check box Printer Name Location Latitude Longitude Enter the name and the installation location information to help you identify this machine when operating your Apple device This information is useful if you have more than one AirPrint printer Appendix 446 ...

Страница 453: ...Pv4 is also changed automatically In this case add the machine to the Mac again 6 Restart the machine Turn OFF the machine wait for at least 10 seconds and turn it back ON Displaying the Screen for AirPrint You can display the screen for AirPrint on which you can not only access the AirPrint Settings but also view information about consumables such as paper and toner cartridge Further you can conf...

Страница 454: ...arks Apple Bonjour iPad iPhone iPod touch Mac Mac OS and Mac OS X are trademarks of Apple Inc registered in the U S and other countries AirPrint and the AirPrint logo are trademarks of Apple Inc Appendix 448 ...

Страница 455: ...SB connection Network Environment You need one of the following environments The Apple device and the machine are connected to the same LAN The Apple device and the machine are in Direct Connection The Mac and the machine are connected via USB Printing from iPad iPhone or iPod touch 1 Make sure that the machine is turned ON and that it is connected to your Apple device For how to make sure of this...

Страница 456: ...sure that the machine is turned ON and that it is connected to your Mac For how to make sure of this see Getting Started Manuals Included with the Machine P 456 2 Add the machine to the Mac from System Preferences Printers Scanners 3 Open a document in an application and display the print dialog box How to display the print dialog box differs for each application For more information see the instr...

Страница 457: ...Apple devices and the machine are connected to the same LAN If the machine is turned ON it may take several minutes before the machine is ready for communication Make sure that Bonjour on your Apple device is enabled Make sure that the machine is configured to enable printing from a computer even when no department ID and password are entered Blocking Jobs When Department ID Is Unknown P 214 Make ...

Страница 458: ...ou are also responsible for paying all Internet connection fees You may not be able to use this function in some countries or regions To use Google Cloud Print a Google account is required If you do not have one access Google Web site to create your account Checking the Machine Settings Before setting up Google Cloud Print check the following Make sure that the machine is assigned an IPv4 address ...

Страница 459: ...Google Cloud Print Settings Enable Google Cloud Print 4 Select On or Off and press Registering the Machine with Google Cloud Print Registering the machine with Google Cloud Print allows you to print from anywhere 1 Start the Remote UI and log on in System Manager Mode Starting Remote UI P 270 2 Click Settings Registration 3 Click Network Settings Google Cloud Print Settings Appendix 453 ...

Страница 460: ...Click Edit select the Use Google Cloud Print check box and then click OK To reregister the machine To reregister the machine if the owner of the machine has changed or for other reasons unregister the machine and register it again 5 Click the link of the URL displayed for URL for Registration Appendix 454 ...

Страница 461: ...st applications that support Google Cloud Print Registering from a mobile device or Google Chrome You can also register the machine from a mobile device or Google Chrome The machine s display shows the following confirmation screen before completion of the registration Press Yes to complete the registration For the registration procedure see the instruction manual for your mobile device or the Goo...

Страница 462: ...a wireless LAN router it also contains information for troubleshooting when configuring the settings Read this manual with Getting Started e Manual This Manual This manual describes all the functions of the machine in a manual that is viewed using a Web browser You can browse information by category or enter a keyword to search for pages on a specific topic Using e Manual P 457 Printer Driver Inst...

Страница 463: ...re looking for from those results You can also enter phrases such as connecting to a network The keyword search also supports the AND Boolean to search for multiple keywords Search Tab P 468 Search the site map Click Site Map on the top part of the screen and a list of all the e Manual topics is displayed From there you can find the topic you are looking for Site Map P 469 System Requirements To u...

Страница 464: ...uter Select a language and click OK if you are prompted to do so If the Software Programs Manuals Setup screen does not appear remove the DVD ROM from the drive and insert it again or see Displaying the Software Programs Manuals Setup Screen P 476 If AutoPlay is displayed click Run MInst exe 2 Click Installation 3 Clear all the check boxes except for Manuals and click Install Appendix 458 ...

Страница 465: ...e Agreement and click Yes to agree 5 Select the folder in which to install the e Manual and click Install The installation begins Wait a moment This process may take some time 6 Click Exit 7 Click Next Exit Appendix 459 ...

Страница 466: ...icon of the e Manual on the desktop If a security warning message appears Click Allow blocked content TIPS for Viewing the e Manual Directly from the DVD ROM 1 Insert the User Software and Manuals DVD ROM into the drive on the computer Appendix 460 ...

Страница 467: ...mpted to do so If the Software Programs Manuals Setup screen does not appear remove the DVD ROM from the drive and then insert it again or see Displaying the Software Programs Manuals Setup Screen P 476 2 Click Manuals 3 Click e Manual Appendix 461 ...

Страница 468: ...1 Insert the User Software and Manuals DVD ROM into the drive on the computer Select a language and click OK if you are prompted to do so 2 Click Start Software Programs If the above screen is not displayed see Displaying the Software Programs Manuals Setup Screen P 476 lf AutoPlay is displayed click Run MInst exe 3 Click Start for Manual Uninstaller Appendix 462 ...

Страница 469: ...4 Click Next Uninstall begins Wait a moment This process may take some time 5 Click Exit 6 Click Back Exit Appendix 463 ...

Страница 470: ...Appendix 464 ...

Страница 471: ...anual is started Canon Click to return to the top page Contents tab Search tab Click to toggle the display between the table of contents and search Contents The titles of chapters are displayed Place the mouse pointer over one of the titles and topics of the chapter are displayed on the right Click a topic and its page is displayed Appendix 465 ...

Страница 472: ...r click the sliding display for more information about each category The sliding display can be stopped by moving the pointer onto it Feature Highlights P 466 Quick Help Troubleshooting Maintenance Click to view how to solve problems or maintain the machine For Mac OS Users Click to view precautions when using Mac OS Notice Click to view important information you should know when using the machine...

Страница 473: ...ick to display the detailed information Click again to close the window Click to display the corresponding topic page Topic Page Contains information about how to configure and use the machine Appendix 467 ...

Страница 474: ...that topic Click to close the expanded topic Print all All pages of the selected chapter are opened in a separate window The chapter can be printed if necessary Navigation See what chapter topic you are currently viewing Click to return to the page top Click to display the previous or following topic Click to jump to the corresponding page To return to the previous page click Back on your Web brow...

Страница 475: ...ially useful when you can predict the general location of the topic that you are looking for Search options selector Select the check box to make your search case sensitive Search with these conditions Click to display the search results with the conditions specified with and Search result list Displays the search results of the pages that contain the specified keywords From the results locate the...

Страница 476: ...ms carefully to operate the machine correctly and avoid damage to the machine or property Indicates a clarification of an operation or contains additional explanations for a procedure Indicates useful functions or tips for using the machine Keys and Buttons Used in this Manual Keys on the operation panel and buttons on the computer display appear in the following notation Type Example Keys on the ...

Страница 477: ... in this manual may slightly differ from the actual displays Also the appearance of drivers and software may differ depending on their version Illustrations Used in This Manual Unless otherwise noted the illustrations of the machine used in the e Manual are those for the LBP252dw The illustrations of the toner cartridge used in the e Manual are those for the Canon Cartridge 719 Appendix 471 ...

Страница 478: ...Manual Display Settings 0W20 08J Appendix 472 ...

Страница 479: ...Others 0W20 080 This section describes basic Windows operations and includes disclaimers copyright information and other information Appendix 473 ...

Страница 480: ...Server 2012 R2 Right click Start select File Explorer Computer or This PC Windows Server 2003 Start select My Computer Displaying the Printer Folder Windows Vista Start select Control Panel Printer Windows 7 Server 2008 R2 Start select Devices and Printers Windows 8 Server 2012 Right click the lower left corner of the screen select Control Panel View devices and printers Windows 8 1 Server 2012 R2...

Страница 481: ...twork discovery under Network discovery Windows Server 2008 Start select Control Panel double click Network and Sharing Center select Turn on network discovery under Network discovery Displaying Shared Printers in the Print Server 1 Open Windows Explorer Windows Vista 7 Server 2003 Server 2008 Start select All Programs or Programs Accessories Windows Explorer Windows 8 Server 2012 Right click the ...

Страница 482: ...indows 8 Server 2012 Right click the lower left corner of the screen Run Enter D MInst exe click OK Windows 8 1 Server 2012 R2 Right click Start Run Enter D MInst exe click OK Windows Server 2003 Start Run enter D MInst exe click OK Printing a Test Page in Windows You can check whether the printer driver is operational by printing a test page in Windows 1 Load A4 size paper in the multi purpose tr...

Страница 483: ... 2012 Right click the lower left corner of the screen select Control Panel Windows 8 1 Server 2012 R2 Right click Start select Control Panel 2 Display System Windows Vista 7 8 Server 2008 R2 Server 2012 Click System and Maintenance or System and Security System Windows Server 2008 Double click System 3 Check the bit architecture For 32 bit versions 32 bit Operating System is displayed For 64 bit v...

Страница 484: ...ter Port 1 Open the printer folder Displaying the Printer Folder P 474 2 Right click your printer icon and click Printer properties or Properties 3 In the Ports tab check that the port is selected correctly Appendix 478 ...

Страница 485: ...ll be maintained You do not need to add a new port If it is Standard TCP IP Port you need to add a new port Configuring Printer Ports P 168 Checking Bidirectional Communication 1 Open the printer folder Displaying the Printer Folder P 474 2 Right click your printer icon and click Printer properties or Properties 3 In the Ports tab make sure that the Enable bidirectional support check box is select...

Страница 486: ...ecking the SSID to Which Your Computer Is Connected If your computer is connected to a wireless LAN network click or in the system tray to display the SSID of the connected wireless LAN router Appendix 480 ...

Страница 487: ...nvironment are explained as examples To view how to use the driver and utility for Mac OS see the following guide or help Object Reference Installing the Driver Getting Started Canon UFR II UFRII LT Printer Driver Guide Canon PS Printer Driver Guide LBP252dw Using each feature Driver s Help Canon UFR II UFRII LT Printer Driver Guide Canon PS Printer Driver Guide LBP252dw Displaying the Driver Guid...

Страница 488: ... requirements of EC Directive Laser Safety This product is certified as a Class 1 laser product under IEC60825 1 2007 and EN60825 1 2007 This means that the product does not produce hazardous laser radiation Since radiation emitted inside the product is completely confined within protective housings and external covers the laser beam cannot escape from the machine during any phase of user operatio...

Страница 489: ...s printed beneath the symbol shown above in accordance with the Battery Directive this indicates that a heavy metal Hg Mercury Cd Cadmium Pb Lead is present in this battery or accumulator at a concentration above an applicable threshold specified in the Battery Directive This product should be handed over to a designated collection point e g on an authorized one for one basis when you buy a new si...

Страница 490: ...ability A non exhaustive list of these documents is set forth below This list is intended to be a guide only If you are uncertain about the legality of using your product to scan print or otherwise reproduce any particular document and or of the use of the images scanned printed or otherwise reproduced you should consult in advance with your legal advisor for guidance Paper Money Travelers Checks ...

Страница 491: ...nc Trademarks Adobe Acrobat and Reader are registered trademarks of Adobe Systems Incorporated in the United States and or other countries Apple AppleTalk EtherTalk LocalTalk Mac Mac OS Safari Bonjour iPad iPhone iPod touch and OS X are trademarks of Apple Inc registered in the U S and other countries AirPrint and the AirPrint logo are trademarks of Apple Inc Microsoft Windows Windows Vista Window...

Страница 492: ...evice or similar item refers to a printing device display device or item respectively that contains PostScript technology created or licensed by Adobe Systems Incorporated and not to devices or items that purport to be merely compatible with the PostScript language Adobe the Adobe logo PostScript the PostScript logo and PostScript 3 are either registered trademarks or trademarks of Adobe Systems I...

Страница 493: ...747 U S A CANON EUROPA N V Bovenkerkerweg 59 1185 XB Amstelveen The Netherlands CANON CHINA CO LTD 2F Jinbao Building No 89 Jinbao Street Dongcheng District Beijing 100005 PRC CANON SINGAPORE PTE LTD 1 Fusionopolis Place 15 10 Galaxis Singapore 138522 CANON AUSTRALIA PTY LTD Building A The Park Estate 5 Talavera Road Macquarie Park NSW 2113 Australia CANON GLOBAL WORLDWIDE SITES http www canon com...

Страница 494: ... to remain under this license does not apply to any document created using the fonts or their derivatives DEFINITIONS Font Software refers to the set of files released by the Copyright Holder s under this license and clearly marked as such This may include source files build scripts and documentation Reserved Font Name refers to any names specified as such after the copyright statement s Original ...

Страница 495: ...rsion except to acknowledge the contribution s of the Copyright Holder s and the Author s or with their explicit written permission 5 The Font Software modified or unmodified in part or in whole must be distributed entirely under this license and must not be distributed under any other license The requirement for fonts to remain under this license does not apply to any document created using the F...

Отзывы: