


En
Es
Fr
Pt
5
2.
To use System Manager mode, select <Yes>.
• Set the System Manager ID and PIN so that you
can configure the settings for extended functions
and the management of access privileges, etc.
• To continue without using System Manager mode,
select <No> and proceed to step
5
.
3.
Set the System Manager ID.
Enter any number and then select <Apply>.
4.
Set the System Manager PIN.
• Enter any number and then select <Apply>.
• Re-enter the same PIN on the next screen as
confirmation and select <Apply>.
* Do not forget your PIN.
5.
To use General User mode, select <Yes>.
• Set the PIN to be used by general users to access
the Remote UI.
• To continue without using General User mode,
select <No> and proceed to step
8
.
6.
Set the Remote UI Access PIN.
• Enter any number and then select <Apply>.
• Re-enter the same PIN on the next screen as
confirmation and select <Apply>.
* Do not forget your PIN.
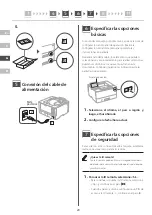
Specifying the Network
Settings
Specify the settings for connecting the machine to a
network. Before proceeding, check that the computer and
router are correctly connected to the network.
• You cannot use a wired LAN and a wireless LAN at the
same time.
Wireless LAN
1.
Check the router's "SSID" and "Network
key."
SSID
: XXXXXXXXXXXX
Network key
: XXXXXXXXXXXX
8
2.
To configure the settings, select <Yes> on
the operation panel.
3.
Select the network with a matching SSID.
4.
Enter the password (network key) and select
<Apply>.
Depending on your model, a connection
confirmation screen may appear. To connect, select
<Yes>.
Wired LAN
Connect the router to the machine with a LAN cable and
then select <No> in the screen for choosing how to
connect to the network.
Rear
Setting Up the Toner
Replenishment Service
Use this procedure to set up the toner replenishment
service. To use this service, you must enter into an
agreement beforehand.
1.
Check the message and select <Next>.
2.
Check the conditions of use, and then
choose whether or not to use the service.
• To use the service: <Accept>.
• To not use the service or not enter into an
agreement: Select <Do Not Accept> and proceed
to step
10
.
3.
When <Connection was successful.> appears,
select <OK>.
9
5
6
7
8
10
9
11
1