background image

En

Es

Fr

Pt

1

2

3

4

5

6

7

11

5

5

6

7

8

10

9

11

1

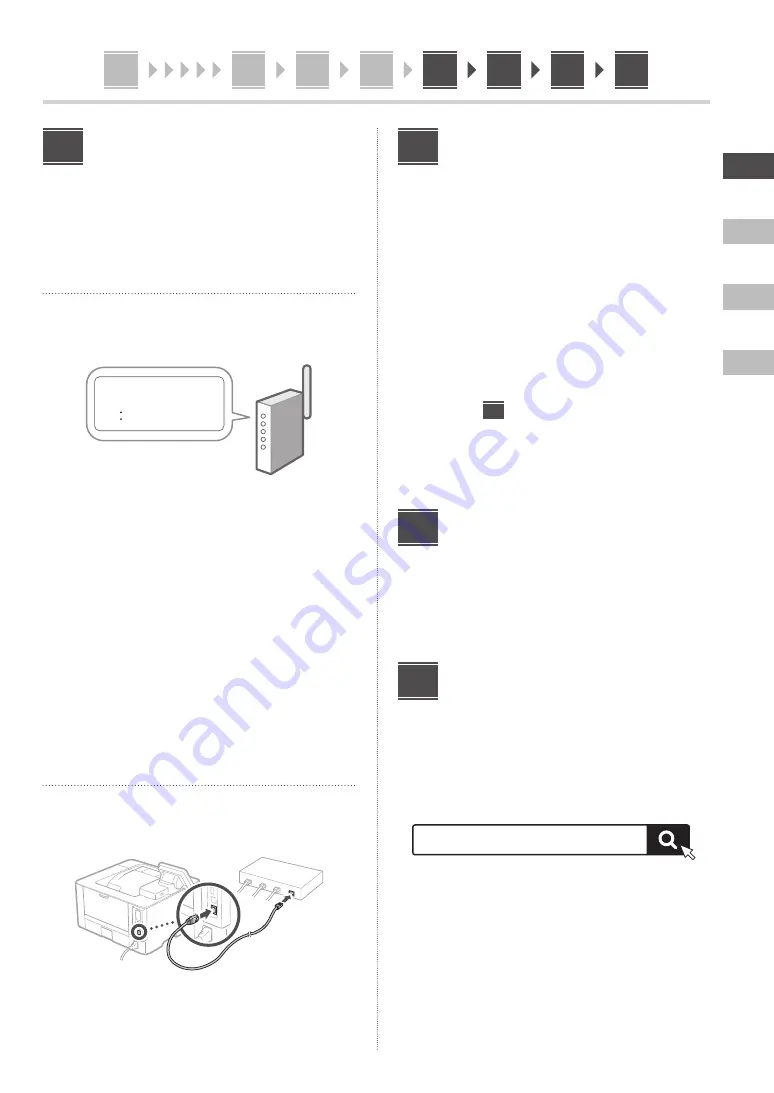
Specifying the Network 

Settings

Specify the settings for connecting the machine to a 
network. Before proceeding, check that the computer and 
router are correctly connected to the network.

Wireless LAN

1. 

Check the router's "SSID" and "Network 
key."

SSID 

: XXXXXXXXXXXX

Network key 

: XXXXXXXXXXXX

2. 

To configure the settings, select <Yes> on 
the operation panel.

3. 

Check the message and select <OK>.

Depending on your model, this screen may not 
appear. In this case, proceed to step 

4

.

4. 

Select the network with a matching SSID.

5. 

Enter the password (network key) and select 
<Apply>.

•  Depending on your model, a connection 

confirmation screen may appear. To connect, 
select <Yes>.

Wired LAN

Connect the router to the machine with a LAN cable and 
then select <No> in the screen for choosing how to 
connect to the network.

8

Setting Up the Toner 

Replenishment Service

Use this procedure to set up the toner replenishment 
service. To use this service, you must enter into an 
agreement beforehand.

1. 

Check the message and select <Next>.

2. 

Check the conditions of use, and then 
choose whether or not to use the service. 

•  To use the service: <Accept>.
•  To not use the service or not enter into an 

agreement: Select <Do Not Accept> and proceed 
to step 

10

.

3. 

When <Connection was successful.> appears, 

select <OK>.

Ending the Setup Guide

Check the description in the Application Library and then 
select <End>. 

* If your model does not support the Application Library 

function, this step does not appear.

Installing the Software/

Drivers

Install the software and drivers from the CD/DVD-ROM 
included, or visit the URL below and download them from 
the Canon website for your country/region.
https://global.canon/en/support/

Example: LBP236dw download

XXXXXXX download

9

10

11

Содержание imageCLASS LBP237dw

Страница 1: ... you finish reading this guide store it in a safe placeforfuturereference The information in this guide is subject to change withoutnotice 3 User s Guide FAQ 1 Important Safety Instructions Be sure to read these instructions before using the machine 2 Setup Guide this document ...

Страница 2: ...he LBP237dw Checking the Items Included Removing the Packing Material 1 Install the machine in the location where it will be used 2 Remove all packing material Remove all of the tape Do not remove the sticker that covers the USB port until you actually use the USB port Loading Paper 1 2 A5 A4 A4 1 2 3 ...

Страница 3: ...talling the Optional Part When installing the optional part after the machine has been installed perform the following before starting work 1 Shut down the machine and your computer 2 Unplug the machine from the mains power outlet 3 Disconnect all cords and cables from the machine 4 Cassette feeding module 1 Install the cassette feeding module in the location where it will be used 2 3 4 ...

Страница 4: ... continue without using the Remote UI select No and proceed to step 8 When A Remote UI Access PIN must be configured appears proceed to step 5 2 To use System Manager mode select Yes Set the System Manager ID and PIN so that you can configure the settings for extended functions and the management of access privileges etc To continue without using System Manager mode select No and proceed to step 5...

Страница 5: ...ct No in the screen for choosing how to connect to the network 8 Setting Up the Toner Replenishment Service Use this procedure to set up the toner replenishment service To use this service you must enter into an agreement beforehand 1 Check the message and select Next 2 Check the conditions of use and then choose whether or not to use the service To use the service Accept To not use the service or...

Страница 6: ...6 ...

Страница 7: ...un endroit sûr pour information Les informations figurant dans ce guide sont sujettes à modifications sans préavis 1 Consignes de sécurité importantes Veillez à lire ces instructions avant d utiliser l appareil 3 Guide de l utilisateur FAQ 2 Guide de configuration ce document Guide de configuration ...

Страница 8: ...LBP237dw Vérification des articles inclus Retrait du matériel d emballage 1 Installez l appareil là où il sera utilisé 2 Retirez tout le matériel d emballage Retirez tout le ruban adhésif Ne retirez l autocollant qui recouvre le port USB qui si vous avez besoin d utiliser le port USB Chargement du papier 1 2 A5 A4 A4 1 2 3 ...

Страница 9: ... passez à l étape Avant d installer l équipement en option Avant d installer l équipement en option sur l appareil que vous avez installé effectuez les opérations suivantes 1 Éteignez l appareil et l ordinateur 2 débrancher l appareil de la prise secteur 3 Débranchez tous les cordons et les câbles de l appareil 4 Module de cassette 1 Installez le module de cassette là où il sera utilisé 2 3 4 ...

Страница 10: ... à l IU distante doit être configuré s affiche passez à l étape 5 2 Pour utiliser le mode Manageur du système sélectionnez Oui Définissez l ID et le code PIN de manageur du système de sorte à pouvoir configurer les réglages pour les fonctions étendues la gestion des droits d accès etc Pour continuer sans utiliser le mode Manageur du système sélectionnez Non et passez à l étape 5 3 Définissez l ID ...

Страница 11: ...ettant de choisir la méthode de connexion au réseau 8 Configuration du service de réapprovisionnement en toner Procédez comme suit pour configurer le service de réapprovisionnement en toner Pour pouvoir utiliser ce service vous devez d abord conclure un accord 1 Vérifiez le message et sélectionnez Suivant 2 Prenez connaissance des conditions d utilisation puis choisissez d utiliser ou non le servi...

Страница 12: ...12 Note ...

Страница 13: ...un lugar seguro para poder consultarla en el futuro La información de esta guía puede sufrir cambios sin previo aviso Guía de configuración 1 Instrucciones importantes de seguridad Recuerde leer estas instrucciones antes de usar el equipo 3 Guía de usuario FAQ 2 Guía de configuración este documento ...

Страница 14: ...ponden con LBP237dw Comprobación de los elementos incluidos Retirar el material de embalaje 1 Instale el equipo allí donde se va a utilizar 2 Retire todo el material de embalaje Retire toda la cinta adhesiva No retire la pegatina que cubre el puerto USB hasta que vaya a utilizar el puerto USB Cargar papel 1 2 A5 A4 A4 1 2 3 ...

Страница 15: ...Antes de instalar la pieza opcional Al instalar la pieza opcional después de haber instalado el equipo haga lo siguiente antes de empezar a trabajar 1 Apague el equipo y el ordenador 2 Desenchufe el equipo de la toma de corriente 3 Desconecte todos los cables del equipo 4 Módulo de alimentación del casete 1 Instale el módulo de alimentación del casete allí donde se vaya a utilizar 2 3 4 ...

Страница 16: ...Debe configurarse un PIN de acceso a la IU remota continúe en el paso 5 2 Para utilizar el modo de administrador del sistema seleccione Sí Establezca el ID del administrador del sistema y el PIN para poder configurar las opciones de funciones ampliadas y la administración de los privilegios de acceso etc Para continuar sin utilizar el modo de administrador del sistema seleccione No y continúe en e...

Страница 17: ...e No en la pantalla para seleccionar cómo desea conectarse a la red 8 Configuración del servicio de relleno de tóner Siga este procedimiento para configurar el servicio de relleno de tóner Para utilizar este servicio debe suscribir un acuerdo de antemano 1 Compruebe el mensaje y seleccione Siguiente 2 Compruebe las condiciones de uso y elija si desea usar o no el servicio Para usar el servicio Ace...

Страница 18: ...18 Notas ...

Страница 19: ... em um local seguro para referência futura As informações contidas neste guia estão sujeitas a alterações sem aviso prévio Guia de configuração 1 Instruções de segurança importantes Certifique se de ler essas instruções antes de usar a máquina 3 Guia do usuário FAQ 2 Guia de configuração este documento ...

Страница 20: ...o do LBP237dw Verificação dos itens incluídos Remoção do material de embalagem 1 Instale a máquina no local em que será usada 2 Remova todo o material de embalagem Remova toda a fita Não remova o adesivo que cobre a porta USB até que realmente utilize a porta USB Carregando papel 1 2 A5 A4 A4 1 2 3 ...

Страница 21: ...ue na etapa Antes de instalar a peça opcional Ao instalar a peça opcional após instalar a máquina execute o seguinte antes de começar a trabalhar 1 Desligue a máquina e seu computador 2 Desconecte a máquina da tomada 3 Desconecte todos os fios e cabos da máquina 4 Módulo de alimentação de cassete 1 Instale o módulo de alimentação de cassete no local em que será usado 2 3 4 ...

Страница 22: ...a etapa 8 Quando aparecer a mensagem Um PIN de Acesso da Interface Remota precisa ser configurado continue na etapa 5 2 Para usar o modo de Gerenciador de Sistema selecione Sim Configure a ID e PIN do Gerenciador de Sistema de modo que possa fazer as configurações das funções estendidas e o gerenciamento de privilégios de acesso etc Para continuar sem usar a UI Remota selecione Não e continue na e...

Страница 23: ...e e selecione Não na tela de seleção de conexão da rede 8 Configurando o serviço de reabastecimento de toner Use este procedimento para configurar o serviço de reabastecimento de toner Para usar o serviço é preciso aceitar o contrato com antecedência 1 Verifique a mensagem e selecione Próxima 2 Verifique as condições de uso e escolhe se deseja ou não usar o serviço Para usar o serviço Accept Para ...

Страница 24: ... Tokyo 146 8501 Japan CANON MARKETING JAPAN INC 16 6 Konan 2 chome Minato ku Tokyo 108 8011 Japan CANON EUROPA N V Bovenkerkerweg 59 1185 XB Amstelveen The Netherlands CANON SINGAPORE PTE LTD 1 Fusionopolis Place 15 10 Galaxis Singapore 138522 CANON AUSTRALIA PTY LTD Building A The Park Estate 5 Talavera Road Macquarie Park NSW 2113 Australia CANON GLOBAL WORLDWIDE SITES https global canon FT6 280...

Отзывы: