3-15
3
Pr
in
te
r Pro
pert
ie
s
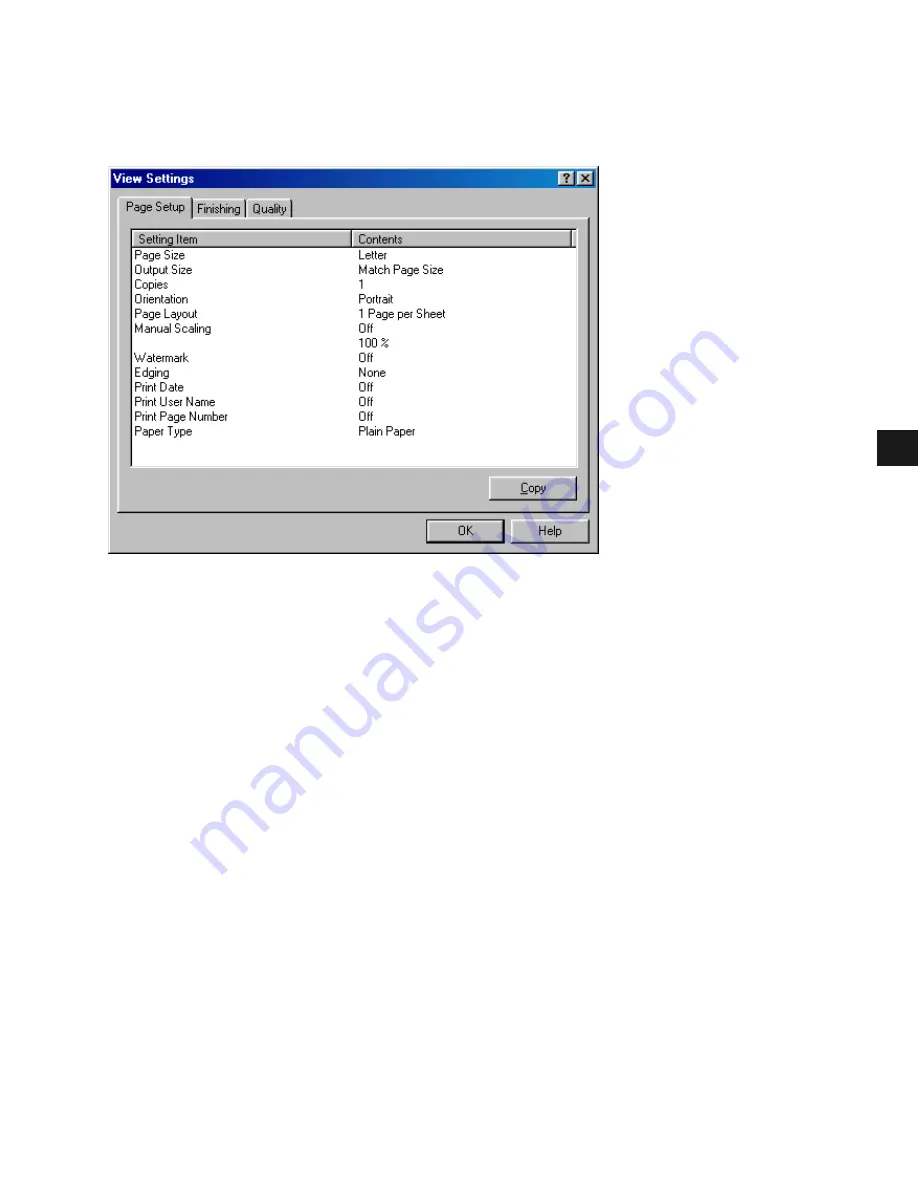
View Settings
Clicking
opens the
dialog box. This dialog box displays the
current settings in the
Page Setup
,
Finishing
, and
Quality
tab windows.
Страница 1: ...Printer Guide IMPORTANT Read this manual carefully Use this manual when you need quick reference help for the printer feature of your machine ...
Страница 2: ...umentation Using Your Documentation Using Your Documentation Using Your Documentation Setting up the machine Installing CARPS Software Document and paper handling Making copies Printing with CARPS Software Maintenance Troubleshooting feed and copy issues Installing CARPS software Printer Properties Troubleshooting Printer Driver issues Setup Sheet Basic Guide Printer Guide ...
Страница 3: ...w This Manual Is Organized How This Manual Is Organized How This Manual Is Organized How This Manual Is Organized Before You Start Installing Canon Advanced Raster Printing System CARPS Printer Properties Troubleshooting Printer Specifications Chapter 1 Chapter 2 Chapter 3 Chapter 4 Appendix Index Glossary ...
Страница 4: ...d in a retrieval system or translated into any language or computer language in any form or by any means electronic mechanical magnetic optical chemical manual or otherwise without the prior written permission of Canon Inc Notice Notice Notice Notice The information in this document is subject to change without notice CANON INC MAKES NO WARRANTY OF ANY KIND WITH REGARD TO THIS MATERIAL EITHER EXPR...
Страница 5: ...the imageCLASS D300 Series Already on Your Network 2 37 Printer Sharing 2 40 Connecting the imageCLASS D300 Series as a Shared Printer 2 41 Chapter 3 Printer Properties Windows 98 Me Printer Properties 3 2 Windows 2000 XP Printer Properties and Default Document Properties 3 21 Printer Properties 3 22 Default Document Properties 3 29 Chapter 4 Troubleshooting Finding Information 4 1 Printer Problem...
Страница 6: ... to these warnings CAUTION Indicates a caution concerning operations that may lead to injury to persons or damage to property if not performed correctly In order to use the machine safely always pay attention to these cautions IMPORTANT Indicates an operational warning or restriction Be certain to read these items to operate the machine correctly and to avoid damage to the machine NOTE Indicates a...
Страница 7: ...d in This Manual Screenshots of computer operation screens used in this manual may differ from the ones you actually see depending on the model or options that come with your machine The keys or buttons which you should press are marked with as shown below When multiple buttons or keys can be pressed they will be highlighted and mentioned in the order in which they should be pressed 4 The Wizard d...
Страница 8: ...iations Used in This Manual In this manual product names and model names are abbreviated as follows Microsoft Windows 98 operating system Windows 98 Microsoft Windows Millennium Edition operating system Windows Me Microsoft Windows 2000 operating system Windows 2000 Microsoft Windows XP operating system Windows XP ...
Страница 9: ...u Start Before You Start This chapter provides an explanation of the system environments required for using CARPS Canon Advanced Raster Printing System It also explains where to find help and information regarding the installation and use of this software Introduction System Requirements Where to Find Help ...
Страница 10: ...or Windows XP operating system the ability to make full use of the printer CARPS enables you to print from any Windows application to your machine You can acquire information about Canon products and update your software on the Canon home page http www usa canon com Introduction Introduction Introduction Introduction ...
Страница 11: ...with a USB port and the USB class driver installed Logon as a user account with administrator rights is recommended System Requirements System Requirements System Requirements System Requirements OS CPU RAM Available free disk space Windows 98 Pentium 90 MHz or greater 32 MB or greater To use a FAT 16 file system 330 MB or greater and to use a FAT 32 file system 300 MB or greater Windows Me Intel ...
Страница 12: ...perties dialog box you can click Help to display additional information about every feature and option in CARPS You can also click Help in the upper right corner of most dialog boxes and then click a specific item in the dialog box for help with that item or right click a specific item and choose Help to access the same help information for the item See the Online Help for detailed information on ...
Страница 13: ...talling Canon Advanced Installing Canon Advanced Installing Canon Advanced Raster Printing System CARPS Raster Printing System CARPS Raster Printing System CARPS Raster Printing System CARPS This chapter describes CARPS Canon Advanced Raster Printing System It includes the following information What is CARPS Installing CARPS ...
Страница 14: ... Installing User Software on page 2 3 or according to your operating system the steps in Windows 98 Me on page 2 11 Windows 2000 on page 2 20 or Windows XP on page 2 29 If the imageCLASS D300 Series is already on your network and you want to start using it follow the steps in Connecting to the imageCLASS D300 Series Already on Your Network on page 2 37 If you want to install the imageCLASS D300 Se...
Страница 15: ...n are from Windows 2000 Installation Procedures Installation Procedures Installation Procedures Installation Procedures Installing User Software Installing User Software Installing User Software Installing User Software 1 Make sure the machine is not connected to your computer and it is turned on IMPORTANT Do not connect the USB cable to the port on your computer at this time During the installati...
Страница 16: ...ialog box 4 When the License Agreement dialog box appears check the contents Select I accept the terms in the license agreement click Next NOTE A message recommending you to restart your computer may appear under some operating systems In this case continue installing after restarting your computer ...
Страница 17: ...he machine to your computer with the USB cable The program starts installing the printer driver automatically IMPORTANT The USB cable must be connected to the port on your computer within 90 seconds after Yes is clicked otherwise the installation will not complete For more information on connecting the USB cable refer to the Setup Sheet ...
Страница 18: ...restart my computer now on the dialog box click Exit 1 Make sure the machine is connected to your computer and it is turned on IMPORTANT If Plug and Play is automatically carried out and the Found New Hardware Wizard dialog box appears click Cancel and follow the procedure below If you are using Windows 2000 XP be sure to log on as member of Administrators The full control access right for the pri...
Страница 19: ...ialog box 4 When the License Agreement dialog box appears check the contents Select I accept the terms in the license agreement click Next NOTE A message recommending you to restart your computer may appear under some operating systems In this case continue installing after restarting your computer ...
Страница 20: ...2 8 2 Installing Canon Advanced Raster Printing System 5 Uncheck Install Printer Driver through a USB connection click Next 6 Check Add printers and Update Drivers click Next ...
Страница 21: ...dard Port Select to configure the standard port Use Network Printer Select to configure your printer as the shared printer Add Port Select to add a port Printer Name Type your printer name Use as Shared Printer Select to configure your printer as the shared printer only for Windows 2000 XP Set as Default Select to configure your printer as the default printer 8 Confirm the contents of the Printer ...
Страница 22: ...2 10 2 Installing Canon Advanced Raster Printing System 9 When the following dialog box appears select Yes I want to restart my computer now click Exit ...
Страница 23: ...edure of Plug and Play under Windows 98 Me The screen shots shown are from Windows 98 Before you install the software make sure you do the following Connect the machine to your computer Setup Sheet Turn on the machine Setup Sheet Start up Windows 98 Me Windows 98 Me Windows 98 Me Windows 98 Me Windows 98 Me 1 Plug and Play is being carried out and the Add New Hardware Wizard dialog box appears Cli...
Страница 24: ...Add New Hardware Wizard dialog box click Next 3 Place the CD ROM into the CD ROM drive 4 Select Specify a location in Windows Me Specify the location of the driver Advanced click Browse to select the driver in the language that you want to install For example if your CD ROM drive is drive D browse to D Usbport win98 click Next ...
Страница 25: ...stem 5 Click Next on Windows driver files search for the device click Finish 6 The Add New Hardware Wizard dialog box appears Click Next 7 Select Search for the best driver for your device Recommended in the Add New Hardware Wizard dialog box click Next ...
Страница 26: ...k Browse to select the driver in the language that you want to install For example if your CD ROM drive is drive D browse to D Drivers us_eng win9x_me click OK Confirm that the folder to browse is selected under Specify a location click Next 9 Click Next on Windows driver files search for the device 10 Enter the name you wish to use click Finish ...
Страница 27: ...2 15 2 Installing Canon Advanced Raster Printing System 11 When the installation is complete the following dialog box appears Click Finish on the Add New Hardware Wizard dialog box ...
Страница 28: ...indows 98 Me Add Printer Wizard The following is the installation procedure of Add printer Wizard under Windows 98 Me The screen shots shown are from Windows 98 1 From the Start menu select Settings Printers The Printers folder appears 2 Double click the Add Printer icon The Add Printer Wizard dialog box appears Click Next 3 Select Local Printer click Next ...
Страница 29: ...5 The Install From Disk dialog box appears Place the CD ROM into the CD ROM drive Use Browse to select the directory or enter the path name that contains CARPS software click OK For example if you are using the CD ROM to install CARPS software and your CD ROM drive is drive D the path name would be D Drivers us_eng win9x_me ...
Страница 30: ...2 18 2 Installing Canon Advanced Raster Printing System 6 Select the printer click Next 7 Select the printer s port click Next ...
Страница 31: ... Installing Canon Advanced Raster Printing System 8 Enter the name you wish to use click Finish NOTE If you already have another printer installed you will be asked whether to use this printer as the default ...
Страница 32: ...ine Setup Sheet Start up Windows 2000 Windows 2000 Windows 2000 Windows 2000 Windows 2000 1 Log on as member of Administrators The full control access right for the printer is necessary for the installation of CARPS 2 Plug and Play is being carried out and the USB class driver USB Printing Support is automatically detected and installed 3 The Found New Hardware Wizard dialog box appears Click Next...
Страница 33: ... location click Next 5 The Found New Hardware Wizard dialog box appears Place the CD ROM into the CD ROM drive Click Browse to select the driver in the language that you want to install For example if your CD ROM drive is drive D browse to D Drivers us_eng win2000_xp click OK ...
Страница 34: ...nced Raster Printing System 6 Click Next on Driver Files Search Results 7 When the installation is complete the following dialog box appears Click OK to close the dialog box Click Finish on the Found New Hardware Wizard dialog box ...
Страница 35: ...zard under Windows 2000 1 Log on as member of Administrators The full control access right for the printer is necessary for the installation of CARPS 2 From the Start menu select Settings Printers The Printers folder appears 3 Double click the Add Printer icon The Add Printer Wizard dialog box appears Click Next 4 Select Local printer click Next IMPORTANT Checking on Automatically detect and insta...
Страница 36: ...2 24 2 Installing Canon Advanced Raster Printing System 5 Select the printer port you want to use click Next 6 Click Have Disk in the Manufacturers Printers dialog box ...
Страница 37: ... CD ROM drive Use Browse to select the directory or enter the path name that contains CARPS software click OK For example if you are using the CD ROM to install CARPS and your CD ROM drive is drive D the path name would be D Drivers us_eng win2000_xp 8 Select your printer model from the list of printers displayed click Next ...
Страница 38: ...to accept the default printer name or enter the name you wish to use click Next NOTE If you already have another printer installed you will be asked whether to use this printer as the default 10 Select whether this printer is shared with other computers or not click Next ...
Страница 39: ...k Yes if you want to print a test page or No if you do not want to print a test page click Next 12 When the installation is complete the following dialog box appears Click Finish to close the dialog box The Canon imageCLASS D300 icon is added to the Printers folder ...
Страница 40: ...ing Canon Advanced Raster Printing System 13 If you opted to print a test page the test page is printed after the installation completes and the following dialog appears If the test page is printed correctly click OK ...
Страница 41: ...et Start up Windows XP Windows XP Windows XP Windows XP Windows XP 1 Log on as member of Administrators The full control access right for the printer is necessary for the installation of CARPS 2 Plug and Play is being carried out and the USB class driver USB Printing Support is automatically detected and installed 3 The Found New Hardware Wizard dialog box appears Place the CD ROM into the CD ROM ...
Страница 42: ...ion in the search click Browse to select the driver in the language that you want to install For example if your CD ROM drive is drive D browse to D Drivers us_eng win2000_xp click Next 6 When the installation is complete the following dialog box appears Click Finish to close the box ...
Страница 43: ...following is the installation procedure of Add Printer Wizard under Windows XP 1 Log on as member of Administrators The full control access right for the printer is necessary for the installation of CARPS 2 From the Start menu select Printers and Faxes The Printers and Faxes folder appears 3 In Printer Tasks click Add a printer The Add Printer Wizard dialog box appears Click Next ...
Страница 44: ...Raster Printing System 4 Select Local printer attached to this computer click Next IMPORTANT Checking on Automatically detect and install my Plug and Play printer is not recommended 5 Select the printer port you want to use click Next ...
Страница 45: ... The Install From Disk dialog box appears Place the CD ROM into the CD ROM drive Use Browse to select the directory or enter the path name that contains CARPS software click OK For example if you are using the CD ROM to install CARPS and your CD ROM drive is drive D the path name would be D Drivers us_eng win2000_xp ...
Страница 46: ...ur printer model from the list of printers displayed click Next 9 Click Next to accept the default printer name or enter the name you wish to use click Next NOTE If you already have another printer installed you will be asked whether to use this printer as the default ...
Страница 47: ...Canon Advanced Raster Printing System 10 Select whether this printer is shared with other computers or not click Next 11 Click Yes if you want to print a test page or No if you do not want to print a test page click Next ...
Страница 48: ...ng dialog box appears Click Finish to close the dialog box The Canon imageCLASS D300 icon is added to the Printers and Faxes folder 13 If you opted to print a test page the test page is printed after the installation completes and the following dialog appears If the test page is printed correctly click OK ...
Страница 49: ...ter Wizard To install CARPS for a shared printer you can use the Windows 98 Me Add Printer Wizard Network Users Network Users Network Users Network Users Connecting to the imageCLASS D3 Connecting to the imageCLASS D3 Connecting to the imageCLASS D3 Connecting to the imageCLASS D300 Series A 00 Series A 00 Series A 00 Series Already on lready on lready on lready on Your Network Your Network Your N...
Страница 50: ...teps 5 through 8 below 5 The Wizard displays a list of available printers Click Have Disk 6 The Install From Disk dialog box appears Use Browse to select the directory or enter the path name that contains CARPS software click OK 7 If the server is a Windows 98 Me computer you can enter a name for the printer or accept the default name click Next NOTE If the connection fails you ll be able to insta...
Страница 51: ...om Start menu The Printers in Windows XP Printers and Faxes folder appears 3 Double click the Add Printer icon in Windows XP click Add a printer in Printer Tasks The Add Printer Wizard dialog box appears 4 Select Network printer server in Windows XP select A network printer or a printer attached to another computer click Next The Connect to Printer in Windows XP Specify a Printer dialog box appear...
Страница 52: ...g Windows 98 or later The print server and client do not need to use the same operating system and it is possible to print from a Windows 98 Me client to a Windows 2000 XP print server or vice versa You can start printing simply by starting the server even if the server was not running when the client was started If the server is running on Windows 2000 XP you can print even if no one is logged in...
Страница 53: ...ver Settings Windows 98 Me Server Settings Windows 98 Me Server Settings Windows 98 Me Server Settings Network Settings Connecting the imageCLASS Connecting the imageCLASS Connecting the imageCLASS Connecting the imageCLASS D300 Series a D300 Series a D300 Series a D300 Series as a s a s a s a Shared Shared Shared Shared Printer Printer Printer Printer 1 Double click the Network icon in Control Pa...
Страница 54: ...ter Printing System 4 Select File and Printer Sharing for Microsoft Networks in the Select Network Service dialog box click OK 5 Click File and Print Sharing NOTE Be sure to check I want to be able to allow others to print to my printer s ...
Страница 55: ...2 43 2 Installing Canon Advanced Raster Printing System 6 Select the Access Control tab check either Share level Access Control or User level Access control 7 Click OK restart Windows ...
Страница 56: ...Advanced Raster Printing System Printer Settings Share level Access Control 1 Open the Canon imageCLASS D300 Properties dialog box check Shared As in the Sharing tab 2 Enter Share Name Comment and Password as needed 3 Click OK ...
Страница 57: ...2 Installing Canon Advanced Raster Printing System User level Access Control 1 Open the Canon imageCLASS D300 Properties dialog box check Shared As in the Sharing tab 2 Enter Share Name and Comment as needed ...
Страница 58: ...Canon Advanced Raster Printing System 3 Click Add select the users allowed to access the printer 4 Click OK when you have finished adding users 5 Click OK again NOTE Do not enter space or special character in Share Name ...
Страница 59: ...enu select Settings Network and Dial up Connections The Network and Dial up Connections folder appears 2 Right click the Local Area Connection icon select Properties from the pop up menu The Local Area Connection Properties dialog box appears 3 Select File and Printer Sharing for Microsoft Networks click OK ...
Страница 60: ... Connections The Network and Internet Connections folder appears 3 Click Network Connections The Network Connections folder appears 4 Right click the Local Area Connection icon select Properties from the menu The Local Area Connection Properties dialog box appears 5 Select File and Printer Sharing for Microsoft Networks click OK The procedure for Windows XP is given for Category View Mode ...
Страница 61: ...inter Sharing Settings 1 Open the Canon imageCLASS D300 Properties dialog box check Shared as in the Sharing tab 2 Enter the share name as needed 3 Click OK The printer icon changes to indicate sharing NOTE Sharing settings may also be made during installation ...
Страница 62: ...es Printer Properties Printer Properties Printer Properties This chapter describes the dialogs and settings on the Printer Properties dialog box It includes the following information Windows 98 Me Printer Properties Windows 2000 XP Printer Properties and Default Document Properties ...
Страница 63: ...of tabs displayed in the Properties dialog box will vary depending on the type of operating system you are using and the method you use to access Properties The screen shots shown are from Windows 98 The method you use to access the dialog boxes determines how long the printing options remain in effect If you start from an application s Print command your choices apply only to that print job They ...
Страница 64: ...3 3 3 Printer Properties General Tab General Tab General Tab General Tab Lets you print a test page or define separator pages Refer to your Windows operating system documentation for more information ...
Страница 65: ...Details Tab Details Tab Details Tab Details Tab Specifies the printer port and time out settings Refer to your Windows operating system documentation for more information Spool Settings The installer sets the following defaults ...
Страница 66: ...ng Tab Sharing Tab Sharing Tab Sharing Tab Specifies the printer sharing settings This tab is available only when file and printer sharing is turned on p 2 41 Refer to your Windows operating system documentation for more information ...
Страница 67: ...are A4 B5 A5 Letter Legal Executive Envelope 10 and Envelope Monarch For Windows 98 Me operating system free size paper is also available Up to 50 types of free size paper can be defined with the Custom Paper Size option p 3 10 2 Output Size lets you select the paper size to print on If your output size is set to anything other than Match Page Size the image will be automatically reduced or enlarg...
Страница 68: ... to specify the magnification factor 25 to 200 11 Page Order lets you select the order in which original pages are placed on each sheet of the output paper when more than one page is printed per sheet 7 Paper Type lets you select the appropriate paper type to print on from the drop down list Plain paper 17 to 24 lb bond or 64 to 90 g m2 Transparencies Special Paper 1 25 to 32 lb bond or 91 to 128 ...
Страница 69: ...List 1 in which you enter the name of watermark to be registered Up to 50 watermarks can be registered 3 Delete removes the selected watermark from Watermark List 1 4 Position lets you set the position where the watermark is printed on each page To set the position specify the values in the X and Y edit boxes in a range between 50 and 50 or use the X and Y slide bars 5 Move to Center relocates the...
Страница 70: ...ize of the text watermark 12 Color lets you select the font color of the text watermark from the drop down list 13 Watermark Border lets you select either of Round or Box for the frame type of the watermark 14 Watermark Type lets you select either of Transparent or Solid for the watermark type 15 Print on First Page Only lets you select whether the watermark appears only on the first page or all p...
Страница 71: ...stom sizes can be defined Selecting a Custom Paper Size Setting 1 Select one of the predefined sizes from the Paper List 1 box 2 If you wish enter a unique name in the Name of Custom Paper Size 2 area 3 Select the Millimater 4 or Inch 5 for Unit 3 of measurement 4 Define the Paper Size 6 using the Height 7 5 00 to 14 00 inches 127 0 to 356 mm and Width 8 3 00 to 8 50 inches 76 2 to 216 mm settings...
Страница 72: ... you add a page frame to be printed on each page 11 options are available Edging is not available to use with Print Sample in the Quality tab p 3 17 2 Print Date lets you add the date to be printed on each page Six positions to print the date are available 3 Print User Name lets you add the user name to be printed on each page Six positions to print the user name are available 4 Print Page Number ...
Страница 73: ...ou to add edit and select a profile which facilitates your print jobs 4 Profile lets you select one of the registered profiles from the drop down list The preview image 5 under the drop down list displays the image with the currently selected settings reflected Right clicking the mouse button on the preview image displays the pop up menu from which you can change the setting for Page Layout and op...
Страница 74: ...lows you to switch the job mode between Print and Edit and Preview The Print mode executes a normal print job The Edit and Preview mode saves the data in the Canon Page Composer dialog box When the Edit and Preview mode is selected Lock appears on the right side which indicates this mode is locked Add Profiles Clicking Add opens the Add Profile dialog box This dialog box allows you to register a n...
Страница 75: ... in the Profile pull down list in the Page Setup Finishing and Quality tab windows 2 Delete deletes the profile selected in Profile List 1 When any of the pre defined profiles is selected this button is disabled 3 Import allows you to import profile information from a file 4 Export allows you to export the selected profile information to a file 5 Apply Settings from Application applies the selecte...
Страница 76: ...3 15 3 Printer Properties View Settings Clicking View Settings opens the View Settings dialog box This dialog box displays the current settings in the Page Setup Finishing and Quality tab windows ...
Страница 77: ...1 Binding Location lets you select a binding location for the printed pages 2 Collate sorts the printed pages by copy Checking this checkbox enables this function 3 Restore Defaults resets all the current settings to their default values Gutter Settings Clicking Gutter in the Finishing tab window opens the Gutter Settings dialog box Gutter lets you specify the gutter width in a range between 0 and...
Страница 78: ... Manual Grayscale Settings allows you to set the grayscale manually Checking this checkbox enables Grayscale Settings 5 to access the dialog box which allows you to set the grayscale for images p 3 18 4 Print Samples prints nine thumbnails per sheet to provide the print samples with the current grayscale settings when printing the document This option is enabled only when the Manual Grayscale Sett...
Страница 79: ...ughness of image and inaccuracy in interpolating when printing an enlarged image in low resolution Checking this checkbox enables this function 3 Toner Save lets you select the setting for saving the toner consumption Edit Grayscale Settings Clicking Grayscale Settings in the Quality tab window opens the Edit Grayscale Settings dialog box This dialog box allows you to control the brightness and co...
Страница 80: ...ted in the center is displayed with the currently selected brightness and contrast When you select another image the brightness and contrast of that image are reflected to the image in the center and the grayscale settings of other eight images are changed accordingly 5 Position indicates the position of the image in the center by the X and Y coordinate values The map on the right side indicates t...
Страница 81: ...s Matching Method 2 and Monitor Profile 3 2 Matching Method lets you select the matching method from the drop down list 3 Monitor Profile lets you select the profile appropriate for your monitor or scanner from the drop down list 4 Gamma lets you specify the gamma correction factor This option is enabled only when the Enable Matching 1 checkbox is not checked 1 2 3 4 ...
Страница 82: ...Printers and Faxes folder or right click the mouse button on the Canon imageCLASS D300 icon in the Printers in Windows XP Printers and Faxes folder and select Document Defaults from the pop up menu You can also open an equivalent dialog box and specify the setting by selecting Print or Page Setup from the File menu of an application Windows 2000 XP Printer Properties and Windows 2000 XP Printer Pr...
Страница 83: ...preferences Refer to your Windows operating system documentation for more information Sharing Tab Sharing Tab Sharing Tab Sharing Tab Specifies the printer sharing settings Refer to your Windows operating system documentation for more information Printer Properties Printer Properties Printer Properties Printer Properties ...
Страница 84: ...stem documentation for more information Advanced Tab Advanced Tab Advanced Tab Advanced Tab Specifies the settings for print spooling Refer to your Windows operating system documentation for more information Spool print documents so program finishes printing faster and Start printing immediately are set automatically when you install the printer driver ...
Страница 85: ...Color Management Tab Associates color profiles with your color printer Refer to your Windows operating system documentation for more information Security Tab Security Tab Security Tab Security Tab Specifies security settings Refer to your operating system documentation for more information ...
Страница 86: ... Add Edit Profiles dialog box which allows you to edit the registered profiles p 3 26 When any of the pre defined profile Default Settings 2 on 1 1 sided or Confidential is selected in Profile List 1 this button is disabled 7 Delete removes the selected profile from Profile List 1 When any of the pre defined profiles is selected this button is disabled 8 Define Document Property lets you control t...
Страница 87: ...he Attribution tab window allows you to specify attributions of the profile 1 Name lets you name the new profile or rename the existing profile 2 Icon lets you select an icon to represent the new profile or change the icon of the existing profile 3 Comment lest you add comments on the new profile or change the comments on the existing profile 4 Restore Defaults resets all the current settings to t...
Страница 88: ...b Specifies the page settings including the paper size scaling number of copies orientation and number of pages per sheet p 3 29 Finishing Tab Specifies the finishing settings for the printed pages including the collating and binding p 3 38 ...
Страница 89: ...3 28 3 Printer Properties Quality Tab Specifies the print quality including resolution brightness and contrast p 3 39 ...
Страница 90: ...automatically reduced or enlarged to fit on the page 3 Copies lets you specify the number of copies to be printed 1 to 99 4 Orientation lets you select the direction of printing relative to the printer s paper Portrait or Landscape 5 Page Layout lets you select the number of pages per sheet 1 2 4 6 8 9 16 and Poster 2 x 2 3 x 3 4 x 4 pages to comprise one sheet If you select an option other than 1...
Страница 91: ...ect the appropriate paper type to print on from the drop down list Available paper types are as follows Plain paper 17 to 24 lb bond or 64 to 90 g m2 Transparencies Special Paper 1 25 to 32 lb bond or 91 to 128 g m2 Thick paper Special Paper 2 Rough paper 8 Watermark lets you insert the watermark to be printed on the document Eight types of watermark are available as default This option is disable...
Страница 92: ... 50 watermarks can be registered 3 Delete removes the selected watermark from Watermark List 1 4 Position lets you set the position where the watermark is printed on each page To set the position specify the values in the X and Y edit boxes in a range between 50 and 50 or use the X and Y slide bars 5 Move to Center relocates the watermark to the page center 6 Angle lets you set the angle of waterm...
Страница 93: ...e text watermark from the drop down list 13 Watermark Border lets you select either of Round or Box for the frame type of the watermark 14 Watermark Type lets you select either of Transparent or Solid for the watermark type 15 Print on First Page Only lets you select whether the watermark appears only on the first page or all pages ...
Страница 94: ... you add a page frame to be printed on each page 11 options are available Edging is not available to use with Print Samples in the Quality tab p 3 39 2 Print Date lets you add the date to be printed on each page Six positions to print the date are available 3 Print User Name lets you add the user name to be printed on each page Six positions to print the user name are available 4 Print Page Number...
Страница 95: ...ou to add edit and select a profile which facilitates your print jobs 4 Profile lets you select one of the registered profiles from the drop down list The preview image 5 under the drop down list displays the image with the currently selected settings reflected Right clicking the mouse button on the preview image displays the pop up menu from which you can change the setting for Page Layout and op...
Страница 96: ... the image is clicked 6 The job mode drop down list allows you to switch the job mode between Print and Edit and Preview The Print mode executes a normal print job The Edit and Preview mode saves the data in the Canon Page Composer dialog box Add Profiles Clicking Add opens the Add Profile dialog box This dialog box allows you to register a new profile with the current settings 1 Name lets you spe...
Страница 97: ... in the Profile pull down list in the Page Setup Finishing and Quality tab windows 2 Delete deletes the profile selected in Profile List 1 When any of the pre defined profiles is selected this button is disabled 3 Import allows you to import profile information from a file 4 Export allows you to export the selected profile information to a file 5 Apply Settings from Application applies the selecte...
Страница 98: ...3 37 3 Printer Properties View Settings Clicking View Settings opens the View Settings dialog box This dialog box displays the current settings in the Page Setup Finishing and Quality tab windows ...
Страница 99: ...1 Binding Location lets you select a binding location for the printed pages 2 Collate sorts the printed pages by copy Checking this checkbox enables the option 3 Restore Defaults resets all the current settings to their default values Gutter Settings Clicking Gutter in the Finishing tab window opens the Gutter Settings dialog box Gutter lets you specify the gutter width in a range between 0 0 and ...
Страница 100: ...nual Grayscale Settings allows you to set the grayscale manually Checking this checkbox enables Grayscale Settings 5 to access the dialog box which allows you to set the grayscale for images p 3 40 4 Print Samples prints nine thumbnails per sheet to provide the print samples with the current grayscale settings when printing the document This option is enabled only when the Manual Grayscale Setting...
Страница 101: ...ghness of image and inaccuracy in interpolating when printing an enlarged image in low resolution Checking this checkbox enables this option 3 Toner Save lets you select the setting for saving the toner consumption Edit Grayscale Settings Clicking Grayscale Settings in the Quality tab window opens the Edit Grayscale Settings dialog box This dialog box allows you to control the brightness and contr...
Страница 102: ...ted in the center is displayed with the currently selected brightness and contrast When you select another image the brightness and contrast of that image are reflected to the image in the center and the grayscale settings of other eight images are changed accordingly 5 Position indicates the position of the image in the center by the X and Y coordinate values The map on the right side indicates t...
Страница 103: ...s Matching Method 2 and Monitor Profile 3 2 Matching Method lets you select the matching method from the drop down list 3 Monitor Profile lets you select the profile appropriate for your monitor or scanner from the drop down list 4 Gamma lets you specify the gamma correction factor This option is enabled only when the Enable Matching 1 checkbox is not checked 1 2 3 4 ...
Страница 104: ...s with the printer If you can print a self test but the printer does not print other jobs or your printed output is not what you expected the problem is with your computer software or cables If your printer is not operating properly try the suggestions in this chapter in the order listed If you have a problem with your printer and you cannot resolve it by referring to the information in this chapt...
Страница 105: ... additional functions or delete the error print job using status monitor Basic Guide No power is supplied The power cord is not plugged in Make sure the power cord is securely plugged into both the machine and the AC outlet The AC outlet is not supplying power Make sure the AC outlet is supplying power try another outlet if necessary The AC voltage does not match printer Make sure the voltage of t...
Страница 106: ...your BIOS Verify that your BIOS setup is correct See your computer s documentation for details Verify that your physical memory is working correctly If you have a Toshiba laptop change this line in your CONFIG SYS file c winutils mxtime exe to REM c winutils mxtime exe Computer indicates a device time out Your computer is sending data to the printer but the printer is not responding The printer mi...
Страница 107: ...eries Specify CARPS Canon imageCLASS D300 as the default driver for the imageCLASS D300 Series Cannot use Adobe Type Manager ATM fonts Adobe Type Manager ATM is not supported Cannot print with a printer driver other than the Canon imageCLASS D300 The printer driver is connected to the same port as the Canon imageCLASS D300 printer driver Connect the printer driver to a port different from the Cano...
Страница 108: ... 2000 XP select the Hardware tab click Device Manager double click Universal Serial Bus Controllers 4 Locate the USB class driver under Universal Serial Bus Controllers Delete ONLY the USB class driver specified for you operating system If the USB class driver is displayed under Other device delete ONLY one the following depending on your operating system Canon imageCLASS D300 Canon CARPS USB Prin...
Страница 109: ...f output is missing The gutter width exceeds the allowable range Check that the gutter setting for the document is within the specified range The maximum gutter width is 0 2 inches 5 mm for envelope 0 4 inches 10 mm Cannot print correctly with the resolution of 600 dpi The resolution setting of 600 dpi is not appropriate for the application Some applications do not support 600 dpi resolution Set t...
Страница 110: ...Start menu select Programs Canon Printer uninstaller click CARPS Printer Driver Uninstaller The Delete Printer dialog box appears 2 In the Delete Printer dialog box select Canon imageCLASS D300 click Cleanup Yes NOTE The CARPS software can be uninstalled using the RUN dialog box from the Start menu To uninstall C Program Files Canon PrnUninstall CARPS printer Driver UNINSTALL exe 1 From the Start ...
Страница 111: ...ximum capacity 250 sheets of 17 lb bond 64 g m2 paper Multi purpose Tray Legal 8 1 2 x 14 inches to 3 x 5 inches Plain paper colored paper recycled paper transparencies envelopes and heavy paper up to 32 lb bond or 128 g m2 Maximum capacity 10 sheets of 17 lb bond 64 g m2 paper Paper delivery Face down output way 50 sheets 17 to 20 lb bond or 64 to 80 g m2 Host interface USB interface Software Pri...
Страница 112: ...ab Windows 98 Me 3 4 Dialog boxes Windows 2000 XP printer properties 3 21 Windows 98 Me printer properties 3 2 dpi G 2 Driver See Printer driver E Edit Gray Scale settings Windows 2000 XP 3 40 Windows 98 Me 3 18 Edit Profiles Windows 2000 XP 3 36 Windows 98 Me 3 14 Edit Watermark Windows 2000 XP 3 31 Windows 98 Me 3 8 F Finishing tab Windows 2000 XP 3 27 3 38 Windows 98 Me 3 16 Fixing assembly G 2...
Страница 113: ... 4 2 4 3 Profiles Windows 2000 XP 3 34 Windows 98 Me 3 12 Progress bar G 5 Q Quality tab Windows 2000 XP 3 28 3 39 Windows 98 Me 3 17 Queue G 5 R Random Access Memory G 5 Removing Canon Advanced Raster Printing System 4 7 Resolution A 1 G 6 Reverse Output Order G 6 S Scaling G 6 Security tab Windows 2000 XP 3 24 Selecting custom paper size 3 10 Server G 6 Settings printer sharing 2 49 Shared print...
Страница 114: ... 27 general tab 3 22 page setup tab 3 29 ports tab 3 23 quality tab 3 39 security tab 3 24 sharing tab 3 22 Windows 98 Me details tab 3 4 finishing tab 3 16 general tab 3 3 page setup tab 3 6 Printer Property 3 2 3 20 quality tab 3 17 sharing tab 3 5 WYSIWYG G 7 ...
Страница 115: ...ster System Printing CARPS Software that extends the power of the Windows operating system to a printer to speed up and simplify printing The Canon Advanced Raster Printing System provides more printing control under Windows applications Client A computer that is connected to the printer over a network A client does not control the printer directly It interacts with the printer through a server Se...
Страница 116: ...information such as descriptions of the fonts and features of the installed printer When you print with the Canon Advanced Raster Printing system you are using its printer driver F F F F Fixing assembly The device used during the print process to fix the toner onto the paper or other media through applying heat and pressure The assembly located inside the printer gets extremely hot 374 F 190 C dur...
Страница 117: ... D300 Series have a USB port located on the side of the machine See also USB interface Italic A font style distinguished by slanted characters the upright strokes of the characters are at an angle to the vertical axis J J J J Jam A situation created when paper becomes caught along the paper path You must remove jammed paper before you can continue printing K K K K Kilobyte KB A unit of measurement...
Страница 118: ...aper before you can continue printing Paper path The route that paper travels through the printer Paper Source Source of paper feed The machine has a cassette and a multi purpose tray Paper Type All kinds of paper plain paper colored paper recycled paper transparencies thick paper envelopes etc are grouped under several Paper Types You can access this setting from the Paper Type field on the Paper...
Страница 119: ...tainer in which your printer information is stored Progress bar In the Status Window or its icon a horizontal bar that graphically indicates the percentage of the print job that has actually printed Properties dialog box The dialog box that contains information about a particular device such as your printer Proportional spacing The spacing of characters according to the width of each character Thi...
Страница 120: ...ch are printed in fixed sizes and angles Scaling Enlarging or reducing the printed image Separator page Optional pages printed at the beginning of each document to help separate one print job from another Server A network computer that is directly attached to the printer The server controls the printer and handles print jobs sent from the clients See also Client Shielded A type of cable that conta...
Страница 121: ...ing and unplugging connectors with the power still turned on to the PC or peripheral equipment V V V V Virtual Memory Space on the hard disk that Windows uses for temporary data storage as if it were actually random access memory RAM Windows does this by means of a swap file This provides Windows with more usable memory but reduces speed of access to it when the swap file must be used See also Phy...