background image

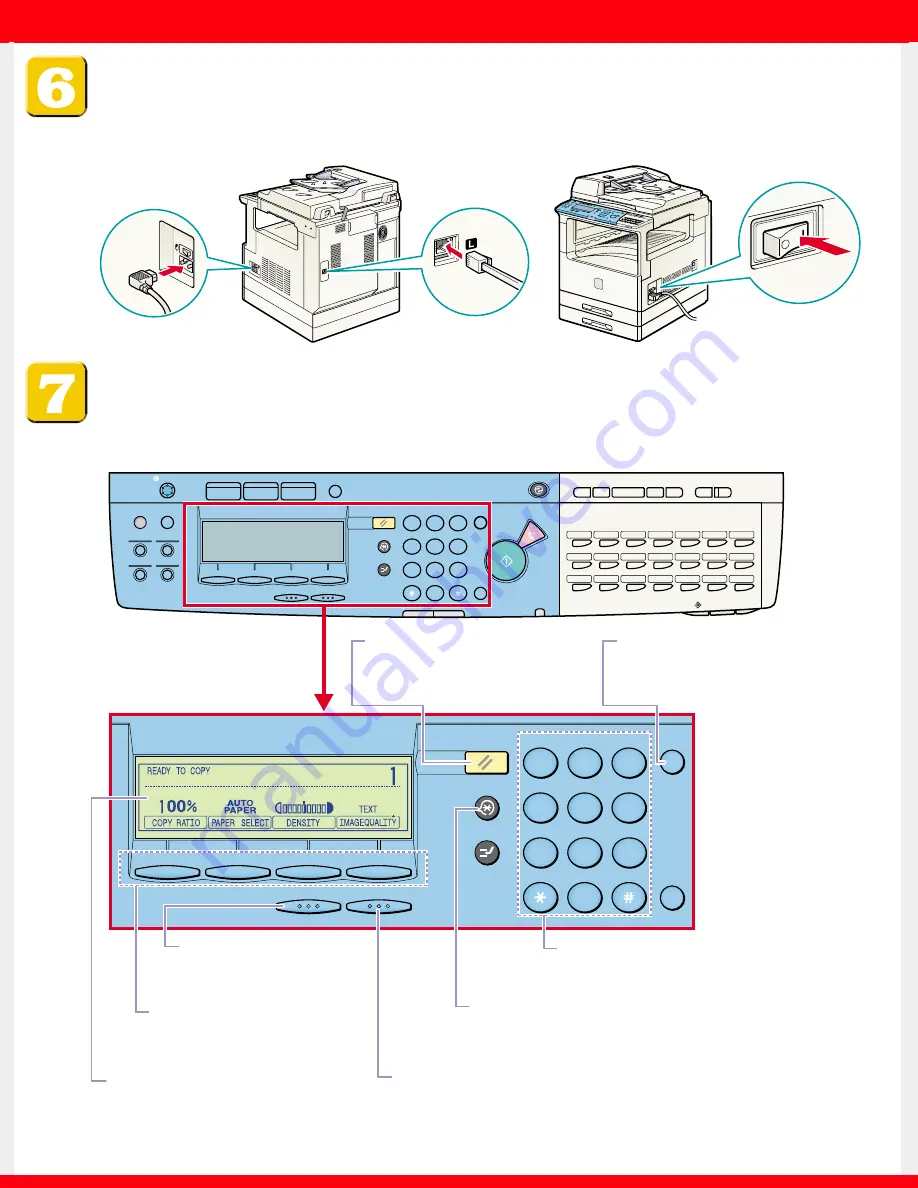
Using the operation panel

Use the following keys on the operation panel to set up the machine for the fax function as explained
on the following pages.

1

2

3

4

5

6

7

8

9

ID

C

0

F4

F1

F2

F3

OK

BACK

@

.

GHI

PRS

ABC

JKL

TUV

DEF

MNO

WXY

SYMBOLS

OPER

Additional Functions

Interrupt

Reset

Clear

Display Contrast

Collate

Enlarge

Frame Erase

Reduce

Two Page Separation

07

06

05

04

03

02

01

14

13

12

11

10

09

08

21

22~42

43~63

20

19

18

17

16

15

1

2

3

4

5

6

7

8

9

ID

C

0

F4

F1

F2

F3

OK

BACK

COPY

FAX

PRINT

Special Features

Monitor

@

.

GHI

PRS

ABC

JKL

TUV

DEF

MNO

WXY

SYMBOLS

OPER

2

1

4

3

Directory

Hook

Tone

Line/Mail Direct TX

Coded

Dial

Pause/
Redial

Additional Functions

Interrupt

Reset

In Use  Memory

Alarm

Start

Clear

Stop

Energy Saver

Power

LCD display

Displays selections, text, numbers,
and names when registering
information.

Reset key

Press to return to the Basic
Features screen.

Additional Functions key

Press to enter the Additional Functions menu.

OK key

Press to set a mode or function.

BACK key

Press to go back to the
previous screen.

Function keys (F1 to F4) 

Select options that appear
on the LCD display.

Numeric keys

Press to enter the numbers or letters.

Clear key

Press to delete the numbers or
letters entered.

Power Switch

3

Phone Cable

Power Cord

1

2

Connect the telephone cable and the power cord.

Connect the phone cable 

1

and the power cord 

2

. Turn on the machine’s power by pressing the power

switch 

3

to ON (“I” side). The power switch is located on the right side of the machine.

Содержание ImageCLASS 2300

Страница 1: ...fore referring to any other documentation Unpack the machine and its components Check that you have the following Machine with cabinet stand Stamp cartridge and tweezers Paper size notice cards 2 Tone...

Страница 2: ...ll functions of the machine Keep this guide handy for easy reference Reference Guide This manual covers machine settings common operations maintenance and troubleshooting Copying Guide This manual exp...

Страница 3: ...nel behind the front cover 6 Open the stack bypass and remove the tape holding the auxiliary tray and the tray extension 7 Pull out the left cover and remove the tape on the inside 3 Lift the feeder a...

Страница 4: ...rtridge 5 Hold the cartridge on a flat stable surface with one hand and pull out the seal completely with the other hand Tabs Protective cover 1 6 Remove the tape holding the orange protective cover a...

Страница 5: ...d slide the side guide to match the size of the paper you are loading Lower the lever again to lock the side guide 8 Load the paper into the drawer Make sure the paper size setting of the drawer match...

Страница 6: ...dditional Functions Interrupt Reset InUse Memory Alarm Start Clear Stop Energy Saver Power LCD display Displays selections text numbers and names when registering information Reset key Press to return...

Страница 7: ...to select 05 TIMER SETTINGS press OK 2 Select 01 DATE TIME SETTING press OK 3 Press F2 or F3 to select the month day year and time enter the current date and time using the numeric keys 4 Press OK Res...

Страница 8: ...ter reading the Basic Guide you require more detailed information see the corresponding sections in the other manuals provided If you have the Network Model of this machine see the Set Up Sheet for Ne...

Отзывы: