background image

Содержание HV20 - VIXIA Camcorder - 1080i

Страница 1: ...lso the following instruction manual electronic version on PDF file For further details refer to the installation gUide Cd Veuillez lire aussi Ie manuel d instruction suivant version electronique sur fichier PDF Pour d autres details referez vous au guide d installation I Lea tambien el siguiente manual de instrucciones version eleclronica en archivo PDF Para mayores detalles reflerase a la guia d...

Страница 2: ...rning the equipment off and on the user is encouraged to try to correct the interference by one or more of the following measures Reorient or relocate the receiving antenna Increase the separation between the equipment and receiver Connect the equipment into an outlet on a circuit different from that to which the receiver is connected Consult the dealer or an experienced radio TV technician for he...

Страница 3: ...t combination to overturn 10 Power Sources The CA 570 Compact Power Adapter should be operated only from the type of power source indicated on the marking label If you are not sure of the type of power supply to your home consult your product dealer or local power company Regarding other power sources such as battery power refer to instructions in this manual 11 Polarization The CA 570 Compact Pow...

Страница 4: ...A GROUNDING AS PER NATIONAL ELECTRICAL CODE Fig 1 ANTENNA LEAD IN WIRE ANTENNA DISCHARGE UNIT NEG SECTION 810 20 GROUNDING CONDUCTORS NEG SECTION 810 21 GROUND CLAMPS POWER SERVICE GROUNDING NEG NATIONAL ELECTRODE SYSTEM ELECTRICAL CODE NEG ART 250 PART H 14 Lightning For added protection of this product during a lightning storm or when it is left unattended and unused for long periods of time dis...

Страница 5: ...ximately 4 times the number of pixels in standard definition TV broadcasts resulting in eye catching colors and richly detailed video recordings I 5 0 Co c 0 1 080 lines o l How to play back your HDV recordings On a high definition TV HDTV CD 67 HDV recordings will be played back in their original high quality On standard definition TVs CD 68 HDV recordings will be down converted to match the reso...

Страница 6: ...me Zone Setting the Date and Time Basic Functions 18 20 20 21 21 22 23 23 24 24 25 Recording Recording Movies Recording Still Images Zooming Playback Playing Back Movies Adjusting the Volume Speaker and Headphones Locating the End of the Last Scene Locating Scenes by Recording Date VieWing Still Images Magnifying the Playback Image Advanced Functions 26 27 28 29 30 32 32 33 34 38 40 35 37 37 Menu ...

Страница 7: ...inuous Shooting and Exposure Bracketing 56 Other Functions On Screen Displays 57 Flash 58 Mini Video Light 59 Self Timer 60 Audio Recording Level 60 Digital Effects 62 Editing Functions Still Image Options Erasing Still Images 64 Protecting Still Images 64 Initializing the Memory Card 65 External Connections Connecting to a TV or VCR Connection Diagrams 66 Playback on a TV Screen 69 Recording to a...

Страница 8: ...gistered in the United States and other countries M I is a trademark HDV and the HDV logo are trademarks of Sony Corporation and Victor Company of Japan ltd JVC HDMI the HDMI logo and High Definition Multimedia Interface are trademarks or registered trademarks of HDMI Licensing LLC Other names and prQducts not mentioned above may be trademarks or registered trademarks of their respective companies...

Страница 9: ...ecautions related to the camcorder operation CD NOTES Additional topics that complement the basic operating procedures e POINTS TO CHECK Restrictions that apply if the function described is not available in all operating modes the operating mode to which the camcorder should be set etc CD Reference page number Screen refers to the LCD and the viewfinder screen The photos included in the manual are...

Страница 10: ...EXT and the page number r icon will appear at the bottom position Push the joystick toward NEXT to display the next page of the guide About the Operating Modes The camcorder s operating mode is determined by the positions of the Ilm lml switch and the I Gd switch In the manual indicates that a function is available in the operating mode shown and indicates that the function is not available When n...

Страница 11: ...anon com y Protect your product We will keep the model number and date of purchase of your new Canon product on file to help you refer to this information in the event of an insurance claim such as loss or theft y Receive information on new products and promotions Upon your request we will send you information on Canon new products and promotions The serial number of this product can be found at t...

Страница 12: ... 77 80 7 USB terminal 1lJ 75 8 CARD access indicator OJ 27 1 CHARGE indicator aJ 18 9 Memory card slot aJ 20 19 Jj tape card switch OJ 10 1 Mode switch 1lJ 45 f Terminal cover O MIC microphone terminal aJ 61 14J AV terminal OJ 66 1 o headphones terminal OJ 30 1 COMPONENT OUT terminal CJ 66 Grip belt 1lJ 21 01i Instant AF sensor CJ 37 l Flash aJ 58 0 Mini video light aJ 59 Remote sensor OJ 21 Names...

Страница 13: ...CT switch OJ 20 d DC IN terminal OJ 18 dJ stop button OJ 29 FOCUS ASSIST button OJ 50 II play pause button OJ 29 START STOP button OJ 26 Viewfinder OJ 21 8 Joystick OJ 10 I Serial number Battery attachment unit OJ 18 6 Iitt1 l mI switch OJ 10 RESETbutton OJ 84 9 FUNC_ button OJ 23 35 CJ Power indicator OJ 10 Zoom lever OJ 28 ri Advanced accessory shoe OJ 59 61 Lock button f 11itt1 l m1 switch OJ 1...

Страница 14: ...ttons CD 32 4 REW button CD 29 5 II button CD 29 6 PAUSE II button OJ 29 z SLOW I button CD 29 C ZERO SET MEMORY button CD 31 9 DISP on screen display button CD 57 0Qi PHOTO button CD 27 tD Zoom buttons 0 28 lgJ PLAY button CD 29 1 FF button CD 29 Q STOP button CD 29 0 11 button CD 29 0iJ x2 button CD 29 C1 J TV SCREEN button CD 43 ...

Страница 15: ... DV recording mode CD 39 Image stabilizer CD 38 j Level marker CD 43 d Backlight correction CD 48 Headphones output CD 30 ifg Audio level indicator microphone C 60 D Wind screen off C 39 Focus assist functions 0 50 DV audio mode CD 39 Condensation warning CD 94 Mini video light CD 59 ICAMERA c g Recording Still Images D il MF P Q 233 OJ liD _ J m ill Remote sensor off CD 44 if Zoom CD 28 Exposure ...

Страница 16: ...Getting to Know the Camcorder Remaining battery charge Card Access Display E 9 is displayed next to the number of ble while the camcorder is the memory card ...

Страница 17: ... 4 Data code CO 57 0 Search function display END SEARCH CJ 32 DATE SEARCH CO 32 Quality size for capturing still images CO 54 7 Audio level indicator CO 60 0 Image number CO 40 2 Current image Total number of images Histogram CO 58 1 Image protection mark CJ 64 5 Still image quality size 6 Date and time of recording CD Recording program CO 45 8 Manual focus CJ 49 Light metering mode CO 54 j_q Manu...

Страница 18: ...e compact power adapter is connected even if a battery is attached its power will not be consumed ONCE THE BATTERY PACK IS FULLY CHARGED 1 Disconnect the compact power adapter from the camcorder 2 Unplug the power cord from the power outlet and the compact power adapter To REMOVE THE BATTERY PACK Slide BATTERY RELEASE in the direction of the arrow and hold it pressed down Slide the battery pack do...

Страница 19: ...nger than you think you might need U S A and Canada only The lithium ion polymer battery that powers this product is recyclable Please call 1 800 8 BATTERY for information on how to recycle this battery I C iil t l III ill O l rn Battery Pack NB 2LH Bp 2L13 BP 2L14 Charging Time 130 min 200 min 225 min y Maximum Recording Time Viewfinder 70 min 120 min 150 min LCD NORMAL 65 min 115 min 140 min LCD...

Страница 20: ...o not interfere with the cassette compartment while it is opening or closing automatically or attempt to close the cover before the cassette compartment has fully retracted Be careful not to get your fingers caught in the cassette compartment cover If the camcorder is connected to a power source cassettes can be inserted removed even if the tmi ml switch is set to _ Inserting and Removing a Memory...

Страница 21: ...en the grip belt Adjust the grip belt so that you can reach the zoom lever with your index finger and the START STOP button with your thumb The Wireless Controller Inserting the Battery Lithium Button Battery CR2025 1 Press the tab in the direction of the arrow and pull out the battery holder 2 Place the lithium button battery with the side facing up 3 Insert the battery holder Using the Wireless ...

Страница 22: ...wish to include yourself when recording with the self timer Subject can monitor the LCD screen LCD Backlight You can set the brightness of the LCD screen to normal or bright Hold IQlsP pressed down for more than 2 seconds Repeat this action to toggle between the normal and bright settings This setting does not affect the brightness of the recording or the viewfinder screen Using the bright setting...

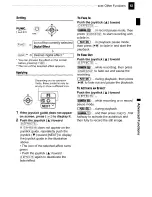
Страница 23: ...eed to press 8 and make further selections Follow the additional operation guides that will appear on the screen such as the icon small arrows etc Selecting an Option from the Setup Menus 3 1 Press FLING 2 Select AT the icon and press 8 to open the setup menus You can also hold FUNCI pressed down for more than 1 second to open directly the setup menus screen 3 Select AT the desired menu from the l...

Страница 24: ... is New York 5 Select T your time zone and press 0 To adjust for daylight saving time select the time zone with the mark next to the area 6 Press FUNC to close the menu FUNC CO 23 1 DATE TIME SETUP i 4 O s i I FUNC 1 Press FUNCI 2 Select T the r icon and press V to open the setup menus 3 Select T DISPLAY SETUP and press V 4 Select T LANGUAGE and press V 5 Select T the desired option and press EV 6...

Страница 25: ...e date will be indicated with blinking up down arrows 5 Change AT each field of the date and time and move to the next field 6 Press to start the clock 7 Press FUNCJ to close the menu j If you do not use the camcorder for about 3 months the built in rechargeable lithium battery may discharge completely and the date and time setting may be lost In such case recharge the built in lithium battery Q 9...

Страница 26: ...y push the joystick T toward NEXT to display the joystick guide in the illustration above The camcorder will play back a few seconds of the last recording made and return to record pause mode If the currently selected recording standard is different from that of the last recording the picture may not be played back correctly WHEN YOU HAVE FINISHED RECORDING 1 Close the LCD panel 2 Turn off the cam...

Страница 27: ...ration of the light by the lens Do not use tripods _ QJI with fastening screws longer than 5 5 mm 0 2 in Doing so may damage the camcorder When recording movies try to get a calm stable picture Excessive camcorder movement while shooting and extensive use of fast zooms and panning can result in jittery scenes In extreme cases the playback of such scenes may result in visually induced motion sickne...

Страница 28: ...ntly for aslow zoom press harder for faster zooms If the subject is not suitable for autofocus 0 turns yellow Adjust the focus manually II 49 When the subject is too bright OVEREXP starts flashing In such case use the optional FS 43U II NO filter Zooming POiN I J c lCA RAIIC RAII II 10 You can also use the T and W buttons on the wireless controller or the LCD panel The zoom speed with these button...

Страница 29: ...s at the point where the standard of the recording HDVIDV changes aJ 10 IEM Playing Back Movies Play back the tape on the LCD display or close the LCD panel to use the viewfinder Special Playback Modes To enter most special playback modes you need to operate the buttons on the wireless controller 0 14 There is no sound during the special playback modes Special playback mode Initial mode On the cam...

Страница 30: ...ng the Volume of the Speaker Headphones The headphones are connected to the AV O terminal which is used for both the headphones and the audio video output Before connecting the headphones follOW the procedure below to change the function of the terminal from AV output to o headphones output and make sure the 0 icon appears on the screen CJ 10 II p y I CD 10 Default value 1 If the joystick guide do...

Страница 31: ... connect the headphones while the terminal is set to AV output only noise will be output When using headphones make sure to lower the volume to an appropriate level The sound of the built in speaker will be muted when you close the LCD panel when you connect the stereo video cable to the AV O terminal or when the AV O terminal is set to 0 PHONESj 6 Press If UNej o appears Note that if the joystick...

Страница 32: ...I END SEARCH and press 8 3 Select EXECUTE and press V END SEARCH appears The camcorder rewinds fast forwards the tape plays back the last few seconds of the recording and stops the tape To cancel the search press Ii FUNC CO 23 FUNC Recordings shorter than 1 minute per datel time zone cannot be located with this function Date search may not function if the date time or data code are not correctly d...

Страница 33: ...played correctly Images not recorded with this camcorder Images edited on or uploaded from a computer Images whose file names have been changed You can jump ahead to a specific image without having to browse all images one byone To RUN THROUGH THE STILL IMAGES Image Jump QJ 10 1 Holding the lock button pressed down set the switch to PLAY 2 Move the 3 l c g switch to c g memory card 3 Select OIl th...

Страница 34: ...index screen closes and the selected image is displayed O FUNC FUNC III 23 1 Move the zoom lever toward W The index screen appears 2 Select AT an image Move the green selection frame to the image you want to view If you have a lot of still images you may find it easier to browse entire index pages instead Move the zoom lever toward W to extend the green selection frame to the whole page and move t...

Страница 35: ...j CONTSHOOT HISPEED CONTSHOOT AEB Mode switch P Iib D EFFECT OFFj FADE T lEWIPE IJlBLK WHT SEPIA IE ART Mode switch P Iib D EFFECT OFFj jJ BLK WHT SEPIA IDigital effects OJ 62 Mode switch P s EVALUATlVEj CENTWEIGHTAVERAGE SPOTj I OJ 54 ILight metering mode LI W_h_it_e_ba_la_n_cee l1 2 50 IStill image simultaneous recording I OJ 53 CAIRAlI RAII Mode switch P AW AUTOj DAYLlGHT 0 SHADE CLOUDY TUNGSTE...

Страница 36: ...j Quality SUPER FINE FINEj II NORMAL CANCEL EXECUTE ILP_R_IN_T_O_RD_E_R li C 82 I PIlY I Press 8 to enter the image selection screen From that screen you can continue to select the still images for which you want to set print orders I Xl ILE ND_S_E_AR_C_H ___ I CO 32 L l R_E_C_PA_U_SE l1 OJ 71 72 CANCEL EXECUTE I T_RA_N_S_FE_R_O_R_DE_R JI C 78 L I S_t_iII_im_a 9 e ca p_tu ri n9 __ J1 C 54 Recordin...

Страница 37: ...u zoom in The digital zoom indicator will appear in light blue from 10x up to 40x and dark blue from 40x up to 200x The digital zoom cannot be used with the I l NIGHT recording program A still image cannot be recorded simultaneously on the memory card while recording movies using the digital zoom IZOOM SPEED IC RAj CA RAII VARIABLE SPEED 3 0 SPEED 2 DIll SPEED 1 When set to VARIABLE the zoom speed...

Страница 38: ...f a recording made in IHDV I HDV PF24 IHID7I will appear on the screen not IHDV I Playing back a widescreen recording TV sets compatible with the Video 10 1 system will automatically switch to wide 16 9 mode Otherwise change the aspect ratio of the TV manually To play back on a TV with normal aspect ratio 4 3 change the TV TYPE setting accordingly aJ 40 IHD STANDARD I L S_EL_F_T_IM_E R ll CD 60 IC...

Страница 39: ...n LONG PLAY When rHO STANDARD is set to one of the DV standards you can change the video quality and as a result also the recording time available on the tape Recording in LP mode extends the available recording time on the tape 1 5 times Depending on the condition of the tape long usage imperfections etc you may notice some video problems blocky video artifacts banding etc in the playback picture...

Страница 40: ...spective menu icon ITV TYPE NO YES IPLAYBACK STD I OJ 65 L J J CANCEL INITIALIZE COMPUNIT I CARD OPERATIONS ITRANS ORD ALL ERASE I OJ 79 JfJ NO YES IPRINT ORD ALL ERASE I OJ 83 r NO YES ICA IC RAII gJ S RESET CONTINUOUS Select the image numbering method to be used when you insert a new memory card Images are automatically assigned consecutive image numbers from 0101 to 9900 and stored in folders c...

Страница 41: ...to the table below When the playback standard selected is different from that of the original recording no video will be output I AVj 0 PHONES IPHONES VOL I I I IOUTPUTCH This setting will be unavailable while the camcorder is connected to an external device using the HDMI cable I LlRj LlLj q R R You can select the audio channel to use during the playback of a tape with audio recorded on two chann...

Страница 42: ...n item that displays the specification of the video output when the camcorder is connected to an external device using the HOMI cable For further details about the HOMI connection refer to QJ 69 playback on a high definition TV Refer to the table below The DV output cannot be changed while a DV cable is connected to the HDVIDV terminal I IDVOUTPUT Settings for Video Output from the COMPONENT OUT T...

Страница 43: ...oller When the the data code is displayed on the camcorder s screen the same information will also appear on a connected TV regardless of the TV SCREEN setting Turn off the data code display by repeatedly pressing DIsP J The default value is 1m OFF in the playback modes ILD_AT_A_C_O_DE J CD 57 AIf IIC IlAll 1m OFF EW LEVEL WHT EG LEVEL GRY lIDv GRID WHT G GRID GRY You can display a grid or a horiz...

Страница 44: ... than 5 minutes To cancel the demo mode once it started press any button turn off the camcorder or load a recording media IDEMO MODE LANGUAGE Q 24 IC AIlCA RAIII P YII P Y I DEUTSCH ENGLISH ESPANOL FRANC AIS ITALIANO POLSKI ROMAN TORKC E PYCCKV1V1 YKPAIHCbKA y ll J ml l1 vm i ii 1 Y Vii1li 1 z 2 oq E3 Il 11 11 SYSTEM SETUP IWL REMOTE ICAIrAIICA RAIII P Y II P bY I maN ImOFF i j Allows the camcorde...

Страница 45: ...orts It prevents the subject from being underexposed fJBEACH Use this mode to record on a sunny beach It prevents the subject from being underexposed fiJPORTRAIT The camcorder uses a large aperture achieving a focus on the subject while blurring other distracting details aSPORTS Use this mode to record sports scenes such as tennis or golf Special Scene Recording Programs IJ 47 I I I I 0 CINE MODE ...

Страница 46: ...hutter speed value The camcorder automatically sets the appropriate aperture value Use a high shutter speed to record fast moving subjects or a slow shutter speed to add motion blur emphasizing the feel of movement Options Default value FUNCI I Desired option TO SET THE APERTURE VALUE OR SHUTTER SPEED When you select il l SHUTTER PRIO AE or rl l APERTURE PRIO AE a numeric value will appear next to...

Страница 47: ...nnis on sunny days When the mode switch is set to t1 IID the joystick guide will not appear Do not change the position of the mode switch while recording as the brightness of the image may change abruptly When setting a numeric value aperture or shutter speed the number display will flash if the aperture or shutter speed is not appropriate for the recording conditions In such case select a differe...

Страница 48: ...ly in ICAMERA I as the shutter speed slows down Adjusting the Picture Exposure Focus and Color Manual Exposure Adjustment and Automatic Backlight Correction At times backlit subjects may appear too dark underexposed or sUbjects under very strong lights may appear too bright or glaring overexposed To correct this you can use the automatic backlight correction or manually adjust the exposure Automat...

Страница 49: ...y the joystick guide in the illustration above The exposure adjustment indicator 0 1 0 and the neutral value O appear on the screen If you operate the zoom while the exposure is locked the brightness of the image may change 3 Adjust the brightness of the image as required The adjustment range and the length of the exposure adjustment indicator will vary depending on the initial brightness of the p...

Страница 50: ...hat case the peaking function will not be canceled even when you start recording In ICAMERA C1J I mode you can also use the focus assist functions after pressing PHOTO halfway The camcorder will automatically return to autofocus when you set the mode switch to C IID White Balance The white balance function helps you accurately reproduce colors under different lighting conditions so that white obje...

Страница 51: ...UORESCENT H If the color looks unnatural adjust it using AW AUTO or SET Options Image Effects You can use the image effects to change the color saturation and contrast of your recordings CAIRAIIC RAII OJ 10 Mode switch P except for the Special Scene recording programs I D FUNC i UNg IDesired option When you select SET do not press FUf JC and continue instead with the procedure below Icon of the cu...

Страница 52: ...PTH Shallower colors Richer color tonality BRIGHTN Darker picture Brighter picture CONTRAST Flatter picture More defined light and shade SHARPNESS Vaguer outlines Sharper outlines ICA ERAII ClJ 10 Icon of the currently selected u J J Image Effect FLING IDesired option When you select c CUSTOM do not press IFUNC I and continue instead with the procedure below To SET THE CUSTOM IMAGE EFFECT 1 Press ...

Страница 53: ... Image Size t J LW 1920x1080 350 525 1 040 L 2048x1536 235 350 700 M1440x1080 470 700 1 370 SW 848x480 1 775 2 515 5 030 S640x480 2 320 3 355 6 040 This size is only available for recording simultaneously on the tape and memory card Q 53 or for capturing a still image from the playback picture Q 54 FUNe 1 lJ23 lFUNC j II Desired image quality o The number displayed on the right corner indicates th...

Страница 54: ...ge cannot be recorded on the memory card while using the digital zoom or while a digital effect is activated To record still images we recommend using the ICAMERA CJj mode which offers the best quality for still images The data code of the still image will reflect the date and time of the original recording on the tape The still image cannot be captured on the memory card if TV TYPE is set to NORM...

Страница 55: ...you press F H6lQ Except for the Ill FIREWORKS recording program Options FUNC CO 23 FUNC Appropriate for standard shooting conditions including backlit scenes The camcorder divides the picture into several areas and the light is measured in all of them to achieve the optimal exposure for the subject Meters only the area within the spot AE point frame Use this setting to adjust the exposure to match...

Страница 56: ...till images These figures are approximate and vary with the recording conditions and subjects The actual number of images per second will be lower when O camcorder shake warning is displayed on the screen FUNC I Desired option CONTINUOUS SHOOTING HIGH SPEED CONTINUOUS SHOOTING 1 Press PHOTO halfway to activate the autofocus 2 Press PH0 IQ fully and hold it pressed down A series of still images wil...

Страница 57: ...1 All displays on 7 Only tape related displays1 LPLAY 1l 2I I On screen displays Data code2 on 7 Only on screen displays on 7 Only tape related displays in stop mode or playback pause or All displays off during playback I PLAy Qj I On screen displays Histogram3 IData code on 7 Only on screen displays on 7 All displays off 1 Tape related displays Tape operation icon time code and remaining tape dis...

Страница 58: ...esents shadows A still image whose histogram skews to the right is relatively bright while one whose histogram peaks to the left is relatively dark The histogram display will appear also after recording a still image while reviewing it within the time set for the REVIEW option or immediately after recording it if REVIEW is set to l lD OFF NOTES Shadows Highlights Reading the Histogram Display 1 If...

Страница 59: ...g the flash when the optional Wide converter or Tele converter is attached its shadow can appear on the screen About the AF Assist Lamp While you press PHojQ halfway if the subject is too dark the assist lamp may light up briefly in order to enable the camcorder to focus more accurately AF assist lamp You can also set AF AST LAMP to m OFF so the assist lamp does not light up The camcorder may not ...

Страница 60: ...dly push the joystick T toward NEXT to display the joystick guide in the illustration above The manual adjustment icon lil will appear to the left of the audio level indicator and the manual adjustment bar green will appear below it tMIC aJ 10 NEXT dB40 12 0 lW llllululllll I I I j i I RAI Mode switch P ICAMERA SETUP ISELF TIMER F UNC j ION o appears ICAMERA JI Press START STOP The camcorder start...

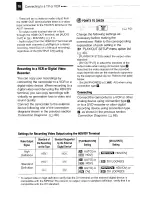
Страница 61: ...hat the audio level meter will go to the right of the 12 dB mark only occasionally When the 0 dB mark turns red the sound may be distorted 4 Press 8 to save the setting and hide the joystick guide To USE THE MICROPHONE ATTENUATOR If the audio level is too high and the sound gets distorted activate the microphone attenuator by selling MIC ATT to rmJ ON CiJ 39 The audio recording level can be adjust...

Страница 62: ...ny stereo microphone with a 0 3 5 mm plug but the audio recording level may vary Options Default value Be careful when attaching a very long external microphone it may appear on the screen Select this effect to add flavor to your recordings You can preview the digital effects on the screen while making the selection When you apply a fader not only the picture but also the sound will fade in or out...

Страница 63: ...during playback then press I J to fade out and pause the playback To ACTIVATE AN EFFECT Push the joystick A toward QJFillT ICAMERA iii I while recording or in record pause mode I PlAy 2illiJ during playback 1 CAMERA QlI and then press PH tQ first halfway to activate the autofocus and then fully to record the still image FUNC Setting FUNC CD 23 Depending on the operation mode these positions may be...

Страница 64: ... FUNC ICARD OPERATIONS IERASE ALL IMAGES CO 10 1 If the joystick guide does not appear on screen press J to display it 2 Push the joystick T toward r 3 Select ERASE and press iEiJ Erasing a Single Image Just After Recording You can erase the last recorded still image while reviewing it within the time set for the REVIEW option or immediately after recording it if REVIEW is set to m OFF ICA RAII l ...

Страница 65: ...y also choose to initialize a memory card to erase all the files in contains The regular initialization option INITIALIZE will clear the file allocation table but will not physically erase the stored data If you need to completely erase all the data select instead the complete initialization option COMPL lNIT I_Y_E_S_ _ Press e to cancel the complete initialization while it is in progress All the ...

Страница 66: ...ponent video terminal is for video only When you use connection type 0 do not forget the audio connections using the AV terminal HOV OV Terminal Check the type and orientation of the terminal and make sure you connect the OV cable properly Open the terminal cover to access HOMIOUT Terminal The HOMI OUT terminal offers a high quality digital connection that combines audio and video in a single conv...

Страница 67: ...Green P I Pb Cb I y OV Cable Commercially available Output connection Signal Flow to an HOTV with a OV IEEE1394 terminal Input connection Signal Flow from a TV or other digital video source with a OV IEEE1394 outpu rool IC lt3 e I1J 4 pin rool Q 4ID IDJ 6 pin Be careful to correctly insert the 6 pin plug into the OV terminal Inserting it in the wrong direction can result in damage to the camcorder...

Страница 68: ...h a DV IEEE1394 output ml GJt J ID I1J DV Cable 4 pin Commercially available ml CI J mJ 6 pin Be careful to correctly insert the 6 pin plug into the DV terminal Inserting it in the wrong direction can result in damage to the camcorder Output connection Signal Flow to a TV or VCR with AV Terminals Input connection Signal Flow 0 from a TV VCR or other analog video source with AV terminals r Yellow V...

Страница 69: ...menu screen in mode Iii PLAY OUT SETUP menu in other modes Correct operation cannot be guaranteed when connecting the camcorder to DVI monitors Some HDTVs have their HDCP digital content protection configured so as not to allow the playback of personal content video recorded for personal uses If you cannot play back the video recorded with this camcorder on your HDTV using the HDMI connection try ...

Страница 70: ... no generation loss in video and sound quality Connect the camcorder to the external device following one of the connection diagrams shown in the previous section Connection Diagrams 0 66 There will be no video or audio output from the HDMI OUT terminal while there is a video input connection to the HDV DV terminal or the AV O terminal To output audio dubbed later on a tape through the HDMI OUT te...

Страница 71: ...rding 1 This camcorder Load the recorded cassette 2 Connected device Load a blank cassette or disc and set the device to record pause mode 3 This camcorder Locate the scene you wish to copy and pause the playback shortly before the scene When the connection is recognized HDV DV will be displayed When the video output starts the display will change to HDV OUT or DV OUT depending on the video output...

Страница 72: ... previous section Connection Diagrams Set PLAYBACK STD to rJ AUTO CO 40 before making the connections QJ 10 ICJfJ oIMPORTANT Depending on the analog signal sent from the connected device the input image may be distorted or not be displayed at all for example video input that includes anomalous signals such as ghost signals Analog video input that includes copyright protection signals cannot be rec...

Страница 73: ...E1394 terminals may be in different video standards Recording starts 7 While recording press ill to pause the recording In record pause press J l again to resume recording 8 Press i iii to stop recording 9 Connected device Stop the playback 1 Set AV DV to l m ON OJ 39 2 Start the playback on the video source and the recording on the recording device Refer to the instruction manuals of the connecte...

Страница 74: ...dings to a computer as digital video The required equipment and operation is the same as described in Transferring Video Recordings CJ 76 except in this case you need to set AV DVj to lim ON before connecting the camcorder to the computer Note that the analog digital conversion may not work correctly depending on the software and the specifications settings of the computer ...

Страница 75: ...ing Cable I Terminal on the Connected Device Output connection Signal Flow to a PC or PictBridge compatible printer with an USB port cGJrnL USB Cable Supplied Output connection Signal Flow to a computer with a DV IEEE1394 terminal or a DV capture board I 00Jt3 IJ DV Cable 4 pin Commercially available l1 D W mJ 6 pin Be careful to correctly insert the 6 pin plug into the DV terminal Inserting it in...

Страница 76: ...Start the computer 2 Set the camcorder to I PLAy t2 I I mode 3 Connect the camcorder to the computer using the digital connection connection type III CD 75 shown in the previous section PC Connection Diagrams When the connection is recognized HOV DV wili be displayed 4 Start the video editing software Refer to the instruction manual of the editing software OJ 10 IIP Y I Change the following settin...

Страница 77: ...t and use the copied file retaining the original Transferring Images l 1if l CO 10 Transferring Still Images Direct Transfer With the supplied USB cable and the Digital Video Software you can transfer still images to a computer simply by pressing Q vI print share The first time you connect the camcorder to the computer you need to install the software and set the auto launch setting From the secon...

Страница 78: ...up to 998 still images You can press to transfer the images instead of 1l lJ N With the automatic transfer options a confirmation message appears Select OK and press 0v When the camcorder is connected to the computer and the image selection screen is displayed press FUNCI to return to the transfer menu AUTOMATIC TRANSFER OPTIONS When you select E ALL IMAGES of NEW IMAGES or 12 TRANSFER ORDERS all ...

Страница 79: ...pears and changes to Ill The Q print share button lights up and the current print settings will be displayed for approx 6 seconds If ill continues to flash for more than 1 minute or if III does not appear the camcorder is not correctly connected to the printer In such case disconnect the USB cable and turn off the camcorder and the printer After a short while turn them on again set the camcorder t...

Страница 80: ...N OFF or DEFAULT Print Effect The print effect can be used with printers compatible with the Image Optimize function to achieve higher quality prints Select ON OFF or DEFAULT Canon PIXMAISELPHY DS printers You can also select VIVID NR and VIVID NR Ill Number of Copies Select 1 99 copies Selecting the Print Settings You can select the number of copies and other settings for printing The setting opt...

Страница 81: ... press V and retry printing Refer also to the printer s instruction manual for details If the error still persists and printing does not restart disconnect the USB cable and turn off the camcorder and the printer After a short while turn them on again set the camcorder to I PLAY Qj I mode and restore the connection WHEN YOU HAVE FINISHED PRINTING Disconnect the cable from the camcorder and printer...

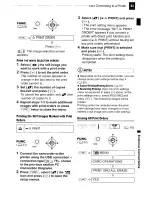
Страница 82: ...ppears 3 Move AT the trimming frame 4 After setting the trimming frame press FUNCJ to return to the print menu CD NOTES About the color of the trimming frame White No trimming settings Green Recommended trimming size The size of the trimming frame may differ depending on the image size paper size or borders settings The trimming setting applies only to one image The trimming setting is canceled in...

Страница 83: ...rehand 4 Make sure that PRINT is selected and press J Printing starts The print setting menu disappears when the printing is completed Depending on the connected printer you can change some print settings before step 4 CD 80 Cancel Printing Printing Errors OJ 81 Restarting Printing Open the print settings menu as explained in steps 2 3 above In the print settings menu select RESUME and press J The...

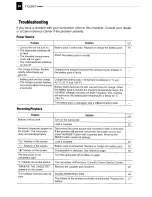
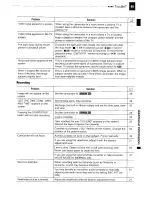
Страница 84: ...irregularly The charging will start once the battery pack temperature is below 40 C 104 OF The battery pack is damaged Use a different battery pack Recording Playback Problem Solution CD Buttons will not work Turn on the camcorder Load a cassette 20 Abnormal characters appear on Disconnect the power source and reconnect it after a short time the screen The camcorder If the problem still persists d...

Страница 85: ...em slightly warped Recording Problem Solution CD Image will not appear on the Set the camcorder to ICAMERA I2IDI 26 screen SET THE TIME ZONE DATE Set the time zone date and time 24 AND TIME appears on the Recharge the built in lithium battery and set the time zone date 93 screen and time Pressing the START STOP Set the camcorder to ICAMERA I2IDI 26 button will not start recording Load a cassette 2...

Страница 86: ...for the COMP OUT setting There is no sound from the TV When connecting the camcorder to an HDTV using the 66 CTC 100 S Component Cable make sure to connect also the audio connections using the white and red plugs of the STV 250N Stereo Video Cable Text displays do not appear on If you connected the camcorder to the TV using the video 42 the TV component connection set DV OUTPUT to HDVIDVj Tape is ...

Страница 87: ... camcorder Remove and 65 reinsert the memory card Initialize the memory card if flashing persists Printing I Problem Solution 0 Cannot record with this Set fAV DV to OFF 39 camcorder video input from an Wrong signal standard Refer also to the instruction manual of external video device the connected device connected to the HDV DV Dubbing may work using the AV terminal terminal using a DV cable Pro...

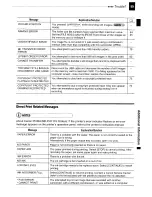
Страница 88: ...d the tape or replace the cassette INCORRECT TAPE You attempted to play back a tape recorded in a different television SPECIFICATION system PAL or SECAM or in a recording standard not supported by this camcorder INPUT SIGNAL NOT The digital device connected with the DV cable is incompatible with SUPPORTED the camcorder PLAYBACK STD LOCKED Current camcorder settings do not match the HDVlDV standard...

Страница 89: ...to dub a copyright protected tape May also appear 73 DUBBING RESTRICTED when an anomalous signal is received during analog line in recording Direct Print Related Messages About Canon PIXMA SELPHY OS Printers If the printer s error indicator flashes or an error message appears on the printer s operation panel refer to the printer s instruction manual Message Explanation Solution PAPER ERROR There i...

Страница 90: ...attery and turn it back on COMMUNICATION The printer is experiencing a data transfer error Cancel printing ERROR Disconnect the USB cable and turn off the camcorder and the printer After a short while turn them on again set the camcorder to I PLAy Jj I mode and restore the connection When you are printing using the cQ button check the print settings Or you attempted to print from a memory card tha...

Страница 91: ...ore than one battery pack perform these precautions at the same time for all battery packs Although the battery pack s operating temperature range is from 0 C to 40 C 32 of to 104 OF the optimal range is from 10 C to 30 C 50 of to 86 OF At cold temperatures performance will temporarily decline Warm it in your pocket before use Handling Precautions Camcorder Do not carry the camcorder by the LCD pa...

Страница 92: ... they are stored for a long time Do not leave the cassette in the camcorder after use Do not use spliced tapes or nonstandard cassettes as they may damage the camcorder Do not use tapes that have been jammed as video heads may become dirty Do not insert anything into the small holes of the cassette or cover them with cellophane tape Handle cassettes with care Do not drop or subject them to severe ...

Страница 93: ...the battery using tweezers or other metal tools as this will cause a short circuit Wipe the battery with a clean dry cloth to ensure proper contact Keep the battery out of the reach of children If swallowed seek medical assistance immediately The battery case may break and the battery fluids may cause internal damage Do not disassemble heat or immerse the battery in water to avoid the risk of expl...

Страница 94: ...t dry cloth to clean the camcorder body Never use chemically treated cloth or volatile solvents such as paint thinner Lens and Viewfinder If the lens surface is dirty the autofocus may not work properly Remove any dust or dirt particles using a non aerosol type blower brush Use a clean soft lens cleaning cloth to gently wipe the lens or viewfinder Never use tissue paper LCD Screen and I AF sensor ...

Страница 95: ...ASSETTE appears and starts flashing Remove the cassette immediately and leave the cassette compartment open Leaving the cassette in the camcorder may damage the tape A cassette cannot be loaded when condensation is detected Using the Camcorder Abroad Power Sources You can use the compact power adapter to operate the camcorder and to charge battery packs in any country with power supply between 100...

Страница 96: ...nverter o0 FS 43U1FS 43U II Filter Set Ci STV 250N Stereo Video Cable J DTC 100 D Terminal Cable VCR DV Cable TVlHDTV Computer 1 1 PictBridge Compatible Printers DVD RecorderlDigllal Device with DV Terminal Card ReaderlWriter miniSD Card Adapter IFC 300PCU USB Cable miniSD Card E CTC 100 Component Cable dL D J HDMI Cable F DM 50 Directional Stereo Microphone Stereo Microphone commercially availabl...

Страница 97: ...on genuine Canon accessories although you may request such repairs on a chargeable basis I Battery Packs When you need extra battery packs select one of the following models BP 2L13 BP 2L14 NB 2LH CB 2LW Battery Charger Use the battery charger for charging the battery packs It plugs directly into a power outlet without a cable Battery Pack NB 2LH BP 2L13 BP 2L14 Charging Time 90 min 175 min 170 mi...

Страница 98: ...rder s advanced accessory shoe for cable free operation I OJ 0 I 1 I c c DM 50 Directional Stereo Microphone This highly sensitive super directional microphone attaches to the camcorder s advanced accessory shoe It can be used as directional microphone monaural or stereo microphone Using the viewfinder to record video when the DM 50 is attached may prevent you from enjoying the full capabilities o...

Страница 99: ...rap WS 20 Wrist Strap Use this for extra additional protection for active shooting II SC 2000 Soft Carrying Case A handy camcorder bag with padded compartments and plenty of space for accessories This mark identifies genuine Canon video accessories When you use Canon video equipment we recommend Canon brand accessories or products bearing the same mark a a o l l 0 3 Ql o l ...

Страница 100: ...ories NB 2LH Battery Pack 9612A001AA BP 2L14 Battery Pack 9582A002AA CB 2LW Battery Charger 0763B001AA TL H43 Tele converter 2071 B001AA WD H43 Wide converter 2072B001AA FS 43U FS 43U II Filter Set 7150A001AA VFL 1 Video Flash Light 8834A001AA VL 3 Video Light 3175A002AA OM 50 Directional Stereo Microphone 3176A002AA WS 20 Wrist Strap 1729B001AA SC 2000 Soft Carrying Case 9389A001AA DVM CL Digital...

Страница 101: ...16 9 approx 2 070 000 Movies 4 3 approx 1 550 000 Still images LW approx 2 070 000 Still images L M S approx 2 760 000 2 7 in wide TFT color approx 211 000 pixels 0 27 in wide TFT color approx 123 000 pixels Stereo electret condenser microphone f 6 1 61 mm F 1 8 3 0 10x power zoom 35 mm eqUivalent Movies 16 9 Movies 4 3 Still images LW Still images L M S 11 elements in 9 groups Autofocus TTL exter...

Страница 102: ...eo output Video 1 Vp p 75 ohms unbalanced Audio output 10 dBV 47 kohms load 3 kohms or less input 10 dBV 40 kohms or more mini B 4 pin IEEE1394 standard inputloutput Luminance Y 1 Vp p 75 ohms Chrominance PB PR CB CR 350 mVp p 1080i 03 I 4801 01 compatible HDMI type A connector 19 pins output only 2 3 5 mm stereo minijack 57 dBV with 600 ohm microphone 5 kohms or more 7 4 V DC battery pack 8 4 V D...

Страница 103: ... 72 Digital zoom 37 Direct print 79 Direct transfer 77 D em e DV audio mode 39 DV recording mode 39 D End Search Erasing still images Error messages D Image effects Image jump Image stabilizer Index screen Initialization Memory card CI HDMI OUT terminal HDV DV terminal Headphones High speed continuous shooting mI Grip belt D File numbers Fireworks recording program Flash Focus priority FUNC menu 4...

Страница 104: ...sure adjustment Manual focus Memory card Microphone Microphone attenuator Mini video light miniSD card Mix balance Mode switch I I Language LCD backlight LCD screen Light metering mode Lithium button battery LP mode n Tape recording standards HDVIDV 38 Telephoto 28 Time zone 24 Transfer order 78 Transferring still images 77 Tripod 27 Troubleshooting 84 Tv recording program 46 iii P recording progr...

Страница 105: ... e General Information I White balance Wide angle Wide TV 16 9 Wind screen Wireless controller n Zero set memory Zoom Zoom speed 50 28 40 39 21 31 28 37 I ...

Страница 106: ...lure to follow operating instructions B If the equipment is defective as a result of leaking batteries sand dirt or water damage C If defects or damages are caused by the use of unauthorized parts or by service other than our authorized agent 0 If the equipment is used for commercial or industrial use This Limited Warranty does not cover cabinet exterior finish video cassette tape head cleanings n...

Страница 107: ... equipment is used for commercial professional or industrial purposes This limited warranty does not cover the cabinet exterior finish of the digital video equipment video cassette tapes head cleanings nor does it apply to digital video equipment purchased outside Canada TO OBTAIN WARRANTY SERVICE Ship your Canon digital video equipment in its original carton box or equivalent properly packed fUll...

Страница 108: ...ation Center toll free at 1 800 828 4040 CANADA only SI vous avez des questions veuillez tehi phoner sand frais au Canada 1 800 828 4040 CANADA seulement CANON MEXICANA S DE R L DE C V Periferico Sur No 4124 Col Ex Rancho de Anzaldo C P 01900 Mexico D F Mexico CANON U S A INC NEW JERSEY OFFICE 100 Jamesburg Road Jamesburg NJ 08831 USA CANON LATIN AMERICA INC 703 Waterford Way Suite 400 Miami FL 33...

Страница 109: ......

Страница 110: ......

Страница 111: ...hargeable basis f s wii d empiohien OriqmCiI UDehoi von Canon 2U VP I w n jen Dieses Produkt ist so konzipiert dass es eine ausgezeichnete Leistung erbringt wenn es mit Canon Originalzubehor verwendet wird Canon ist fur Schaden am Produkt bzw Unfalle wie beispielsweise Brande o A die durch eine Fehlfunktion von nicht originalen Zubehorteilen wie beispielsweise ein Leck oder die Explosion eines Akk...

Страница 112: ...arte de gararme el attachez fa il votre faclure I MODEL I SERIAL NO Date of Purchase MODELE N0 DE SERlE Date d achat Purchaser s Name Nom d acheteur Address Adresse Dealer s Name Nom de marchand Address Adresse Model DIGITAL VIDEO CAMCORDER Modele CAMESCOPE ET LECTEUR VIDEO DIGITAL Warranty coverage is subject to the country where the unit was purchased Please read all warranty information careful...

Страница 113: ...TE Canon ZIP CODE Should service necessary for product please cal toll free the U S A Should service be necessary for this product please call toll free Canada Or 5j vous besolr de SUPPOI t technique pout ce prodult numero sans frais Canada ...

Страница 114: ...DV Standard Recordings Occasionally you may find that you cannot play back recordings made in HDV standard or during their playback you may notice bnef stops This is usually caused by dirt particles accumulating and attaching to the video heads In such case try the following actions Clean the video heads with a cleaning tape Make sure to use videocassettes recommended for HDV recording Canon Digit...

Отзывы: